
To show a computer’s name in Windows, simply execute the hostname command from a Windows command prompt (CMD) or PowerShell.
There may be multiple reasons to rename the computer.
In this article, i will show you how to change your computer’s name in Windows using the CMD and PowerShell.
Rename Computer using PowerShell
The name of the computer can be changed from the elevated PowerShell using the Rename-Computer command.
Press ⊞ Win + X to open the Start menu flyout and then click on “Windows PowerShell (Admin)”.
Enter the following PowerShell’s command, substituting <NewHostname> with your preferred name, and press the “Enter” to rename the computer:
PS C:> Rename-Computer -NewName "<NewHostname>"
- sample output -
WARNING: The changes will take effect after you restart the computer <OldHostname>.
Restarted the computer to complete the name changing.
Change Hostname using CMD
Alternatively, you can change the computer’s name from the elevated Windows command prompt (CMD).
Press ⊞ Win keybutton to open the Start menu, type in cmd to search for the command prompt and press Ctrl + Shift + Enter to start the CMD as administrator.
To change the computer’s hostname, execute the following command from the elevated Windows command prompt:
C:> wmic computersystem where name="%computername%" call rename name="<NewHostname>"
- sample output -
Executing (\\<OldHostname>\ROOT\CIMV2:Win32_ComputerSystem.Name="<OldHostname>")->rename()
Method execution successful.
Out Parameters:
instance of __PARAMETERS
{
        ReturnValue = 0;
};
As well as with the PowerShell, you need to restarted the computer to complete the name changing.
Was it useful? Share this post with the world!
После установки Windows Server или дестопной Windows 10/11, вам нужно изменить имя компьютера, заданное по-умолчанию. Чаще всего в имени компьютер рекомендуется указывать его местоположение или роль, например:
msk-dc01
,
wks-mskIT12
,
MRKTG021
и т.д. Можно использовать серийный или инвентарный номер устройства в качестве имени компьютера.
Содержание:
- Переименовать компьютер из графического интерфейса Windows
- Изменить имя компьютера с помощью PowerShell
При установке Windows сама генерирует имя компьютера формата, например,
DESKTOP-P2FHTKQ
. Имя содержит 15 символов, первые семь берутся из имени организации, остальные символы генерируются случайным образом. Для домашнего компьютера имя обычно не имеет особого значение, но если ваш компьютер находится в организации и работает в составе рабочей группы или домена AD, желательно задать осмысленное имя компьютера. В этой статье мы покажем, как переименовать компьютер Windows.
Имя компьютера должно соответствовать следующим требованиям:
- Длина не более 15 символов
- Не должно содержать специальных символов (< > ; : » * + = \ | ? ,)
- Можно использовать тире и нижнее подчеркивание
- Не должно состоять только из цифр
- Имя компьютера регистр независимо
- Если компьютер будет добавлен в домен Active Directory, имя компьютера должно быть уникальным в пределах домена.
Переименовать компьютер из графического интерфейса Windows
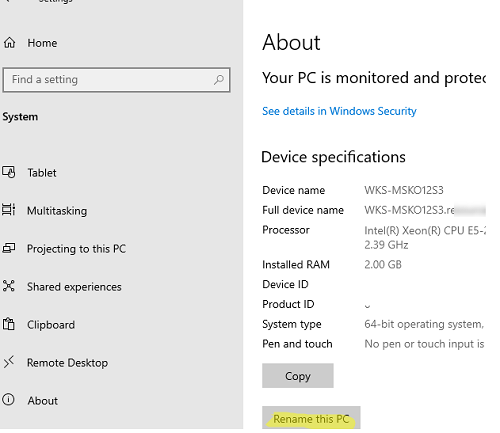
В современных версиях Windows 10 и 11 вы можете переименовать компьютер с помощью панели Settings.
- Нажмите
Win+I
и перейдите в раздел System -> About (можно использовать URI команду
ms-settings:about
для быстрого доступа к разделу Settings);
- Нажмите на кнопку Rename this PC;
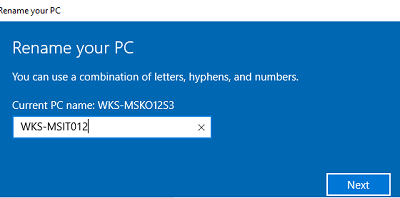
- Укажите новое имя компьютера и нажмите Next;
- Перезагрузите компьютер, чтобы применить изменения.
Также вы можете изменить имя компьютера из классического интерфейса System Properties в Windows:
- Нажмите
Win+R
на клавиатуре и выполните команду
sysdm.cpl
или
systempropertiescomputername
; - Здесь отображается текущее имя компьютер и имя вашего домена или рабочей группы;
- Нажмите на кнопку Change, укажите новое имя компьютера и сохраните изменения.
- Перезагруите Windows
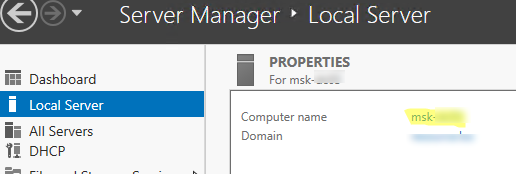
В Windows Server вы можете изменить имя компьютера через Server Manager. Выберите раздел Local Server и нажмите по имени в поле Computer Name.
Изменить имя компьютера с помощью PowerShell
Вы можете переименовать компьютер из командной строки с помощью PowerShell командлета Rename-Computer.
Откройте консоль PowerShell с правами администратора. Чтобы узнать текущее имя компьютера, выполните команду:
$env:computername
Или:
Hostname
Если вам нужно получить FQDN компьютера:
$env:computername.$env:userdnsdomain

Чтобы изменить имя компьютера, выполните:
Rename-Computer -NewName "WKS-MSKO12S3"
Теперь можно перезагрузить компьютер с помощью команды Restart-Computer (или можно добавить опцию перезагрузки прямо в команду смены имени хоста):
Rename-Computer -NewName "WKS-MSKO12S3" –Restart -Force

После перезагрузки проверьте, что имя компьютера сменилось успешно.
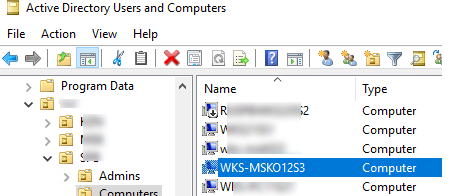
Если этот компьютер был добавлен в домен AD перед сменой имени и находился в определенной OU (Organization Unit), его учетная запись но уже с новым именем по прежнему будет находится в том же самом контейнере. Можете проверить это с помощью консоли ADUC. Для переименования компьютера в AD вашей учетной записи должны быть делегированы разрешения на создание и удаление объектов Computers в этой OU.
Командлет Rename-Computer позволяет сменить имя удаленного компьютера. Используйте команды:
Rename-Computer -ComputerName "msk-test" -NewName "msk-preprod02" -DomainCredential Contoso\Admin01 –Force
Для подключения к удаленному компьютеру используется WMI, поэтому если он отключен на удаленном хосте или сетевые порты заблокированы, появится ошибка:
Rename-Computer : Cannot establish the WMI connection to the computer ‘priorauthdes’ with the following error message: Access is denied. (Exception from HRESULT: 0x80070005 (E_ACCESSDENIED)).
Можно использовать командлеты PowerShell Remoting для подключения к удаленному компьютеру. Если вы включили на удаленном компьютере WinRM вручную или настроили его с помощью GPO, можно использовать командлет Invoke-Command для запуска команды на удаленном компьютере. Чтобы переименовать удаленный компьютер, выполните:
Invoke-Command -ComputerName msk-test -ScriptBlock { Rename-Computer -NewName msk-preprod02 –Restart -Force}
Также для переименования компьютера ранее использовалась утилита netdom:
- Переименовать локальный компьютер:
netdom renamecomputer localhost /newname msk-preprod02 /reboot - Сменить имя удаленного компьютера:
netdom renamecomputer msk-test /newname:msk-preprod02 /userd:CONTOSO\Admin01 /password:*
В Windows Serve Core можно использовать встроенную псевдографическую команду sconfig для переименования компьютера.
Если вы устанавливаете ваш эталонный образ Windows на компьютеры с помощью автоматизированных средств установки (WDS, SCCM или по сети с помощью PXE), вы можете добавить в них небольшой скрипт для автоматического переименования компьютера в соответствии с политиками именования вашей организации.
Whatever the reason you want to change computer name from the command line, Control Panel or PC Settings here’s our step-by-step tutorial showing three different ways how to do it.
How to get computer name from cmd
Before diving into three different ways how to change a computer name from the command line, the first thing you need to know is: how to get computer name?
In your workplace where the same computer can be used by many people or one person may be using multiple computers, it’s important to be able to tell your IT team which computer is experiencing the issue you’re reporting. Although your IT team should be able to walk you through finding this information, knowing it in advance will save you time and solve the problem more quickly. Once you’re familiar with the process, it will only take you a few seconds to locate the name of any computer. Here are three different ways how to get computer name:
Method 1 – How to get computer name from cmd
- Use the search bar in your taskbar and type in Command Prompt.
- Right-click on Command Prompt from the results and choose Run as administrator. If prompted, enter your password.
- Type in one of the commands such as cmd hostname or cmd computer name below and hit enter on your keyboard.
-
- cmd /k hostname
cmd computer name
-
- hostname
cmd hostname
Method 2 – How to get computer name from Control Panel
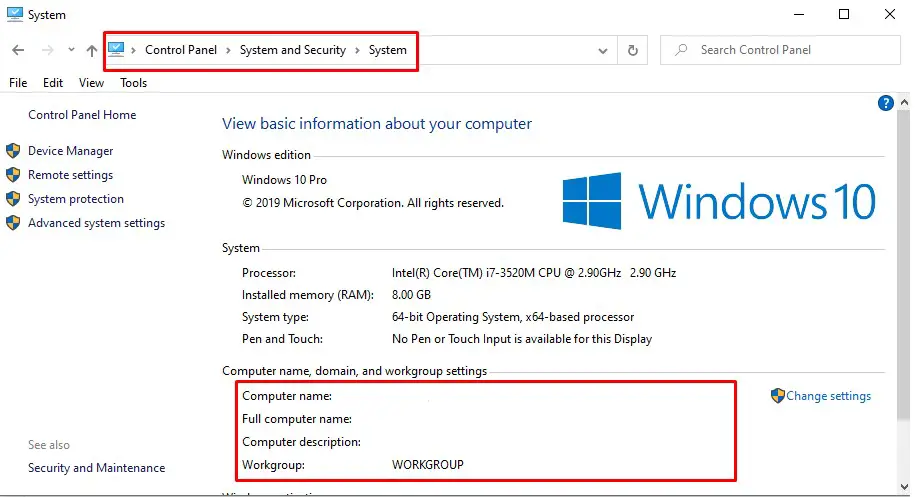
- Open the Control Panel.
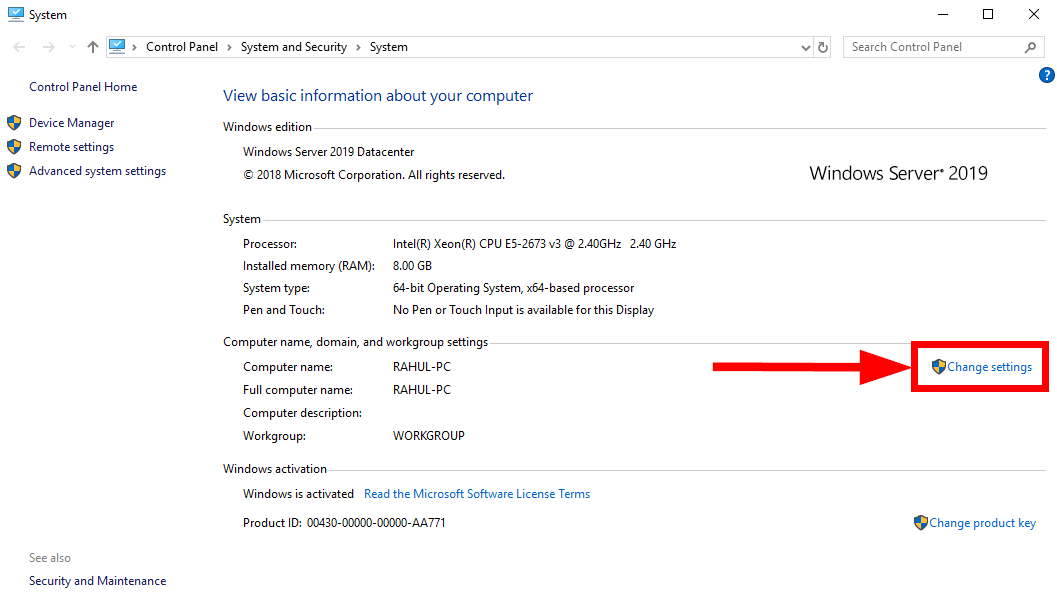
- Click System and Security > System.
- On the View basic information about your computer page, see the Full computer name under the section Computer name, domain, and workgroup settings.
How to get computer name from Control Panel
Method 3 – How to get computer name from This PC
- Use the search bar in your taskbar and type in This PC
- Right-click and then click Properties.
The computer name appears under Computer name, domain, and workgroup settings.
How to Change computer name from the command line
Now that you have found your computer name you can change computer name from the command line, Control Panel, or PC Settings.
Method 1.1 – How to change computer name from the command line of your own computer
- Use the search bar in your taskbar and type in Command Prompt.
- Right-click on Command Prompt from the results and choose Run as administrator. If prompted, enter your password.
- Type in the command line the following command and hit enter on your keyboard.
WMIC computersystem where caption='OldComputerName' rename NewComputerName
Note: Replace “OldComputerName” with your current Computer Name and “NewComputerName” the new name you would like to have. After running the command, you need to reboot the computer to make the changes effective. This command works on all types of Windows editions. This command can also be used from a batch file to rename the computer.

Change computer name from the command line
Note: If you run it from a normal command prompt, you would get the below error.
C:\>wmic computersystem where caption='xp-pc' call rename windows7-pc

Executing (\\XP-PC\ROOT\CIMV2:Win32_ComputerSystem.Name="XP-PC")->rename()

Method execution successful.

Out Parameters:

instance of __PARAMETERS

{
ReturnValue = 5;
};

C:\>
Method 1.2 – How to change computer name from the command line of a remote computer
Besides changing the name of a local computer, you can also use the WMIC command to rename a remote computer on the same network. For example, if want to rename a remote PC named Alis-Laptop to Tom-Laptop and you know the login credentials:
- Use the search bar in your taskbar and type in Command Prompt.
- Right-click on Command Prompt from the results and choose Run as administrator. If prompted, enter your password.
- Type in the command line the following command and hit enter on your keyboard.
WMIC /node:"Alis-Laptop" /user:Admin /password:password123 computersystem call rename "Tom-Laptop"
The value following /node: indicates the name of the remote computer on the LAN. The value following /user: must be an admin account on the remote computer.
Method 2– From Control Panel
- Open the Control Panel.
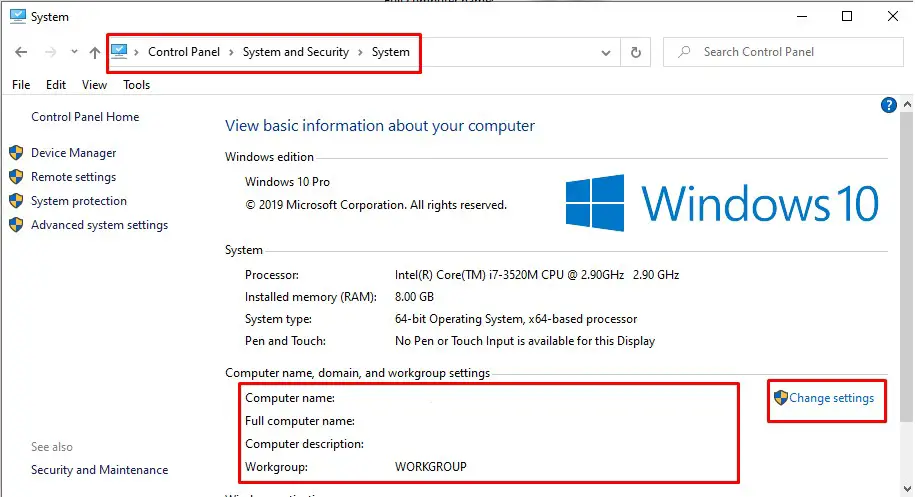
- Click System and Security > System.
- On the View basic information about your computer page, see the Full computer name under the section Computer name, domain, and workgroup settings.
- Click Change Settings. Note: You need to be an Administrator in order to perform changes.
How to change computer name from Control Panel
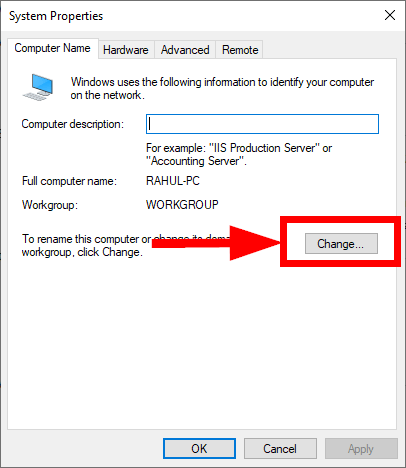
- 5-The System Properties screen will open with the “Computer Name” tab already selected. Click on the Change… button.
How to change computer name from Control Panel
- 6- Now type the new name you want in the “Computer name” box and click OK.
How to change computer name from Control Panel
- 7- A restart will be required to complete the name change, and after that, you’re all set!
Method 3– From PC Settings
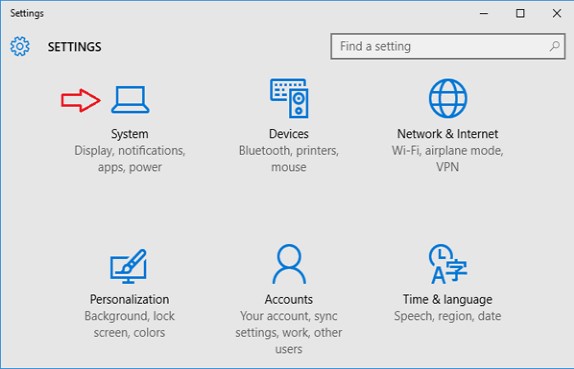
- Click on Start to access the Start Menu. Select Settings.
Settings
- When the PC Settings app opens, click on System.

System
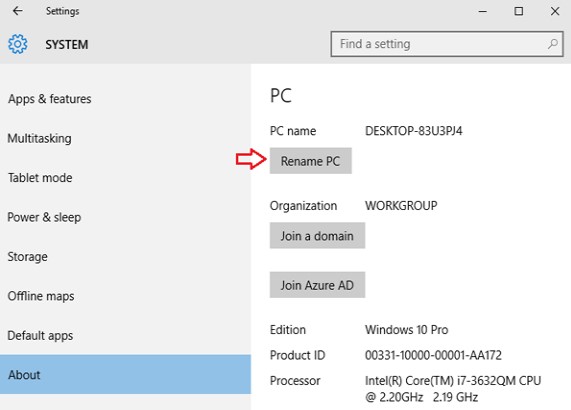
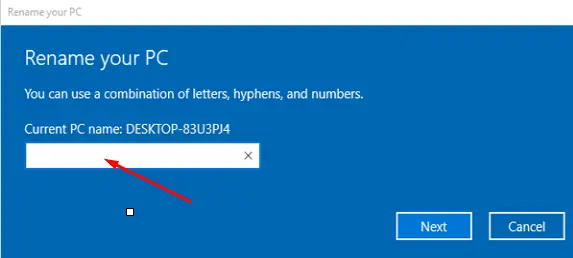
- Go to the About section and then click on “Rename PC“.

Rename PC
- Type the new name you want to use and click on Next.

Rename PC
- You will be prompted to restart your PC to apply your new settings, click on Restart Now to proceed.
Conclusions
Dear followers of Get IT Solutions, these are all the methods of how to change a computer name from the command line, Control Panel, or PC Settings. We hope you will find this method helpful. Have you managed to change it? Please let us know in the comments below.
In the following tutorial, you will learn how to find the Hostname in Windows 10 using the System Information utility, Command Prompt, and PowerShell.
I will also demonstrate how to change the Hostname using the Rename-Computer PowerShell command.
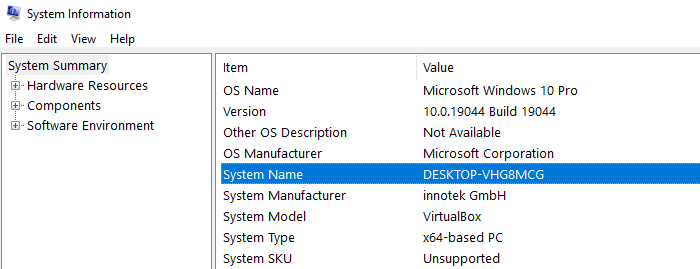
The built-in System Information tool displays basic system details, including Windows version, Processor type, Installed Physical Memory, and Hostname.
On your Windows computer, click the Start button, type msinfo32, and then press Enter to open the System Information utility.
Next to System Name, you will find the Hostname, as shown in the following screenshot.
The Hostname Command
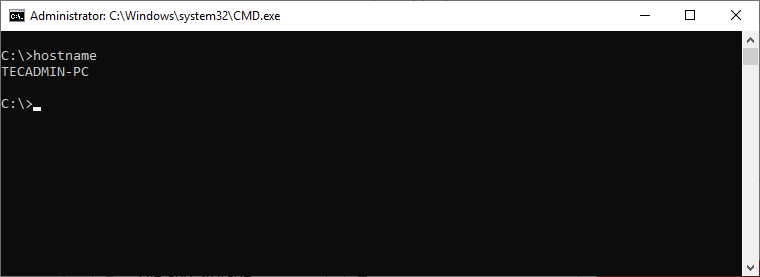
At a command prompt, type hostname and press Enter to find the Hostname of the local computer.
hostname
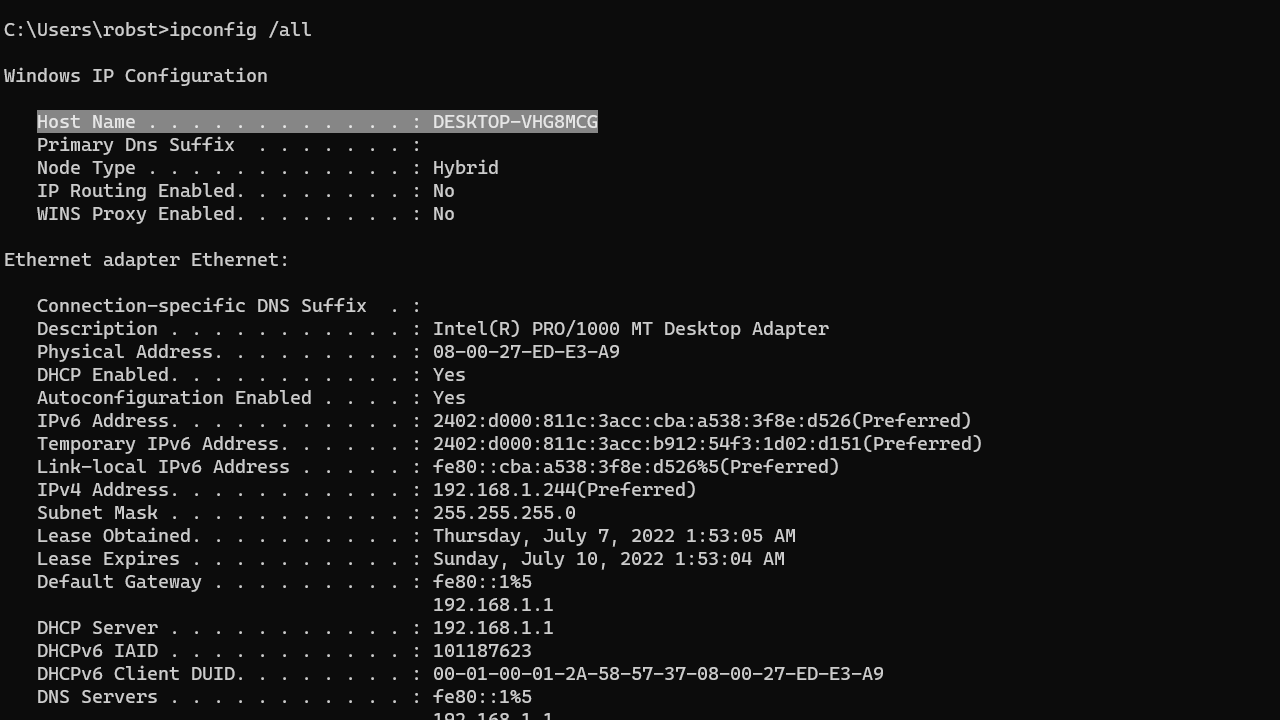
Alternatively, you can also use the ipconfig /all command to find the hostname. The hostname is found under the Windows IP Configuration section.
On a PowerShell prompt, you can use the Get-ComputerInfo command to find the computer name:
Get-ComputerInfo -Property CsName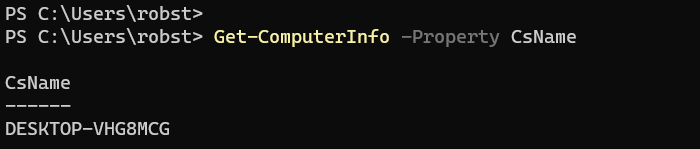
Changing the Hostname
To change the hostname, use the Rename-Computer PowerShell command.
Example
The following command changes the hostname of the local computer to MyPC.
Rename-Computer -NewName MyPC -RestartThe command will change the hostname and will restart your computer immediately. If you don’t want to restart your computer, don’t use the -Restart parameter (the name will not change until you restart Windows).
Rename-Computer -NewName MyPC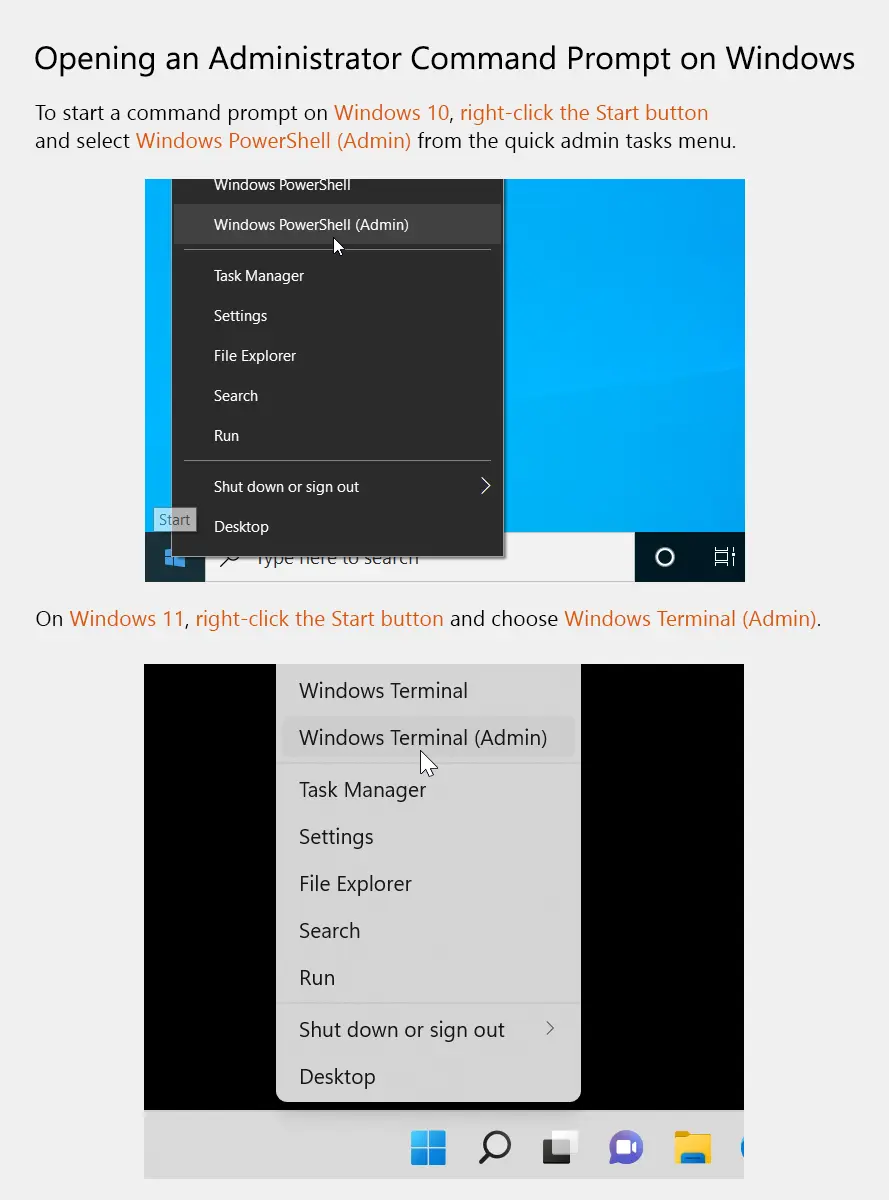
A hostname is a unique name for a device in a network, which helps to manage and control the network. It makes it easy to identify and communicate with the device. If you want to change the network settings or manage many devices, changing the hostname on a Windows computer or server is an important step.
Before you change the hostname on your Windows computer, make sure to save all your open work and get ready for the computer to restart. This is especially important if you are working on a server, as it will need to restart after the hostname is changed.
Here is a simple guide on how to change the hostname (also called the computer name or network name) in Windows to help with network management and setup.
Step-by-Step Guide to Changing the Hostname on Windows
Like other operating systems, Windows allows you to easily change its hostname. This is a simple but important task for network setup and system management. Remember, once you change the hostname, the computer must restart to apply the changes.
Method 1: Quick Instructions
Here are the quick steps to change the hostname on your Windows computer:
- Open “My Computer” properties.
- Click Change Settings under the “Computer name, domain, and workgroup settings” section.
- Click the Change button under the “Computer Name” tab.
- Enter a new hostname (computer name) and click OK.
- The computer will need to restart. You can restart it right away or later.
- All done!
After the system restarts, the hostname will be updated.
Method 2: Detailed Instructions
Follow these detailed steps to change the hostname on your Windows system with pictures for help:
- Open the properties of “Computer,” “My Computer,” or “This PC,” depending on your Windows version.

Open My Computer Properties - Click on the Change Settings link under the “Computer name, domain, and workgroup settings” section. See the image below:

Computer Change Setting Link - A new window will open. In the “Computer Name” tab, click the Change button in front of “To rename this computer or change its domain or workgroup”.

Click the Change Button - In the next window, enter a new name for your computer and click OK.
Input a New Hostname for Windows - A window will pop up asking if you want to restart the system right away or later. Choose an option.
In some versions of Windows, you won’t have the choice to restart later. The system will ask you to save any open files and restart immediately. - After restarting, open the command prompt to check the new hostname.

Checking Windows Hostname - All done!

Conclusion
Changing the hostname on your Windows computer can be helpful for many reasons. It makes it easier to identify your device in a large network, can meet software needs, or simply helps to personalize your computer. By following these steps, you can quickly and easily change the hostname. Just make sure to follow the rules for naming your computer to avoid any issues.