
Applies ToWindows 11 Windows 10
Управление дисками в Windows помогает выполнять дополнительные задачи с хранилищем, такие как инициализация нового диска, расширение и сжатие томов.
Чтобы открыть оснастку «Управление дисками», щелкните правой кнопкой мыши (или нажмите и удерживайте) кнопку Пуск и выберите Управление дисками.
-
Откройте управление дисками.
-
Выберите и удерживайте (или щелкните правой кнопкой мыши) диск, который нужно инициализировать, а затем выберите Инициализировать диск. Если диск указан как автономный, сначала выберите и удерживайте (или щелкните правой кнопкой мыши) диск, а затем выберите В сети.
Некоторые USB-диски не могут быть инициализированы. Эти диски только форматируются, а затем назначаются буквы диска.
-
В диалоговом окне Инициализация диска убедитесь, что выбран правильный диск, а затем нажмите кнопку ОК, чтобы принять стиль секции по умолчанию или изменить его при необходимости.
-
Используйте GPT , если у вас есть современная система с встроенным ПО UEFI и требуется поддержка больших дисков и более четырех секций.
-
Используйте MBR , если вы работаете с более старым оборудованием или операционными системами, которые не поддерживают UEFI.
Затем состояние диска кратко меняется на Инициализация, а затем на состояние «В сети«. Если инициализация по какой-либо причине завершается сбоем, см. статью Устранение неполадок с управлением дисками.
Чтобы создать раздел или том (эти два термина часто используют как взаимозаменяемые) на жестком диске, вам необходимо войти в систему с правами администратора. Кроме того, на жестком диске должно быть либо нераспределенное дисковое пространство, либо свободное место в дополнительном разделе.
Если нераспределенного дискового пространства нет, вы можете создать его, сжав или удалив один из существующих разделов либо использовав программу стороннего производителя для работы с разделами жесткого диска.
-
Откройте управление дисками.
-
Щелкните правой кнопкой мыши нераспределенную область на жестком диске, а затем выберите Создать простой том.
-
В мастере создания простого тома нажмите кнопку Далее.
-
Введите размер тома, который вы хотите создать, в мегабайтах (МБ) или подтвердите максимальный размер, заданный по умолчанию, а затем нажмите кнопку Далее.
-
Подтвердите букву диска, предложенную по умолчанию, или выберите другую букву диска для идентификации раздела, а затем нажмите кнопку Далее.
-
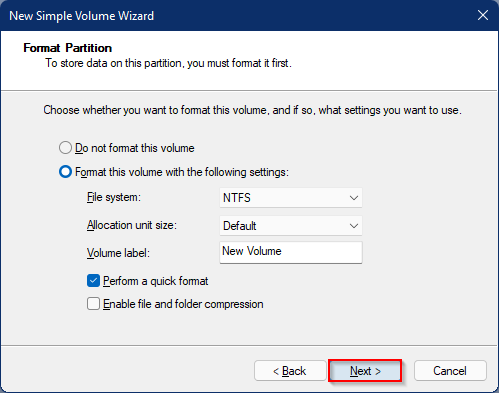
В диалоговом окне Форматирование раздела выполните одно из указанных ниже действий.
-
-
Если вы хотите отложить форматирование тома, выберите Не форматировать данный том, а затем нажмите кнопку Далее.
-
Чтобы отформатировать том, используя параметры, заданные по умолчанию, нажмите кнопку Далее.
-
-
Проверьте все выбранные вами параметры и нажмите кнопку Готово.
Примечание: При создании разделов на базовом диске первые три раздела будут отформатированы как основные разделы. Начиная с четвертого, каждый раздел будет настроен в качестве логического диска в дополнительном разделе.
Предупреждение: При форматировании тома все имеющиеся на нем данные будут уничтожены. Перед началом работы сделайте резервную копию всех нужных данных.
-
Откройте управление дисками.
-
Щелкните правой кнопкой мыши том, который вы хотите отформатировать, а затем выберите пункт Форматировать.
-
Чтобы отформатировать том, используя параметры, заданные по умолчанию, в диалоговом окне Форматирование нажмите кнопку ОК, а затем еще раз нажмите кнопку ОК.
Примечания:
-
Вам не удастся отформатировать диск или раздел, которые на момент попытки форматирования используются другими программами, а также раздел, содержащий Windows.
-
Параметр Выполнить быстрое форматирование создаст таблицу файлов, но не будет полностью перезаписывать или стереть том. Быстрое форматирование выполняется намного быстрее, чем обычное форматирование, при котором полностью стираются имеющиеся в томе данные.
Нужна дополнительная помощь?
Нужны дополнительные параметры?
Изучите преимущества подписки, просмотрите учебные курсы, узнайте, как защитить свое устройство и т. д.
Если вам требуется поменять размеры разделов диска HDD или SSD в Windows 11, Windows 10 и предыдущих версиях ОС — увеличить размер раздела, уменьшить его, либо выделить место под дополнительные разделы, сделать это сравнительно легко: в некоторых случаях достаточно прибегнуть к встроенным средствам системы, в других могут потребоваться сторонние программы.
В этой инструкции подробно о способах изменения размеров разделов диска в Windows актуальных версий в управлении дисками, командной строке или с помощью сторонних инструментов. На близкую тему: Как увеличить диск C.
Возможности изменения размеров разделов средствами Windows
В Windows присутствует два инструмента для работы с разделами: «Управление дисками» с графическим интерфейсом и DISKPART — инструмент командной строки. Возможности использования в части изменения разделов ограничены.
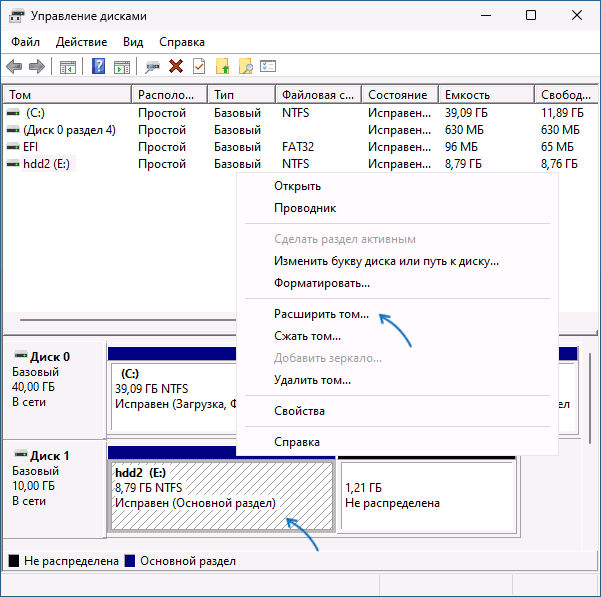
Сначала рассмотрим задачи, которые можно выполнить с помощью «Управления дисками». Для запуска утилиты вы можете нажать клавиши Win+R на клавиатуре и ввести diskmgmt.msc, либо нажать правой кнопкой мыши по кнопке «Пуск» и выбрать пункт «Управление дисками».
- Для большинства разделов с данными вы можете «Сжать том» — то есть уменьшить размер раздела. Нажмите правой кнопкой мыши по разделу, выберите «Сжать том» и укажите, на сколько его требуется сжать (не более, чем есть свободного места на выбранном разделе, в некоторых случаях — меньше). При этом область, которая высвободилась, будет помечена как «Не распределена» и будет расположена справа от раздела (высвободить её слева средствами системы не получится). Её можно будет использовать для создания нового раздела (с присоединением к другим разделам встроенными средствами системы не все просто).

- Если справа от раздела с данными есть область, которая «Не распределена» (или вы готовы удалить том, находящийся справа, чтобы создать такую область), вы можете расширить том на всю эту область («вправо»), либо на её часть, то есть увеличить размер раздела. Запустить расширение тома так же можно через контекстное меню по правому клику.
- Если область, которая «Не распределена» находится слева от раздела, который нужно увеличить, в некоторых случаях (если это не системный раздел) вы так же можете расширить том. Однако при этом диск будет преобразован в «Динамический», о чём вы увидите соответствующее уведомление. Это не всегда удобно, а потому я бы рекомендовал для таких целей использовать сторонние программы изменения размеров разделов.


Те же действия можно выполнить в командной строке:
- Запустите командную строку от имени администратора, например, используя поиск в панели задач.
- По порядку введите команды, нажимая Enter после каждой
diskpart
list volume
- Обратите внимание на номер тома (раздела), над которым нужно произвести действия (далее — N) и введите команду
select volume N
- Если вам нужно сжать том, используйте команду (размер указываем в мегабайтах)
shrink desired=РАЗМЕР minimum=РАЗМЕР
- Если требуется расширить том, используйте команду
extend size=РАЗМЕР


Все условия о наличии незанятого пространства остаются теми же, что и в «Управлении дисками».
Как можно заметить, встроенные средства системы не позволяют гибко и удобно менять размеры разделов, особенно в случае наличия промежуточных разделов или если требуется выполнить какие-то операции без потери данных на уже имеющихся дисках и без преобразования в динамический диск. Во всех сложных случаях лучше будет воспользоваться сторонними программами.
Увеличение и уменьшение размеров разделов в сторонних программах
Существует множество условно-бесплатных программ, позволяющих гибко менять размеры разделов на дисках в удобном интерфейсе. Среди них:
- Aomei Partition Assistant Standard — есть русский язык интерфейса, функциональна, большинство функций по работе с размерами разделов доступны бесплатно.
- MiniTool Partition Wizard Free — все то же самое, что и для предыдущего варианта, но без русского языка интерфейса.
- DiskGenius — условно бесплатная программа, недавно появился русский язык интерфейса, почти все функции доступны и без приобретения.
- Acronis Disk Director — функциональная и русскоязычная программа, не бесплатная.
Это не полный список и, если вы не знаете, что выбрать, рекомендую использовать эти программы с загрузочной флешки WinPE Sergei Strelec (подробнее можно прочитать здесь), где вы найдете сразу все указанные, а также некоторые дополнительные средства для работы с разделами дисков, в том числе с изменением их размеров в разделе программ «Жесткий диск».

Сам процесс изменения размеров разделов почти одинаков во всех этих программах: обычно достаточно выбрать нужный раздел, а затем — нужное действие в списке инструментов, либо в контекстном меню. Несколько примеров:
- Aomei Partition Assistant — нажмите правой кнопкой мыши по разделу, выберите опцию «Перемещение и изменение размеров разделов», в следующем окне задайте размеры разделов, если нужно забрать часть свободного места от другого раздела, отметьте пункт «Назначьте свободное пространство из раздела в раздел». После настройки размеров, не забудьте нажать «Применить» в главном окне программы.

- Вторая возможность в Aomei Partition Assistant — использование функции «Распределить свободное пространство» для присоединения части свободного пространства с одного раздела к другому.

- DiskGenius — здесь то же самое: достаточно выбрать диск и раздел на нем, нажать правой кнопкой мыши и выбрать пункт «Resize Partiton» (изменить размер раздела), после чего уменьшить раздел (мышью или введя нужные числа), создав свободное пространство в начале или конце раздела, или увеличить его за счет находящегося рядом свободного пространства. Подтвердите изменение размера нажатием кнопки «Start». Если нужно увеличить размер, но свободного пространства нет, первым действием уменьшите соседний раздел, создав свободное пространство с той стороны, которая примыкает к разделу, который нужно расширить, а затем расширьте раздел, который требовалось увеличить.

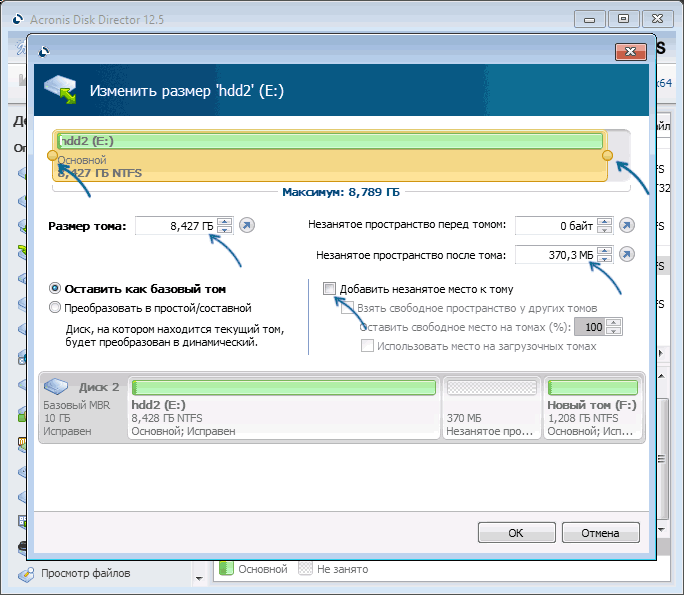
- Acronis Disk Director — достаточно выбрать раздел, затем нажать по нему правой кнопкой мыши и выбрать пункт «Изменить размер тома». После этого вы сможете вручную настроить размер нового тома, введя нужные размеры (за счет свободного от разделов пространства) или с помощью мыши и регулировки в графическом представлении. Если свободного пространства нет, можно поставить отметку «Добавить незанятое место к тому», чтобы использовать свободное место от других разделов.


Как можно заметить, логика действий почти во всех программах примерно одинакова: с уменьшением размера раздела нет никаких проблем, и оно выполняется в пару кликов, а для увеличения раздела в некоторых программах может потребоваться предварительно уменьшить соседний раздел, чтобы рядом с расширяемым появилось незанятое пространство.
Надеюсь, инструкция была полезной. Если остаются вопросы, опишите задачу в комментариях, я постараюсь помочь.
UPDATED 3/24/2025: On Windows 11, you can change partition size to either increase the drive size or use the unallocated space to create one or more partitions, and in this guide, I’ll show you how.
Regardless of the reason, you can resize a partition on Windows 11 without re-formatting or losing your files using the Settings app with the “Disks & volumes” settings, Disk Management, Command Prompt, and PowerShell. When using these tools, you can change the size of any partition, including the “C,” or the partition on any drive, including those from an external location.
In this guide, I’ll teach you the steps to shrink and extend the size of a partition on Windows 11.
- Change partition size with Settings on Windows 11
- Change partition size with Disk Management on Windows 11
- Change partition size with Command Prompt on Windows 11
- Change partition size with PowerShell on Windows 11
Change partition size with Settings on Windows 11
To change the size of a partition on Windows 11, use these steps:
-
Open Settings on Windows 11.
-
Click on System.
-
Click the Storage tab.
-
Click on Advanced storage settings under the “Storage management” section.
-
Click the “Disks & volumes” setting.

-
Select the drive with the partition (volume) to resize.
-
Select the partition and click the Properties button.

-
Click the Change size button under the “Size” section.
-
(Option 1) Confirm a lower number than the “Current” size to shrink the partition.
-
(Option 2) Confirm a higher number than the “Current” size but not larger than the “Max” number to extend the partition.
-
Click the OK button.


Once you complete the steps, the system will change the partition size without losing data to reflect the specified setting.
If you must extend the installation (C:) drive, you may have to delete and recreate the Recovery Partition before you can change the size of the main system partition.
Change partition size with Disk Management on Windows 11
Using the legacy Disk Management tool is the easiest way to shrink or expand the partition size on Windows 11.
Shrink partition
To shrink a partition on Windows 11 with Disk Management, use these steps:
-
Open Start.
-
Search for Create and format hard disk partitions and click the top result to open the Disk Management console.
-
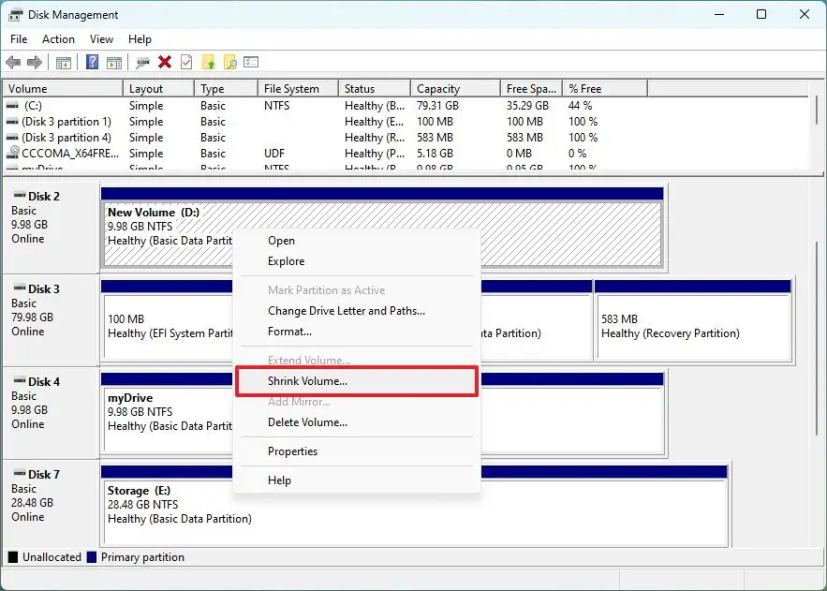
Right-click the drive you want to change its partition size and select the Shrink Volume option.

-
Confirm the amount of space to shrink the partition (in megabytes).
Quick note: As you change the size value, you can confirm the total size of the unallocated space after shrinking the original partition.
-
Click the Shrink button.

Once you complete the steps, the partition will reduce to the specified size.
Extend partition
To increase (or extend) the drive partition size using Disk Management, use these steps:
-
Open Start.
-
Search for Create and format hard disk partitions and click the top result to open the Disk Management console.
-
Right-click the drive to change its partition size and select the Extend Volume option.
-
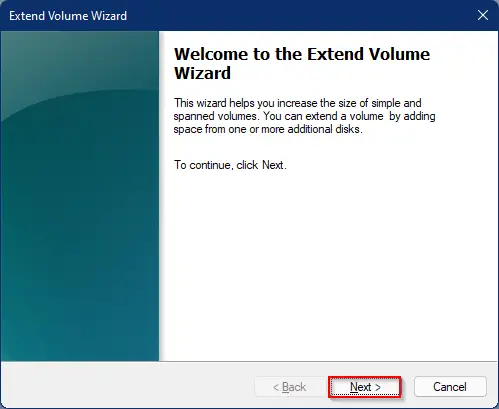
Click the Next button.
-
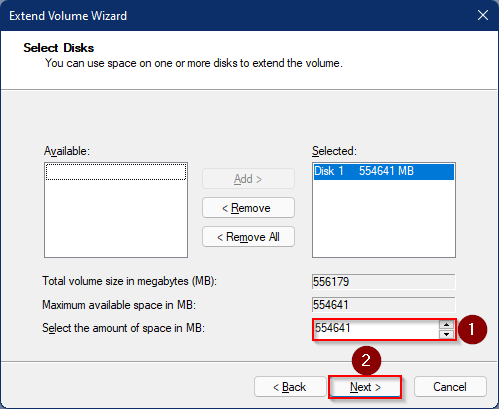
Choose the disk with available space under the “Selected” section (if applicable).
Quick note: In some cases, you may need to select the disk from the “Available” section and click the Add button to make it available.
-
Confirm the space to increase the drive partition (if necessary).
-
Click the Next button.
-
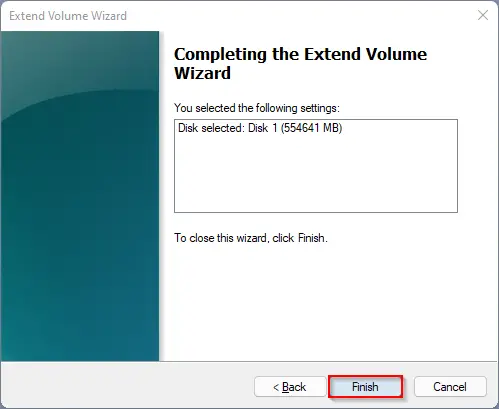
Click the Finish button.


After completing the steps, the drive partition will extend to the specified size.
If the “Extend volume” option is greyed out, the physical drive doesn’t have any space to increase the volume.
Change partition size with Command Prompt on Windows 11
It’s also possible to change the partition size without losing data on Windows 11 using the DiskPart tool with Command Prompt.
Shrink partition
To shrink a partition with Command Prompt on Windows 11, use these steps:
-
Open Start.
-
Search for Command Prompt, right-click the top result, and select the Run as administrator option.
-
Type the following command to start diskpart and press Enter:
diskpart
-
Type the following command to list the volumes and press Enter:
list volume
-
Type the following command to select the volume you want to shrink the partition and press Enter:
select volume 2
In the command, change “2” to the number representing the partition you want to modify.
-
Type the following command to determine the space you can decrease the partition and press Enter:
shrink querymax
-
Type the following command to shrink the drive partition by a specific amount (in megabytes) and press Enter:
shrink desired=7099
In the command, change “7099” for the amount (in megabytes) you want to shrink the partition.
-
(Optional) Type the following command to shrink the partition by its maximum space reclaimable and press Enter:
shrink

Once you complete the steps, DiskPart will reduce the size of the partition to the new smaller size.
Extend partition
To increase the drive partition size with DiskPart, use these steps:
-
Open Start.
-
Search for Command Prompt, right-click the top result, and select the Run as administrator option.
-
Type the following command to start diskpart and press Enter:
diskpart
-
Type the following command to list the available disks and their capacity, and press Enter:
list disk
Quick note: Identify the drive’s total size with the partition you want to increase.
-
Type the following command to list the volumes and press Enter:
list volume
-
Type the following command to select the volume to shrink the partition and press Enter:
select volume 2
In the command, change “2” for the number that represents the partition to modify.
-
Type the following command to increase the size of the partition and press Enter:
extend size=20480
In the command, change “20480” for the amount (in megabytes) you want to increase the partition.
-
(Optional) Type the following command to increase the size of the partition using all contiguous space on the drive and press Enter:
extend


After you complete the steps, the partition will extend to the new size without losing your data.
Change partition size with PowerShell on Windows 11
Alternatively, you can change partition sizes using PowerShell commands.
Shrink partition
To resize a partition with PowerShell, use these steps:
-
Open Start.
-
Search for PowerShell, right-click the top result, and select the Run as administrator option.
-
Type the following command to list all the drives and their total size, and press Enter:
Get-Disk
-
Type the following command to list the available partitions on the drive and Enter:
Get-Partition -DiskNumber 2
In the command, change “2” for the number of the drive with the partition to shrink.
-
(Optional) Type the following command to understand the minimum and maximum space you can resize the partition and press Enter:
Get-PartitionSupportedSize -DiskNumber 2 -PartitionNumber 2
In the command, change the disk and partition number corresponding to your situation. Also, the “SizeMin” and “SizeMax” are specified in bytes, which means that you may need to use an online converter to understand the information in gigabytes or any other size.
-
Type the following command to resize the partition to 5GB and press Enter:
Resize-Partition -DiskNumber 2 -PartitionNumber 2 -Size (5GB)
In the command, replace the partition number and size for the information corresponding to your drive and the size to shrink the drive. Also, I”m using GB, but you can also specify the space in bytes, KB, MB, and TB

Once you complete the steps, PowerShell will shrink the partition, leaving additional unallocated space to create additional volumes.
Extend partition
To extend the partition size with PowerShell, use these steps:
-
Open Start.
-
Search for PowerShell, right-click the top result, and select the Run as administrator option.
-
Type the following command to list all the drives and their total size, and press Enter:
Get-Disk
-
Type the following command to list the available partitions in the drive and press Enter:
Get-Partition -DiskNumber 2
In the command, change “2” for the drive number with the partition you want to extend.
-
(Optional) Type the following command to understand the minimum and maximum space you can resize the partition on Windows 11 and press Enter:
Get-PartitionSupportedSize -DiskNumber 2 -PartitionNumber 2
In the command, change the disk and partition number corresponding to your situation.
-
Type the following command to increase the partition to 9GB and press Enter:
Resize-Partition -DiskNumber 2 -PartitionNumber 2 -Size (9GB)
In the command, replace the partition number and size for the information corresponding to your drive and the size to increase the partition.
-
(Optional) Type the following command to extend the partition to its maximum size on Windows 11 and press Enter:
Resize-Partition -DiskNumber 1 -PartitionNumber 2 -Size 10720624128
In the command, replace the disk and partition number for the information that corresponds to your situation. Also, to specify the new size of the partition, use the “SizeMax” number available in step 4.

After completing the steps, the partition will cover the available space or the specified amount.
It’s important to note that sometimes partition and volume are used interchangeably, but they are different. For example, a “partition” is a logical division of a physical drive. You can divide a single drive into multiple partitions, allowing you to organize the storage, run multiple operating systems on the same drive, or separate different types of data.
On the other hand, a “volume” is a formatted storage area with a file system. It’s the logical unit that the operating system recognizes for storing and accessing files. A volume can reside on a single partition, but in some cases, it can span multiple partitions. In other words, a volume is a partition that has been formatted with a file system (like NTFS, FAT32, or ext4).
In summary, a “drive” is a physical piece of hardware, a “partition” is a logical division of the physical drive, and the “volume” is a formatted storage area with a file system, which may reside on a partition.
Update March 24, 2025: This guide has been updated to ensure accuracy and reflect changes to the process.
Do you want to partition your hard drive on Windows 11? Depending upon the HDD or SSD size, you can create several partitions on your Windows 11 PC. All you need to use is a built-in disk management tool to resize or create a new partition. That means there is no need to install a third-party tool on your PC for partitioning your hard drive.
Partitioning of a hard disk drive is just like ABCD. That means there is no technical knowledge required for it. Any novice person can make partitions by reading this post.
Why is partitioning needed?
When you buy a new Windows computer or laptop, it may ship with SSD or HDD. Mostly the hard disk will have a single partition, and it isn’t easy to organize your files and folder in different categories. Single partition also has its own disadvantage. If your Windows OS got corrupt due to some reason, you have to do a lot of work to recover your data. If you have more than one or multiple partitions created on your PC, you can simply delete the Windows drive, and the rest of the stored data will be safe. That means, without any fear of data loss, you can operate your PC.
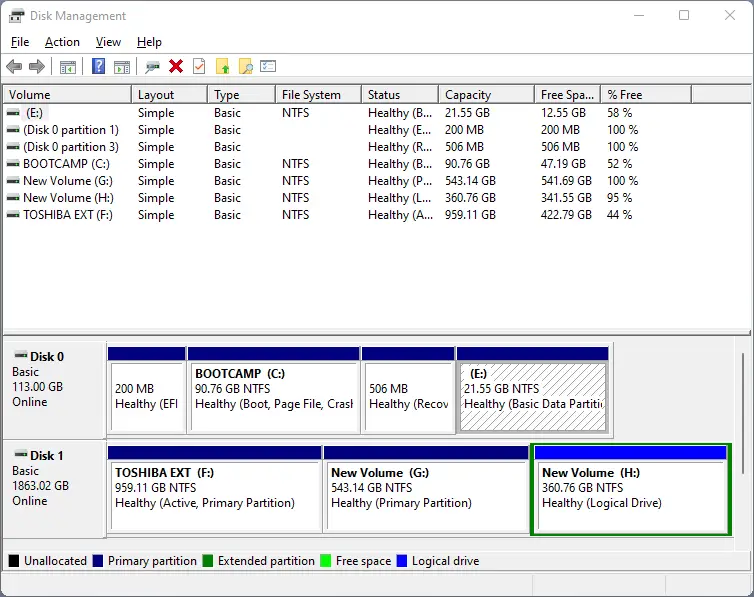
To organize your files into different categories, you might want to partition hard disks and create multiple drives. As said above, Windows 11 also comes with a default option to manage hard disks that help you to create, delete, extend, shrink and resize partitions. To partition a hard disk in Windows 11, you need to open the Disk Management tool. Let’s see in detail how partitioning on Windows 11 works.
How to Shrink a Partition in Windows 11?
As said above, when you purchase a new PC, in most cases, you will find a single drive where your OS will be installed. Suppose your computer has 2TB of hard disk; you will find a single drive “C” under “This PC.” Since your PC has a single drive that has occupied all the space on your computer, first, you need to free up space. To free up space on the HDD or SSD, you need to Shrink it.
Step 1. Click on the Start button (Windows logo) or Seach icon on the taskbar, and in the search box, type partition. In the available results, click on Create and format hard disk partitions.
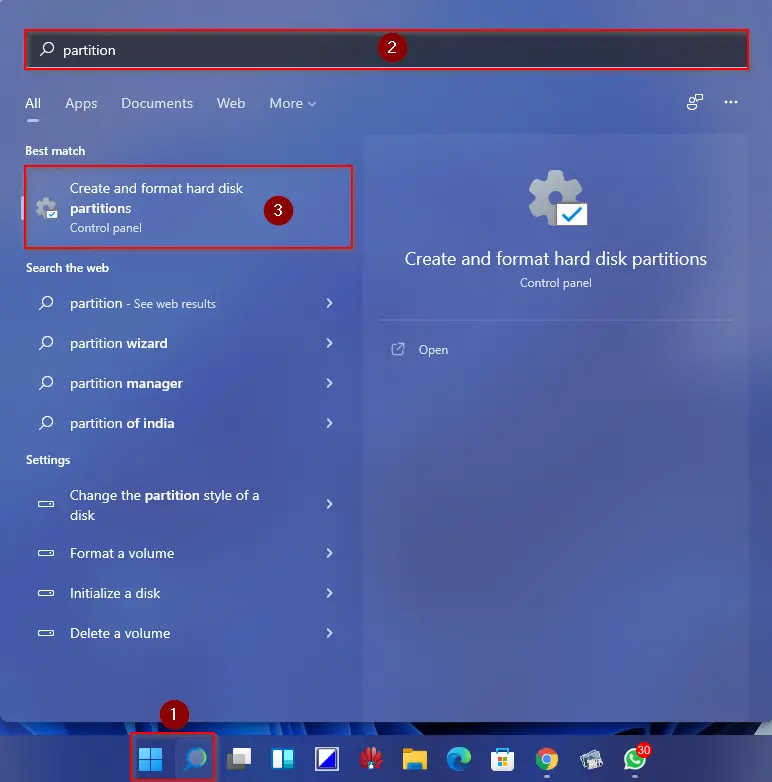
The above action will open the “Disk Management” window.
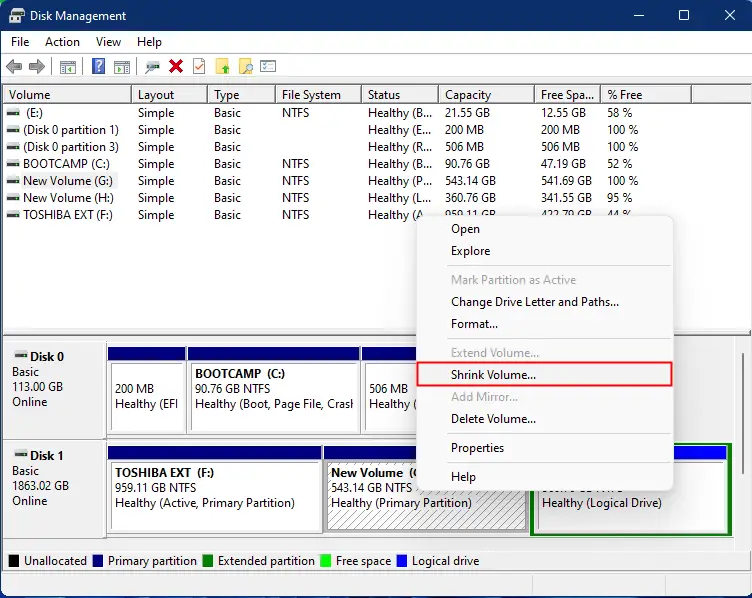
Step 2. Right-click on the partition that you want to shrink and free up space to create a new partition. Select the Shrink Volume option.
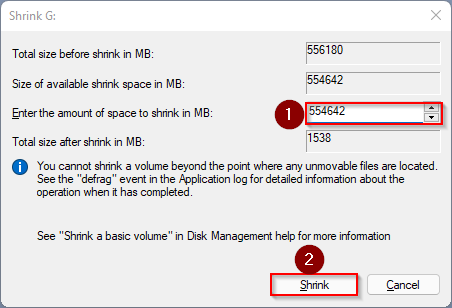
Step 3. A new pop-up window will appear. Here, next to the “Enter the amount of space to shrink in MB” option, type the size (in MB) that you want to free up from the select drive and then click on the Shrink button.
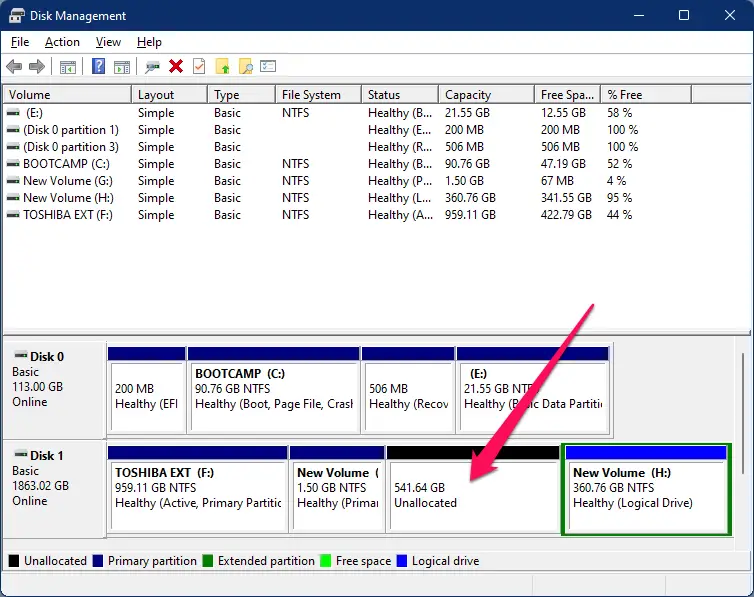
Step 4. Now selected volume size will be decreased, and you will see an Unallocated space next to the selected drive.
How to Create a New Partition in Windows 11?
If you see some unallocated space and a disk management window, or you have freed up some space by shrinking any partition and want to create a new drive or partition, do the following steps:-
Step 1. Click on the Start button (Windows logo) or Seach icon on the taskbar, and in the search box, type partition. In the available results, click on Create and format hard disk partitions.
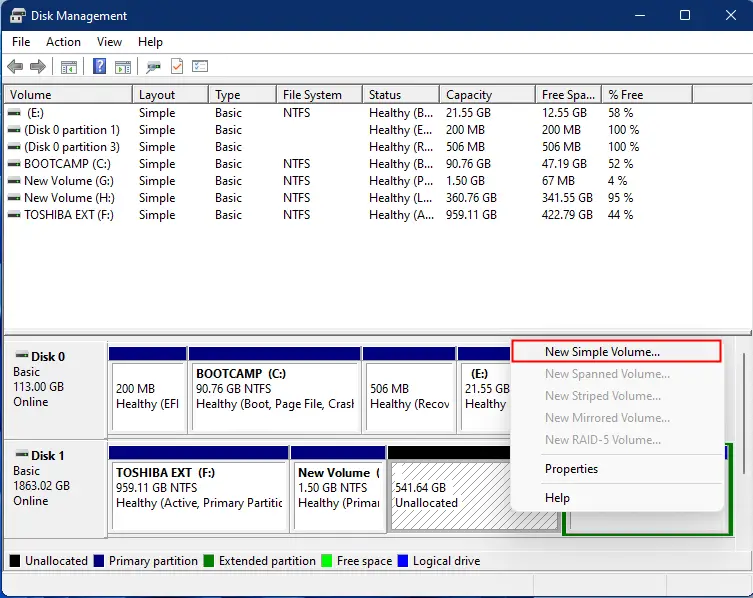
Step 2. After doing the above steps, you will see the “Disk Management” window. Right-click on Unallocated space and then select the New Simple Volume option.
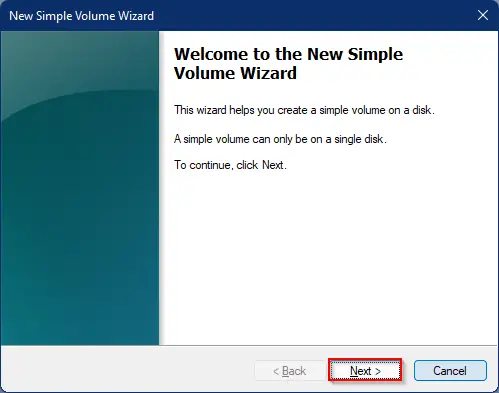
Step 3. Click the Next button on the New Simple Volume Wizard.
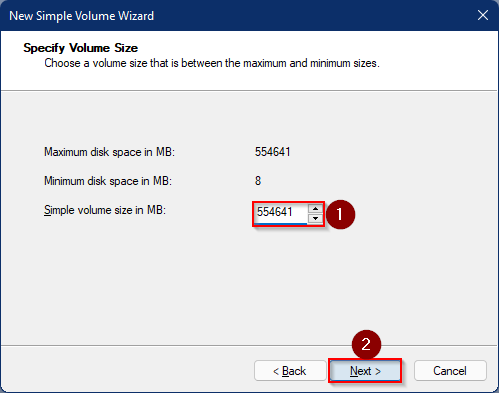
Step 4. In the next window, if you want, you can decrease the size of the partition by modifying its default value next to “Simple volume size in MB.” By default, Windows 11 will allocate all the free space. Once you have set the desired size of the partition, click on the Next button.
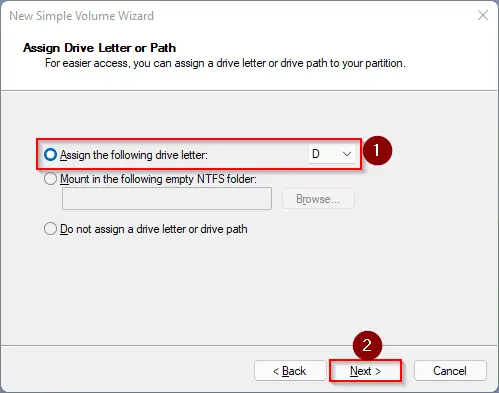
Step 5. Now, Windows will automatically assign select a free drive letter for your partition. If you wish to change, click on the “Assign the following drive letter” drop-down and pick your desired drive letter for your partition. Once done, click on the Next button.
Step 6. Click the Next button.
Step 7. Finally, click on the Finish button to create your new partition.
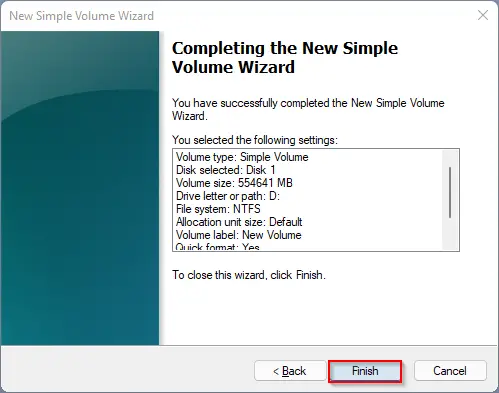
Now, Windows 11 will create your new partition and format it for you. You can access your newly created drive under File Explorer or This PC.
How to Delete an Existing Partition in Windows 11?
For some reason, if you want to delete a partition or drive on Windows 11 PC, it can be performed using the Disk Management tool.
Step 1. Click on the Start button (Windows logo) or Seach icon on the taskbar, and in the search box, type partition. In the available results, click on Create and format hard disk partitions.
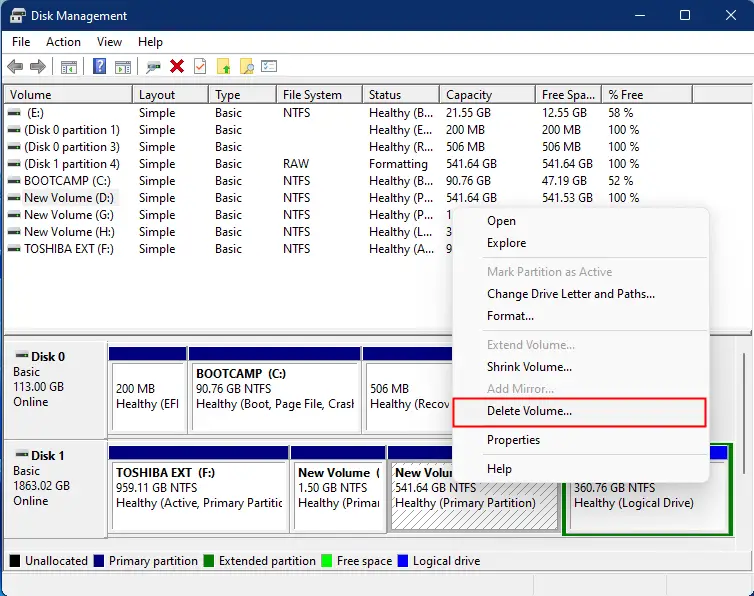
Step 2. After doing the above steps, you will see the “Disk Management” window. Right-click on the volume or partition you would like to remove from your PC and select the Delete Volume option.
Note: Deleting a partition will erase all the data from that drive. Make sure you have taken the backup of existing data in case you have stored some important data.
Step 3. Click on Yes when you are prompted.
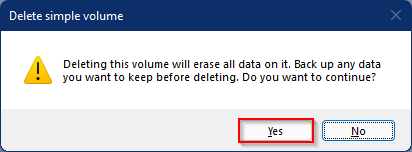
After executing the above steps, the selected drive and its data are permanently eliminated from your computer.
How to Extend an Existing Partition in Windows 11?
If you find that an existing drive or partition is running out of space or, for some reason, you want to increase its size, you can extend the space using the Disk Management tool. But this feature is available only if you have free space available after that partition or drive. Suppose you have a “G” drive that you would like to extend. Unallocated space should be just after the “G” drive; otherwise, you can not increase the “G” partition size.
Step 1. Click on the Start button (Windows logo) or Seach icon on the taskbar, and in the search box, type partition. In the available results, click on Create and format hard disk partitions.
Step 2. After doing the above steps, you will see the “Disk Management” window. Right-click on the volume or partition you would like to extend on your computer and then select the Extend Volume option.
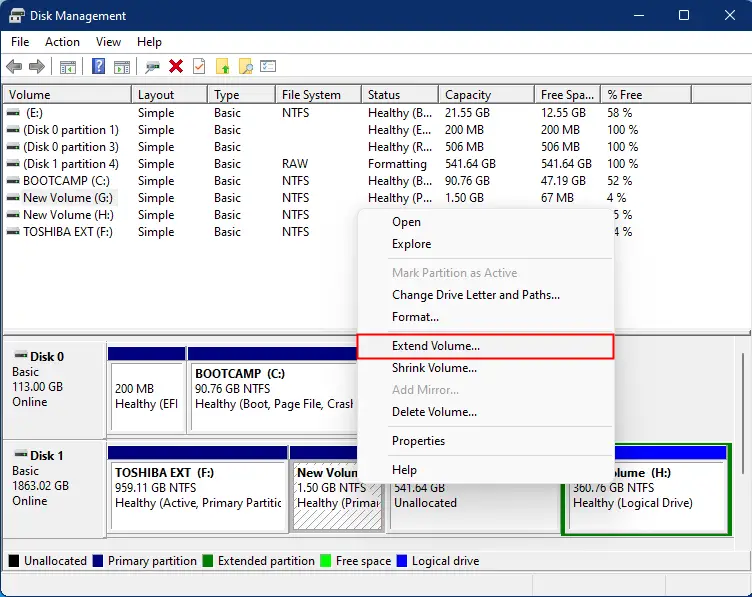
Step 3. In the next window, click on the Yes button.
Step 4. On the next window, Windows 11 will automatically allocate all the free space next to your selected drive that you would like to extend. If you wish, enter the size according to choice next to the “Select the amount of spaced in MB” option. Once the size is entered manually, click on the Next button.
Step 5. Finally, click on the Finish button to merge both partitions.
Conclusion
In conclusion, partitioning your hard drive on Windows 11 is a simple process that can help you better organize your files and protect your data. Using the built-in Disk Management tool, you can easily shrink, create, delete, and extend partitions on your hard drive without the need for third-party software. Whether you’re a novice or an experienced user, you can easily follow the steps outlined in this post to partition your hard drive on Windows 11 and take control of your storage space. Remember to back up your data before making any changes to your partitions to avoid any potential data loss.
Moving partitions in Windows 10 is a relatively straightforward process, but it should be done with caution as it can cause data loss or corruption. Here are the steps to move a partition in Windows 10:
1. Back up any important files stored on the partition you want to move before proceeding.
2. Open the disk management utility by searching for “diskmgmt.msc” in the run dialogue box (Windows + R).
3. Right-click on the partition you want to move and select “Delete Volume” from the context menu that appears. Make sure you delete only one partition at a time, as deleting multiple partitions simultaneously can lead to undesired results.
4. Once all of your desired partitions have been deleted, right-click on an unallocated space and select “Extend Volume” from the context menu that appears, then follow through with any additional steps given by your computer’s prompt until completion.
5. Lastly, create new partitions using this extended space as needed by right-clicking on an unallocated space and selecting «New Simple Volume» from the context menu that appears; again follow through with any additional steps given by your computer’s prompts until completion.
It is important to note that these steps may vary slightly depending on what version of Windows 10 you are running; please refer to Microsoft’s official website for more detailed instructions if necessary (https://support.microsoft.com/en-us/help/177506/how-to-manage-disks-and-volumes-in-windows).
How do I move a partition position?
How do I reallocate a partition in Windows 10?
Reallocating a partition in Windows 10 can be done using the Disk Management tool. To access this tool, open the Start menu and type “Disk Management” into the search bar. Once it appears, select “Create and format hard disk partitions” to open the tool.
Once you are in Disk Management, you will see all of your drives listed on the left side of the window. Right click on the partition that you want to reallocate and select “Shrink Volume” from the list of options. Follow instructions to reduce or expand its size as needed, then right click again and select “Extend Volume” to give more space for other partitions.
It is important to note that you cannot allocate more space than what is available in your hard drive so make sure that there is enough free space before attempting these steps. Additionally, keep backups of any data stored in a partition before changing it as reallocation may result in data loss if not done correctly.
How do I move a partition in Windows 10 diskpart?
In order to move a partition in Windows 10 using Diskpart, you will need to:
1. Open an elevated command prompt window. To do this, type ‘cmd’ into the search box on your taskbar, right-click on Command Prompt and select ‘Run as administrator’.
2. Type ‘diskpart’ into the command prompt window and press Enter.
3. Type ‘list disk’ and press Enter to view all available disks connected to your computer.
4. Select the disk that contains the partition you want to move by typing ‘select disk X’ (where X is the number of the disk).
5. Type ‘list partition’ and press Enter to view all partitions for that disk.
6. Select the partition you want to move by typing ‘select partition Y’ (where Y is the number of the partition).
7. Move it by typing ‘move’ followed by any additional parameters such as ‘size=nnn mbytes’ or ‘offset=nnn mbytes’. This will allow you to specify where exactly it should be moved on your hard drive or how much space it should occupy after being moved from its original location; if nothing is specified then it will be moved at its current size with no change in offset from its original location .
8. Once finished, type ‘exit’ twice – once for exiting out of Diskpart and again for exiting out of Command Prompt – then reboot your PC for changes to take effect
How do I move a Windows partition to another drive?
Moving a Windows partition to another drive can be done using a disk cloning tool. The best way to do this is to use professional software such as EaseUS Todo Backup.
Steps:
1. Download and install the software onto your computer.
2. Launch the program and select “Clone” from the main menu.
3. Select the source drive (the one you want to move) and then select the target drive (the new location of the partition).
4. Click “Proceed” and wait for the process to finish, which may take some time depending on how large your data is and how fast your computer is.
5. When it’s finished, reboot your computer with both drives connected and check that everything works correctly in Windows before disconnecting them again if necessary.
If you need any further help or have any other questions, please don’t hesitate to reach out!
How do I reallocate partition space?
To reallocate partition space, you will need to use a disk management tool. Windows has a built-in tool called Disk Management, which can be accessed by searching for “Disk Management” in the Start menu or by right-clicking on This PC and selecting Manage. Once Disk Management is open, you will see all of your drives listed with their current partitions. To reallocate partition space, right-click on the partition you want to resize and select “Extend Volume” or “Shrink Volume” depending on what you want to do. Follow the prompts in the wizard that appears and make sure to read any warnings before continuing with your changes. Once complete, you should have successfully reallocated your partition space.
How do I move a partition left and right?
In order to move a partition left and right, you will need to use a disk partitioning tool. Depending on your operating system, the tool may be different. For example, Windows users can use the Disk Management tool that is built-in to the operating system. To access it, open Control Panel > System and Security > Administrative Tools > Computer Management > Disk Management. Right click on the partition you wish to move and select “Move/Resize Partition” from the context menu. You will then be able to set how much space you want to add or remove from either side of the partition.
If you are using Linux, there are several tools available such as GParted or KDE Partition Manager which allow similar features for manipulating partitions as described above.
It is important that you back up any data stored on the partition before making changes in case something goes wrong during this process. Also make sure you have enough free space available in order to complete this task successfully.
How do I realign a partition?
Realigning a partition is a relatively simple process that requires you to use disk management tools. First, you will need to access the disk management tool for your operating system. For Windows, this can be done by pressing the Windows key and typing «disk management«. Once you have accessed the disk management tool, select the drive that has the partition you want to realign. Right-click on it and select «Change Drive Letter and Paths» from the menu. On this page, click on the partition you’d like to realign and then click «Modify«. Enter in new settings for the alignment of your partition using sector-based values and then click OK. This should realign your partition accordingly. If you encounter any issues during this process or need additional assistance, please consult with an IT professional or refer to your operating system’s user guide for more detailed instructions.
How to change disk partition in Windows 10 without formatting?
Changing disk partition in Windows 10 without formatting is possible with the help of the Disk Management tool. To do this, follow the steps below:
1. Open File Explorer (Windows key + E).
2. Right-click on This PC and select Manage.
3. Go to Storage in the left pane, then click on Disk Management in the right pane.
4. Select the drive you want to modify and right-click it, then choose Shrink Volume or Extend Volume from the context menu that appears.
5. Follow the instructions on screen to complete your desired operation without formatting your drive.
It’s important to note that you can only shrink or extend a partition by using unallocated space on your hard drive, so make sure you have enough available before attempting any operations with Disk Management tool. Additionally, back up all data before making any changes as there is always a potential risk of data loss when modifying partitions on a hard drive.