
Applies ToWindows 11 Windows 10
Support for Windows 10 will end in October 2025
After October 14, 2025, Microsoft will no longer provide free software updates from Windows Update, technical assistance, or security fixes for Windows 10. Your PC will still work, but we recommend moving to Windows 11.
Learn more
Renaming your device can be beneficial for several reasons:
-
Organization: if you use multiple devices with your Microsoft account, renaming them can help clearly identify and differentiate between them
-
Security: default device names might provide hints about the device type or user, which could be a security risk. Renaming can help obscure such details
-
Management: for organizations and IT management, having a consistent naming convention can simplify the process of tracking and managing devices
How to rename your device
-
In the Settings app on your Windows device, select System > About, or use the following shortcut:
About
-
Select Rename this PC
-
Enter a new name and select Next
-
Select Restart now or Restart later
Need more help?
Want more options?
Explore subscription benefits, browse training courses, learn how to secure your device, and more.
При просмотре списка устройств в диспетчере устройств обычно удобно ориентироваться по их именам, однако, в некоторых случаях это бывает не совсем удобно: автоматически заданные имена могут не давать четкого представления о том, о каком устройстве идет речь, особенно если у нескольких устройств они одинаковые.
В этой инструкции подробно о том, как изменить имена устройств в диспетчере устройств Windows 11 или Windows 10 — иногда это может быть полезным (например, если требуется различить многочисленные HID-устройства или мониторы), а иногда заняться переименованием можно и с не столь полезными целями: например, «установить» себе видеокарту помощнее. Внимание: если вам требуется переименование Bluetooth устройства, об этом отдельно: Способы переименовать Bluetooth устройство в Windows.
Изменение имени устройства в диспетчере устройств с помощью редактора реестра
Прежде чем приступить к переименованию устройства, рекомендую создать точку восстановления системы на случай, если что-то пойдет не так. Процесс обычно безопасен, но ошибки пользователя при изменении параметров потенциально могут привести к непредвиденным результатам.
Для того, чтобы изменить имя устройства, отображаемое в диспетчере устройств, выполните следующие шаги:
- Зайдите в диспетчер устройств (в Windows 11 и Windows 10 это можно сделать в меню по правому клику на кнопке «Пуск»).
- Дважды нажмите по устройству, которое нужно переименовать, откройте вкладку «Сведения», а в поле «Свойства» выберите пункт «Путь к экземпляру устройства». Не закрывайте это окно, оно пригодится далее.

- Запустите редактор реестра: нажмите клавиши Win+R на клавиатуре, введите regedit и нажмите Enter.
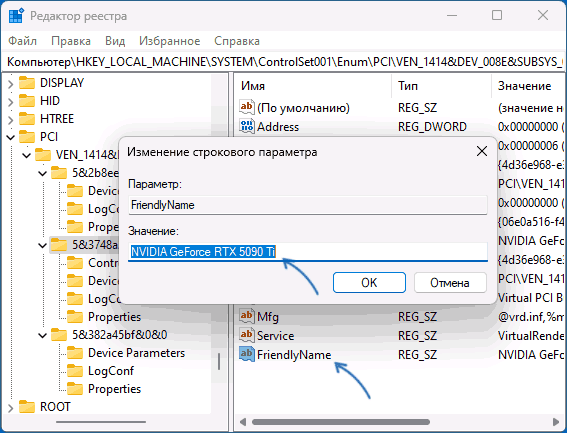
- В редакторе реестра перейдите к разделу
HKEY_LOCAL_MACHINE\SYSTEM\ControlSet001\Enum
- В этом разделе перейдите по такому же пути, как указан в окне «Путь к экземпляру устройства» на 2-м шаге к вложенному подразделу, в котором и хранятся настройки нужного устройства.

- Если после перехода к нужному подразделу в правой панели редактора реестра вы видите параметр с именем FriendlyName, дважды нажмите по нему. Иначе нажмите правой кнопкой мыши в пустом месте правой панели редактора реестра, выберите пункт «Создать» — «Строковый параметр», задайте имя «FriendlyName» для этого параметра и дважды нажмите по нему для изменения значения.
- Введите нужное имя устройства и нажмите «Ок».

- Закройте редактор реестра, закройте диспетчер устройств, а затем снова его откройте: вы увидите, что ваше устройство было переименовано.


Учитывайте, что заданное вами имя будет отображаться лишь в диспетчере устройств. Другие средства для просмотра технических характеристик и аппаратных компонентов компьютера, включая системные, будут показывать реальное имя устройства:

Однако, надеюсь, для кого-то из читателей инструкция окажется полезной даже с учетом этого нюанса.
The best and foremost thing about Windows is its customization ability. It is already evident that we can’t directly change the device names in the Device Manager because Windows doesn’t provides us the native options to rename the entries there. Today in this article, I’d like to share you the one and only approach that is via registry modification to modify the device names.
Prior to making any changes in the registry, I suggest you to make a System Restore point. This will help you in case if you’ve done any mistakes in the registry manipulation procedure which is described as follow:
How To Rename Devices In Device Manager For Windows 10/8/7
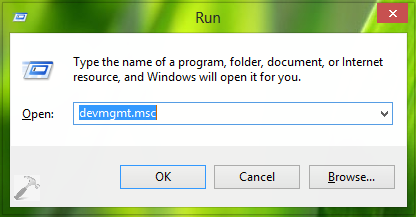
1. Press + R and put devmgmt.msc in Run dialog box and hit Enter to open Device Manager.
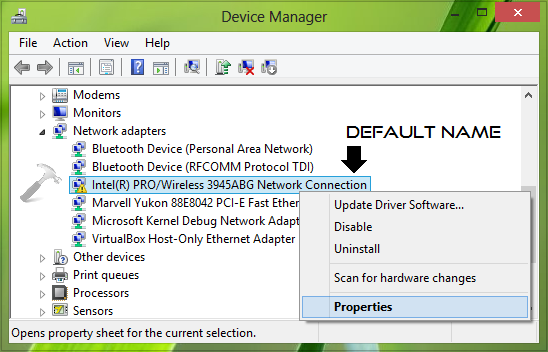
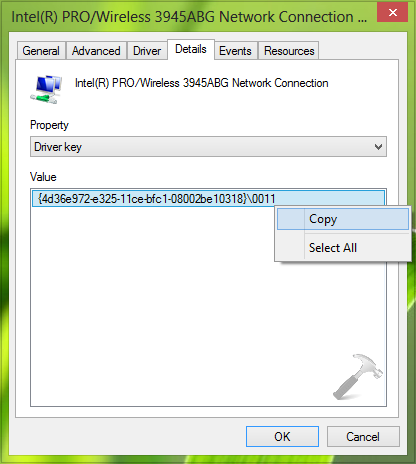
2. Here look for the device name you’d like to rename, for instance, we pick the Intel(R) PRO/Wireless 3945ABG Network Connection which is basically the WiFi driver on the system. Now right click over it and select Properties.
3. In the Properties window, select the Driver key property from drop-down list. Copy the Value as shown in below image.
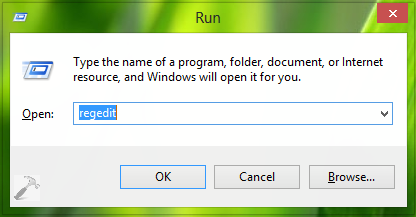
4. Press + R and put regedit in Run dialog box to open Registry Editor (if you’re not familiar with Registry Editor, then click here). Click OK.
5. Navigate here:
HKEY_LOCAL_MACHINE\SYSTEM\ControlSet001\Enum
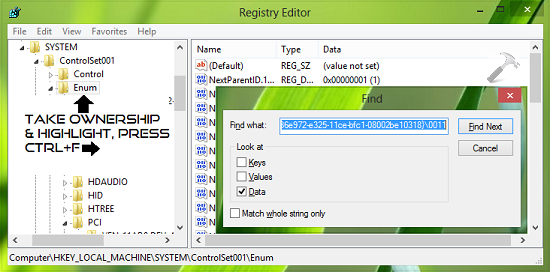
6. In the left pane of this location, take the ownership of Enum key as per method of this article or using RegOwnershipEx. Make sure you have full control on the key as far as permissions are concerned. Now highlight the same key i.e. Enum and press Ctrl+F, in Find window so appears; paste the driver key value we’ve copied in step 3 and hit Enter.
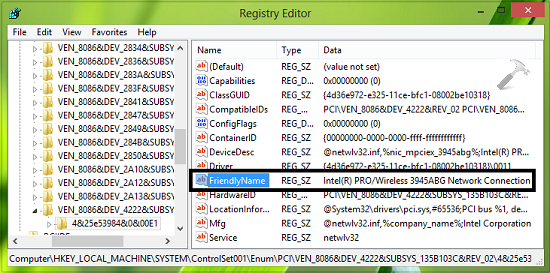
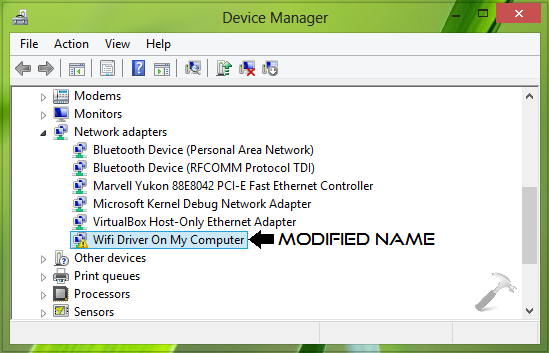
7. For the location so resulted, in the right pane look for the FriendlyName named registry string (REG_SZ), it must be having the same name for the device we’re looking to rename. Double click on the same string to modify and put your desired name under the hood of Value data, suppose we put Wifi Driver On My Computer. Click OK.
Finally, close the Registry Editor and get back to Device Manager window. As shown in the step 2, right click the device entry for which we changed the name and this time select Scan for hardware changes. The name you inputted in step 7 should appear now as shown in first screenshot of the article.
Here is the live illustration of this trick:
That’s it!
RELATED ARTICLES
Changing the device name on Windows 10 is a simple process that can help personalize your computer. Here’s a quick guide to make it happen: just head to your system settings, locate the ‘About’ section, and edit the current device name to the one you prefer. After a restart, your PC will boast its new identity.
Step-by-step Tutorial on Changing Device Name in Windows 10
Changing your device name in Windows 10 is a straightforward task that involves accessing a few settings. Follow these steps, and you’ll have a new device name in no time.
Step 1: Open System Settings
Access the Start menu and click on the gear icon to open ‘Settings.’
The ‘Settings’ window is your control center for all things Windows. You’ll find the gear icon in the Start menu, typically located at the bottom-left corner of your screen. Clicking this will open up a hub of options where you can adjust various settings.
Step 2: Navigate to System
In Settings, select ‘System’ from the list of available categories.
The ‘System’ section is where you can customize how your computer behaves. It includes settings for display, notifications, and, importantly for us, information about your device.
Step 3: Click on ‘About’
Scroll down and click ‘About’ on the left sidebar.
The ‘About’ section provides a summary of your device’s technical specifications and system software. It’s where you’ll find the option to change your computer’s name.
Step 4: Change the Device Name
Under ‘Device specifications,’ click on ‘Rename this PC.’
This button will prompt you to enter a new name for your device. Choose something memorable or descriptive, so your PC has a unique identity that stands out or fits a specific purpose.
Step 5: Restart Your PC
After entering the new name, click ‘Next,’ then restart your computer to apply the changes.
Restarting your computer finalizes the name change. Once it boots back up, you’ll see the new name reflected throughout your network and in various system settings.
Once you’ve completed these steps, your device will now sport a new name. This change will become effective after the restart, making your system easier to identify, especially in network settings or when sharing files.
Tips for Changing Device Name in Windows 10
- Make sure your new device name is unique, especially if you are on a shared network.
- Keep it short and simple to avoid confusion.
- Avoid using special characters; stick to letters and numbers.
- For business environments, consider using a naming convention.
- Remember, changing your device name will not affect any files or folders within your computer.
Frequently Asked Questions
What if I can’t find the ‘Rename this PC’ button?
Ensure you are in the ‘About’ section under ‘System.’ If it’s still missing, check if you have administrator privileges.
Can I include spaces in my device name?
Yes, spaces are allowed, but simplicity is often better for easy recognition.
Will changing the device name affect my files?
No, changing the device name does not impact your files or folders. It only changes how your PC is identified on networks.
How many times can I change my device name?
You can change your device name as often as you like. Just remember to restart your computer each time to apply the changes.
Why should I change my device name?
A personalized device name can help you easily identify your computer on networks, which is especially useful if you have multiple devices.
Summary
- Open System Settings
- Navigate to System
- Click on ‘About’
- Change the Device Name
- Restart Your PC
Conclusion
Changing the device name in Windows 10 is like giving your trusty steed a name that suits it. Not only does it help identify your computer amidst a sea of generic “DESKTOP-XXXXXX” names, but it also adds a personal touch. By following the steps we discussed, you’ll give your machine a new identity, whether it’s for personal pride or practical networking reasons.
Remember, a unique device name helps avoid confusion, especially in environments where several devices are connected to the same network. It’s not just a cosmetic change; it can make tasks like file sharing or troubleshooting much smoother.
If you found this guide helpful, there are plenty of resources available to take your Windows 10 knowledge further. Explore other customization options, like changing your PC’s theme or optimizing your system’s performance. You’ll find that small adjustments can make a big difference in your computing experience. Happy computing!
Matt Jacobs has been working as an IT consultant for small businesses since receiving his Master’s degree in 2003. While he still does some consulting work, his primary focus now is on creating technology support content for SupportYourTech.com.
His work can be found on many websites and focuses on topics such as Microsoft Office, Apple devices, Android devices, Photoshop, and more.
Changing the device name in Windows 11 can be a straightforward process, yet it can often feel stress-inducing for those who are not familiar with the operating system. Whether you want to personalize your computer, make it easier for a network to recognize your device, or simply ensure your new machine has a name that reflects your personality, learning how to change your device name is essential. This comprehensive guide will explore various methods for changing your device name in Windows 11, helping you navigate through the settings seamlessly.
Understanding Device Naming
The device name is an identifier for your computer on a network and is visible to other connected devices. It serves various purposes, including:
- Network Identification: This is especially crucial in home or office setups with multiple devices.
- Personalization: A custom name can reflect one’s personality or provide meaningful context, such as «John’s Gaming PC» or «Office Laptop.»
- Troubleshooting and Management: When troubleshooting network issues, having distinct names helps in identifying devices quickly.
Method 1: Changing Device Name via Settings
One of the most straightforward methods to change your device name is through the Windows Settings app. This method is user-friendly and does not require additional software.
Step 1: Open Settings
- Click on the Start button, or press the Windows key on your keyboard.
- Select the Settings icon (which looks like a gear).
- Alternatively, you can press Windows + I to access Settings directly.
Step 2: Navigate to System Settings
- In the Settings window, click on System from the left-hand side menu.
- Scroll down to find and select About on the right panel.
Step 3: Change the Device Name
- In the About section, look for Device Name.
- Click on the Rename this PC button located just beneath your current device name.
- A dialog box will appear prompting you to type the new device name. Enter your desired name, keeping in mind that it shouldn’t include special characters (except hyphens) or be excessively long.
- Once you’ve entered the new name, click on Next.
Step 4: Restart Your Computer
- After clicking Next, you’ll see an option to restart your PC. You can either restart right away or select the option to restart later.
- After the restart, your new device name will take effect.
Method 2: Using Control Panel
For users who prefer the classic Control Panel interface, changing the device name can also be done through it. Here’s how:
Step 1: Open Control Panel
- Press Windows + R to open the Run dialog box.
- Type
controland hit Enter, or alternatively, you can search for «Control Panel» in the Start menu.
Step 2: Navigate to System Settings
- Once in Control Panel, locate and click on System and Security.
- Next, click on System to access system information.
Step 3: Change Computer Name
- On the left sidebar, click on Change settings next to «Computer name, domain, and workgroup settings.»
- In the System Properties window, click on the Change button situated near the bottom.
Step 4: Enter New Device Name
- In the Computer Name/Domain Changes window, enter your new device name into the Computer name field.
- Once completed, click OK.
Step 5: Confirm Changes and Restart
After you click OK, you will be prompted to restart your computer to apply the changes. Ensure you save all ongoing work before proceeding to restart.
Method 3: Using Windows PowerShell
For the more tech-savvy user, changing the device name using PowerShell is an efficient option. This method allows for advanced configurations and quick actions.
Step 1: Open PowerShell
- Right-click on the Start button (or press Windows + X) to open the context menu.
- Select Windows Terminal (Admin) or Windows PowerShell (Admin).
Step 2: Change the Device Name
-
In the PowerShell window, type the following command and press Enter:
Rename-Computer -NewName "NewName" -Restart- Replace
"NewName"with your desired device name.
- Replace
-
The system will restart automatically after executing the command, applying the new name.
Method 4: Using Command Prompt
Similar to PowerShell, you can also change your device name via the Command Prompt.
Step 1: Open Command Prompt
- Press Windows + R to open the Run dialog box.
- Type
cmdand hit Enter or right-click on the Start button and choose Windows Terminal.
Step 2: Change Device Name
-
In the Command Prompt window, type the following command:
WMIC computersystem where name="%COMPUTERNAME%" call rename name="NewName"- Again, replace
NewNamewith your desired name.
- Again, replace
-
After successfully executing the command, you may need to restart your computer to see the changes.
Method 5: Active Directory (For Network Administrators)
If you are in a corporate environment and your device is part of a domain managed by Active Directory, the device name can also be changed through the Network Administrator.
- Open Active Directory Users and Computers on the domain controller.
- Locate the computer object you wish to rename.
- Right-click on the object and select Rename.
- Enter the new device name and confirm the change.
Considerations When Changing Device Names
-
Network Impact: Changing your device name can disrupt network shares, as other users or devices may not recognize your computer under the new name until the network is refreshed.
-
Software Dependencies: Some applications tied specifically to the device name may not function correctly after a name change. This could include remote desktop settings, certain licenses, or applications that rely on identifying the machine by its name.
-
Backup Important Data: Although changing the device name is generally safe, making a backup of your important files before undertaking such changes is always a good practice.
Conclusion
Changing the device name in Windows 11 can enhance both your user experience and network ease-of-use. Whether you prefer navigating through the Settings app, PowerShell, Command Prompt, or Control Panel, users can find a method that suits their comfort level. With these step-by-step guidelines, you can personalize your device name without complications, ensuring your computer aligns with your identity or organizational structure.
By carefully following these instructions, you can take control and make your Windows 11 device truly feel like your own. Happy computing!