
Все способы:
- Невозможна установка Windows на диск
- Вариант 1: Не хватает места на диске
- Вариант 2: Таблица разделов
- Заключение
- Вопросы и ответы: 8
При установке Windows довольно редко, но все же возникают различные ошибки. В большинстве случаев они приводят к тому, что продолжение инсталляции становится невозможным. Причин таких сбоев множество – от некорректно созданного установочного носителя до несовместимости различных компонентов. В этой статье мы поговорим об устранении ошибок на этапе выбора диска или раздела.
Невозможна установка Windows на диск
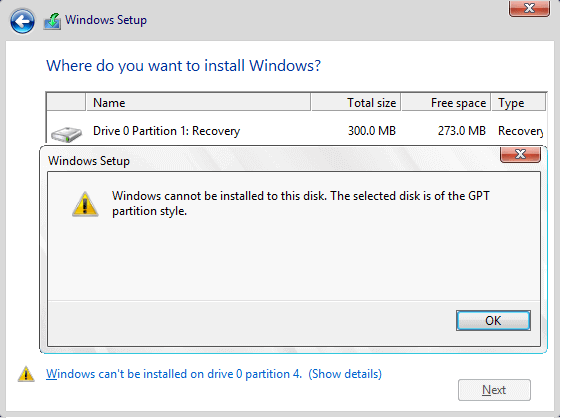
Рассмотрим подробнее саму ошибку. При ее возникновении в нижней части окна выбора диска появляется ссылка, нажатие на которую открывает подсказку с указанием причины.
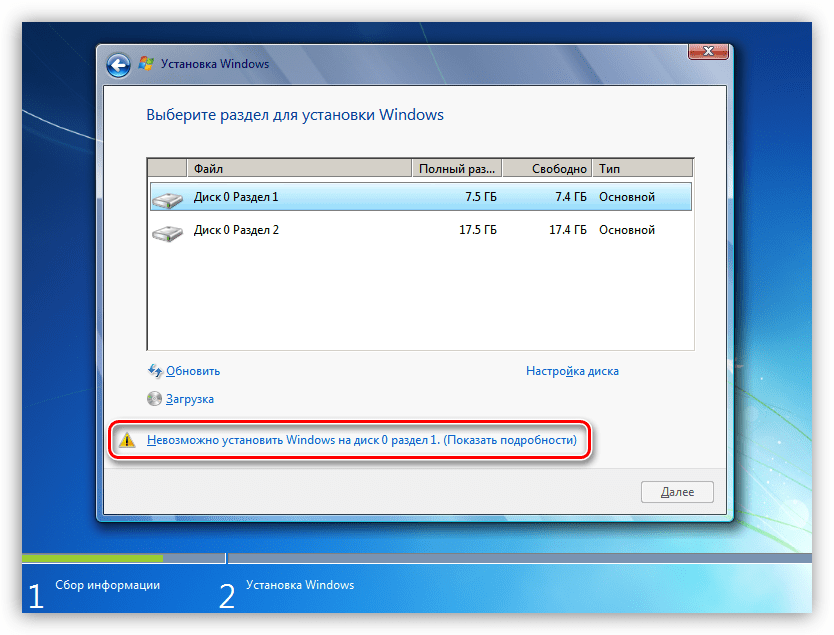
Причин, вызывающих данную ошибку, всего две. Первая – недостаток свободного места на целевом диске или разделе, а вторая связана с несовместимостью стилей разделов и микропрограммного обеспечения – BIOS или UEFI. Далее мы разберемся, как решить обе этих проблемы.
Читайте также: Нет жесткого диска при установке Windows
Вариант 1: Не хватает места на диске
В такую ситуацию можно попасть при попытке установки ОС на диск, который до этого был разбит на разделы. Доступа к софту или системным утилитам мы не имеем, но нам на выручку придет инструмент, «вшитый» в установочный дистрибутив.
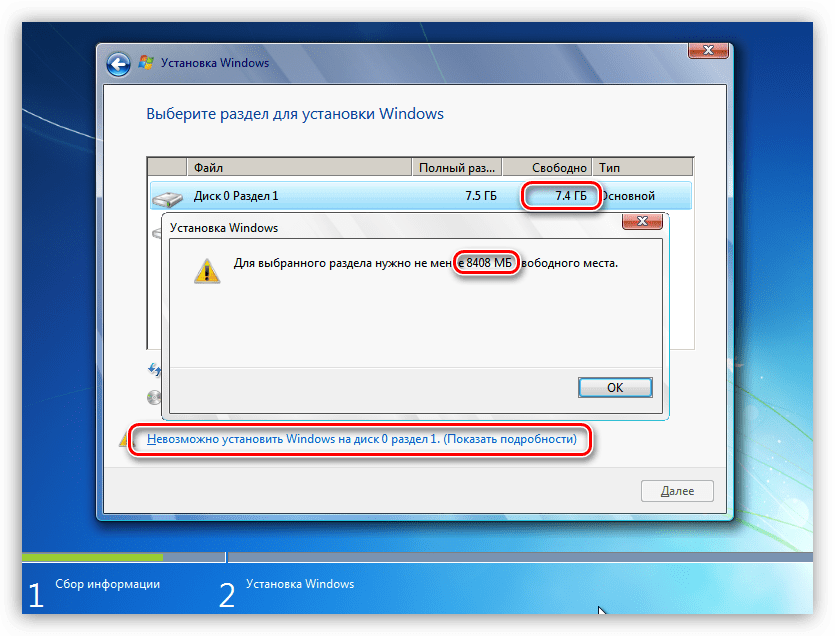
Нажимаем на ссылку и видим, что рекомендуемый объем немного больше имеющегося в разделе 1.
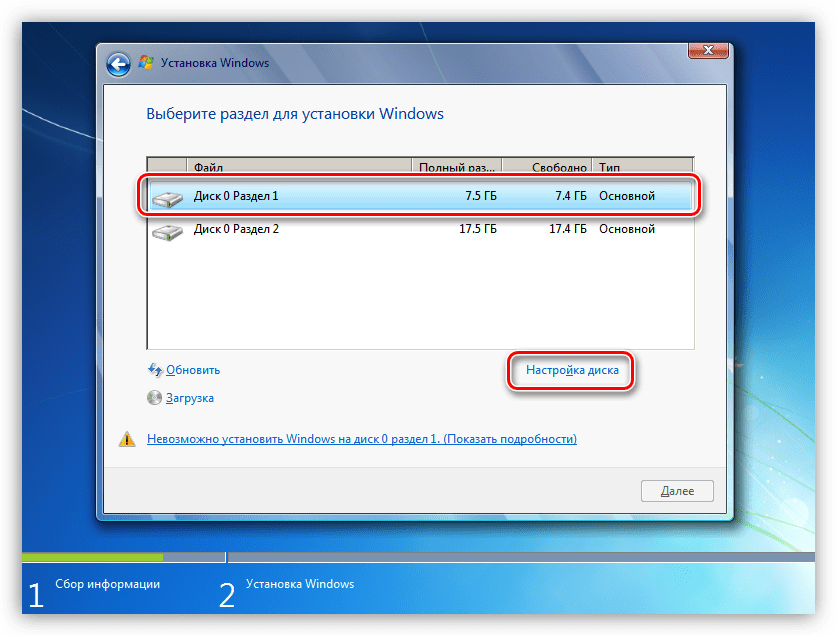
Можно, конечно, установить «винду» и в другой подходящий раздел, но в таком случае в начале диска останется пустое место. Мы пойдем другим путем – удалим все разделы, объединив пространство, а затем создадим свои тома. Имейте в виду, что все данные при этом будут удалены.
- Выбираем первый том в списке и открываем настройки диска.

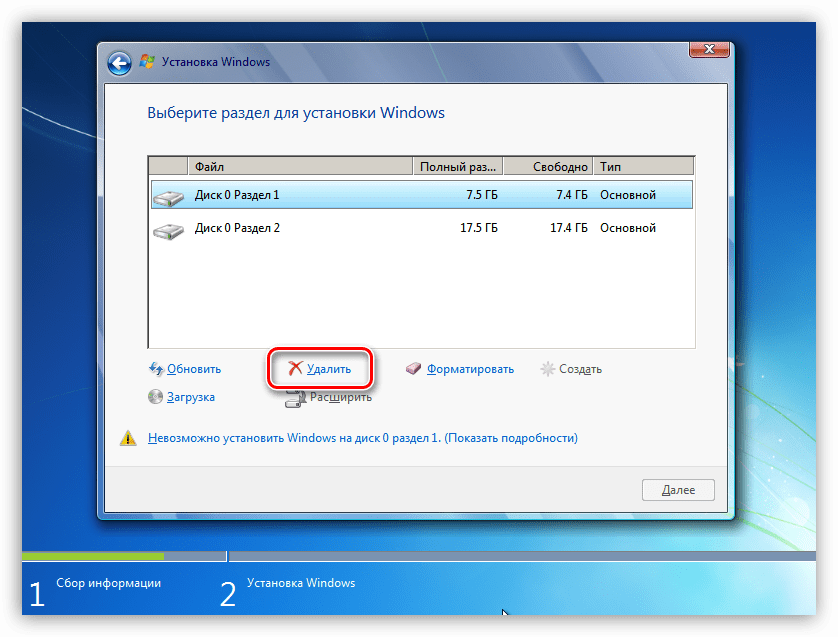
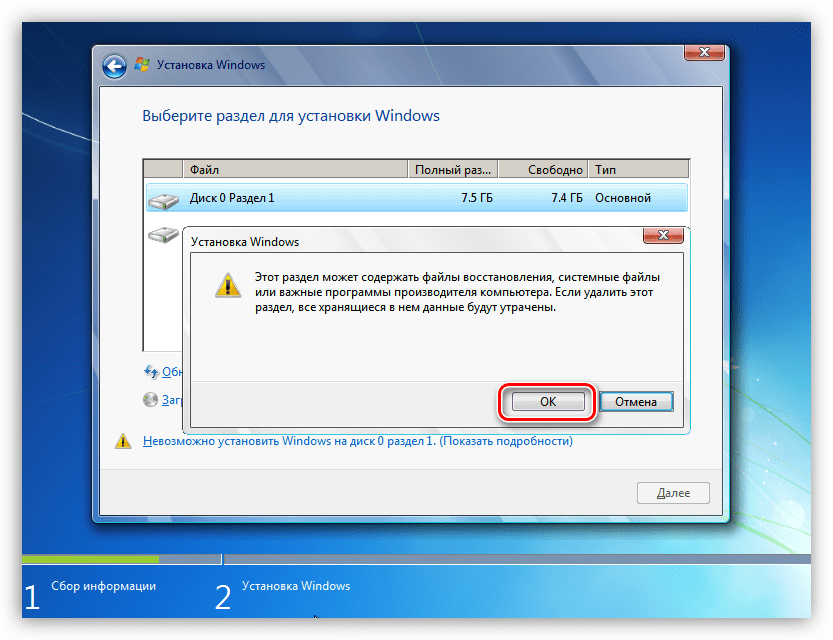
- Нажимаем «Удалить».

В диалоговом окне с предупреждением жмем ОК.

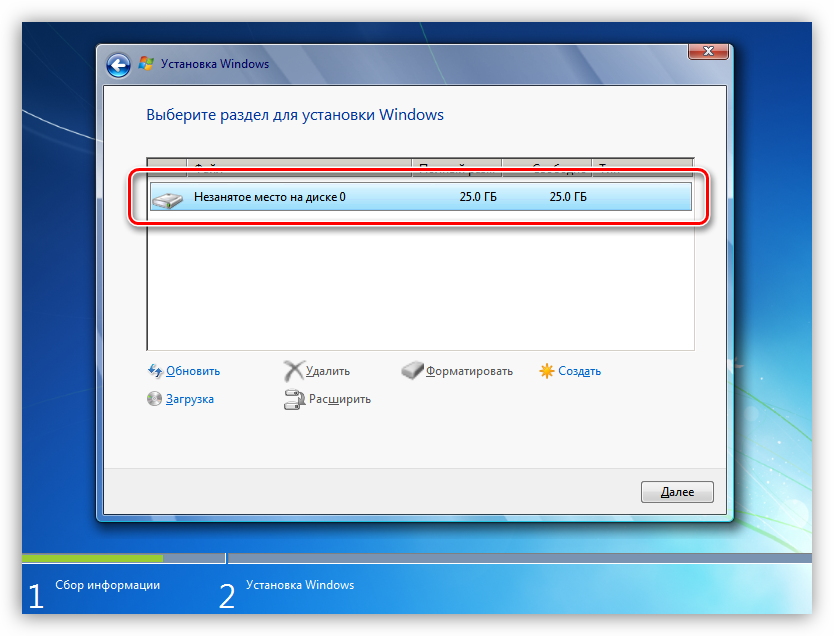
- Повторяем действия с остальными разделами, после чего получим одно большое пространство.

- Теперь переходим к созданию разделов.
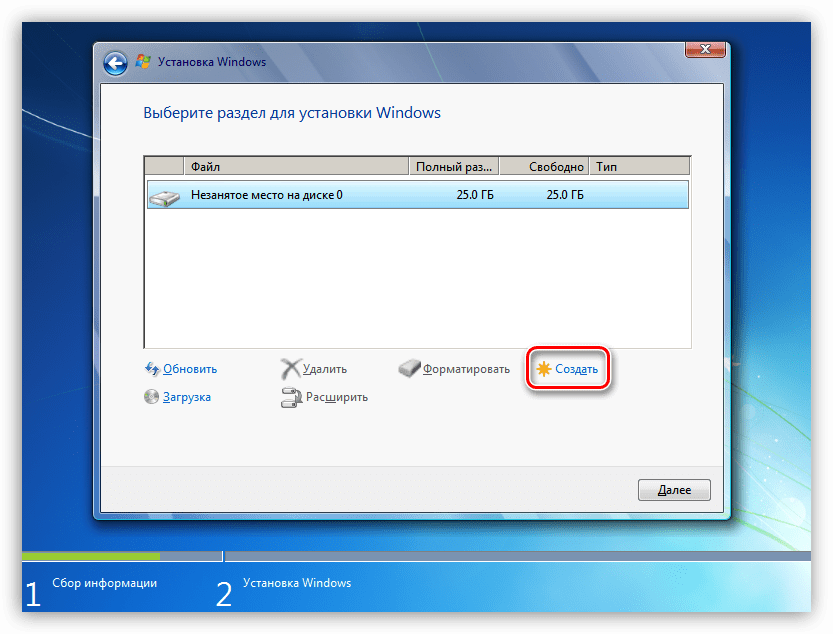
Если диск разбивать не требуется, то этот шаг можно пропустить и перейти непосредственно к установке «винды».
Нажимаем «Создать».

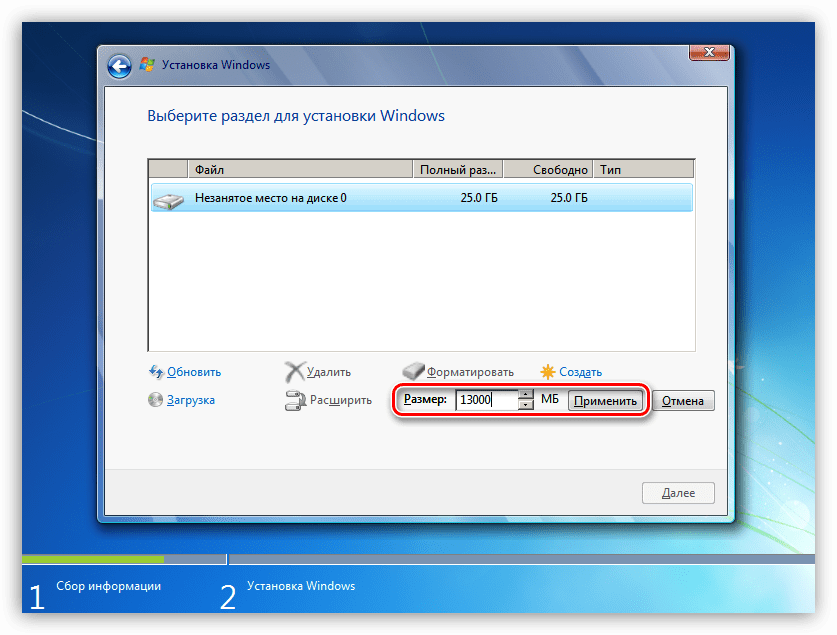
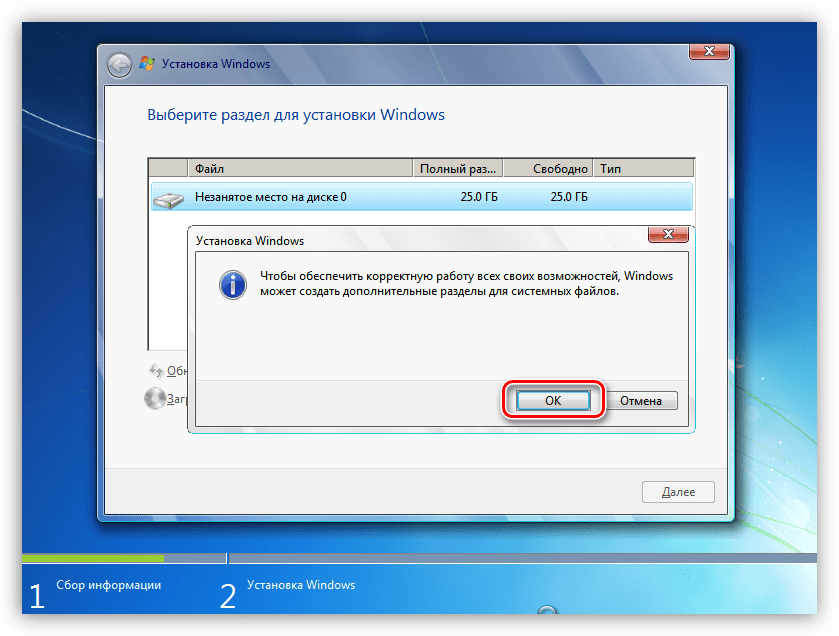
- Настраиваем необходимый объем тома и нажимаем «Применить».

Установщик сообщит нам, что может быть создан дополнительный системный раздел. Соглашаемся, нажав ОК.

- Теперь можно создать еще один или несколько разделов, а может, заняться этим позже, прибегнув к помощи специальных программ.
Подробнее: Программы для работы с разделами жесткого диска
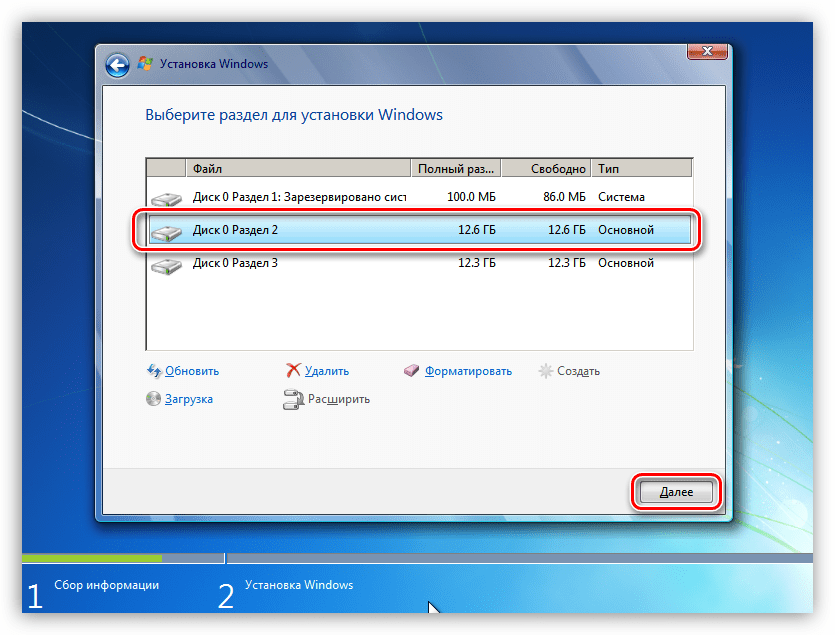
- Готово, в списке появился том нужного нам размера, можно устанавливать Windows.

Вариант 2: Таблица разделов
На сегодняшний день существует два вида таблиц – MBR и GPT. Одно из главных их отличий – наличие поддержки типа загрузки UEFI. В GPT такая возможность имеется, а в MBR нет. Есть несколько вариантов действий пользователя, при которых возникают ошибки установщика.
- Попытка установки 32-разрядной системы на GPT-диск.
- Инсталляция с флешки, содержащей дистрибутив с UEFI, на диск MBR.
- Установка из дистрибутива без поддержки UEFI на носитель GPT.
Что касается разрядности, то здесь все ясно: нужно найти диск с 64-битной версией Windows. Проблемы же с несовместимостью решаются либо конвертированием форматов, либо путем создания носителя с поддержкой того или иного типа загрузки.
Подробнее: Решение проблемы с GPT-дисками при установке Windows
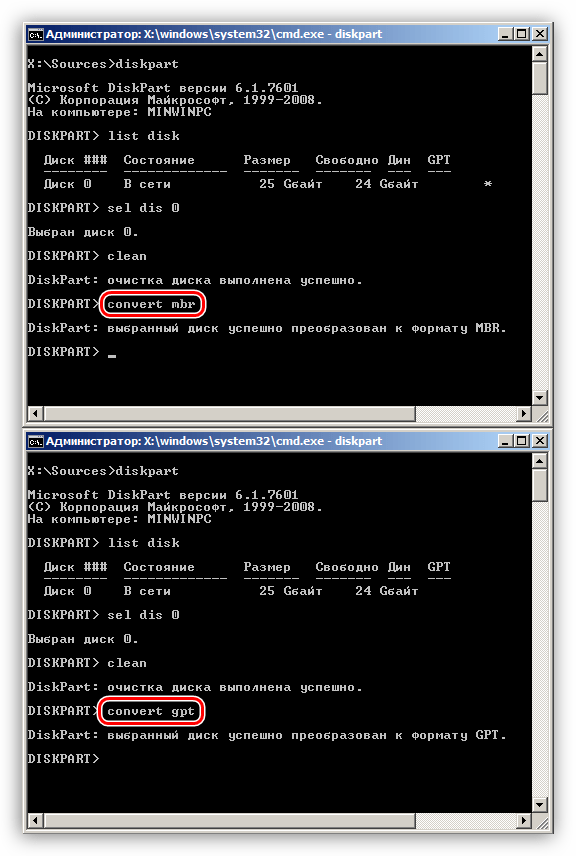
В статье, доступной по ссылке выше, описан только вариант с установкой системы без UEFI на диск GPT. При обратной ситуации, когда у нас установщик UEFI, а диск содержит таблицу MBR, все действия будут аналогичными, кроме одной консольной команды.
convert mbr
ее нужно заменить на
convert gpt
C настройками BIOS также все наоборот: для дисков с MBR нужно отключить UEFI и режим AHCI.

Заключение
Таким образом, мы разобрались в причинах проблем с дисками при установке Виндовс и нашли их решение. Для того чтобы избежать возникновения ошибок в дальнейшем, необходимо запомнить, что на диски GPT можно установить только 64-разрядную систему с поддержкой UEFI или создать такую же флешку. На MBR, в свою очередь, устанавливается все остальное, но только с носителя без UEFI.
Наша группа в TelegramПолезные советы и помощь
Updated on Apr 28, 2025
When you encounter this error — «Windows cannot be installed to disk 0 partition 1» on your computer, here are two ways to help you out:
①. Convert disk 0 to MBR or GPT; ②. Clean the target disk.
Follow the detailed tutorial steps to get Windows installed on your disk 0 partitions 1 with ease:
| Workable Solutions | Step-by-step Troubleshooting |
|---|---|
| Fix 1. Convert Disk 0 to MBR/GPT | Try to convert MBR disk to GPT disk with…Full steps |
| Fix 2. Clean Target Disk via DiskPart | Type diskpart > list disk > sel disk 0…Full steps |
The solutions are viable to fix the «Windows cannot be installed on this drive» error on Windows 10/8/7 and Windows XP/Vista, etc.
Warm Note: As Windows installation will cause partial data loss, make sure that you have backed up all valuable data on the target disk to another secure storage device in advance. For example, back the computer to a USB flash drive.
Causes for Windows Can’t Be Installed to Disk Error
When you come across with «Windows cannot be installed to Disk 0 Partition 1» or «Windows is unable to install to the selected location» error while installing Windows, don’t worry. Can I delete Partition 1? No, we wouldn’t recommend you do so. Partition 1 on Disk 0 is the reserved partition for the operating system, and you may not delete it as Windows may stop working and the OS information will be lost. Therefore, you can’t simply delete Partition 1 and expect to resolve this issue on your PC.

Here, we will analyze the two possible causes that prevent you from installing Windows on the target disk, and if you think it’s helpful, click the social buttons below to share it with other people in need.
1. The Target Disk Doesn’t Support BIOS or UEFI Boot Mode
«Windows cannot be installed to this disk 0 partition 1» error usually happens when the Boot Mode or Boot List Option in the Bios settings is set to UEFI (Unified Extensible Firmware Interface), and the hard drive is over 2 TB (terabytes) in size.
When it appears, you will not be able to install Windows on your computer successfully. To get rid of this error and continue with Windows installation, you will need to convert the target disk 0 to MBR to GPT first.
2. SAS Driver Issue or Corrupted MFT on the Target Disk
When the target hard drive contains SAS driver issue or corrupted Master File Table (MFT), Windows Partition Manager (partmgr.sys) will lose communication when changes are made on the partition.
If you attempt to install Windows Windows 10/8/7 using the internal SAS controller for the hard drives, you might get a «Windows cannot be installed to disk 0 partition 1» error message.
So how to remove this error, and install Windows computer on your selected disk 0 partitions 1 effectively? Try the following fixes in both Part 1 and Part 2.
Read Also: Windows 10 Won’t Install on SSD
Part 1. Fix «Windows Cannot Be Installed on Drive 0 Partition 1» Error
When the «Windows cannot be installed to disk 0 partition 1» error occurs, you can fix it using DiskPart or EaseUS partition software. You can follow either fix with the tutorial steps listed below to get rid of this error from your disk. Both two solutions are simple and easy.
However, as the DiskPart CMD command will result in data loss on the disk, so we recommend you try EaseUS partition software, a safer way, as your first choice.
EaseUS Partition Master allows you to fix the «Windows cannot be installed to disk 0 partition 1» error without losing data.
Method 1. Fix by Converting Disk to MBR or GPT using EaseUS Partition Master
Applies to: Get rid of «Windows cannot be installed to disk 0 partition 1» error by converting target disk to MBR or GPT on Windows 10/8.1/7/Vista/XP. No data loss.
#1. Converting Disk 0 (Target Disk) to GPT
Don’t worry if you received the error message as shown below:
«Windows cannot be installed to this disk. The selected disk has an MBR partition table. On EFI systems, Windows can only be installed to GPT disks.»
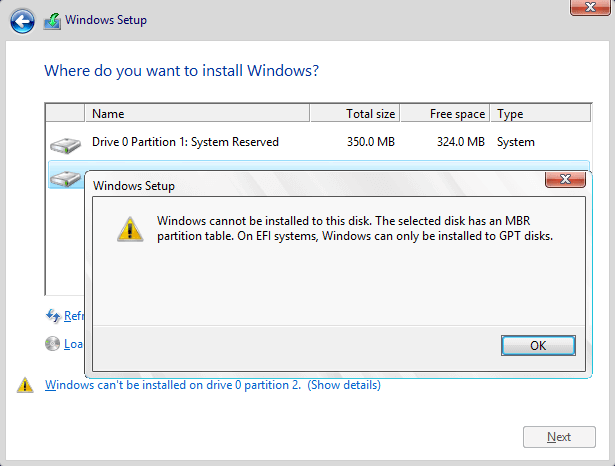
When your target disk 0 has more than 2TB capacity, you will also need to convert the target disk to GPT so to gain a smooth Windows installation process.
First, you need to discontinue the Windows installation process and reboot computer from your old OS disk.
Then, you can install EaseUS partition software and apply it to convert MBR disk to GPT disk so to fix «Windows cannot be installed to disk 0 partition 1» issue easily.
Tutorial: Steps to Convert Target Disk (0) to GPT:
Step 1. Download and launch EaseUS Partition Master on your computer.
Step 2. Go to Disk Converter, select «MBR => GPT» and click «Next» to continue.

Step 3. Select the target MBR disk that you tend to convert to GPT, and click «Convert» to start the conversion.

You May Also Like:
#2. Convert the Target Disk (0) to MBR
Relax when you receive the following error message while installing Windows on your selected disk:
«Windows cannot be installed to this disk. The selected disk is of the GPT partition style. Windows cannot be installed to this hard disk space. The partition is an EFI system partition (ESP).»
First, escape or discontinue the Windows installation process.
Next, you can easily fix «Windows cannot be installed to disk 0 partition 1» issue by using EaseUS Partition Master to convert GPT disk to MBR disk on your own.
Tutorial: Guide Steps to Convert Target Disk to MBR:
Step 1. Install and launch EaseUS Partition Master on your computer, go to the Disk Converter section.
Step 2. Select «Convert GPT to MBR» and click «Next» to continue.
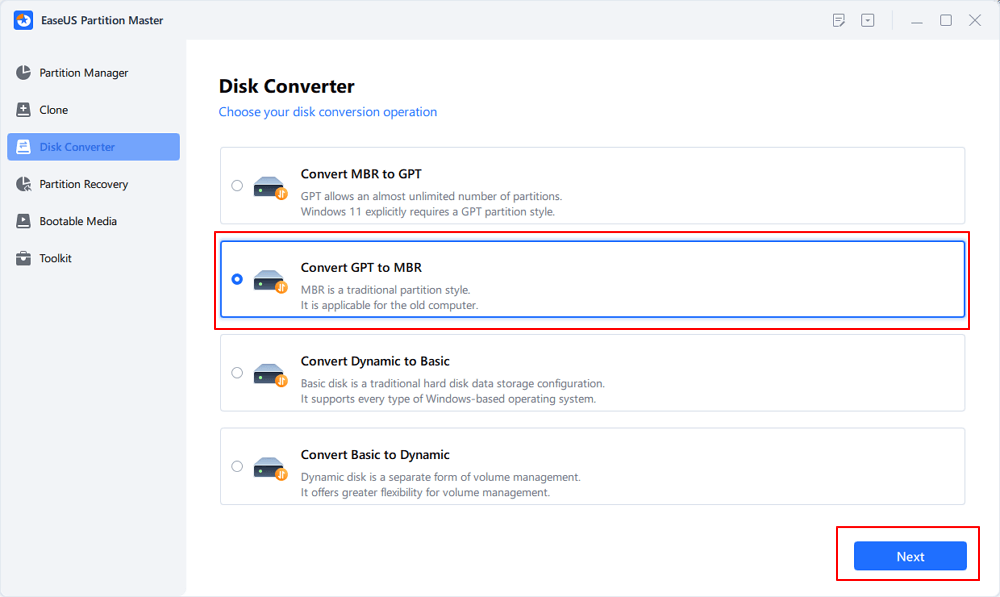
Step 3. Select the target GPT disk that you want to convert to MBR, and click «Convert» to start the conversion.

When the process completes, restart your computer if necessary. And you may jumpy to Part 2 to finish installing Windows to Disk 0 Partition 1.
🔥Read Also: Fix Total Identified Windows Installations 0
Method 2. Fix by Cleaning Target Disk Partitions via DiskPart Clean Command
Applies to: Get rid of SAS driver issue or fix corrupted MFT issue on target disk, empty disk partition to install Windows on the disk. This is a data destroy procedure.
When you receive «Windows can’t be installed on drive 0 partition 1» error on your computer, you can close the Windows set up windows. And follow the steps here to clean all existing partitions on the target disk using DiskPart clean command:
Step 1. Close the Windows Setup window.
Step 2. Press «Shift+F10» to bring up Command Prompt windows.
Step 3. Type the following command and hit Enter each time:
- diskpart
- list disk
- select disk 0 (0 represents the disk number of your target disk.)
- clean
Step 4. Type exit to close the DiskPart window.
When you finish the above steps, you may now continue with steps in Part 2, finishing the Windows installation process on your target disk.
Part 2. Install Windows after Fixing «Windows Cannot Be Installed to Disk» Error
Applies to: Complete Windows installation process after fixing or removing «Windows cannot be installed to disk 0 partition 1» error on Windows 10/8/7.
You can directly turn to Microsoft to start fresh with a clean installation of Windows. Here, we will take Windows 10 as an example to show you the complete process of Windows 10 installation with Windows Installation Media.
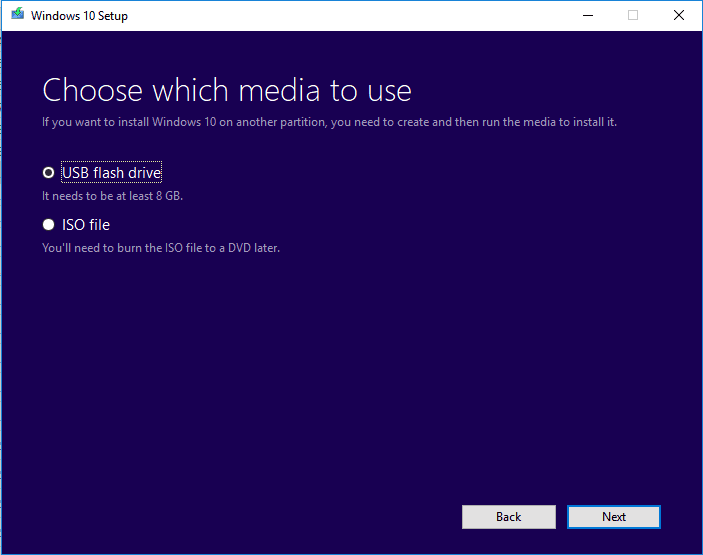
Step 1. Create a Windows Installation Media to an Empty USB flash drive, connect it to your PC.
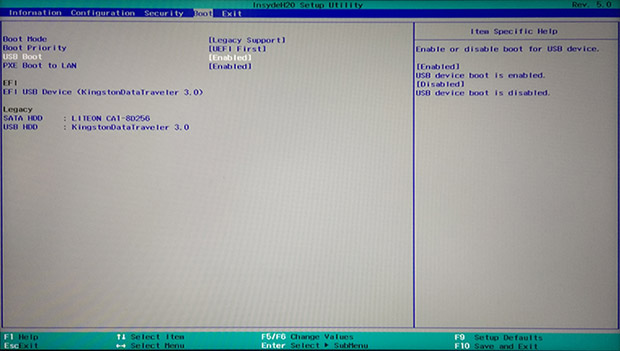
Step 2. Reboot PC and enter BIOS, setting PC to boot from the USB installation media.
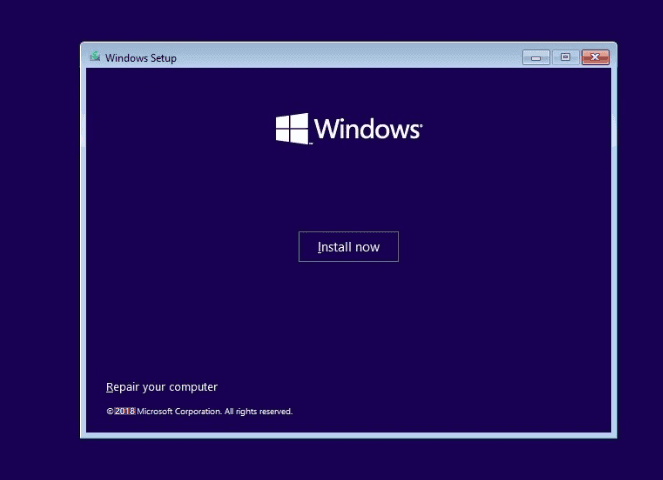
Step 3. Once PC boot from the installation media, click «Install Now» to set up preferences settings, such as languages, time, etc.
Step 4. Follow on-screen guidelines to install Windows, activate it if you have a key.
Step 5. Set up PC to boot from new disk (disk 0) after installing Windows in BIOS.
Save the changes and restart your PC. When your computer restarts, log in and activate your Windows with an activation key if you didn’t activate it during the installation.
Now, you can restore your backups back to your computer and enjoy life with a new Windows OS.
If you think the above-provided methods are way too complex to follow, and you prefer online assistance, refer to an EaseUS Windows configuration services here:
EaseUS experts are available to provide you with 1-on-1 manual services (24*7) and help fix different Windows configuration issues. Our experts will offer you FREE evaluation services and efficiently diagnose and resolve Windows update errors, Windows installation, or daily OS issues using their decades of experience.
- 1. Fix Windows update errors, such as update failure, unable to upgrade Windows, etc.
- 2. Serve to download and install the latest Windows operating system on PC with success.
- 3. Provide fixes for daily Windows system errors with drivers, permission, account settings, etc., issues.
Conclusion
On this page, we covered the reasons why you cannot install Windows to a selected disk partition and offered two practical solutions to help you fix the «Windows cannot be installed to disk 0 partition 1» error.
If your target disk is not disk 0 partition but you are having a similar issue, you can also apply the EaseUS Partition Master or DiskPart command to resolve this issue effectively.
Back up everything in advance for a no-data risk process while installing Windows.
Installing Windows is supposed to be straightforward, but errors like «Windows cannot be installed to Disk 0 Partition 1» can stop you in your tracks. If you’ve faced this error, you’re not alone—it’s a common issue, often caused by mismatched disk formats, BIOS settings, or partition types. The good news? You can fix it yourself without much hassle.
In this guide, I’ll walk you through the exact steps to resolve this issue and get Windows installed on your system. Whether you’re dealing with an old PC or a brand-new one, I’ll help you troubleshoot and solve this problem step by step.
Why Does This Error Happen?
This error usually appears during Windows installation because the selected partition doesn’t meet the system’s requirements. Here are the common causes:
-
Disk Format Issues: The disk may be formatted in MBR (Master Boot Record), but your system needs GPT (GUID Partition Table) or vice versa.
-
BIOS Mode Mismatch: Your BIOS might be set to Legacy mode but the partition format is GPT, or it’s in UEFI mode with an MBR disk.
-
Partition Type Problems: The partition may not be marked as active or suitable for installation.
-
Corruption: The disk or partition may have corrupted files.
Understanding these reasons makes it easier to choose the right fix.
Solution 1: Check and Convert Partition Format (MBR or GPT)
The most common reason for this error is a mismatch between the partition format and the BIOS mode.
Steps:
-
Check the Current Partition Format:
-
Boot into the Windows setup screen.
-
Press Shift + F10 to open the Command Prompt.
-
Type diskpart and press Enter.
-
Then type list disk and press Enter. You’ll see your disk with either an asterisk (*) under the GPT column or none.
-
-
Convert the Partition Format:
-
If the disk is in MBR and you’re using UEFI:
-
Type select disk 0 and press Enter.
-
Type clean (this deletes all data on the disk, so back up first).
-
Type convert gpt to change the format.
-
-
If the disk is in GPT and you’re using Legacy BIOS:
-
Repeat the above steps but type convert mbr instead.
-
-
-
Exit the Command Prompt and restart the installation.
Solution 2: Change BIOS Settings
Sometimes, the problem isn’t the disk but the BIOS configuration.
Steps:
-
Enter BIOS Settings:
-
Restart your PC and press the BIOS key (usually F2, Del, or Esc).
-
-
Change Boot Mode:
-
If your disk is GPT:
-
Set the boot mode to UEFI.
-
-
If your disk is MBR:
-
Change the boot mode to Legacy or CSM (Compatibility Support Module).
-
-
-
Save and Exit:
-
Press F10 to save changes and exit BIOS.
-
Restart the installation process.
-
This ensures your BIOS and disk format match, resolving the error.
Solution 3: Delete and Recreate the Partition
If converting the format or changing BIOS doesn’t work, deleting the problematic partition and recreating it might fix the issue.
Steps:
-
Start Windows Setup and go to the partition screen.
-
Select Disk 0 Partition 1 and click Delete.
-
This removes all data, so ensure you’ve backed up first.
-
-
Click New to create a fresh partition.
-
Follow the prompts to format it correctly.
Windows setup should now recognize the partition as suitable for installation.
Solution 4: Mark the Partition as Active
Sometimes, the partition isn’t marked as active, which can cause the error.
Steps:
-
Open Command Prompt during setup (Shift + F10).
-
Type diskpart and press Enter.
-
Type list disk and press Enter.
-
Select your disk by typing select disk 0.
-
Type list partition and press Enter.
-
Select the target partition by typing select partition 1.
-
Type active to mark it as the active partition.
Exit Command Prompt and restart the installation.
Solution 5: Fix Corrupted Disk or Partition
If the error persists, the disk or partition might be corrupted. Use the following steps to fix it.
Steps:
-
Open Command Prompt (Shift + F10).
-
Run a disk check:
-
Type chkdsk C: /f /r /x (replace C: with the affected drive letter).
-
-
Run the Diskpart tool:
-
Type diskpart, then follow the steps in Solution 1 to clean and recreate the partition.
-
This clears any corruption and creates a clean slate for installation.
Solution 6: Use a Third-Party Partition Tool
If the built-in tools don’t work or you prefer a graphical interface, third-party tools like EaseUS Partition Master or MiniTool Partition Wizard can help.
Steps:
-
Download the partition tool on another PC.
-
Create a bootable USB drive with the tool.
-
Boot your PC using the USB drive.
-
Use the tool to convert disk formats, delete partitions, or mark active partitions.
These tools often simplify the process and provide extra options.
Conclusion
The «Windows cannot be installed to Disk 0 Partition 1» error can seem overwhelming at first, but it’s usually easy to fix once you understand the root cause. Whether it’s converting disk formats, adjusting BIOS settings, or using advanced tools, there’s a solution for every scenario. By following the steps outlined in this guide, you’ll have Windows installed and running in no time. Remember, patience and careful attention to detail are key when dealing with installation errors.
FAQs
Why does Windows require GPT or MBR formats for installation?
Windows uses GPT for UEFI mode and MBR for Legacy BIOS. The mismatch happens when the BIOS mode and disk format don’t align, causing installation errors.
Will converting my disk to GPT or MBR erase data?
Yes, converting a disk removes all data on it. Always back up important files before performing this step.
How can I tell if my system uses UEFI or Legacy BIOS?
Enter your BIOS settings during boot. Look for terms like UEFI Boot or Legacy Boot. You can also check in Windows under System Information > BIOS Mode.
Can I fix this issue without deleting my data?
If the partition format matches the BIOS mode and there’s no corruption, marking the partition as active or changing boot mode might fix the issue without data loss.
What should I do if none of these solutions work?
If none of the steps resolve the issue, your disk might have a hardware fault. Run a disk diagnostic tool or consult a professional to check for physical damage.

Welcome everyone;
On this topic, I will show you how to fix this error “Windows Can’t be Installed on Drive 0 Partition 3” when trying to install windows 10 or windows 11 or another operating system.
When clicking on Show Details hyperlink, it says that “Windows Cannot be Installed to This Hard Disk Space. Followed by one of the following error causes:
- “The selected disk has an MBR partition table. On EFI systems, Windows can only be installed to GPT disks”
- “The selected disk is of the GPT partition style”.
- The partition was reserved by the computer’s Original Equipment Manufacturer (OEM)
- “Windows must be installed to a partition formatted as NTFS. Windows cannot be installed to this Hard Disk Space. The Partition is an EFI System Partition {ESP)”
- “BitLocker Drive Encryption is Enabled on the Selected Partition”
- “We couldn’t install Windows in the Location you Chose. Please check your Media Drive. Here’s more about what happened: 0x80300001”.
- “This computer’s hardware may not support booting to this disk. Ensure that the disk’s controller is enabled in the computer’s BIOS menu”
- “The partition contains one or more dynamic volumes that are not supported for installation.”
This topic will show you how to fix all of them one by one.
First Part: How to Fix “Windows Cannot be Installed to This Hard Disk Space ?
“Windows Cannot be Installed to This Hard Disk Space. “BitLocker Drive Encryption is Enabled on the Selected Partition”
This error can be fixed by either unlocking the encrypted partition keeping all data untouched, or by deleting the encrypted partition with removing everything on the deleted partition or disk.
Unlocking BitLocker-encrypted partition:
If you have the BitLocker Recovery Password, you can unlock your partition as followings:
- Press Shift + F12 keys from keyboard to open command prompt
- Type this command and press enter to show BitLocker status:
- MANAGE-BDE -STATUS
- Type the following command followed by the recovery password to unlock windows partition:
- MANAGE-BDE -UNLOCK E: -RP
- Replace E with the letter of locked partition in your computer
- Recovery Password is a unique 48-digits for each locked partition. It’s generated when enabling BitLocker Disk Encryption. BitLocker key can be retrieved from Microsoft account linked to the same computer or from a USB or any external drive based on wherever you or the administrator choose to save it. Refer this topic n for more details about retrieving BitLocker recovery key.
- After unlocking partition, disable BitLocker encryption using this command:
- MANAGE-BDE -PROTECTORS -DISABLE E:
- Close command prompt and then click on Refresh option on Setup Wizard Window.
- As you can see on the video, the error message disappeared after unlocking the selected partition. So, I can format or extend the selected partition, or even installing windows directly by clicking on Next button.
__________________________
Installing windows on a BitLocker-encrypted partition using Delete option:
If you are unable to get BitLocker Recovery password, you can delete the encrypted partition and then install windows. But this step will remove everything from deleted partition. To delete the BitLocker-encrypted partition, do the followings:
- Click on Delete option to remove encrypted partition and its data.
- Select the unallocated space and click on New to recreate the removed partition.
- Click on Next to start windows installation process.
Second Part: How to Fix MBR Issue: “The Selected Disk Has an MBR Partition Table. On EFI Systems, Windows Can Only be Installed to GPT Disks”?
If you are trying to install windows created in a GPT scheme while the disk on computer has an MBR scheme, you will see the following error message: “The selected disk has an MBR partition table. On EFI systems, Windows can only be installed to GPT disks”
That is because the Legacy is enabled in your BIOS settings, which accept only a Bootable USB that has an MBR disk scheme in order to install windows.
Also enabling UEFI mode in BIOS settings, will refuse windows installation from a USB created in an MBR disk scheme.
You can fix this problem by recreating a Bootable USB in MBR system, creating a hybrid USB for both GPT and MBR schemes, or by converting the internal disk to GPT system.
Creating Dual Bootable USB drive in Mobile:
To create a bootable USB that supports both MBR and GPT using your mobile, do the followings:
- Download windows 11 or Windows 10 ISO file to your mobile from official links in video description
- Install Ventoy app in your mobile and start it
- Connect a bootable USB to your mobile and allow Ventoy to access it
- Click Install button to convert the USB to bootable device and to copy the required files to the USB.
- Navigate to Copy tab and then press on + icon
- Navigate to mobile storage and load the ISO file of Windows that you have downloaded.
Creating an MBR disk scheme Using Rufus tool:
- To create a bootable USB in MBR system using Rufus tool, do the followings:
- Download Rufus tool from this link for free.
- Connect an empty USB flash drive to your computer
- Open Rufus tool and select the USB drive if not selected automatically or if there are more than one drive connected to your computer.
- Click on SELECT to load the downloaded ISO file of windows from computer
- Change Partition Scheme option to MBR and then click Start to start flashing process
- After that, boot from the USB to install windows without error message.
Note: Both Rufus and Ventoy tools are available for free, but all data on the USB will be deleted when using either tool.
Read this topic for more details about creating a bootable USB.
Converting MBR disk to GPT Without Losing Data:
- To convert your disk from MBR to GPT scheme, you have to confirm that your computer supports UEFI boot Mode, by opening BIOS settings or by searching google for your specific model.
- To open BIOS settings, do the followings:
- Power off your computer
- Power on the computer
- Immediately and repeatedly press F12 or another hot key to open BIOS settings menu.
- This is the list of hotkeys that can be used to open BIOS menu in different computers:
- Lenovo:
Desktop= F1, F2
Laptop & Notebook= F1, F2 or Nano Button - Hp:
Desktop & Generic= F10, Esc
Laptop & Notebook= F10 or Esc
Tower= F1 - Dell:
Desktop & Laptop= F2 - Asus:
Desktop= F9
Laptop & Notebook= F2 or Delete - Acer:
Desktop= F2
Laptop= F2 or Del - Samsung:
Notebook & Ultrabook= F2
Ultrabook Ative Book= F10 - Sony:
Laptop= Assist Button, F1, F2, F3 - Toshiba:
Laptop= F2
Protege, Satellite, Tecra= F1, Esc
Equium= F12 - Compaq= F10
- Fujitsu= F2
- Lenovo:
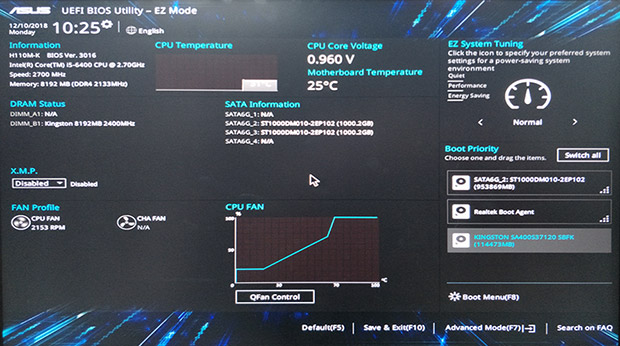
- Navigate to Advanced menu or to Boot menu and see if there is any option called Boot Mode or if there is any setting called UEFI mode.
- If the UEFI mode present in your BIOS, you can convert your disk to GPT without issue as followings:
- Press Shift + R keys to open CMD
- Type DISKPART and press Enter
- Type LIST DISK and press Enter
- In my case as you can see on the video, the size of the disks indicates that the disk number zero is the internal disk, and the disk number 1 is the USB drive.
- In addition, the USB has a GPT disk scheme as indicated by asterisk under the GPT column, while the internal disk has an MBR scheme.
- Select the internal disk using this command:
- SEL DISK 0
- Replace the 0 with the number of your disk if you have more than one disk. If you have more than one disk, select the disk you want to install windows on, according to its total size.
- SEL DISK 0
- Type LIST PART and press ENTER
- if you have more than three partitions on the selected disk, you have to delete one partition, because you can’t convert the disk to GPT if the disk has more than 3 partitions.
- But before deletion, take care of the followings:
- Copy your files to another partition as followings:
- Press Shift + R keys to open another CMD window
- Type NOTEPAD and press Enter
- From File tab, select Open option
- Click on This PC icon to show your partitions
- Copy the entire partition that you will delete or just copy the important files to external USB drive.
- The copy progress notification will not be shown, but unresponsiveness of mouse cursor is the indicator that the copy process is still on progress.
- Make sure not to delete Windows partition, Boot partition or Recovery partition.
- Deleting mentioned partitions will cause failure of disk conversion to GPT without formatting, and you will lose all data on the disk if decided to convert the disk using another method.
- So you have to identify which one is the Boot partition, which one is the Recovery Partition and which one is the Windows Partition using “DIR /A” command to show their contents.
- For example, to show contents of C partition, use this command: DIR /AC:\
- Usually:
- Boot folder indicates the Boot Partition
- Recovery folder indicates the Recovery Partition
- Windows folder, Programs & Files folder, and Users folder indicates Windows Partition.
- Usually:
- Copy your files to another partition as followings:
Open this link for more details in how to differentiate between all partitions.
- Select the partition that you will delete using SEL PART command followed by the partition number.
- In my case as you can see on the video, I deleted partition number four, using this command:
- SEL PART 4
- Type this command to delete the selected partition:
- DELETE PARTITION
- Execute LIST PART again to confirm that the partition was deleted.
- Type EXIT and press Enter to exit DISKPART
- Type BCDEDIT to determine the letter of windows partition
- In my case the D is the windows partition, so I will change CMD path to system32 folder using this command:
- CD /D D:\WINDOWS\SYSTEM32
- Now, execute this command to convert the disk from MBR to GPT without losing data:
- MBR2GPT /CONVERT
- Execute LIST DISK Command again to see if the disk converted to GPT or not:
- If the disk converted to GPT, you will see an asterisk next to the disk number 0 under GPT column.
- Now, back to BIOS settings and change Boot mode to UEFI and [(enable Secure Boot) if you are installing Windows 11].
- After that, boot from the USB to install windows without issue.
- In my case as you can see on the video, I deleted partition number four, using this command:
Third Part: How to Fix “The Selected Disk is of the GPT Partition Style” Without Losing Data?
As shown previously in the second part, you will fail to install windows in a GPT disk scheme if booting from a bootable USB with an MBR disk scheme.
- The simplest solution for this issue is by just recreating a Bootable USB in GPT system in another computer, or use your mobile to create a bootable USB that supports both GPT and MBR systems at the same time.
- Also you can fix this issue by converting the internal disk to MBR, but this conversion is strongly not recommended, because the GPT scheme has many advantages over MBR scheme in relation to boot speed, number of partitions per disk, size of each partition and many more features.
- Also and unlike conversion from MBR to GPT, converting disk from GPT to MBR will remove all data and files from all partitions on the converted disk.
- To convert your disk from GPT to MBR, do the followings:
- Press Shift + F10 to open CMD
- Type DISKPART and hit Enter
- Type LIST DISK and press Enter
- Select the disk you want to convert using SEL DISK command followed by the disk number
- In my case, I will select the disk number 0 using this command:
- SEL DISK 0
- Type CLEAN and press Enter to remove all partitions and everything from the selected disks
- Type this command to convert the disk to MBR
- CONVERT MBR
- Show the disks using LIST DISK command to confirm the disk conversion
- As you can see, the disk successfully converted to MBR system, and all partitions removed as indicated by unallocated space label on the disk.
- Open CMD again and execute DISKPART to create new partition
- Select the disk using SEL DISK command
- Create new partition using this command:
- CREATE PARTITION PRIMARY
- Type LIST VOL and press Enter
- Select the new volume using SEL VOL followed by the volume number:
- for example, if the new created volume has the number 3, so select it using this command:
- SEL VOL 3
- for example, if the new created volume has the number 3, so select it using this command:
- Format the selected volume in NTFS file system using this command:
- FORMAT FS=NTFS QUICK
Fourth Part: How to Fix “The Partition was Reserved by the Computer’s Original Equipment Manufacturer (OEM)”?
This error indicates that you are trying to install windows to a partition that is reserved to store recovery and other data of your computer. Usually, the size of this partition is smaller than the required size for windows to be installed. So try to select another partition with enough disk space, and keep OEM partition untouched.
Fifth Part: How to Fix “Windows Must be Installed to a Partition Formatted as NTFS”?
To fix this error you have to convert the file system of the disk to NTFS as followings:
- Press Shift + F10 keys to open Command prompt
- Type DISKPART and hit Enter
- Type LIST DISK and press Enter
- Select the disk using this command
- SEL DISK 0
- Show available volumes using this command:
- LIST VOL
- Determine the volume that you want to install windows on, according to its total size then select it using this command followed by the volume number:
- SEL VOL
- Format the selected partition in NTFS file system using this command:
- FORMAT FS=NTFS QUICK
- Close command prompt and back to Setup wizard
- Click Refresh option
- Select the partition again if not selected and then click on Next to start windows installation
Sixth Part: How to fix “Please Check your Media Drive. Here’s More About What Happened: 0x80300001”?
This error may appear after converting the disk to MBR or after formatting the Entire disk drive, as the temporary boot partition is removed from the formatted disk.
To fix this error, do the followings:
- Make sure you have created new primary partition after formatting the disk
- Close setup wizard menu and start installation again, so the boot partition will be recreated.
Seventh part: How to fix “The partition contains one or more dynamic volumes that are not supported for installation”?
This error can be fixed by converting the disk from dynamic to basic, but you have to make a backup copy for your files on the disk, as this conversion will remove everything on the disk.
To convert your disk to basic, do the followings:
- Press Shift + R keys to open CMD
- Type DISKPART and press Enter
- Type LIST DISK and press Enter
- The asterisk under Dynamic column indicates that the disk number zero is the dynamic one, so I selected it using this command:
- SEL DISK 0
- Execute this command to convert the disk to basic:
- CONVERT BASIC
- Execute LIST DISK again to confirm the conversion
- Close the CMD and click Refresh, so you can divide your disk or directly install windows by clicking Next
- As indicated by second part of the error message, the disk controller in BIOS settings is the most common source for this error.
Configure SATA in BIOS settings:
- If you are trying to install windows to New SSD drive or if you have updated your BIOS, you have to change SATA mode in BIOS settings as followings:
- Open BIOS settings as instructed previously
- In Lenovo and similar computers, navigate to Configuration tab to change Disk Controller mode
- Change SATA Controller Mode from Compatible to AHCI mode
- In some old HP and similar computers, the disk controller called SATA Device Mode, and can be accessed by clicking on Advanced tab and then open Device Configuration. Also the Compatible or IDE mode is called RAID Mode in such computers.
- In Dell computers, you can open the Advanced tab and then change Configure SATA as, from IDE to AHCI.
- If the mentioned options are unavailable in your computer, locate and disable any option related to the following words:
- Disk Controller
- AHCI
- IDE
- RAID
- Compatibility
- After that, navigate to Exit tab and select Exit Saving Changes option.
Reformat the disk Using Windows Integrated tool:
Another solution for this error is by formatting the disk and then recreate a primary partition as shown previously. Especially if the disk has been formatted or partitioned using a third-party app, especially when installing an older windows version such as windows 7, windows Vista or windows XP.
Disconnect the Second disk and then install windows to the Internal Disk:
In some Mac and similar models, this error may arise if you have another hard disk connected via optibay Caddy in place of DVD Drive. To fix this issue, just disconnect the OptiBay disk and install windows into the internal disk. After installing and booting windows, power off the computer and reconnect the disk.
For example, in some Mac models, this error may arise if there are more than one disk installed on your computer, especially if the second disk is connected via Optibay Caddy in place of DVD Drive. To fix this issue, just disconnect the Opti Bay disk and install windows into the internal disk. After installing and booting windows, power off the computer and reinstall the disk.
The most important cause or this issue is the SATA mode in BIOS settings. If you are trying to install an older version of windows such windows XP, you have to change SATA Controller Mode be set to IDE or compatible mode, but if you are trying to install windows 10 or windows 11, change it to AHCI.
Topics You May Like:
- How to Fix MBR2GPT Disk Layout Validation Failed for Disk 0/1
- How to fix The Selected Disk Has an MBR Partition Table
- How to Fix Can’t Delete Protected Partition Without the Force Protected Parameter Set
VIDEO:
For more details about how to fix Windows cannot be Installed on drive 1 Partition 2, watch this video:
Please follow and like us:
Updated on April 22, 2024
When encountering the error «Windows cannot be installed to disk 0 partition 1» on your computer, you can try these two solutions:
①. Convert disk 0 to MBR or GPT;
②. Clean the target disk.
Follow the step-by-step tutorial to easily install Windows on your Disk 0 Partition 1:
当然,我很乐意帮助你。请提供你想要翻译的语言内容。
| Workable Solutions | Step-by-step Troubleshooting |
|---|---|
| Fix 1. Convert Disk 0 to MBR/GPT | Try to convert the MBR disk to a GPT disk using…Full steps |
| Fix 2. Clean Target Disk via DiskPart | Enter ‘diskpart’, then ‘list disk’, followed by ‘sel disk 0’…Full steps |
These solutions are effective for resolving the «Windows cannot be installed on this drive» error on Windows 10/8/7, as well as Windows XP/Vista, etc.
Friendly Reminder: Since Windows installation may cause data loss, ensure that you have事先将目标磁盘上的所有重要数据备份到其他安全存储设备上。例如,将电脑备份到USB闪存驱动器。
Causes for «Windows Cannot Be Installed to This Disk» Error
When encountering the error «Windows cannot be installed to Disk 0 Partition 1» or «Windows is unable to install to the selected location» during Windows installation, don’t panic. Can I delete Partition 1? No, we wouldn’t advise you to do that. Partition 1 on Disk 0 is typically an operating system reserve partition, and deleting it might cause Windows to stop functioning, resulting in the loss of OS-related data. Consequently, simply deleting Partition 1 will not solve the problem on your computer.

Here, we will examine the two possible reasons that might prevent you from installing Windows on the target disk. If you find this information useful, please share it with others in need by clicking the social media buttons below.
Sorry, I need the text to translate. Please provide the content you want to be translated into English.
< strong >1. The Target Disk Doesn’t Support BIOS or UEFI Boot Mode
The «Windows cannot be installed to this disk 0 partition 1» error typically occurs when the Boot Mode or Boot List Option in the BIOS settings is set to UEFI (Unified Extensible Firmware Interface), and the hard drive exceeds 2 TB (terabytes) in size.
When it appears, you won’t be able to install Windows on your computer successfully. To eliminate this error and proceed with the Windows installation, you’ll need to convert the target disk 0 from MBR to GPT first.
2. SAS Driver Issue or Corrupted MFT on the Target Disk
When the target hard drive has issues with the SAS driver or a corrupted Master File Table (MFT), the Windows Partition Manager (partmgr.sys) will lose communication when alterations are made to the partition.
If you try to install Windows 10/8/7 using the internal SAS controller for the hard drives, you might encounter an error message stating «Windows cannot be installed to disk 0 partition 1.»
那么如何消除这个错误并有效地在所选的磁盘0分区1上安装Windows计算机呢?请尝试以下部分中的解决方案。
Also Read: Windows 10 Won’t Install on SSD
Part 1. Resolve the «Windows Cannot Be Installed on Drive 0 Partition 1» Error
When encountering the «Windows cannot be installed to disk 0 partition 1» error, you can resolve it using DiskPart or a third-party partition tool. Follow the tutorial steps provided below for either method to eliminate this error from your disk. Both solutions are straightforward and user-friendly.
However, since the DiskPart CMD command may cause data loss on the disk, we recommend trying partition software as a safer alternative first.
The tool Partition Master enables you to fix the «Windows cannot be installed to disk 0 partition 1» error without compromising your data.
Method 1: Resolve the issue by converting the disk to MBR or GPT using Partition Master tool.
Applies to: Resolving the «Windows cannot be installed to disk 0 partition 1» error by converting the target disk to MBR or GPT on Windows 10/8.1/7/Vista/XP without any data loss.
#1. Converting Disk 0 (Target Disk) to GPT
Translation:
#1. Converting Disk 0 (Target Disk) to GUID Partition Table (GPT)
If you receive the error message shown below, don’t worry:
«Windows cannot be installed on this disk. The selected disk has an MBR partition table. On EFI systems, Windows can only be installed on GPT disks.»

When your target disk 0 has a capacity of over 2TB, you’ll also need to convert the target disk to GPT in order to ensure a smooth Windows installation.
First, you need to stop the Windows installation process and restart your computer from your old OS disk.
Then, you can install a partition tool and use it to convert MBR disk to GPT disk so as to easily fix the «Windows cannot be installed to disk 0 partition 1» issue.
Tutorial: Steps to Convert Target Disk (0) to GPT:
1. Backup your data: Before making any changes to your disk, ensure that you have a complete backup of all important files and data on the target disk (0). This is crucial in case anything goes wrong during the conversion process.
2. Boot from a Windows Installation or Rescue Media: Insert a USB with a Windows installation media or a bootable rescue disk that supports disk partitioning tools. Restart your computer and enter the BIOS or UEFI settings to change the boot order, prioritizing the USB drive.
3. Access the Command Prompt: In the Windows Setup or rescue environment, choose the appropriate language and click «Next.» Then, click «Repair your computer» and select «Troubleshoot.» Choose «Advanced options» and then «Command Prompt.»
4. Identify your target disk: In the Command Prompt, type «diskpart» and press Enter. This will launch the Disk Partition utility. Next, type «list disk» and press Enter. This will display a list of available disks on your system. Identify the target disk (usually labeled as Disk 0).
5. Select the target disk: Type «select disk X,» replacing ‘X’ with the number of the target disk (e.g., «select disk 0») and press Enter.
6. Clean the disk: Type «clean» and press Enter. This command will erase all data from the selected disk, so make sure you’ve backed up your data beforehand.
7. Convert the disk to GPT: Type «convert gpt» and press Enter. This command will convert the disk’s partition style to GUID Partition Table (GPT).
8. Create partitions: If necessary, create partitions on the GPT disk using the following commands:
— «create partition primary»
— «assign» (to assign a drive letter)
— «format fs=ntfs quick» (to format the partition with NTFS file system)
9. Exit and reboot: Type «exit» twice to close the Command Prompt and return to the main menu. Remove the USB drive, and reboot your computer. The system should now recognize the disk as GPT formatted.
Remember, this process will erase all data on the target disk, so ensure you have a backup before proceeding.
Step 1. Download and launch tools Partition Master on your computer.
Step 2. Proceed to Disk Converter, choose «Convert MBR to GPT,» and click «Next» to proceed.

Step 3. Select the target MBR disk that you want to convert to GPT, and click «Convert» to start the conversion process.

You May Also Like:
#2. Convert the Target Disk (0) to MBR
When you encounter the following error message while installing Windows on your chosen disk, remain calm:
«Windows cannot be installed on this disk. The selected disk is of the GPT partition style. Windows cannot be installed to this hard disk space. The partition is an EFI system partition (ESP).»

First, exit or cancel the Windows installation process.
Next, you can easily fix «Windows cannot be installed to disk 0 partition 1» issue by using tools Partition Master to convert GPT disk to MBR disk on your own.
Tutorial: Steps to Convert Destination Disk to MBR:
Step 1. Install and launch tools Partition Master on your computer and go to the Disk Converter section.
Step 2. Choose «Convert GPT to MBR» and click «Next» to proceed.

Step 3. Select the target GPT disk that you wish to convert to MBR and click «Convert» to initiate the conversion process.

When the process is complete, restart your computer if needed. Then, you can proceed to Part 2 to finish installing Windows on Disk 0 Partition 1.
?Also read: Fix Total Identified Windows Installations 0
Method 2: Resolve the Issue by Cleaning Target Disk Partitions with the DiskPart Clean Command
Applies to: Resolving SAS driver issues or fixing corrupted MFT on the target disk, or clearing a disk partition for installing Windows. This process involves data deletion.
When encountering the error «Windows cannot be installed on Drive 0 Partition 1» on your computer, you can close the Windows setup window. Then, follow these steps to erase all existing partitions on the target disk using the DiskPart clean command:
Step 1. Close the Windows Setup window.
Step 2. Press «Shift+F10» to open the Command Prompt window.
Step 3. Type the following command and press Enter after each one:
- diskpart
- list disk
- select disk 0 (0 represents the disk number of your target disk.)
- clean
These are commands for the Diskpart utility in Windows, which is used for managing disks.
Step 4. Type exit to close the DiskPart window.
After completing the steps above, you can proceed with the steps in Part 2 to finish installing Windows on your target disk.
Part 2: Installing Windows After Resolving the «Windows Cannot Be Installed to This Disk» Error
Applies to: Proceed with the complete Windows installation process following the resolution of the «Windows cannot be installed to disk 0 partition 1» error on Windows 10/8/7.
You can directly contact Microsoft to start afresh with a clean installation of Windows. Here, we will use Windows 10 as an example to guide you through the entire process of installing Windows 10 using the Windows Installation Media.
Step 1. Create a Windows Installation Media on an empty USB flash drive and plug it into your PC.

Step 2. Restart your PC and enter BIOS, configuring your computer to boot from the USB installation media.

Step 3: Once your PC boots from the installation media, click «Install Now» to set up preference settings, such as language and time, etc.

Step 4: Follow the on-screen instructions to install Windows. If you have a product key, activate it during the process.

Step 5. Configure your PC to boot from the new disk (disk 0) after installing Windows in BIOS.

Save the changes and restart your PC. Upon restarting, log in and activate your Windows using an activation key, if you didn’t do so during the installation process.
Now, you can restore your backups back to your computer and enjoy life with a new Windows OS.
Conclusion
On this page, we have discussed the reasons behind the inability to install Windows on a chosen disk partition and presented two practical solutions to resolve the «Windows cannot be installed to Disk 0 Partition 1» error.
If your target disk is not Disk 0 Partition but you encounter a similar issue, you can also utilize the tools Partition Master or DiskPart command to effectively address this problem.
Backup all your data in advance to mitigate the risk of data loss during the Windows installation process.