
-
Windows Support Forums
-
Installation, Updates and Activation
You should upgrade or use an alternative browser.
Problem installing W11 Home… «Windows cannot read the <productkey> setting from the unattend answer file»
-
Thread starter
Thread starterPictobug
-
Start date
Start date
- Local time
- 9:07 PM
- Posts
- 3
- OS
- Windows 11 Home
-
-
#1
This is my first PC build so it’s a completely fresh install on a brand new SSD.
I previously had an issue where installing via the Windows Media download on Microsoft.com wasn’t giving me the option to install Windows 11 Home, it would only allow me to Install Windows 11 Pro (this was during installation on the «Select The Operating System You Want» page)
So, I used the Windows 11 Disc Image (ISO) and used RUFUS to create a USB. This solved my issue and gave the option to install Windows Home — all good!
But no, now, after selecting the correct OS, ticking the agreement box, selecting language, etc, I get the «Windows cannot read the <productkey> setting from the unattend answer file» message as soon as it begins installing.
I’ve looked everywhere but the majority of fixes involve Virtual Machines (??).
To help, I’ve included my PC Spec’s.
MSI MAG Z790 TOMAHAWK WI-FI
Intel i5-14600kf
32Gb DDR5 T-Force Delta 6400 RAM
Samsung 980Pro 1TB SSD
RTX 4070 Super GPU
If I had hair, I’d have pulled it all out by now, so any help would be VERY much appreciated.
My Computer
-
- OS
- Windows 11 Home
- Computer type
- PC/Desktop
- Manufacturer/Model
- Self Built
- CPU
- i5-14600KF
- Motherboard
- MSI MAG Z790 TOMAHAWK WI-FI
- Memory
- 32Gb T-Force Delta DDR5 6400
- Graphics Card(s)
- RTX 4070 12Gb
- Sound Card
- Motherboard
- Hard Drives
- Samsung 890Pro
SIW2
Well-known member
- Local time
- 9:07 PM
- Posts
- 2,318
- OS
- Win7,Win11
-
-
#2
you can make one using something like this and compare to the one rufus made
Windows Answer File Generator
www.windowsafg.com
My Computers
-
- OS
- Win7,Win11
- Computer type
- PC/Desktop
- CPU
- i5-8400
- Motherboard
- gigabyte b365m ds3h
- Memory
- 2x8gb 3200mhz
- Monitor(s) Displays
- benq gw2480
- PSU
- bequiet pure power 11 400CM
- Cooling
- cryorig m9i
-
- Operating System
- win7,win11
- Computer type
- PC/Desktop
- CPU
- pentium g5400
- Motherboard
- gigabyte b365m ds3h
- Memory
- 1x8gb 2400
- PSU
- xfx pro 450
-
-
#3
In the xml file, it should look similar to this
<ProductKey>W269N-WFGWX-YVC9B-4J6C9-T83GX</ProductKey>
Can you open the xml file and look? Right click on it in File Explorer…Open with…Notepad
Last edited:
My Computers
-
- OS
- Windows 11 Pro 24H2 26100.3915
- Computer type
- Laptop
- Manufacturer/Model
- Acer Swift SF114-34
- CPU
- Pentium Silver N6000 1.10GHz
- Memory
- 4GB
- Screen Resolution
- 1920 x 1080
- Hard Drives
- SSD 2TB
- Cooling
- fanless
- Internet Speed
- 150 Mbps
- Browser
- Brave
- Antivirus
- Webroot Secure Anywhere
- Other Info
- System 3
ASUS T100TA Transformer
Processor Intel Atom Z3740 @ 1.33GHz
Installed RAM 2.00 GB (1.89 GB usable)
System type 32-bit operating system, x64-based processorEdition Windows 10 Home
Version 22H2 build 19045.3570
-
- Operating System
- Windows 11 Pro 23H2 22631.2506
- Computer type
- Laptop
- Manufacturer/Model
- HP Mini 210-1090NR PC (bought in late 2009!)
- CPU
- Atom N450 1.66GHz
- Memory
- 2GB
- Browser
- Brave
- Antivirus
- Webroot
- Local time
- 11:07 PM
- Posts
- 5,732
- Location
-
Athens
- OS
- Windows 11 Pro 23H2 (build 22631.4249) test laptop, Windows 11 Pro v24H2 (build 26100.3915) main PC
-
-
#4
My Computers
-
- OS
- Windows 11 Pro 23H2 (build 22631.4249) test laptop, Windows 11 Pro v24H2 (build 26100.3915) main PC
- Computer type
- Laptop
- Manufacturer/Model
- Acer Extensa 5630EZ
- CPU
- Mobile DualCore Intel Core 2 Duo T7250, 2000 MHz
- Motherboard
- Acer Extensa 5630
- Memory
- 4GB
- Graphics Card(s)
- Mobile Intel(R) GMA 4500M (Mobile 4 series)
- Sound Card
- Realtek ALC268 @ Intel 82801IB ICH9 — High Definition Audio Controller
- Monitor(s) Displays
- 1
- Screen Resolution
- 1280×800
- Hard Drives
- Samsung SSD 850 EVO 250GB SATA Device (250 GB, SATA-III)
- Internet Speed
- VDSL 50 Mbps
- Browser
- MICROSOFT EDGE
- Antivirus
- WINDOWS DEFENDER
- Other Info
- Legacy MBR installation, no TPM, no Secure Boot, no WDDM 2.0 graphics drivers, no SSE4.2, cannot get more unsupported
 This is only my test laptop. I had installed Windows 11 here before upgrading my main PC. For my main PC I use everyday see my 2nd system specs.
-
- Operating System
- Windows 11 Pro v24H2 (build 26100.3915)
- Computer type
- PC/Desktop
- Manufacturer/Model
- Custom-built PC
- CPU
- Intel Core-i7 3770 3.40GHz s1155 (3rd generation)
- Motherboard
- Asus P8H61 s1155 ATX
- Memory
- 2x Kingston Hyper-X Blu 8GB DDR3-1600
- Graphics card(s)
- Gainward NE5105T018G1-1070F (nVidia GeForce GTX 1050Ti 4GB GDDR5)
- Sound Card
- Realtek HD audio (ALC887)
- Monitor(s) Displays
- Sony Bravia KDL-19L4000 19″ LCD TV via VGA
- Screen Resolution
- 1440×900 32-bit 60Hz
- Hard Drives
- WD Blue SA510 2.5 1000GB SSD as system disk, Western Digital Caviar Purple 4TB SATA III (WD40PURZ) as second
- PSU
- Thermaltake Litepower RGB 550W Full Wired
- Case
- SUPERCASE MIDI-TOWER
- Cooling
- Deepcool Gamma Archer CPU cooler, 1x 8cm fan at the back
- Mouse
- Sunnyline OptiEye PS/2
- Keyboard
- Mitsumi 101-key PS/2
- Internet Speed
- 100Mbps
- Browser
- Microsoft Edge, Mozilla Firefox
- Antivirus
- Microsoft Windows Defender
- Other Info
- Legacy BIOS (MBR) installation, no TPM, no Secure Boot, WDDM 3.0 graphics drivers, WEI score 7.4
 This is only my test laptop. I had installed Windows 11 here before upgrading my main PC. For my main PC I use everyday see my 2nd system specs.
- Local time
- 3:07 PM
- Posts
- 4,202
- Location
-
Texas, USA
- OS
- Win11 Pro 24H2
-
-
#5
1) What version of Windows are you installing? Be specific and include the source if you can. For example, «I am installing Windows 11 24H2 26100.560» or «I am installing Windows 23H2 using an ISO image downloaded using the Media Creation Tool».
2) Did you add an answer file of your own or is this simply media created using Rufus with nothing else added or modified?
My Computers
-
- OS
- Win11 Pro 24H2
- Computer type
- PC/Desktop
- Manufacturer/Model
- Self-built
- CPU
- Intel i7 11700K
- Motherboard
- ASUS Prime Z590-A MB
- Memory
- 64GB (Waiting for warranty replacement of another 64GB for 128GB total)
- Graphics Card(s)
- No GPU — Built-in Intel Graphics
- Sound Card
- Integrated
- Monitor(s) Displays
- HP Envy 32
- Screen Resolution
- 2560 x 1440
- Hard Drives
- 1 x 1TB NVMe SSD
1 x 2TB NVMe SSD
1 x 4TB NVMe SSD
3 x 512GB 2.5″ SSD
1 x 4TB 2.5″ SSD
5 x 8TB Seagate Barracuda HDD
- PSU
- Corsair HX850i
- Case
- Corsair iCUE RGB 5000X mid tower case
- Cooling
- Noctua NF-S12A chromax.black.swap case fans (Qty. 7) & Home Computer Specifications, Configuration, and Usage Notes General Specifications ASUS Prime Z590-A motherboard, serial number M1M0KC222467ARP Intel Core i7-11700K CPU (11th Gen Rocket Lake / LGA 1200 Socket) 128GB Crucial Ballistix RGB DDR4 3200 MHz DRAM (4 x 32GB) Corsair iCUE RGB 5000X mid tower case Noctua NH-D15 chromax.black CPU cooler Noctua NF-S12A chromax.black.swap case fans (Qty. 7) & Corsair LL-120 RGB Fans (Qty. 3)
- Keyboard
- Corsair K70 Max RGB Magnetic Keyboard
- Mouse
- Logitech MX Master 3
- Internet Speed
- 1Gb Up / 1 Gb Down
- Browser
- Edge
- Antivirus
- Windows Defender
- Other Info
- The five 8TB drives and three 512GB SSDs are part of a DrivePool using StableBit DrivePool software. The three SSDs are devoted purely to caching for the 8TB drives. All of the important data is stored in triplicate so that I can withstand simultaneous failure of 2 disks.
Networking: 2.5Gbps Ethernet and WiFi 6e
-
- Operating System
- Win11 Pro 23H2
- Computer type
- Laptop
- Manufacturer/Model
- Lenovo ThinkBook 13x Gen 2
- CPU
- Intel i7-1255U
- Memory
- 16 GB
- Graphics card(s)
- Intel Iris Xe Graphics
- Sound Card
- Realtek® ALC3306-CG codec
- Monitor(s) Displays
- 13.3-inch IPS Display
- Screen Resolution
- WQXGA (2560 x 1600)
- Hard Drives
- 2 TB 4 x 4 NVMe SSD
- PSU
- USB-C / Thunderbolt 4 Power / Charging
- Mouse
- Buttonless Glass Precision Touchpad
- Keyboard
- Backlit, spill resistant keyboard
- Internet Speed
- 1Gb Up / 1Gb Down
- Browser
- Edge
- Antivirus
- Windows Defender
- Other Info
- WiFi 6e / Bluetooth 5.1 / Facial Recognition / Fingerprint Sensor / ToF (Time of Flight) Human Presence Sensor
- Local time
- 10:07 PM
- Posts
- 4
- OS
- Windows 11
-
-
#6
1. I am installing Windows 11 23H2 version from Download Windows 11
2. I am using Rufus 4.5 version
3. Media created using Rufus — just ticked no TPM
4. Even copied unattend.xml file to the USB root directory
I am attaching the file.
My Computer
-
- OS
- Windows 11
- Computer type
- PC/Desktop
- Manufacturer/Model
- HP
- Local time
- 11:07 PM
- Posts
- 5,732
- Location
-
Athens
- OS
- Windows 11 Pro 23H2 (build 22631.4249) test laptop, Windows 11 Pro v24H2 (build 26100.3915) main PC
-
-
#7
oobe\bypassnro which will unhide the «I don’t have internet» option and restart the computer. Upon restart go though the initial configuration (Region, Language etc) and at the network screen click on «I don’t have internet». This will warn you that you will be missing some «features», ignore that and proceed with «limited functionality» to create a local account. Of course you are not missing anything, after login to the local account you can use a Microsoft account to use the extra features, but be careful not to convert your local account to Microsoft (use for this app only). For anything else ask us or consult the relevant threads.
My Computers
-
- OS
- Windows 11 Pro 23H2 (build 22631.4249) test laptop, Windows 11 Pro v24H2 (build 26100.3915) main PC
- Computer type
- Laptop
- Manufacturer/Model
- Acer Extensa 5630EZ
- CPU
- Mobile DualCore Intel Core 2 Duo T7250, 2000 MHz
- Motherboard
- Acer Extensa 5630
- Memory
- 4GB
- Graphics Card(s)
- Mobile Intel(R) GMA 4500M (Mobile 4 series)
- Sound Card
- Realtek ALC268 @ Intel 82801IB ICH9 — High Definition Audio Controller
- Monitor(s) Displays
- 1
- Screen Resolution
- 1280×800
- Hard Drives
- Samsung SSD 850 EVO 250GB SATA Device (250 GB, SATA-III)
- Internet Speed
- VDSL 50 Mbps
- Browser
- MICROSOFT EDGE
- Antivirus
- WINDOWS DEFENDER
- Other Info
- Legacy MBR installation, no TPM, no Secure Boot, no WDDM 2.0 graphics drivers, no SSE4.2, cannot get more unsupported This is only my test laptop. I had installed Windows 11 here before upgrading my main PC. For my main PC I use everyday see my 2nd system specs.
-
- Operating System
- Windows 11 Pro v24H2 (build 26100.3915)
- Computer type
- PC/Desktop
- Manufacturer/Model
- Custom-built PC
- CPU
- Intel Core-i7 3770 3.40GHz s1155 (3rd generation)
- Motherboard
- Asus P8H61 s1155 ATX
- Memory
- 2x Kingston Hyper-X Blu 8GB DDR3-1600
- Graphics card(s)
- Gainward NE5105T018G1-1070F (nVidia GeForce GTX 1050Ti 4GB GDDR5)
- Sound Card
- Realtek HD audio (ALC887)
- Monitor(s) Displays
- Sony Bravia KDL-19L4000 19″ LCD TV via VGA
- Screen Resolution
- 1440×900 32-bit 60Hz
- Hard Drives
- WD Blue SA510 2.5 1000GB SSD as system disk, Western Digital Caviar Purple 4TB SATA III (WD40PURZ) as second
- PSU
- Thermaltake Litepower RGB 550W Full Wired
- Case
- SUPERCASE MIDI-TOWER
- Cooling
- Deepcool Gamma Archer CPU cooler, 1x 8cm fan at the back
- Mouse
- Sunnyline OptiEye PS/2
- Keyboard
- Mitsumi 101-key PS/2
- Internet Speed
- 100Mbps
- Browser
- Microsoft Edge, Mozilla Firefox
- Antivirus
- Microsoft Windows Defender
- Other Info
- Legacy BIOS (MBR) installation, no TPM, no Secure Boot, WDDM 3.0 graphics drivers, WEI score 7.4
- Local time
- 10:07 PM
- Posts
- 4
- OS
- Windows 11
-
-
#8
My Computer
-
- OS
- Windows 11
- Computer type
- PC/Desktop
- Manufacturer/Model
- HP
- Local time
- 11:07 PM
- Posts
- 5,732
- Location
-
Athens
- OS
- Windows 11 Pro 23H2 (build 22631.4249) test laptop, Windows 11 Pro v24H2 (build 26100.3915) main PC
-
-
#9
Unattend.xml — it is/was one of the possibilities to install Win11 without TPM 2.0 on older equipment.
Make your life easier. Just use Rufus to create the USB flash drive. It will detect it is a Windows 11 ISO and on clicking to begin it will prompt you if you want to bypass compatibility checks. Just select all the options, if I remember correctly, latest versions include allowing you to create a local account.
My Computers
-
- OS
- Windows 11 Pro 23H2 (build 22631.4249) test laptop, Windows 11 Pro v24H2 (build 26100.3915) main PC
- Computer type
- Laptop
- Manufacturer/Model
- Acer Extensa 5630EZ
- CPU
- Mobile DualCore Intel Core 2 Duo T7250, 2000 MHz
- Motherboard
- Acer Extensa 5630
- Memory
- 4GB
- Graphics Card(s)
- Mobile Intel(R) GMA 4500M (Mobile 4 series)
- Sound Card
- Realtek ALC268 @ Intel 82801IB ICH9 — High Definition Audio Controller
- Monitor(s) Displays
- 1
- Screen Resolution
- 1280×800
- Hard Drives
- Samsung SSD 850 EVO 250GB SATA Device (250 GB, SATA-III)
- Internet Speed
- VDSL 50 Mbps
- Browser
- MICROSOFT EDGE
- Antivirus
- WINDOWS DEFENDER
- Other Info
- Legacy MBR installation, no TPM, no Secure Boot, no WDDM 2.0 graphics drivers, no SSE4.2, cannot get more unsupported This is only my test laptop. I had installed Windows 11 here before upgrading my main PC. For my main PC I use everyday see my 2nd system specs.
-
- Operating System
- Windows 11 Pro v24H2 (build 26100.3915)
- Computer type
- PC/Desktop
- Manufacturer/Model
- Custom-built PC
- CPU
- Intel Core-i7 3770 3.40GHz s1155 (3rd generation)
- Motherboard
- Asus P8H61 s1155 ATX
- Memory
- 2x Kingston Hyper-X Blu 8GB DDR3-1600
- Graphics card(s)
- Gainward NE5105T018G1-1070F (nVidia GeForce GTX 1050Ti 4GB GDDR5)
- Sound Card
- Realtek HD audio (ALC887)
- Monitor(s) Displays
- Sony Bravia KDL-19L4000 19″ LCD TV via VGA
- Screen Resolution
- 1440×900 32-bit 60Hz
- Hard Drives
- WD Blue SA510 2.5 1000GB SSD as system disk, Western Digital Caviar Purple 4TB SATA III (WD40PURZ) as second
- PSU
- Thermaltake Litepower RGB 550W Full Wired
- Case
- SUPERCASE MIDI-TOWER
- Cooling
- Deepcool Gamma Archer CPU cooler, 1x 8cm fan at the back
- Mouse
- Sunnyline OptiEye PS/2
- Keyboard
- Mitsumi 101-key PS/2
- Internet Speed
- 100Mbps
- Browser
- Microsoft Edge, Mozilla Firefox
- Antivirus
- Microsoft Windows Defender
- Other Info
- Legacy BIOS (MBR) installation, no TPM, no Secure Boot, WDDM 3.0 graphics drivers, WEI score 7.4
- Local time
- 10:07 PM
- Posts
- 4
- OS
- Windows 11
-
-
#10
My Computer
-
- OS
- Windows 11
- Computer type
- PC/Desktop
- Manufacturer/Model
- HP
-
-
#11
Scroll down to where it says «Download Windows 11 Disk Image x64» Select «multi-edition iso»
This multi-edition iso will give a list and let you select which version of Windows to install.
Then use Rufus again to create your install media making sure to select the option to disable all the compatibility checks.
My Computers
-
- OS
- Windows 11 Pro 24H2 26100.3775
- Computer type
- PC/Desktop
- Manufacturer/Model
- Dell Optiplex 7080
- CPU
- i9-10900 10 core 20 threads
- Motherboard
- DELL 0J37VM
- Memory
- 32 gb
- Graphics Card(s)
- none-Intel UHD Graphics 630
- Sound Card
- Integrated Realtek
- Monitor(s) Displays
- Benq 27
- Screen Resolution
- 2560×1440
- Hard Drives
- 1tb Solidigm m.2 nvme+256gb SKHynix m.2 nvme /External drives 512gb Samsung m.2 sata+1tb Kingston m2.nvme+ 4gb Solidigm nvme
- PSU
- 500w
- Case
- MT
- Cooling
- Dell Premium
- Keyboard
- Logitech wired
- Mouse
- Logitech wireless
- Internet Speed
- so slow I’m too embarrassed to tell
- Browser
- #1 Edge #2 Firefox
- Antivirus
- Defender+MWB Premium
-
- Operating System
- Windows 11 Pro 24H2 26100.3775
- Computer type
- PC/Desktop
- Manufacturer/Model
- Dell Optiplex 9020
- CPU
- i7-4770
- Motherboard
- stock Dell
- Memory
- 24 gb
- Graphics card(s)
- integrated
- Sound Card
- integrated
- Monitor(s) Displays
- Benq 27
- Screen Resolution
- 2560×1440
- Hard Drives
- 256 gb Toshiba BG4 M.2 NVE SSB and 1 tb hdd
- PSU
- 500w
- Case
- MT
- Cooling
- Dell factory
- Mouse
- Logitech wireless
- Keyboard
- Logitech wired
- Internet Speed
- still too embarrassed to tell
- Browser
- Firefox
- Antivirus
- Defender
-
-
#12
I have similiar problem on the older HP Desktop. When this message is displayed, when I click OK or close the window — installation is stopped.
1. I am installing Windows 11 23H2 version from Download Windows 11
2. I am using Rufus 4.5 version
3. Media created using Rufus — just ticked no TPM
4. Even copied unattend.xml file to the USB root directory
I am attaching the file.
Don’t do your step 4. Rufus will do it.
My Computers
-
- OS
- Windows 11 Pro 24H2 26100.3915
- Computer type
- Laptop
- Manufacturer/Model
- Acer Swift SF114-34
- CPU
- Pentium Silver N6000 1.10GHz
- Memory
- 4GB
- Screen Resolution
- 1920 x 1080
- Hard Drives
- SSD 2TB
- Cooling
- fanless
- Internet Speed
- 150 Mbps
- Browser
- Brave
- Antivirus
- Webroot Secure Anywhere
- Other Info
- System 3
ASUS T100TA Transformer
Processor Intel Atom Z3740 @ 1.33GHz
Installed RAM 2.00 GB (1.89 GB usable)
System type 32-bit operating system, x64-based processorEdition Windows 10 Home
Version 22H2 build 19045.3570
-
- Operating System
- Windows 11 Pro 23H2 22631.2506
- Computer type
- Laptop
- Manufacturer/Model
- HP Mini 210-1090NR PC (bought in late 2009!)
- CPU
- Atom N450 1.66GHz
- Memory
- 2GB
- Browser
- Brave
- Antivirus
- Webroot
- Local time
- 3:07 PM
- Posts
- 4,202
- Location
-
Texas, USA
- OS
- Win11 Pro 24H2
-
-
#13
I am willing to take the time to create a customized answer file for you and provide step-by-step directions for creating bootable media, if you so wish. But I will only take the time to do this if you are really interested, so do let me know.
NOTE: I have noticed that 24H2 has a new requirement for creating bootable media on 2 partitions. If you use a single FAT32 or NTFS partition on your installation media (or you use an ISO image), then no change is needed. If you create your installation media using 2 partitions (a small FAT32 partition and a larger NTFS partition) then the method used for previous versions of Windows will no longer work. You need to make a small change to allow 24H2 to install from such media. Took me a little while to figure this out, but I have this working with 100% reliability now.
If you want to proceed, please answer these questions:
1) What edition of Windows do you want to install (Home, Pro, etc.)?
2) What do you want the unattended answer file to do? Do you want it to bypass the Windows 11 requirements such as TPM, CPU requirements, etc. only? Do you also want it to create a local user account for you?
3) Do you want it to do anything else (supply the time zone, language settings, etc.) to make a truly unattended Windows installation or do you not want that?
4) If you DO want the answer file to create a local user account, what username would you like to use? I need both the abbreviated and full name that you want to use. For example, I often use «WinUser» with a full name of «Windows User» for generic installation. Otherwise I use «hanness» and «Hannes Sehestedt». Note that the full name is optional and can be omitted. Also, do you want a default password? I usually set my answer files to create a password of «Password1» and then I change it after setup. A blank password (no password) is also acceptable.
My Computers
-
- OS
- Win11 Pro 24H2
- Computer type
- PC/Desktop
- Manufacturer/Model
- Self-built
- CPU
- Intel i7 11700K
- Motherboard
- ASUS Prime Z590-A MB
- Memory
- 64GB (Waiting for warranty replacement of another 64GB for 128GB total)
- Graphics Card(s)
- No GPU — Built-in Intel Graphics
- Sound Card
- Integrated
- Monitor(s) Displays
- HP Envy 32
- Screen Resolution
- 2560 x 1440
- Hard Drives
- 1 x 1TB NVMe SSD
1 x 2TB NVMe SSD
1 x 4TB NVMe SSD
3 x 512GB 2.5″ SSD
1 x 4TB 2.5″ SSD
5 x 8TB Seagate Barracuda HDD
- PSU
- Corsair HX850i
- Case
- Corsair iCUE RGB 5000X mid tower case
- Cooling
- Noctua NF-S12A chromax.black.swap case fans (Qty. 7) & Home Computer Specifications, Configuration, and Usage Notes General Specifications ASUS Prime Z590-A motherboard, serial number M1M0KC222467ARP Intel Core i7-11700K CPU (11th Gen Rocket Lake / LGA 1200 Socket) 128GB Crucial Ballistix RGB DDR4 3200 MHz DRAM (4 x 32GB) Corsair iCUE RGB 5000X mid tower case Noctua NH-D15 chromax.black CPU cooler Noctua NF-S12A chromax.black.swap case fans (Qty. 7) & Corsair LL-120 RGB Fans (Qty. 3)
- Keyboard
- Corsair K70 Max RGB Magnetic Keyboard
- Mouse
- Logitech MX Master 3
- Internet Speed
- 1Gb Up / 1 Gb Down
- Browser
- Edge
- Antivirus
- Windows Defender
- Other Info
- The five 8TB drives and three 512GB SSDs are part of a DrivePool using StableBit DrivePool software. The three SSDs are devoted purely to caching for the 8TB drives. All of the important data is stored in triplicate so that I can withstand simultaneous failure of 2 disks.
Networking: 2.5Gbps Ethernet and WiFi 6e
-
- Operating System
- Win11 Pro 23H2
- Computer type
- Laptop
- Manufacturer/Model
- Lenovo ThinkBook 13x Gen 2
- CPU
- Intel i7-1255U
- Memory
- 16 GB
- Graphics card(s)
- Intel Iris Xe Graphics
- Sound Card
- Realtek® ALC3306-CG codec
- Monitor(s) Displays
- 13.3-inch IPS Display
- Screen Resolution
- WQXGA (2560 x 1600)
- Hard Drives
- 2 TB 4 x 4 NVMe SSD
- PSU
- USB-C / Thunderbolt 4 Power / Charging
- Mouse
- Buttonless Glass Precision Touchpad
- Keyboard
- Backlit, spill resistant keyboard
- Internet Speed
- 1Gb Up / 1Gb Down
- Browser
- Edge
- Antivirus
- Windows Defender
- Other Info
- WiFi 6e / Bluetooth 5.1 / Facial Recognition / Fingerprint Sensor / ToF (Time of Flight) Human Presence Sensor
- Local time
- 10:07 PM
- Posts
- 4
- OS
- Windows 11
-
-
#14
I suspect either an issue with the iso file itself, your flash drive, OR with maybe a glitch with Rufus (Rare but not impossible. Rufus is very dependable). I would start over. Download your iso here:Scroll down to where it says «Download Windows 11 Disk Image x64» Select «multi-edition iso»
This multi-edition iso will give a list and let you select which version of Windows to install.Then use Rufus again to create your install media making sure to select the option to disable all the compatibility checks.
You found a solution! All my attempts 6 or 7 were made with flash drives from the same manufacturer. At the end I tried to change to different and… success! Thank you for your help.
My Computer
-
- OS
- Windows 11
- Computer type
- PC/Desktop
- Manufacturer/Model
- HP
-
-
#15
My Computers
-
- OS
- Windows 11 Pro 24H2 26100.3775
- Computer type
- PC/Desktop
- Manufacturer/Model
- Dell Optiplex 7080
- CPU
- i9-10900 10 core 20 threads
- Motherboard
- DELL 0J37VM
- Memory
- 32 gb
- Graphics Card(s)
- none-Intel UHD Graphics 630
- Sound Card
- Integrated Realtek
- Monitor(s) Displays
- Benq 27
- Screen Resolution
- 2560×1440
- Hard Drives
- 1tb Solidigm m.2 nvme+256gb SKHynix m.2 nvme /External drives 512gb Samsung m.2 sata+1tb Kingston m2.nvme+ 4gb Solidigm nvme
- PSU
- 500w
- Case
- MT
- Cooling
- Dell Premium
- Keyboard
- Logitech wired
- Mouse
- Logitech wireless
- Internet Speed
- so slow I’m too embarrassed to tell
- Browser
- #1 Edge #2 Firefox
- Antivirus
- Defender+MWB Premium
-
- Operating System
- Windows 11 Pro 24H2 26100.3775
- Computer type
- PC/Desktop
- Manufacturer/Model
- Dell Optiplex 9020
- CPU
- i7-4770
- Motherboard
- stock Dell
- Memory
- 24 gb
- Graphics card(s)
- integrated
- Sound Card
- integrated
- Monitor(s) Displays
- Benq 27
- Screen Resolution
- 2560×1440
- Hard Drives
- 256 gb Toshiba BG4 M.2 NVE SSB and 1 tb hdd
- PSU
- 500w
- Case
- MT
- Cooling
- Dell factory
- Mouse
- Logitech wireless
- Keyboard
- Logitech wired
- Internet Speed
- still too embarrassed to tell
- Browser
- Firefox
- Antivirus
- Defender
Similar threads
-
Windows Support Forums
-
Installation, Updates and Activation
Table of Contents
Cannot Read the ProductKey From the Unattend Answer File in VirtualBox
In some cases, you got the following error when trying to install a Windows VM in VirtualBox with unattended installation. The error during Windows setup appears to be caused by malformed unattended XML configuration file.
To fix the issue, you can follow the steps below:
1. Turn off the virtual machine.
2. Open the Oracle VM Virtual Manager → Right-click on the VM in the VM list, then select Show in Explorer to open the installation location of the virtual machine.
3. Inside that directory, you will find the unattended XML Source File. Please open it using your preferred text editor. The file is named ad Unattended-xxxxx.xml.
4. Scroll down to find the <ProductKey> tag. It looks strange with this empty line after <ProductKey>.
...
            <UserData>
                <ProductKey>

                    <WillShowUI>OnError</WillShowUI>
                </ProductKey>
                <AcceptEula>true</AcceptEula>
            </UserData>
...
5. We need to insert the <Key> tag as follows. You can also input your product key inside the <Key> tag if you have one. Leaving it empty will install Windows without the product key.
...
            <UserData>
                <ProductKey>
                    <Key></Key>
                    <WillShowUI>OnError</WillShowUI>
                </ProductKey>
                <AcceptEula>true</AcceptEula>
            </UserData>
...
The final XML Source File should be formatted as shown in the screenshot. Then, close and save the file.
Start the virtual machine again, and the error should be gone. The unattended installation should be started to auto-install the guest without any user interaction.
KB ID 0000511
Problem
Note: This is applicable to running the Windows 8 Developer Preview in VMware Workstation.
When you attempt to power on the machine you see the following error:
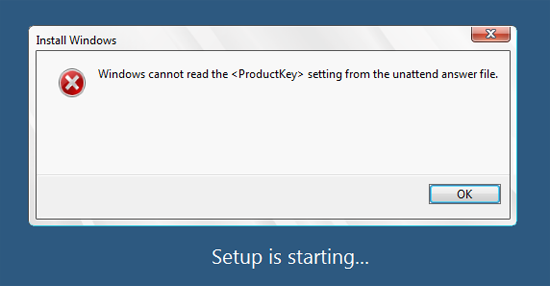
Install Windows
Windows cannot read the <ProductKey> setting from the unattend answer file.
Solution
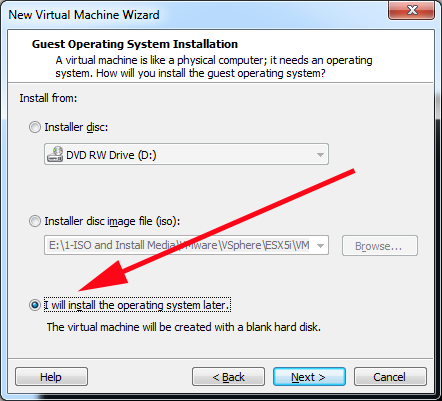
1. Delete your broken virtual machine and create a new one, but this time select “I will install the operating system later”
Note: Just select Windows 7 x64 for the OS type.
2. Now that the machine has been created > Go to it’s settings > and point the CD drive to the iso/DVD with the Windows 8 install files on it.
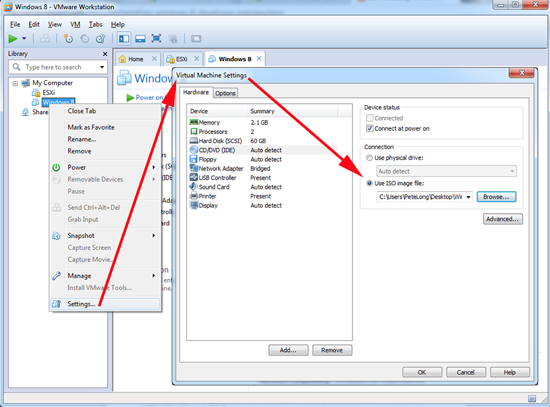
3. Now things should look a bit healthier when you try and install.

Related Articles, References, Credits, or External Links
Dual Booting Windows 8 with Windows 7
Got this «Windows cannot read the <ProductKey> setting from the unattended answer file.» when installing Microsoft Windows 10 Pro 32-bit/64-bit English USB on a freshly built Intel/ASRock computer. I have the printed product key but am never given a chance to enter it.
Just built the computer. Starts at BIOS as expected.
Just took the Windows 10 USB out of the shrink wrapped package purchased last week at Micro Center. Booted the new hardware on the Windows !0 USB. The computer boots on the Microsoft USB stick and displays the Windows 10 logo with the expected rotating dots. But then the «Windows cannot read the <ProductKey> setting from the unattended answer file.» error appears.
The same Microsoft supplied USB stick offers a «Windows Memory Diagnostic Tool» which works as expected.
Tried different USB ports anyway and got the same result.
Any ideas about what the next step should be? M$ isn’t particularly forthcoming about things like this.
Win
Download Windows Speedup Tool to fix errors and make PC run faster
When trying to install Windows on a VirtualBox Virtual Machine we encountered an error that says that the VirtualBox cannot read the product key. Due to this, the installation process fails to go beyond the ‘Setup is starting’ process. In this post, we are going to talk about this issue and see what you can do to resolve it.
Windows cannot read the <ProductKey> setting from the unattended answer file.

If the VirtualBox cannot read the product key, follow the solutions mentioned below.
- Delete the unattended configuration file
- Make changes to the VM’s configuration
- Download a new ISO file and create a new VM
- Make sure that the Windows native hypervisor is off
Let us talk about them in detail.
1] Delete the unattended configuration file

First, we will delete the configuration file related to your virtual machine, as it is possible that the files are corrupted or misconfigured. Do keep in mind that this will not delete your personal files, just the files containing the VM’s configuration information. To do so, follow the steps mentioned below.
- First of all, power off the virtual machine by right-clicking on the machine and selecting Stop.
- Now, again right-click on the machine and select Settings.
- Switch to Expert mode.
- Go to the Advanced tab, and copy the location of the Snapshot Folder.
- Open File Explorer and paste the location in the address bar.
- Now, delete all the unattended configuration files.
- Go to System > Motherboard, select Floppy from the Boot Order, and then untick it.
- Finally, click on Ok.
Once done, start the virtual machine and see if you are able to go beyond the setup screen. If you again receive the error message, delete the unattended files as mentioned earlier one more time, and then go to the next solution.
2] Make changes to the VM’s configuration
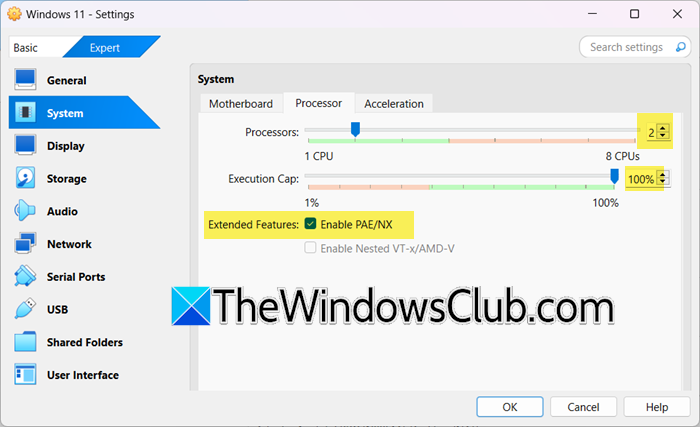
You may encounter this issue if the virtual machine’s configuration is improper. So, we need to make some changes to your VM’s settings and see if the issue is resolved. In order to do so, follow the steps mentioned below.
- In VirtualBox, right-click on the VM, and click on Settings.
- Now, go to System > Processor and make sure that the CPU is at least 2 and the Execution cap is 100%. Also, make sure that the Enable PAE/NX is checked.
- Go to Display > Screen, check if Enable 3D Acceleration is enabled, and increase Video Memory to 256.
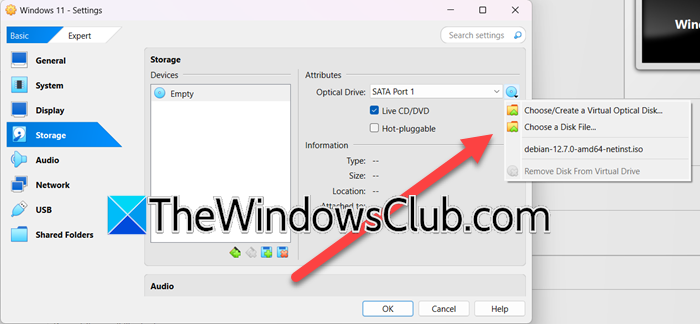
- Click on Storage, from the Storage device, select the Unattended storage device, and then click on the Remove button. And then from the Attributes section placed on the right section, tick Live CD/DVD.
After saving all the changes we asked you to make earlier, then, check if the issue is resolved.
3] Download a new ISO file and create a new VM
You may encounter this issue if the ISO file that you are using is corrupted. So, in order to resolve it, we recommend you delete the file that you are using and then download a fresh copy from the official Microsoft website. Once you have downloaded the ISO file, follow the steps mentioned below to create the virtual machine.
- In VirtualBox, click on New, and then start creating the machine normally.
- When you reach the screen where you are required to select the ISO file, do not select it, and move forward.
- After creating the machine, right-click on it, and click on Settings.
- Go to Storage > Attributes, and then click on the Disk icon.
- Now, select Choose a disk file, navigate to the location where you have kept the new ISO file, and then add it.
- Finally, start the virtual machine and try installing the operating system.
Hopefully, you will be able to install the disk without any issues.
4] Make sure that the Windows native Hypervisor is off
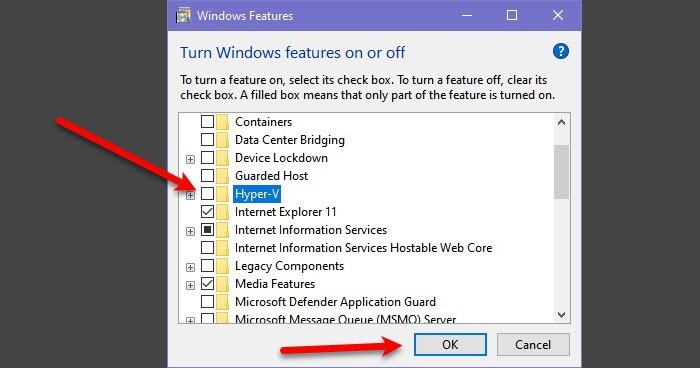
You need to ensure that the native Hypervisor of Windows, that is, Hyper-V is disabled as that can interfere with VirtualBox and cause peculiar issues. To do so, follow the steps mentioned below.
- Open Control Panel.
- Change the View by to Large icons.
- Now, go to Programs and Features > Turn Windows features on or off.
- Untick Hyper-V and click on Ok; wait for the feature to get uninstalled.
- Reboot your computer.
Once your computer starts back up, you must check if the issue is resolved.
Hopefully, you can resolve the issue using the solutions mentioned in this post.
Read: Test drive Windows 11 in VirtualBox – Detailed screenshot guide
How to fix Windows product key errors on VirtualBox?
If you encounter a Windows product key error on VirtualBox, you need to delete the unattended configuration file and then make some changes to the configuration of your machine. Additionally, we need to check if Hyper-V (Windows Hypervisor) is enabled, if it is enabled, we might have to disable it. In order to do all this, we recommend you follow the solutions mentioned earlier.
Read: How to speed up a VirtualBox Virtual Machine and make it run faster
Why the Product key is not working?
If you are entering a product key and it’s not working, check if it has been used on a different device or if it has surpassed the allowed limit of devices as per the purchased license. Go through the documentation to find out if that’s the case. If not, you can contact Microsoft Support here on microsoft.com and raise a dispute.
Also Read: Fix VirtualBox Installer Installation failed error.
Yusuf is an Engineering graduate from Delhi. He has written over 1000 technical articles and has knowledge of programming languages including Java, and C++, and technologies such as Oracle 12C and MsSQL. Troubleshooting Windows is his favorite past-time.