
Formatting a drive is not new thing for any of us and everyone here knows how to format a drive in Windows. But the matter of interest is – what if Windows refuses to format a drive and you can do nothing about it? Well, this is case we recently came around and we thought it should be shared with all of you because this issue can happen with anyone.
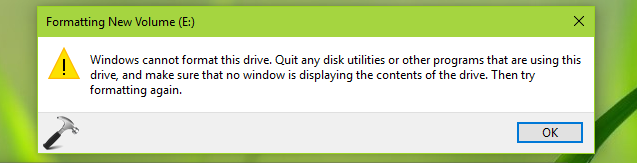
While formatting a hard-drive which was being utilized for System Image backup in Windows 10, we got following warning:
Page Contents
Windows cannot format this drive. Quit any disk utilities or other programs that are using this drive, and make sure that no window is displaying the contents of the drive. Then try formatting again.
As per the suggestions, we quit all the windows displaying contents of this drive and also tried to change location of System Image Backup to different drive, but still there were no changes in situation and we can’t format the drive.
You may instead receive following message, if the disk you’re formatting is being used in other third-party program:
Windows was unable to complete the format.
For both type of problems, we have found the fixes mentioned below. Try the fix matches your case and get rid of this hiccup.
FIX : ‘Windows Cannot Format This Drive’ In Windows 10
CASE 1 : If Drive Is Utilized In Some Program
The drive Windows is unable to format may be utilized in some third-party software you might be using on your machine. If it is possible for you to uninstall that software for a while, you can do so and format the drive. But if it is not possible for you to remove the software (due to interruption from background services etc.), however you still want to format the drive, you can try formatting via Command Prompt at boot recovery options. Here’s how:
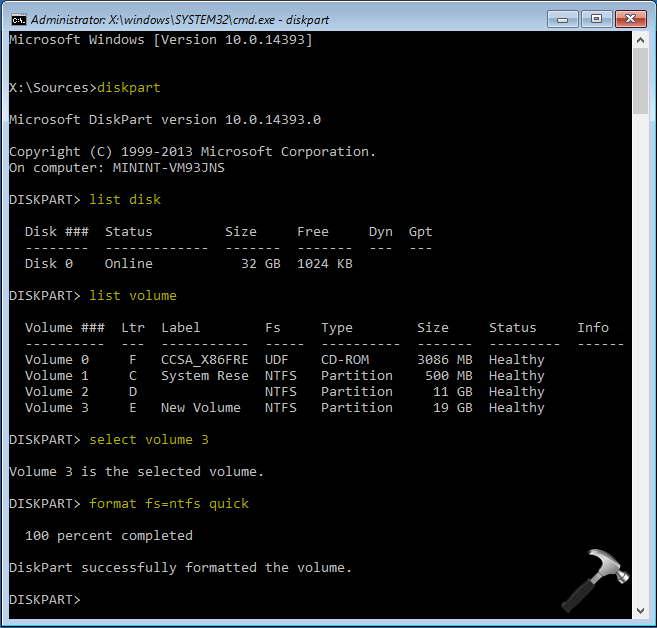
1. Boot into Advanced System Recovery Options and select Command Prompt.
2. In Command Prompt window, type following commands (mentioned in bold) one-by-one and press Enter key after each.
diskpart Starts Disk Management Utility
list disk Lists your system hard-drive
list volume Lists all hard-drive partitions including USB, DVD
select volume # Replace # with drive number you're unable to format
format fs=ntfs quick Performs quick NTFS format on selected drive
You can now close the Command Prompt window and Continue to your operating system. The formatted drive can now be used for your desired purpose.
CASE 2 : If Drive Is Utilized In Windows Operating System
When you’re unable to format the drive you’re using for System Image Backup, the reason is that its paging file is system managed. This system managed paging file doesn’t allows Disk Management to manipulate the drive. These steps should help you in this case:
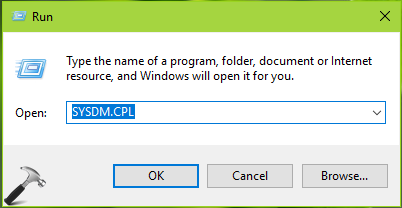
1. Press + R and type sysdm.cpl in Run. Click OK or press Enter key.
2. In System Properties window, switch to Advanced tab. Click Settings under Performance.
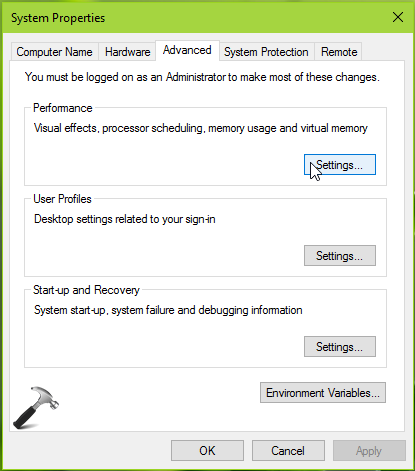
3. Then in Performance Options window, switch to Advanced tab. Under Virtual memory section, hit Change.
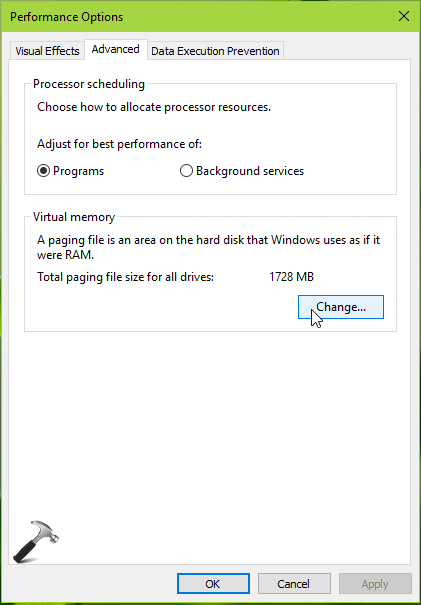
4. Next in Virtual Memory window, uncheck Automatically manage paging file size for all drives. Then select the drive which you’re were unable to format, it must be having its Paging File Size set to System Managed. Select the No paging file option and hit Set which should change Paging File Size to None from System Managed. Click OK, Apply and close System Properties.
Finally, re-try to format the same drive and this time it should work without any warnings.
That’s it!
RELATED ARTICLES
If you try to format a hard drive on your Windows 11/10 system and you receive an error that says Windows cannot format this drive, then this post will help you with the working solutions. Most of the issues with Windows 11/10 have one good resolution – formatting the system drive and reinstalling Windows. Or then at times, we may want to simply erase all the files & folders on our data drives, eg. D drive, E drive, etc. To do this, we simply access This PC section in File Explorer, right-click on the drive, and select the Format option from the context menu. Or we could open Disk Management Utility to do it.

However, formatting a hard disk might not always be the smoothest of processes. Many users have reported an error message when trying to format the hard drive:
Windows cannot format this drive. Quit any disk utilities or other programs that are using this drive, and make sure that no window is displaying the contents of the drive. Then try formatting again.
Let us consider the two scenarios:
- You wish to format the System Drive C: It’s obvious that it won’t happen. The system drive has to be formatted using external media or internal options but not when logged on to Windows.
- You wish to format a Data drive like D, E, etc.: If you get this error in this scenario, you should close all your open applications and then try to format the drive. Unfortunately, it doesn’t always help.
Let us troubleshoot the issue on a case-by-case basis:
You wish to format the system drive C & erase all data from your system

To do this, it is best you use the Windows installation media during Setup and select the Format option when you are asked. You will usually want to do this when you plan to clean install an operating system.
You wish to format the Data drives D:, E:, etc.
The ideal procedure to format any of these drives would be to right-click on the drive, click on Format and then start the formatting procedure. But since it is not working, we will try the following steps:
1] Force Format using Disk Management
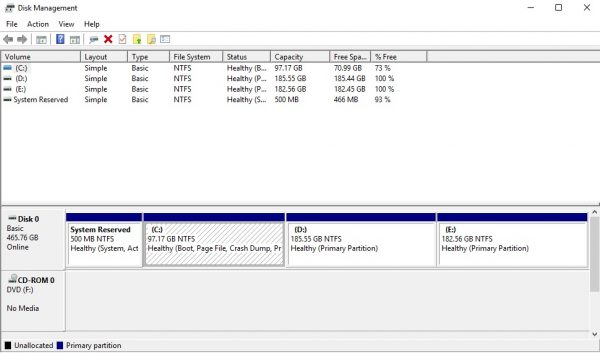
Press Win+R to open the Run Command window. Type diskmgmt.msc and press Enter. This opens the Disk Management Tool.
From this list of volumes, right-click on the drive or volume you wish to format and click on the option Format. The drive won’t format straight away but will give the following message:
The volume (name of the drive) logical drive currently in use. To force the format of this volume click Yes.
It will format the drive forcefully and this could be verified by checking the space on the drive.
Read: Can’t format USB Drive.
2] Use Diskpart
If this does not work for you, you may need to make use of the Diskpart command-line tool which ships with your Windows 11/10 OS.

To run this tool, open an elevated Command Prompt window and run the following commands one after the other:
diskpart
list disk
select disk <disk #>
clean
create partition primary
format fs=ntfs
assign letter <letter #>
Here is what each command does:
- diskpart: It is used to access the DISKPART tool
- list disk: To view the list of all the disks available on your Windows 11/10 PC including the external hard drive and USB drive
- select disk <disk #>: To select the disk that you want to format. Here, you have to replace <disk #> with the actual number (say select disk 1)
- clean: This command deletes all the data present in the selected disk
- create partition primary: With this command, the disk is made accessible again
- format fs=ntfs: This command formats the disk with the NTFS File system
- assign letter <letter #>: To assign a letter number to the disk. Here, replace <letter #> with an actual letter (say assign letter L).
This will format the drive.
The optional switches you can use with the format command are:
- FS=<FS> – Specifies the type of file system. If no file system is given, the default file system is used.
- REVISION = <X.XX> – Specifies the file system revision (if applicable).
- RECOMMENDED – If specified, use the recommended file system and revision instead of the default if a recommendation exists.
- LABEL=<“label”> – Specifies the volume label.
- UNIT=<N> – Overrides the default allocation unit size. Default settings are strongly recommended for general use.
- QUICK – Performs a quick format.
- COMPRESS – NTFS only: Files created on the new volume will be compressed by default.
- OVERRIDE – Forces the volume to dismount first if necessary. All opened handles to the volume would no longer be valid.
- NOWAIT – Forces the command to return immediately while the format process is still in progress.
- NOERR – For scripting only. When an error is encountered, DiskPart continues to process commands as if the error did not occur.
Examples:
- FORMAT FS=NTFS LABEL=”New Volume” QUICK COMPRESS
- FORMAT RECOMMENDED OVERRIDE
Hope this helps.
Now read: How to format an External Hard drive or USB drive using PowerShell
How to fix you need to format the disk in drive before you can use it?
If you try to open your external hard drive, USB drive, etc., and receive an error that says You need to format the disk in drive before you can use it, then first plug in the drive to another port and see if this works. If not, run the CHKDSK utility on your Windows 11/10 system which is helpful to check and repair disk errors or bad sectors. You should also update the hardware driver (if available).
Read: Windows cannot format the system partition on this disk
How to fix SSD cannot format?
If you are unable to format your SSD, then first check and remove the write protection for the drive (if applied). Also, scan SSD for malware and viruses, and try again. Additionally, you can format the drive using the Disk DISKPART utility to forcefully format it.
See these posts if you receive such error messages:
- Windows could not format a partition on disk – Error Code 0x80070057
- Windows cannot be installed to this disk, The selected disk is of the GPT partition style.
Readers help support Windows Report. We may get a commission if you buy through our links.
Read our disclosure page to find out how can you help Windows Report sustain the editorial team. Read more
No operating system is not free of quirks, and sometimes when your machine is slow, you may try to resolve the problem by formatting your hard disk. However, users sometimes get a Windows cannot format this drive prompt when trying to format their device.
This error can make you clueless about the next line of action. Thankfully, this issue can be fixed with a few tweaks, as shown in this guide.
How can I fix the Windows cannot format this drive, quit any disk utilities error?
1. Use the Diskpart command
- Press the Windows key, type cmd, and click Run as administrator under Command Prompt.

- Type the command below and hit Enter:
diskpart
- Now, type the following commands and press Enter after each:
list disk
list volume
select volume<number>
format - Note that you need to replace the <number> in the third command with the correct one you need to format (we used 2 in our command).


One of the quickest methods to fix the Windows cannot format this drive error is to force the process through using the DiskPart command.
If you have a preferred file system you want to format your drive to, you can use the fs switch with the format command. An example is format fs=ntfs quick.
2. Hard Format using Disk Management
- Press the Windows key + R, type diskmgmt.msc, and press Enter.
- Right-click the drive you want to format and select the Format option.

- If you get a prompt that The volume (Disk>#) is currently in use, click the Yes option to force the format of the volume.
- After clicking Yes, the storage disk will be formatted without further error messages.

- Error Checking File System 712 (0x2C8): Fix it With 4 Steps
- How to Fix a Disk Error Bad Block on Your HDD
- How to Fix MFReadWrite.dll is Missing on Windows N
- Fix: ERROR_SUBST_TO_JOIN 141 (0x8D)
- What is ERROR_NOT_SUBSTED 137 (0x89) & How to Fix it?
Another effective solution to try if you are getting Windows cannot format this drive error is to use the Disk Management feature to complete the process.
With this second fix, we can conclude this guide. We believe you now have everything to fix. Windows cannot format this drive error.
If the solutions above fail to fix this issue, you must check your drive for physical damage. You can also check and fix bad sectors on your PC.
It might also help to read our guide on how to format an NVMe SSD on Windows 11 or convert exFAT to FAT32.
Feel free to let us know in the comments below the solution that helped you fix this issue.
Madalina Dinita
Networking & Security Specialist
Madalina has been a Windows fan ever since she got her hands on her first Windows XP computer.
She is interested in all things technology, especially emerging technologies — AI and DNA computing in particular.
Prior to joining the WindowsReport team, she worked in the corporate world for a number of years.
Learn effective methods to resolve the frustrating “Windows cannot format this drive” error and successfully format your drives in Windows 10 and 11.
Published
3 min read

Formatting a drive in Windows is usually a straightforward process, but sometimes you may encounter an error message stating “Windows cannot format this drive. Quit any disk utilities or other programs that are using this drive, and make sure that no window is displaying the contents of the drive. Then try formatting again.” This error can occur when trying to format system drives, data drives, or external storage devices. Let’s explore some effective solutions to this problem.
Why Windows Can’t Format Your Drive
Before we dive into the solutions, it’s important to understand why this error occurs. Common reasons include:
- The drive is currently in use by the operating system or other applications.
- The drive has write protection enabled.
- There are bad sectors on the drive.
- The drive is infected with malware.
- The file system is corrupted.
Method 1: Use Disk Management to Force Format
The Disk Management tool provides a way to force format a drive that Windows can’t format through the usual methods.
Step 1: Press Win + R to open the Run dialog, type diskmgmt.msc, and press Enter to open Disk Management.
Step 2: In the Disk Management window, right-click on the drive you want to format and select “Format”.
Step 3: A warning message will appear stating that the drive is in use. Click “Yes” to force the format.
Step 4: Choose the file system (usually NTFS for Windows), allocation unit size, and volume label. Check the “Perform a quick format” box if you want the process to be faster.
Step 5: Click “OK” to start the formatting process.
This method often works when the standard formatting process fails. However, if it doesn’t solve the issue, move on to the next method.
Method 2: Use DiskPart Command-Line Tool
DiskPart is a powerful command-line tool that can help you format drives that resist other methods.
Step 1: Press Win + X and select “Windows PowerShell (Admin)” or “Command Prompt (Admin)”.
Step 2: Type diskpart and press Enter to start the DiskPart utility.
Step 3: Use the following commands in sequence:
list disk
select disk X (replace X with the number of your disk)
clean
create partition primary
format fs=ntfs quick
assign letter=Y (replace Y with your desired drive letter)
Step 4: Wait for each command to complete before entering the next one. The “clean” command will erase all data on the disk, so make sure you’ve selected the correct disk.
Step 5: Once the process is complete, exit DiskPart by typing exit.
This method provides a more thorough approach to formatting and can often overcome stubborn formatting issues.
Method 3: Check and Fix Disk Errors
Sometimes, disk errors prevent Windows from formatting a drive. Using the built-in Check Disk utility can help resolve these issues.
Step 1: Open File Explorer and right-click on the problematic drive.
Step 2: Select “Properties” and go to the “Tools” tab.
Step 3: Under “Error checking”, click “Check” and then “Scan drive”.
Step 4: If errors are found, allow Windows to fix them.
Step 5: After the scan and repair process, try formatting the drive again using the standard method.
This method addresses underlying disk issues that might be preventing successful formatting.
Method 4: Remove Write Protection
Write protection can prevent formatting. Here’s how to remove it:
Step 1: Open Command Prompt as administrator.
Step 2: Type the following commands:
diskpart
list disk
select disk X (replace X with your disk number)
attributes disk clear readonly
Step 3: Exit DiskPart and try formatting the drive again.
This method removes software-based write protection. For physical write-protection switches on devices like SD cards, ensure the switch is in the unlocked position.
Method 5: Use Third-Party Formatting Tools
If Windows tools fail, third-party disk management software can often format drives that Windows can’t handle.
Step 1: Research and download a reputable disk management tool. Popular options include EaseUS Partition Master, MiniTool Partition Wizard, or AOMEI Partition Assistant.
Step 2: Install and run the software.
Step 3: Select the drive you want to format.
Step 4: Choose the format option and select your desired file system.
Step 5: Apply the changes and wait for the formatting to complete.
Third-party tools often have more advanced algorithms for handling disk issues and can be effective when Windows tools fail.
Remember to back up any important data before attempting to format a drive. If you’re dealing with a system drive (usually C:), you’ll need to use Windows installation media to format it during a clean install process. For persistent issues with external drives, consider checking for hardware problems or contacting the manufacturer for support.
Let’s say you are dealing with a slow PC or want to reinstall Windows 10, in either case, you might want to format a partition on your hard drive. Actually, formatting a hard drive can be a solution to many problems. Formatting computers is also a way to repair a PC which has registry issues. It can help get rid of a stuffed hard drive which has temporary files and junk which you don’t even know exists.
Under normal circumstances, you would go to your desired drive (leaving aside the (C:) drive) – D:, E:, F:, right click on it and choose format. Then, you would follow the on-screen instructions.
But, what if you find that your PC’s hard drive cannot be formatted? Here’s the kind of issue that many users have reportedly faced and even you might likely face –
“Windows cannot format this drive. Quit any disk utilities or other programs that are using this drive, and make sure that no window is displaying the contents of the drive. Then try formatting again”
You might be wondering why you might have to face such an issue. The reasons for “Windows cannot format this drive” can be many. Let’s have a brief look at few of them –
- Corrupted files
One of the reasons why you might not be able to format your desired drive could be because of damaged or missing SYS, DLL or EXE files.
- Bad sectors
When there is a presence of bad sectors, you may not be able to format your PC’s or laptop’s hard drive with normal measures.
- Malware Or Virus
A Malware or Virus can damage your hard drive in such a manner that you might neither be able to access the data or even format it.
So, Your Computer’s Hard Drive Cannot Be Formatted? Here’s What You Can Do –
Method 1. Use Command-Line DiskPart
One of the most effective ways to deal with “Windows cannot format this drive” issue is to use DiskPart which is also used to extend C: drive space in Windows 10. The DiskPart in Windows 10 is used in Command Prompt and can be your best bet when the Disk Management tool isn’t working to format your desired drive.
- Open Start
- Type Cmd and from the right-hand side click on Run as administrator
- When the Command Prompt opens type diskpart

- Next to diskpart type list disk
- Now, type Volume Number e.g. Volume 2
- Type format fs=ntfs quick
Note – If you have lost data because of bad sectors, you can use a data recovery tool like Advanced Disk Recovery which can help you recover all kinds of data (videos, audios, photos, documents and others) with just a few clicks.
Let’s see Advanced Disk Recovery in action:
- Install and run Advanced Disk Recovery
- Select the areas you want to scan for deleted files and folders. In our case we will choose Hard Drive
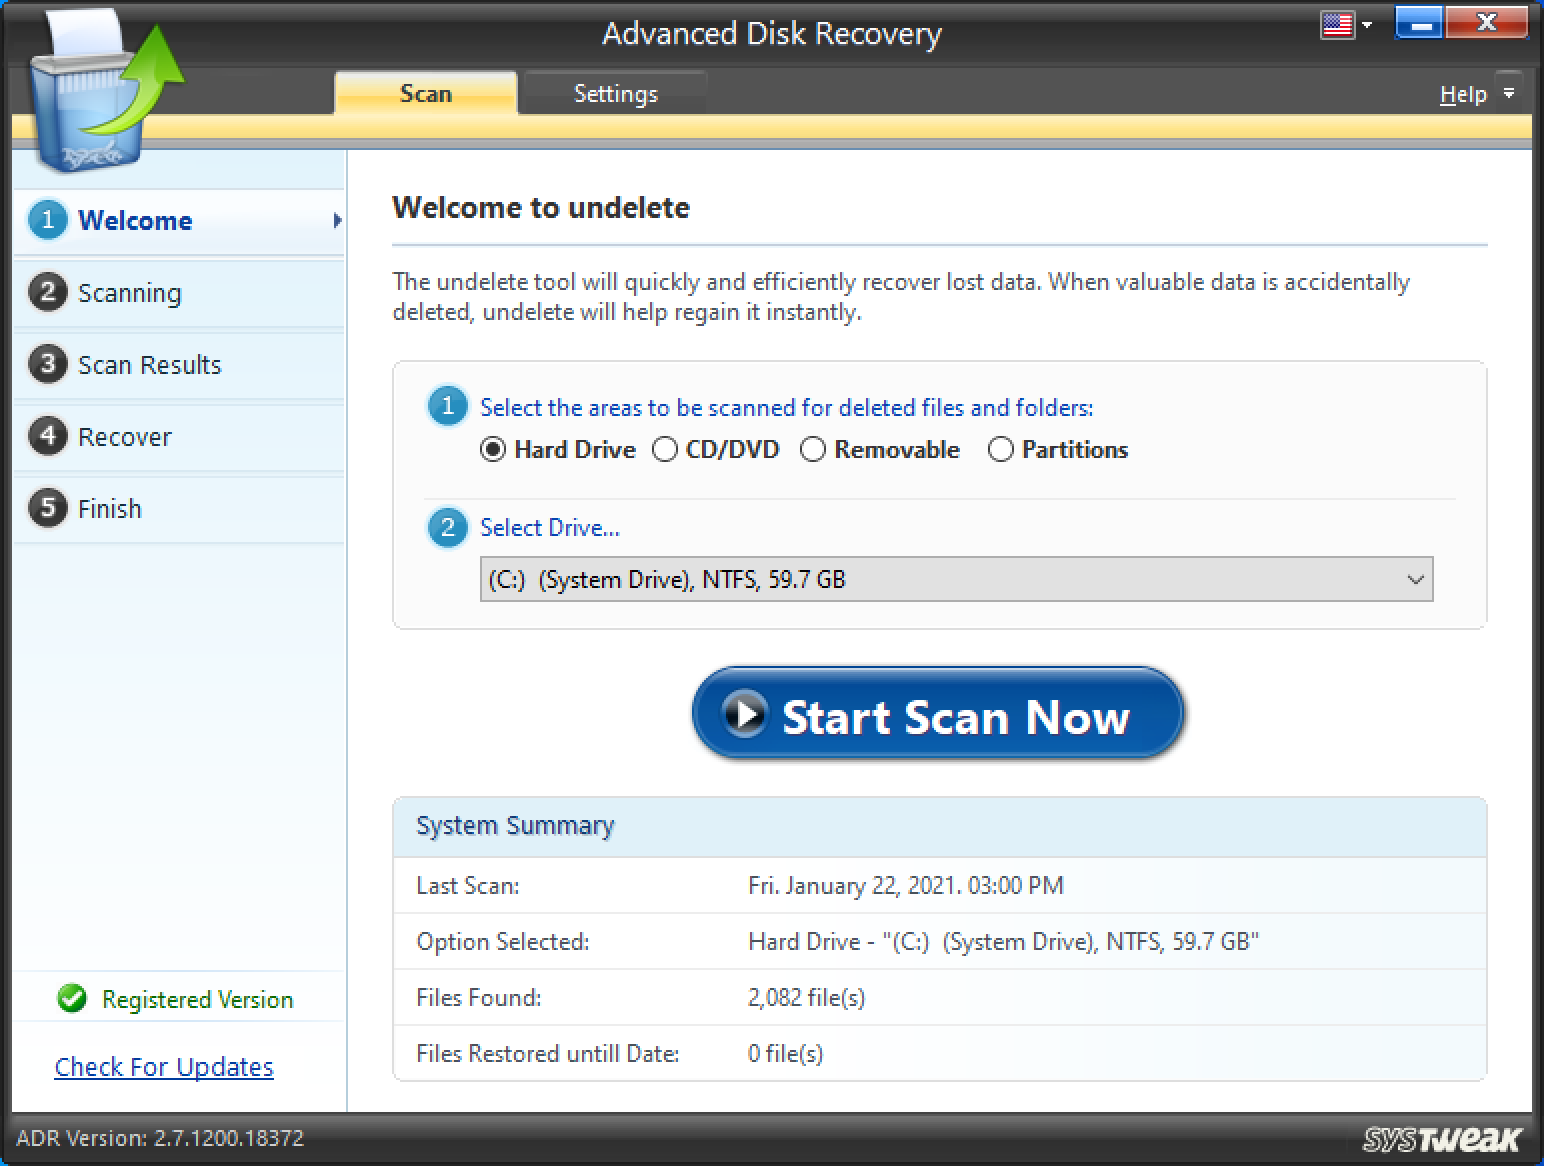
- Choose a drive – E.g. (F:)

- Click on Start Scan Now

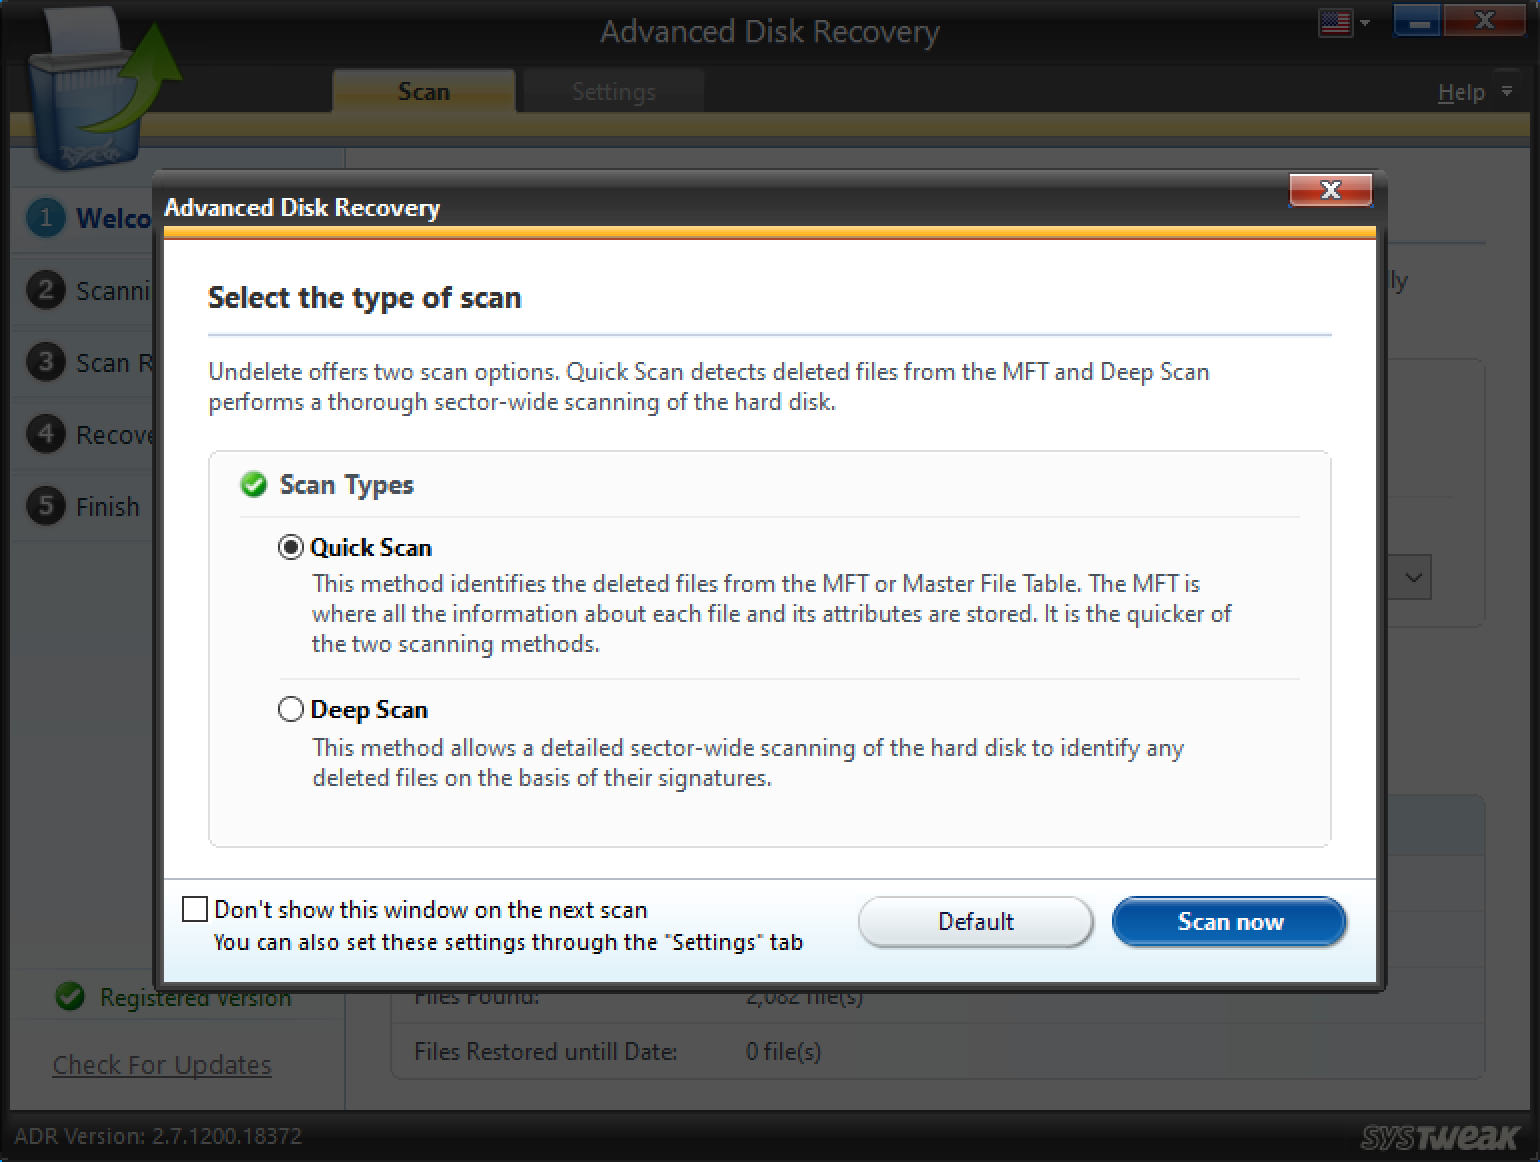
- Select from one of the Scan Types and then click on Scan now
- Choose the file or folder you want to recover. Here you can see the deleted file is marked in red. Now, click on recover at the bottom right of the screen

- Here’s a little piece of advice –
Words Of Wisdom
Chances of data recovery would reduce if you try to recover files on the same drive. So make sure you choose a different drive to recover files.

- So, choose another drive to restore files and click OK. Wait as the process will take a little time depending on how big the file size is
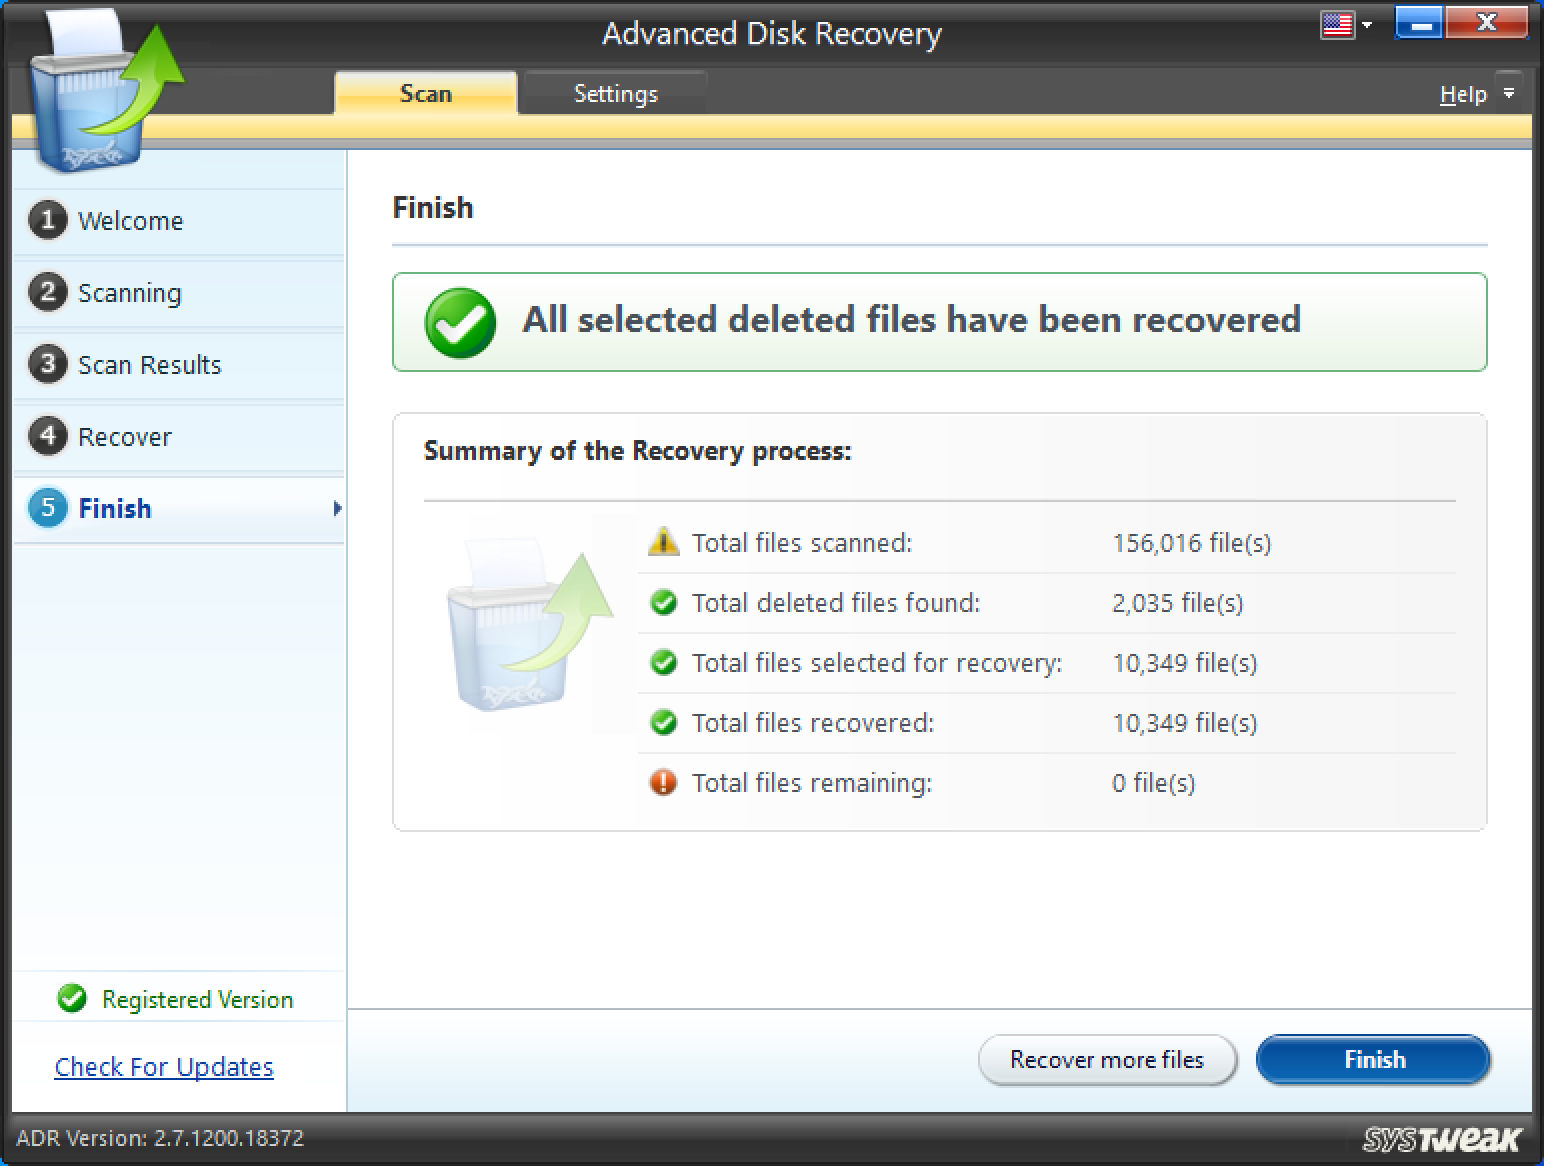
- You can now see that the deleted file has been recovered and you can also see the scan history as well
Method 2. Use Disk Management To Force Format

If going by normal ways, you are not able to format a drive and instead are getting “Windows cannot format this drive”, you can try and use the disk management tool that is present in Windows 10 –
- Type Disk Management in the Windows search bar
- On the right hand side you will see Create and format hard disk partitions, click on open
- Right-click on the partition that you want to format and then click on Format
You might have to forcefully format the drive if you receive a message saying –
“The volume (drive’s name) is currently in use. To force the format of this volume click Yes.”
After this, your desired drive will be formatted forcefully and to verify that you can check the space on the disk.
Also Read: Best Free Driver Updater Software For Windows
Method 3. Use CHKDSK To Fix Soft Bad Sectors Which Could Be Causing The Issue
If the hindrance in formatting is caused by soft bad sectors, you can take aid of CHKDSK in command prompt and fix them.
Remember, when using CHKDSK you will not be able to access the drive. Also, make sure that you have selected Command Prompt as an administrator otherwise you won’t be able to use the CHKDSK command in the first place.
Here are the steps to use chkdsk in Command Prompt–
- Type cmd in the Windows search bar
- From the right-hand pane choose Run as administrator
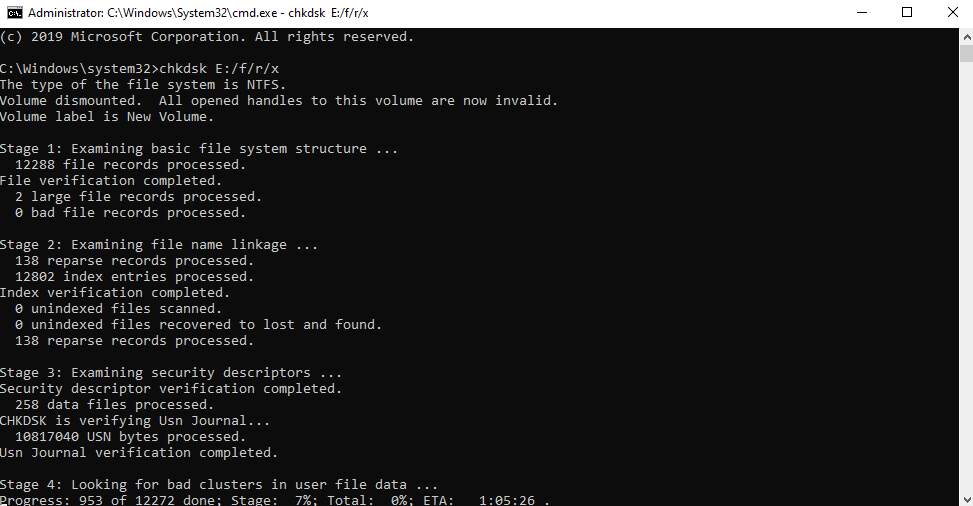
- Once the Command Prompt window opens type the below mentioned command
chkdsk name of the drive: (e.g. E:) /f /r /x and then press enter. Which means if you want to check E: drive, the command will be – chkdsk E: /f /r /x
After you have applied this step, proceed to the next step.
Method 4. Try Formatting Disk Using Normal Measures
Now, once you have applied the CHKDSK, try using the normal way of formatting a hard disk. For this –
- Open Windows Explorer
- Go to your desired drive. For instance, the E: Drive
- Right-click on it
- Click on Format
In A Nutshell
Getting rid of files and folders can be a solution to many of your problems but formatting cleans your PC in and out. And, while trying to format your PC, you bump into “Windows cannot format this drive” issue, you can try the steps above. And, it is advisable that you keep a tool like Advanced Disk Recovery handy so that in time of need, you can recover data.
If you found the blog to be helpful, do give it a thumbs up. You can also follow us on Facebook, Instagram, Twitter and also subscribe to our YouTube channel.
Next Read
How and Why to Completely Uninstall/ Remove Drivers in Windows 10
How To Backup Drivers in Windows 10 and Restore Them