
On Windows 10, you can use the mouse and touchpad to navigate and interact with the elements easily. Both of the 2 input devices come with a default scrolling direction. However, some users want to change scroll direction Windows 10. Here MiniTool will show you how to invert scrolling on Windows 10.
The following part will introduce the guide to change the scrolling directions for a mouse and touchpad separately. You can utilize the Settings app to invert touchpad scrolling Windows 10. To reverse mouse scroll Windows 10, you need to use the Registry Editor.
Here’s how to reverse scrolling Windows 10 of your touchpad using the Settings app.
Step 1. Press Win + I keys to open the Settings app, and then click on the Devices option from the pop-up window.

Step 2. In the Settings window, click on the Touchpad section from the left side.
Note: This reverse scrolling option is only available for these devices with a precision touchpad. If you can’t find the option, you can invert touchpad scrolling Windows 10 through the software provided by its manufacturer.
Step 3. Under the Scrolling directions, select the Down motion scrolls down option from the drop-down menu.
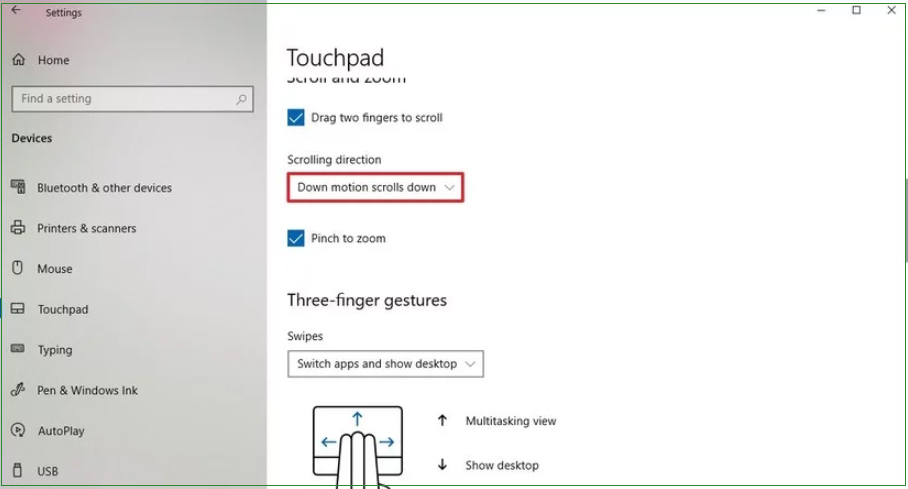
After you finish the above steps, you can use the scroll the pages in the downward direction. How to reverse scrolling Windows 10 of your mouse? Please keeping reading.
If there is no option to reverse mouse scroll Windows 10 in the Settings window, you need to use the Registry Editor to change the scrolling behavior. There are 2 major parts to change the mouse scroll direction.
Warning: It is necessary to remind you that editing the Registry has potential risks, which can lead to irreversible damage to your Windows installation. So, please follow the steps carefully and we recommend that you make a full backup of your PC in advance.
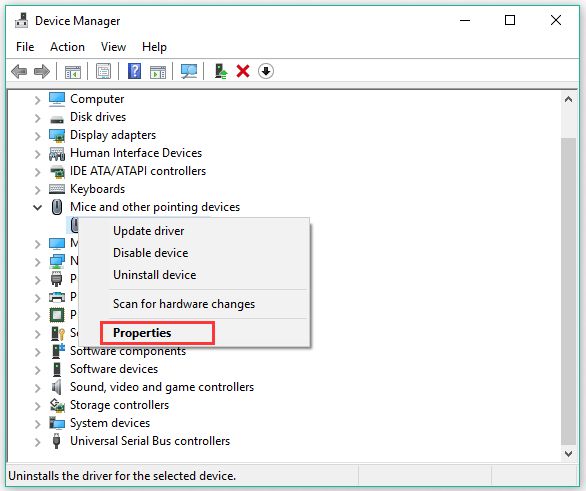
Check the Mouse Identification Number
Step 1. Right-click the Start menu and select the Device Manager option from the context menu.
Step 2. Expand the Mice and other pointing devices category, right-click the mouse that you are using and select the Properties option.
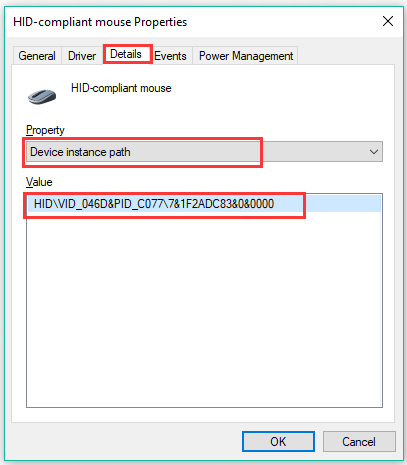
Step 3. Navigate to the Details tab and select the Device instance path option from the drop-down menu to check the VID ID value for the mouse.
Then you can continue the following part to reverse the mouse scrolling using the Registry Editor.
Reverse Mouse Scroll Windows 10
To change the scroll direction Windows 10 for a mouse, follow the steps below carefully.
Step 1. Press the Win + R keys to call out the Run dialog box, and then type regedit in the box and hit Enter.
Step 2. In the Registry Editor window, navigate to the following destination path through the left sidebar.
ComputerHKEY_LOCAL_MACHINESYSTEMCurrentControlSetEnumHID
Step 3. Expand the key folder that matches the VID ID value of your mouse, and then expand the available key folder and select the Device Parameters key.
Step 4. Double click the FlipFlopWheel DWORD and set the Value data from 0 to 1, and click on OK.
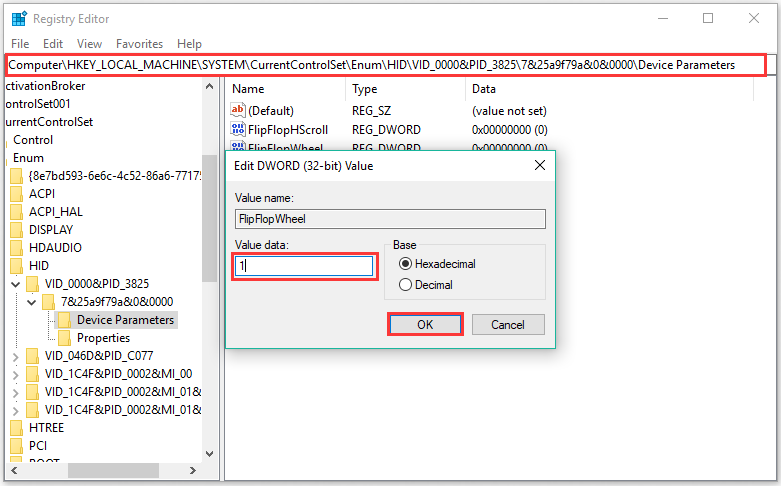
Step 5. Restart your PC to execute this change. After that, you can scroll up the page when scrolling up with the mouse.
If you see the error message Windows cannot find … Make sure you typed the name correctly on a Windows 11 PC, read this post to know how to fix the issue. It often occurs when users try to access an application or a file on a Windows PC but the OS fails to locate the file. In this post, we will briefly cover some of them and show you what methods to follow to fix the errors.

As already mentioned, Windows cannot find … Make sure you typed the name correctly error can have many variations, and a few of them are as follows:
- Windows cannot find Explorer.exe
- Windows cannot find AMD Software Installers
- Windows cannot find printmanagement.msc
- Windows cannot find C:\Program Files
- Windows cannot find GPEDIT.MSC
- Windows cannot find C:/Windows/regedit.exe
- Windows cannot find Powershell.exe
- Windows cannot find ‘wt.exe’
- Windows cannot find ms-windows-storePurgeCaches
- Windows cannot find Bin64\InstallManagerApp.exe
- Windows cannot find wfs.exe
- Windows cannot find Steam.exe
Let us cover these errors in detail one by one.
1] Windows cannot find Explorer.exe

This error is commonly encountered when users click on the File Explorer icon present in the Windows 11 taskbar. Due to the error, they cannot open and use File Explorer on their PC. The complete error message reads:
Explorer.EXE – Windows cannot find”. Make sure you typed the name correctly, and then try again.
If you encounter this error, you should change the File Explorer Options to fix it. Type ‘file explorer options’ in the Windows Search bar and press the Enter key. File Explorer Options window will open. Within the General tab, select This PC in the Open File Explorer to dropdown. click on Apply and then on OK.
Apart from this, you may run the sfc /scannow command in the System File Checker, perform an antivirus scan, and delete Explorer-related entries from the Registry Editor.
For more details, read: Windows cannot find Explorer.exe.
2] Windows cannot find AMD Software Installer

This error appears when users try to update or install the drivers for AMD’s graphics card on their Windows 11 PC. The complete error message says:
Windows cannot find ‘C:\Program Files\AMD\CIM\Bin64\InstallManagerAPP.exe’. Make sure you typed the name correctly, and then try again.
If you see this error, temporarily turn off Controlled folder access in security settings. Search for the Windows Security app and open it. Navigate to Virus & threat protection. Select Manage settings. Click on the toggle button next to the Manage Controlled folder access option to turn off the option.
You may also temporarily disable your antivirus, reinstall Microsoft Visual C++ Redistributable, and reinstall the AMD drivers.
For more details, read: Windows cannot find AMD Software Installer.
3] Windows cannot find printmanagement.msc

This error is generally encountered when users try to print to a specific printer after updating Windows to the latest version. The error occurs when Print Management, which manages printers and printing jobs on a Windows PC, gets missing. The complete error message reads:
Windows cannot find ‘printmanagement.msc’. Make sure you typed the name correctly, and then try again.
If you see this error on your Windows 11 PC, you should manually add the Print Management feature via the Settings app.
Go to Settings > Apps > Optional features. Click on the View features button next to the Add an optional feature option. On the next popup window, search for Print Management, click on the checkbox next to the option, and then click on Next > Install.
Next, you should run the System File Checker or repair system image to fix the issue.
For more details, read: Windows cannot find printmanagement.msc.
4] Windows cannot find C:\Program Files

This error occurs when users try to launch an app, such as an MS Office app, an Adobe app, or other apps on their Windows 11 PC. The complete error message reads:
Windows cannot find ‘C:\Program Files\Microsoft Office\root\Office16\outlook.exe’. Make sure you typed the name correctly, and then try again.
The above error message indicates the user is trying to open MS Outlook. You may receive the same error for any other app, the only difference will be the ‘path’, which will include the root directly of the app or program you’re trying to access.
If you see this error, you should temporarily disable your antivirus software. Another fix would be to delete the program’s ‘.exe’ key from IEFO in Windows Registry.
Open Registry Editor and navigate to the following path:
HKEY_LOCAL_MACHINE\SOFTWARE\Microsoft\Windows NT\CurrentVersion\Image File Execution Options
Right-click on the program’s executable in the left panel and select Delete.
For more details, read: Windows cannot find C:\Program Files\Microsoft Office\root\Office16\outlook.exe.
5] Windows cannot find GPEDIT.MSC

Windows cannot find GPEDIT.MSC error occurs when the Group Policy Editor is missing on your Windows system. The error message read:
Windows cannot find ‘GPEDIT.MSC’. Make sure you typed the name correctly, and then try again.
First of all, confirm that you’re running Windows 11 Pro/Business/Enterprise/etc. editions. The Home edition does not ship with the Group Policy Editor. After that, run the System File Checker, Repair System Image, and use the Cloud Reset or Reset this PC option to fix the issue.
For more details, read: Windows cannot find GPEDIT.MSC.
6] Windows cannot find C:/Windows/regedit.exe

This error appears when users try to open the Registry Editor on their Windows PC. This may happen when a malware has altered the settings of the registry to block your access to the Registry Editor. If your PC is affected, you will see the following error message:
Windows cannot find ‘C:\Windows\regedit.exe’. Make sure you typed the name correctly, and then try again.
Registry malfunction is considered extremely dangerous, so you should take immediate steps to resolve the issue. Run a complete antivirus scan, preferably at boot time to remove potentially harmful viruses (malware) from your PC. Then run SFC and DISM tools to repair system files and system image. If nothing helps, repair the Windows OS using installation media.
For more details, read: Windows cannot find C:/Windows/regedit.exe.
7] Windows cannot find Powershell.exe

When users try to run PowerShell, they may sometimes encounter the following error message:
Windows cannot find ‘C:\Windows\System32\WindowsPowerShell\v1.0\powershell.exe’.
Make sure you’ve typed the name correctly, then try again.
If the above message is preventing you from opening PowerShell on your Windows 11 PC, here’s what you need to do.
Check whether PowerShell is enabled. Go to Control Panel > Programs and Features > Turn Windows features on or off. Make sure the checkbox for Windows PowerShell 2.0 is checked. Then update Windows PowerShell. Right-click on the Start button icon, select Terminal (Admin), and run the following command:
Winget install --id Microsoft.Powershell --source Winget
If the error persists, run the System File Checker to fix the issue.
For more details, read: Windows cannot find Powershell.exe.
8] Windows cannot find ‘wt.exe’

Users encounter this error while downloading Windows updates or while upgrading their system from Windows 10 to Windows 11. The error occurs when Windows OS or Windows Terminal files get corrupted during the installation process. The complete error message reads:
Windows cannot find ‘wt.exe’. Make sure you typed the name correctly, and then try again.
To resolve the error, change the Windows Terminal settings on your Windows PC. Go to Settings > Apps > Advanced app settings > App execution aliases. Navigate to Terminal (wt.exe) in the list of apps and click on the toggle button next to the option. This will switch off Windows Terminal. Again click on the toggle button to turn the Terminal On.
Then navigate to %USERPROFILE%\AppData\Local\Microsoft\WindowsApps in File Explorer and locate ‘wt.exe’. If the file is present, try running Windows Terminal. If not, repair or reset the Windows Terminal app.
For more details, read: Windows cannot find wt.exe; Windows Terminal not opening.
9] Windows cannot find ms-windows-storePurgeCaches

This is another instance of the error which appears when you run the Windows Store Reset command to remove cache and temporary files from the Microsoft Store. The primary cause of the error is file corruption or registry issues. The error message reads:
Windows cannot find ms-windows-storePurgeCaches is missing
Or
Cannot find path ‘c:\windows\winstore\appxmanifest.xml’ because it does not exist
To fix the issue, you should open PowerShell using administrator privileges and re-register the Windows Store app using the following commands:
PowerShell -ExecutionPolicy Unrestricted -Command "& {$manifest = (Get-AppxPackage *WindowsStore*).InstallLocation + '\AppxManifest.xml' ; Add-AppxPackage -DisableDevelopmentMode -Register $manifest}"
Get-AppxPackage -allusers Microsoft.WindowsStore | Foreach {Add-AppxPackage -DisableDevelopmentMode -Register "$($_.InstallLocation)AppXManifest.xml"}
Apart from this, you can run the System File Checker tool, delete Microsoft Store’s local cache, and run the Windows Store Troubleshooter.
For more details, read: Windows cannot find ms-windows-storePurgeCaches.
10] Windows cannot find Bin64\InstallManagerApp.exe

InstallManagerApp.exe comes with AMD Radeon Graphics driver. It is part of the AMD Catalyst Control Center which overclocks and optimizes the graphics card. When the file goes missing, you may see the following error:
Windows cannot find ‘Bin64\InstallManagerApp.exe’. Make sure you typed the name correctly, and then try again.
To fix this, you should uninstall the AMD driver using the Display Driver Uninstaller in Safe Mode. Then visit the AMD Support page and download the latest drivers. Run the AMD Radeon Software Installer to clean install the drivers on your Windows PC.
For more details, read: Windows cannot find Bin64\InstallManagerApp.exe.
11] Windows cannot find wfs.exe

The wfs.exe is an essential component of the Windows Fax and Scan (WFS) feature that lets you send or receive faxes on a Windows PC. If this file goes missing, you see the following error message:
Windows cannot find ‘C:\WINDOWS\system32\wfs.exe’. Make sure you typed the names correctly, and then try again.
The best way to fix the error is to restore the wfs.exe file. You may run the System File Checker to fix the file automatically. Copy wfs.exe file from another running Windows PC and transfer it to your system using a USB drive. Or re-install the Windows Fax and Scan feature.
For more details, read: WFS.exe is missing or not found on Windows.
12] Windows cannot find Steam.exe

This error occurs when users try to open the Steam client using the desktop shortcut or the Steam.exe file directly from the Steam installation folder. The file becomes inaccessible and the following message appears:
Windows cannot find ‘D:\Steam\Steam.exe’. Make sure you typed the name correctly, and then try again.
Improper Steam installation, antivirus software, and malware attack are among the common causes of the error. To fix the error, you should check the Quarantine/Virus Chest or a similar folder in your antivirus. If you find Steam.exe there, restore it. If you’re using Avast antivirus, add Steam.exe as an exception. Also, scan your Windows PC for potentially harmful malware.
I hope this helps.
How do I get rid of Windows cannot find error?
You may fix the ‘Windows cannot find’ by running the System File Checker tool. Further, depending on the app or program for which the error occurred, you can take specific measures. For example, you can re-register the Windows Store apps, rename the executable, reinstall the software, or scan your PC for viruses. You may also need to use advanced methods, including editing the Windows Registry.
Read:
- MSDT.exe error Windows cannot access the specified device, path or file
- Credential Manager: The system cannot find the path specified
What is Windows Cannot find file path error?
Windows cannot find the specified path error occurs when you use an invalid path to download or save a file. The error may also occur if the file installation directory has been file modified or removed. To fix the error, make sure you have permission to access the file. Then ensure the file location is accessible (the file is not on a networked or removable media). Also, check if your antivirus is blocking the file.
Read Next: Can’t find Recycle Bin! Where is the Recycle Bin in Windows?
You may have a unique preference when it comes to scrolling directions whether you mouse or the touchpad. Some people prefer the page is scrolled in the same direction in which direction they move their finger on the touchpad. Some people do this in an inverted way. This is called reverse scrolling. Enabling reverse scrolling Windows 10 on your laptop trackpad is easy as Windows offers this customization by default. In some cases, your trackpad scrolls in the wrong way for many reasons. This issue is fixable. If you are wondering how to enable the reverse scrolling Windows 10, follow the steps which are listed in this article.

Table of Contents
Below we have shown how to perform reverse scrolling on both Touchpad and mouse.
Method 1: On Touchpad
Windows 10 supports reverse scrolling on selected computers which comes with a precision touchpad. If this option is not available you can change scroll direction Windows 10 by using the manufacturer’s software for the peripheral. Follow the below-listed instructions for Windows 10 reverse scroll on the touchpad.
1. Press the Windows + I keys together to open Settings.
2. Now, click on Devices as depicted.

3. Scroll down the left pane and select the Touchpad option.

4. Go to the Scroll and zoom section in the right pane and choose Downwards motion scrolls down as depicted.

5. After completing these steps, the pages will scroll in the downwards direction when you scroll up on the touchpad. This is how you change scroll direction Windows 10 using Touchpad.
Also Read: Fix Mouse Wheel Not Scrolling Properly
Method 2: On Mouse
If you are using a mouse for navigating the Windows 10 pages, you have to tweak some registry keys to enable Windows 10 reverse scroll. That is, there will not be a default option in the settings, but you will be able to change the scrolling behaviour by identifying your mouse VID ID and implementing the changes in the Registry editor.
NOTE: Editing or deleting keys in Registry is risky since a small change could cause serious damage to your computer. So, it is recommended to do a complete backup on your computer before proceeding. If you do not know how to back up your registry, refer to our guide How to Backup and Restore the Registry on Windows.
Step I: Identify Mouse VID ID
The Vendor Identification ID (VID) is used to distinguish devices from one another. They are 16-digit numbers assigned by USB Implementers Forum to any particular company where Product Identification ID (PID) are assigned to specific products. They are embedded within the component and are activated when they are plugged into your device. As a first step to change scroll direction Windows 10, find the VID ID of your mouse as instructed below. Follow these steps to identify the mouse identification number.
1. Hit the Windows key and type Device Manager, then click on Open.
2. Double-click on Mic and other pointing devices option to expand it.
3. Right-click on the mouse which is active and click on the Properties option.

4. Switch to the Details tab and select the Device instance path option in the Property drop-down menu.

5. Note down the VID ID value of the mouse. In our example, it is: ACPI\DLL09EC\4&4E6962E&0.

6. Once you have completed all the above-listed instructions, follow the steps below for modifying the Registry to enable the reverse scrolling.
Step II: Perform Reverse Scrolling
Once you have found the VID ID of your mouse, you can use the following steps to tweak the Registry for Windows 10 reverse scroll.
1. Press the Windows key, and type regedit and click on Open.

2. Go to the following path in Registry Editor.
HKEY_LOCAL_MACHINE\SYSTEM\CurrentControlSet\Enum\HID

3. Expand the key folder which matches the VID ID of the mouse for example ACPI\DLL09EC\4&4E6962E&0.

4. Expand the available key and open the Device Parameters key.
5. Now, in the right pane, double click on the FlipFlopWheel DWORD.

6. Then, change the Value Data from 0 to 1 and click on OK.

7. Close the Registry editor and, restart your computer.
8. Now, the page will scroll up when you scroll up the mouse wheel.
9. If you want to reverse the changes to their default settings use the same steps above but make sure to set the value from 0 to 1 in Step 5.
Also Read: How to Disable Mouse Acceleration in Windows 10
Additional Method: How to Perform Reverse Scrolling with Macro Script
There is an additional way to reverse your scrolling direction which is using software that is capable of setting up macro scripts. The simplest method of implementing this is by doing with AutoHotkey. It is user-friendly and is completely free. You can reverse both your mouse and touchpad with this method.
1. You can download the freeware by visiting the official Autokey website.
2. Here, click on the Download button. Wait for the download to be completed and run the setup file from My downloads to install it on Windows 10.

3. Right-click on your desktop and select New > Text Document. This creates a New Text Document.
Note: You don’t need to name the file right now.

4. Open the new Text Document and paste the following commands.
WheelUp::
Send {WheelDown}
Return
WheelDown::
Send {WheelUp}
Return

5. Now, save the modifications and change the extension as .ahk from .txt. Now you will receive a prompt showing that your file might be unusable. Don’t mind it, proceed by clicking on OK.
NOTE: If you cannot see this extension, open a File Explorer window. Then, switch to the View tab and select the box which is next to File Name Extensions.

6. As soon as you press the OK button you must see the icon of the text file transform into some other format.
Note: If this happens, Windows is recognising it as an AutoHotkey file. Enforce the hotkey by double-clicking on it and reverse the scrolling of the mouse.
7. If you want to disable the hotkey and you prefer the default way of scrolling, open the Task Manager by searching it in the Windows Search bar. Click on Open to launch it.

8. Now, switch to the Processes tab and look for AutoHotkey which will be under the Background processes or Apps sometimes.

9. Then, click on End Task for reverting to the default settings. This method is simple and effective if you want to change scroll direction Windows 10 using third-party apps.
Also Read: Fix Logitech Mouse Double Click Problem
Pro Tip: How Do You Fix an Inverted Mouse
The steps to fix an inverted mouse are completely different in Windows and Macs. If you have a Mac, the process is simple, and here is how to do it.
Option I: On Mac
Fix an inverted mouse in Mac.
1. Click on the Apple icon to go to the main Settings.
2. Go to System Preferences and then click Mouse.

3. Now, uncheck the checkbox which is beside the Scroll Direction: Natural option.
Option II: On Windows
Here below are the steps to do it in Windows.
1. Go to Device Manager and then to Mice and Other Pointing Devices.

2. Right-click on your mouse and choose Properties.

3. Go to the Details tab and choose Device Instance Path in the Property menu.
4. Note down the text in the Value field.
5. Go to Registry Manager and then go to the following path.
HKEY_LOCAL_MACHINE\SYSTEM\CurrentControlSet\Enum\HID

6. Look for the folder with a name that matches the text in the Value field and then open it.
7. Click on Device Parameters and go to the FlipFlopWheel property. Change the value in the Value field. That is, if the value is 1 change it to 0 and if the value is 0 change it to 1.
8. Click OK.
Here are answers to some of the frequently asked questions which are related to Reverse Scrolling Windows 10 (Both Touchpad and mouse).
Frequently Asked Questions (FAQs)
Q1. How Do You Invert a Scrolling Wheel in Minecraft?
Ans. Normally, the direction of your mouse scrolling in Minecraft is the same as you have implemented through your PC settings. However, if your mouse is scrolling in the wrong direction, you can modify it in the settings of the game. Go to the Controls Settings and click on the Invert Mouse Off option which changes the direction of scrolling.
Q2. Can You Reverse Your Scrolling Direction?
Ans. Yes, you could reverse the scrolling direction of your mouse or touchpad. Some people prefer the page is scrolled in the same direction in which direction they move their finger on the touchpad. Some people do this in an inverted way. This is called reverse scrolling.
Q3. Why Does My Mouse Scroll the Wrong Way?
Ans. Sometimes the reason for this may be simple. If there is dust around the scrolling wheel your mouse may scroll in the wrong direction. Another common reason is the old battery. Most of the time, the problem is with the mouse driver. You can update it in Windows by opening the Device Manager and right-clicking your mouse which is under the Mouse and Other Pointing Devices option and from there choose Update Driver.
Recommended:
- Fix Pokémon Go Error 26 on Android
- Fix There is a System Repair Pending Which Requires Reboot to Complete
- Fix This Operation Requires an Interactive Window Station
- Fix Battlefront 2 Mouse Not Working in Windows 10
We hope that this guide will be useful to fix mouse scrolling in the wrong direction. You also learned how reverse scrolling Windows 10 works and how to enable or disable it as needed. Feel free to reach out to us with your queries and suggestions via the comments section below.

(Image credit: Windows Central)
On Windows 10, the mouse and touchpad are ubiquitous input peripherals that make navigation and interaction with elements on the desktop a lot easier. However, there’s a problem. These peripherals have a default scroll direction (scroll down to move up), which, while it works for the majority of users, it’s not the default behavior everyone feels comfortable using.
If you are among those who like pages to move up as you scroll up for a more natural experience, Windows 10 includes an option to reverse the scrolling direction of the touchpad using the Settings app. If you want to change the scrolling direction of the mouse, you won’t find an option, but you can modify the Registry to complete the task.
In this Windows 10 guide, we’ll walk you through the steps to reverse the scrolling direction of your touchpad or mouse.
- How to reverse touchpad scrolling direction on Windows 10
- How to reverse mouse scrolling direction on Windows 10
Windows 10 supports reverse scrolling only on computers with a precision touchpad. If the option isn’t available, you may still be able to change the scrolling behavior using the manufacturer’s software for the peripheral.
To reverse the touchpad scrolling direction through Settings, use these steps:
- Open Settings.
- Click on Devices.
- Click on Touchpad.
- Under the «Scroll and zoom» section, use the drop-down menu to select the Down motion scrolls down option.
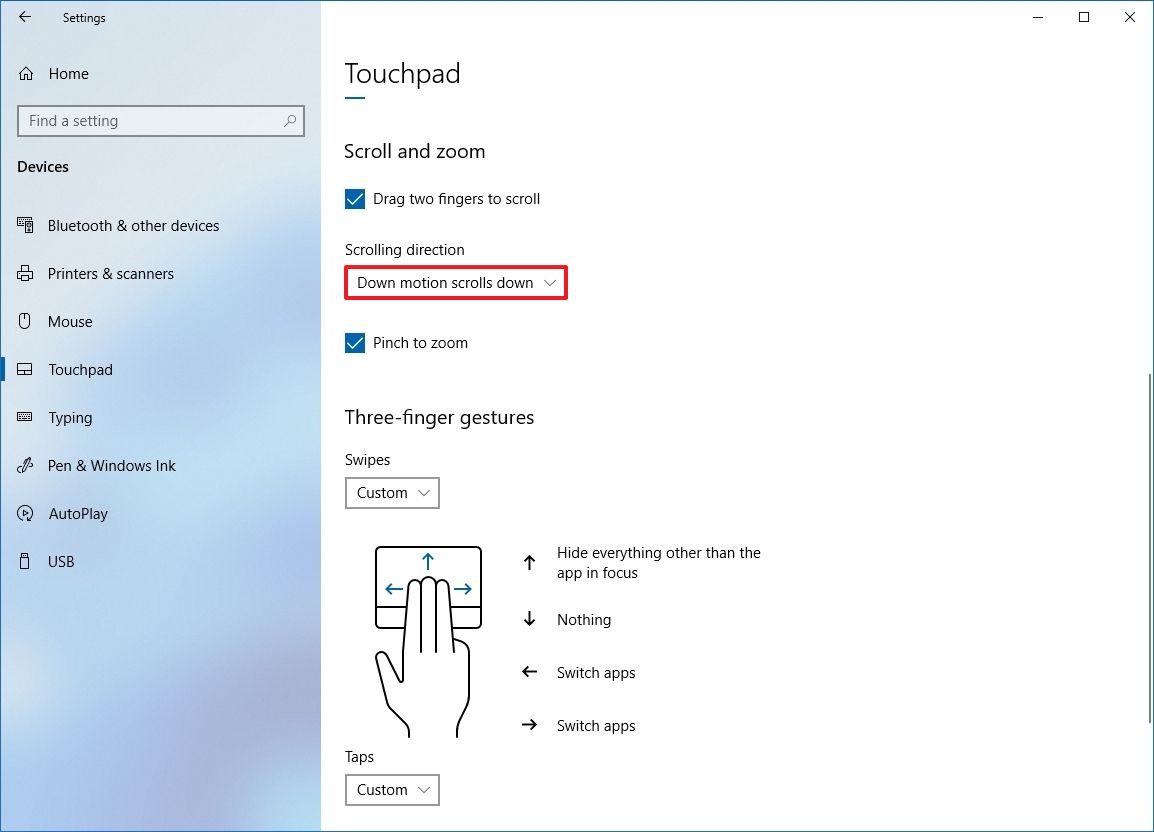
Once you complete the steps, using the scrolling up gestures on the touchpad will scroll pages in the downward direction for a more natural experience.
If you use a mouse to navigate the Windows 10 desktop, the Settings app does not include an option to reverse the scrolling direction. However, you can still modify the scrolling behavior using the Registry.
All the latest news, reviews, and guides for Windows and Xbox diehards.
Warning: This is a friendly reminder that editing the Registry is risky, and it can cause irreversible damage to your installation if you don’t do it correctly. Before proceeding, it’s recommended to make a full backup of your computer.
Identifying mouse information
To identify the mouse identification number, use these steps:
- Open Start.
- Search for Device Manager, click the top result to open the app.
- Expand the Mice and other pointing devices branch.
- Right-click the active mouse and select the Properties option.
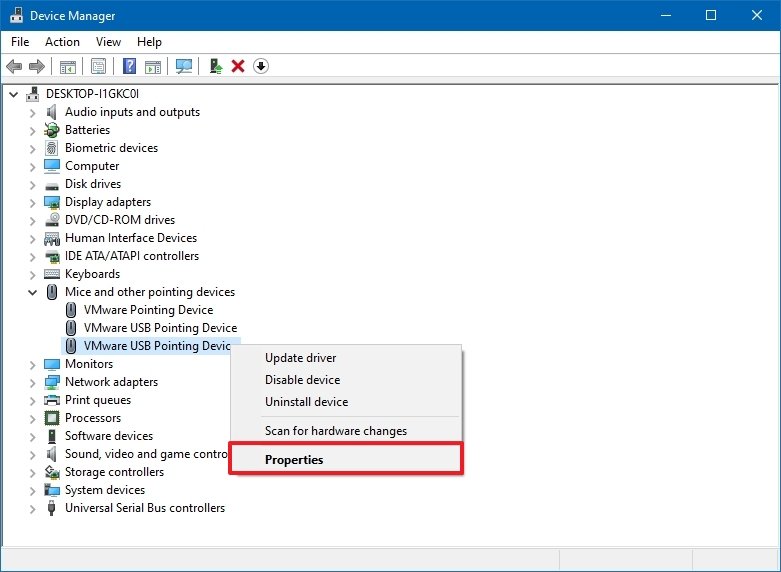
- Click on the Details tab.
- Use the «Property» drop-down menu and choose the Device instance path option.
- Confirm the «VID ID» value for the mouse — for example, VID_0E0F&PID_0003&MI_01.
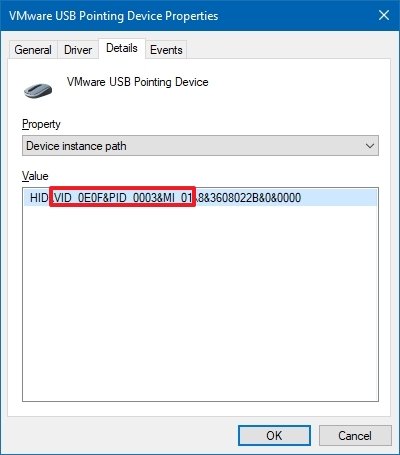
After you complete the steps, continue with the steps below to modify the Registry to reverse the mouse scrolling.
To use the Registry to reverse the mouse scrolling direction, use these steps:
- Open Start.
- Search for regedit and click the top result to open the Registry Editor.
- Browse the following path:
HKEY_LOCAL_MACHINE\SYSTEM\CurrentControlSet\Enum\HID - Expand the key (folder) that matches the «VID ID» of your mouse — for example, VID_0E0F&PID_0003&MI_01.
- Expand the available key.
- Select the Device Parameters key.
- Double-click the FlipFlopWheel DWORD and set the value from 0 to 1.
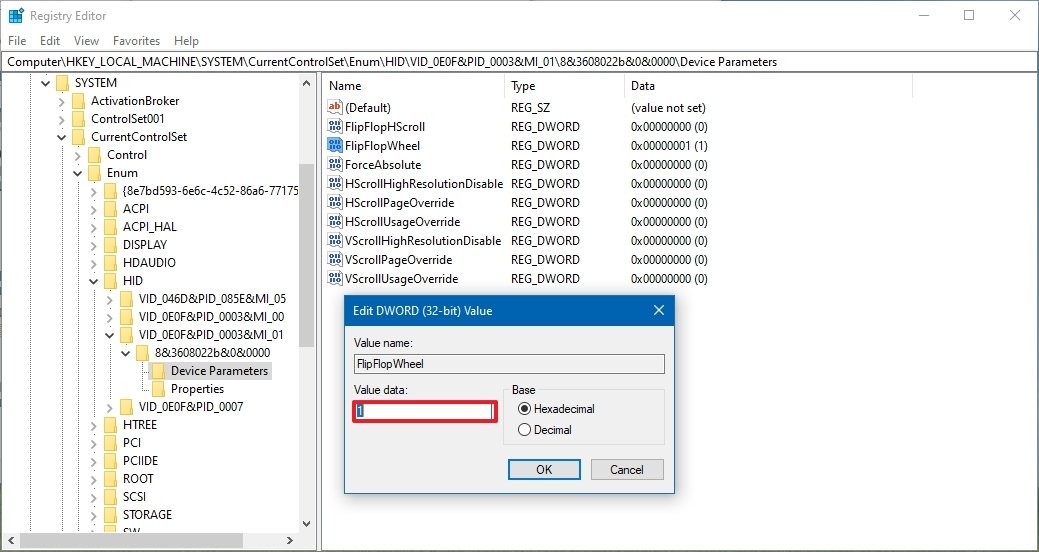
- Click OK.
- Restart your computer.
Once you complete the steps, when you scroll up with the mouse wheel, the page should also scroll up.
If you change your mind, you can always revert the changes to their original settings using the same instructions, but on step 7, make sure to set the value from 1 to 0.
More Windows resources
For more helpful articles, coverage, and answers to common questions about Windows 10 and Windows 11, visit the following resources:
- Windows 11 on Windows Central — All you need to know
- Windows 11 help, tips, and tricks
- Windows 10 on Windows Central — All you need to know
Mauro Huculak has been a Windows How-To Expert contributor for WindowsCentral.com for nearly a decade and has over 15 years of experience writing comprehensive guides. He also has an IT background and has achieved different professional certifications from Microsoft, Cisco, VMware, and CompTIA. He has been recognized as a Microsoft MVP for many years.