
Reinstalling Windows can be a time-consuming process, riddled with obstacles. Some people might get lucky and not receive a single error message in the process, while others will need to solve some problems.
While a lot can go wrong, there are a few “Windows cannot be installed to disk” messages that are more common than others.
Thankfully, there are ways to fix these problems and continue with Windows installation. Whether you’re trying to move Windows to a newly installed SSD or having issues with the partition style, we can help you find solutions.
The error “The selected disk has a GPT partition style” comes up because your computer was designed to be set up in Basic Input/Output System or BIOS mode.
But the hard drive where you’re trying to install Windows is partitioned in GPT, which runs on Unified Extensible Firmware Interface or UEFI.
The only way to solve this problem is to convert the GUID Partition Table or GPT disk to the Master Boot Record of MBR. Here’s what you should do:
- When you see the error “The selected disk has a GPT partition style” on your screen, open Command Prompt.

- Enter the “
diskpart” command and press Enter.
- Type the “
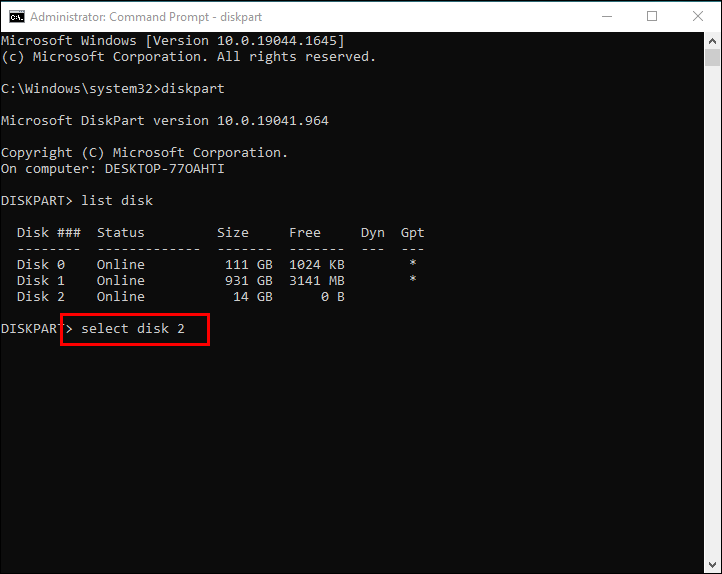
list disk” command and hit Enter again.
- Type “
select disk #” and press Enter. Make sure to replace “#” with the GPT partition style disk number.
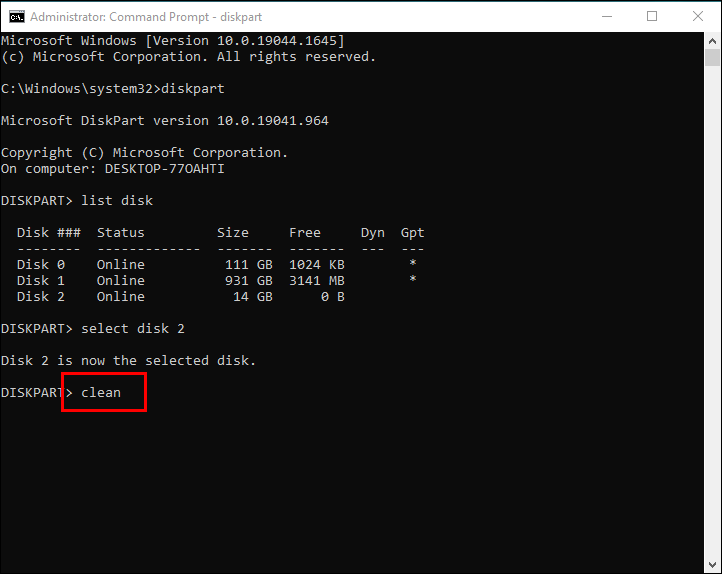
- Type “
clean” and hit Enter followed by “convert mbr” and Enter.


Windows Cannot Be Installed to This Disk MBR
Many users come across “The selected disk is of the MBR partition style” when they’re trying to install Windows 10, 8, or 7.
That happens when you’re trying to set up Windows in UEFI, but your hard drive is not set up to support it. Essentially, the selected disk has GPT instead of MBR partition style.
The good news is that you can change the UEFI boot configuration by going through BIOS. Here’s how:
- Reboot your computer and start BIOS mode. Note that the process may vary depending on the manufacturer, but “Delete + F10” is the standard shortcut.

- Go to “Boot Devices” in BIOS and select the boot order that changes the DVD drive from UEFI to Legacy Mode.

- Make sure to save the changes and exit BIOS.
- Reboot your computer and try the Windows installation process again.


Windows Cannot Be Installed to This Disk SSD
If you have a brand new Solid State Drive (SSD) on your computer, moving Windows will surely improve speed and performance.
But you might run into a situation where either BIOS or the Windows setup doesn’t recognize the SSD. The first course of action should be to check the cable connection to the SSD.
You might need to replace the serial advanced technology attachment or SATA cable used with SSD. It’s also important to check if the SATA port is enabled, which you can check manually by going into BIOS mode and controller and drive details.
However, if the problem persists, you’ll need to use Command Prompt function to fix the problem. Here’s how:
- Launch Command Prompt by searching it in Windows’ main toolbar.
- Type “
diskpart” followed by the Enter key.
- Enter “
list disk #” and replace the disk’s number, then press Enter.
- Enter “
clean all” and press Enter again.
- Type “
exit,” close Command Prompt. - Go back to Windows setup.

Don’t forget to back up any valuable information from SSD before going through this process, as it will wipe any data you have on it.
Windows Cannot Be Installed to This Disk the Disk May Fail Soon
If you’re trying to reinstall Windows 10 or 11 to ensure better performance, upgrade the system, or get rid of malware, you may encounter a strange error.
A pop-up window may appear telling you that “The Windows cannot be installed to this disk. The disk may fail soon.” The error will prompt you to consider another disk for Windows installation, but there is a way to get around this problem.
You can attempt to solve this problem with the CHKDSK (check disk) Windows utility. It was designed to catch errors and resolve them. The process is straightforward, and these are the steps to follow:
- Go to your desktop’s search bar and type in “
CHKDSK.”
- Right-click on the results and select “Run ad Administrator.”


You can also perform the same check using Command Prompt by launching it and entering “CHKDSK.”
Windows Cannot Be Installed to This Disk NTFS
Some users have run into the “Windows must be installed to an NTFS partition” error when trying to install Windows to a specific location.
This means that your boot partition is not properly set up, and you might need to convert some older file systems to the New Technology File System or NTFS drives.
As with many other partition style issues, the most efficient solution is to use the DiskPart management. In this particular case, that procedure requires the following steps:
- Open the Command Prompt and type “
diskpart” and press Enter.
- Type “
select disk #” press Enter and type “list partition” and press Enter.
- Type “
select partition #” followed by Enter key.
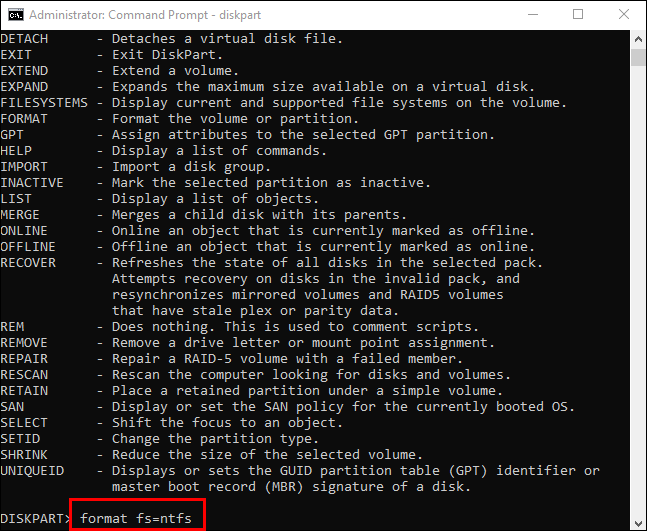
- Type “
format fs=ntfs quick” and press the Enter key to start the file system conversion.


Windows Cannot Be Installed to This Disk 0x803
The “Error 0x80300024” is something many Windows users encounter when installing a newer version of the operating system.
Again, this problem indicates an issue with a partition style or volume. However, it’s also essential to check if your computer has minimal requirements in terms of hardware and can indeed support the Windows upgrade. If that’s not an issue, you can try several other solutions.
This error can be caused by other hard drives connected to your computer. They could be interfering with the Windows installation process, so make sure to disconnect them.
Also, installing the new Windows using any of the USB ports on your computer might be the root of the problem. Try every USB port to eliminate the possibility that one of the ports is causing the problem.
Finally, the hard drive partition might contain some corrupted data, preventing the Windows installation. The only solution there is to format the disk where you want to install Windows.
It’s a simple enough process, but you will need to back up any existing data on the disk – otherwise, it will be permanently lost. If you want to wipe the data clean or already have it saved, here’s what you need to do:
- Right-click on the disk where the Windows installation will go.
- Select the “Format” option and confirm.
- Select the “Next” option when the disk is formatted to proceed with Windows installation.
Installing Windows Without a Hitch
If you’ve ever attempted to reinstall the current version of Windows or install a new one, you probably know that errors are not unusual. Still, it can be frustrating trying to figure out what went wrong and how to fix it.
Fortunately, the most frequent issues are relatively easy to solve by going into BIOS mode or using commands in Command Prompt. Sometimes it is a hardware issue, and you’ll need to check USB ports, cables, and even format a disk to erase any corrupted files.
Have you ever run into an error when installing Windows? Let us know in the comments section below.
“Windows Cannot Be Installed to This Disk” is one of the most irritating errors one could ever encounter while installing Windows on a hard drive. Notably, there could be several causes of this error. But fortunately, there are some workarounds to eliminate the “Windows Cannot Be Installed to This Disk” error, and we’ve all of them with us.
If you’re also getting the same error when trying to install Windows on your storage drive, read this troubleshooting guide until the end, as we’ve shared all the true and tested workarounds in it. So read ahead and fix the “Windows Cannot Be Installed to This Disk” error with ease.
What Are the Types Of “Windows Cannot Be Installed to This Disk” Error?
Here are some of the most common types of “Windows Cannot Be Installed to This Disk” errors users are getting when trying to install Windows:
- Windows Cannot Be Installed to This Disk
- The Selected Disk Is of the GPT Partition Style
- Selected Disk Has an MBR Partition Table
- This Computer’s Hardware May Not Support Booting to This Disk
- Windows Cannot Be Installed to This Disk GPT
- Windows Cannot Be Installed to This Disk the Disk May Fail Soon
- Windows Must Be Installed to an NTFS Partition
- Windows Cannot Be Installed on Dynamic Disk
- Windows Cannot Be Installed to This MBR Disk
Why Is the “Windows Cannot Be Installed to This Disk” Error Appearing?
The “Windows Cannot Be Installed to This Disk” error usually appears when the hard drive partition style doesn’t support your BIOS. If you don’t know, there are basically two versions of BIOS: Legacy and Unified Extensible Firmware Interface (UEFI). UEFI is a modern version of BIOS.
Whereas Legacy is an older version of BIOS that doesn’t support Windows installation. So, if your system’s BIOS mode is set to Legacy, you can’t install Windows on it.
The below-mentioned ones could also be the reason for this error and other errors:
- Enabled Hard Disk Protection
- Disk Errors
- Enabled UEFI Boot
- Unnecessary Boot Devices in BIOS
- Enabled AHCI Mode
- Switched On EFI Boot Sources
- Incorrect SATA Controller Mode Settings
- Problem With Your BIOS Settings
Fix the “Windows Cannot Be Installed to This Disk” Error
Here are some working workarounds to get rid of the “Windows Cannot Be Installed to This Disk” error:
1. Confirm If Your PC Supports UEFI
Before moving to the workarounds, we’ve a quick suggestion to make. We first suggest you check if your system comes with UEFI support. Simply put, you need to check whether your system’s hard disk can install Windows. We can’t list the steps to do so, as it varies from OEM to OEM. But it’s worth stating that you can check the same in the Boot tab of BIOS.
Once you’ve moved to the Boot tab, check if your Boot Mode is set to UEFI Mode. If yes, then it means your system can install the Windows system. But something else is stopping it from installing. In that case, try other fixes to fix the “Windows Cannot Be Installed to This Disk” error.
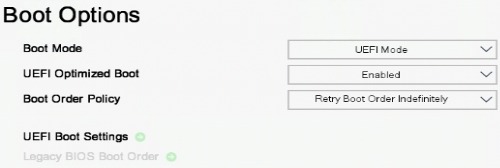
In case the Boot Mode is set to Legacy, you can’t install Windows on it. You need to convert your GPT disk into an MBR disk to install it. You can check the next workaround to do the same.
2. Convert Your GPT Disk to MBR
If your system’s Boot Mode is set to Legacy, you’ve to convert your GPT disk to an MBR disk. You can do the same using Command Prompt and Disk Management, and this section explains the same:
Use Command Prompt
You can check the below steps to convert your GPT disk to an MBR disk using Command Prompt:
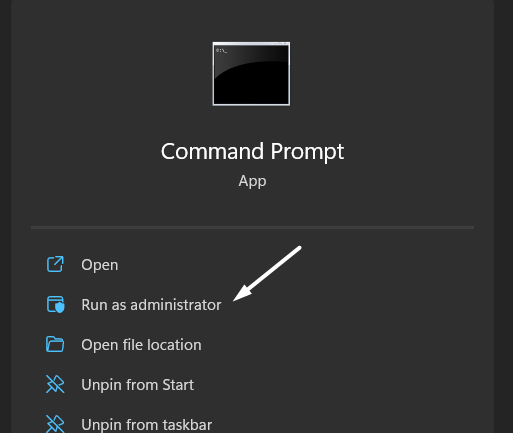
1. Press the Windows key to open the Windows Search Box, and type Command Prompt in it.

2. Click on Run as administrator in the search results to open Command Prompt with admin rights.
3. Once the console is opened, type list disk in it and press the Enter key to execute it. Also, make sure to enable the Diskpart utility before that by running the diskpart command.

4. Type select disk 1 in the console. Also, make sure to replace the “1” with your GPT disk’s serial number mentioned in the table that appeared after executing the previous command.

5. After that, type the clean command in the console to remove everything from the selected GPT disk.
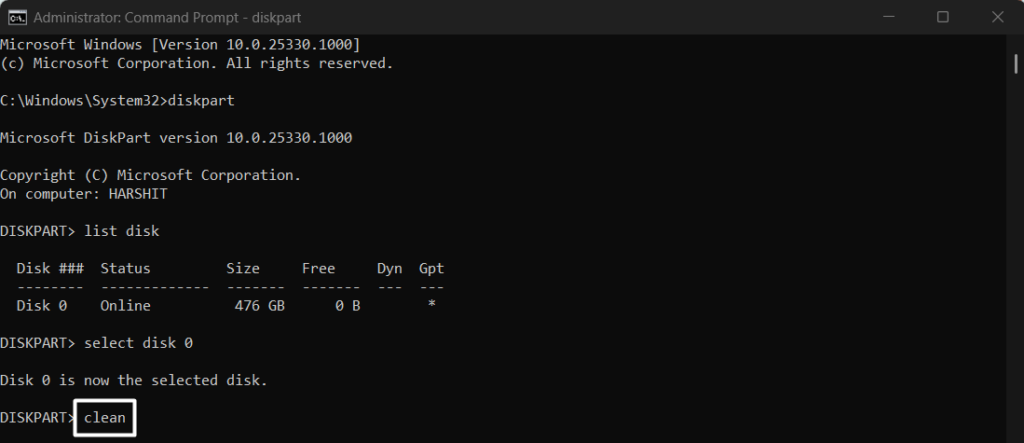
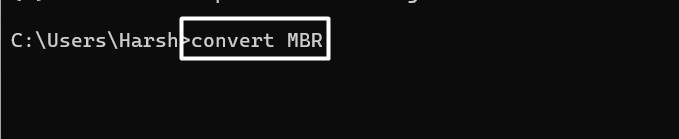
6. Lastly, copy-paste convert MBR in the CMD and press Enter to convert the chosen GPT disk to MBR.
Using the Windows Disk Management Utility
Below are the steps to turn your GPT disk into an MBR disk using the Disk Management utility:
1. Open the Control Panel on your system and proceed to the System and Security section.
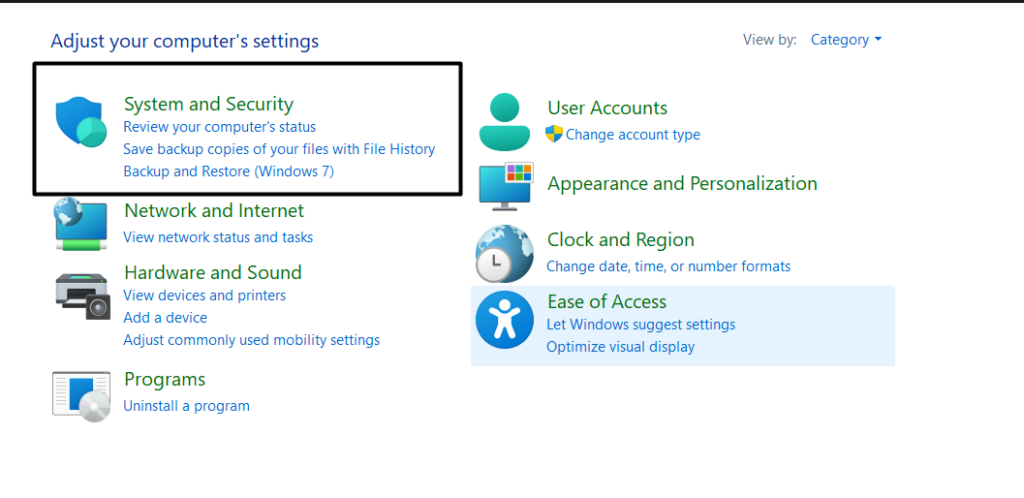
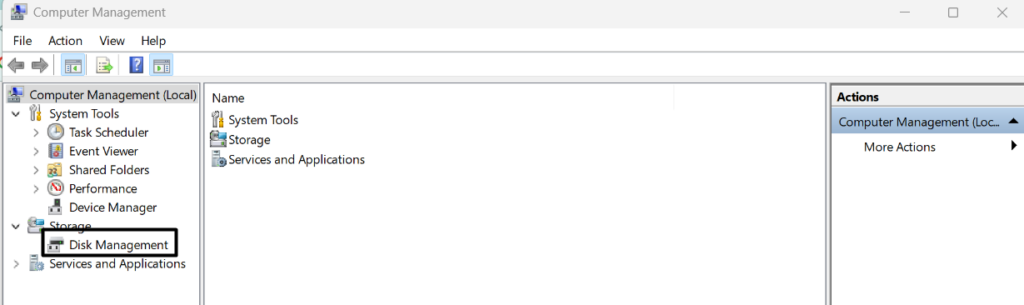
2. In the System and Security section, click on the Computer Management option in the Administrative Tools option.

3. Click on the Disk Management option under Storage in the left navigation pane to open it.
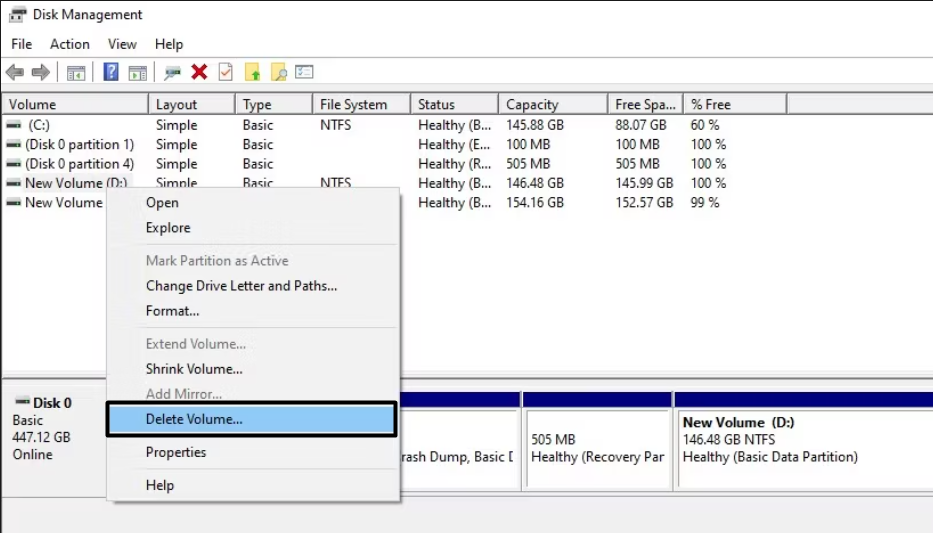
4. To convert your GPT disk to an MBR disk, you have to delete all the existing volumes. So, to do so, right-click on a volume, and select the Delete Volume… option from the right-click menu.
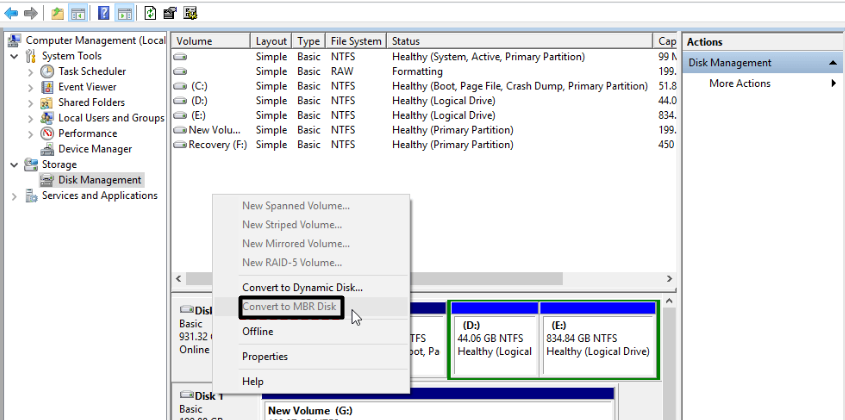
5. Once all the volumes are deleted, right-click on the MBR disk and select Convert to MBR Disk from menu.
After converting your GPT disk to an MBR disk, check if you can install Windows.
Use a Third-Party Tool
You can also convert your GPT disk to an MBR disk using a third-party disk management tool. There are plenty of disk management tools that let you do so with ease. So, if the above methods seem difficult to you or doesn’t work, do the same with third-party software.
3. Make the Partition Active
It could be possible that the partition you’re using to install Windows isn’t active; thus, this error appears. In that case, we suggest you make that particular partition active and check if it improves the situation. Follow the below steps, as they demonstrate the same:
1. Press the Windows key on your keyboard to open the search box and type Command Prompt in it.
2. Click on the Run as administrator option from the search results to launch the app with administrative rights.
3. Once the Command Prompt is opened with admin rights and type the diskpart command in it to activate the utility.
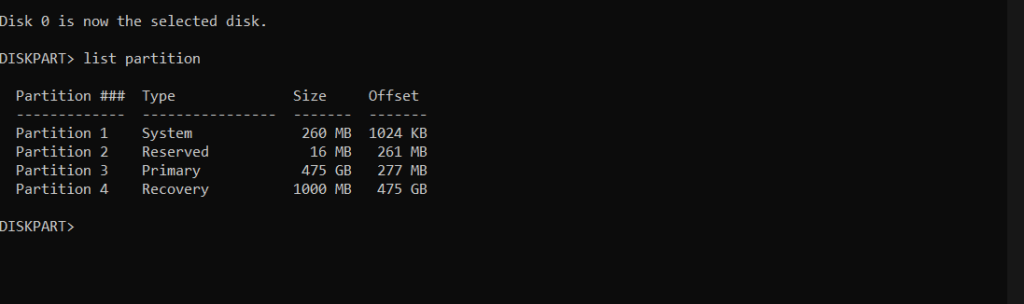
4. After that, execute the list disk command in the console to view all your connected hard drives and their partitions.
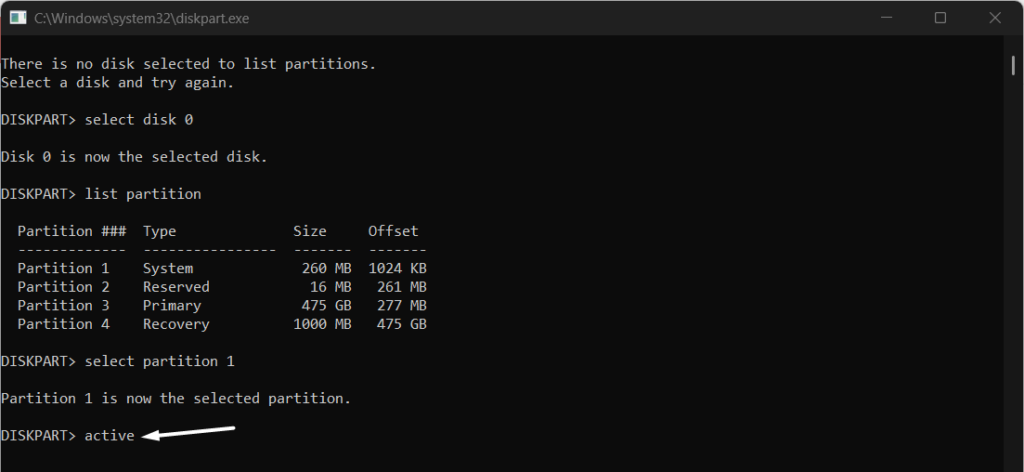
5. Type select disk 0 in Command Prompt and press the Enter key to execute the command.
Note: You need to now replace “0” with the hard drive digit you want to activate.
6. Once done, copy-paste list partition into the Command Prompt and press the Enter key.
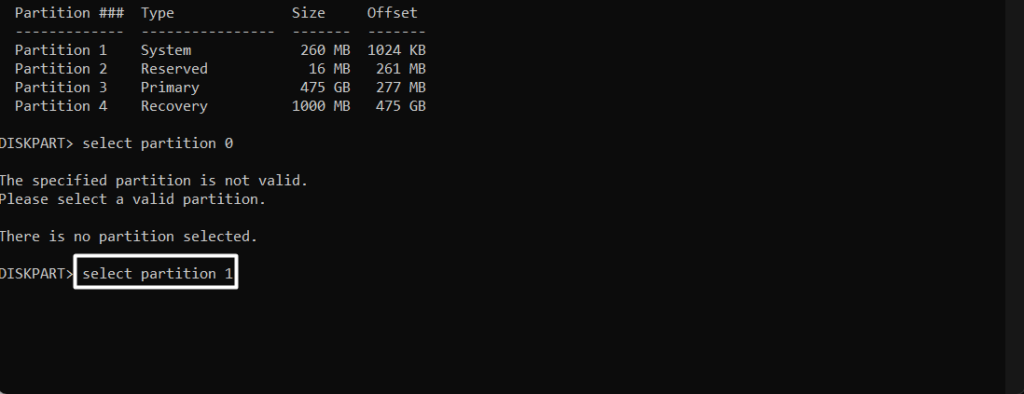
7. Type the select partition 0 command in the console and replace “0” with the partition’s digit you want to activate.
8. Type active in the Command Prompt utility to activate the selected partition.
4. Make Sure That No Additional Hard Drives Are Connected to the PC
One of the reasons for getting the “Windows Cannot Be Installed to This Disk” error is the additional hard drives connected to the system. In that case, we suggest you disconnect all additional drives, such as USB flash drives, SD cards, etc., on which you aren’t going to install Windows.
Fix the “Selected Disk Has an MBR Partition Table” Error
Below are some working solutions to resolve the “Windows Cannot Be Installed to This Disk” error message:
1. Try Disabling EFI Boot Sources
One of the workarounds to get rid of the “Windows Cannot Be Installed to This Disk” error is to disable the EFI boot sources option in your system’s BIOS. Doing so will allow you to install Windows on your GPT disk without such issues. So, follow the below steps to turn off EFI boot sources in your system’s BIOS:
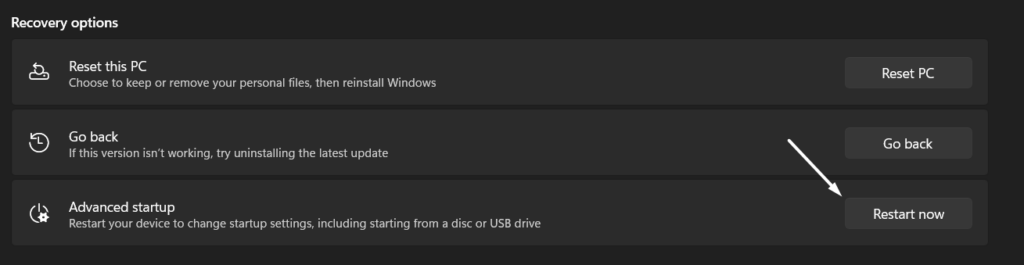
1. Press the Windows + I shortcut to open the Settings app and navigate to the Recovery section.

2. In the Recovery section, click on the Restart now button right next to the Advanced startup option.
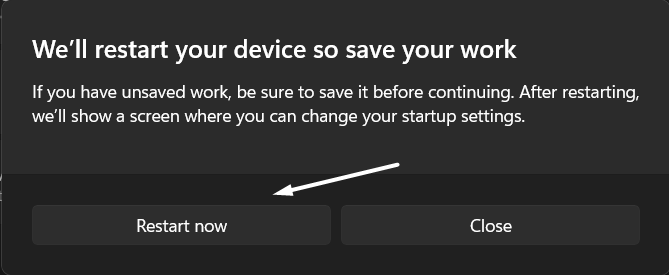
3. Then, click on the Restart now button on the We’ll restart your device so save your work prompt.
4. Once you click on Restart now, you’ll see the Choose an Option screen. From there, you need to go to Troubleshoot > Advanced options > UEFI Firmware Settings.

5. On the UEFI Firmware Settings screen, move to the Boot Order section and search for EFI boot sources.
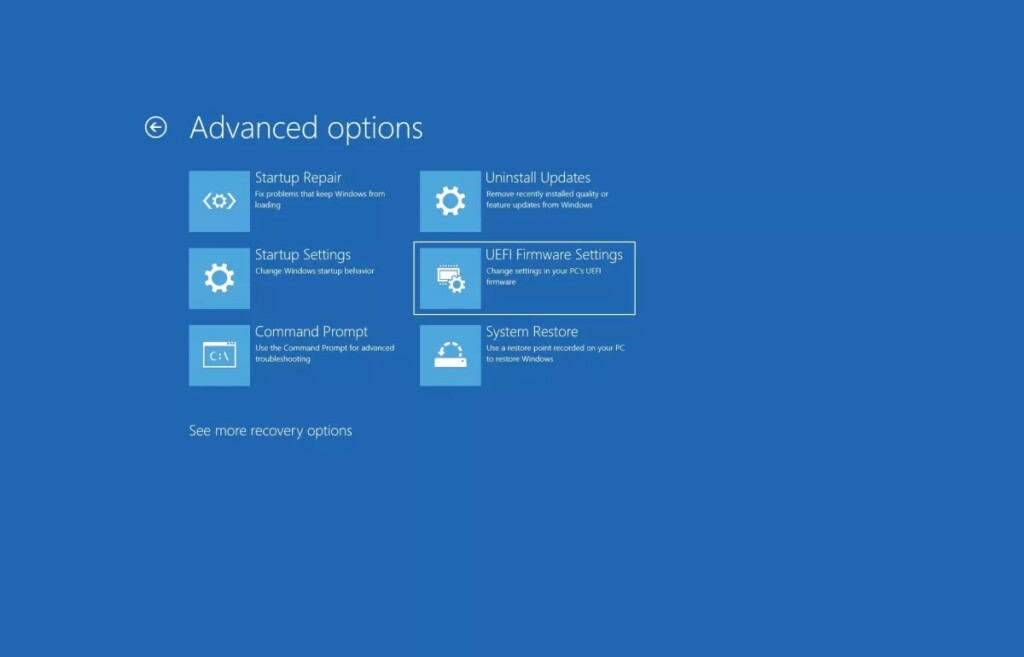
6. Lastly, switch off the EFI boot sources option, exit BIOS, and try installing Windows again on your drive.
If disabling the EFI boot sources option in BIOS doesn’t help you install Windows, then you’ll have to convert your disk. You need to convert your disk from MBR to GPT. Also, make sure to re-enable the EFI boot sources option before doing so.
2. Convert From MBR to GPT Using the Command Prompt
If disabling the EFI boot sources in BIOS doesn’t eliminate the error, you need to convert your MBR disk to a GPT disk. You can easily do the same using the Command Prompt utility. We’ve explained the process to do the same in the below-mentioned instructions:
1. Press the Windows key to open search, type Command Prompt in it, and select it from the results.
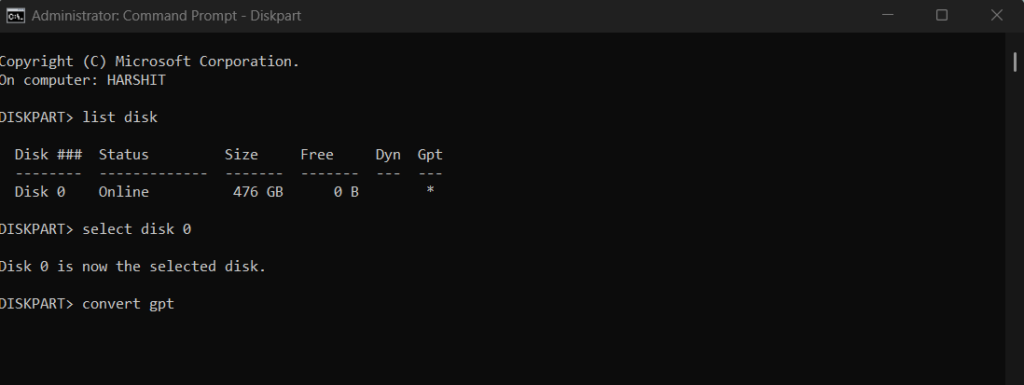
2. Type diskpart in it, press Enter, and then execute the list disk command to view all the existing disks.
3. You need to now select the disk that you want to convert to GPT. So, type select disk 0 in the console. Make sure to replace “0” with the digit of the disk that you want to convert to GPT.
4. Once done, type clean in the console to clean the partition and then convert gpt to convert it into GPT.
Fix the “This Computer’s Hardware May Not Support Booting to This Disk“ Error
Try these iterations to resolve the “This Computer’s Hardware May Not Support Booting to This Disk” error:
1. Disable Write Protection
In case you’re getting the “This Computer’s Hardware May Not Support Booting to This Disk” error while installing Windows, then it could be possible that the write protection is enabled on your hard drive. This option disallows system from erasing or writing over the information stored on your storage drive. Hence, it sometimes leads to this error.
Due to this, we suggest you disable write protection on your drive and check the issue’s status. You can follow the below-mentioned instructions to disable it on your system:
1. Open Command Prompt on your Windows system with administrative rights.
2. Copy-paste the below-mentioned command into Command Prompt and press Enter.
diskpart3. Type list disk in the same Command Prompt and press the Enter key to execute the listed command.
4. After that, copy-paste the below-mentioned command into the Command Prompt and press Enter.
select disk dNote: Please replace “d” with the letter of the hard drive you’re trying to disable write protection on.
5. Execute the below-mentioned command in the console to remove the read-only permission.
attributes disk clear readonly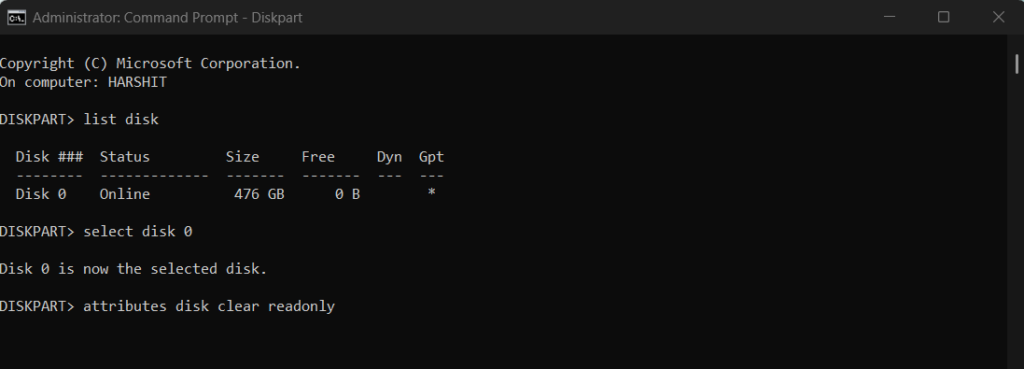
After performing the above instructions, try installing Windows again to check whether the issue is fixed.
2. Configure the SATA Controller Mode
If switching off the write protection on your hard drive does eliminate the error, then it could be possible that your SATA Controller mode settings in BIOS are improperly configured.
In that case, we suggest you set the SATA Emulator option to the AHCI Mode. We’ve mentioned the instructions to make this exact change using Registry Editor below with ease:
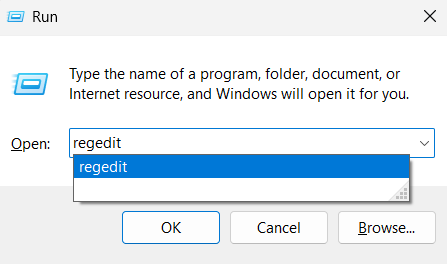
1. Use the Windows + R keyboard shortcut to open the Run utility, type regedit, and press the Enter key.
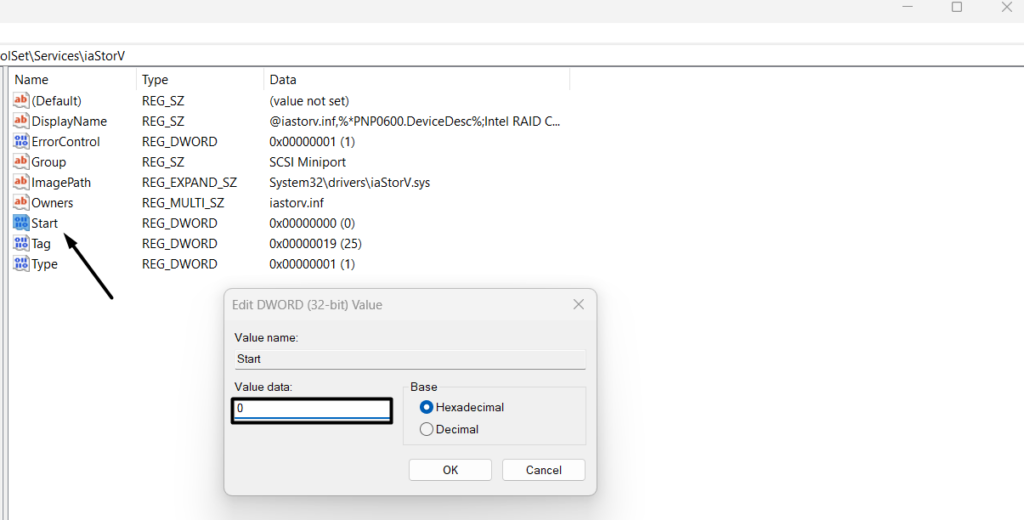
2. Once the Registry Editor is opened, go to the below-mentioned location:
HKEY_LOCAL_MACHINE\ SYSTEM\ CurrentControlSet\ Services\ iaStorV
3. Next, double-click on the Start key in the right panel and enter 0 in the Value data: field.
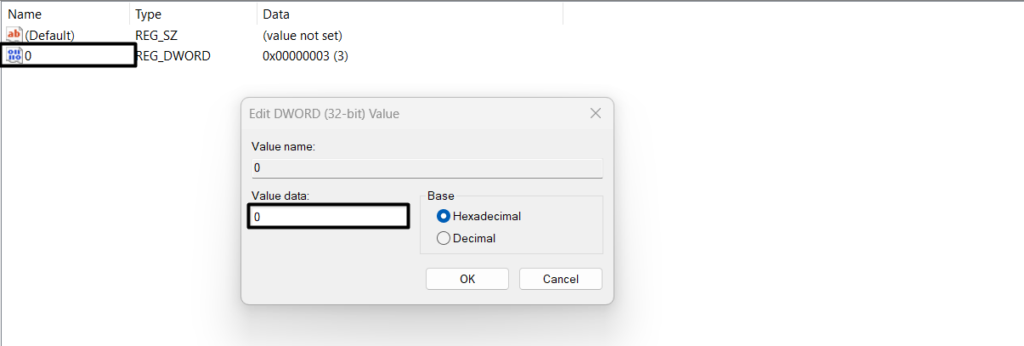
4. Once done, head to the below-mentioned location and double-click on StartOverride in the left panel.
HKEY_LOCAL_MACHINE\ SYSTEM\ CurrentControlSet\ Services\ iaStorAV\5. Double-click on 0 in the right panel, add 0 in the Value data: field, and click on OK to save all these changes.
6. Navigate to the HKEY_LOCAL_MACHINE\ SYSTEM\ CurrentControlSet\ Services\ storahci path.

7. Double press on the Start key in the right panel, add 0 in the Value data: field, and press the Enter key.
8. After doing so, boot your system in BIOS and move to the UEFI Firmware Settings section. You can check Fix 3 (Steps 1 – 4) to enter your system’s BIOS and do the same.
9. Once you’ve moved there, look for the SATA or SATA Mode Selection option and set it to AHCI.
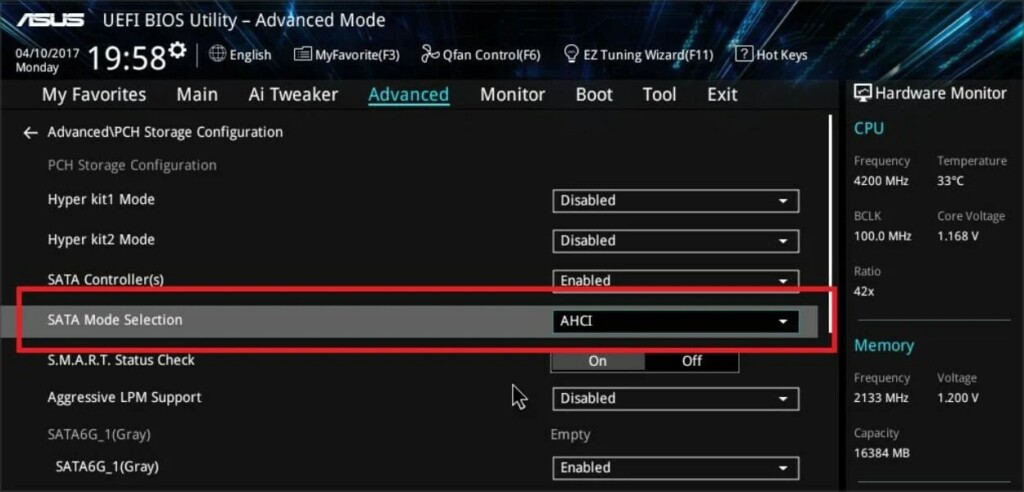
10. Lastly, exit BIOS and reboot your system normally and let the SATA drivers be installed. Once done, check if the error is gone.
3. Connect Your DVD Drive to the Motherboard
This error sometimes also appears when you connect your SSD and DVD to the controller. Due to this, we suggest you connect your DVD drive to your motherboard and the SSD with to system’s controller. Luckily, this has fixed the issue for some users. So, try the same with your SSD and DVD.
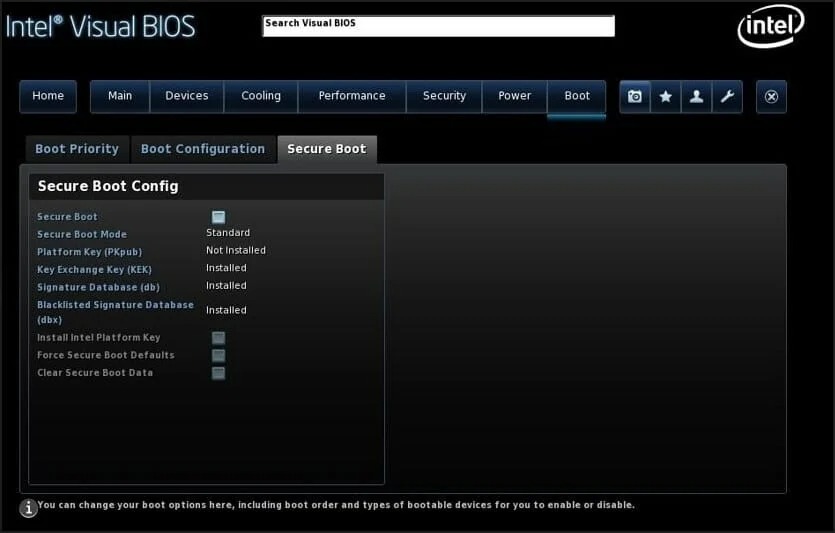
4. Turn Off Intel Boot Security
Some users said that disabling Intel Boot Security in BIOS can also help fix the error. Due to this, we suggest you disable the above option in your system’s BIOS. We’ve mentioned the instructions to turn off Intel Boot Security below:
1. You need to first enter your system’s BIOS mode and navigate to the Secure Boot section.
2. In the Secure Boot section, search for Intel Boot Security and disable the toggle.
5. Connect Your Hard Drive to Intel SATA 3 Port Instead of Marvell Port
Another fix to get rid of the “This Computer’s Hardware May Not Support Booting to This Disk” error is to connect your hard drive to an Intel SATA 3 port instead of a Marvell port. You can do this in the UEFI Firmware Settings section in your PC’s BIOS.
6. Turn Off All Unnecessary Boot Devices in BIOS
Some users said that disabling all the unnecessary boot devices in the system’s BIOS can also resolve the “This Computer’s Hardware May Not Support Booting to This Disk” error.
So, try disabling all unnecessary boot devices and check the issue’s status. Follow the below-mentioned instructions to disable all unnecessary boot devices:
1. You need to first enter your PC’s or laptop’s BIOS and navigate to the Boot section of it.
2. In the Boot section, you’ll see all the boot devices in the Boot Options Priorities section.
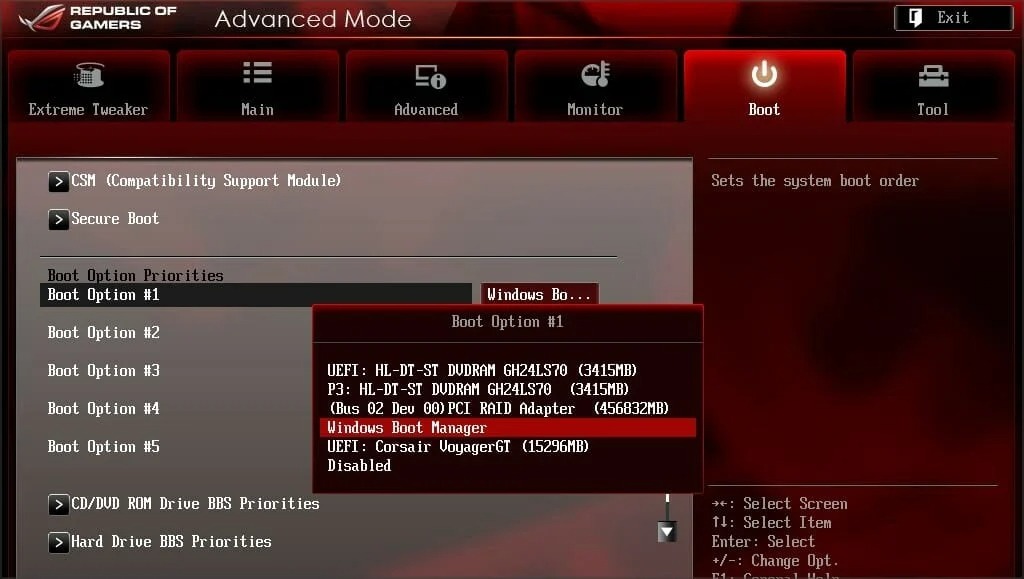
3. Lastly, disable all the enabled unnecessary boot devices using your keyboard’s arrow keys.
Fix the “Windows Cannot Be Installed to This Disk. The Disk May Fail Soon” Error
Below are some fixes to fix the “Windows Cannot Be Installed to This Disk. The Disk May Fail Soon” error:
1. Run CHKDSK Scan
If you’re getting the “Windows Cannot Be Installed to This Disk the Disk May Fail Soon” error, then they may be appearing because of some errors in your storage drive.
In that case, we suggest running a CHKDSK scan on your system to see if the drive has some errors causing this error. So check the below steps to execute a CHKDSK scan on your PC:
1. Right-click on the Windows logo key in the taskbar and choose the Terminal (Admin) option from it.
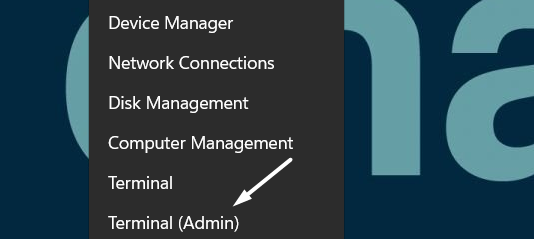
2. Once the Terminal is opened, copy-paste the below-mentioned command into the console and press Enter.
Note: Please make sure to replace “f” with the letter of the hard drive you want to scan for errors and issues.
chkdsk /F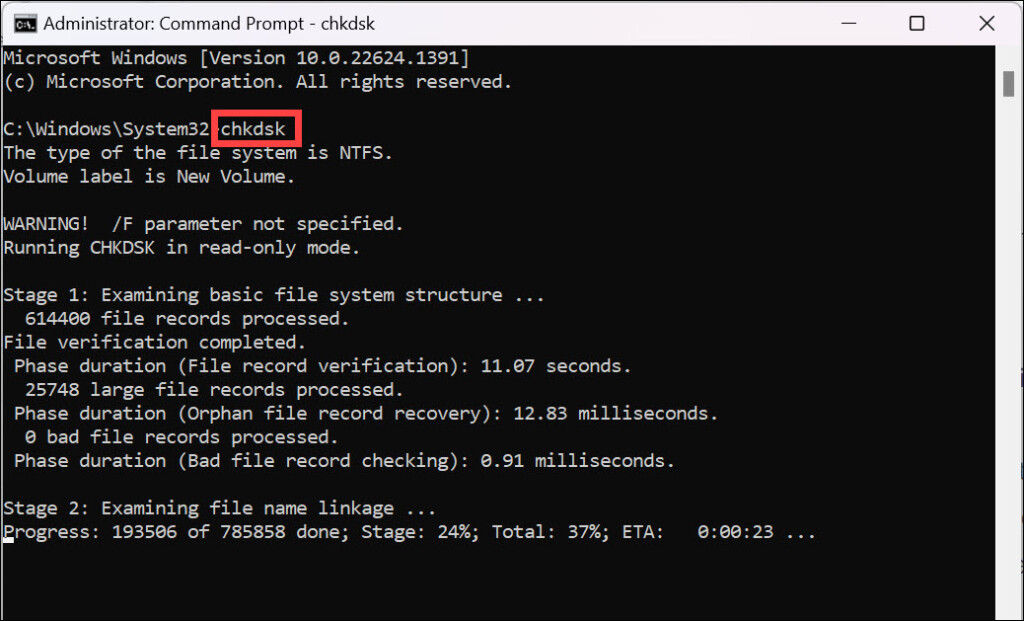
3. Press the Y key on your keyboard to schedule the CHKDSK scan on the next system start.
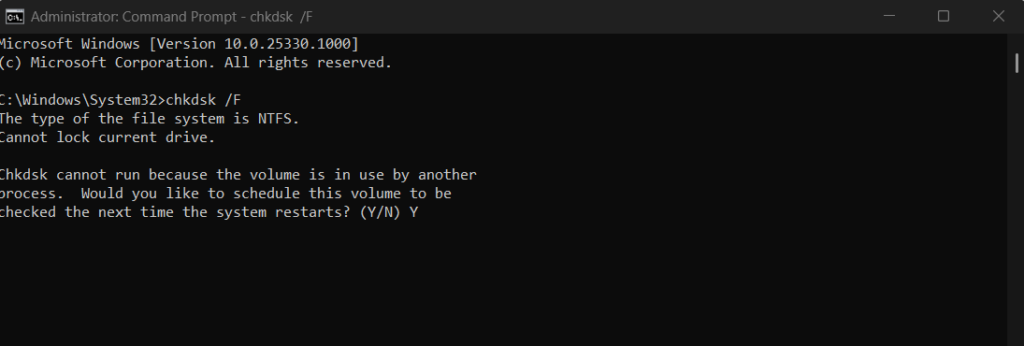
4. Use the Alt + F4 keyboard shortcut to open the Shut Down Windows prompt and select Restart from it.
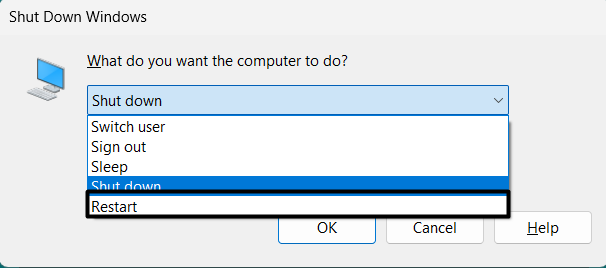
5. You’ll now see that the Windows system is restarting, and the CHKDSK scan has also started.
6. Once the CHKDSK scan completes, your system will restart and report all the errors. In case it finds some errors, you can try searching for them online and repairing them.
2. Try Replacing Your Hard Drive
If the error still appears while installing Windows, we suggest you replace your hard drive. You can try installing Windows on another hard drive to see if it eliminates the error. Also, this workaround has been suggested by Microsoft. So, try the same and see if it works.
Fix the “The Partition Contains One or More Dynamic Volumes That Are Not Supported for Installation” Error
You can follow the listed fixes to eliminate the “The Partition Contains One or More Dynamic Volumes That Are Not Supported for Installation” error while installing Windows.
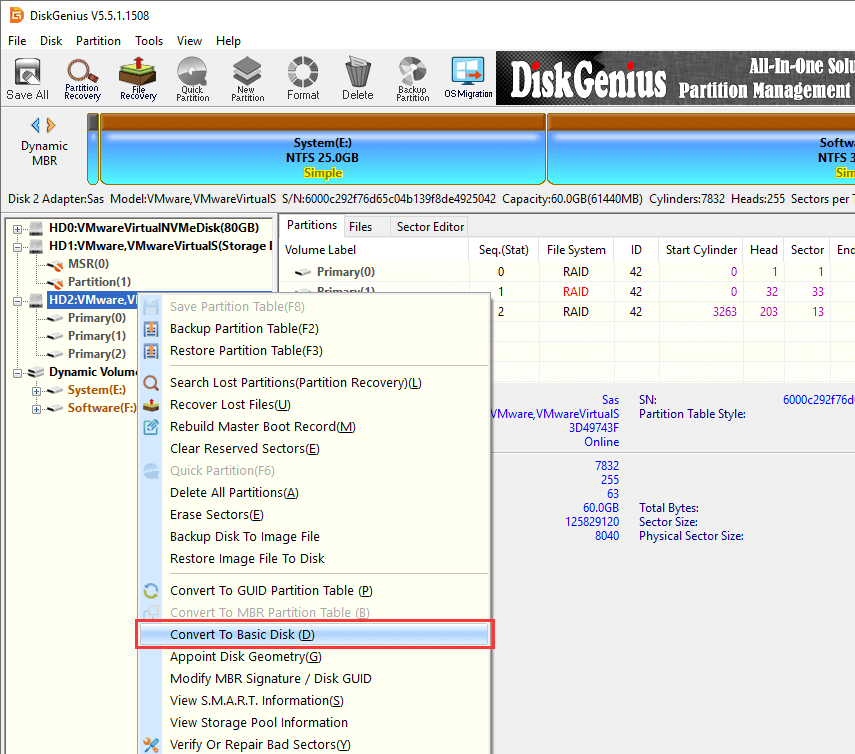
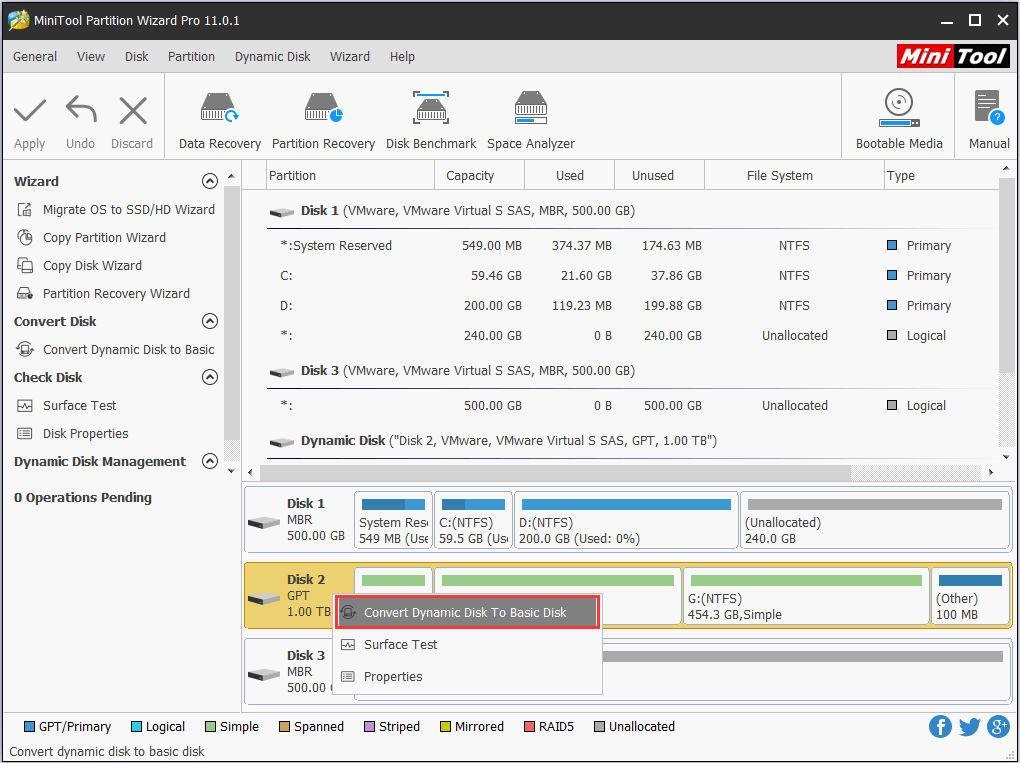
1. Convert Your Dynamic Disk to a Basic Disk
If you’re getting the “The Partition Contains One or More Dynamic Volumes That Are Not Supported for Installation” error, then you need to convert your dynamic disk to a basic disk. We’ve explained the procedure to convert your dynamic hard disk to a basic disk below:
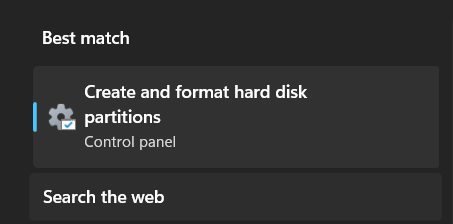
1. Use the Windows + S shortcut to open search and type Create and format hard disk partitions in it.

2. Click on Create and format hard disk partitions in the Best match section to open Disk Management.
3. You need to now delete all the volumes of your hard drive on which you’re trying to install Windows. To do the same, right-click on the volume and select Delete Volume… from it.
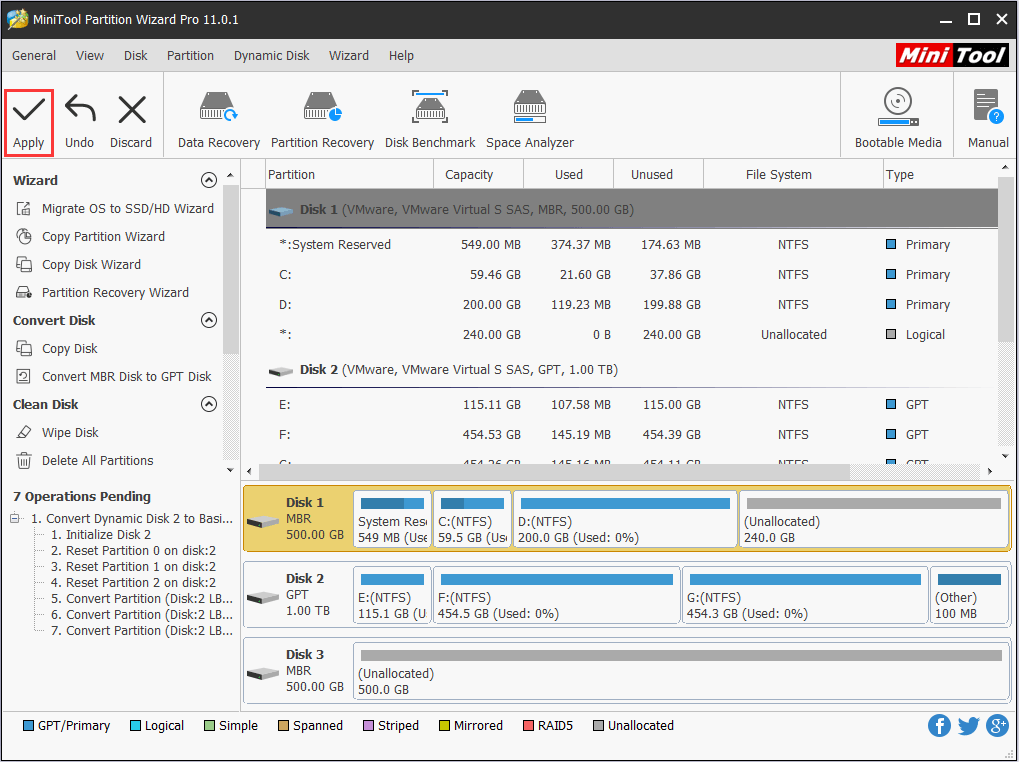
4. Once all the volumes are deleted, right-click on the disk and select Convert to Basic Disk from it.

5. Follow the on-screen instructions to complete the conversion process and install Windows.
2. Clean the Entire Storage Drive
Another possible solution to fix the above-mentioned error is to clear the hard entire storage drive on which you’re trying to install Windows. Before doing this, make sure to take a backup of your hard drive’s data. Once done, check the below instructions to clean your entire hard drive:
1. Open the Settings app using the Windows + I shortcut and move to the Recovery section.
2. In the Recovery section, click on the Reset PC button next to the Reset this PC option.
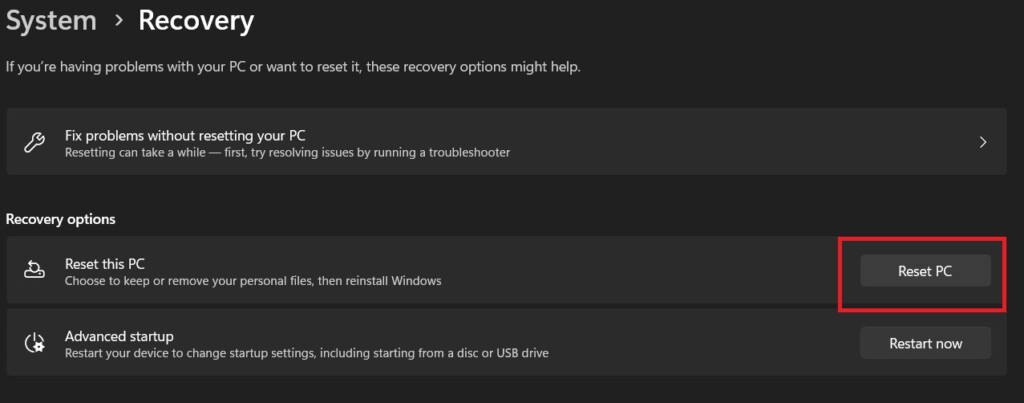
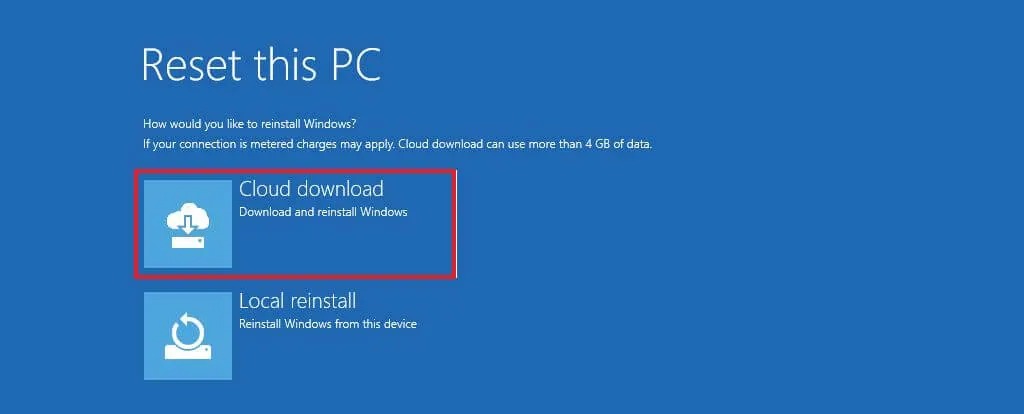
3. Select the Cloud download option on the How would you like to reinstall Windows? prompt.
4. Now, continue following the on-screen prompts until you reach the Additional settings window.
5. On the Additional settings prompt, click on Change settings and enable the Clean data? switch.
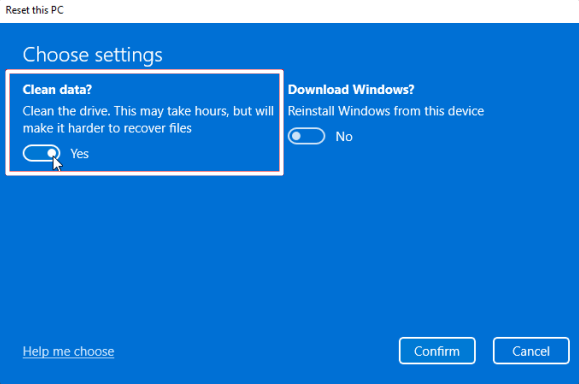
6. Once done, continue following the on-screen instructions to delete all the existing partitions or volumes and let the system create a new partition to install Windows on it.
Fix the “Windows Cannot Be Installed to This MBR Disk“ Error
Below are some tested fixes to get rid of the “Windows Cannot Be Installed to This MBR Disk” error:
1. Delete All Partitions & Create a New One
If you’re getting the “Windows Cannot Be Installed to This MBR Disk” error message when installing Windows, we suggest you delete all the existing partitions during the Windows installation process and create a new GPT-style partition.
This will eliminate the error, as it has for many Windows users. You can check the below-listed steps to do the same:
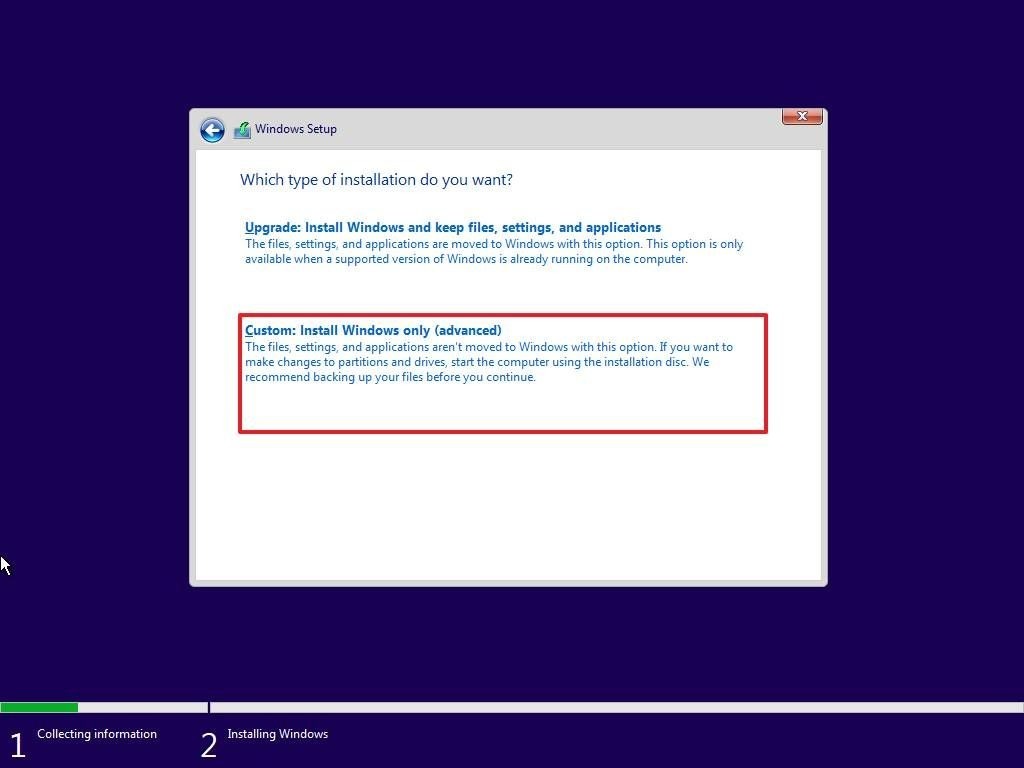
1. Start the Windows installation process and keep following it until you see the Which type of installation do you want? prompt.
2. On the Which type of installation do you want? prompt, click the Custom: Install Windows only (advanced) button.
3. On the Where do you want to install Windows? window, choose the system partition, and click on Delete. You need to now apply the same steps to other systems and primary partitions.
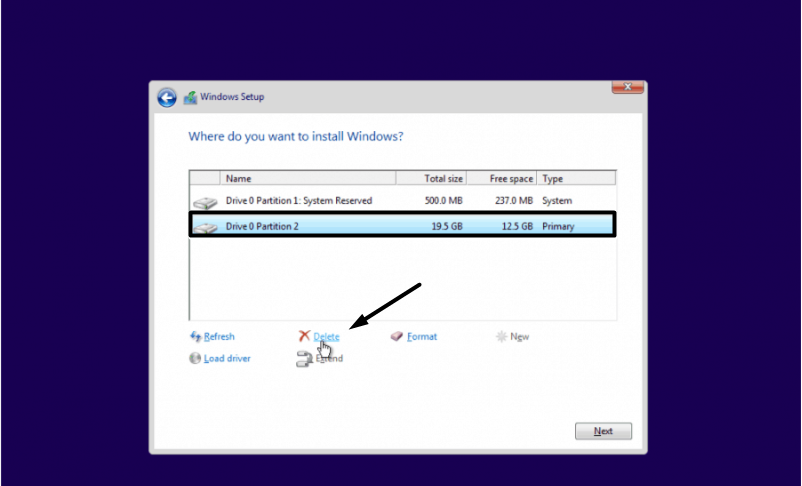
4. Once all the partitions are deleted, click on the New button at the bottom and then click the Apply button.
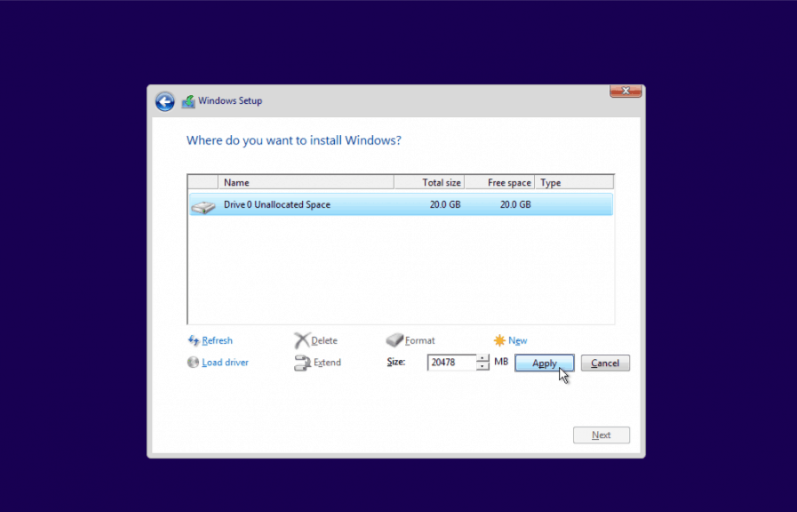
Doing so will create a new GPT-style partition, and the new Windows will automatically install on it. You can now follow the on-screen steps to install Windows without such errors.
2. Use a 2.0 Flash Drive for Windows Installation
If you’re using an external hard drive to install Windows in the system’s drive and getting this error, then we suggest you utilize a 2.0 flash drive for the installation purpose. Doing so will allow you to boot your system in the Legacy mode.
As a result, you won’t get any errors again and be able to install Windows. In addition, using a 2.0 external flash drive is much more efficient for Windows installation. So, try the same and check the issue’s status.
FAQs
How To Fix Windows Cannot Be Installed to This Disk Using CMD?
In order to eliminate the “Windows Cannot Be Installed to This Disk” error message, you need to convert your GPT disk to an MBR disk using CMD.
How Do I Fix a GPT Partition Error?
In order to fix the GPT partition error, you must make sure that Windows can be installed on the partition. You can also try running the CHKDSK scan on your system to repair all the errors with your drive.
Why Windows 10 Is Not Installing in GPT Partition?
If you can’t install Windows 10 on your GPT partition, it could be possible that you may have disabled UEFI in your system’s BIOS. To install Windows in the GPT partition, you must enable UEFI in your BIOS.
How To Change GPT to MBR?
One of the most common methods to convert your GPT disk to an MBR disk is using the Disk Management utility. You can also use the Diskpart utility in the Command Prompt utility to do so.
How To Repair Disk Using CMD?
You need to execute the CHKDSK scan to repair your hard disk using the Command Prompt program.
Final Words
“Windows Cannot Be Installed to This Disk” is one of the most prevalent and irritating Windows installation errors. But fortunately, there are already some workarounds available to easily eliminate this error.
In case you were also encountering the same error while installing Windows on your system’s hard drive, then we hope the workarounds we shared in this guide helped you get rid of it. If the mentioned workarounds helped you resolve the “Windows Cannot Be Installed to This Disk” error, then do let us know which of the workarounds did so.
Download Windows Speedup Tool to fix errors and make PC run faster
If you encounter the error message Windows cannot be installed to this disk, The disk may fail soon when attempting to install Windows 11 or Windows 10 on your device, then this post is intended to help you with the most suitable solutions you can apply to successfully resolve this issue.

When you encounter this issue, you’ll receive the following full error message;
Windows setup
Windows cannot be installed to this disk – The disk may fail soon. If other hard disks are available, install Windows in another location.
Generally, this is an indication that the SMART data the disk is producing is warning about imminent failure.
Why Windows cannot install to disk?
Windows users that receive the error message “Windows cannot be installed to this disk. The selected disk is not of the GPT partition style” is because your PC is booted in UEFI mode, but your hard drive is not configured for UEFI mode. To resolve the issue, you need to configure your drive for UEFI by using the GPT partition style.
How do you fix Windows cannot install on this drive?
There are quite a number of ‘Windows cannot install on this drive’ errors, and resolving the error depends on the instance of the error you have encountered on your Windows PC. Generally, to fix Windows cannot be Installed on Drive (0), you can try the following suggestions:
- Erase your drive to avoid compatibility with previous partitioning systems.
- Select the correct option for booting, Legacy BIOS or UEFI.
- Change the partitioning table from GPT to MBR (Backup your data if any).
If you’re faced with this issue, you can try our recommended suggestions in the order presented below to resolve the Windows cannot be installed to this disk – The disk may fail soon error on your Windows 11/10 computer.
- Run S.M.A.R.T. test
- Run CHKDSK
- Replace hard drive
Let’s take a look at the description of the process involved concerning each of the listed solutions.
1] Run CHKDSK
If hard disk contains bad sectors, you can try repairing it. Ensure that all files are backed up first to prevent data loss that might occur due to the repair operation. Keep in mind that Windows operating system shouldn’t be installed to a hard drive that contains bad sectors.
You can run CHKDSK to repair bad sectors that might be triggering the Windows cannot be installed to this disk – The disk may fail soon error on your Windows 11/10 computer.
2] Run S.M.A.R.T. test
S.M.A.R.T. (Self-Monitoring, Analysis and Reporting Technology; often written as SMART) is a monitoring system native to HDDs, SSDs and eMMC drives found in Windows computers. The utility’s primary function is to detect and report various indicators of drive reliability with the intent of anticipating imminent hardware failures.
When S.M.A.R.T. data indicates a possible imminent drive failure, software running on the host system may notify the user so preventive action can be taken to prevent data loss, and the failing drive can be replaced and data integrity maintained.
3] Replace hard drive
Depending on the result or the outcome of the two tests above, your only option may have to be to backup your files (if the drive wont boot, you can try retrieve your files using Linux Live USB), replace the drive with a healthy drive and then clean install Windows.
Related:
- Windows must be installed to a partition formatted as NTFS
- The selected disk has an MBR partition table
- Setup does not support configuration of or installation to disks connected through a USB or IEEE 1394 port
- Windows cannot be installed to this hard disk space. The partition contains one or more dynamic volumes that are not supported for installation
How do I fix my disk is likely to fail soon?
As this error generally arises when your hard disk has some issues, it is recommended to run the CHKDSK tool to get rid of this problem. However, you can also run the S.M.A.R.T. test to mitigate the problem. If nothing helps, you must change the hard drive or SSD to install Windows 11/10 on your computer.
Hope this helps!
Related post: Windows cannot be installed to this disk, Disk is of the GPT style.
Obinna has completed B.Tech in Information & Communication Technology. He has worked as a System Support Engineer, primarily on User Endpoint Administration, as well as a Technical Analyst, primarily on Server/System Administration. He also has experience as a Network and Communications Officer. He has been a Windows Insider MVP (2020) and currently owns and runs a Computer Clinic.
Reader Interactions
Table of Contents:
How do you fix Windows cannot be installed on this drive? The message Windows cannot be installed on this drive typically appears during the Windows installation process, indicating that there is an error preventing you from continuing the Windows installation. In addition to the error, there can be another message appearing along with it, providing additional information. And the accompanying error message varies depending on the underlying cause of the issue, and thus it is useful to read the error message to get clues to solutions. The error message can be caused by several reasons, such as, improper file system format, incorrect partition table type, insufficient disk or partition size, bad sectors, wrong BIOS/UEFI settings, etc.
You can follow troubleshooting mentioned below to identity and fix the error. It is important to back up any data you don’t want to lose before making changes to the drive, because some solution involves deleting or formatting data and partitions. It’s always a good idea to keep backups for important data.
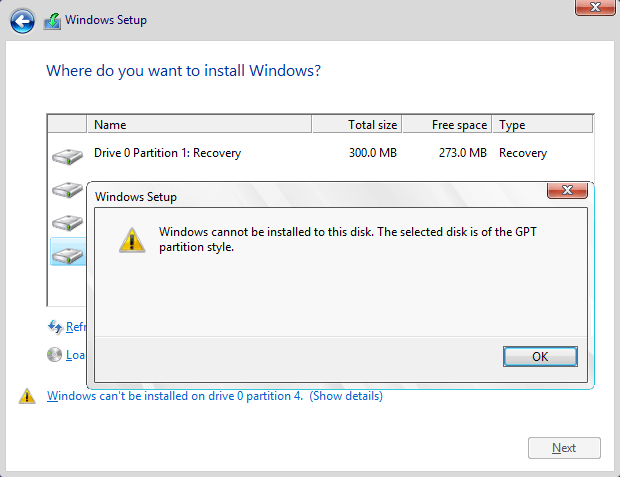
Fix 1: Windows cannot be installed to this disk. The selected disk is of the GPT partition style.
You may receive the error message »
The selected disk is of the GPT partition style
» when installing Windows OS to a GPT-style disk, see picture below. You will ask why Windows cannot be installed to this GPT disk. Generally, the main cause is motherboard. There are two types of boot modes: BIOS Boot Mode and UEFI Boot Mode. Most Windows versions have UEFI (Unified Extensible Firmware Interface) boot mode, while some versions since older days of Window XP have BIOS (Basic Input Output System) boot mode. Due to different boot modes, there are two types of partitioning schemes: MBR (Master Boot Record) and GPT (GUID Partition Table). If you want to boot system from a GPT disk, the motherboard should support UEFI; while on BIOS you should use MBR partition table. Thus, if you install Windows on BIOS system, the GPT partition table comes in your way. The installation will be blocked by the error.
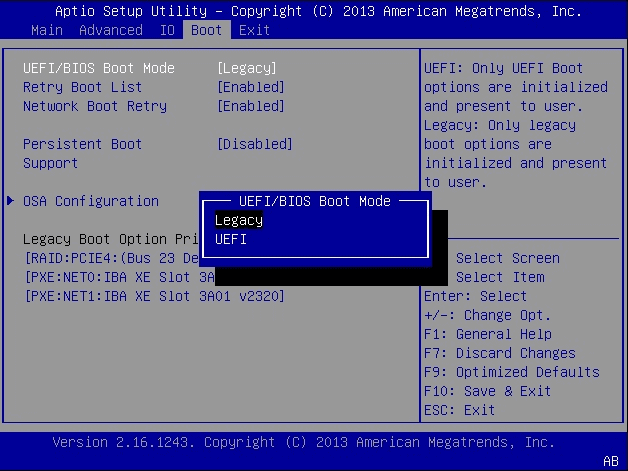
Solution #1: Configure BIOS settings (boot mode)
First of all, you should ensure the Boot Mode in your BIOS is set to Legacy BIOS instead of UEFI. At present, most motherboards support both legacy BIOS boot and UEFI boot. Thus, you need to make sure the proper boot mode is selected in BIOS setting. The picture shows the boot mode is modified to Legacy. Please note that the BIOS menu may look different on your computer, as it varies based on the models of the motherboard on your computer.
Solution #2: Convert the GPT disk to MBR without losing data
Since Windows cannot be installed on the GPT disk, you can fix the error by converting the GPT disk to MBR format. The converting does not deleting existing partitions and files if you use third-party free partition manager software to finish the task.
DiskGenius is free partition manager software for all Windows users and it is able to convert GPT disk to MBR without risking any data loss. If you prefer a user-friendly alternative to the Command Prompt,
DiskGenius Free Edition
is an excellent choice, as it is easier and safer to use. Additionally, this partition tool enables you to create a WinPE bootable USB disk, allowing you to manage your disks and partitions even if your system fails to boot. Furthermore, DiskGenius can assist you in backing up your data, imaging your system, recovering lost data or partitions, and backing up your partition table, migrating Windows 11/10 to HDDs or SSDs, etc.
Step 1. Download, install and launch DiskGenius from your computer. If your computer cannot boot to system, you can
create a bootable USB disk
to boot computer, and then carry out rest tasks.
Step 2. Select the GPT disk to be converted and click «Disk» menu to choose «Convert to MBR Partition Table«, as below:
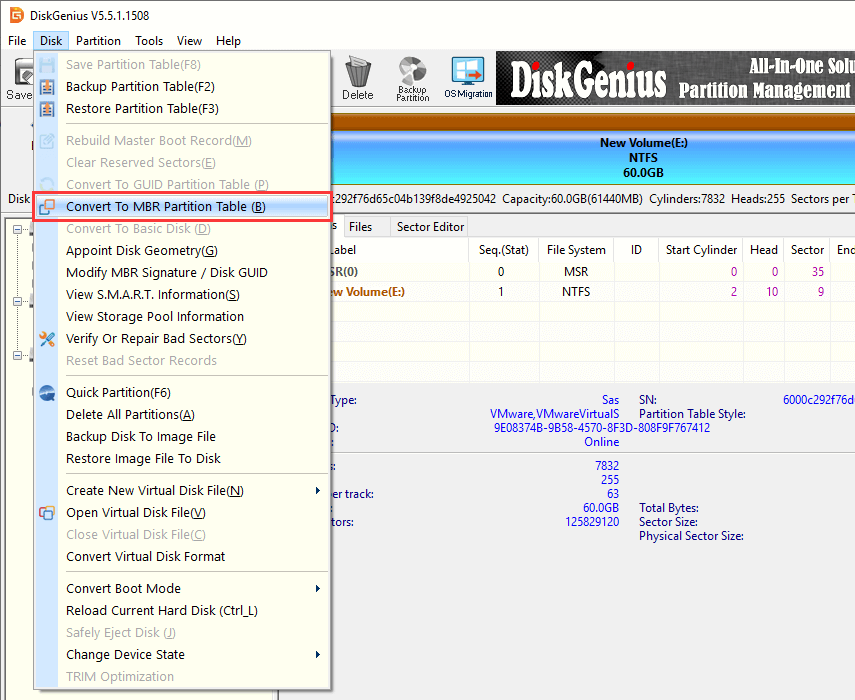
Step 3. Click Save All button from toolbar and click «Yes» from pop-up message box to save changes on partition table.
Tips: If capacity of the GPT disk is larger than 2TB, system can only make use of 2TB after it is converted to MBR.
Solution #3: Clean up the disk and convert to MBR using Command Prompt
It’s important to note that the conversion from GPT to MBR using Command Prompt will result in data loss on the disk, as the process involves deleting all partitions and data on the disk. it’s strongly recommended to back up all important data from the disk to a separate storage device to prevent data loss before trying following steps.
Step 1. Backup all of your data on the GPT disk you want to convert, as the process will erase all data.
If you can’t afford to clean the disk or do not want to take efforts to back up data, you can convert GPT to MBR following steps in Solution 2 which does not disturb existing data.
Step 2. Run Command Prompt.
Boot computer from the Windows installation disk and click «Repair your computer» when you see following screen.
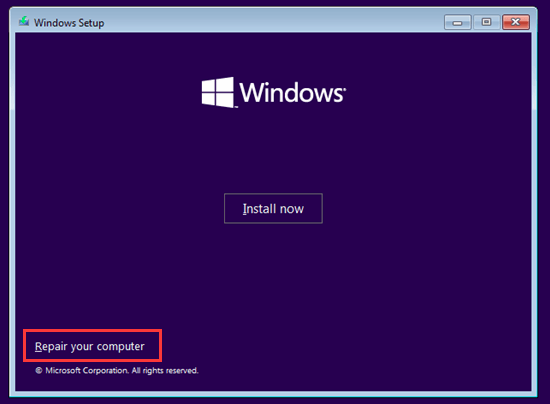
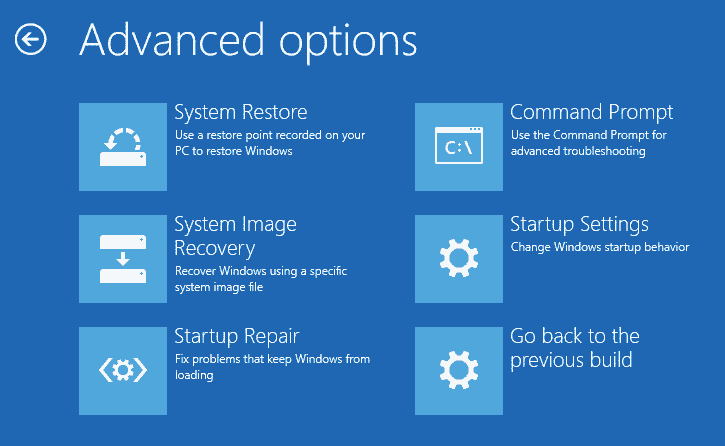
You will then be directed to the Advanced Recovery mode and see the Troubleshoot screen. The click Advanced options > Troubleshoot > Command Prompt.
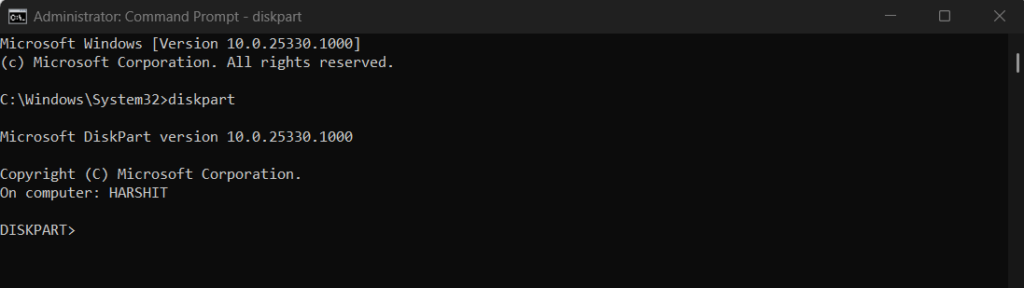
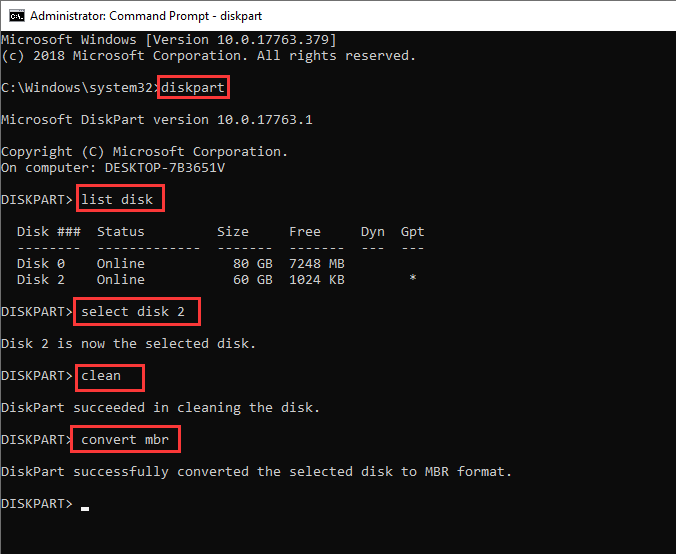
Step 3. Type diskpart in the command prompt and press Enter.
Step 4. Type in list disk and hit Enter key to view which one is of GPT style. The GPT disk is marked with asterisk in the GPT column. Remember the disk number you need to clean and convert.
Step 5. Type select disk # (# is the disk number and you should replace it with the actual number in your computer) to select disk.
Step 6. Type clean and press Enter.
Notice: this step will completely clean up selected disk, and all partitions and data will be deleted. Please make sure you have a backup before performing this command.
Step 7. Type convert mbr and press Enter, and the disk will be converted to MBR. Then you can execute exit command to exit or continue creating partition on this MBR disk.
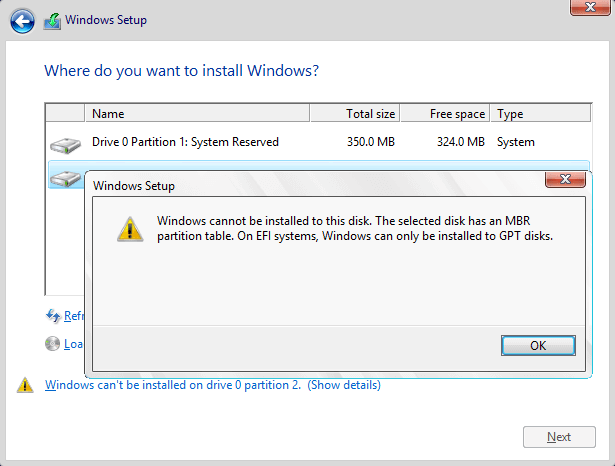
Fix 2: Windows cannot be installed to this disk. The selected disk has an MBR partition table. On EFI systems, Windows can only be installed to GPT disks.
When you attempt to install Windows in UEFI mode on your computer, you cannot select the disk you want. You may click Show details to view the reason which says »
The selected disk has an MBR partition table
. On EFI systems, Windows can only be installed to GPT disks». That means you cannot install UEFI mode on a disk using MBR partition table and it can only install to GPT disks, as image below:
GPT (GUID Partition Table) was introduced as part of UEFI which is the acronym for Unified Extensible Firmware Interface. Compared to the traditional MBR partitioning scheme, GPT offers a more flexible approach to disk partitioning. Partitions or volumes are contiguous areas on a physical or logical disk, visible to both the system firmware and the installed Windows operating system. The system firmware controls access to partitions before the operating system boots, and once booted, the partitions are managed by the OS.
Many modern computers support the UEFI version of BIOS, which speeds up boot and shutdown speed as well as provides security features. If you want to boot computer in UEFI mode, the disk installs operating system should be of GPT style. Many computers are able to use UEFI and they also provide CSM (compatibility support module) so that legacy version of BIOS can be used in necessary. The GPT drive format allows users to set up drives larger than 4TB and does not impose a limit on the number of partitions.
Solution #1: Change BIOS Boot Settings
The first try to solve the problem should be going through BIOS and changing UEFI boot settings. You can manually switch boot mode to legacy BIOS compatibility instead of UEFI mode.
Step 1. Restart computer and enter BIOS by pressing the specified key prompted by your motherboard manufacturer.
The prompt appears on screen before computer boots into Windows.
Step 2. Go to Boot tab and locate boot order option. Then disable EFI Boot Source and change boot mode to Legacy.
Step 3. Save changes and exit.
Solution 2: Convert MBR disk to GPT using DiskGenius Free
DiskGenius Free Edition is able to convert an MBR disk to GPT without losing data and the process is quite easy to follow:
Step 1. Install and launch DiskGenius Free. You can download this free partition manger software from the download center.
Step 2. Locate and select the MBR disk to be converted to GPT and click «Disk» menu to choose «Convert To GUID Partition Table«.
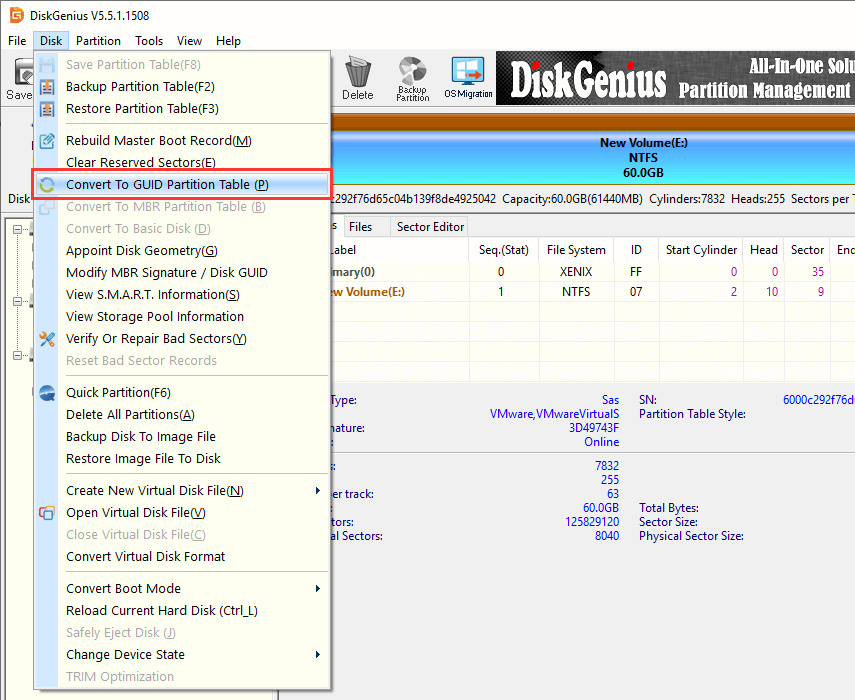
Step 3. Click «OK» button on the message box. Then click «Save All» button to make the converting work
When the disk is converted to GPT, you can retry installing Windows again and check if the error is fixed.
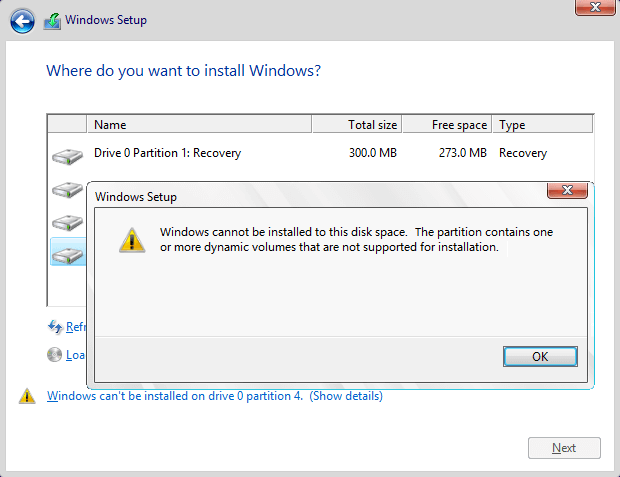
Fix 3: Windows cannot be installed to this hard disk space. The partition contains one or more dynamic volumes that are not supported for installation.
The «The partition contains one or more dynamic volumes that are not supported for installation» error is likely to appear when you attempt to install Windows on a dynamic disk. Users are allowed to make a fresh Windows installation on a dynamic volume only when the volume was converted from a basic disk and retained an entry in partition table. However, simple volumes (except system or boot volumes before conversion) that have been converted from basic disks do not have an entry in partition table, thus the installation will end up with the following error.
What is basic disk and dynamic disk? A basic disk is a storage type mostly used in Windows operating system, providing a solution to accommodate an array which changes storage requirement scenarios. A basic disk consists of partitions, such as primary and logical partitions, which can be formatted with a file system to store data. Generally, basic disks use MBR partition style since the disk is used by Microsoft MS-DOS operating system and all versions of Windows. Also, it supports GPT partitions on systems that support it. With basic disks you can create and delete primary, extended and logical partitions as well as format a partition or mark it as active.
On the other hand, a dynamic disk offers additional features not found in basic disks, for example, it is able to create volumes crossing multiple disks and create fault-tolerant volumes. Either MBR or GPT partition table styles can be used by a dynamic disk. Dynamic disks provide greater flexibility for managing volumes by utilizing a database to track information for volumes and other dynamic disks. Additionally, dynamic disk volumes can be created on noncontiguous scope or physical disks, while volumes on a basic disk should be located on a contiguous area on a single physical disk.
Solution #1: Convert the dynamic disk to basic disk in Disk Management
Step 1. Back up all volumes and data on the dynamic disk to be converted to basic, as this converting method removes all partitions and data on the disk.
If you don’t want to spends too much effort on data backup and transferring, you can try Solution 3 which can do the converion without deleting data.
Step 2. Open Disk Management. Right-click the Start menu (the Windows icon) and click «Disk Management».
Step 3. Delete all volumes on the disk. Right-click each volume on the disk you want to change to basic disk and select Delete Volume.
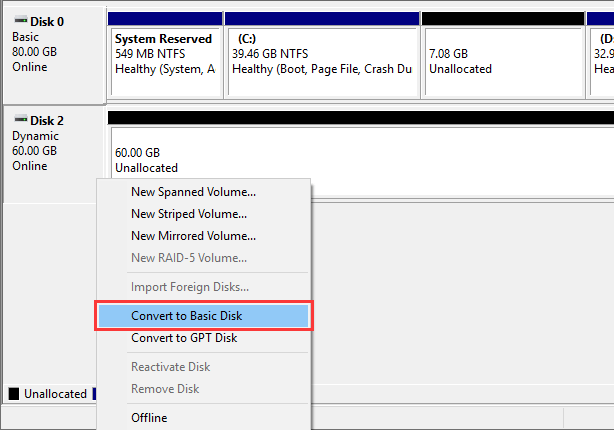
The disk will be converted to basic automatically after all volumes are deleted from the disk. If the converting does not happen, then move to step 4.
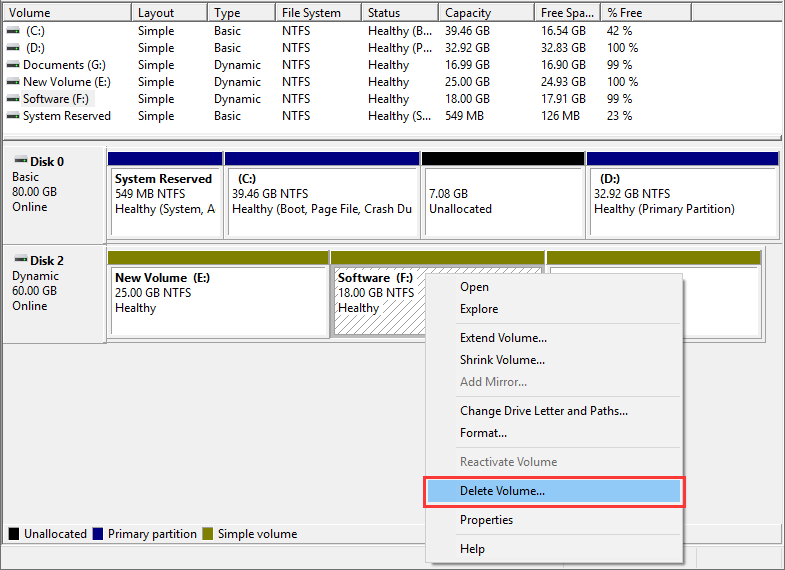
Step 4. Right-click the disk and select Convert to Basic Disk. Once the disk is converted to basic disk, you can create partitions on the disk.
Solution #2: Change a dynamic disk to basic disk using command line
Warning: If you want to keep your files on the disk, back up files or copy data to another disk before starting following steps.
Step 1. Open Command Prompt. If there in not operating system on your computer, you can use a Windows installation CD or bootable disk to boot computer and open CMD.
After the computer boots from the installation disc, choose «Repair your computer» and then access «Troubleshoot» to locate «Command Prompt».
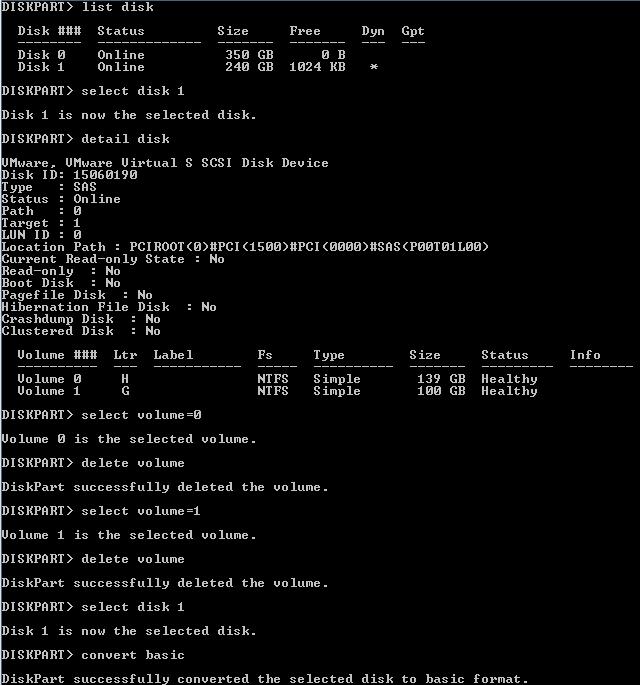
Step 2. Delete all volumes on the dynamic disk by typing following commands with pressing Enter after each command.
diskpart
list disk
select disk # (# is the number of the dynamic disk)
detail disk
select volume 0
delete volume
To delete other volumes, you can continue typing «select volume 1» -> «delete volume» one more time.
Step 3. After all volumes are deleted, type convert basic and the disk will be converted into a basic disk.

Solution #3: Convert a dynamic disk to basic disk without data loss
Both methods above require you delete all volumes and data before converting, thus you should make sure there are not important data or you’ve created a full backup beforehand. Here is an alternative solution which is able to complete the conversion without losing data. DiskGenius is a professional dynamic disk converter, it is able to convert the dynamic disk to basic without deleting volumes within several seconds. Let’s see the entire converting process.
Step 1. Run DiskGenius and you can see the dynamic disk on the main interface.
Step 2. Locate and right-click on the dynamic disk and select Convert to Basic Disk option, as below:
Step 3. Click OK button from the pop-up message box to make the changing work.
Fix 4: Windows cannot be installed to this disk. Windows must be installed to a partition formatted as NTFS
Due to compatibility problems on file system, most versions of Windows operating system can be installed to partitions formatted to NTFS, and only few versions can be installed to a FAT partition. If the volume is formatted to an improper file system, you’ll receive error «Windows must be installed to a partition formatted as NTFS». Since the target partition has a file system issue, we can fix this error easily by changing its files system to NTFS.
Solution #1: Convert FAT file system to NTFS using Convert.exe
Converting the file system has the potential to result in data loss, and it is recommended to back up important data on the drive you are going to convert.
Step 1. Launch Command Prompt. Click Start button and enter cmd in searching box and press Enter.
Step 2. In the Command Prompt, type the following command convert G: /fs:ntfs and press Enter.
G is the drive letter of the partition that you want to change file system. You can open Windows Explorer to view the drive letter. Make sure the drive letter is correctly entered here. If it asks to enter the volume name, type in the name and press Enter.
Step 3. Convert.exe attempts to convert file system into NTFS and the process won’t take too long. After the conversion is complete, you might be prompted to restart your computer.
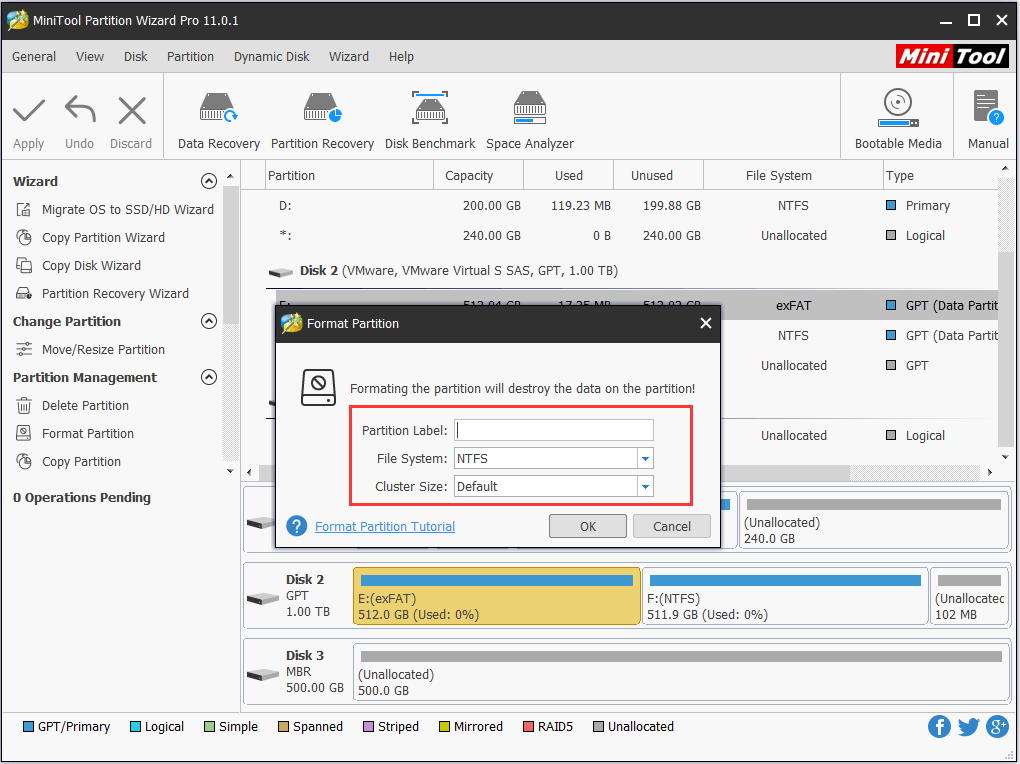
Solution #2: Format the partition into NTFS
Step 1. Copy the folder where DiskGenius installs to your bootable disk and then use the disk to boot computer.
Besides, you can create a bootable disk with DiskGenius: Click «Tools» menu and choose «Create WinPE Bootable USB Drive of DiskGenius» option.
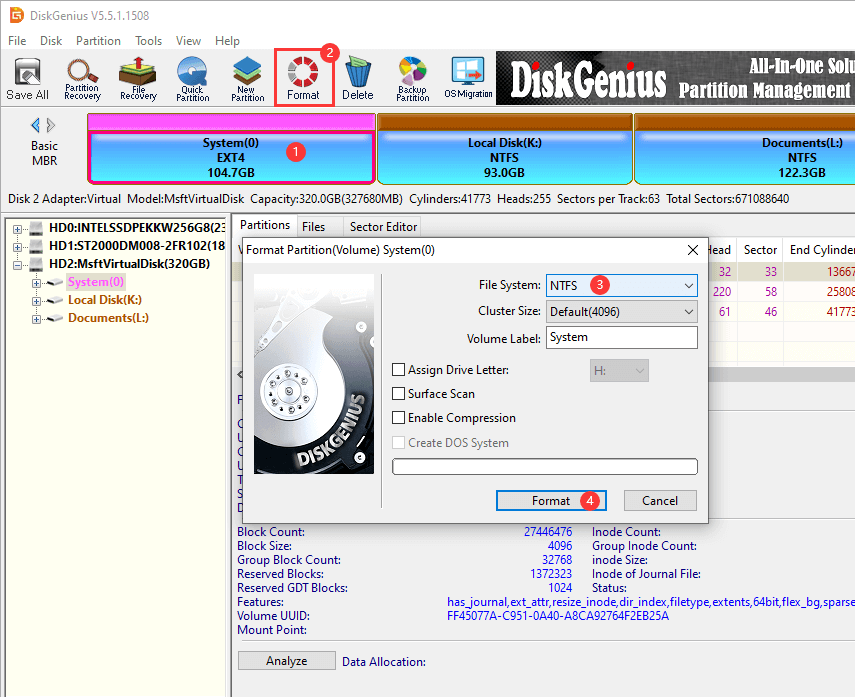
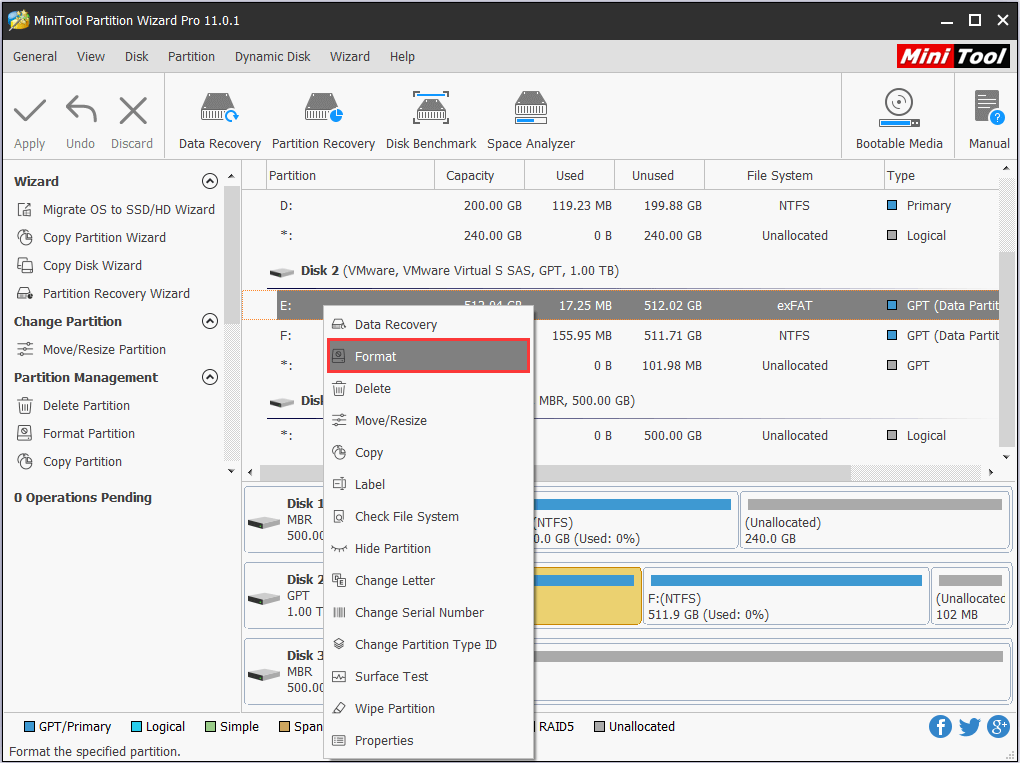
Step 2. Launch DiskGenius, select the system partition you want to format to NTFS, and click «Format» button.
Step 3. Set the file system as NTFS and click Format button.
As to options like Cluster Size, Volume Label, Surface Scan, etc., you can follow the default value set by the partition manager.
Step 4. Click Yes from the message box which prompts all files on this partition will be lost after formatting.
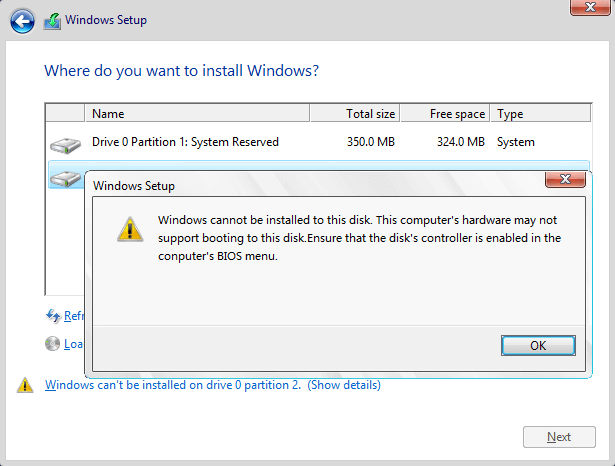
Fix 5: Windows cannot be installed to this disk. This computer’s hardware may not support booting to this disk. Ensure the disk’s controller is enabled in the computer’s BIOS menu
You may receive the warning message «This computer’s hardware may not support booting to his disk. Ensure the disk’s controller is enabled in the computer’s BIOS menu» when you try to install Windows. If you click Next to continue and you will receive another error «Windows cannot find a system volume that meets requirements for installation».
This error may indicate that BIOS settings of your computer are not properly configured, thus you can try setting BIOS to factory and go back to default settings. Plus, please ensure that your computer’s firmware (BIOS/UEFI) is up to date. Manufacturers often release updates that can improve compatibility and fix bugs.
Also, this issue is caused by improperly configured hard disk mode; in that case, you need to change AHCI to Compatibility in BIOS. If there is not Compatibility option, you can select IDE. Additionally, if your system uses RAID, ensure that the RAID configuration is set up correctly in the BIOS/UEFI settings.
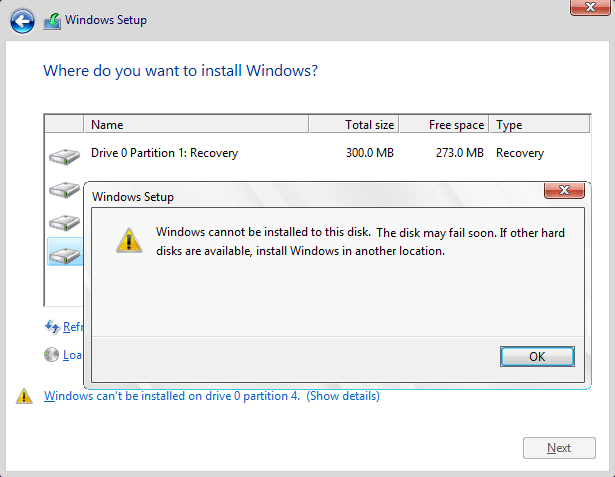
Fix 6: Windows cannot be installed to this disk. The disk may fail soon. If other hard disks are available, install Windows in another location
There might be something wrong with the hard drive if you get the error «Windows cannot be installed to this disk. The disk may fail soon. If other hard disks are available, install Windows in another location.» You should be cautious if the hard drive is damaged, as data on that disk may get lost, which is similar to the system warning
Windows detected a hard disk problem
, you should have a check for hard drive health condition.
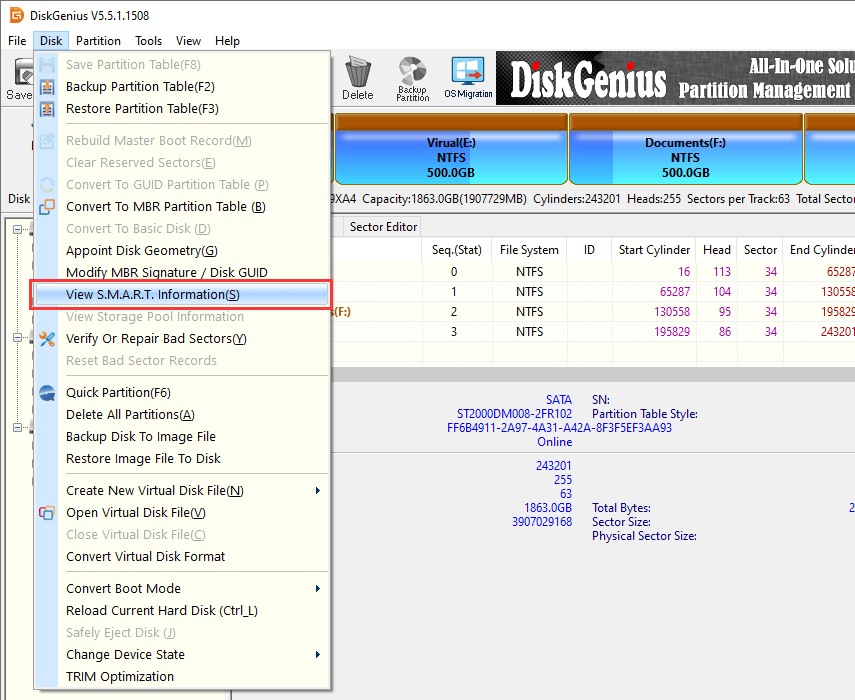
Step 1. Check hard drive or SSD health via accessing S.M.A.R.T. data.
Select the hard disk that may fail soon and click Disk menu to choose View S.M.A.R.T. Information. If the health status is NOT Good, then backup data and verify bad sectors following Step 2.
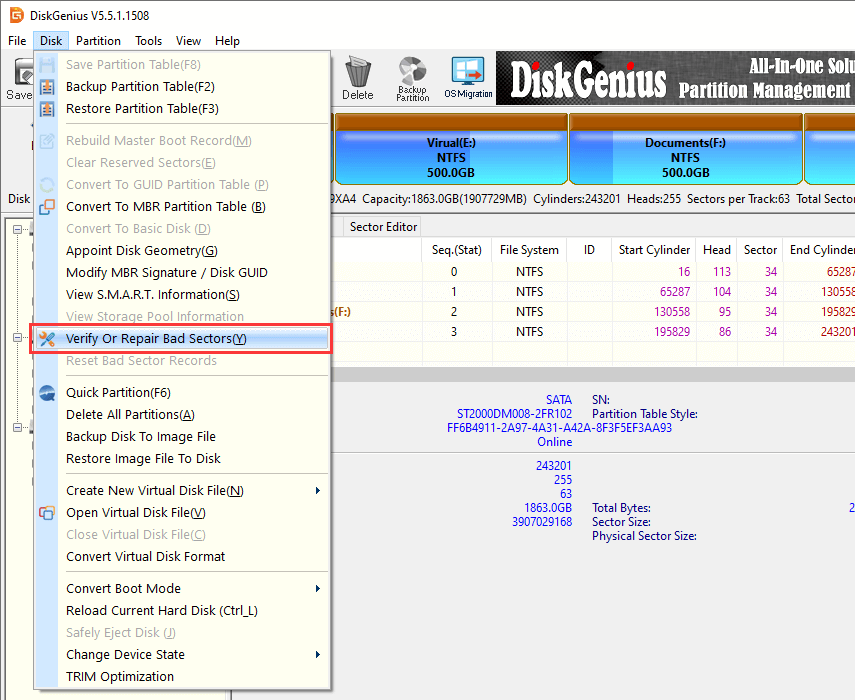
Step 2. Check bad sectors for the hard drive in questions.
Still in DiskGenius, select the disk you want to check bad sectors, click «Disk» and choose «Verify Or Repair Bad Sectors«. Then click Start Verify button to start scanning sectors for selected area.
If the hard disk contains bad sectors, you can try repairing it with DiskGenius. However, it is crucial to backup all files before proceeding the repairing, as the process of repairing bad sectors can result in data loss. It is important to note that certain bad sectors caused by physical damages may be irreparable. In that situation, you can manually create a hidden partition on that area to isolate bad sectors. Moreover, it is recommended to install Windows operating system on a health hard drive or SSD that does not have bad sectors.
Fix 7: Windows is unable to install to the selected location. Error: 0x80300001
While installing Windows 7, you might run into an error saying «Windows is unable to install to the selected location. Error: 0x80300001». This error typically occurs when you are asked to exchange hard drives in order to install required drivers on the system and the system disk hasn’t been put back. It can also be caused by other reasons, so you may have to try more than one solution to solve it.
Solution #1: Reconnect Windows installation disk
Step 1. Boot computer using a Windows installation CD or USB disk to access the setup wizard. Go to the step which requires selecting a partition and click «Load Driver». When you see the error message, ignore it.
Step 2. Reinsert the installation disk and click Refresh link and then Advanced Drive Options to create a new partition with any size. If Windows prompts it has to carry out some operations, click «OK». Then you can see a new system partition and a new primary partition.
Step 3. Select the new primary partition and click «Next» button. Then the setup should continue without any errors.
Solution #2: Change boot order
It’s possible that this error occurs when the disk is not set as the boot disk provided that you are not using RAID. In that circumstance, you can get rid of the problem by changing boot order in BIOS.
Step 1. Enter BIOS Setup Utility. Turn on or restart your computer and watch message appearing on screen. A specific key such as Del or F2 will be promoted on the screen to enter BIOS. Press that key.
Step 2. Select the «Boot» tab. All BIOS utilities look different, but boot option is definitely included. Locate and select it.
Step 3. Set the hard drive where you want to install system as the boot device. Any attached storage devices like external hard drives, USB flash drives, floppy drives, etc. are listed here too, and you can change their order manually. Save changes and exit.
Fix 8: Windows cannot be installed to Disk 0 Partition 1
People who try to install Windows using internal SAS controllers for hard drives will encounter the message «Windows cannot be installed to disk # partition #». Usually this issue occurs due to SAS driver issues or corrupted $MFT. The Microsoft Windows partition manager is out of touch with drivers after changes were made on partitions. Here is an approach to troubleshoot the problem.
Step 1. When the Windows installation process asks where you want to install Windows, load the SAS driver from a USB key. If the disk is larger than 2TB and needs to be converted to GPT, you can follow steps in previous solutions to do the conversion.
Step 2. View and check all possible partitions available for system installing. If the disk does not show up, have a check whether the drive is correctly installed.
Step 3. Delete partitions until there is only unallocated Space on the disk. Click «New» and you can see recommended partition size. Continue «OK» and you can see 3 partitions: system partition, MSR partition and large partition.
For this step, you can also use DiskGenius to
repartition the hard disk
and choose GUID partition table, which is easier and intuitive.
Step 4. Select the big partition and click «Refresh». Then click «Next» to start the installation.
Conclusion
This guide addresses 8 scenarios that the «Windows cannot be installed to this disk» error appears during the Windows setup process. If the selected disk is of improper partition table style corresponding to BIOS settings, Windows installation will be blocked by errors. This article provides step by step solutions to each situation. If you have better solutions, please feel free to contact us or share with other readers. It is important to note that certain approaches mentioned in this article, such as disk formatting and partition deletion, may result in data loss. Therefore, it is essential to ensure that all files and partitions are backed up prior to executing these steps. The free partition manager DiskGenius provides proper and effective functions to help fix this error occurring in different cases, and it is a qualified partition and disk management tool as well as data recovery program for both beginners and professional users.
Windows cannot be installed to MBR/GPT disk? Windows cannot be installed to dynamic disk? These are the most common issues that can occur during the process of Windows 10/8/7 installation. This post shows how to address such issues with detailed steps given.
When installing Windows OS (whether it is a clean install, reinstall or dual boot), you may receive various kinds of errors saying Windows cannot be installed to this disk. In this post, we will introduce 6 types of Windows installation errors as well as top corresponding solutions.
Error 1: Windows Cannot Be Installed to This Disk. The Selected Disk Is of the GPT Partition Style.
When installing Windows on a GPT disk, you may receive Windows cannot be installed on GPT disk error:
“Windows cannot be installed to this disk. The selected disk is of the GPT partition style.”
What causes this error?
Reasons
This is mainly because the motherboard supports Legacy BIOS only rather than both Legacy and UEFI or CSM boot. Under legacy BIOS mode, you can only install Windows to an MBR disk since traditional BIOS cannot recognize GPT partition, but data read/write on GPT disk is available as long as Windows supports it.
Solutions
To fix this error, firstly you need to enter BIOS Setup to see what the boot mode it is set to. Start/restart computer and continuously press a key to enter BIOS before the Windows logo appears. Different computers may require different keys, so you had better search “how to enter BIOS plus computer trademark or motherboard name” on the internet to find the exact key.
In BIOS, if you find no signal showing you are using a UEFI motherboard like the following picture shows, maybe you are using a traditional motherboard which supports legacy BIOS boot only. Under this situation, the only solution is to convert the GPT disk to an MBR disk.

Here are the deals:
Solution 1. Convert GPT Disk to MBR if the Motherboard Supports Legacy BIOS Only
Note: We will explain 3 ways to convert GPT disk to MBR disk. The 2nd & 3rd ways will cause data loss since Windows requires you to delete all partitions.
1) Use Partition Wizard
MiniTool Partition Wizard Free Edition is a free yet outstanding partitioning tool for Windows NON-SERVER users, which helps to convert GPT disk to MBR disk without losing data when an existing Windows is available. However, you should know that Partition Wizard can only change non-system GPT disk to MBR disk without bringing any data loss. This works for all Windows XP/Vista/7/8/10 users.
MiniTool Partition Wizard FreeClick to Download100%Clean & Safe
Tip: If no Windows can be used, you may need the help of MiniTool Partition Wizard Bootable CD, a built-in tool that comes with all MiniTool Partition Wizard Paid Editions.
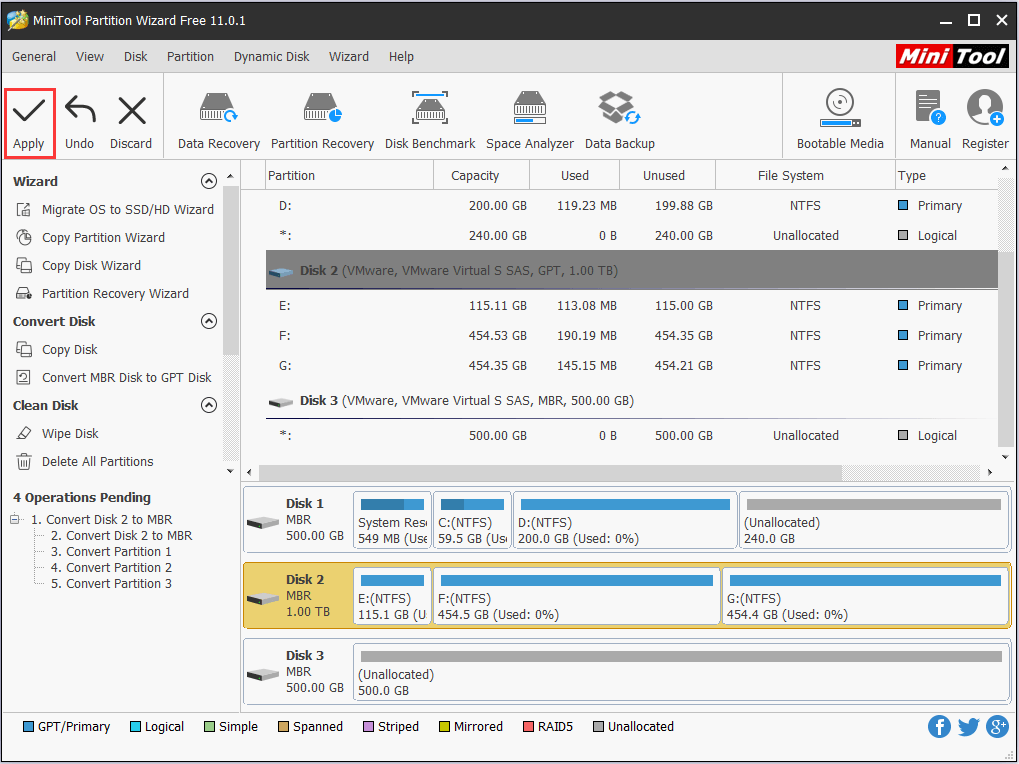
Step 1: run MiniTool Partition Wizard.
Launch MiniTool Partition Wizard. Then right-click on the target disk to be converted and choose “Convert GPT Disk to MBR Disk“.
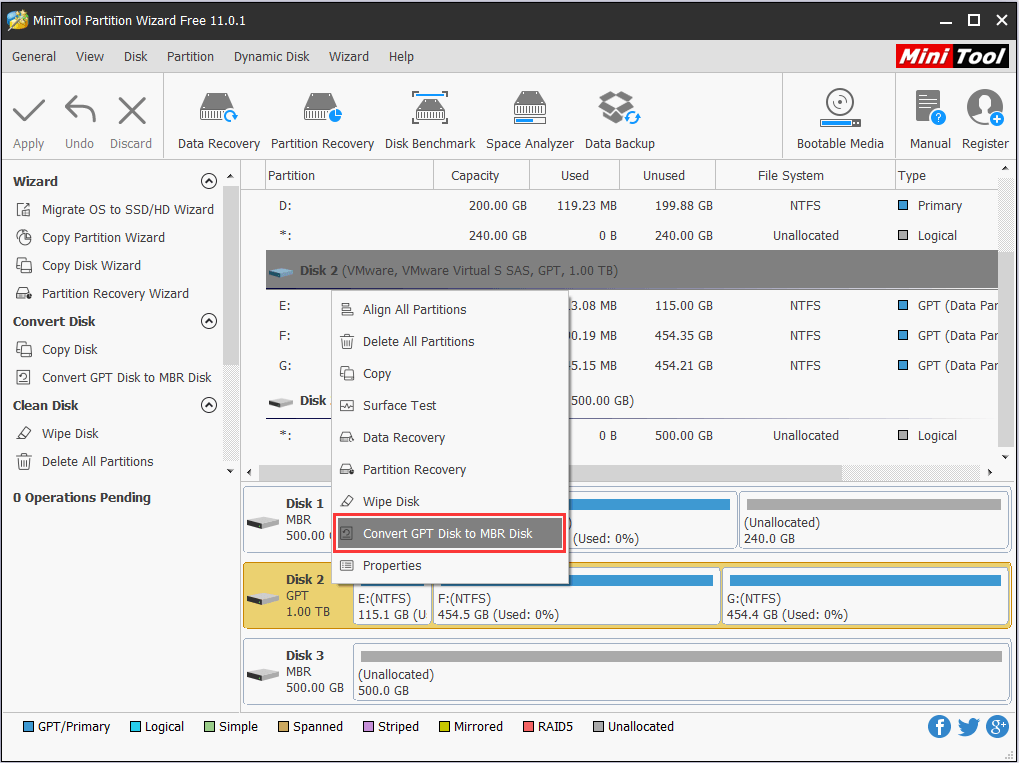
Step 2: confirm the conversion.
You will see the GPT attribute has turned to MBR. However, this is only pending operations for us to preview. Please press “Apply” to confirm the change. After the conversion, you will find that all data is still there.
2) Use Diskpart
It is possible to make the conversion during the installation process. Please do the following:
Step 1: call out CMD.
Once the error pops up, click “OK” to close the error and try pressing on “Shift + F10” to call out CMD. If the utility does not emerge, please go back to the install Windows interface, then press “Shift + F10” again to launch CMD.
Step 2: clean the disk and convert it to MBR.
Now you need to do a clean on the disk by typing the following commands:
“diskpart -> list disk -> select disk 1 (1 signifies the number of GPT disk) -> clean -> convert MBR.“
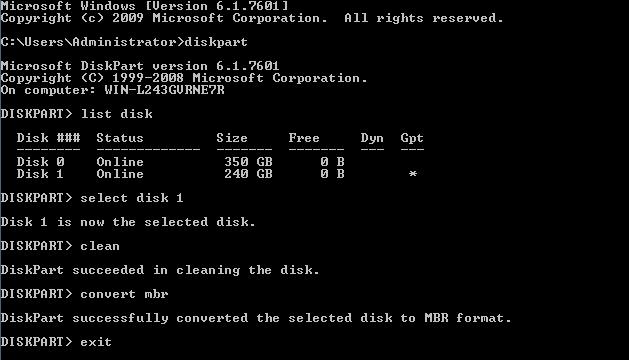
When diskpart shows it has successfully converted the selected disk to MBR format, you can exit from this program and continue to install Windows.
3) Use Disk Management Utility
If another Windows OS is available on the same computer, then Disk Management utility is helpful. Try these operations:
Step 1: go to Disk Management.
Start the working Windows and enter the built-in Disk Management tool by right clicking the “Computer” icon on the desktop, choosing “Manage“, and selecting “Disk Management“.
Step 2: delete volume.
Delete all partitions or volumes on the GPT disk one by one via the right-click function “Delete Volume“.
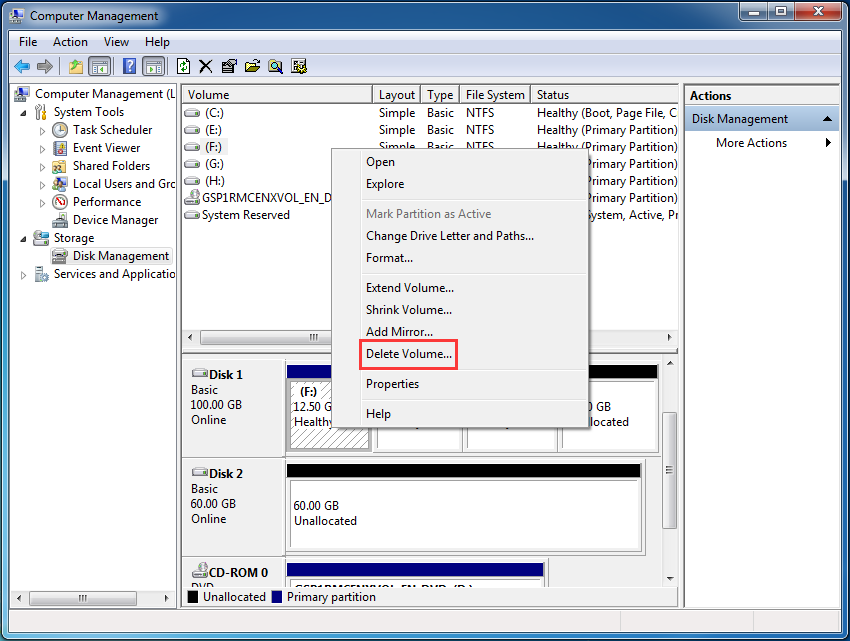
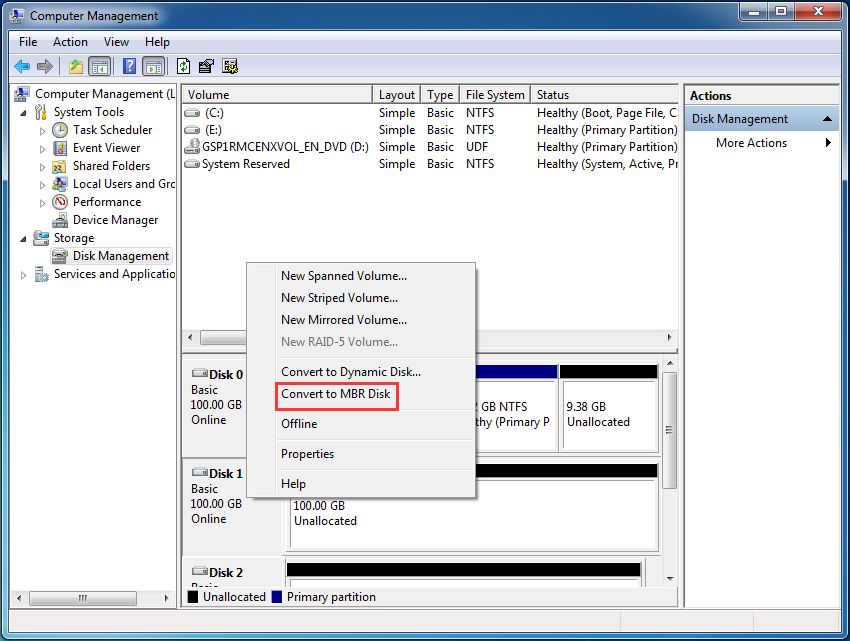
Step 3: convert to MBR disk.
When the entire disk becomes an unallocated space, right click the GPT disk and choose “Convert to MBR Disk“. After these steps, the original GPT disk will be converted to an MBR disk, and then you can go on installing Windows on this disk.
Tip: When deleting volumes you may meet the situation where some special volumes like system volume, recovery volume, and OEM volume cannot be deleted. For reasons and corresponding solutions, please see Cannot Delete Volumes in Windows.
Solution 2. Change Boot Mode If the Motherboard Supports Both Legacy and UEFI Boot
Currently, most motherboards support both the Legacy boot and UEFI boot, and users can choose the most appropriate one manually. If you select Legacy only, it will be impossible to install Windows on GPT disk. At this time, you can enter BIOS and set the boot mode to CSM boot or choose Both.
Once the change has been made, please press on F10 to save changes, and then you can install Windows on a GPT disk.
Error 2: Windows Cannot Be Installed to This disk. The Selected Disk Has an MBR Partition Table.
When installing Windows 7, Windows 8 or other newly released Windows OS, you may receive another error saying Windows cannot be installed on MBR disk:
“Windows cannot be installed on this disk. The selected disk has an MBR partition table. On EFI systems, Windows can only installed on GPT disks”.
Why can’t Windows be installed on an MBR disk under EFI systems?
Reasons
To answer this question, you need to know something about UEFI + GPT boot. Under EFI systems, theoretically both an MBR disk and GPT disk can be used to boot operating systems, but Microsoft rules Windows can only be installed on a GPT disk. To fix this error, the best way is to convert the MBR disk to a GPT disk.
Solutions
Convert MBR Disk to GPT Disk to Fix the Error
Steps are nearly the same as those to convert GPT disk to MBR disk, and the only difference is that you need to convert disk to GPT rather than MBR. For converting without data loss, please see Convert MBR Disk to GPT Disk for more details.
That’s not all…In the former part, we have said most UEFI motherboards support both Legacy boot and UEFI boot but we can change it manually. If the error is caused by setting boot mode to be UEFI only, changing the mode to Both or CSM boot may fix the error, which has been introduced in Error 1.
Click to Tweet
Error 3: Windows Cannot Be Installed on Dynamic Disk.
When installing Windows on a dynamic disk, you may receive this message:
“Windows cannot be installed to this hard disk space. The partition contains one or more dynamic volumes that are not supported for installation”.
Reasons
Why can’t Windows be installed on a dynamic disk? Let’s see what Microsoft Resource says.
“You can perform a fresh Windows installation on a dynamic volume only if that volume was converted from a basic volume and retained an entry in the partition table. Simple volumes converted from basic disks do not have an entry in the partition table unless they were system or boot volumes prior to conversion.”
That is to say users can only install Windows to a dynamic volume which was a boot partition or system partition before converting to a dynamic disk. Under this situation, if you want to go on installing Windows, a good solution is to convert a dynamic disk to a basic disk.
Solutions
Convert Dynamic Disk to Basic Disk to Solve the Problem
Note: There are 3 ways to convert a dynamic disk to basic: by using MiniTool Partition Wizard, Disk Management utility, and diskpart. Note that the latter 2 require deleting all existing dynamic volumes, which means data loss.
1) Use MiniTool Partition Wizard
MiniTool Partition Wizard is a Windows based partitioning tool that can help revert a dynamic disk to basic without any data loss. Here are detailed steps:
Step 1: run Partition Wizard and choose the function for dynamic disk conversion.
Launch MiniTool Partition Wizard. Right click on the dynamic disk you want to convert and choose “Convert Dynamic Disk to Basic Disk“.
Step 2: confirm operation.
You can have a preview that this dynamic disk will become a basic disk without data loss. At this time, press “Apply” to finish this conversion.
Note: The free edition does not support operating a dynamic disk, so please purchase professional or more advanced editions for dynamic disk support. In addition, if Windows cannot boot normally, Partition Wizard Pro built-in tool – MiniTool Partition Wizard Bootable CD is available for it can boot a computer without Windows OS.
MiniTool Partition Wizard DemoClick to Download100%Clean & Safe
2) Use Disk Management Utility
Go to Disk Management and then delete all the volumes that were introduced one by one, which has been introduced in Error 1. After these steps, the dynamic disk will become basic automatically. However, if there is no Windows OS available but you have a Windows installation CD or DVD, make use of Diskpart.
3) Employ Diskpart
Step 1: run cmd.
Boot computer via the installation disc and open CMD by pressing on “Shift + F10“.
Step 2: delete volume in diskpart.
Type corresponding commands to delete all dynamic volumes one by one:
“diskpart -> list disk -> select disk N (N is the number of the dynamic disk) -> detail disk -> select volume=0 -> delete volume -> select volume=1 -> delete volume…“
Step 3: After all volumes on the dynamic disk are deleted, type “convert basic“. Once Diskpart shows it has successfully converted the selected dynamic disk to basic, you can type “exit” to quit from Diskpart.
Nevertheless, if you do not want to delete any volume because of important data, there is a lossless solution below.
Click to Tweet
Error 4: Windows Cannot Be Installed to This Disk. This Computer’s Hardware May not Support Booting to This Disk.
Another error message you may receive during Windows installation is:
“Windows cannot be installed to this disk. This computer’s hardware may not support booting to this disk. Ensure the disk’s controller is enabled in the computer’s BIOS menu.”
Reasons
Generally speaking, there are 2 possible reasons:
- Hard disk protection is enabled.
- SATA Controller mode was set incorrectly (with incorrect drive mode, the very disk cannot be used normally).
Solutions
Solution 1. Remove Hard Disk Protection
For the first situation, please read the specification or contact a sales person to confirm whether there is hard disk protection if the computer is not configured by ourselves. If there is, remove the protection by following the instructions.
Solution 2. Change SATA Controller Mode
For the second situation, if we changed SATA Controller mode in BIOS before, try setting BIOS to factory settings. Different BIOS gives different options to set itself to factory settings, like Restore Defaults, Load BIOS Defaults, and Load Optimal Defaults, so you should choose the correct one according to practical situations.
However, when this solution does not work, you must change the hard disk mode manually in BIOS. If the current state is IDE, change it to AHCI. If the current mode is AHCI, change it to IDE, etc. Actually, if Compatibility or Compatible is given, you must choose this mode.
Moreover, when you are installing the Data Center or Enterprise Server edition of Windows Server 2008/R2 or later to a raw disk via CD or DVD, you may get the same error. This is because the default SAN policy during setup on new installations of Data Center or Enterprise SKUs is Offline Shared, which applies Offline and Read Only attributes to any presented disks that are on a shared bus and not considered as System or Boot disks.
RAW disks cannot be detected as System or Boot, leading to offline and read only attributes. As a result, you cannot install Windows to these kinds of disks. To solve the problem, configure the default SAN policy to OnlineAll. For detailed steps, please see the corresponding Setup Reports Error of Microsoft.
Error 5: Windows Cannot Be Installed to This Disk. The Disk May Fail Soon.
Sometimes you may receive the following error message when installing Windows:
“Windows cannot be installed to this disk. The disk may fail soon. If other hard disks are available, install Windows to another location.”
Reasons
When this error appears, it indicates there may be something wrong with the hard disk.
Solutions
Backup and Repair/Replace the Hard drive
At this time, you must stop Windows installation, and then backup important data immediately in case of a real disk failure. If there is not so much data that is required to back up, just copy and paste them to a safe place. However, if you want to backup all or a large number of data on the disk, using a third party disk clone software to back up the entire hard disk can save you a lot of time.
Tip: If there is no Windows to use, you may need a bootable disk clone tool, and free MiniTool Partition Wizard Bootable CD might be a good choice.
When the backup is made, check the health state of the disk by running a diagnosis and repair tools which can be downloaded either from the hard disk manufacturer’s website or from a professional downloading center. If Windows won’t boot, please download the ISO file and burn it to a CD or DVD on another computer, and then make a disk diagnosis via the bootable disc.
If errors are detected from your hard disk but cannot be repaired, replace the dying hard disk with a new one. However, if it is under warranty, send it back to the manufacturers because they will repair the disk or give you a new one.
Error 6: Windows Cannot Be Installed to This Hard Disk Space, Windows Must Be Installed to a Partition Formatted in NTFS.
When installing Windows on an old disk, you may receive a Windows cannot be installed to this hard disk space message:
“Windows cannot be installed to the hard disk space. Windows must be installed to a partition formatted in NTFS.”
What causes this error?
Reasons
This is mainly caused by an incompatible file system of the partition to be installed with Windows. Microsoft rules that Windows must be installed to a partition formatted in NTFS since Windows Vista.
Solutions
Solution 1. Format the Partition with NTFS File System
1) Use MiniTool Partition Wizard
Remember Windows won’t allow you to format the current boot partition no matter if you turn to Disk Management or CMD. If you have no operating system to use, formatting needs more effort. Thus, to make things easier, we strongly recommend using MiniTool Partition Wizard Bootable CD to cope with different situations with one solution. Please do the following:
Step 1: use Partition Wizard Bootable to boot your computer.
On the tool bar of each Partition Wizard paid editions, launch Bootable Media Builder to create a bootable CD/DVD disc or USB flash drive. Then set your computer to boot from the bootable media and finally enter MiniTool Partition Wizard Bootable.
Tip: If you do not have a bootable media builder, you can upgrade to MiniTool Partition Wizard advanced editions.
Click on the partition to be formatted and select “Format Partition” from the operations menu.
Step 3: choose NTFS as the desired file system.
In the pop-up window, choose NTFS at file system and then click “OK” to continue.
Step 4: execute the operation.
Go back to the main interface and hit “Apply” to execute this change.
2) Use Windows Installation Disk
Also you can choose to format the partition during the installation. When you see “where do you want to install Windows”, click on the target partition at first and then hit Drive Options (Advanced) to format it.
Solution 2. Clean the Whole Drive
Another solution for Windows should be installed to a partition formatted in NTFS is to clean the whole drive. You can also use MiniTool Partition Wizard Bootable CD to do this job (use Delete All Partitions), then Windows will make its partition automatically during installation.
Summary
If you receive one of the 6 errors during a Windows installation, I hope our solutions are useful for you. If they prove to be useful, please share to help more people. Should you have any doubts or problems, please feel free to leave us your comments in the following area or send to [email protected]. We will try our best to help you get out of trouble.