
Applies ToWindows 7 Enterprise Windows 7 Home Basic Windows 7 Home Premium Windows 7 Professional Windows 7 Starter Windows 7 Ultimate
Проблема
При попытке установить, обновить или запустить программу или файл появляется следующее сообщение об ошибке:
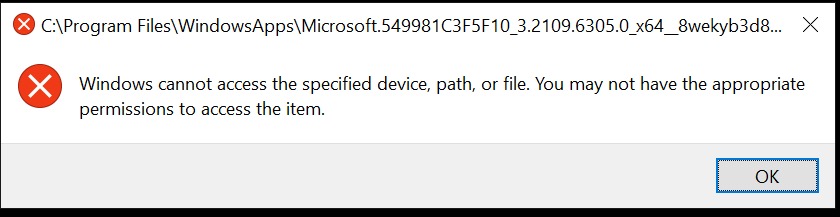
Ошибка: «Windows не удается получить доступ к указанному устройству, пути или файлу. Возможно, у вас нет нужных разрешений для доступа к этому объекту.»
Решение
Для решения этой проблемы выполните действия, описанные ниже, начиная со способа 1. Если этот способ не поможет, переходите к следующему способу.
Способ 1. Проверьте разрешения на доступ к файлу и папке
Примечание. Необходимо обладать правами администратора или быть членом группы «Администраторы домена», если компьютер входит в домен.
Разрешения — это правила, связанные с файлами, которые определяют, может ли пользователь получать доступ к файлу и какие действия с ним он может выполнять. Чтобы проверить разрешение на файл или папку, выполните указанные ниже действия.
-
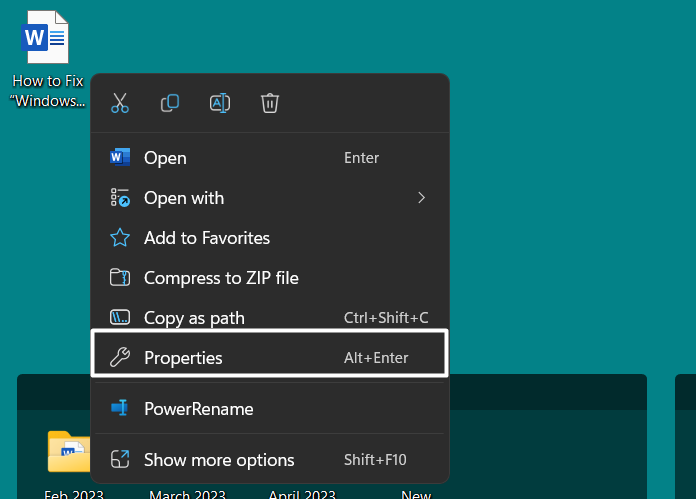
Щелкните файл или папку правой кнопкой мыши и выберите пункт Свойства.
-
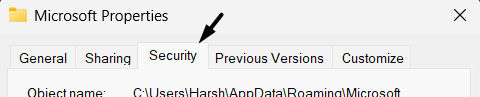
Перейдите на вкладку Безопасность.
-
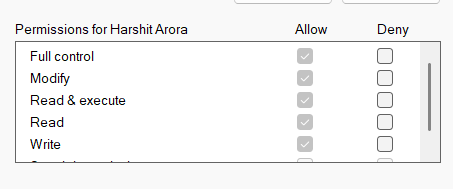
В разделе Группы или пользователи выберите свое имя, чтобы просмотреть имеющиеся разрешения. (Снимок экрана для этого этапа приведен ниже.)
-
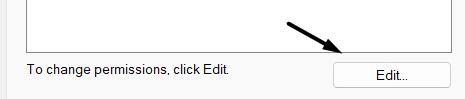
Нажмите кнопку Изменить, установите флажки для нужных разрешений и нажмите кнопку ОК. (Снимок экрана для этого этапа приведен ниже.)
Дополнительные сведения о разрешениях см. в статье Что такое разрешения?.
Способ 2. Проверьте расположение файла
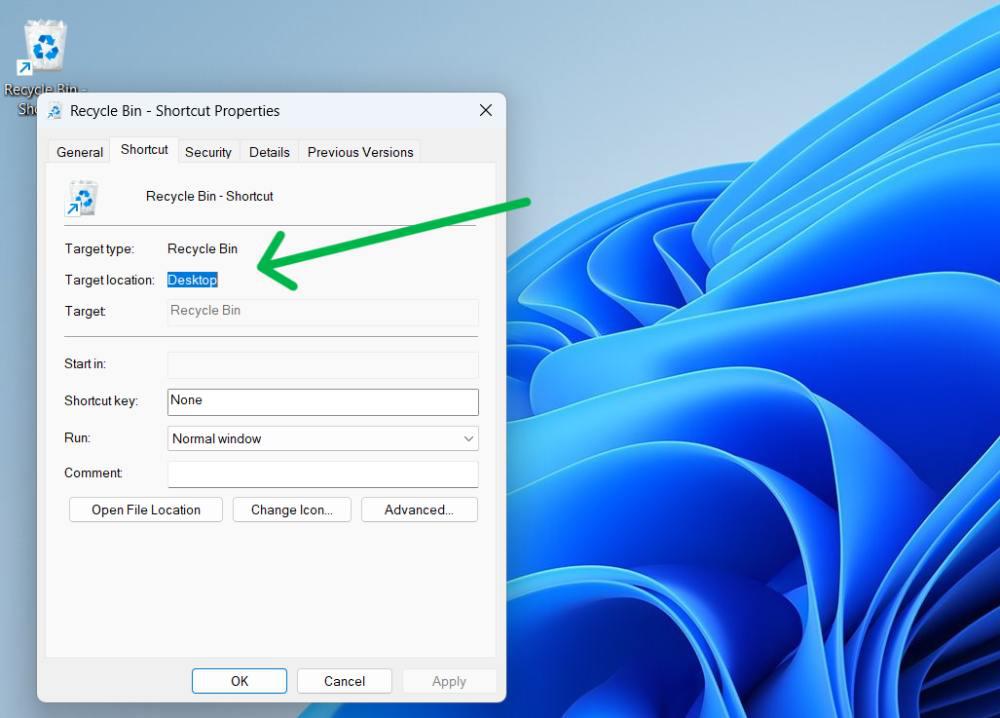
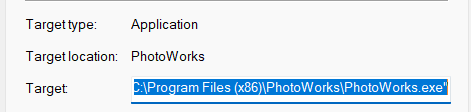
Данная ошибка может возникать, если ярлык или установленная программа пытаются получить доступ к расположению, недоступному в настоящее время (например, к сетевой папке или съемному диску). Проверьте путь к файлу, к которому Windows не может получить доступ, и убедитесь, что расположение доступно. (Снимок экрана для этого этапа приведен ниже.)
Способ 3. Убедитесь, что файл не был перемещен или удален
Данная ошибка может возникнуть также в случае, если файл был перемещен или удален. Перейдите в папку, содержащую необходимый файл, и убедитесь, что он находится там.
Способ 4. Создайте ярлык повторно, чтобы проверить наличие повреждений
Данная ошибка может возникать также в случае, если ярлык или файл другого типа был поврежден. Проверить ярлыки на наличие повреждений можно посредством повторного создания ярлыка. Для этого перейдите к разделу Создание или удаление ярлыка.
Если повреждено приложение или файл другого типа, для решения проблемы может потребоваться восстановить приложение.
Способ 5. Разблокируйте файл
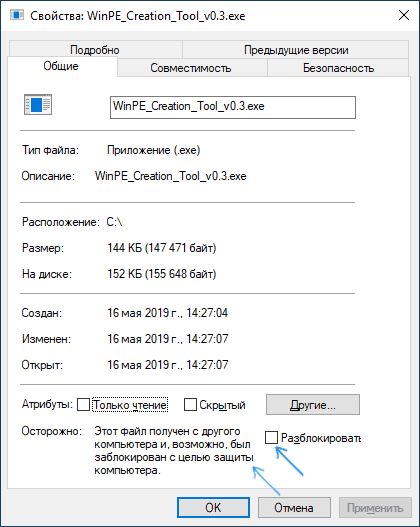
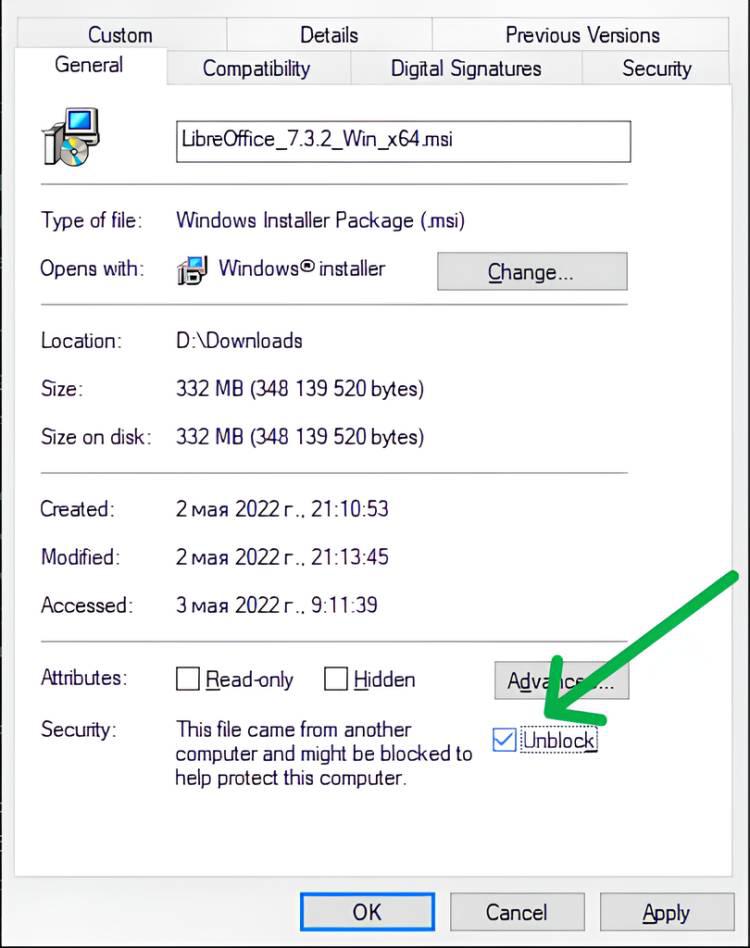
В некоторых случаях Windows может блокировать файл. Просмотрите свойства файла — они могут содержать следующее примечание: Этот файл получен с другого компьютера и, возможно, был заблокирован с целью защиты компьютера. Чтобы проверить это и при необходимости разблокировать файл, сделайте следующее.
-
Щелкните заблокированный файл правой кнопкой мыши и выберите пункт Свойства.
-
На вкладке Общие нажмите кнопку Разблокировать, если она доступна.
Способ 6. Проверьте, не блокирует ли файл антивирусное программное обеспечение
Чтобы проверить, не блокирует ли файл ваша антивирусная программа, временно отключите ее и попытайтесь открыть файл. Если потребовалось временно отключить антивирусное программное обеспечение, включите его сразу же после выполнения необходимого действия. Если во время данного отключения компьютер подключен к Интернету, он уязвим для атак.
Важно! Отключение антивирусного программного обеспечения или изменение его настроек может сделать ваш компьютер уязвимым для вирусов, мошенничества и других вредоносных действий. Корпорация Майкрософт не рекомендует отключать антивирусное программное обеспечение или изменять его настройки. Если потребовалось временно отключить антивирусное программное обеспечение, включите его сразу же после выполнения необходимого действия. Применяя этот метод обхода проблемы, вы действуете на собственный риск. Сведения о временном отключении антивирусного программного обеспечения см. в статье Отключение антивирусного программного обеспечения.
Причина
Подобная проблема может возникать при выполнении на компьютере любого из следующих условий.
-
Нет разрешения на доступ к файлу или его расположению.
-
Файл находится в недоступном в настоящее время расположении, например в сетевой папке или на внешнем диске, не подключенном к компьютеру в настоящий момент.
-
Файл был перемещен или удален.
-
Файл или ярлык поврежден.
-
Windows может блокировать файл.
-
Антивирусное программное обеспечение может блокировать файл.
Дополнительная информация
Дополнительные сведения об ошибках при доступе к файлами или папкам в Windows см. в статье «Отказано в доступе» и другие ошибки при попытке доступа к файлам и папкам Windows или при работе с ними.
Нужна дополнительная помощь?
Нужны дополнительные параметры?
Изучите преимущества подписки, просмотрите учебные курсы, узнайте, как защитить свое устройство и т. д.
Иногда, при запуске программ (файлов .exe) вы можете получить сообщение об ошибке «Windows не удается получить доступ к указанному устройству, пути или файлу. Возможно, у вас нет нужных разрешений для доступа к этому объекту». При этом права администратора обычно в наличии, а о причинах ошибки можно лишь догадываться.
В этой инструкции подробно о том, как исправить ошибку «Windows не удается получить доступ к указанному устройству, пути или файлу» и о том, чем она может быть вызвана.
- Разрешения на выполнение в свойствах файла
- Windows не удается получить доступ к указанному устройству, пути или файлу при запуске программ с флешки и других USB-накопителей
- Локальные политики безопасности, Software Restriction Policies как причина ошибки
- Блокировка файлов антивирусными программами
- Дополнительная информация
Проверка разрешений в свойствах исполняемого файла и блокировки файла

Первое, что следует проверить при возникновении ошибки «Windows не удается получить доступ к указанному устройству, пути или файлу» — актуальные разрешения на выполнение этого .exe файла. Для этого выполните следующие шаги:
- Откройте свойства .exe файла, который вы пробуете запустить (не свойства ярлыка, а именно исполняемого файла .exe), для этого нажмите по нему правой кнопкой мыши и выберите нужный пункт меню.
- Перейдите на вкладку «Безопасность» (если таковая отсутствует, возможно, файл находится на томе FAT32 и этот раздел инструкции не подходит для вашего случая).
- Выбирая пользователей в списке «Группы и пользователи» проверьте, включен ли запрет на чтение и выполнения для Администраторов или конкретно для вашего пользователя.

- Если такой запрет присутствует, нажмите кнопку «Изменить», а в следующем окне либо снимите отметку «Запретить», либо установите отметку «Разрешить» для нужных пользователей и групп.

Если файл был загружен из Интернета, на всякий случай зайдите также на вкладку «Общие» в свойствах .exe файла и посмотрите, нет ли там сообщения «Этот файл получен с другого компьютера и, возможно, был заблокирован с целью защиты компьютера».
При наличии такого уведомления, разблокируйте его, установив соответствующую отметку и применив настройки.
По завершении изменений, примените настройки и попробуйте снова запустить файл, который ранее не запускался для проверки, была ли решена проблема.
Ошибка «Windows не удается получить доступ к указанному устройству, пути или файлу» при запуске .exe с флешки или другого USB-накопителя
Если все программы, за исключением тех, что расположены на флешке, карте памяти или внешнем жестком диске исправно запускаются, причиной могут служить политики доступа к съемным запоминающим устройствам.
Решением в данном случае будет следующий путь:
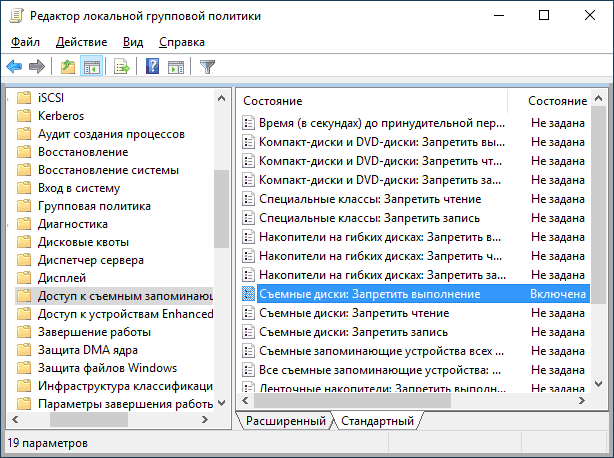
- Если на вашем компьютере установлена Windows 10, 8.1 или Windows 7 версий Профессиональная, Корпоративная или максимальная, нажмите клавиши Win+R, введите gpedit.msc и нажмите Enter. Для домашней редакции Windows перейдите к шагу 5.
- Откроется редактор локальной групповой политики, в нем перейдите к разделу «Конфигурация компьютера» — «Административные шаблоны» — «Система» — «Доступ к съемным запоминающим устройствам». Обратите внимание на значение политик «Съемные диски: Запретить выполнение» и других политик, связанных со съемными дисками.

- Если среди них есть включенные, дважды нажмите по таким политикам и задайте «Не задано» или «Отключена», примените настройки.
- Повторите то же самое для аналогичного подраздела в «Конфигурация пользователя» и перейдите к шагу 9.
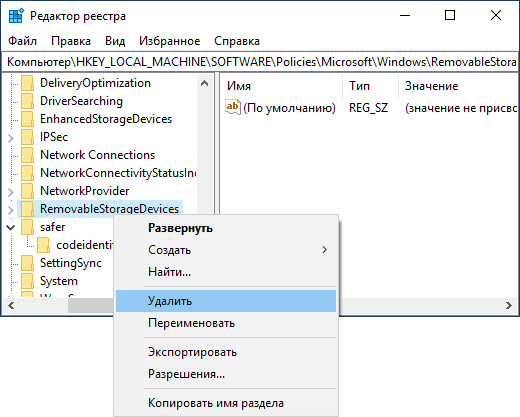
- Если на вашем компьютере установлена домашняя редакция Windows, нажмите клавиши Win+R на клавиатуре, введите regedit и нажмите Enter.
- В открывшемся редакторе реестра перейдите к разделу
HKEY_LOCAL_MACHINE\SOFTWARE\Policies\Microsoft\Windows\
- Если внутри него располагается подраздел RemovableStorageDevices, удалите его.

- Проверьте наличие аналогичного подраздела в HKEY_CURRENT_USER, удалите его в случае, если он присутствует.
- Обычно настройки вступают в силу сразу, однако USB накопитель потребуется отключить и подключить заново.
Политики ограниченного использования программ (SRP) и политики безопасности
Редко, но случается, что причиной рассматриваемой ошибки являются настроенные политики ограниченного использования программ либо локальные политики безопасности.
Проверить наличие политики ограниченного использования программ можно с помощью редактора реестра (случается, что когда они установлены сторонним ПО, в редакторе локальной групповой политики они не отображаются):
- Нажмите клавиши Win+R на клавиатуре, введите regedit и нажмите Enter.
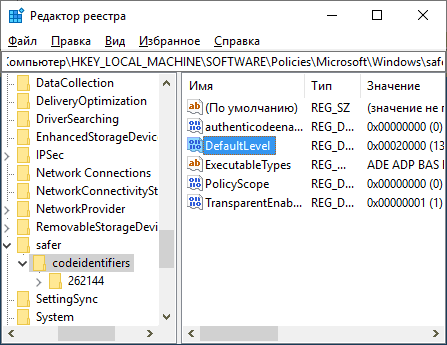
- Перейдите к разделу реестра
HKEY_LOCAL_MACHINE\SOFTWARE\Policies\Microsoft\Windows\
- Посмотрите, присутствует ли в нем подраздел safer\codeidentifiers. Если да — политики SRP включены и у вас есть два основных варианта действий.
- Более щадящий (особенно если речь идет не о вашем личном компьютере) — изменить значение параметра DefaultLevel в правой части редактора реестра на 40000, применить настройки и перезагрузить компьютер.

- Целиком удалить подраздел codeidentifiers в safer и перезагрузить компьютер.
Аналогичную ошибку могут вызывать и настроенные политики безопасности (посмотреть можно в secpol.msc — Локальная политика — Параметры безопасности. В частности, когда речь идет о пользователе в домене, причиной может быть включенный параметр «Контроль учетных записей: режим одобрения администратором для встроенной учетной записи администратора».
Блокировка запуска файлов антивирусными программами
Антивирусы могут помещать подозрительные файлы (особенно если речь идет об играх из нелицензионных источниках, утилитах из интернета) в карантин и блокировать их запуск, используя техники, которые вызывают появление того же сообщения «Windows не удается получить доступ к указанному устройству, пути или файлу. Возможно, у вас нет нужных разрешений для доступа к этому объекту».
Проверьте журнал вашего антивируса или другого ПО безопасности, не находится ли запускаемый файл в списке найденных угроз. Также можно попробовать просто временно отключить антивирус, если вы уверены, что файл в порядке (но рекомендую сначала проверить его на VirusTotal).
Дополнительная информация
В завершение — несколько дополнительных моментов, которые следует учесть, если вы столкнулись с ошибкой из этой статьи в Windows 10, 8.1 или Windows 7:
- Причиной могут оказаться сторонние средства родительского контроля или блокировки запуска программ (см. Как заблокировать запуск программ в Windows).
- Если вы используете встроенную учетную запись с именем «Администратор», попробуйте создать нового пользователя с не зарезервированным именем и дать ему права администратора, а затем проверить, сохраняется ли проблема при входе под этим пользователем (см. Как создать пользователя Windows 10).
- В случае, если проблема появилась внезапно, а еще недавно этот же файл запускался, попробуйте использовать точки восстановления Windows. Даже если они не запускаются с той же ошибкой, вы можете использовать их с загрузочной флешки с Windows: загрузитесь с неё и на втором экране внизу слева выберите «Восстановление системы».
- Если программа запускается с ярлыка, откройте его свойства и посмотрите, доступен ли путь, на который ссылается поле «Объект».
- При расположении .exe файла на сетевом диске, убедитесь, что он доступен с вашего компьютера.
When you are trying to open a file or start a program, you might receive an error message that says Windows cannot access the specified device path or file. This post will show you 5 solutions to solve this problem. In addition, this post will introduce an effective and reliable way to keep data safe, which is using MiniTool ShadowMaker to create a backup image.
Windows Cannot Access the Specified Device Path or File
You may receive an error message ‘Windows cannot access the specified device, path or file. You may not have the appropriate permission to access the item.’ when you are trying to start a program or open a file. And the error message is shown as the follow:

You won’t be able to access the file or the program when you receive the error message. Do you know the reason behind and how to fix this?
In general, there are various reasons that cause the issue Windows cannot access the specified device. For example:
- The antivirus software may block the files.
- Windows has blocked the files.
- The file is corrupted, hidden or deleted by antivirus.
- The shortcut of the program is corrupted.
- Or you don’t have the permission to access the item since you are not the administrator.
Of course, some other reasons may also give rise to the issue that Windows cannot access the specified device path or file. Meanwhile, the most important part is how to solve this problem. Thus, please keep on reading.
How to Fix Windows Cannot Access the Specified Device Path or File?
- Disable antivirus software temporarily.
- Check permission of the file or folder.
- Unblock the file.
- Check the location of the file.
- Recover the removed file or deleted file.
5 Solutions to Windows Cannot Access the Specified Device Path or File
In this section, we will list 5 solutions to solve the problem when Windows cannot access the specified path. You can try them one by one to fix this problem when you may not have appropriate permissions to access the item. You can also watch the following video to fix the problem Windows cannot access the specified file.
Solution 1. Disable the Antivirus Software Temporarily
The issue Windows cannot access the specified file may be caused by the antivirus program. Therefore, in order to solve the problem, you can temporarily disable it. You can follow the steps below to disable your antivirus program.
Step 1: Press Windows key and R key together to open Run dialog and type msconfig in the box, then click OK or hit Enter to continue.

Step 2: In the System Configuration window, go to the Start up tab and click Open Task Manager to continue.

Step 3: In the popup window, find the antivirus program and choose it. Then click Disable button at the right bottom to continue.
Now, you can open the program or the file again to check whether the issue Windows cannot access the specified path Windows 10 is solved.
Note: When you have solved the problem, you should re-enable the antivirus program as soon as possible since if the antivirus is disabled, the computer is vulnerable to attack.
Solution 2. Check Permissions of the File or Folder
Now, this section will introduce the second method to solve the issue when you may not have appropriate permissions to access the item. To fix this problem, you can try checking the permissions of the file or folder.
You can refer to the following detailed instructions.
Step 1: Select the file you want to open and right-click it. Then choose Properties from the context menu.
Step 2: Go to the Security tab and choose your name under Group or user name and click Edit to continue.
Step 3: Then under Permissions for SYSTEM in the popup window, you can check the permissions you want to have in Allow column. After that, please check whether the issue Windows cannot access the specified path is solved.
Note: Please note if all boxes are grayed out with a checkmark in it, it means that the permissions are enabled. In this situation, this solution does not work for you and you need to move on to the next method.
Solution 3. Unblock the File
Windows cannot access the specified device path or file may occur if the file is blocked by Windows. To fix this problem, you can try to unblock the file. You can look at the specific steps of operations below.
Step 1: Right-click the file which has the problem Windows cannot access the specified path and choose Properties to continue.
Step 2: In the popup window, go to the General tab. Then you will see a message The file came from another computer and might be blocked to help to protect the computer if the file is blocked by Windows. Thus, you can check Unblock and click OK to continue.
Now, you can check whether the issue Windows cannot access the specified path Windows 10 is solved.
Solution 4. Check the Location of File
If you are trying to access a file via a shortcut which is on an external hard drive or a network location that it is no longer connected to your computer, Windows might not be able to access the specified device path or file. Thus, you can check the location of the target file and see if the file is in an inaccessible location based on following instructions.
Step 1: Right-click the shortcut of the file on your computer and choose Properties from the context menu.
Step 2: Under the Shortcut tab in the popup window, check the path in Target is available or not.
Solution 5. Recover the Removed or Deleted File
Windows will not be able to access the specified device path or file if the files are removed, deleted, or hidden by an antivirus. In a situation like this, you can recover the data to solve this problem.
In order to recover the lost data, you can take advantage of the best data recovery software – MiniTool Power Data Recovery. It is a user-friendly program for Windows users, which can be used to recover lost data due to various reasons, such as mistaken deletion, virus attack, mistaken formatting and so on.
As a read-only software, it will not bring any damage to the original data. So if you have lost data, you can download the Trail edition to scan the lost files.
MiniTool Power Data Recovery TrialClick to Download100%Clean & Safe
Here are the specific instructions to recover the lost data from the inaccessible folder or partition.
Step 1: Download and install the best data recovery software and launch it to enter its main interface.
Step 2: Next, you will see four options and choose This PC module to continue. Then choose the partition which you have lost the file and click Scan to continue.

Step 3: When the scan is finished, you can see all files are listed here in order and you can open each path to find out the file you need.

Note: If you know the name of the files you have lost, you can use the Find feature to find them quickly. If you know the type or other features of the file, you can use Filter feature to continue. These two features can help you to save the scanning time.
Step 4: When you have checked the lost files, you can choose a destination to save the files by clicking Save button. Here, you will receive a warning message that tells you a license key is required to activate the program since you are using the Trial edition. Thus, you can click here to get here to buy a license. Then activate the program and complete the recovery.

When you have recovered lost files, you can check whether the issue Windows cannot access the specified device path or file is solved.
I have successfully solved the issue Windows cannot access the specified path or file by using the method in this post. I’d like to share it with more friends.Click to Tweet
Useful Suggestion
When you have solved the issue when Windows cannot access the specified path Windows 10 or successfully recovered the lost files, it is recommended to back up the data so as to provide better protection.
Here, MiniTool ShadowMaker, the best backup software is another product of MiniTool® Software Ltd.
MiniTool ShadowMaker is a user-friendly program which can provide protection for your data and computer. With its powerful features, it can back up a file, folder, disk, partition, and the operating system.
Besides the backup feature, it can also provide recovery solutions when there is a need so as to help you to restore the computer or data.
Thus, you can download MiniTool ShadowMaker Trial to create a backup image for the data so as to provide better protection for them when you have recovered the lost data or solved the issue Windows cannot access the specified file.
MiniTool ShadowMaker TrialClick to Download100%Clean & Safe
Here, we will show you how to back up the files with MiniTool ShadowMaker. ou can continue according to the following instructions.
For backup the operating system, you can refer to this article: Easily & Free Create a Windows 10 Image Backup Now – MiniTool
Step 1: Install the program and launch it, click Keep Trail.
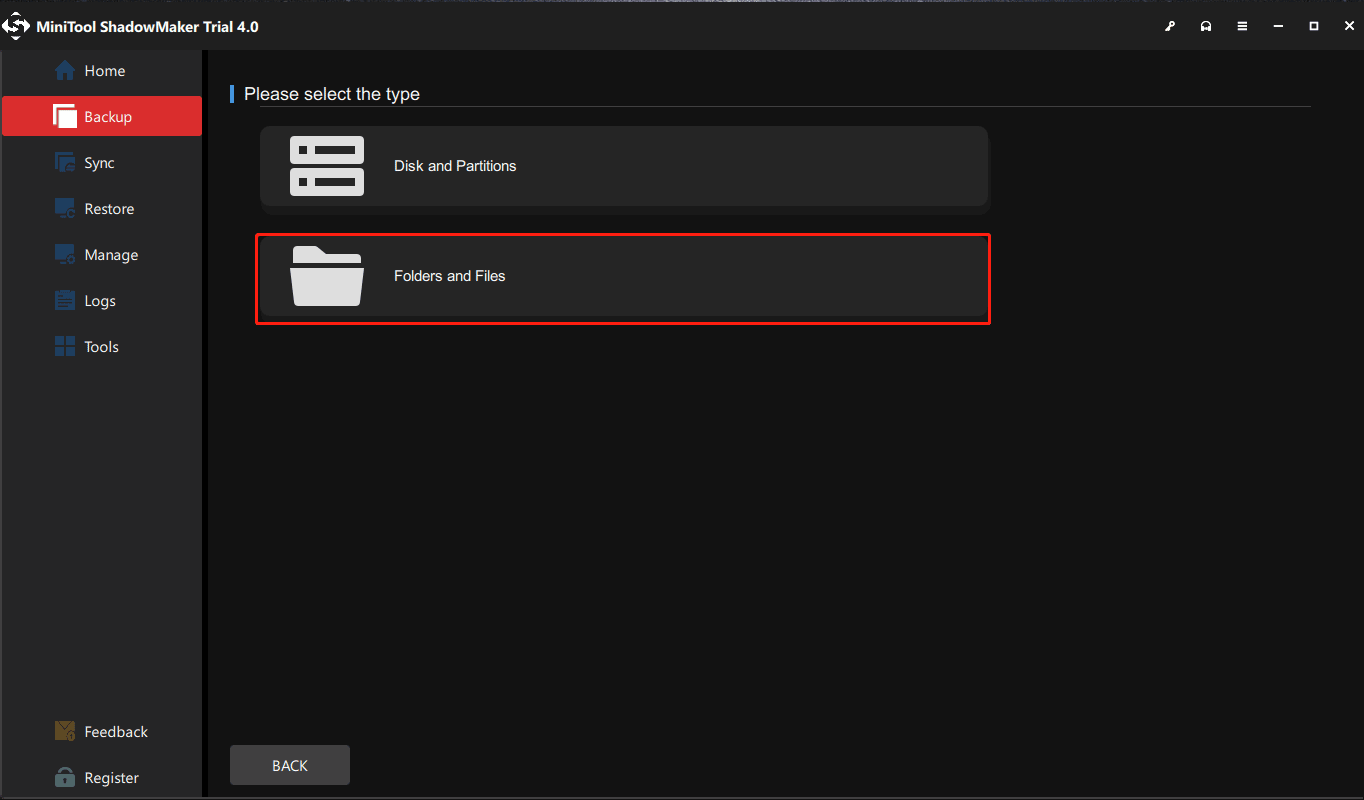
Step 2: In the main interface, go to the Backup tab and click SOURCE module to continue.
Step 3: In the popup window, choose Folder and Files to choose what you want to back up.
Step 4: When returning to the main interface, you need to click DESTINATION module to choose where you want to save the backup image. It is advised to choose an external hard drive as the destination.
In order to provide better protection for data, there are three important things you need to pay attention to.
- MiniTool ShadowMaker enables you to create an automatic file backup. Thus, you just need to click Schedule Settings in Options button to set the backup task on a regular basis.
- There are three different backup schemes offered, including Full Backup, Incremental backup, and Differential backup. You can change the backup scheme by clicking Backup Scheme.
- You can also set some advanced backup parameters by clicking Backup Options.
Step 5: When you have selected the backup source and destination, you can click Back Up Now to perform this backup task immediately or click Back Up Later to delay the backup task.

After having successfully created a backup image to the data, you can keep data safe and even can restore them to a previous state when there is a need.
MiniTool ShadowMaker is a user-friendly program that can help me to create a backup image with ease so as to keep data safe.Click to Tweet
Bottom Line
After reading this post, we learned that Windows cannot access the specified device path or file because of many reasons such as antivirus software, corrupted shortcut, file deleted by antivirus and so on.
However, this post has listed 5 solutions to solve the problem when Windows cannot access the specified file and you can try them out.
After successfully solving the problem or recovering the lost files, you should use MiniTool ShadowMaker to back up all important files so as to provide better protection for data.
By the way, if you have any better solution to the problem you may not have appropriate permissions to access the item, you can share it one the comment zone.
Or if you have any problem about MiniTool products, please don’t hesitate to contact us via the email [email protected].
Windows Cannot Access the Specified Device Path or File FAQ
How do I fix Windows cannot access the specified device path or file?
- Disable antivirus software temporarily.
- Check permission of the file or folder.
- Unblock the file.
- Check the location of the file.
- Recover the removed file or deleted file.
How do I fix you do not have permission to access?
How do I get full permission on Windows 10?
- Open File Explorer and select the file or folder you want to have full permission to right-click it.
- Choose Properties.
- Go to the Security tab.
- Click Advanced.
- On the next page, click Change.
- Then click Advanced.
- On the Select User or Group page, click Find Now.
- Then select your user account and click OK.
- On the Select User or Group page, click OK.
- Click Apply,
- Then click OK.
You can refer to the post How To Take Ownership Of Folder In Windows 10 By Yourself to learn more.
How do I fix access denied folder in Windows 10.
Last Updated :
07 Apr, 2025
Encountering the «Windows cannot access the specified device» error can be frustrating, especially when you need to access an important file or application. This common issue often arises due to permission settings, file location, or even antivirus software blocking the file. In this guide, we’ll walk you through how to fix Windows cannot access errors using several methods. Whether the problem is caused by incorrect permissions or file path issues, these steps will help you resolve the Windows error-specified device quickly.
Table of Content
- Why Windows Cannot Access The Specified Device Path Error?
- How to Fix the «Windows Cannot Access the Specified Device» Error in Windows?
- Method 1: Run the App as an Administrator
- Method 2: Disable the Antivirus Software Temporarily
- Method 3: Check Permissions of the File or Folder
- Method 4: Unblock the File
- Method 5: Check the Location of the File
- Method 6: Recreate a Program’s Shortcut
- Method 7: Repair or Reinstall Corrupted File Using Control Panel
Why Windows Cannot Access The Specified Device Path Error?
- For certain reasons, Windows is unable to access the specified device path. Firstly, there could be permission issues, which means that there might be insufficient permissions for users in order for them to access files.
- Another possible cause is if the file paths are not accessible. Moreover, the files may be on external devices that are not connected. Also,Corrupted files and security blocks from Windows are other potential causes.
- Access issues can also arise from bad sectors in the drive, antivirus interference with it, damaged files within it, missing system files in it, and insufficient disk space on it among others. Now let’s learn to repair Windows can’t access specified device issues.
How to Fix the «Windows Cannot Access the Specified Device» Error in Windows?
Now, we’ll see some easy methods to fix «Windows cannot access the specified device». In this article, we will discuss eight methods to resolve Windows cannot access the specified device error.
Method 1: Run the App as an Administrator
Running the App as an Administrator mostly does the trick. Very often, the simplest solution is the most effective. Run the program with admin privilege to avoid access-related problems and allow it to execute commands correctly.
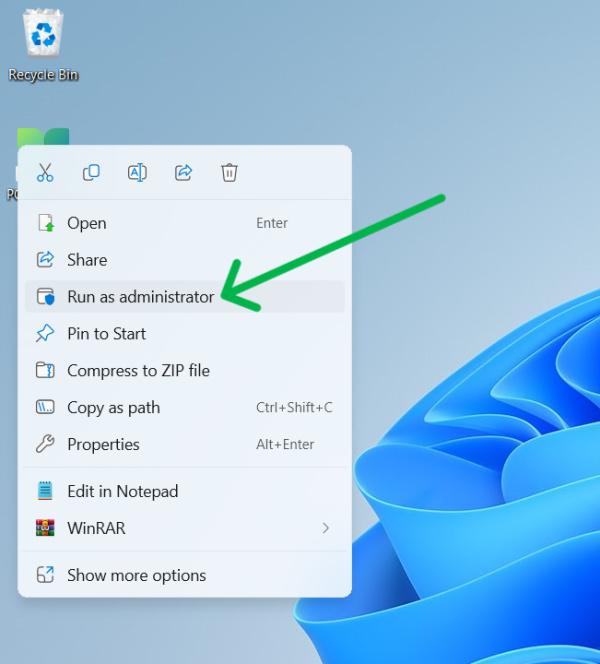
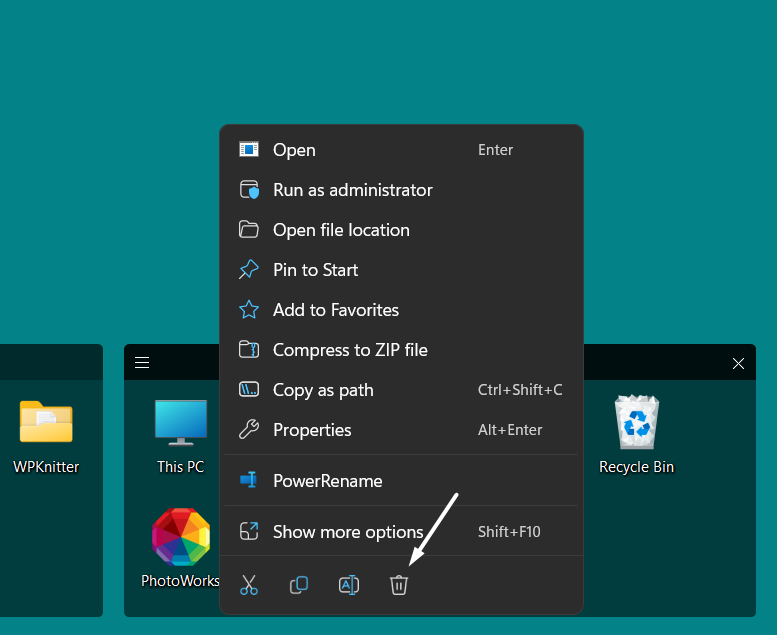
Step 1: Right-click on any application that cannot access the problem
Step 2: After that right-clicking on the application and select «Run as administrator«
Method 2: Disable the Antivirus Software Temporarily
Antivirus programs are supposed to protect your system but they can sometimes confuse secure ones for viruses. Disable your antivirus temporarily to resolve Windows cannot access the specified device error.
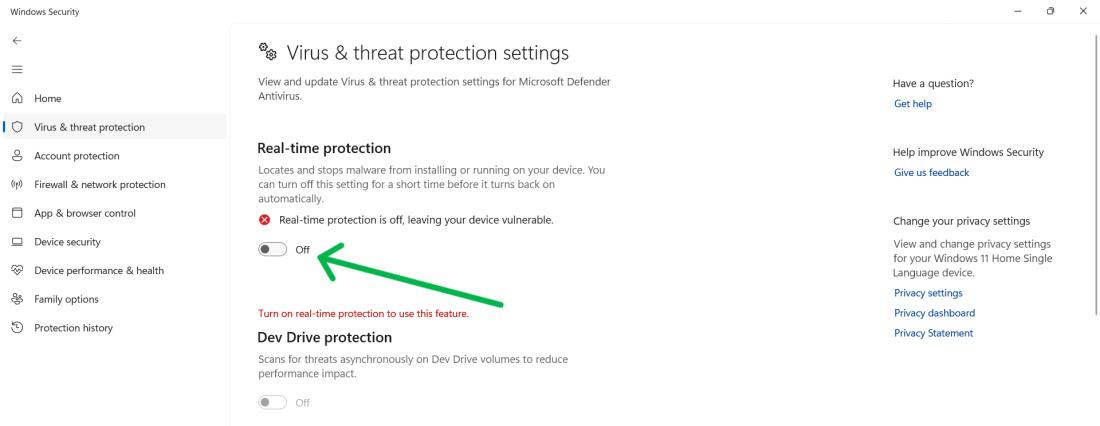
Step 1: Open your antivirus software like Windows security
Step 2: On the left side bar click on «Virus & threat threat threat protection-threat protection-threat protection«
Step 3: Scroll down and then click on «Manage Settings» under the Virus & Threat Protection settings
Step 4: Toggle off the «Real-time protection«
Method 3: Check Permissions of the File or Folder
Is access denied? Improper permissions might be the culprit. Check that your user account has the correct permissions for the file or folder to troubleshoot access errors.
Step 1: Select the file you want to open. Right-click on the selected file.
Step 2: Choose «Properties» from the context menu.
Step 3: Then navigate to the «Security» tab, Under the Group or user name click on the «Edit» button
Step 4: Check desired permissions for SYSTEM under the «Allow» column in the popup window. Then, verify if the issue is resolved.
Method 4: Unblock the File
Security features can block files from unfamiliar sources. Unblock the file if you trust its origin, as this could be the simple fix you need.
Step 1: Right-click on the file/folder that Windows cannot access the specified path then from the menu select «Properties«
Step 2: Navigate to the «General» tab then uncheck the checkbox next to Unblock
Method 5: Check the Location of the File
Verify the File’s Location Access errors can result from a misdirected shortcut or a moved file. Verify the file’s location to ensure your system isn’t misled.
Step 1: Right-click on the file/folder that Windows cannot access the specified path then from the menu select «Properties«
Step 2: Navigate to the «Shortcut» tab, and check whether the path in the Target location is available or not.
Method 6: Recreate a Program’s Shortcut
Recreate the Program’s Shortcut are convenient, but they’re useless when broken. Recreate the program’s shortcut to regain access to it.
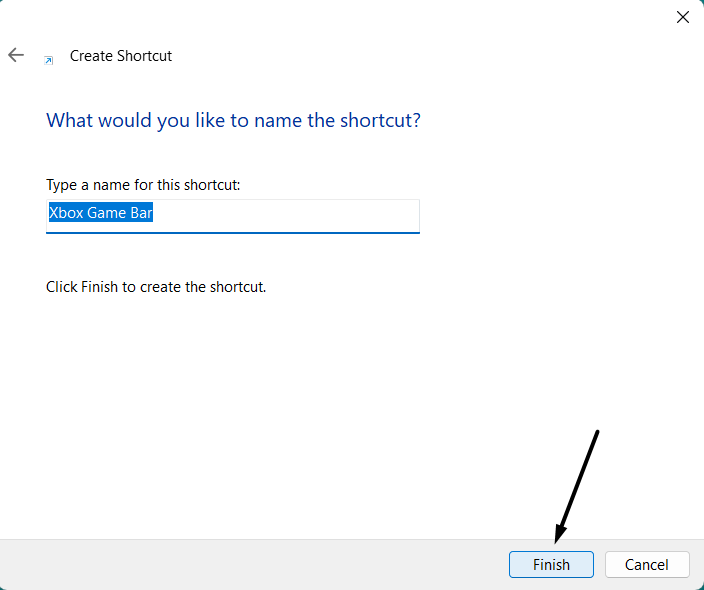
Step 1: Right-click on space on the desktop then from the menu select «New» After that click on «Shortcut«
Step 2: Click on browse to select EXE that has Windows cannot access the specified path error then press the OK button

Step 3: Choose «Next» and enter a shortcut title.
Step 4: Click «Finish» to add the new program shortcut.
Method 7: Repair or Reinstall Corrupted File Using Control Panel
Step 1: Open the Control Panel from the start menu and select programs.
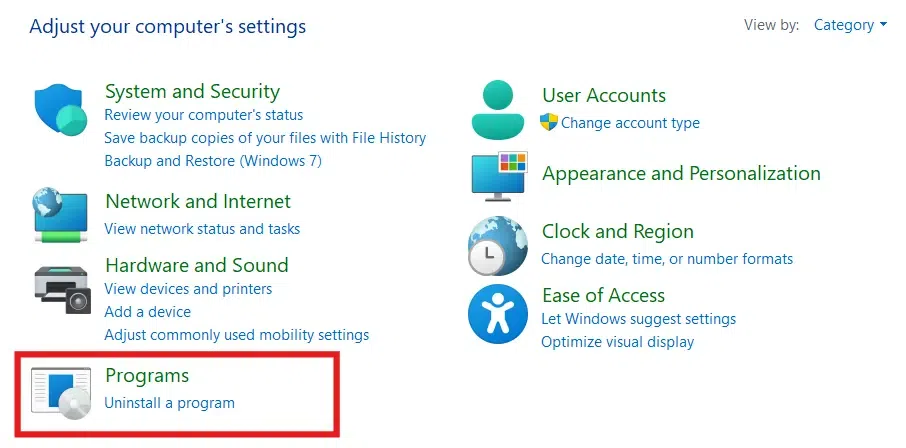
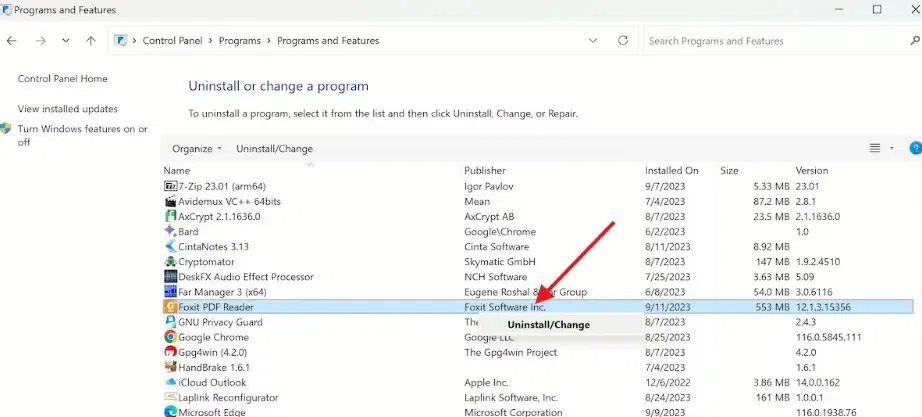
Step 2: Now select the Programs and Features option.

Step 3: Right-click on any program and select Uninstall/Change.
Conclusion
Dealing with the «Windows cannot access the specified device» error doesn’t have to be overwhelming. By following these steps, you can effectively fix Windows cannot access error and regain access to the device or file. Whether it’s a simple permission change or updating your antivirus settings, troubleshooting specified device access issues in Windows will help you resolve this problem and get back to work without interruptions.
Also Read
- How to Fix Missing Operating System Issues on Windows?
- How to Troubleshoot Windows 10 Boot Issues?
- How to Fix Boot Error 0xc0000225 in Windows?
We all keep a ton of programs, files, and folders on our system, and sometimes, while opening them, we encounter different errors. And the “Windows Cannot Access the Specified Device Path or File” error is one of them.
If you’re currently getting the same error while opening a program, file, or folder, then don’t fret. Here in this guide, we’ve shared several workarounds to fix the “Windows Cannot Access the Specified Device Path or File” error.
Why Are You Getting the “Windows Cannot Access the Specified Device Path or File” Error?
According to our research, these are some of the most prevalent causes of the “Windows Cannot Access the Specified Device Path or File” error:
- Lack of Permissions
- File Has Been Moved or Deleted
- Incorrect File Location
- Third-Party Antivirus
- Restrictions by Windows Defender Firewall
- Removed Storage or NAS Drive
- Corrupted Shortcut
- Disabled Hidden Administrator Account
- File Is Blocked
Fix the “Windows Cannot Access the Specified Device Path or File” Error
Here are some tried and tested workarounds to eliminate the “Windows Cannot Access the Specified Device Path or File” error.
1. Check the Permission of the File or Folder
You may not have the required permissions to access that particular file or folder, which is why you’re getting this error repeatedly. In that case, we suggest you make sure that the user account you’re using has permission to access the file or folder. You can make sure the same by following the mentioned instructions:
1. Right-click on the file or folder, and then select the Properties option from the context menu.
2. Navigate to the Security tab, and click on your user account under the Group or user names section.
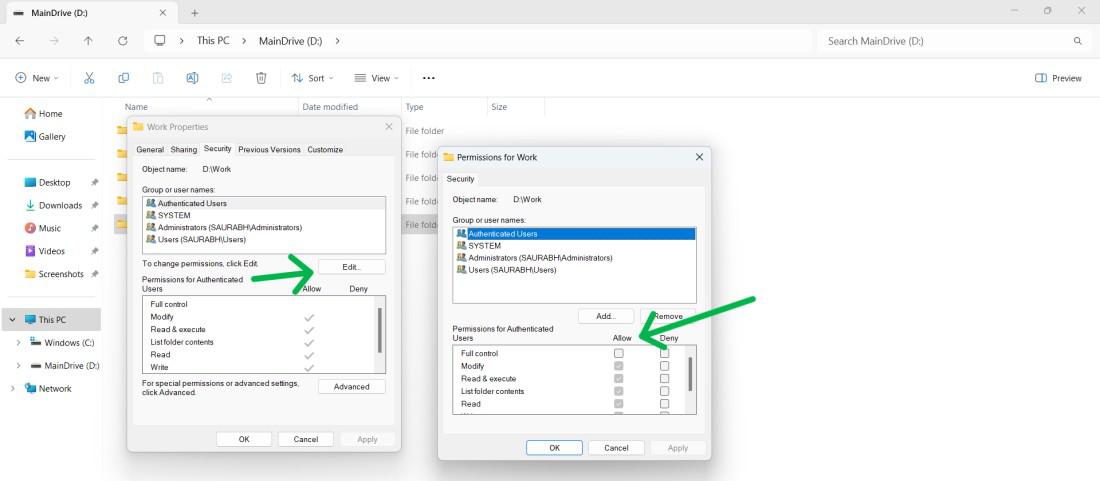
3. Make sure there’s a tick next to Read and Write in the Allow column under the Permissions for (Your Account Name) section.
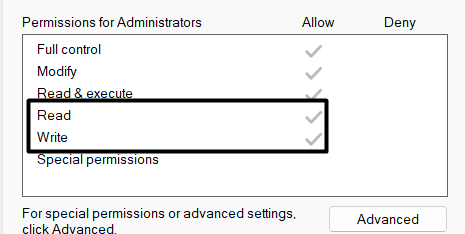
4. If there’s no tick, then it means you don’t have permission to read and write the selected file. In that case, click on Edit… on the same prompt.
5. Proceed to the Permissions for (Your Account Name) section on the new prompt.

6. In the end, tick the checkboxes next to the Read and Write option and click on Apply to save the changes.
2. Check the File’s Location
Suppose you’ve permission to access the inaccessible file, but you’re still not able to. In that case, we suggest you check the file’s location. It could be possible that the file or folder was originally stored in a removable drive, which is not connected to the device. Hence, you’re getting this error. You can follow the listed steps and check the file’s location:
1. Right-click on the file, and choose the Properties option from the contextual menu.
2. Head to the Shortcut section and check the file’s location in the Target field.
If the file was originally stored in a removable storage drive, you must see its name in the path. If it shows the same, reconnect that storage drive to the computer and try accessing the inaccessible content again.
3. Connect the Computer or NAS to the Network
One of the most prevalent reasons for not being able to open a particular file and getting this error message is that you’ve saved that particular file, folder, or app in another network computer or NAS device, which is currently not connected to the system. If that’s the case, consider reconnecting the NAS device to the system and try to open it again.
4. Make Sure That the File Hasn’t Been Moved or Deleted
Another possible reason for the “Windows Cannot Access the Specified Device Path or File” error is that the particular file has been deleted or moved to another location. Keeping this cause in mind, we suggest you check the file’s target location and make sure the file is there. If the file isn’t there, we suggest you check the Recycle Bin and see if it’s present there.
5. Recreate the Shortcut To Check for Corruption
If you’re trying to open a program with its shortcut, and getting the specified error, then we suggest you recreate that particular shortcut, as it’s possible that the existing shortcut has got corrupted. So, follow the below steps to recreate the shortcut:
1. Right-click on the shortcut you want to delete and click on the Bin icon in the right-click menu.
2. Right-click on the blank space on your desktop, hover the arrow on New, and select Shortcut from the submenu.

3. Browse the app’s location, whether it’s actually stored, and click on the Next button to proceed ahead.

4. Lastly, click the Finish button to save the shortcut and return to the desktop to check if it’s opening.
6. Unblock the File
If you’re still not able to access a particular file on your Windows PC, then it’s possible that it’s blocked by the system. In that case, we recommend you unblock it and then check the issue’s status. You can follow the below-mentioned instructions to unblock that particular file on your PC:
1. Right-click on your file, select the Properties option from the right-click menu and jump to the General tab.
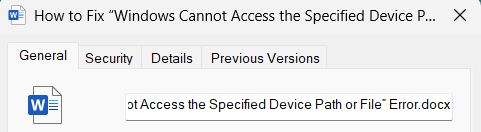
2. In the General section, untick the Unblock checkbox under the Security section to unblock the file.

7. Check if Your Third-Party Antivirus Software Is Blocking the File or Folder
Some users reported that the third-party antivirus on their system was blocking the file they were trying to open, because of which they were encountering this error. This could be the same in your case. In that case, we recommend you temporarily disable the third-party antivirus software on your system and check if the folder or file is opening.
Note: If disabling an external antivirus software doesn’t resolve the issue, re-enable it before moving ahead.
8. Disable Windows Defender Firewall
In case disabling the antivirus program doesn’t fix the issue, we suggest you disable Windows Defender Firewall on your system. This is because it could be possible that your Windows system’s integrated firewall is blocking the folder, file, or app from opening. If that’s the case, doing so will fix the issue.
The below-mentioned steps demonstrate to do the same:
1. Press the Windows key on your keyboard, type Virus and threat protection in it, and press the Enter key.

2. Click on it in the Best match section and select Firewall & network protection from the left sidebar.

3. Click on Domain network and disable the toggle under Microsoft Defender Firewall.
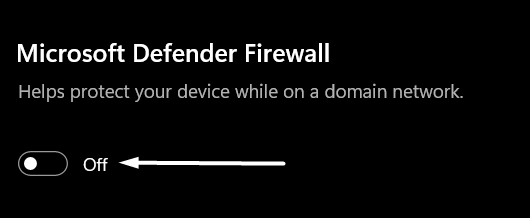
4. Lastly, do the same with the Private network option.
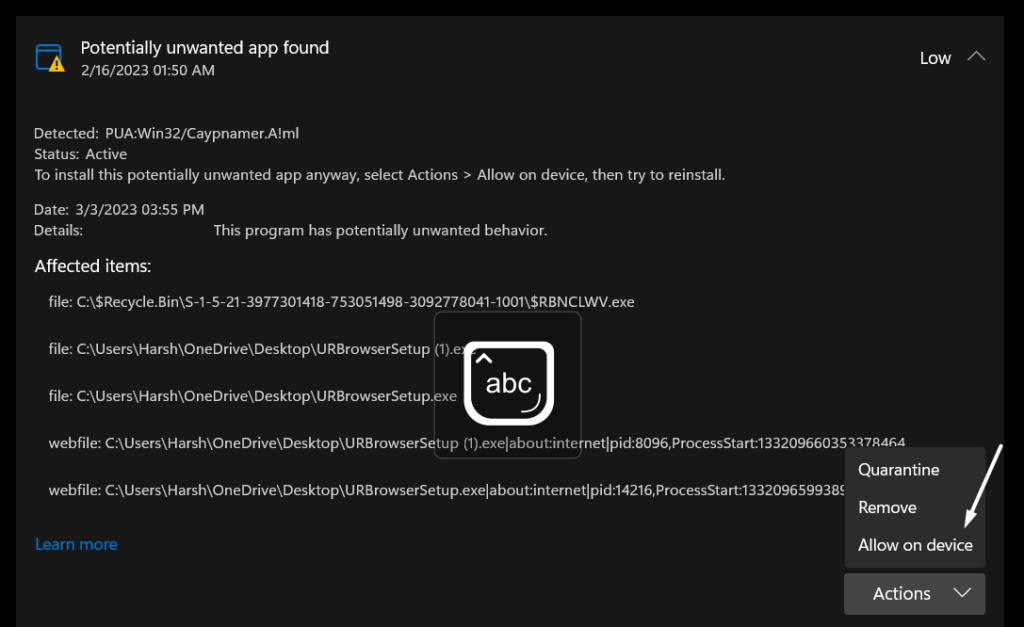
9. Remove the Program or Folder From Quarantine
There’s a possibility that your Windows system’s integrated antivirus utility marked that particular file as malicious. As a result, the built-in antivirus utility quarantined it to protect the PC from getting infected.
In that case, you can try sealing off that specific file, folder, or app at your own risk. So check the below-mentioned steps to do the same with ease:
1. Press the Windows key, type Virus and threat protection in it, and select it from the search results.
2. Click on the Protection history option under the Current threats section.
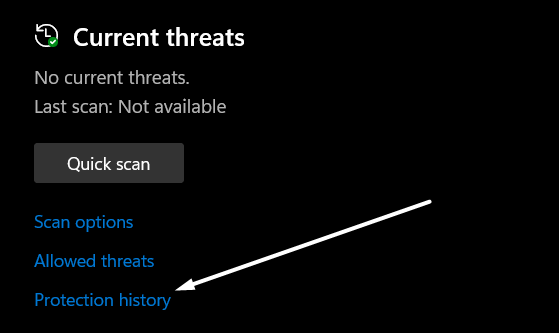
3. Expand all the sections and check if the content you’re trying to open is marked as malicious. If yes, select Allow on device from the Actions dropdown.
10. Repair the Corrupted System Files
One of the possible workarounds to get rid of this error is to repair the corrupted system files, as they could also result in the “Windows Cannot Access the Specified Device Path or File” error.
Considering this, we suggest you run SFC and DISM scans on your Windows PC. You can take a look at the listed steps to run these two scans on your Windows PC:
1. Right-click on the Start Menu in your system’s taskbar, and select the Terminal (Admin) option from it.

2. Once the Command Prompt is opened, execute the below-mentioned commands in it one-by-one:
Dism /Online /Cleanup-Image /CheckHealthDism /Online /Cleanup-Image /ScanHealthDism /Online /Cleanup-Image /RestoreHealth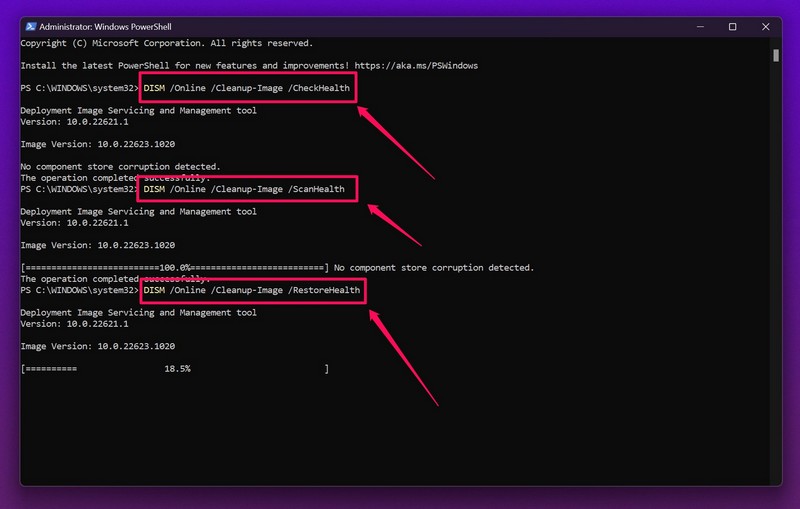
3. Once the DISM scan is completed, copy-paste the below-mentioned command in it to run an SFC scan.
sfc /scannow
4. Once done, reboot your Windows system to refresh all the files and check the issue’s status.
11. Prevent System From Blocking Unwanted Apps
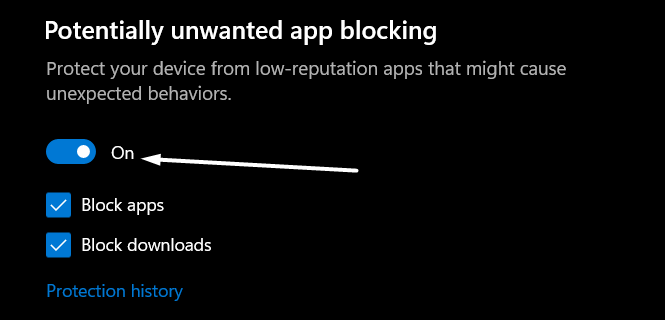
One of the ways to eliminate the “Windows Cannot Access the Specified Device Path or File” error is to disable the Potentially unwanted app blocking option on your Windows system.
The reason is that this option sometimes restricts genuine programs on your PC and leads to these kinds of issues. So, disable it by following the below-mentioned instructions:
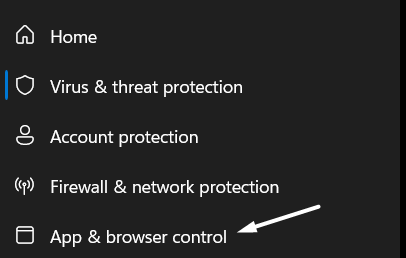
1. Open the Virus & threat protection settings and select App & browser control from the left pane.
2. Click on the Reputation-based protection settings option in the Reputation-based protection section.
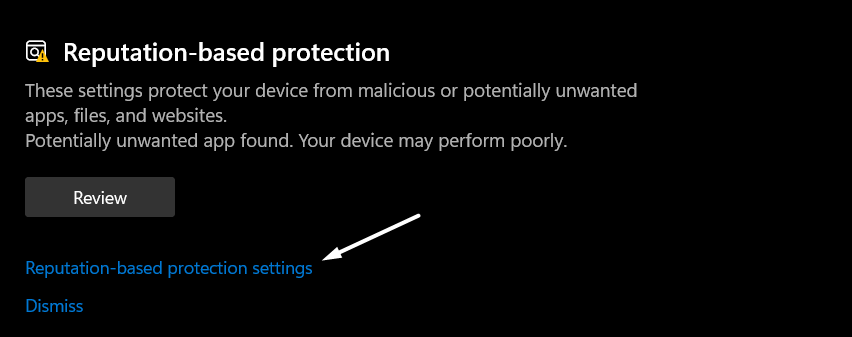
3. Lastly, slide the toggle to Off under Potentially unwanted app blocking and then untick both checkboxes.
12. Try Adding Permission for All Users (For Microsoft Office Users)
Some users are getting the “Windows Cannot Access the Specified Device Path or File” error only while launching Microsoft Office on their Windows system. If that’s the same case with you, we recommend adding permission for all users to access the %appdata\Microsoft folder.
You can do the same as we did by following the mentioned steps:
1. Press the Windows and R keys at the same time to open the Run utility, and type %appdata% in it.
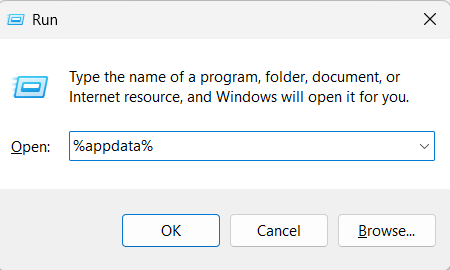
2. Press Enter to move to the above-mentioned directory, search for the Microsoft folder and right-click on it.

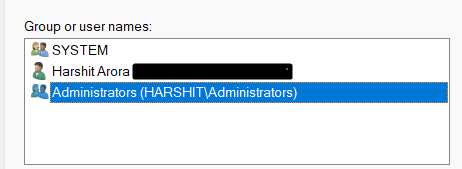
3. Select Properties from the contextual menu, and then navigate to the Security tab.
4. In the Security tab, select the user or users required to access this particular Microsoft folder.
5. Proceed to the Permissions for (User Account ) section and make sure the List folder contents checkbox is ticked.
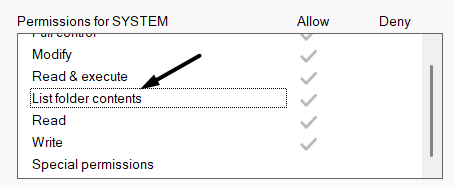
6. Click the Apply button at the bottom to apply all the changes and then OK to close the prompt.

Tip: If this doesn’t resolve the issue, try updating the Microsoft Office app to see if it helps.
13. Turn On Admin Permissions With Group Policy Editor
If you’re logged in as an administrator on your system and still not able to access the content, then try enabling the admin permissions with the help of Group Policy Editor.
Also, this has done wonders for many users. So, you can try the same and see if it works for you. Follow the below steps to enable the admin permissions with Group Policy Editor:
1. Open Group Policy Editor on your Windows PC and select Computer Configuration in the left sidebar.
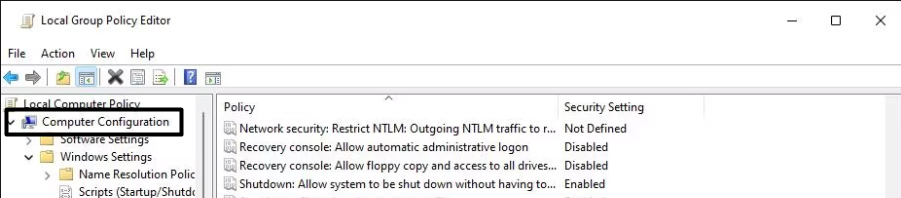
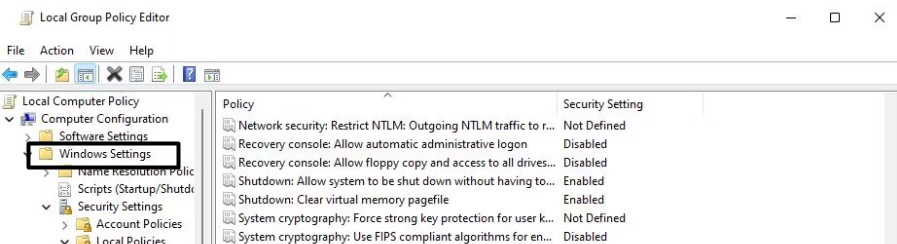
2. Expand the Windows Settings section under the Computer Configuration section.
3. After that, Expand the Security Settings section and double-click on the Local Policies option to expand it.
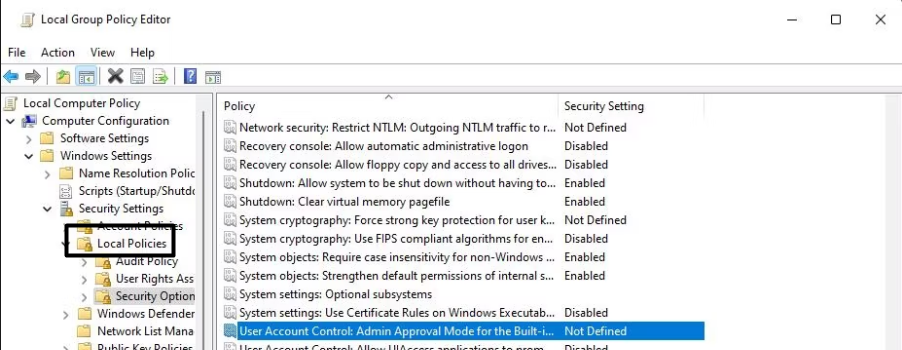
4. Click on Security Options under Local Policies and double-click on the User Account Control: Admin Approval Mode for Built-in Administrator policy in the right panel.
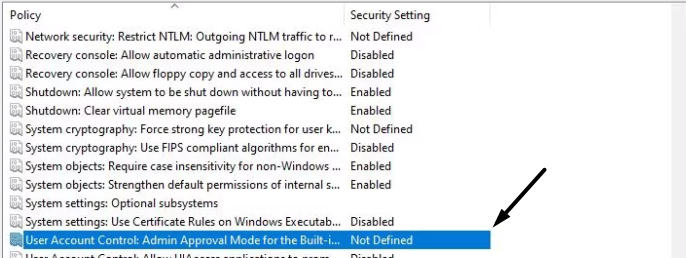
5. Select Enabled under the Local Security Setting and then save the changes.
14. Enable Hidden Administrator Account
Another workaround to fix the “Windows Cannot Access the Specified Device Path or File. You May Not Have Appropriate Permissions” error is to enable the hidden administrator account on your system and re-access it. We’ve explained the steps to do the same below:
1. To start, you need to boot your Windows system into Safe mode with Command Prompt.
2. Once done, open Command Prompt and type net user administrator /active:yes in it.
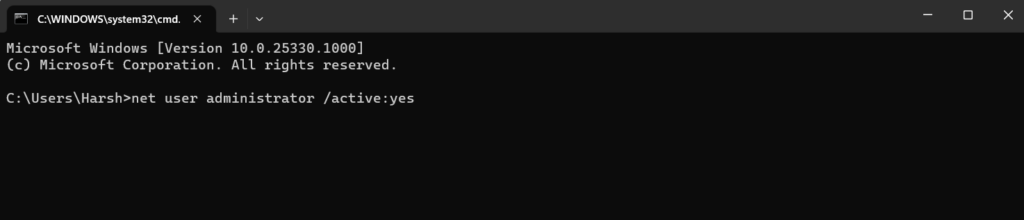
3. Press the Enter key on your keyboard to turn on the hidden administrator account on your system.
4. Reboot your Windows PC and choose the hidden administrator account to enter into the system.
5. Open the Control Panel on your Windows PC and set the View by option to Small icons.
5. Search for User Accounts, click on it, and then choose the Manage another account option.

6. Click on the hidden user account, click on Change the account type, and then select Administrator.

7. Finally, click on the Change Account Type option at the bottom to save all the changes.

15. Add Folder to Exclusions
In case enabling the hidden administrator account doesn’t help you eliminate this error, we suggest you exclude that particular file, folder, or program from the Windows Defender Firewall’s security radar.
Doing so will make sure that Windows Defender Firewall isn’t stopping it from opening. So, below is the complete process to do the same in an easy manner:
1. Press the Windows key, type Virus and threat protection in it, and press the Enter key.
2. Click on Virus and threat protection under Best match and click on Manage settings.

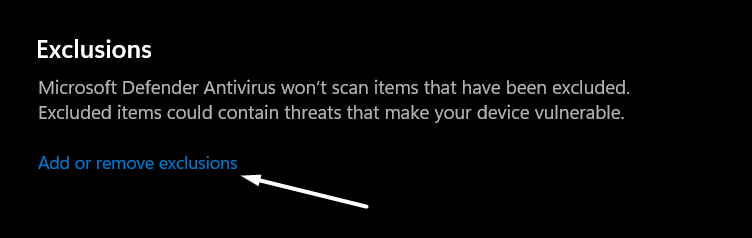
3. Scroll down until the end, click the Add or remove exclusions option, and then click Yes.
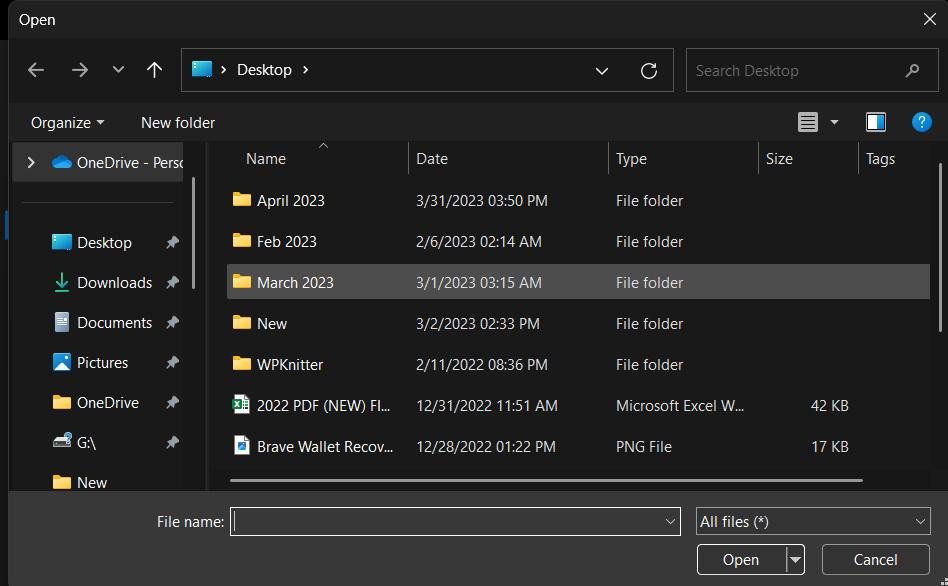
4. On the next window, click on + Add an exclusion and select the type of content you want to exclude. For instance, if you want to exclude a file, select File from the dropdown.

5. In the end, move to the directory where that particular file is stored, choose it, and click Open to add it.
16. Restore an Existing Backup
If none of the above-mentioned workarounds help you eliminate the “Windows Cannot Access the Specified Device Path or File” error, then we recommend you restore an existing system backup if you’ve one. In case you don’t have a backup of your system, consider reverting your system to a previous system restore point.
FAQs
How To Get Rid of Windows Cannot Access the Specified Device Path or File?
If you’re getting the “Windows Cannot Access the Specified Device Path or File” error on your PC, make sure you’ve all the required permissions to access that particular application, file, or folder. Another possible workaround to fix the error is to repair all the corrupted system file using an SFC scan.
Why Does Windows Cannot Access the Specified Device Path or File?
If you’re getting the “Windows Cannot Access the Specified Device Path or File” error, then it’s possible that you don’t have the required permissions to access the path, file, or folder you’re trying to access.
How Do I Reset Windows Drive Permissions?
You can follow the below-mentioned steps to reset your Windows system’s storage drive permissions:
1. Use the Windows + S keyboard shortcut to open the Windows Search Box and type cmd in the search box.
2. Click on the Run as administrator option under Command Prompt in the search results.
3. Click on Yes on the UAC prompt to open the Command Prompt with administrative rights.
3. Copy-paste the below-mentioned command into the console, and press the Enter key to execute it.
ICACLS * /reset /t /c /q4. Restart your Windows PC to apply all the changes.
Why Windows Cannot Access the Disk?
If you’re getting the “Windows Cannot Access the Disk” error while accessing a particular drive, then it’s possible that it’s not properly connected to your Windows system. Another possible reason behind this error message is malicious files on your system.
Does CHKDSK Fix Permissions?
Yes, CHKDSK can easily fix/repair corrupted system files as well as permissions with ease.
Last Note
“Windows Cannot Access the Specified Device Path or File” is one of the most prevalent Windows errors. There could be several reasons for constantly getting this error while launching an app, file, or folder. But luckily, it’s pretty easy to eliminate this error.
If you were also getting a similar error while opening an application, file, or folder, then we hope the listed workarounds helped you eliminate it. If yes, don’t forget to share which solution worked for you.