
Целостность накопителя и файлов компьютера являются важнейшей частью в обеспечении работоспособности ПК. Узнайте, как очистить диск С на Windows.
Почему важно
«Корзина» и «Загрузки»
Избавиться от мусора
Освободить место
Удалить программы
Переполнение диска
Важно
Почему важно
«Корзина» и «Загрузки»
Избавиться от мусора
Освободить место
Удалить программы
Переполнение диска
Важно
Редакция Hi-Tech.Mail продолжает серию статей об обслуживании компьютера. В данном материале мы затронем тему того, как очистить диск С на Windows. Для демонстрации мы выбрали самую популярную версию Windows 10, старую, но еще актуальную Windows 7 и современную 11-ю.
Почему важно очищать диск C на Windows
Начнем с того, что определение «диск С», носит, скорее, общеупотребительный характер. «С» — всего лишь литера. Они помогают отличать накопители друг от друга, если в компьютере установлено более двух хранилищ.

Никто не запрещает выдать букву «Н» или «Z», все зависит от пользователя. Устоявшиеся пользовательские традиции по инерции заставляют нас использовать маркировку «C» именно для системных накопителей. То есть тех, на которых установлена операционная система.
- Ускорение работы компьютера и повышение производительности.
- Предотвращение ошибок и сбоев в работе.
- Безопасность личных данных.
- Подготовка компьютера к продаже или передаче.
С целями разобрались, перейдем к практике.
«Корзина» и «Загрузки»
Их мы решили выделить отдельно. Принцип взаимодействия с ними одинаков для любых версий ОС Windows. Папка «Загрузки» вмещает в себе все файлы, которые вы скачиваете из интернета.

Для удаления файлов из директории достаточно выделить их зажатой правой кнопкой мыши и нажать «Удалить».
В «Корзину» перемещаются файлы после их удаления с рабочего стола или любой другой директории. «Корзина» выглядит однообразно на любой операционной системе Windows. Находится слева вверху рабочего окна.


Для удаления файлов достаточно нажать на соответствующую опцию слева вверху или нажав на пустую область рабочего пространства правой кнопкой мыши вызвать контекстное меню.

Проверенные способы избавиться от мусора и очистить диск C на Windows 10
Разберем способы очистки накопителя на самой популярной операционной системе Windows 10. Мы использовали дистрибутив Windows 10 Pro со всеми установленными обновлениями.
1. Очистка накопителя встроенными инструментами Windows 10
Начнем с простого: встроенных инструментов Windows. У нас накопитель всего один и его литеру мы не меняли.
-
Откроем меню обслуживания. Сначала кликаем правой кнопкой мыши по иконке накопителя и выбираем раздел «Свойства».

-
Нам откроются свойства накопителя. Идем в раздел «Общие» и ищем кнопку «Очистка диска».

В открывшемся окне система демонстрирует возможные варианты очистки. В нашем случае можно очистить 95,7 МБ данных, включая временные файлы интернета, кэш, эскизы. Для завершения процесса нажмите «Очистить системные файлы».
Можно обратить внимание на установленные на компьютере программы.
-
Открываем меню «Пуск» и переходим в раздел «Приложения».

-
Откроется список установленных приложений.

-
Вы можете удалить ненужные программы, просто нажав левой кнопкой мышки на программу и кнопку «Удалить».

2. Очистка с помощью Auslogics BoostSpeed 13
В интернете есть множество гайдов о том, как произвести очистку накопителя с помощью CCleaner. В этой статье мы хотим предложить альтернативу в виде Auslogics BoostSpeed 13. Разработчики обеих программ официально ушли из России, но их софт по-прежнему можно скачать с площадок.

-
Для работы с накопителем перейдите в раздел «Очистка».

-
Откроется меню с широким инструментарием. Можно воспользоваться глубокой очисткой диска, удалить пустые папки, ненужные большие файлы или проблемные приложения. Нажмите на «Глубокая очистка диска».

-
Запустится процесс сканирования накопителя. По его окончании приложение выведет статистику ненужных файлов. Нажмите «Очистить», чтобы стереть ненужные файлы.

-
После завершения очистки появится окно со статистикой удаленных файлов.

Отметим, что использование Auslogics BoostSpeed 13 или CCleaner не ограничивается операционной системой Windows 10 и утилиты могут быть запущены на любых других ОС при наличии такой поддержки.
Эффективные методы освободить место на диске C в Windows 11
Перейдем к обзору способов очистки дискового пространства на ОС Windows и уделим внимание собственным возможностям системы.
1. Очистка накопителя встроенными инструментами Windows 11
-
Переходим в раздел установленных приложений по пути «Параметры-Приложения-Установленные приложения». Удаляем все, чем не пользуемся.

-
В разделе «Приложения» обратите внимание на пункт «Дополнительные компоненты».

-
В нем содержатся вспомогательные программы и утилиты, которые можно удалить. Будьте осторожны, чтобы случайно не стереть важные программы.
2. Очистка временных файлов
-
Вызовите меню выполнения команд с помощью комбинации клавиш Win+R.

-
В открывшемся окне введите команду cleanmgr и выберите диск С.

-
Откроется почти точно такое же окно, как и в Windows 10. Нажмите «ОК», чтобы завершить процесс очистки.
3. Очистка папки WinSxS
В папку WinSxS помещаются резервные копии обновлений, которые нельзя удалить в пару кликов. Она находится по пути: «Этот компьютер/Windows (буква диска)/Windows».

-
Откройте командную строку от имени администратора и введите команду Dism.exe /online /cleanup-image /AnalyzeComponentStore для анализа хранилища.

-
По завершении процесса введите команду Dism.exe /online /Cleanup-Image /StartComponentCleanup /ResetBase, чтобы очистить папку WinSxS.
Как удалить ненужные программы и файлы с диска C на Windows 7
Перейдем к ставшей легендарной Windows 7. Несмотря на отсутствие поддержки, она по-прежнему стоит на многих компьютерах.
1. Очистка накопителя встроенными инструментами Windows 7
В Windows 7 очистка происходит по тому же принципу, что и в Windows 10:
-
Кликнув правой кнопкой мыши по системному диску выберите «Свойства» и «Очистка диска».

-
В окне выберите «Очистка диска» и кликните «Очистить системные файлы».
-
Во вкладке «Дополнительно», нажмите «Очистить» в разделе «Восстановление системы и теневое копирование».

2. Стандартное удаление приложений
Откройте «Панель управления» и перейдите в раздел «Программы и компоненты». Для удобства отсортируйте файлы по объему и удалите ненужные.

Как предотвратить переполнение диска C в будущем
Рассмотрим способы предотвращения переполнения диска С в будущем.
- Следите за папками «Загрузки» и «Корзина». Именно в них скапливаются файлы после загрузки и удаления их с компьютера.
- Не забывайте заходить в «Этот компьютер» или «Мой компьютер». Индикатор заполнения накопителя уведомит вас о том, сколько свободного места осталось.
- Используйте сторонние программы для обслуживания ПК. Идеально подойдут Auslogics BoostSpeed 13 или CCleaner. Они могут удалять не только обычные файлы, но и резервные копии обновлений, драйверов или точки восстановления систем.
Что нужно запомнить о правильной очистке диска C и поддержании системы в порядке
- Не забывайте очищать диск С для поддержания операционной системы в оптимальном рабочем состоянии. Делать это можно вручную с помощью инструментов ОС или сторонних утилит. Они существенно расширят возможности по удалению скрытых и недоступных файлов и папок.
- Выбор утилиты зависит от ваших потребностей. Лидером является CCleaner, но есть и множество альтернатив: Dism++, Auslogics BoostSpeed 13, Advanced SystemCare и много других.
- В современных реалиях мы рекомендуем использовать несколько накопителей. Один SSD под операционную систему, один SSD (желательно м.2) под современные игры и HDD для хранения файлов и документов. Так вы снизите нагрузку на каждый компонент.
Freeing up disk space on your Windows computer can significantly improve performance and prevent crashes caused by a cluttered hard drive. This guide will walk you through how to clean your C drive on both Windows 10 and Windows 11. By following these steps, you can reclaim disk space, optimize your system, and speed up your PC. Make sure to stick with this tutorial until the end, so you don’t miss any crucial steps.
Key Takeaways
- Utilize built-in Windows tools like Disk Cleanup and Storage Sense to remove unnecessary files and optimize drives.
- Use free software to clear temporary files, uninstall unwanted programs, and identify large files for deletion or relocation.
- For advanced users, moving user folders from the C drive to another drive can free up significant space.
Important Note Before Cleaning the C Drive:
Before starting with the guide, make sure to backup all important files and folders on your computer. This tutorial involves deleting files, and I am not responsible for any data loss that may occur. Please double-check everything before proceeding.
Also, take note of your current disk space usage before beginning. This will help you track how much space you’ve freed up, and I’d love to hear your results in the comments!
Use Built-In Windows Tools to Free Up Disk Space
Step 1: Disk Cleanup

Start by opening This PC on your computer. Right-click on the C drive and choose Properties. From here, click on Disk Cleanup. You’ll see a list of files that can be deleted. For maximum space, select everything.
Next, click on Clean up system files. This will bring up a similar screen, but with additional options like Windows Update Cleanup. If you recently upgraded from Windows 10 to 11 and want to roll back, uncheck this box. Otherwise, select all the options and click OK to start the cleanup process.
Step 2: Optimize Drives

Once Disk Cleanup is complete, switch over to the Tools tab and click on Optimize. Ensure that Scheduled Optimization is on (set to weekly by default). You can manually optimize each drive as well by selecting the drive and clicking Optimize.
Step 3: Enable Storage Sense

Type Storage Sense in the search bar and hit Enter. Toggle Storage Sense on, then click on Configure Storage Sense or run it now. Review the available settings, and when you’re done, click Clean now.
Clear Temporary Files Using Free Software

For a deeper clean, download the portable version of HiBit Uninstaller from their website. Once installed, navigate to the Tools menu and select Junk Files Cleaner. Choose the areas you want to clean, such as temporary files and old prefetch data, then click Clean.
Next, head to Advanced Cleaner to scan and clean up your drives. You can also use Hybrid Uninstaller to remove unnecessary Windows Store apps and other programs that are hogging disk space.
Uninstall Unnecessary Software and Games

To free up even more space, use HiBit Uninstaller to get rid of large programs and games. Sort the list by size to identify the biggest space hogs, then right-click and choose Force Removal. This option thoroughly removes the program and any leftover files.
Move or Delete Large Files with Free Software

If you’re still low on space, download WizTree. This free software scans your entire disk and identifies the largest files. Once identified, you have the option to move or delete these files.
If you need the files but not on the C drive, move them to another drive with more available space. For unimportant files, delete them by right-clicking and choosing Delete. To permanently remove them, hold down Shift while clicking Delete.
Advanced Method: Move User Files from C Drive

A less-known trick to free up space on the C drive is moving your user files (Documents, Pictures, Music, etc.) to another drive. Here’s how:
- Create a new folder on the drive where you want to store these files. Name it something like User Files.
- Navigate to the Users folder on your C drive, and right-click on the folder you want to move (e.g., Desktop).
- Go to Properties, click the Location tab, and then click Move. Choose the new folder you created earlier and confirm the change.
Repeat this process for other user folders like Documents, Pictures, and Music. This method can free up substantial space and improve your PC’s performance.
Conclusion
By following this tutorial, you can free up a significant amount of space on your C drive in Windows 10 and Windows 11. This not only makes your computer run faster but also extends the life of your hardware by reducing strain on your drives. Don’t forget to back up important files before starting and keep track of how much space you’re able to free up!
FAQs
1. How much space should I keep free on my C drive?
It’s recommended to keep at least 15-20% of your C drive’s total space free to ensure smooth system performance.
2. What happens if I delete Windows Update Cleanup files?
Deleting these files will remove the option to roll back to a previous version of Windows. Only delete them if you’re sure you won’t need to downgrade.
3. Is it safe to compress my C drive?
Compressing your C drive can save space, but it may also slow down your system. It’s generally not recommended unless you’re desperate for space.
4. Can I move installed programs to another drive?
Yes, but it’s more complicated than moving user files. You’ll need to uninstall the program and then reinstall it on the new drive.
5. Will uninstalling Windows Store apps affect system performance?
Uninstalling unused apps can free up space and improve performance slightly, but it won’t make a huge difference unless those apps are consuming a lot of resources.
Download Article
Download Article
This wikiHow will provide detailed guides on how to clean drive C for more space on Windows 11. There are three solutions in this article, and you can use Windows Disk Clean-up and Storage Sense to clean space for drive C. You can also empty the Recycle Bin to free up space on the C drive.
-

1
Open Windows 11 search box. It should be on the bottom of your screen and located next to the blue Windows icon. You’ll see a small box with a magnifying glass, and the word «Search» is written on it.
-
2
Type in disk cleanup in the pop-up window. This operation will help you find matching Windows settings, applications, photos, and also website results.
Advertisement
-
3
Click Disk Clean-up. It should be in the Best Match section in the Windows search box interface. You’ll open the Disk Clean-up window after clicking the button.
-
4
Select drive C and click OK in the pop-up window. If you change your mind, you can also click on Exit to cancel the disk cleanup. (You can also choose another drive in this selection part.)
-
5
Click Clean up system files. You can clean up more space on the C drive by cleaning up system files. You may need to wait a few seconds to let OS calculate the available items.
-
6
Choose files to delete. You’ll see multiple items you can delete in Disk Clean-up, and every item has a checkbox. Ensure you check every checkbox next to the items you want to delete. Suppose you don’t know the actual meaning of every item. In that case, you can check the following explanation:
- Windows Update Clean-up: Windows will still keep copies of all installed updates after installation. You can free up a lot of space by deleting Windows updates.
- Downloaded Program Files: These files include Java applets, Activex controls, and also website browser extensions.
- Temporary Internet Files: All the internet caches, such as web pages, pictures, videos, and other media items. Basically, these caches were created while visiting the websites.
- Offline webpages: All the webpages you can visit without any internet connections.
- System error memory dump files: All the information about the system errors, and these files, like the Windows error reports that record every crash of the OS.
- Temporary files: All the temporary files created by the applications and Windows operating system.
-
7
Click OK. If you don’t want to delete files and perform a disk clean-up, you can also click {{MacButton|Cancel} to close his window.
-
8
Click Delete Files in the pop-up window. After clicking this button, the Disk Clean-up utility will start to permanently delete the selected files.
-
9
Wait for minutes, and the Disk Clean-up window will automatically close when the deletion finish. If you select many large files, the deletion time will be longer.


Advertisement
-
1
Open Windows 11 search dialogue. It is easy to find this search utility, and you’ll see a small box with a magnifying glass, and the word «Search» is written on it.
-
2
Type in storage settings and click Storage settings. You’ll search for Windows Storage Settings and open the Windows Storage Settings window.
-
3
Turn on Storage Sense by clicking the switch button. If the Storage Sense is already turned on, the switch button will show blue with the word «On».
-
4
Click Storage Sense to adjust advanced settings. You can enable automatic cleanup and run Storage Sense manually in the pop-up window.
-
5
Check the checkbox under Cleanup of temporary files, and turn on Automatic User content cleanup. You can configure Windows Storage Sense’s cleanup schedules in this window.
- Run Storage Sense every day/week/month or during low free disk space.
- Delete files in the Recycle Bin for over 1/14/30/60 days. You can also set it to never do this operation as well.
- Clean up files in the Downloads folder that are not opened for more than 1/14/30/60 days. Choose Never to refuse to automatically delete the files in the Downloads folder.
- Click Run Storage Sense now will perform a cleanup immediately.


Advertisement
-
1
Double click Recycle Bin icon to open the Windows 11 Recycle Bin folder. You can easily find Recycle Bin on the desktop.
- You can easily empty the Recycle Bin by right-clicking the Recycle Bin icon and choosing Empty Recycle Bin.
-
2
Click Empty Recycle Bin. This button has a trash icon at the top of the Recycle Bin window. Move your pointer to the button, and you will see the explanation «Delete all items in the Recycle Bin to clear some disk space».


Advertisement
Ask a Question
200 characters left
Include your email address to get a message when this question is answered.
Submit
Advertisement
Video
Thanks for submitting a tip for review!
About This Article
Thanks to all authors for creating a page that has been read 115,369 times.
Is this article up to date?
This page provides reliable solutions for you to clean C drive and even delete system C drive, follow to see how can you clean or delete your system C drive in Windows 10/8/7 on your own now:
- Notice:
- In order to avoid unnecessary data loss issue due to cleaning C drive, please create a backup of important files on your C drive in advance. Professional backup software like EaseUS Todo Backup can help you with this job.
How to Clean C Drive without Formatting Windows 10/8/7
When the computer or Windows system has been running for a very long period, many useless junk files will be leftover in the system C drive. With more and more leftover files accumulating, the computer becomes slower and slower.
🚩Read More: How to Find Large Files on Windows 10
So how to resolve this problem? The best and most straightforward solution to this issue is to clean the C drive. Some people may come up with the solution to format C drive. But Windows computer won’t allow you to format the system C drive. Huge file loss or even system error would occur if you do so.
Here in the below, we’ve gathered two tested and effective methods for you to apply and clean C drive without formatting in Windows 10, 8 and even 7:
Method 1. Clean Up C Drive Without Formatting
You’ll see that Disk Cleanup utility can only remove some temp files and Recycle Bin files on your computer. If you want to remove more Windows built-in application junk files or large files in Windows 10/8/7, you’ll need to turn on another powerful partition manager software for help.
To remove all useless files and even large files from your C drive, we’d like to recommend you try EaseUS CleanGenius software.
It’s 100% free and risk-free for optimizing computer performance with its Cleanup feature. You may directly download and install it on your PC, following guidelines below to clean up your C drive without formatting now:
Step 1. Download and install EaseUS Partition Master Suite.
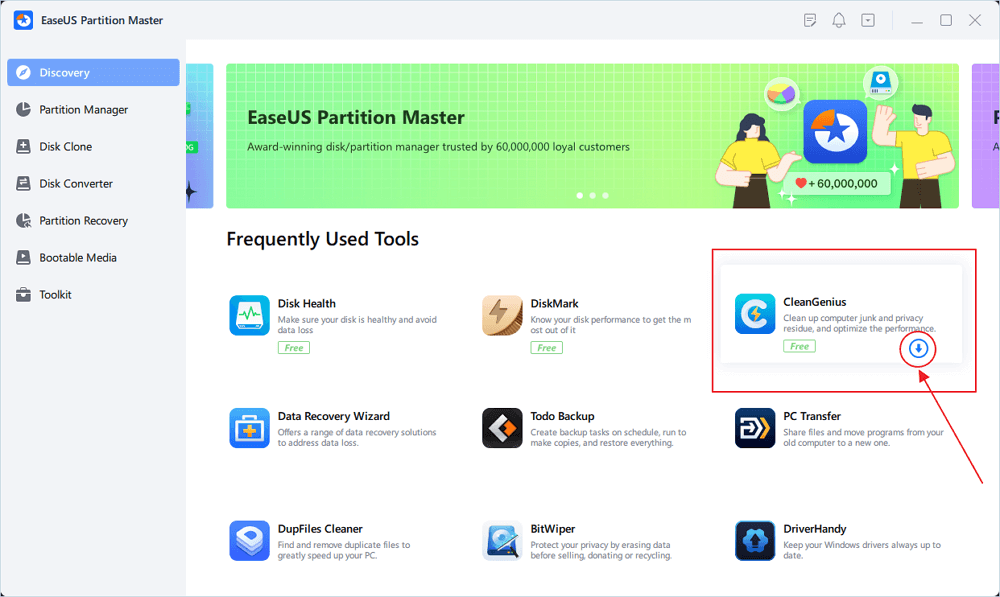
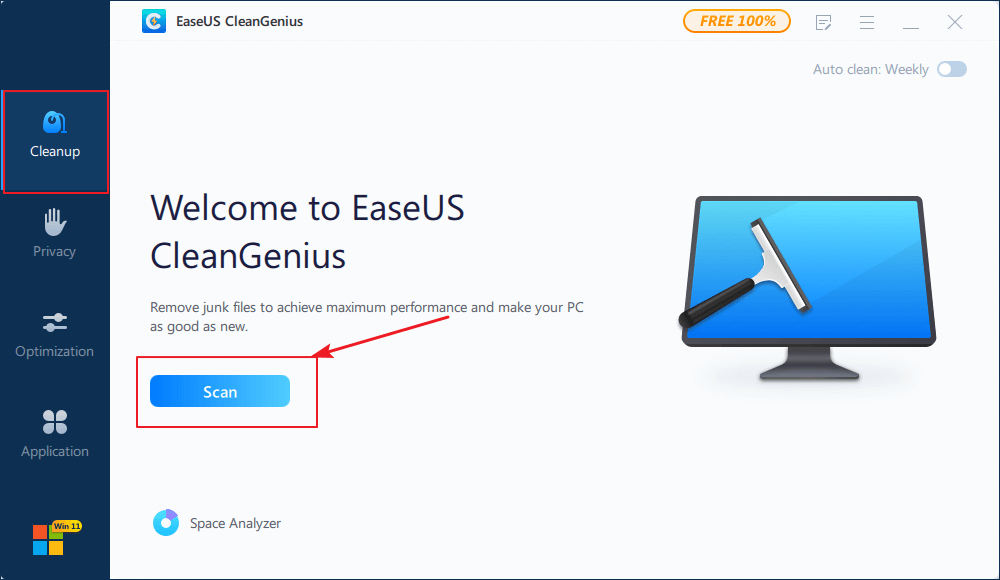
Step 2. Click PC Cleaner and install EaseUS CleanGinus. Then, click «Cleanup» and click «Scan» to start cleaning up the system and make your PC as good as new.
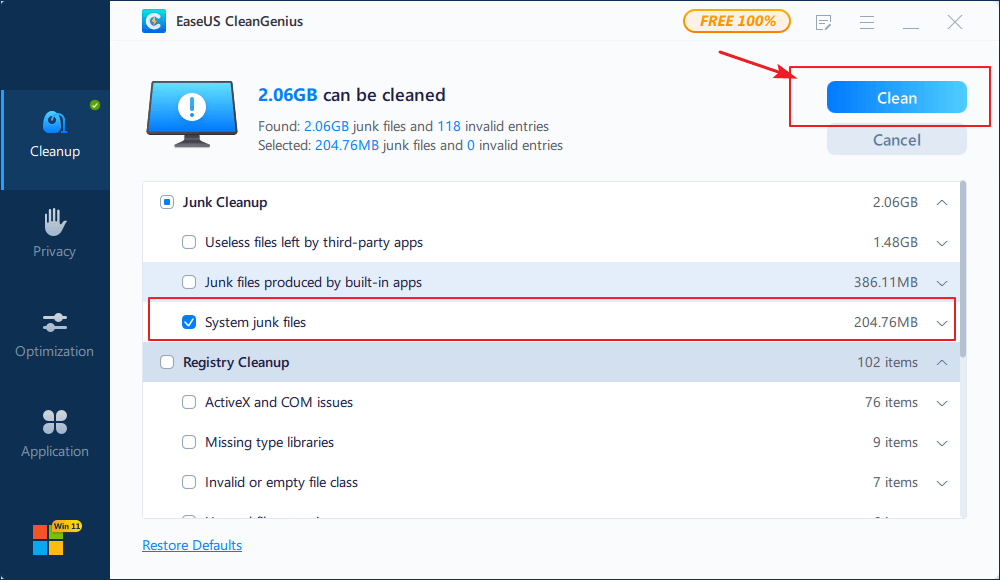
Step 3. The software will scanning all over your computer to find idle data files that take a huge amount of disk space, you can select useless large files, system junk files and Windows invalid entries and click «Clean» to start system cleanup process.
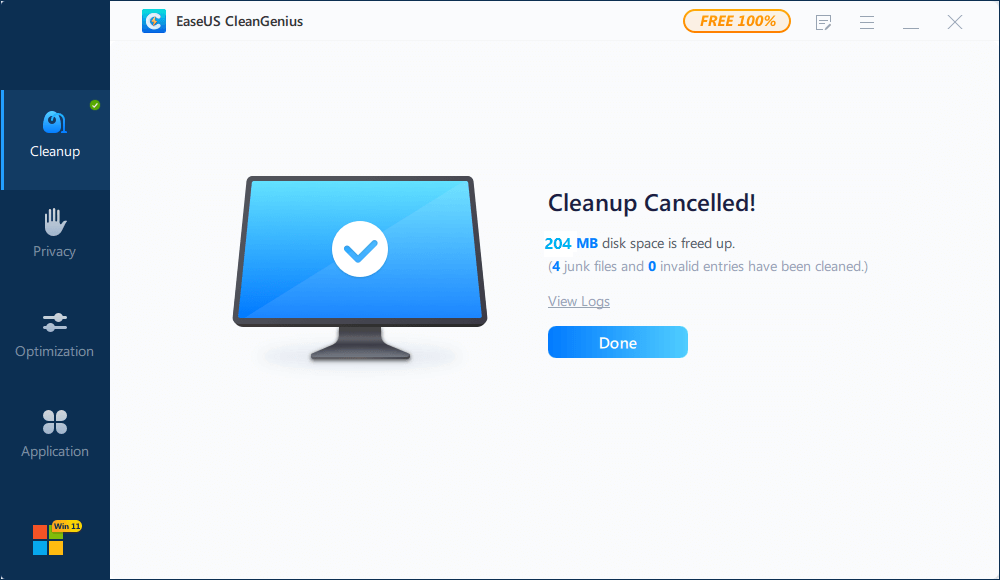
Step 4. When the scan is complete, click «Done» to finish cleaning system junk files.
Method 2. Run Disk Cleanup Utility to Clean C drive
1. Open This PC/My Computer, right-click on C drive and select Properties.
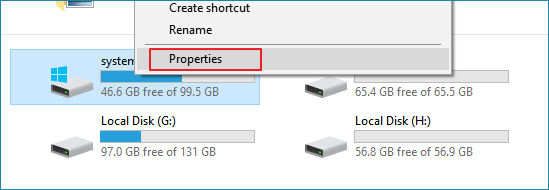
2. Click Disk Cleanup and select files that you want to delete from C drive.
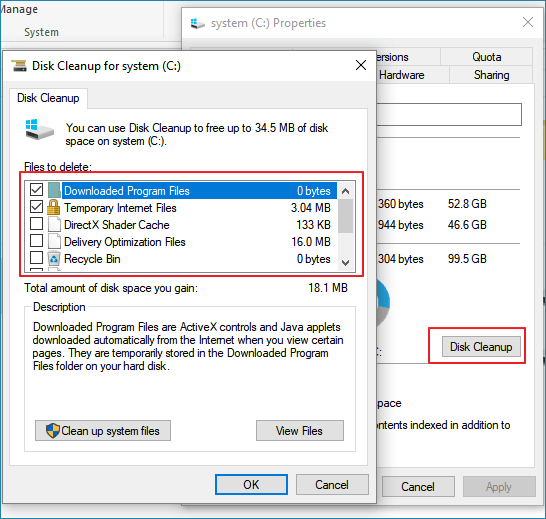
3. Click OK to confirm the operation.
After this, you’ll get a clean but faster-running speed on your computer.
Delete System C Drive (Including OS) Without Formatting
Besides cleaning or clearing the C drive, some other Windows users are even thinking to delete the system C drive (including the OS) from HDD or SSD without formatting. But why do these people want to do so? And how to do it?
Here is a list of reasons why Windows users want to delete a system drive from a Windows computer, and if you are one of them, don’t worry. You’ll find a solution here:
- 1. To perform a clean install of Windows 10/8/7: wiping all data on the system disk is necessary, especially to delete the system drive.
- 2. To delete the system drive on the old HDD after system cloning to a new HDD/SSD.
- 3. To delete system C drive on the target disk when the OS migration process failed or is halted.
How to delete the system C drive without formatting? You can apply professional partition manager software — EaseUS Partition Master Pro for help.
This software can do the job that other Windows built-in tools or third-party software can’t do: to directly delete system C drive and partitions on your Windows disk with a created WinPE bootable disk.
You can directly activate it into a full version and apply it to the below guidelines to delete the system C drive with ease now.
1. Create a WinPE disk
2. Delete the system C drive
Now, insert the bootable USB to your PC, restart it, and press F2/F8/Del to enter BIOS and set the computer to boot from the EaseUS Bootable disk so as enter EaseUS Partition Master.
And now, you can continue with the next steps to fully delete the C drive and clean up it for new usages:
Note that this will delete all existing partitions on the system disk, including the OS. So make sure you’ve backed up all essential content in advance.
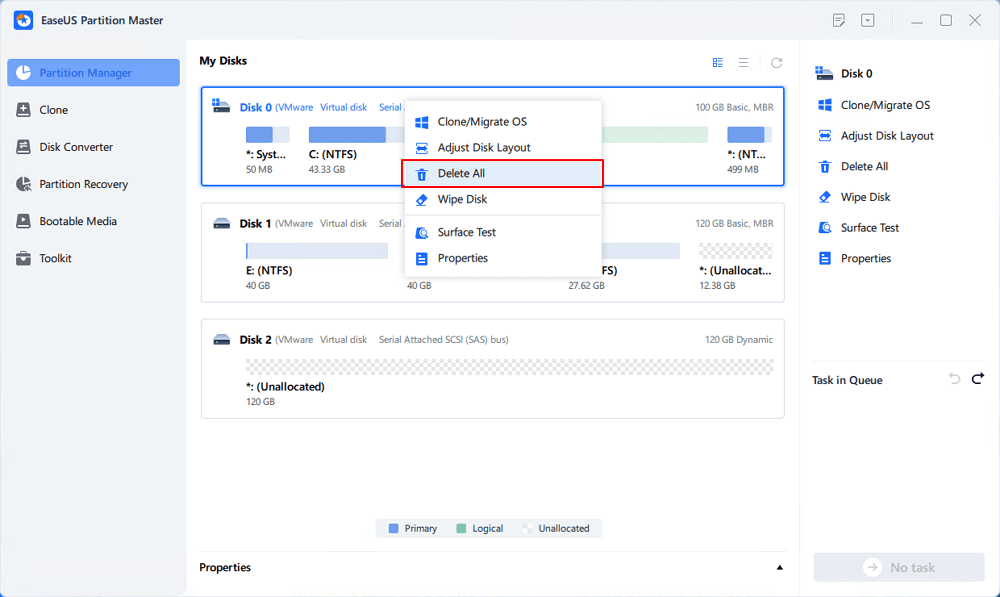
Step 1. Launch EaseUS Partition Master, go to the Partition Manager section, right-click your OS disk and select «Delete All».
Step 2. Click «Yes» ton confirm that you are sure to delete all partitions on the OS disk.
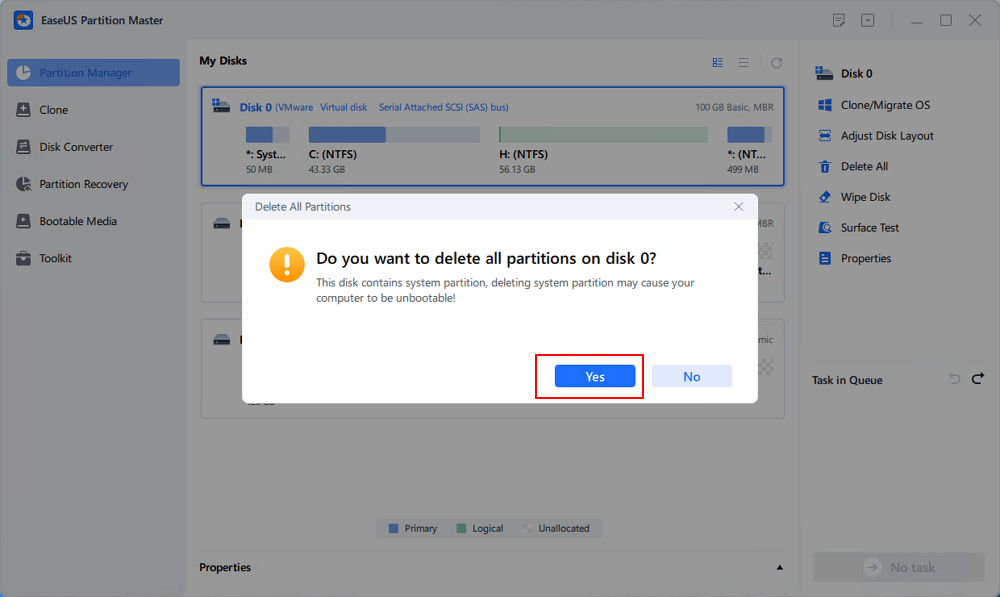
Step 3. Click «Execute * Task» and click «Apply» to start deleting all partitions with OS on the selected disk.
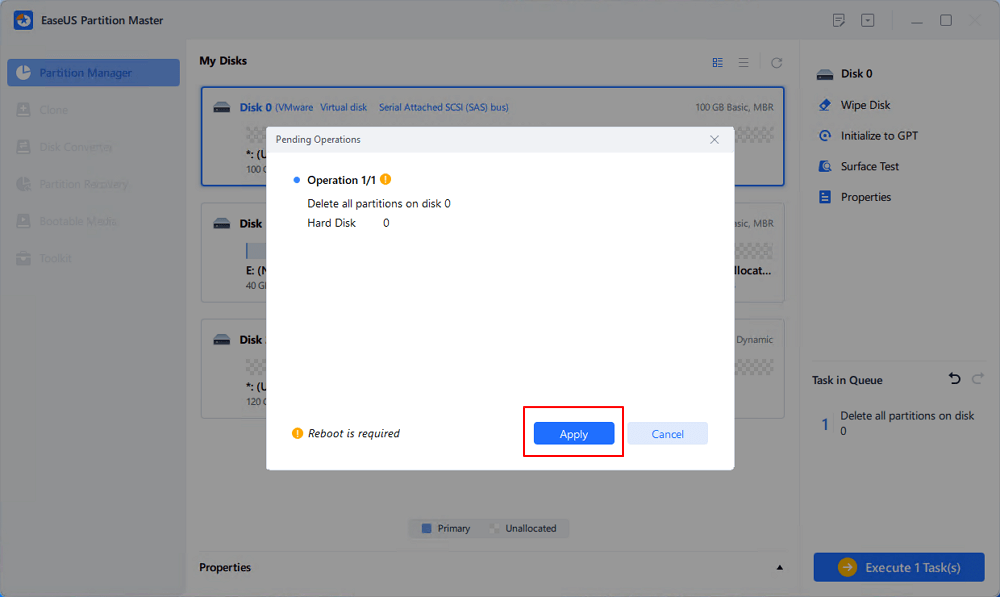
Note: After this, you’ll just need to wait patiently and EaseUS Partition Master will automatically delete the OS drive and other data partition on your disk.
If you’ve deleted the system C drive on your current running computer, you’ll not be able to run or boot up the Windows system anymore. You can refer to clean install Windows 10, 8 or 7 for tutorial help.
Conclusion
Clean up C drive is simple and easy with reliable methods. If you simply want to free up some space in the C drive, you can apply Method 1 with EaseUS WindowsGenius to help you quickly clean up junk files in the system c drive.
If you want to clean and delete the entire OS drive so as to reinstall Windows, you can turn to EaseUS Partition Master with its Bootable Media for help. It’s efficient and quick to execute the operation.
FAQs About Clean C Drive in Windows without Formatting
If you have more questions on how to clean the C drive or clear the C drive without formatting in Windows computers, follow the questions and find answers below:
1. How to clean your computer without deleting files?
Here is a list of tips that you can follow to deep clean your computer without deleting files:
- Back up all valuable files and data to an external hard drive or cloud drive.
- Create a backup of useful installed programs and software to an external hard drive. For a guide, follow this link: Backup Apps Windows 11.
- Then, uninstall installed programs and software.
- Wipe all the existing partitions and volumes.
2. How do I deep clean my C: drive?
- Run the Disk Cleanup utility to remove temporary files, delete Windows.old, and system backup images.
- Uninstall has broken or corrupted programs.
- Empty the recycle bin.
- Delete File History backup.
- Clean junk files with antivirus software.
3. What can I delete to free up space on C drive?
- Uninstall broken or unnecessary programs.
- Clean useless desktop folders and files.
- Empty the recycle bin.
- Find and delete duplicate files.
- Clean up useless downloaded folders and files.
- Discard temporary files.
- Upload files to the cloud drive and delete them from your C drive.