
(Image credit: Mauro Huculak)
Renaming a single file on Windows 10 is simple. The challenge comes when you need to rename multiple files in a folder, but don’t worry since there are easy ways to complete this task.
If you have to rename a long list of files, you can speed up the process using File Explorer, PowerShell, Command Prompt, or even the Microsoft PowerToys app.
In this how-to guide, I’ll explain several ways to bulk rename files, including changing the extension.
Recent updates
These instructions has been updated to ensure accuracy and reflect changes to the process in the operating system.
How to rename multiple files using File Explorer
The simplest way to rename one or multiple files on Windows 10 is through File Explorer.
Rename multiple files one at a time
To rename multiple files with the «Tab» key, use these steps:
- Open File Explorer.
- Quick tip: You can quickly open File Explorer with the icon in the taskbar, the «Windows key + E» keyboard shortcut, or by clicking the File Explorer icon from the left pane in the Start menu.
- Open the folder with the files to rename.
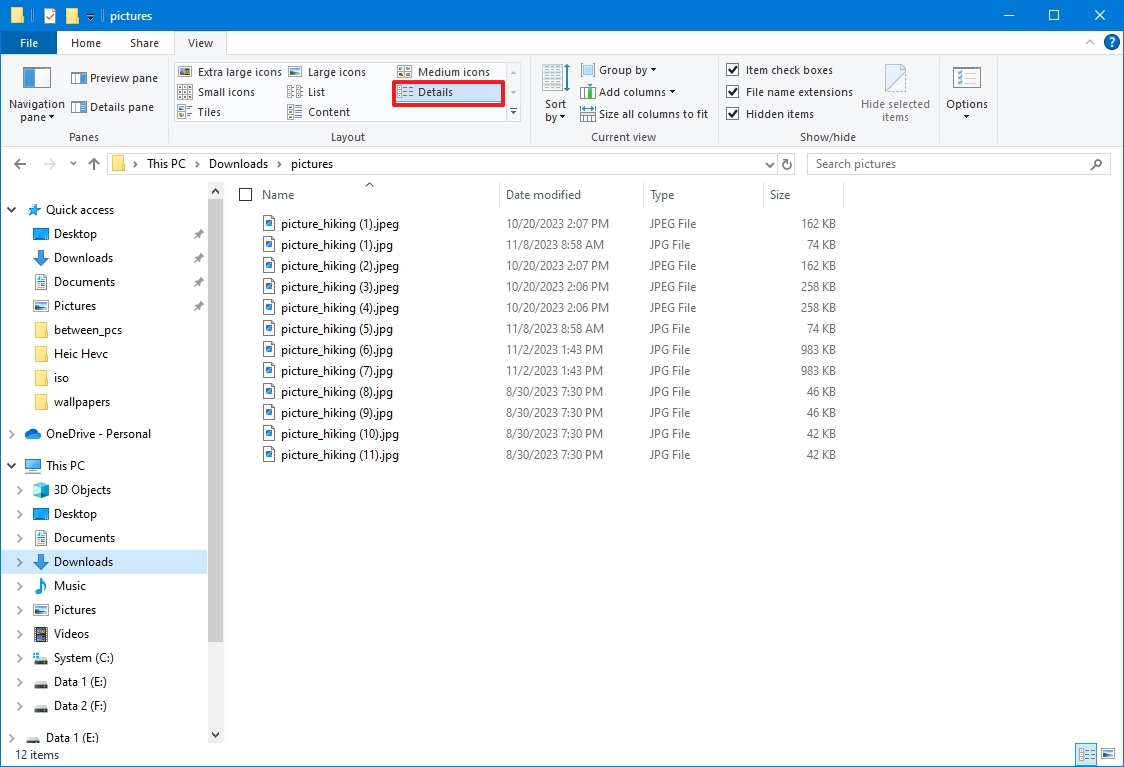
- Click the View tab.
- Select the Details view.
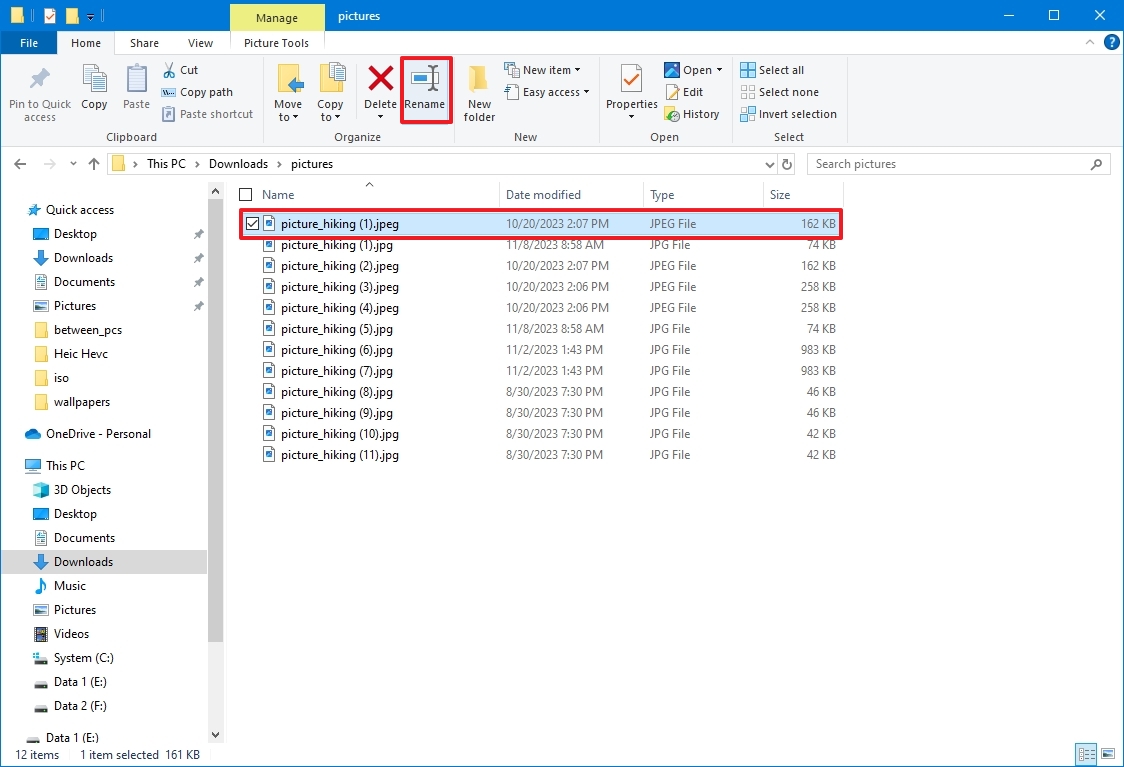
- Select the first file in the folder.
- Click the Home tab.
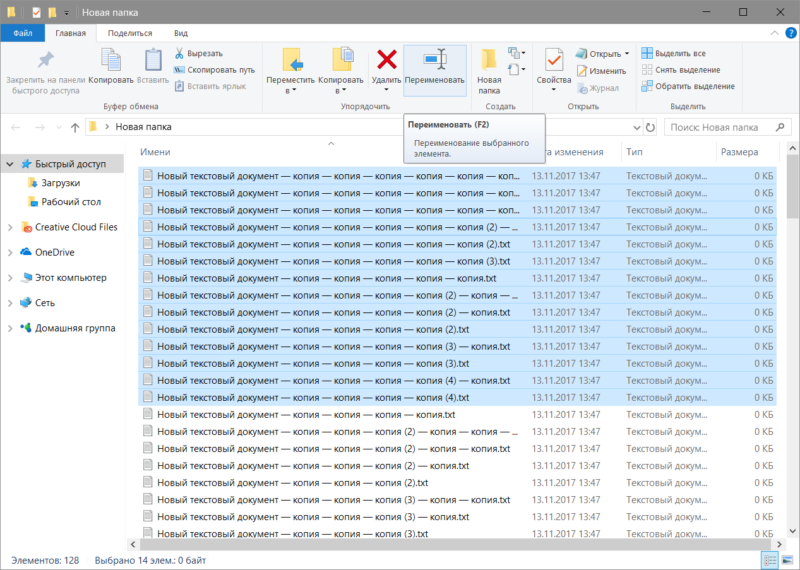
- Click the Rename button.
- Quick tip: Alternatively, you can press the «F2» button. Right-click the file and select the «Rename» option from the context menu. Or, you can click the file once and slowly click the name again to trigger the rename action.
- Confirm a new name for the file.
- Press the Tab key to jump and trigger the rename action for the next file down the list.
- Confirm the new file name.
- Press the Tab key again to jump and trigger the next rename.
- Quick tip: You can keep pressing the «Tab» key to skip the file and continue renaming other files.
- Continue repeating steps 9 and 10 to rename all the files.
Once you complete these steps, keep pressing the «Tab» key to continue renaming files in the location.
Rename multiple files at once
To rename multiple files in bulk with the same name structure on Windows 10, use these steps:
All the latest news, reviews, and guides for Windows and Xbox diehards.
- Open File Explorer.
- Open the folder with the files to change their names.
- Click the View tab.
- Select the Details view.
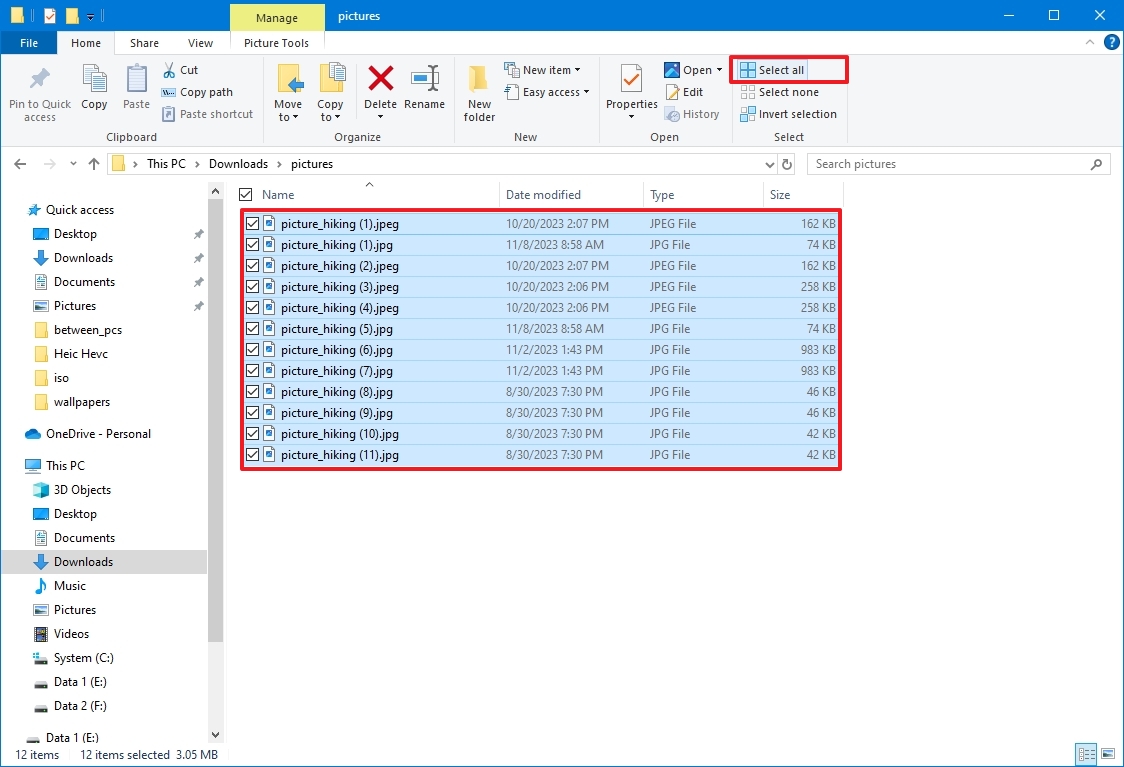
- Click the Home tab.
- Click the Select all button.
- Quick tip: Alternatively, you can select all files using the «Ctrl + A» keyboard shortcut. You can press and hold the «Ctrl» key and then click each file to rename. Or you can choose the first file, press and hold the «Shift» key, and then click the last file to select a group.
- Click the Rename button from the «Home» tab.
- Confirm the new file name base and press Enter.
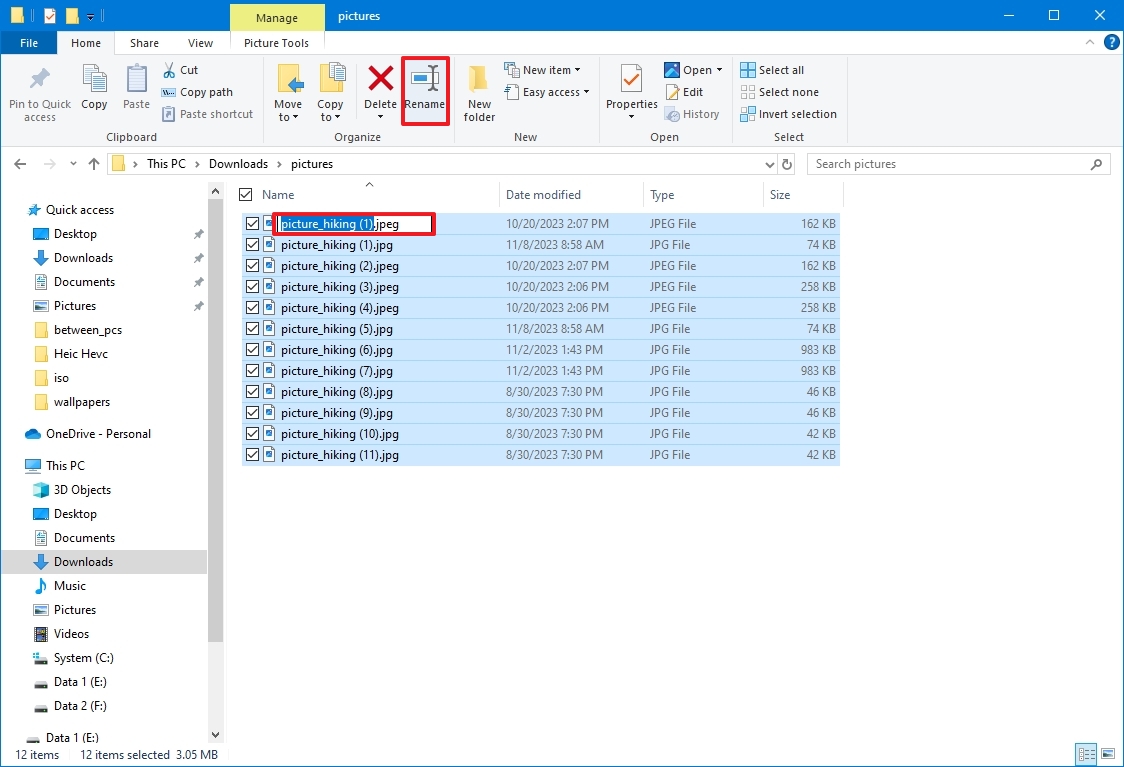
After you complete the steps, the selected files will be renamed using the same naming structure you specified, with a count number in parentheses to make each file name different. For example, «summer_trip_2023 (1).jpg» and «summer_trip_2023 (2).jpg.»
If you make a mistake, you can use the «Ctrl + Z» keyboard shortcut to undo the changes, or you can click the menu button in the title bar and select the «Undo» button.
How to rename multiple files using Command Prompt
Command Prompt also offers multiple ways to change the name of multiple files in bulk on Windows 10.
Rename single file
To rename one file with Command Prompt on Windows 10, use these steps:
- Open Start.
- Search for Command Prompt and click the top result to open the app.
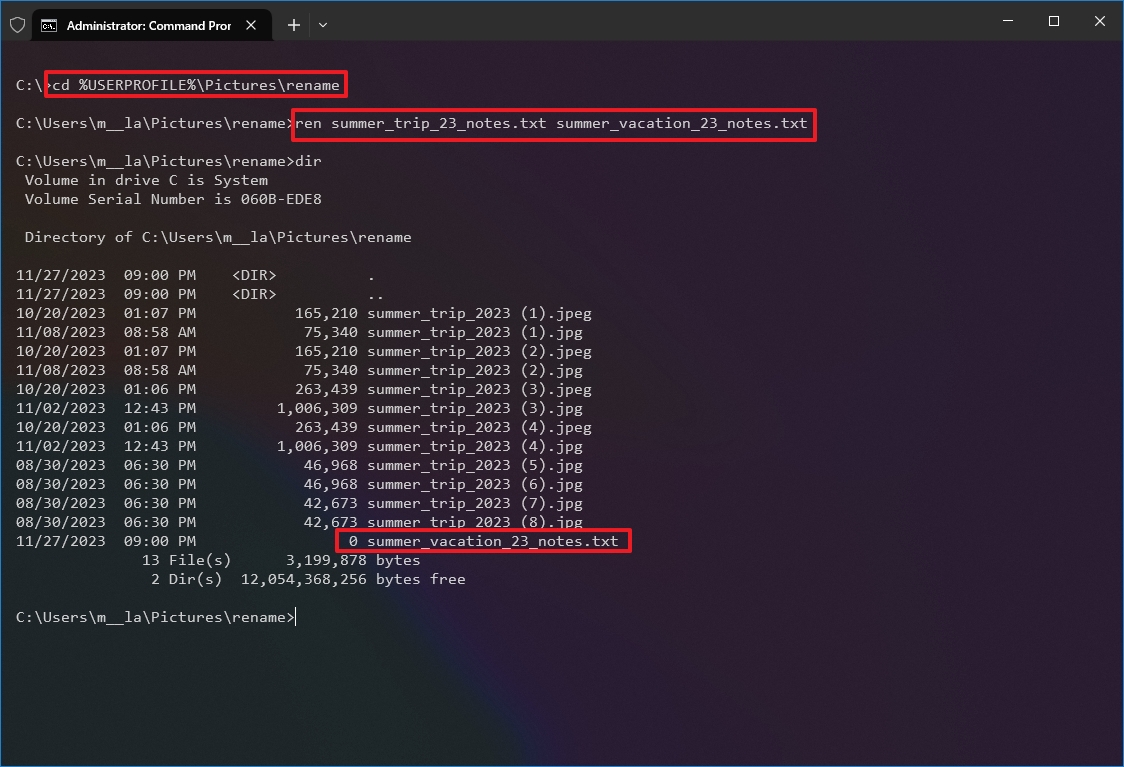
- Type the following command example to navigate to the folder with the files to rename, and press Enter: cd c:\PATH\TO\FILES
For instance, this example opens the «rename» folder inside «Pictures»: cd %USERPROFILE%\Pictures\rename
- Type the following command to view the files in the location and press Enter: dir
- Type the following command to rename the file and press Enter: ren «OLD-FILENAME.EXTENSION» «NEW-FILENAME.EXTENSION»
In the command, replace «OLD-FILENAME.EXTENSION» and «NEW-FILENAME.EXTENSION» with the old and new file names. The quotation marks are only necessary if the title includes spaces. For instance, this command renames the file to «summer_trip_23_notes.txt»: ren summer_trip_23_notes.txt summer_vacation_23_notes.txt
- Repeat step 5 to change the name of the remaining files.
Once you complete these steps, Command Prompt will rename the file with the new name.
Rename multiple files
To rename multiple files in bulk with the same name structure with Command Prompt, use these steps:
- Open Start.
- Search for Command Prompt and click the top result to open the app.
- Type the following command example to navigate to the folder with the files to rename, and press Enter: cd c:\PATH\TO\FILES
For example, this example opens the «rename» folder inside «Pictures»: cd %USERPROFILE%\Pictures\rename
- (Optional) Type the following command to view the files in the location and press Enter: dir
- Type the following command to rename the files in bulk and press Enter: ren *.FILE-EXTENSION ???-FILE-NAME.*
In the command, replace «FILE-EXTENSION» with the extension to change and «FILE-NAME» with part of the name to add to the files. The asterisk (*) is a wildcard that tells the ren command to rename everything with a specific extension. The question mark (?) is also a wildcard, but it represents a character of the original name you want to keep as part of the new name. For example, this command renames all «.jpg» files, leaving the first three characters (which works as a unique identifier to avoid duplication), and appends «-Camping-Trip» to the name: ren *.jpg ???-Camping-Trip.*
- Quick tip: When renaming files, the «ren» command sees a period (.) as the end of the filename. The command may produce unexpected results if you have files with a period as part of the name.
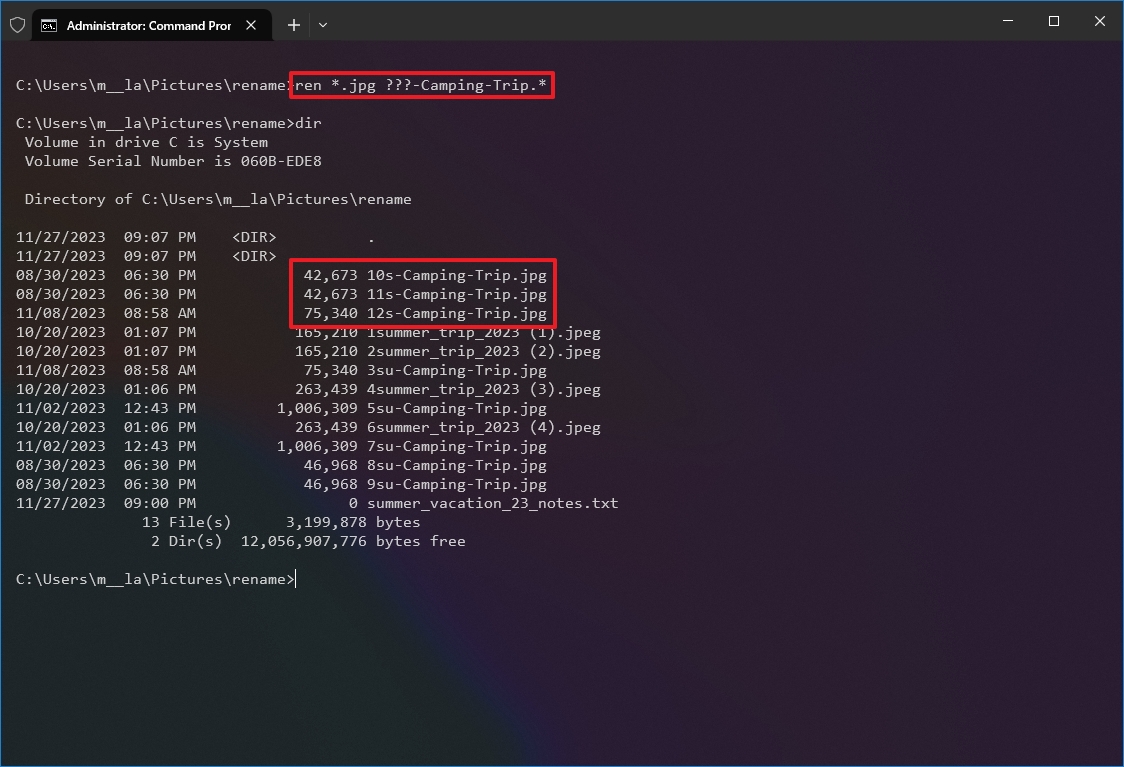
After you complete the steps, the files will be renamed using the settings you specified.
Trim multiple file names
To make file names shorter with Command Prompt on Windows 10, use these steps:
- Open Start.
- Search for Command Prompt and click the top result to open the app.
- Type the following command example to navigate to the folder with the files to rename, and press Enter: cd c:\PATH\TO\FILES
This example opens the «rename» folder inside «Pictures»: cd %USERPROFILE%\Pictures\rename
- (Optional) Type the following command to view the files in the location and press Enter: dir
- Type the following command to make file names shorter and press Enter: ren *.* ?????.*
In the command, the asterisk (*) matches all the file names and extensions in the folder, and the question marks (?) indicate how many characters to use for the new file name. For instance, this command trims the file names longer than five characters: ren *.* ?????.*
- Quick note: If the file name has fewer than five characters, the name will not change. (If you want to shorten the file name, add extra question marks in the syntax.)
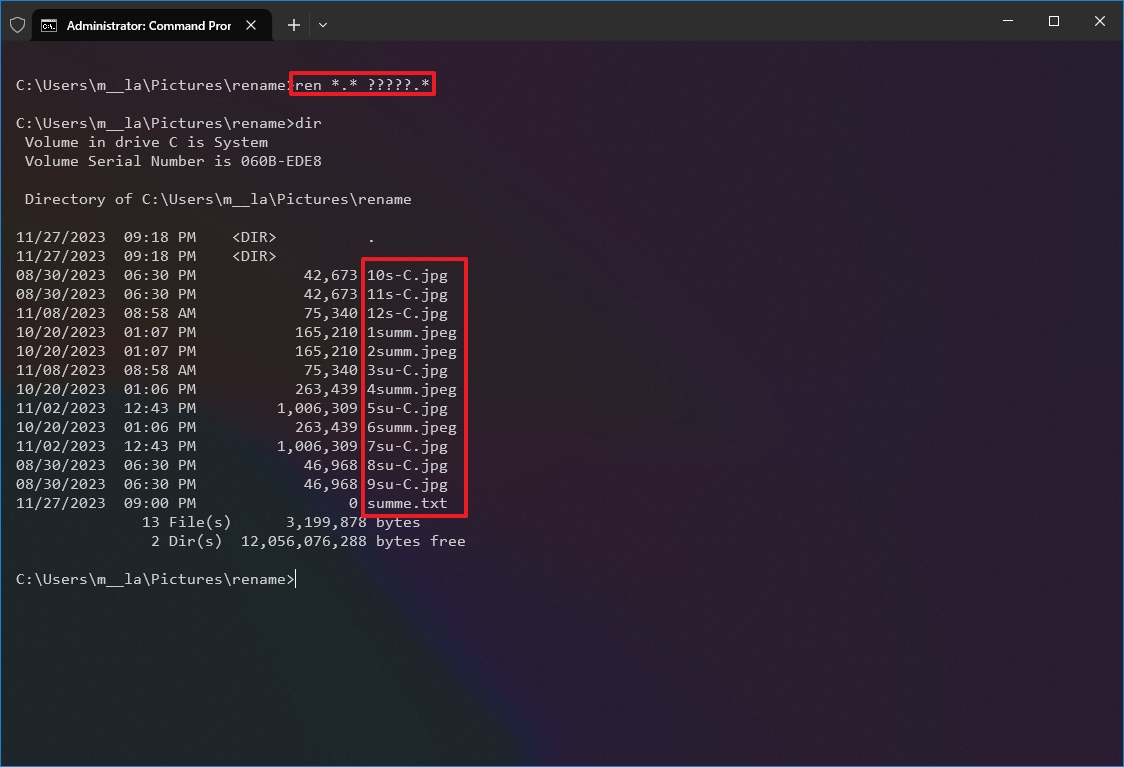
Once you complete these steps, the command will run and shorten the file name, depending on the question marks (?) available in the command.
Modify multiple file names
To rename part of the name on similar files on Windows 10, use these steps:
- Open Start.
- Search for Command Prompt and click the top result to open the app.
- Type the following command example to navigate to the folder with the files to rename, and press Enter: cd c:\PATH\TO\FILES
This example opens the «rename» folder inside «Pictures»: cd %USERPROFILE%\Pictures\rename
- (Optional) Type the following command to view the files in the location and press Enter: dir
- Type the following command to rename the part of the file name and press Enter: ren OLD-FILE-NAME-PART*.* NEW-FILENAME-PART*.*
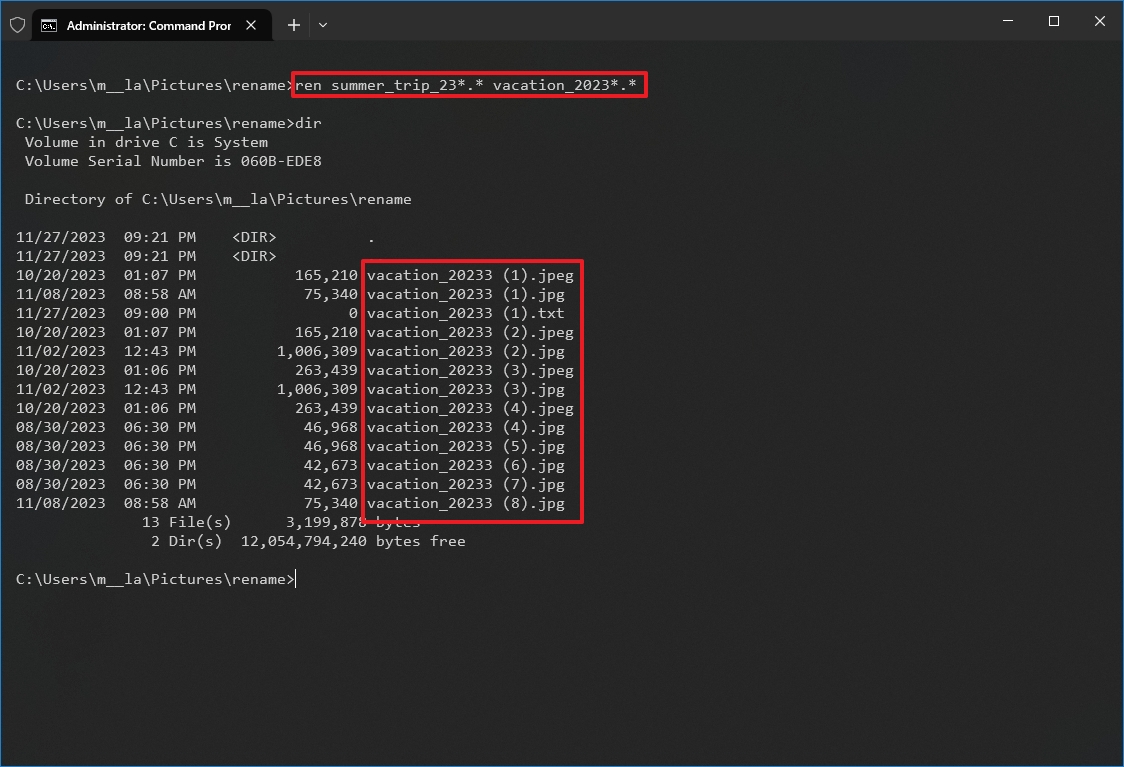
In the command, replace «OLD-FILE-NAME-PART» and «NEW-FILENAME-PART» with the old and new parts of the filename. The asterisk (*) is a wildcard that will match the rest of the filename and file extension to append the new part of the name. For instance, this command renames files that start with «summer_trip_23» to «vacation_2023»: ren summer_trip_23*.* vacation_2023*.*
After you complete the steps, the command will modify those files like the new name structure available in the command.
Change file extension
To change the file extension to another, use these steps:
- Open Start.
- Search for Command Prompt and click the top result to open the app.
- Type the following command example to navigate to the folder with the files you want to rename and press Enter: cd c:\PATH\TO\FILES
This example opens the «rename» folder inside «Pictures»: cd %USERPROFILE%\Pictures\rename
- (Optional) Type the following command to view a listing of the files in the location and press Enter: dir
- Type the following command to change the file extension and press Enter: ren *.OLD-EXTENSION *.NEW-EXTENSION
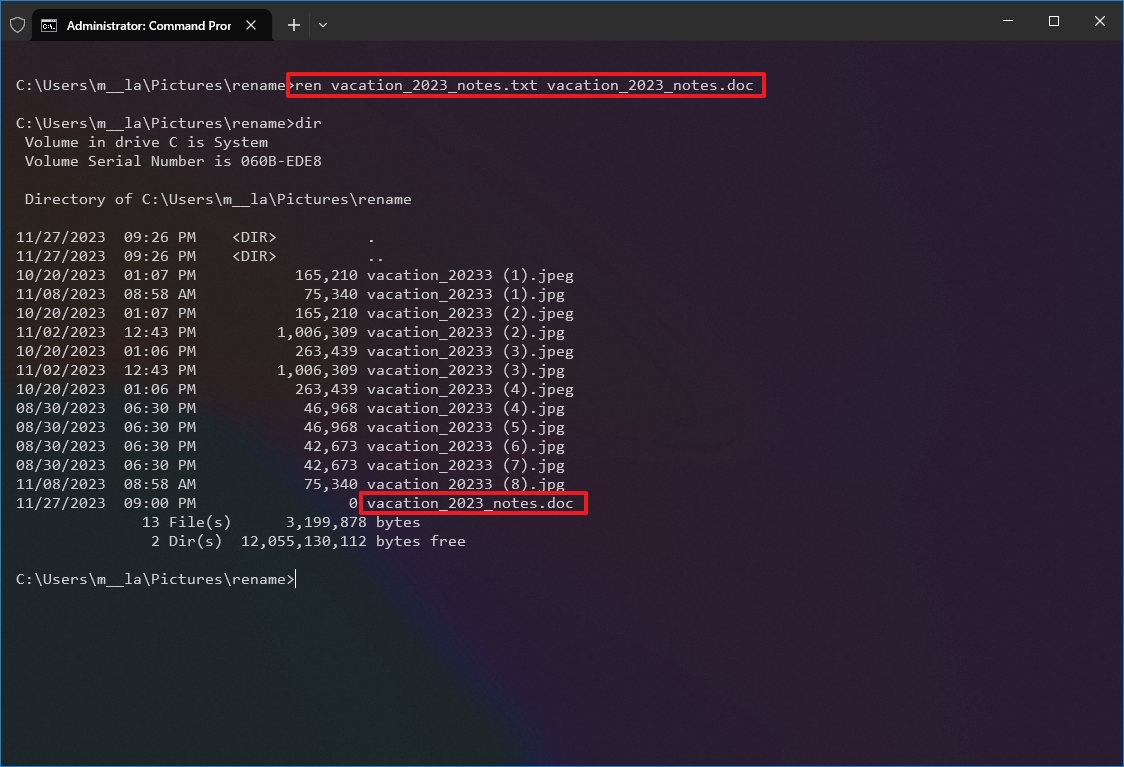
In the command, change «OLD-EXTENSION» and «NEW-EXTENSION» with the old and new file extensions. For example, this command changes the extension from «.txt» to «.doc» compatible with Microsoft Word for the files in the location: ren *.txt *.doc
This example without wildcards (*) changes the only extension of a single file from «.txt» to «.doc»: ren vacation_2023_notes.txt vacation_2023_notes.doc
Once you complete the steps, the file extension will be changed to the new extension in the command.
Rename files with specific extensions
The previous steps rename every file within the location. However, if you want to rename only a group of files with a specific format, you must omit the asterisk (*) and specify the command’s target extension.
To rename files with a specific file extension with Command Prompt, use these steps:
- Open Start.
- Search for Command Prompt and click the top result to open the app.
- Type the following command example to navigate to the folder with the files to rename, and press Enter: cd c:\PATH\TO\FILES
This example opens the «rename» folder inside «Pictures»: cd %USERPROFILE%\Pictures\rename
- (Optional) Type the following command to view the files in the location and press Enter: dir
- Type the following command to change the file extension in the location and press Enter: ren OLD-FILE-NAME*.EXTENSION NEW-FILE-NAME*.EXTENSION
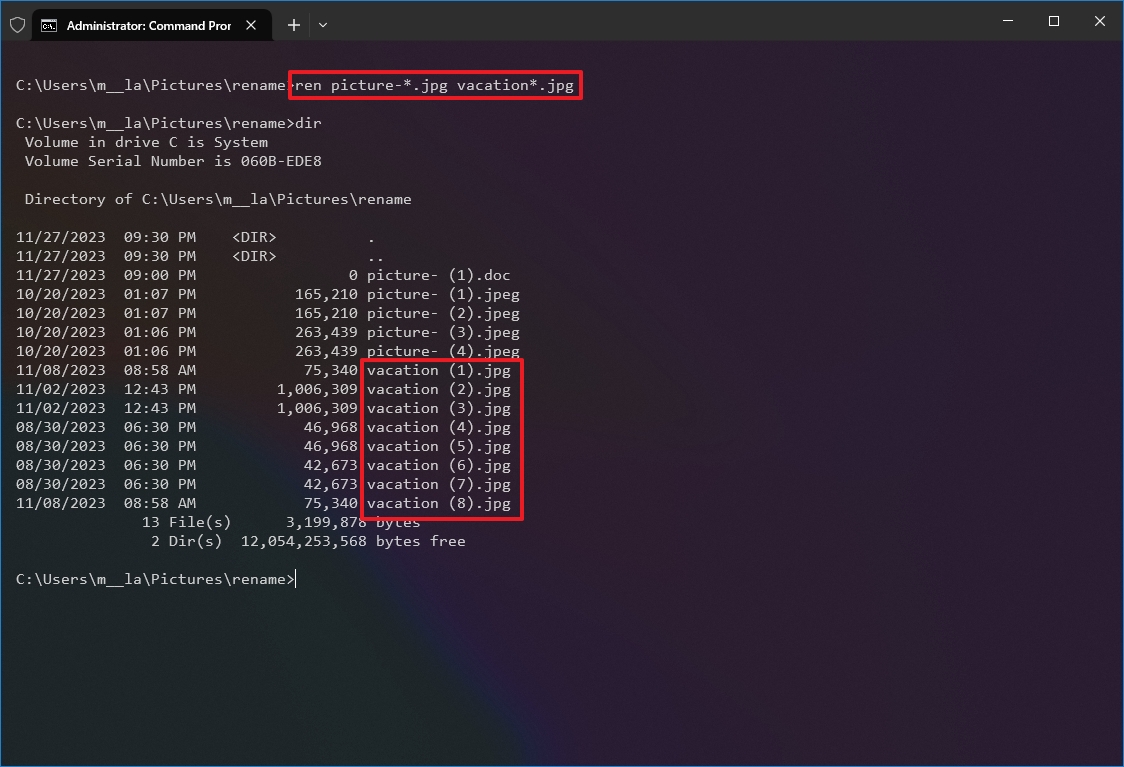
In the command, change «OLD-FILE-NAME,» «NEW-FILE-NAME,» and «EXTENSION» with the old and new file name and extension. For instance, this command only renames images with a «.jpg» extension: ren picture-*.jpg vacation*.jpg
After you complete the steps, Command Prompt will rename the files using the specified options.
How to rename multiple files using PowerShell
On Windows 10, you can also use PowerShell to rename multiple files. Although you have many ways to manipulate files using this tool, the instructions in this guide are only meant to get started with the most common scenarios.
Rename single file
To rename only one file with a PowerShell command, use these steps:
- Open Start.
- Search for PowerShell and click the top result to open the app.
- Type the following command example to navigate the folder with the files to rename and press Enter: cd PATH\TO\FOLDER
In the command, replace «PATH\TO\FOLDER» with the actual path to the location. For example, this command navigates the «rename» folder inside «Pictures»: cd C:\Users\USERNAME\Pictures\rename
- (Optional) Type the following command to view the files in the location and press Enter: ls
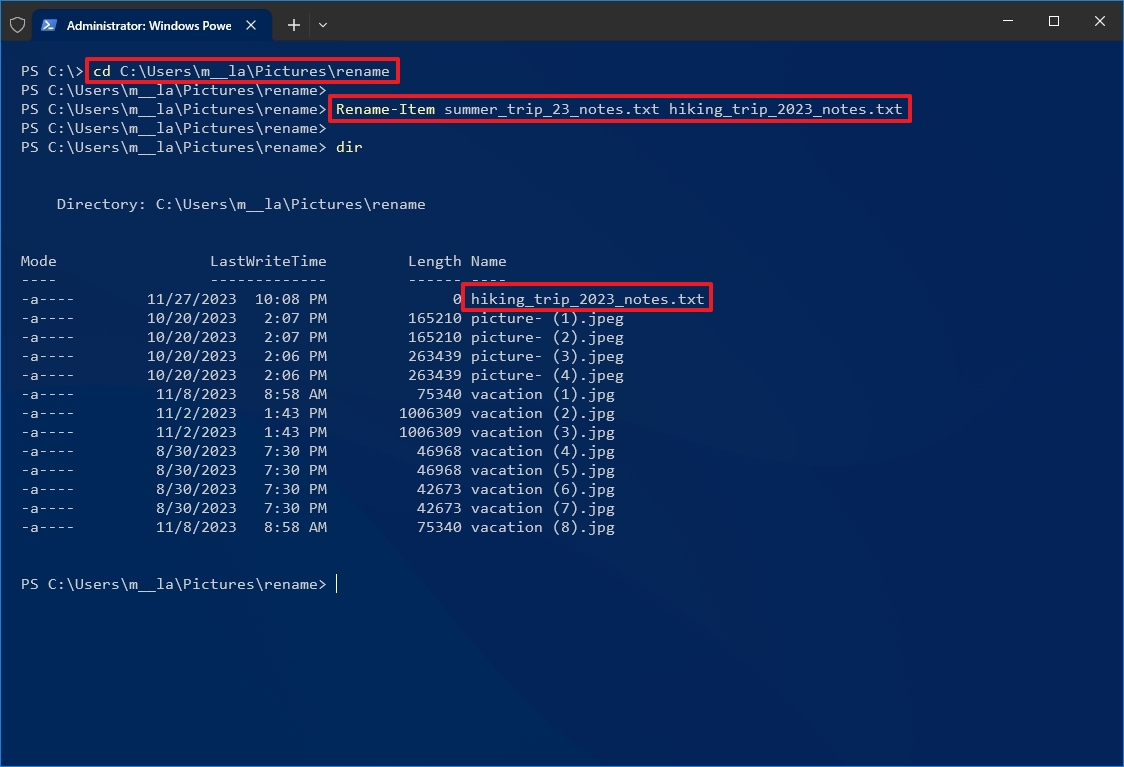
- Type the following command to change the name of a single file and press Enter: Rename-Item «OLD-FILE-NAME.EXTENSION» «NEW-FILE-NAME.EXTENSION»
In the command, specify the old and new file names and extensions. The quotation marks are only required if the name includes spaces. For instance, this command renames the file to «hiking_trip_2023_notes.txt»: Rename-Item summer_trip_23_notes.txt hiking_trip_2023_notes.txt
- Repeat step 5 to continue renaming other files.
Once you complete the steps, the command will change the specified file name.
Rename multiple files in bulk
To rename multiple files in bulk when the name structure is not important, use these steps:
- Open Start.
- Search for PowerShell and click the top result to open the app.
- Type the following command example to navigate to the folder with the files to rename and press Enter: cd PATH\TO\FOLDER
In the command, replace «PATH\TO\FOLDER» with the actual path to the location. For example, this command navigates the «rename» folder inside «Pictures»: cd C:\Users\USERNAME\Pictures\rename
- (Optional) Type the following command to view a listing of the files in the location and press Enter: ls
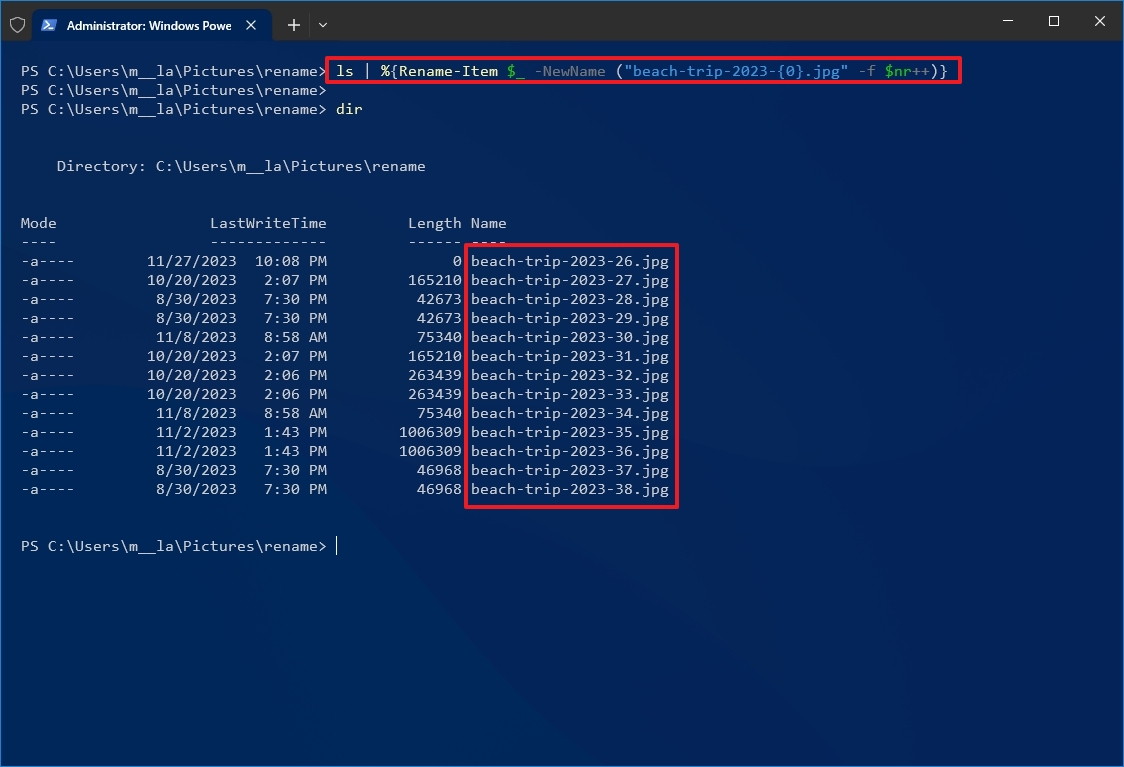
- Type the following command to rename multiple files in bulk and press Enter: ls | %{Rename-Item $_ -NewName («NEW-FILE-NAME-{0}.EXTENSION» -f $nr++)}
In the command, replace «NEW-FILE-NAME» with the structure name you want to use. For example, this command renames images with a «.jpg» extension using the same («beach-trip-2023-«) naming structure and appends a different number at the end of the name: ls | %{Rename-Item $_ -NewName («beach-trip-2023-{0}.jpg» -f $nr++)}
After you complete these steps, the files with the specified format will be renamed using the structure available with the command.
Trim multiple file names
To make file names shorter or trim part of the names by an «N» number of characters, use these steps:
- Open Start.
- Search for PowerShell and click the top result to open the app.
- Type the following command example to navigate the folder with the files to rename and press Enter: cd PATH\TO\FOLDER
In the command, replace «PATH\TO\FOLDER» with the actual path to the location. For example, this command navigates the «rename» folder inside «Pictures»: cd C:\Users\USERNAME\Pictures\rename
- (Optional) Type the following command to view the files in the location and press Enter: ls
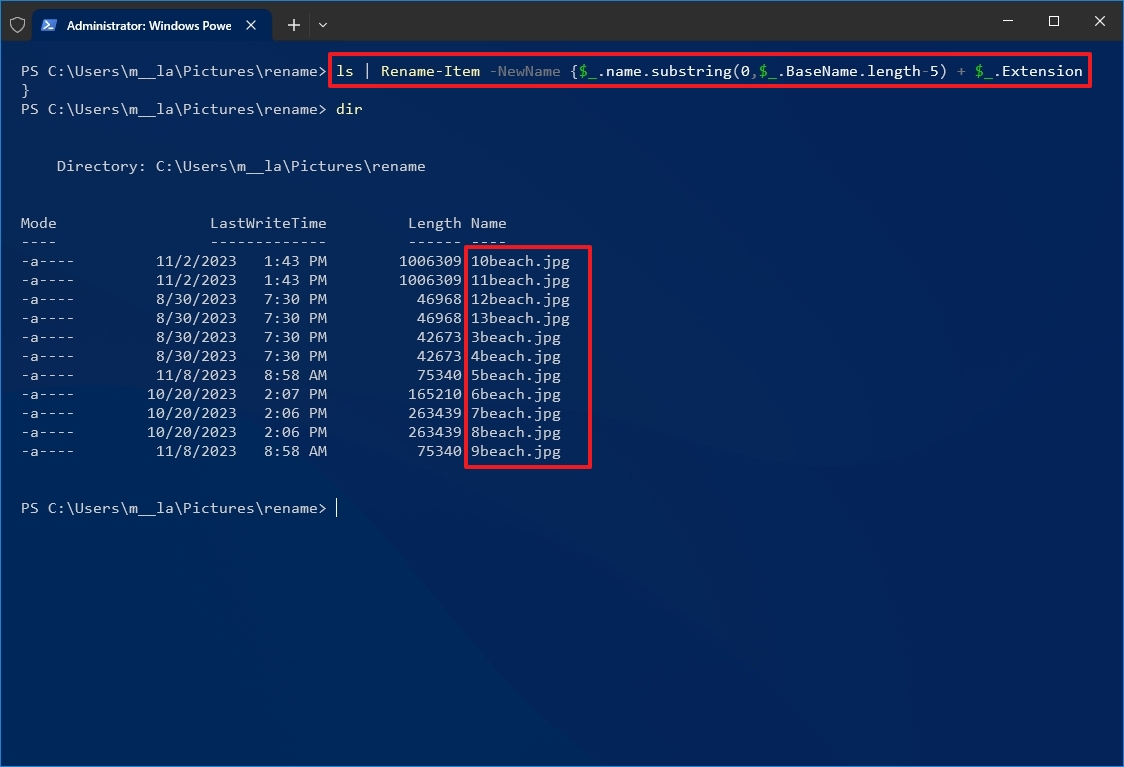
- Type the following command to rename files using shorter names and press Enter: ls | Rename-Item -NewName {$_.name.substring(0,$_.BaseName.length-N) + $_.Extension}
In the command, inside «$_.BaseName.length-N» update the value of «N» to specify the number of characters to remove. For instance, this command trims the name of your files by eight characters: ls | Rename-Item -NewName {$_.name.substring(0,$_.BaseName.length-8) + $_.Extension}
Once you complete these steps, the files in the location will have shorter names (right to left), depending on the specified length.
Delete part of the name from multiple files
To remove part of the file name on multiple files with PowerShell commands, use these steps:
- Open Start.
- Search for PowerShell and click the top result to open the app.
- Type the following command example to navigate to the files to rename and press Enter: cd PATH\TO\FOLDER
In the command, replace «PATH\TO\FOLDER» with the actual path to the location. For example, this command navigates the «rename» folder inside «Pictures»: cd C:\Users\USERNAME\Pictures\rename
- (Optional) Type the following command to view the files in the location and press Enter: ls
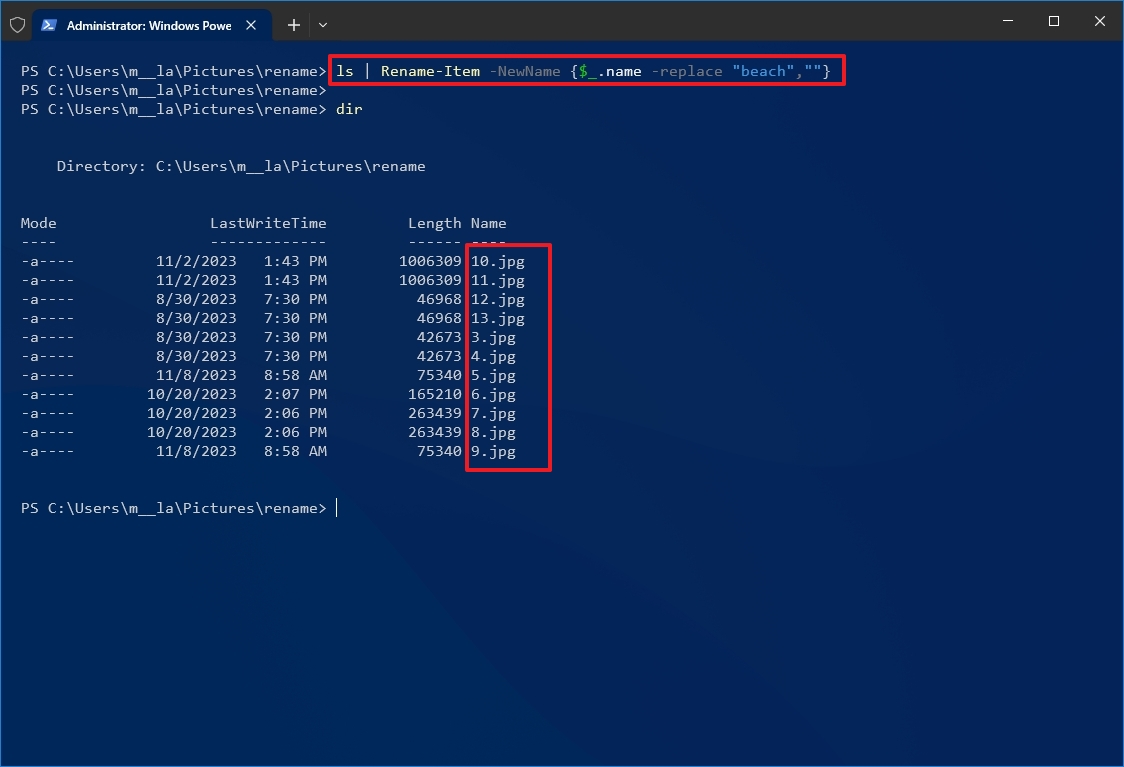
- Type the following command to remove part of the file name and press Enter: ls | Rename-Item -NewName {$_.name -replace «OLD-FILE-NAME-PART»,»»}
In the command, replace «OLD-FILE-NAME-PART» with the actual part of the name you want to replace. For instance, this command removes the word «trip» from the name of all files in the folder: ls | Rename-Item -NewName {$_.name -replace «beach»,»»}
After you complete the steps, the command will remove the file name part as specified in the command.
Replace part of the name from multiple files
To rename the same part of the file name, use these steps:
- Open Start.
- Search for PowerShell and click the top result to open the app.
- Type the following command example to navigate to the folder with the files to rename and press Enter: cd PATH\TO\FOLDER
In the command, replace «PATH\TO\FOLDER» with the actual path to the location. For example, this command navigates the «rename» folder inside «Pictures»: cd C:\Users\USERNAME\Pictures\rename
- (Optional) Type the following command to view a listing of the files in the location and press Enter: ls
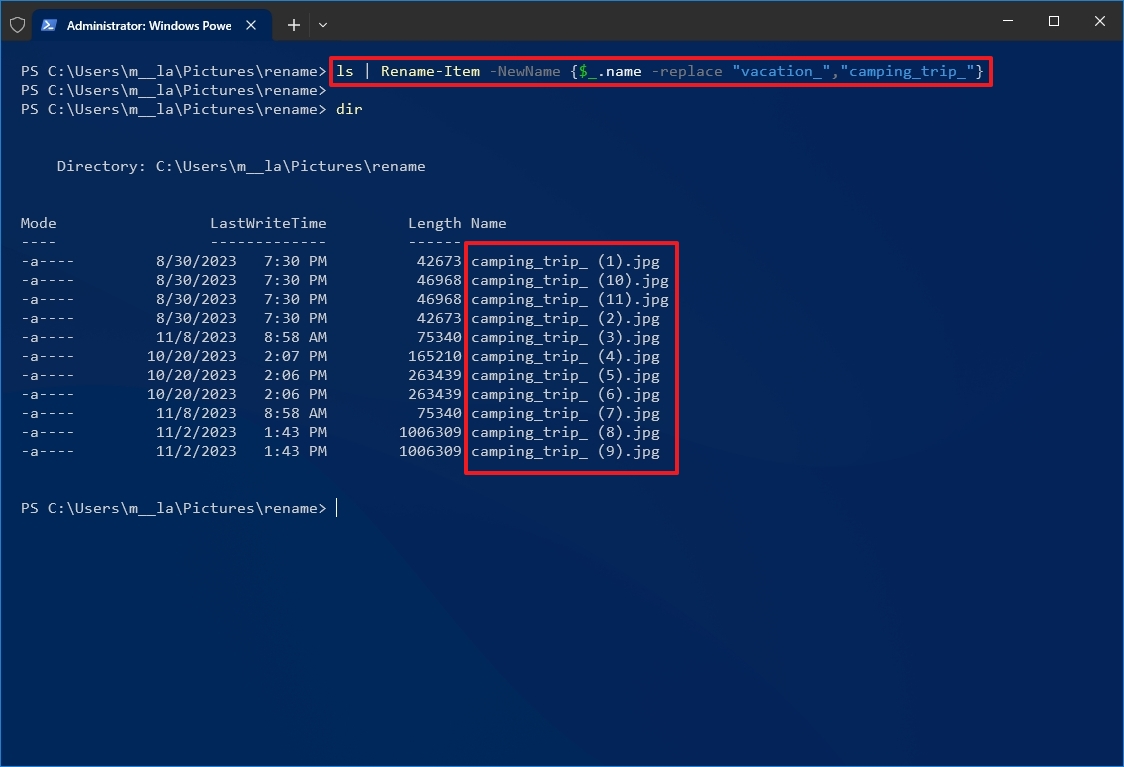
- Type the following command to replace part of file name and press Enter: ls | Rename-Item -NewName {$_.name -replace «OLD-FILE-NAME-PART»,»NEW-FILE-NAME-PART»}
In the command, replace «OLD-FILE-NAME-PART» and «NEW-FILE-NAME-PART» with the old and new parts of the file name. For example, this command replaces the word «vacation_» for «camping_trip_» in the file name: ls | Rename-Item -NewName {$_.name -replace «vacation_«,»camping_trip_»}
Once you complete these steps, the command will modify the file names with the replacement you specified in the command.
Remove spaces from multiple files
The space character as part of the file name can sometimes cause problems, even more so when using commands. If you have files with spaces in their names, you can use PowerShell to replace the character for a visual separator, such as a dash or underscore symbol.
To remove and replace spaces with underscores in filenames with PowerShell, use these steps:
- Open Start.
- Search for PowerShell and click the top result to open the app.
- Type the following command example to navigate to the folder with the files to rename and press Enter: cd PATH\TO\FOLDER
In the command, replace «PATH\TO\FOLDER» with the actual path to the location. For example, this command navigates the «rename» folder inside «Pictures»: cd C:\Users\USERNAME\Pictures\rename
- (Optional) Type the following command to view the files in the location and press Enter: ls
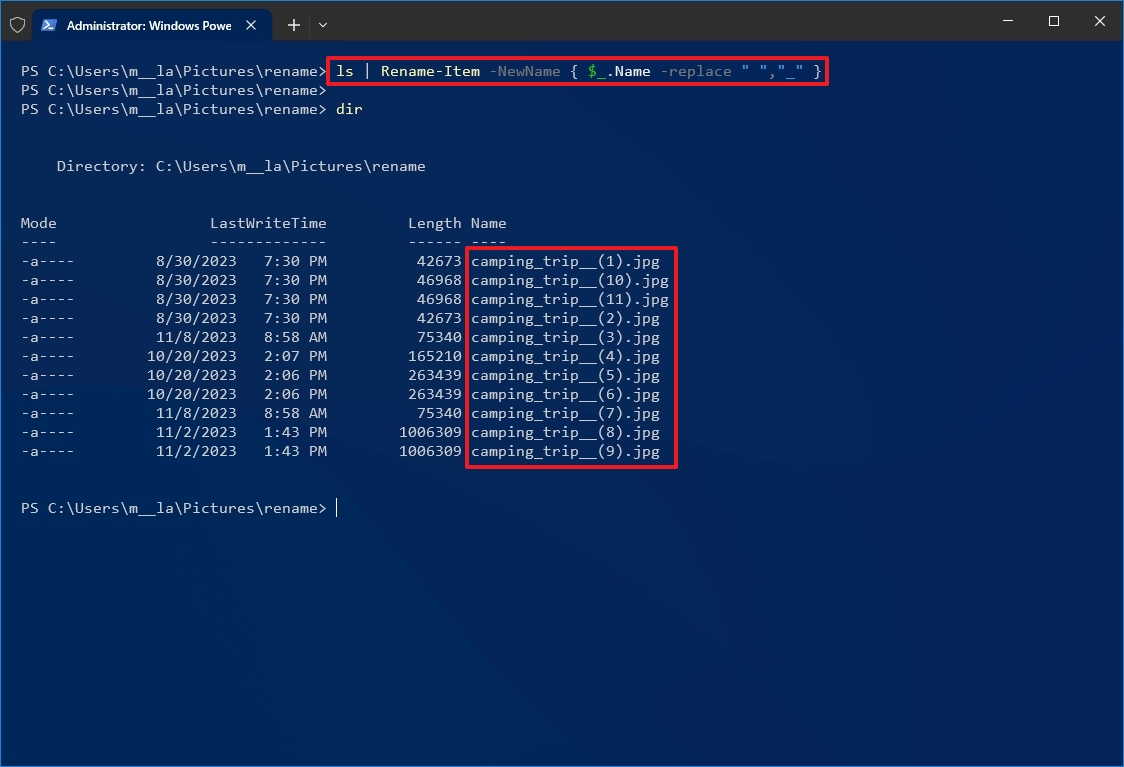
- Type the following command to remove spaces from file name and press Enter: ls | Rename-Item -NewName { $_.Name -replace » «,»SEPARATOR» }
In the command, make sure to replace «SEPARATOR» with the symbol instead of a space. For instance, this command replaces spaces with underscores in the files: ls | Rename-Item -NewName { $_.Name -replace » «,»_» }
After you complete the steps, the spaces will be replaced with the separator indicated in the command.
Change file extension
To change the file extension for a bunch of files with PowerShell, use these steps:
- Open Start.
- Search for PowerShell and click the top result to open the app.
- Type the following command example to navigate to the folder with the files to rename and press Enter: cd PATH\TO\FOLDER
In the command, replace «PATH\TO\FOLDER» with the actual path to the location. For example, this command navigates the «rename» folder inside «Pictures»: cd C:\Users\USERNAME\Pictures\rename
- (Optional) Type the following command to view the files in the location and press Enter: ls
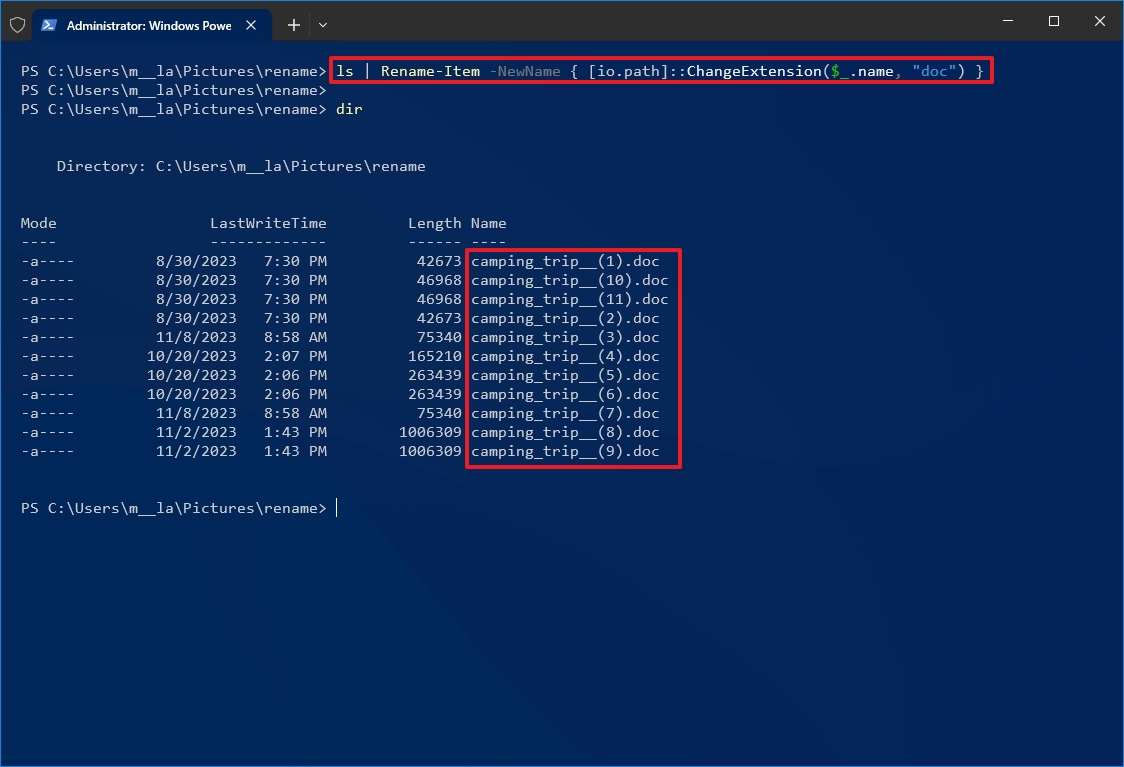
- Type the following command to change the extension on files and press Enter: ls | Rename-Item -NewName { [io.path]::ChangeExtension($_.name, «.NEW-EXTENSION») }
In the command, replace «.NEW-EXTENSION» with a new file extension. For instance, this command changes any file extension to «.doc»: ls | Rename-Item -NewName { [io.path]::ChangeExtension($_.name, «doc») }
Once you complete the steps, PowerShell will change the extension for the files in the folder location.
Rename specific extension file names
The above instructions will rename every file within the folder. However, if you want to change the name of a specific file format, such as documents, pictures, or videos, you can use the «-filter» option.
To change the names of a specific file format with PowerShell commands on Windows 10, use these steps:
- Open Start.
- Search for PowerShell and click the top result to open the app.
- Type the following command example to navigate to the folder with the files to rename and press Enter: cd PATH\TO\FOLDER
In the command, replace «PATH\TO\FOLDER» with the actual path to the location. For example, this command navigates the «rename» folder inside «Pictures»: cd C:\Users\USERNAME\Pictures\rename
- (Optional) Type the following command to view the files in the location and press Enter: ls
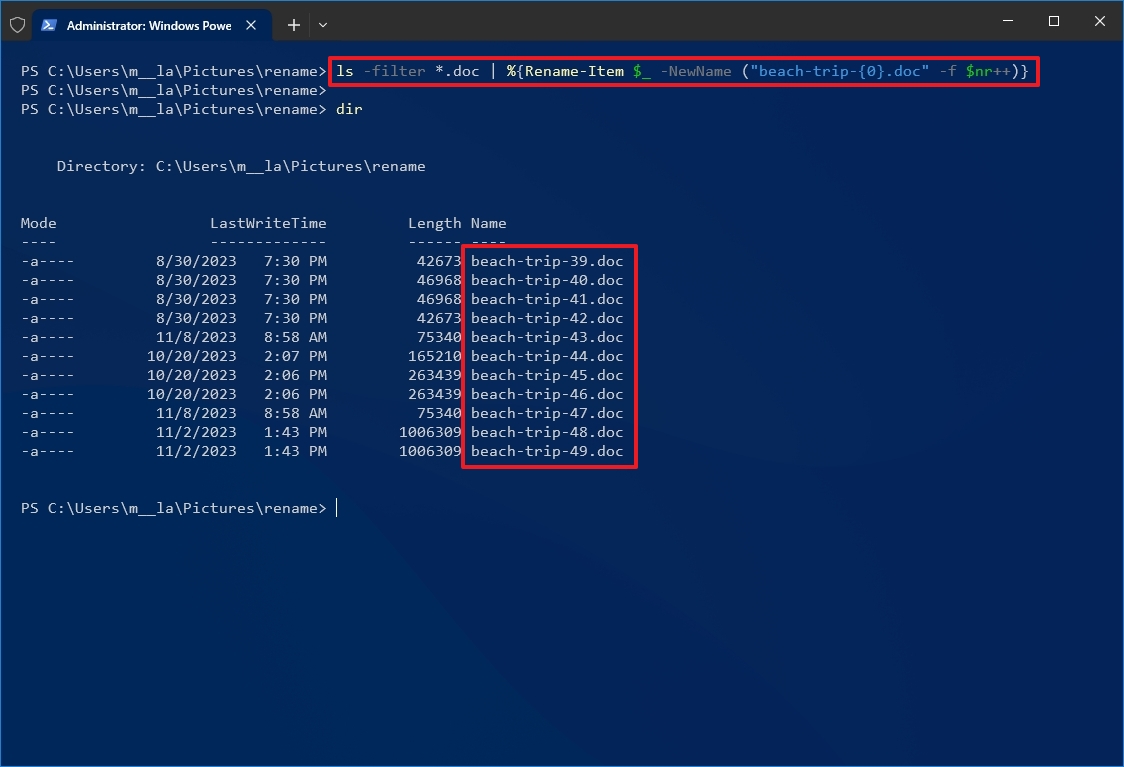
- Type the following command to rename files with a specific extension and press Enter: ls -filter *.EXTENSION | %{Rename-Item $_ -NewName («NEW-FILE-NAME-{0}.EXTENSION» -f $nr++)}
In the command, replace «NEW-FILE-NAME» and «EXTENSION» with the new parameter. For instance, this command renames only files that include the «.doc» extension: ls -filter *.doc | %{Rename-Item $_ -NewName («beach-trip-{0}.doc» -f $nr++)}
Once you complete the steps, PowerShell will rename the files with a specific extension specified in the command.
While these commands have been tested to work as expected, it is always recommended that you perform a test run before renaming the original files on your computer.
How to rename multiple files using PowerToys
On Windows 10, PowerToys is an advanced tool that adds many helpful productivity tools, including PowerRename, which makes it easier to rename files in bulk without using commands.
Install PowerToys
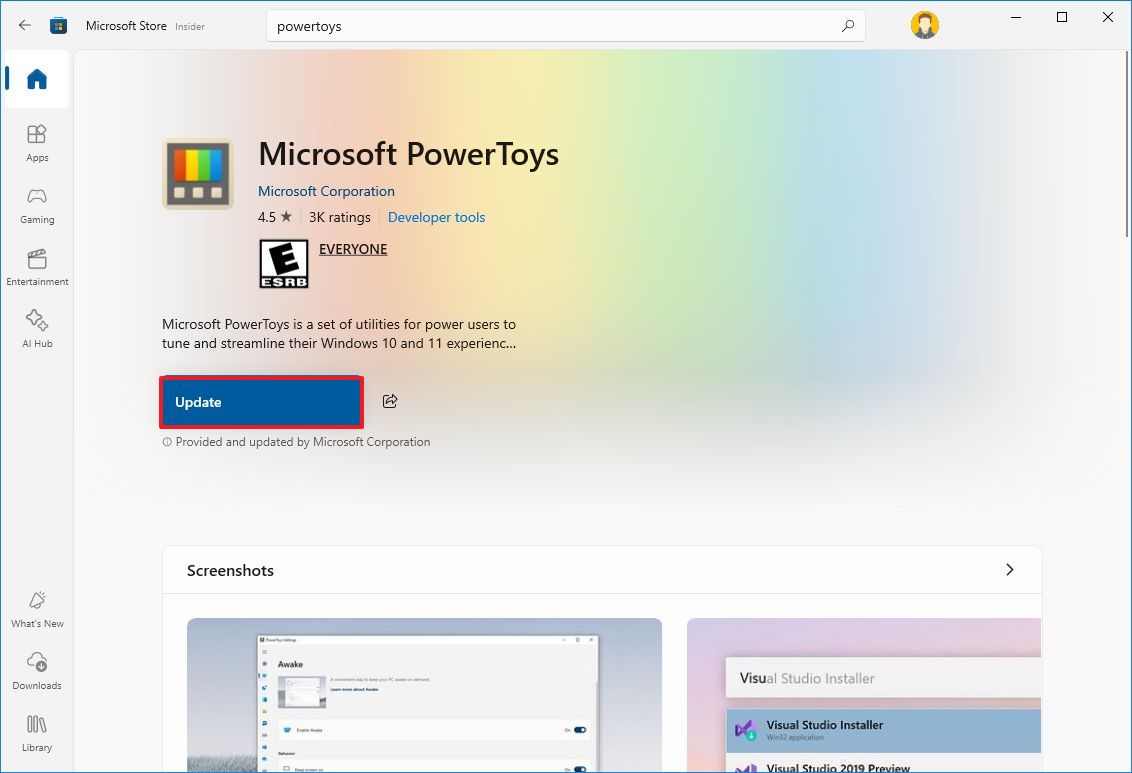
To install PowerToys on Windows 10, use these steps:
- Open the PowerToys app page.
- Click the View in Store button.
- Click the Install button.
- Open the PowerToys app.
- Click on File Management on the left navigation pane.
- Click on PowerRename.
- Turn on the «Enable PowerRename» toggle switch (if applicable).
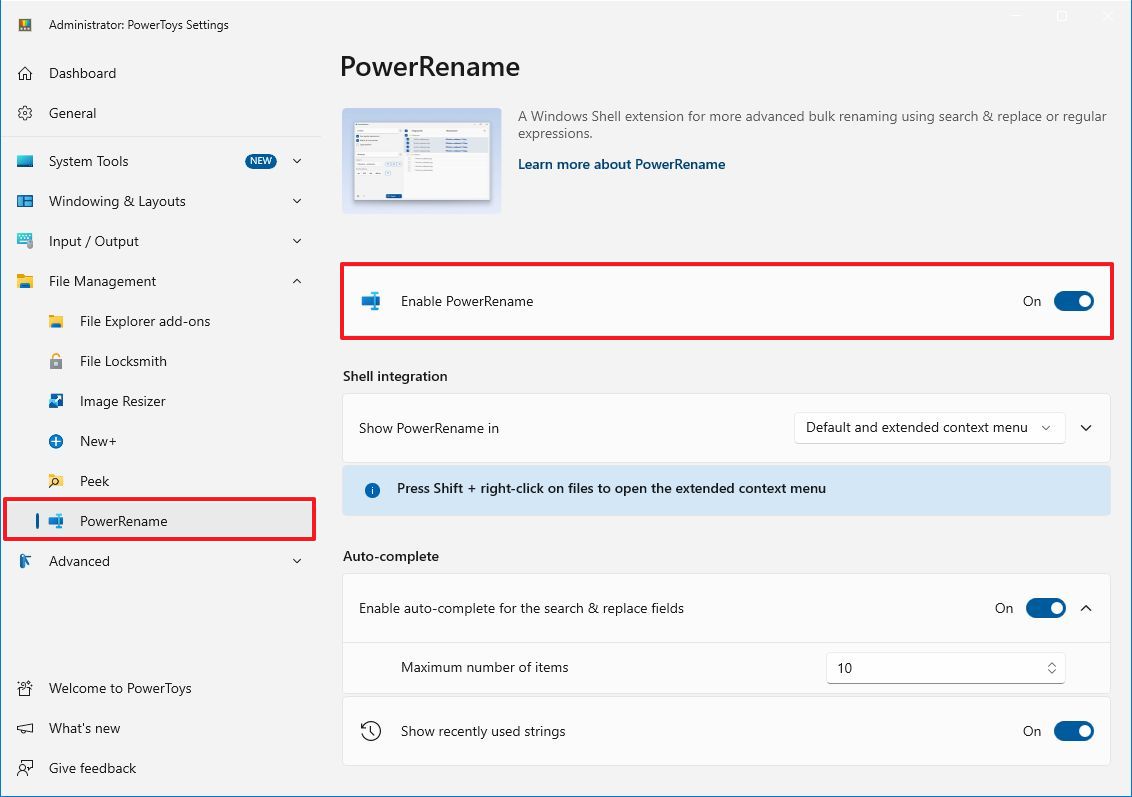
After you complete the steps, you can start using the tool to rename multiple files.
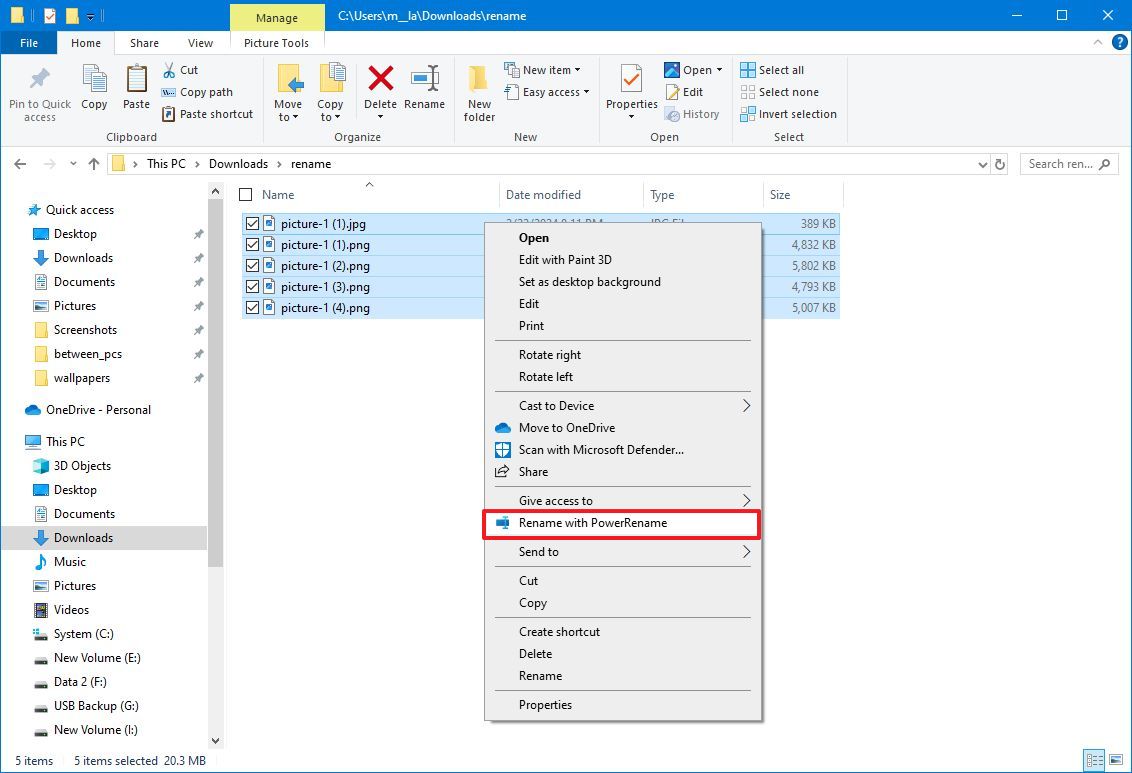
Rename files by matching partial name
To rename or replace part of the name of multiple files, use these steps:
- Open File Explorer.
- Open the folder with the files to rename.
- Select the files to rename.
- Right-click the selection and choose the «Rename with PowerRename» option.
- In the «Search for» box, define the part to rename.
- In the «Replace with» box, specify the name structure you want to use for the files.
- Use the «Apply to» menu to confirm the part of the file name to change — for example, filename, extension, or both.
- Choose the content to rename, including files, folders, and subfolders, with the buttons on the right side.
- (Optional) Choose the text formatting, including lowercase, uppercase, and title case, or capitalize every word.
- (Optional) Choose the «Enumerate items» option to allow the files to have the same name but with a different number at the end.
- Confirm the preview on the right side.
- Click the Apply button.
Once you complete the steps, the files will be renamed according to your configuration.
Rename files by matching any name
To rename all the files without a common structure, use the steps:
- Open File Explorer.
- Open the folder with the files to rename.
- Select the files to rename.
- Right-click the selection and choose the «Rename with PowerRename» option.
- In the «Search for» box, use the (.*) regular expression to match all the files.
- Check the «Use regular expressions» option.
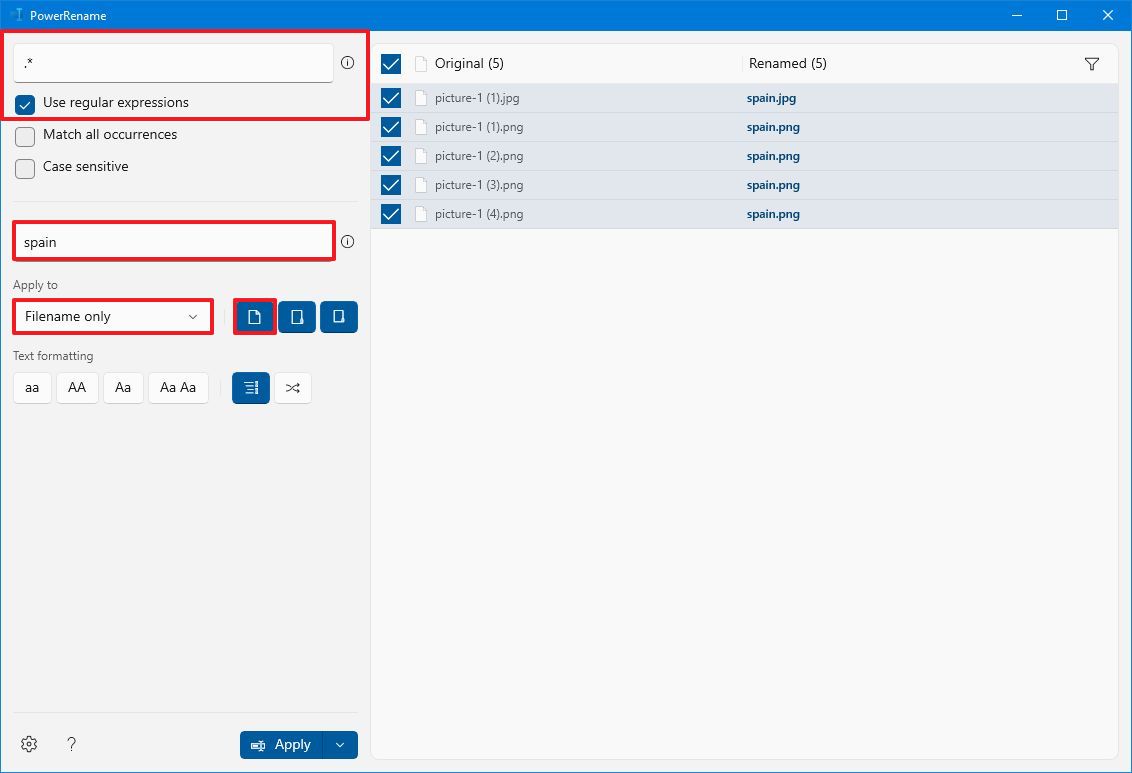
- In the «Replace with» box, specify the name structure you want to use for the files.
- Click the «File creation date and time help» button on the right side and select help to enumerate the files, since they will have the same base name – for example, «$ff» to add two-millisecond digits.
- Use the «Apply to» menu to select the Filename only option.
- Choose the content to rename, including files, folders, and subfolders, with the buttons on the right side.
- (Optional) Choose the text formatting, including lowercase, uppercase, and title case, or capitalize every word.
- (Optional) Choose the «Enumerate items» option to allow the files to have the same name but with a different number at the end.
- Confirm the preview on the right side.
- Click the Apply button.
After you complete the steps, all the files in the list will be renamed to the base name you assigned them.
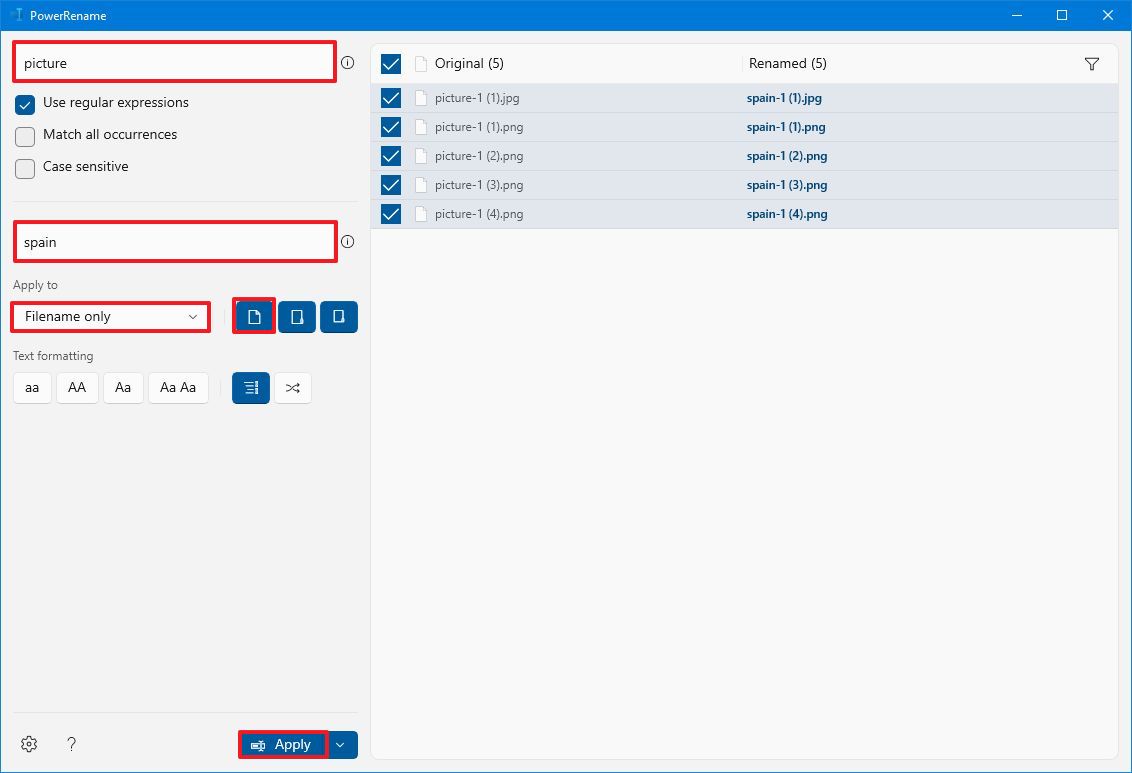
Rename files by appending description
To append a description to the file name, use the steps:
- Open File Explorer.
- Open the folder with the files to rename.
- Select the files to rename.
- Right-click the selection and choose the «Rename with PowerRename» option.
- In the «Search for» box, use the (\.) regular expression to match all the files.
- Check the «Use regular expressions» option.
- In the «Replace with» box, specify the description you want to add to files — for example, «spain.»
- Quick note: If you use this option, remember the period at the end of the description to prevent breaking the file extension.
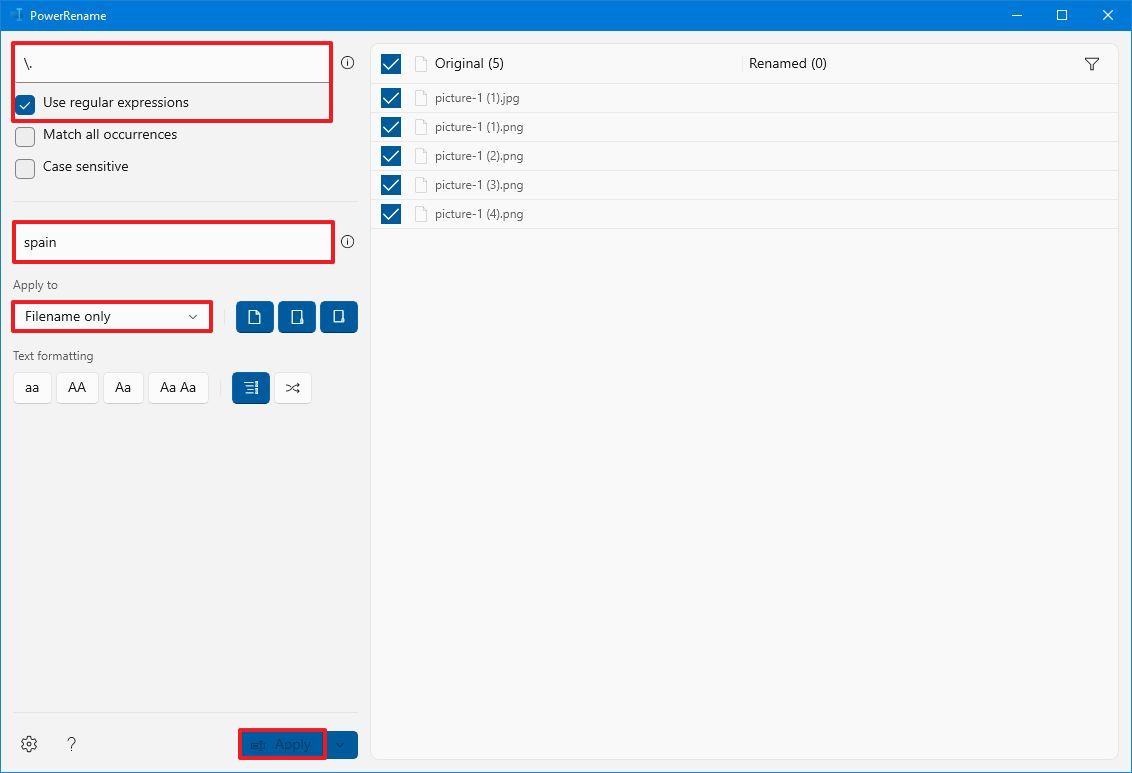
- Use the «Apply to» menu to the Filename + extension option.
- Choose the content to rename, including files, folders, and subfolders, with the buttons on the right side.
- (Optional) Choose the text formatting, including lowercase, uppercase, and title case, or capitalize every word.
- (Optional) Choose the «Enumerate items» option to allow the files to have the same name but with a different number at the end.
- Confirm the preview on the right side.
- Click the Apply button.
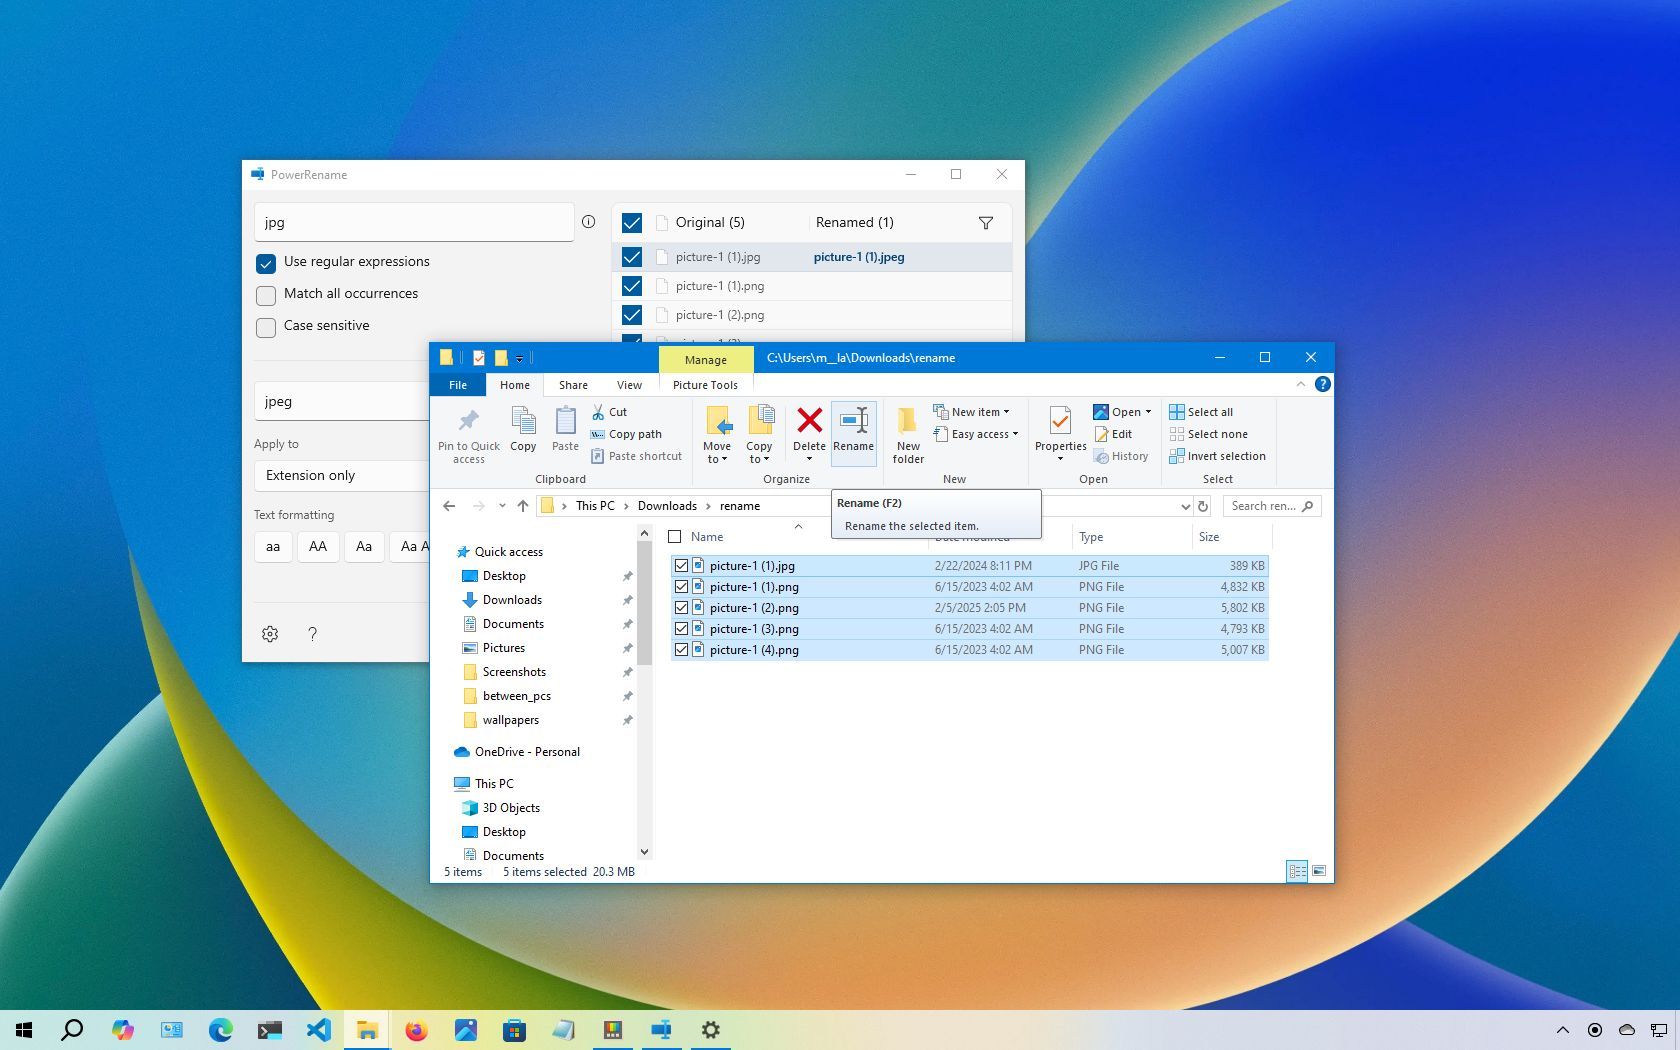
Change file extension
To change the file extension of multiple files with PowerToys, use these steps:
- Open File Explorer.
- Navigate to the folder with the files to rename.
- Select the files to rename.
- Right-click the selection and choose the «Rename with PowerRename» option.
- In the «Search for» box, confirm the extension to replace — for example, jpg.
- In the «Replace with» box, confirm the new compatible extension — for example, jpeg.
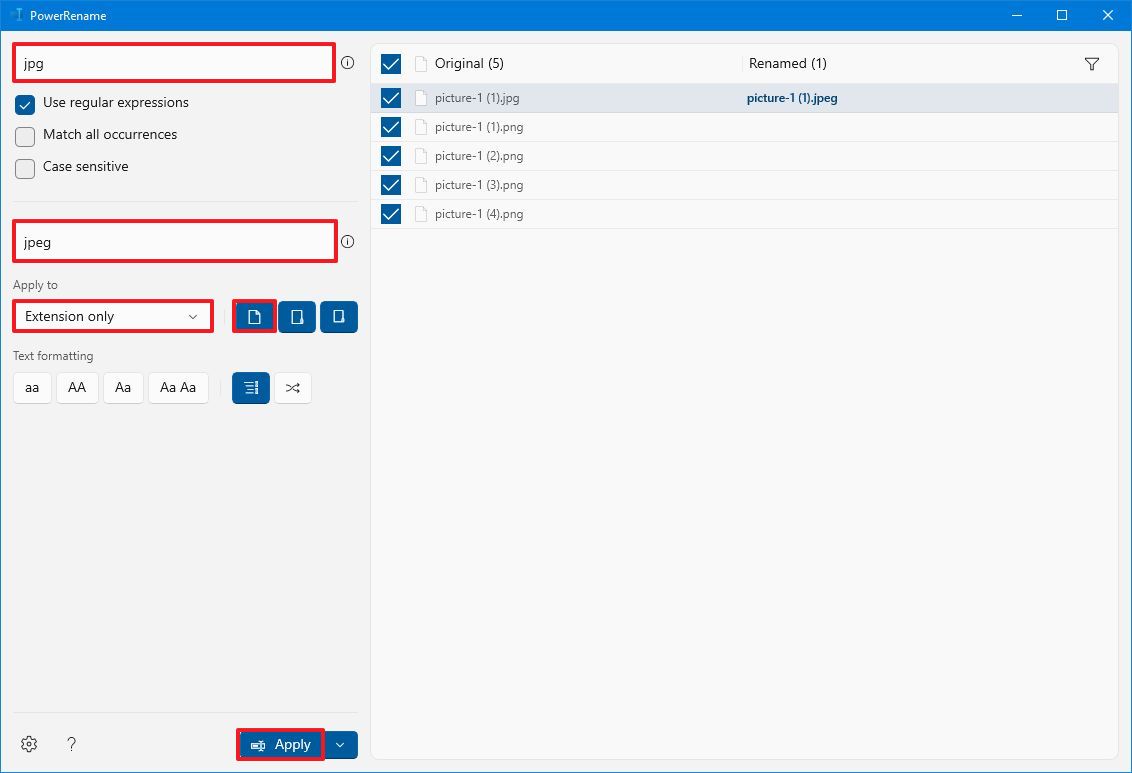
- Use the «Apply to» menu to select the «Extension only» option.
- Choose only the Include files option with the buttons on the right side.
- Click the Apply button.
Once you complete the steps, the file extension will change to the one you specified.
PowerToys PowerRename is a powerful tool that lets you manipulate file names virtually in any way you want using regular expressions. This Microsoft documentation page explains the options available for creating patterns to rename files.
More resources
For more helpful articles, coverage, and answers to common questions about Windows 10 and Windows 11, visit the following resources:
- Windows 11 on Windows Central — All you need to know
- Windows 10 on Windows Central — All you need to know
Mauro Huculak has been a Windows How-To Expert contributor for WindowsCentral.com for nearly a decade and has over 15 years of experience writing comprehensive guides. He also has an IT background and has achieved different professional certifications from Microsoft, Cisco, VMware, and CompTIA. He has been recognized as a Microsoft MVP for many years.
Наведите порядок в файловой системе с помощью этих встроенных инструментов или специального ПО.
Чтобы быстро находить файлы и бегло ориентироваться в них, недостаточно разложить всё по правильным папкам. Не менее важно присвоить файлам легко читаемые и осмысленные имена. Возиться с каждым из них по отдельности — контрпродуктивно. Поэтому существуют способы группового переименования.
Для работы с группой файлов лучше скопировать их в отдельную папку. Это существенно упростит процесс.
С помощью штатных средств Windows
Изменяем имена файлов
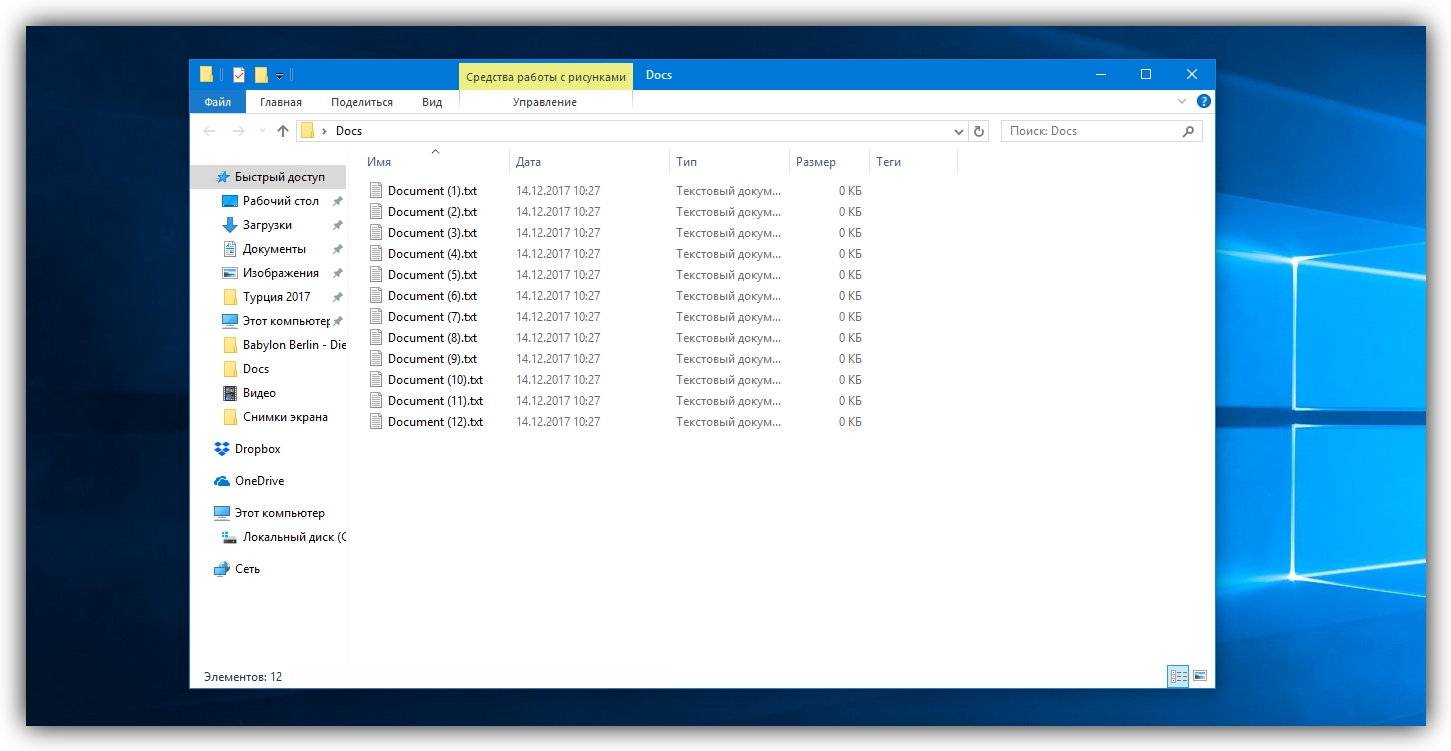
Рассмотрим самый простой случай: у нас есть n‑ое количество изображений с ни о чём не говорящими названиями.
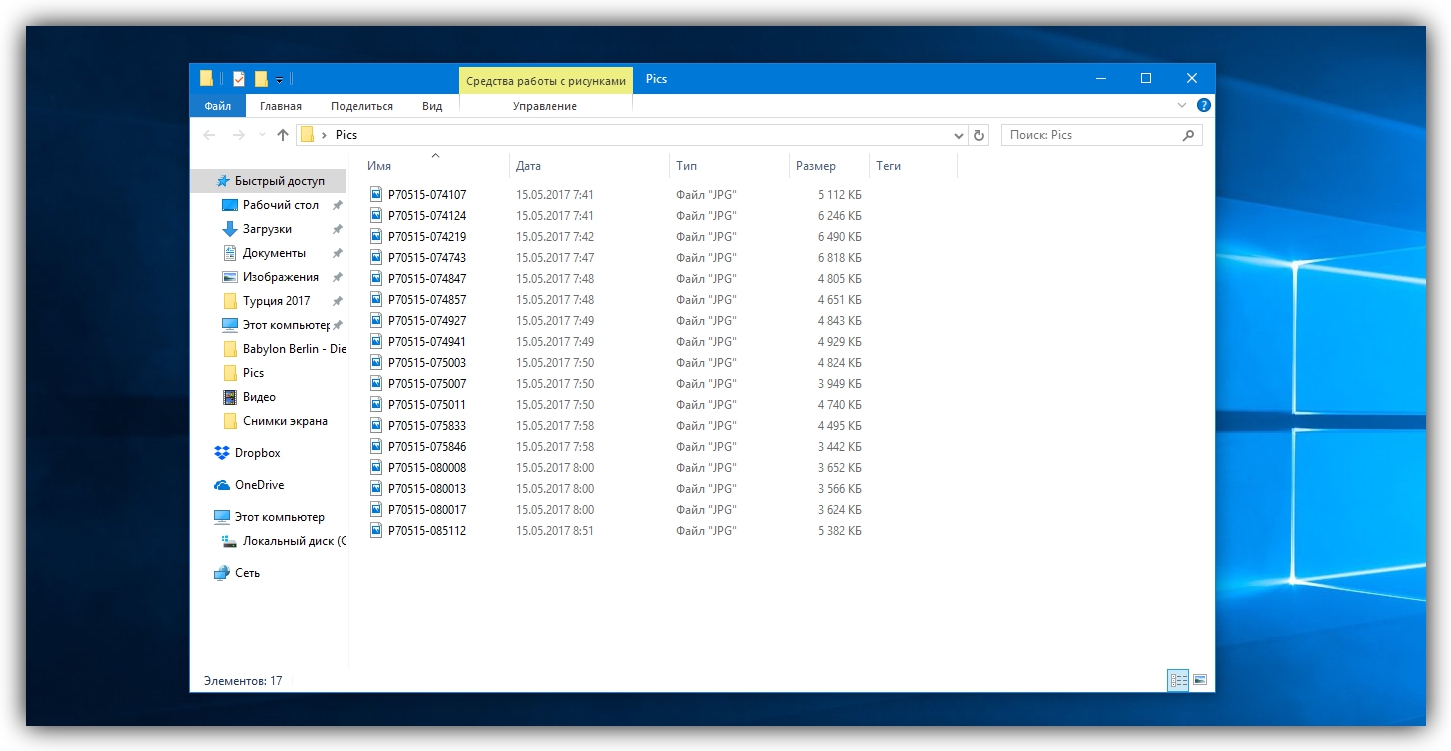
Приведём имена этих файлов к наглядному виду Picture (n), где Picture будет названием, а n — порядковым номером. Это можно легко сделать прямо в «Проводнике».
Выделяем все картинки, которые хотим переименовать. Чтобы сделать это быстро, используем комбинацию клавиш Ctrl + A. Затем просто жмём F2 или кликаем правой кнопкой мыши на первом файле и выбираем «Переименовать». В качестве имени для выделенного изображения вводим слово Picture и нажимаем Enter.
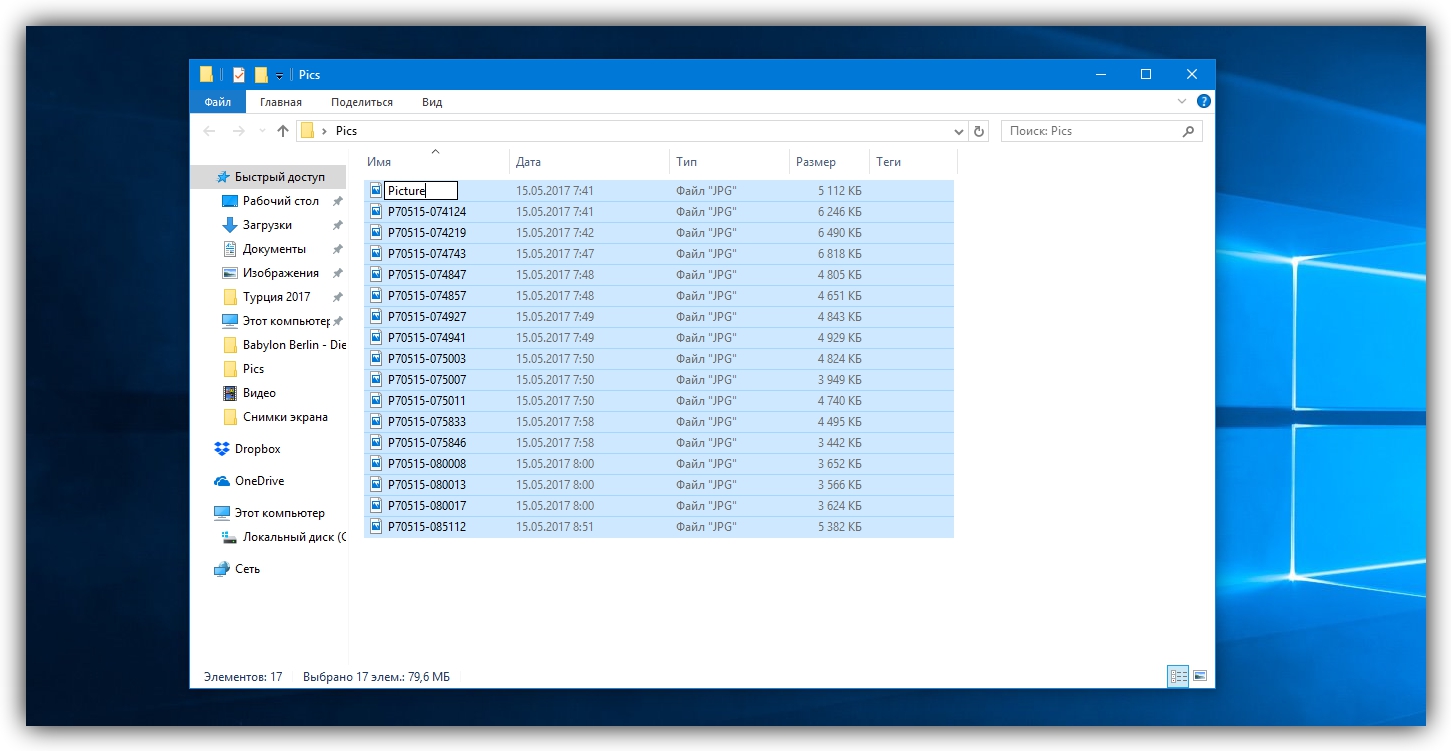
Windows автоматически присвоит такое же имя всем последующим файлам и расставит все порядковые номера.

При необходимости вы можете отменить массовое переименование комбинацией клавиш Ctrl + Z.
Если захотите переименовать группу папок в «Проводнике», то это можно сделать точно так же.
Изменяем расширения файлов
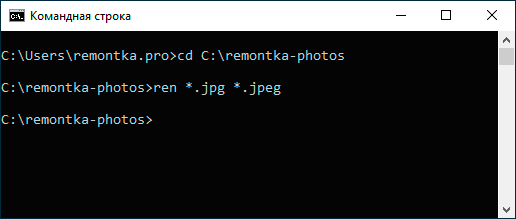
Допустим, у нас есть несколько текстовых документов, которые после двойного клика открываются блокнотом. Но нам нужно, чтобы по умолчанию они открывались браузером. Для этого придётся изменить их расширение с .txt на .html. Операции такого рода можно быстро выполнять с помощью командной строки.
Нажимаем клавиши Windows + R, вводим в появившемся поле cmd и кликаем ОК — видим окно командной строки. Теперь вставляем в него путь к папке, в которой лежат наши файлы, сразу после команды cd: cd C:\Users\Max Volotsky\Desktop\Docs, и жмём Enter. Затем используем специальную команду, которая изменит их расширения: rename *.txt *.html, и снова нажимаем Enter.
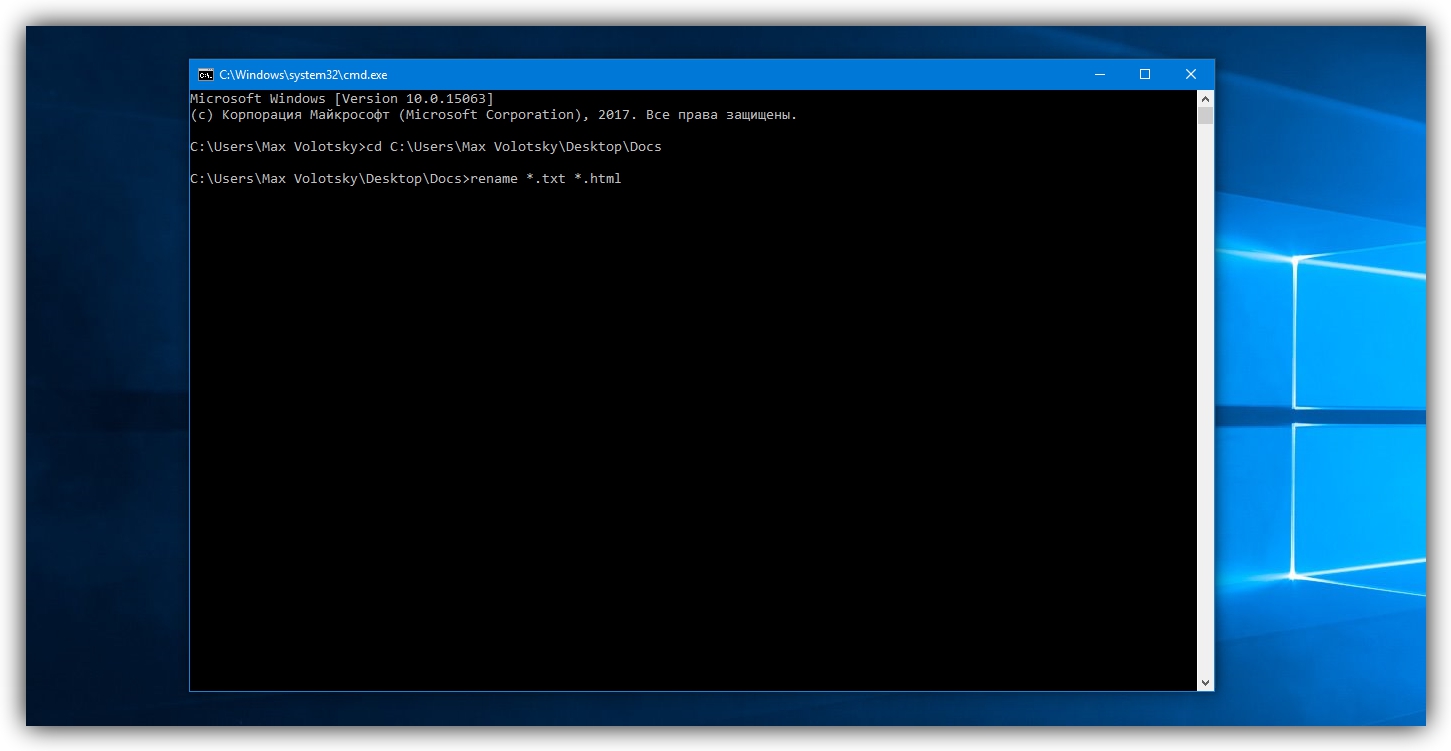
Первым в команде указывается исходное расширение, вторым — новое. После ввода команды система мгновенно вносит изменения.

Чтобы вернуть всё как было, нужно повторно воспользоваться командой rename, поменяв местами расширения.
С помощью сторонних утилит
Никакие встроенные инструменты не сравнятся по функциональности со специальными программами, разработанными специально для пакетного переименования. В Сети можно найти множество таких бесплатных утилит, достаточно ввести в поиске bulk file rename.
Мы рассмотрим переименование на примере программы Bulk Rename Utility. С её помощью очень удобно изменять имена папок и файлов, а также расширения последних.
При первом запуске может показаться, что интерфейс утилиты пришёл прямо из ада и, возможно, в этом есть доля правды. Зато пользователю не нужно переходить по многочисленным вкладкам и меню: он получает доступ ко всем функциям из одного окна.

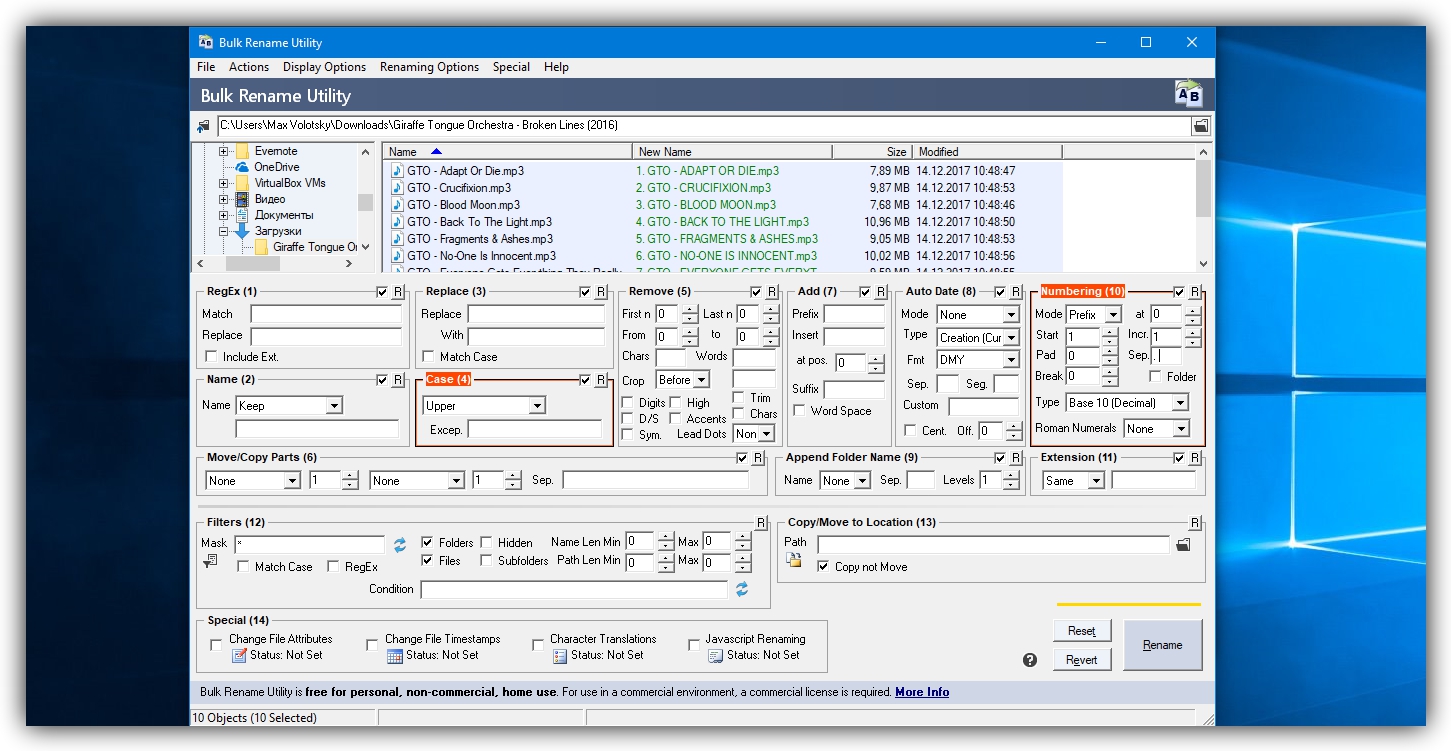
Итак, допустим, у нас есть группа аудиофайлов, которые хочется привести к приятному для глаза виду. В данном случае раздражают цифры и отсутствие названия исполнителя.
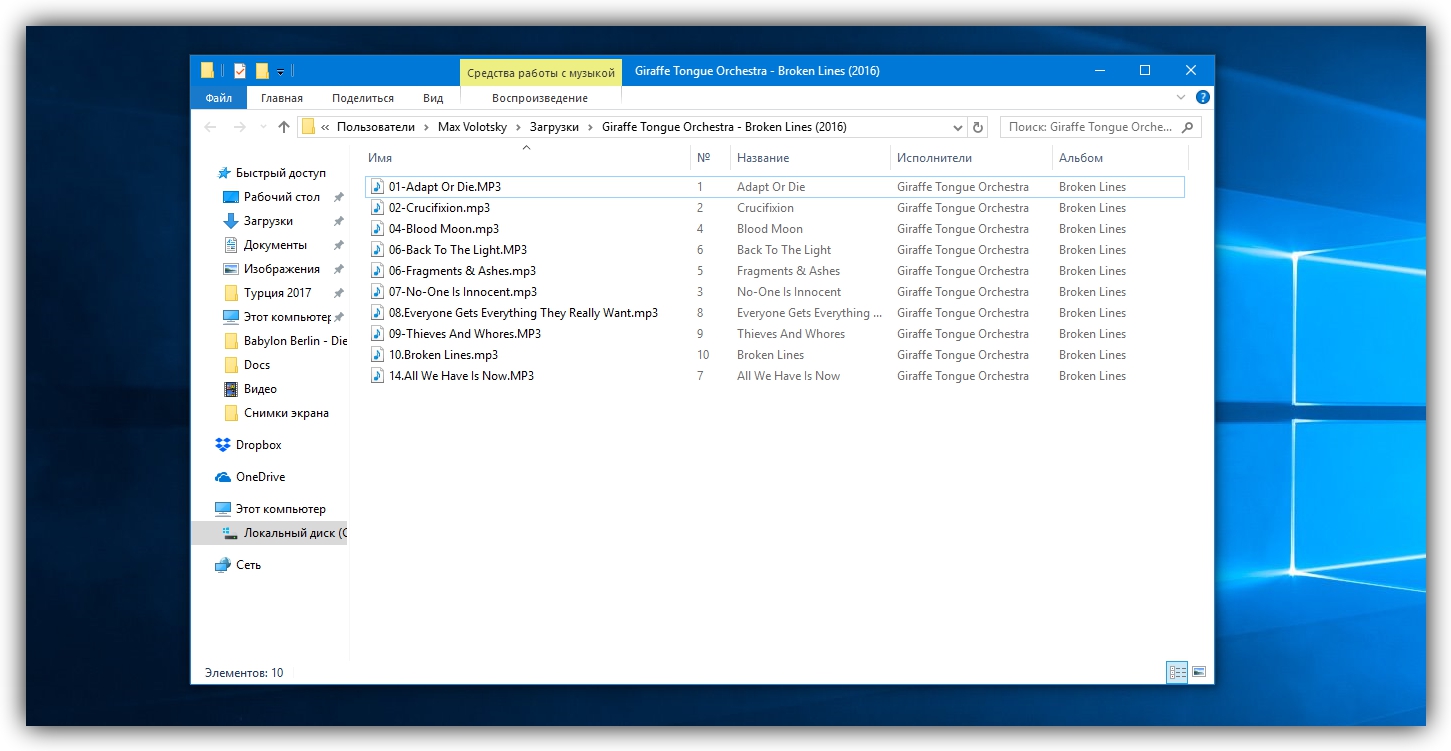
Запускаем приложение и через встроенный файловый менеджер переходим в нужную нам папку. Далее, уже знакомым сочетанием клавиш Ctrl + A выделяем все файлы. Нам нужно удалить первые 3 символа в начале имени каждого файла и дописать название исполнителя в самом начале. Для этого указываем необходимые параметры на панелях Remove и Add, после чего жмём Rename.
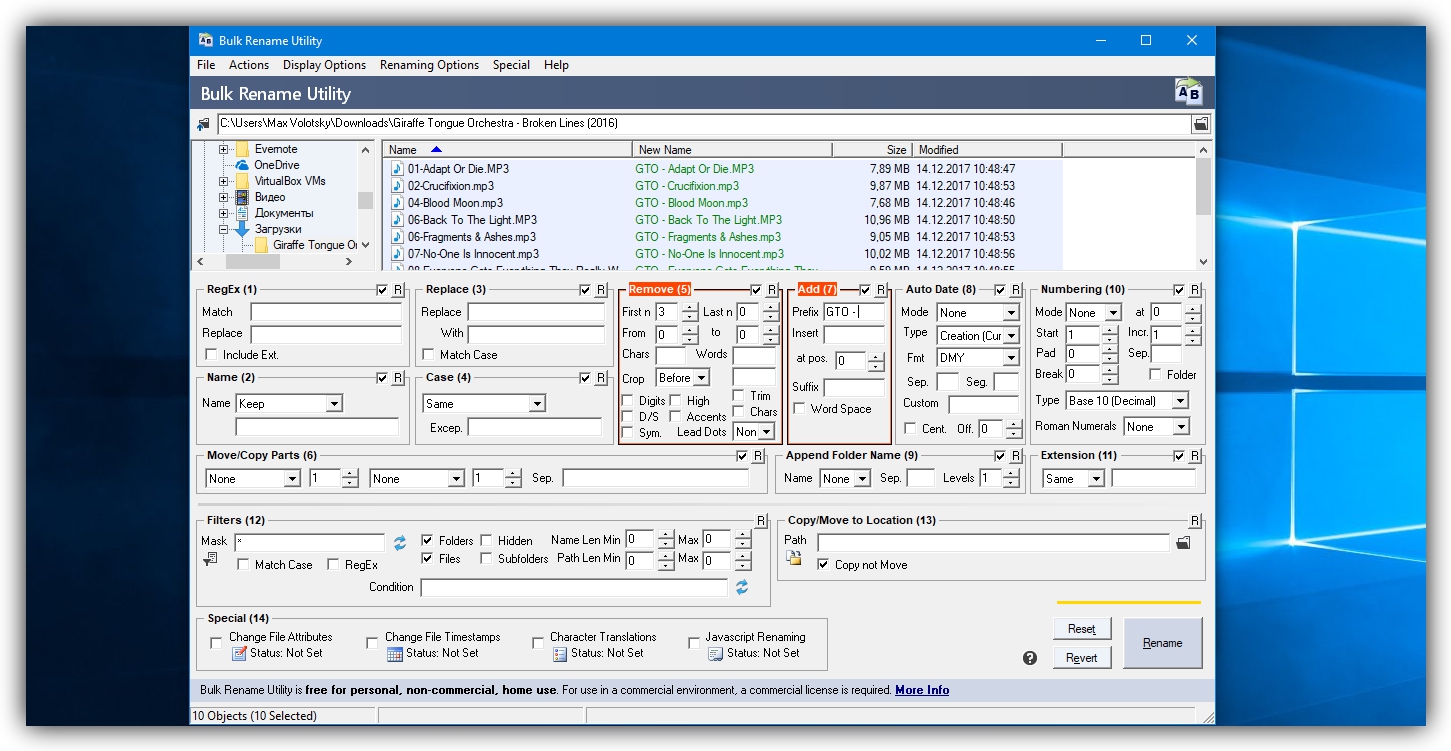
Теперь сделаем так, чтобы все расширения состояли из символов в нижнем регистре: на панели Extension выбираем вариант Lower и нажимаем Rename.

Как видите, в окне программы доступны и другие панели. К примеру, Numbering позволяет нумеровать документы различными способами, а с помощью Case можно менять регистр символов в именах файлов. Благодаря столбцу New Name во встроенном проводнике, который показывает результат переименования ещё до его применения, вы легко разберётесь в остальных инструментах Bulk Rename Utility.
Последнюю операцию с файлами и папками, выполненную в программе, можно легко отменить комбинаций клавиш Ctrl + Z.
Рано или поздно почти каждый пользователь сталкивается с тем, что ему требуется выполнить массовое переименование группы файлов: иногда задача простая — например, нужно дать им имена с номерами по порядку, иногда — более сложная: к примеру, нужно изменить имена группы файлов таким образом, чтобы они имели в имени номер, дату создания, какую-либо дополнительную информацию.
Всё это можно реализовать в том или ином виде, для части сценариев достаточно встроенных средств Windows 10, 8.1 или Windows 7, иногда лучше использовать специальные программы для массового переименования файлов и папок. И те и другие методы будут рассмотрены в этой инструкции. Кстати, функции переименования группы файлов есть в наборе полезных утилит Microsoft PowerToys для Windows 10.
- Advanced Renamer — бесплатная программа для продвинутого массового переименования файлов
- Переименование группы файлов средствами Windows
- Массовое переименование группы файлов в Total Commander
- Видео инструкция
Advanced Renamer
Advanced Renamer — бесплатная программа для массового переименования файлов и папок с использованием настраиваемых шаблонов, которая может очень многое, если с нею разобраться. На официальном сайте доступна на русском языке как в виде установщика, так и portable версии (ZIP-архив, не требующий установки). Приведу пример использования Advanced Renamer для массового переименования группы файлов:
- Есть папка фотографий (но метод подойдет и для любых других типов файлов), снятых в одно время, но на разные устройства (фотоаппарат и смартфон). Часть имеют в качестве имени дату и время без пробелов, часть — номер снимка, сделанного фотоаппаратом. При этом имя файла и расширение файлов с камеры написано в верхнем регистре. Задача — привести имена группы файлов к удобному виду.

- Запускаем Advanced Renamer, затем либо перетаскиваем файлы для переименования в список по центру интерфейса, либо нажимаем кнопку «Панель папок», находим папку с нужными файлами и нажимаем кнопку «Добавить». Откроется окно, где можно задать параметры добавления: в моем случае всё оставляю как есть: нужно переименовать все файлы.

- Следующий этап — нажать «Добавить метод» в панели слева и выбрать «Новое имя» (возможны и иные методы, о них далее), чтобы определить, как именно будут переименовываться файлы. Здесь начинается самое интересное. В качестве новых имен файлов мы можем использовать предопределенные в программе теги, позволяющие легко подставлять в новые имена файлов нужную информацию. При необходимости вы можете нажать «Справка по тегам», чтобы получить более подробную информацию (правда, на английском) на официальном сайте. Но уже из краткого описания каждого тега должно быть примерно ясно, что именно они означают. Например, если в поле «Новое имя» в настройках метода я введу:
photo-<Inc Nr:1>-<Img Day>-<Img Month:X>-<Img Year:X>.jpg
то получу в результате имена файлов вида
photo-увеличивающийся_номер-день_съемки-месяц_съемки-год_съемки.jpg
Причем дата съемки будет браться не из даты изменения файла (что тоже можно сделать), а из данных EXIF, записанных камерой.
- Чтобы у файлов не получилось двойное расширение, при его смене в поле «Применить к» нужно выбрать «Имя и расширение», а не просто «Имя». Если вы не меняете расширение, то оставьте этот параметр со значением по умолчанию (в этом случае шаблон переименования не будет применяться к расширениям файлов).
- Какие имена файлов получатся после переименования вы можете наблюдать сразу на центральной вкладке программы ещё до запуска процесса массового переименования.

- Чтобы приступить, достаточно нажать кнопку «Запустить» и подтвердить запуск переименования. Если нужно не просто переименовать, а скопировать или переместить файлы в другое расположение, в поле «Пакетный режим» вверху окна программы выберите соответствующий пункт.

- В результате получим группу файлов, переименованных по заданному нами шаблону.


Добавляемые методы (шаблоны переименования) сохраняются в программе, и вы можете выбирать нужный в нужное время. При нажатии правой кнопкой мыши по названию шаблона можно изменить его описание, например «Для фото», «Для архивов» и как угодно ещё. С шаблонов, которые не нужно использовать при текущем процессе переименования достаточно снять отметки.
Также при переименовании можно использовать не единственный шаблон, а сразу несколько (отмечаем соответствующие шаблоны, и они будут применяться в том порядке, в котором расположены в столбце «Методы переименования»): например, первый изменяет имя, второй — регистр в имени файлов, третий — удаляет «мусорные» символы из имени файла (для этого используем метод «Замена»).
Я привел лишь простой пример использования программы, но может она и многое другое: к примеру, вы можете сохранить файл шаблонов, а затем запускать переименование нужной группы файлов по нужному шаблону из командной строки, импортировать список файлов и новых имен из таблиц CSV, массово изменять атрибуты файлов, задавать случайные имена файлов, оптимизировать имена для использования в сети (или превратить кириллицу в транслитерацию), использовать информацию EXIF, данные тегов ID3, видео, GPS и не только.
Чтобы познакомиться с некоторыми готовыми шаблонами, можете нажать кнопку «Открыть» в методах переименования и посмотреть один из 4-х предопределенных в Advanced Renamer шаблонов и как именно они устроены.
Скачать Advanced Renamer можно с официального сайта https://www.advancedrenamer.com/. Примечание: в моем случае при загрузке архива с программой Защитник Windows 10 сообщил об угрозе в файле. Однако, VirusTotal сообщает, что он полностью чист.
Переименование группы файлов средствами Windows 10, 8.1 и Windows 7
Проводник Windows, командная строка и PowerShell могут быть использованы для массового переименования файлов и некоторые простые задачи вполне выполнимы с использованием этих средств (а если вы умеете писать скрипты PowerShell, спектр реализуемых задач становится заметно шире). Далее — примеры переименования в каждой из указанных системных утилит.
Переименование нескольких файлов в Проводнике Windows
Сначала о простом ручном переименовании в проводнике: вы можете выбрать файл, а затем выбрать в контекстном меню пункт «Переименовать». Еще быстрее будет нажать F2 после выделения файла. Не все знают, но, если после ввода нового имени файла нажать клавишу Tab, автоматически будет начато переименование следующего в папке файла.
Еще один вариант, подойдет мало для чего, но знать о нём имеет смысл: выбираем несколько файлов в папке в проводнике (мышью, либо удерживая Shift при выборе, либо удерживая Ctrl и нажимая мышью по отдельным файлам). После этого нажимаем F2 (или выбираем «Переименовать» в контекстном меню) и вводим имя для того файла, изменение имени которого начнется. Нажимаем Enter по окончании.

В результате все файлы будут иметь одинаковое имя, но после каждого имени в скобках будет указан номер по порядку, как на скриншоте.
Возможности переименования в командной строке
Командная строка также позволяет выполнять переименование группы файлов с помощью стандартной команды ren (для начинающих: Как запустить командную строку).
Примеры использования команды для переименования группы файлов, используя которые можно составить и свою команду:
ren *.jpg *.jpeg
В результате выполнения все файлы в текущей папке (на скриншоте выбрана командой cd путь_к_папке) с расширением .jpg приобретут расширение .jpeg. Значок «зведочка» в команде может заменять любой набор символов (как один символ, так и сразу несколько).
ren *.jpeg ?????.jpg
Указанная команда изменит расширение всех файлов в текущей папке с jpeg на jpg, а также сократит их имена до первых 5 символов. Вопросительный знак в команде означает любой один символ. Команда может выдать ошибку, если первые пять букв в имени двух и более файлов будут совпадать.
ren * file-*.old
Команда переименует все без исключения файлы в папке и приведет их к виду: file-старое_имя_файла.old (старое расширение при этом исчезнет).
Массовое переименование файлов в PowerShell
Еще один инструмент Windows, который может быть использован для массового переименования файлов и папок — Windows PowerShell. Самый быстрый способ его запуска — использовать поиск в меню пуск (панели задач) или, если у вас Windows 10 — нажать правой кнопкой мыши по кнопке Пуск и выбрать нужный пункт меню в контекстном меню (Другие способы: Как запустить Windows PowerShell).
В PowerShell есть команда Rename-Item для переименования файлов, которая при работе с единственным файлом может быть использована почти так же, как команда ren в командной строке, но благодаря возможности PowerShell использовать одни команды с другими, rename-item оказывается более функциональной. Несколько примеров:
Get-ChildItem -Path *.jpeg | Rename-Item -NewName {$_.name -replace ".jpeg",".jpg"}
В результате будут изменены все расширения файлов .jpeg на .jpg в текущей папке.
Get-ChildItem *.jpg | Rename-Item -NewName { $_.Name.Replace(' ','_') }
Команда выше заменит все пробелы в именах файлов .jpg в текущей папке на знаки нижнего подчеркивания.
Get-ChildItem | % { Rename-Item $_ "Секретный файл $_"}
К имени каждого файла в начале будет добавлено «Секретный файл» и пробел.
Get-ChildItem *.* | ForEach { Rename-Item -Path $_.FullName -NewName "$($_.DirectoryName)\$($_.BaseName)_$(Get-Date -F dd-MM-yyyy)$($_.Extension)" }
К имени каждого файла будет добавлено нижнее подчеркивание и дата в формате День-Месяц-Год.
Массовое переименование файлов в Total Commander
Многие пользователи используют Total Commander для работы с файлами на диске. Возможности группового переименования есть и в этой программе, реализовано это очень просто:
- Выделите нужные файлы (используйте Shift и стрелки клавиатуры, правым кликом мыши, Ctrl+выбор мышью).

- Нажмите Ctrl+M или выберите в меню «Файл» — «Групповое переименование файлов».
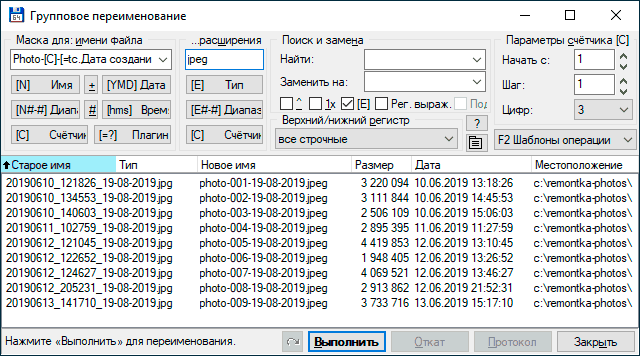
- Задайте параметры переименования в разделе «Маска для имени файла», используя предложенные маски, замены, изменение регистра, счетчик, а также опции из раздела «Плагины». Меняя опции, в окне предварительного просмотра вы сразу будете видеть, как именно будут называться уже переименованные файлы. Для изменения расширения используйте поле «Маска для расширения».

- В примере выше на скриншоте набор файлов будет переименован в Photo- с последующим добавлением счетчика из трех цифр и датой создания в формате ДД-ММ-ГГГГ (доступно в плагинах), расширение будет изменено на jpeg, а имя файла переведено в нижний регистр.


Сначала использование утилиты массового переименования в Total Commander может показаться сложным для кого-то, но, если слегка разберетесь, уверен, инструмент станет полезным и удобным.
Видео инструкция
В завершение видео о массовом переименовании файлов в Total Commander и Advanced Renamer, как самых эффективных способах.
Существуют и другие программы для рассмотренных целей (например, бесплатная Bulk Rename Utility), но, на мой взгляд, приведенных выше будет более чем достаточно почти для любых задач переименования.
Можно с уверенностью на 100% сказать, что каждый пользователь сталкивался с ситуацией, когда ему надо было переименовать несколько файлов одновременно. Изменять имя каждого файла по отдельности – дело далеко не самое интересное и уж точно не самое быстрое. В таких случаях возникает необходимость узнать, как переименовать несколько файлов одновременно и сделать это как можно быстрее и качественнее. Эта инструкция расскажет вам, как можно сделать это несколькими методами. Она описывает как встроенные системные методы, так и приложения от сторонних разработчиков.
Как переименовать несколько файлов одновременно в Проводнике
Начнем из самого простого и самого очевидного способа. Он делается через Проводник и окажется эффективным для подавляющего большинства пользователей.
- Откройте Проводник (это можно сделать с помощью комбинации клавиш Win + E) и найдите нужные вам файлы.
- Выделите те объекты, которые надо переименовать. Сделайте это с помощью кнопок Ctrl + A, либо выделите мышью часть файлов.
- Теперь нажмите F2, либо кликните правой кнопкой мыши по любому из файлов и выберите Переименовать. Как вариант, можно еще нажать на кнопку переименования на панели Проводника. Сами решайте, какой вариант для вас удобнее.

- Укажите новое имя для файла и нажмите Enter. После этого система переименует все выделенные файлы и отметит их порядковыми номерами. Название будет одно для всех, только появится цифровое обозначение. К примеру, Файл, Файл (1), Файл (2), Файл (3) и так далее. Поскольку в одной папке не может быть два файла с одинаковым названием, Windows добавляет номер в конце названия.
Подсказка: после выделения нескольких файлов можно достаточно быстро переименовать их вручную (если речь идет лишь о нескольких объектах). Нажмите F2, а после этого используйте Tab для перемещения к следующему файлу.
Как переименовать несколько файлов за один раз через Командную строку
Следующий метод будет выполняться через Командную строку и соответствующую команду ren. Нажмите Win + R и введите cmd. Нажмите Enter. После открытия командной строки введите путь к папке с нужными вам файлами. К примеру, чтобы перейти в папку Photos на диске D, надо ввести следующую команду:
CD D:\Photos.
Чтобы переименовать один файл, вы можете использовать эту команду:
ren “file (1).txt” “new file.txt”
Обратите внимание: если файл содержит в имени пробелы, его название надо брать в кавычки. Если нет, кавычки можно не использовать.
Лучше всего использовать Командную строку для быстрой смены расширения большого количества файлов. К примеру, у вас есть список из txt-файлов, которые надо превратить в html. Для этого используйте команду:
ren *.txt *.html
Звездочка в этом случае служит указанием, что файл с любым названием должен быть переименован.
Кроме того, можно использовать знак ? для других указаний. Команда ren *html *.??? удалит последнюю букву расширения из всех HTML-файлов. Таким образом HTML-файлы превратятся в HTM-файлы. Этот принцип можно использовать не только для расширений, но и названий файлов. Используйте его по своему усмотрению.
Как переименовать несколько файлов сразу с помощью PowerShell
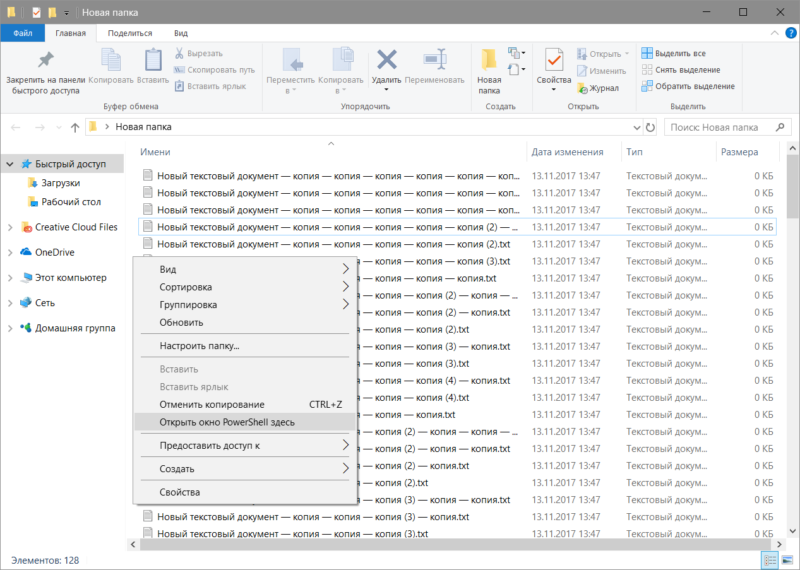
По сравнению с Командной строкой, PowerShell предоставляет куда больше возможностей при переименовании большого количества файлов. Откройте папку, в которой содержатся ваши файлы, зажмите кнопку Shift и выберите Открыть окно PowerShell здесь.
Для начала рассмотрим процесс переименования одного файла на следующем примере:
rename-item “файл.расширение” “новое имя.расширение”
Достаточно легко, но переименовывать один файл через PowerShell – дело весьма странное, поэтому переходим к групповому переименованию. Рассмотрим на примере вот этой команды:
dir | rename-item -NewName {$_.name -replace “ ”,”_”}
Команда dir собирает все файлы в папке и «прикрепляет» их к общей команде переименования rename-item. Далее $_.name обозначает, что надо сменить имя для каждого файла в директории. —replace указывает системе, что одну часть названия надо сменить на другую. Текст в первых кавычках – это то, что надо убрать, а то, что вы поместите во вторые кавычки, появится вместо удаленного текста.
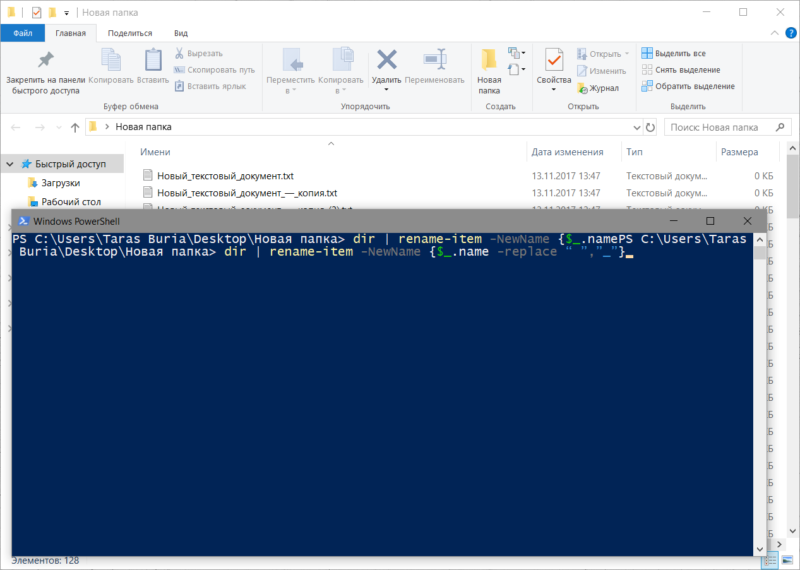
Конкретно эта команда удаляет из названий файлов пробелы и заменяет их на подчеркивание. Изучив принцип работы этой команды, вы сможете легко изменять названия файлов пачками, без необходимости играться с каждым файлом отдельно. Разумеется, можно дописать дополнительные аргументы, которые усложнят переименование и сделают его более специфичным, но для этого вам надо будет изучить подробнее список существующих команд в PowerShell. Если вы их знаете, тогда скорее всего, в этой инструкции вам делать нечего.
Как переименовать несколько файлов одновременно с помощью сторонних программ
PowerShell подойдет не каждому, поскольку не у всех есть желание изучать команды и принципы их строения. В этом случае на помощь спешат сторонние утилиты, которые предлагают переименовать несколько файлов одновременно с использованием графически понятных интерфейсов. Рассмотрим на примере Bulk Rename Utility.
Как использовать Bulk Rename Utility
Надо признать, что неподготовленного пользователя может напугать внешний вид этого приложения, которое больше напоминает консоль сложного оборудования, нежели утилитки для смены имени нескольких файлов одновременно. Все жеж Bulk Rename Utility предлагает в буквальном смысле тонны различных опций, которые в PowerShell можно использовать лишь в том случае, если у вас хорошо прокачаны навыки текстовых команд консоли Windows.
С первого взгляда кажется, что здесь без поллитры не разобаться. Но на самом деле все не так уж и страшно.
Да, интерфейс у этой утилиты очень сложный, но ее прелесть в том, что все внесенные вами изменения сразу же отображаются в столбце предварительного просмотра. Благодаря этому вы можете в буквальном смысле изучать приложение «методом тыка» и смотреть, как тот или иной параметр влияет на именf файлов. Надо также сказать, что усвоить базовые принципы использования этого приложения и его интерфейса можно буквально за несколько минут.
Для начала работы перейдите на официальный сайт приложения (оно полностью бесплатное), скачайте его и установите. Если вы не хотите его устанавливать, можете воспользоваться «портативной версией», но в этом случае вы не сможете интегрировать приложение в контекстное меню, а также использовать ассоциации BRU-файлов. Выбирайте то, что вам удобнее и предпочтительнее.
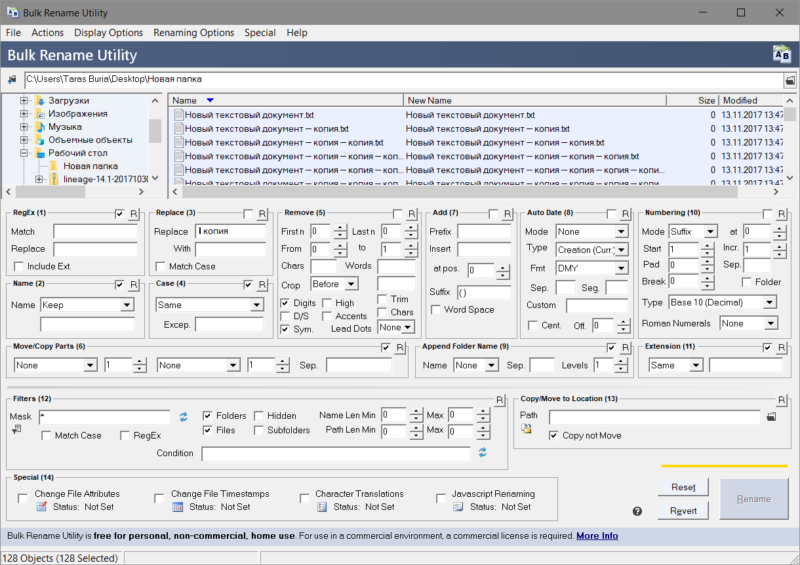
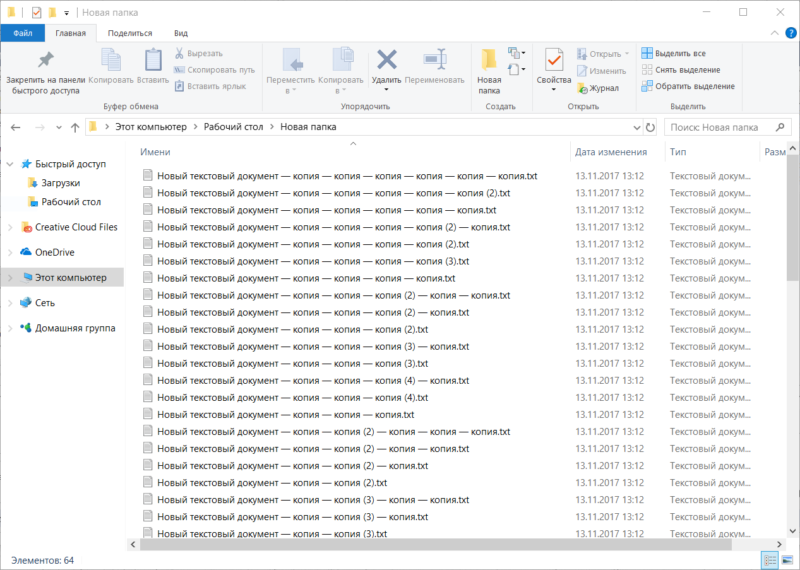
На скриншоте выше вы можете увидеть, что надо переименовать большое количество текстовых файлов, в названиях которых много слов «-копия». Сначала надо указать, какой текст надо удалить. Для этого в секцию Replace (3) вводим необходимы текст. В данном случае *пробел*- копия. Поле with остается пустым. Таким образом все файлы получают имя Новый текстовый документ.txt.
Некоторые файлы остались со скобками и цифрами. Чтобы их убрать, активируем панель Remove (5) и ставим отметку Digits. Она отвечает за удаление цифр из названия. Чтобы удалить скобки, отметьте Sym. Она удалит любые символы в названии, будь то тире, скобки, точки и так далее. Можно также дать указание на удаление отдельных знаков или слов. Это полезно, если надо удалить лишь определенные знаки, цифры, буквы или слова Их надо вводить в поля Chars и Words. Кстати, с помощью этого же раздела можно удалить слова «копия» из названий.
Теперь осталось добавить порядковые суффиксы, поскольку в одной папке не могут находиться файлы одного имени и расширения. Устанавливаем отметку возле Numbering (10) и указываем Mode – Suffix. После этого каждый файл получит свой аккуратно оформленный номер.
В конечном итоге окно приложения выглядит следующим образом:
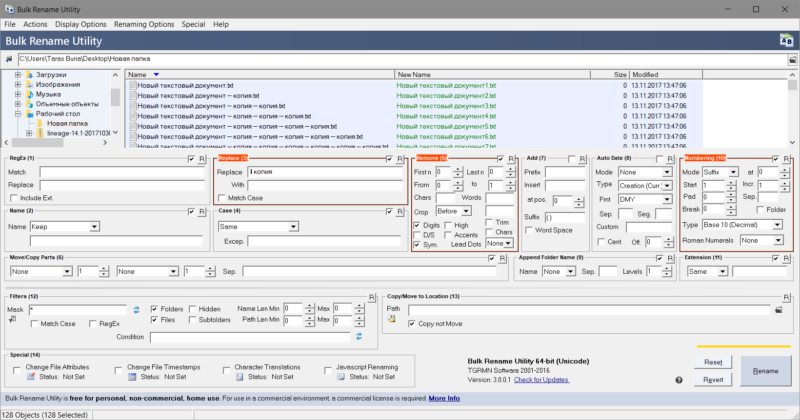
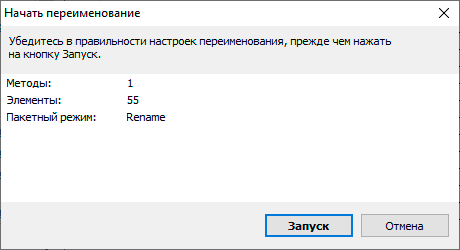
Осталось лишь нажать на большую кнопку Rename, после чего хаотичный набор файлов будет приведет в порядок. Приложение предупредит о необходимости проверить все файлы перед применением изменений, поскольку у вас не будет возможности откатить внесенные изменения. Единственный вариант – это использовать историю файлов. Хотя при переименовании файлов стандартными средствами системы у пользователя есть возможность отменить переименование, использование Bulk Rename Utility не предусматривает откат внесенных изменений.
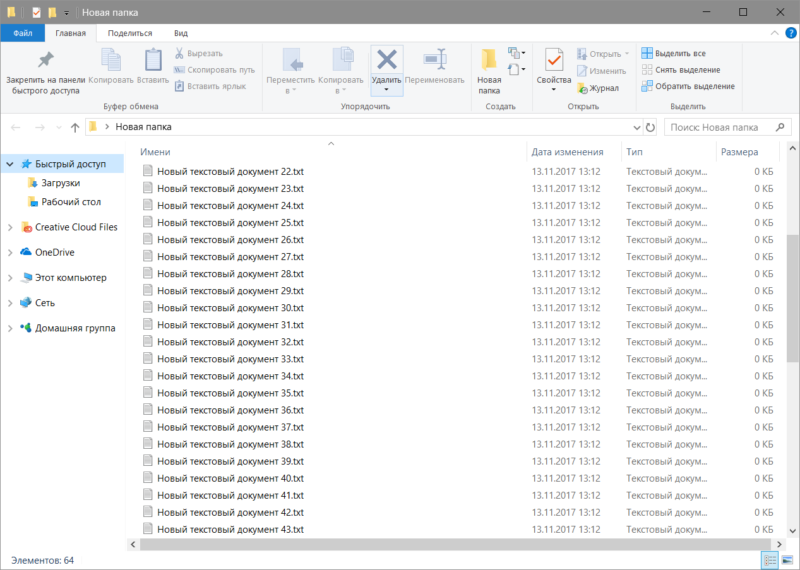
Гораздо лучше.
Чтобы использовать приложение максимально эффективно, вам надо будет провести некоторое время за его исследованием и изучением опций, которые мы не затрагивали в этой статье. Да, на это уйдет как время, так и силы, но это определенно стоит того, особенно, если вам часто приходится выполнять подобные задачи. Если вам не нравится это приложение, можете также воспользоваться услугами программ Advanced Renamer или Total Commander. Да, последняя – это такой привет из нулевых, но в состав этого файлового менеджера входит достаточно мощные инструменты по массовому переименованию, поэтому Total Commander может пригодиться и в современных реалиях.
In this article, we have listed some of the best bulk rename utility for Windows 10 and older versions. Keep reading the article to know more about them.
The first step to organizing your computer is by renaming the files. The number of files you have stored on the computer is a lot and changing the names or renaming those files one by one can be very tough and time-consuming. No one wants to waste time renaming the files of a computer.
What if there is a shortcut to renaming those files? Yes, that’s true. You can easily rename files using the Windows bulk rename files software. To know more about the software, refer to the list below.
Top 13 Best Bulk Rename Utility for Windows 10, 11 in 2024
Here is the list of best software that you can use to rename Windows files in bulk easily.
1. File Renamer Basic

First, in the list of bulk rename utility for Windows 10 and other versions, we have File Renamer Basic. This software is compatible with almost every version of Windows and the best part about the software is that it is available for free. Other than the free version, this Windows bulk rename tool has a Regular and Deluxe version too which requires a subscription.
Using this amazing software you can easily rename up to 1000 files in one go. The software has won many awards for its excellent performance. For renaming, you can easily select the folders or files which you wish to rename and then change the name. You can even rename mp3 files using this software.
Download Now
2. Bulk Rename Utility

One of the most popular software for renaming bulk files is Bulk Rename Utility. This is very easy-to-use software using which you can easily rename, edit or delete the file names according to your preferences. If you are new to the software then it can be a little difficult to understand at first but later you will easily get used to it.
This software is compatible with Windows 10, 11, and older versions. The best part about the software is that it does not require any installation to run, you can easily use this portable software according to your preference. Other than the feature of renaming multiple files at once Windows, you can even filter the files using this software.
Download Now
Also Read: Best Free File Managers For Windows 10
3. Flexible Renamer

Next in the list of bulk rename utility for Windows 10/8/7 is Flexible Renamer. Using this software you can easily rename multiple files in Windows 10/11. The software is really easy to use and offers the users many other features too. The lists of features include renaming with tag, file numbering, manage the order of the files, and many more.
If you are going to use the software regularly then you can use the preset feature of the software. Using this feature you can create a preset which can be used for your upcoming files too. This feature will ease the process of renaming, and you can save a lot of time.
It is free-to-use software that offers multiple language support including English, French, Japanese, German, and Spanish.
Download Now
4. Advanced Renamer

Advanced Renamer is another great software for bulk rename utility for Windows 10 and older versions. The software can easily rename files in bulk with an effective tool to make the process easy and accurate. It is a very easy-to-use software, and it does not increase the load on the system as it is very lightweight.
The software can easily eliminate files, rename files, change attributes of files, arrange the numbering of files, and can create custom batch strips. The software can rename every file on your computer including GPS information files, TV shows, music, and others too.
If you want to use the software with limited features for personal use then the software is free but if you wish to upgrade and add some more features then you need to pay as per requirement.
Download Now
Also Read: Best Duplicate Photo Finder & Cleaner Software
5. Renamer

Renamer as the name suggests is a great bulk rename utility for Windows 10 and older versions. You can use this simple software to edit/ rename multiple files in Windows 10 and older versions. If you are new to the software then you can easily take a tour of the software to understand how the software works. When you install the software it will ask you to take a quick tour, click ok to start, after that the software will take you to the tour and explain the work of different tools and how you can use them.
This Windows 10 file rename utility offers features like delete, insert, rearrange, and 10 more. Renaming the files with this software is very easy, now it’s your turn to start bulk rename utility download. So that you can also enjoy effortless renaming.
The best part of this bulk-rename software is that it is free to use, which means every user who wishes to use this kind of software can use it without any barrier.
Download Now
6. PFrank- A Unique Tool

If you are using the bulk file utility in Windows 10, 11, or below version, then you can consider opting for this software. It is a unique software that can help you organize the files too, other than renaming them.
If you are new to using the software then you may face issues in the beginning as it is a little complicated as compared to other tools.
The best part about this Windows bulk file rename tool is that it is free to use. Irrespective of the offerings the user can use this software for free which makes it one of the best Windows bulk rename tools.
Download Now
Also Read: Best Data Recovery Software For Windows
7. Rename-It

Rename- It is another windows bulk file rename tool that you can use to rename all your files in one go. The software in one go can edit and rename as many files as you want. Other than just helping you in renaming, the software also helps in numbering the files according to your preferences and previously saved names.
This bulk rename software is free for all users, if you wish to use the premium features then you can upgrade by paying the minimal subscription fee. The software allows the user to create a script to carry out the renaming function and take the correct exit code back.
8. Rename Master

Next up in the list of bulk rename utility for Windows 10, we have Rename Master. As the name suggests it is master in renaming bulk files in Windows 10 or older versions. You can easily rename the files using this portable software. The files including documents, images, and videos can be renamed using this software.
While renaming the files you get to preview them before proceeding further with them. Moreover, the software offers Unicode filename support. The best part about the software is that it is available for free. You can try this software to rename multiple files easily in Windows 10, 8, 7, and older versions.
Also Read: Best File Compression Software
9. Wild Rename

One of the easiest and straightforward bulk rename utility for Windows 10 and older versions. You can easily rename multiple files at once, you can choose whether you wish to rename one at a time or rename in batches. Other than this you can even change the name like lower case to upper case or normalized case, and can even capitalize the first letter.
It is a free-to-use software using which you can easily rename Windows files in bulk. Other than this you don’t even have to install the software. The load on the system is also reduced as you don’t add any software for renaming files.
Download Now
10. Flash Renamer

Next, in the list of bulk rename utility for Windows 10 and older versions, we have Flash Renamer.
The software has a very clean interface which you can easily get used to. The software has a preset for the file name depending on the extensions to make your work a lot easier in renaming.
A very unique feature of the software is that it lets you undo your changes. This is a very rare feature and most of you might have faced this issue with other Windows 10 file rename utility. You can even clean the files and folders with this software.
The software offers a free trial to all the users so that before purchasing you can understand the efficiency/ effectiveness of the software.
Download Now
11. Easy File Renamer

The next tool in the list of bulk rename utility for Windows 10 and older versions is Easy File Renamer.
The learning curve of this tool is quite steep. The major reason behind this is the easy-to-use interface of Easy File Renamer. Additionally, with the help of this tool, you can even rename the files present on the cloud storage.
The tool is quite advanced and allows you to rename all kinds of files including music, videos, audio, images, and more. The smart build of the tool allows you to rename the music according to its metadata.
You can download and use Easy File Renamer for free on your Windows PC and remove multiple files in a single click.
Download Now
12. Eagle File Renamer

The next one in our list of best bulk rename utilities for Windows is Eagle file renamer. You can rename the associated using its user-friendly interface. The tool that makes renaming files simple. Also, it further offers an intuitive interface that makes it simple to move the letters and characters around. The finest file renamer is one that allows you to redefine your files quickly. I know one of the greatest methods for managing digital assets. Eagle aids in the management of design and picture materials. The greatest photo renamer, hands down. It may be purchased for $29.95.
You can quickly rename a large number of files with the help of this tool. A folder’s files can be renamed, and call edit can be used for finishing touches.
Download Now
13. EF Multi File Renamer

EF Multi File Renamer is another best bulk rename utility tool for Windows 10, 11. The utility is basically utilized for renaming the folders, files, and sub-folders. EF File Renamer also provides some pre-defined tools, which can later be customized according to one’s preferences. It also supports multiple languages and third-party plugins.
It offers a full real-time preview option and error recognition functionality. This real-time preview option instantly displays any modifications you make to the parameters.
In addition, it provides a wide range of functions and great flexibility. In sum, EF Multi File Renamer is a versatile tool that easily renames multiple files or entire directories in just a single click.
Download Now
Also Read: Best Registry Cleaner Software For Windows
Concluding Words: List of Best Bulk Rename Utility Windows 10, 11
The list above has the best bulk rename utility for Windows 10 using which you can easily rename multiple files in Windows 10 and previous versions. According to your requirements and preferences, you can choose the software from the list. We hope that you will find the list of bulk file rename windows 10 helpful, if you have any doubts or queries, please write them down in the comments section.