
This page hosts packages containing binaries of ffmpeg, ffprobe and ffplay.
Essentials build compatible with Windows 7 or above. Full build requires at least Windows 10.
If you’re downloading a package to support features in a program like Krita or Blender,
the release essentials build is sufficient. Read more in the section about these builds.
The following builds are also available through package managers:
release essentials: choco install ffmpeg winget install "FFmpeg (Essentials Build)"
release full: choco install ffmpeg-full scoop install ffmpeg winget install ffmpeg
release full shared: scoop install ffmpeg-shared winget install "FFmpeg (Shared)"
git master: scoop install ffmpeg-gyan-nightly
Last build update: 2025-05-05
Next build update: 2025-05-08
list of tools
                           aviocat

                           crypto_bench

                           cws2fws

                           enum_options

                           ffescape

                           ffeval

                           ffhash

                           fourcc2pixfmt

                           graph2dot

                           ismindex

                           pktdumper

                           probetest

                           qt-faststart

                           seek_print

                           sidxindex

                           venc_data_dump

                           zmqsend
FFmpeg is a widely-used cross-platform multimedia framework which can process almost all common and many uncommon media formats.
It has over 1000 internal components to capture, decode, encode, modify, combine, stream media, and it can make use of dozens of
external libraries to provide more capabilities.
The FFmpeg project offers 3 primary tools in source code form to access this functionality, which are
ffmpeg for processing, ffprobe for information and ffplay for playback.
Binaries of these tools can be built to include only a select set of these components & libraries.
This site offers builds in a couple of variants: the essentials build variant contains commonly used libraries, whereas
the full build variant also contains most of the remainder. See the libraries section for a list.
All variants contain all internal components available for Windows.
FFmpeg’s source code is maintained using a version control system called git.
The git master builds are built from the master branch of the repository, which is where all development occurs whereas
the release builds are built from the latest release branch. These are essentially a snapshot of the master branch at a given
point of time. They are updated with bug and security fixes for a while but no new features.
It is highly recommended to choose a git master build; unlike many software, releases are primarily made for the convenience of OS distributors
and package managers and don’t signify greater stability or maturity. For a bug report to be accepted, the issue must
be reproducible using a very recent git master build.
All builds are 64-bit, static and licensed as GPLv3;
the release full variant is also available as a shared build with development files.
A set of supplementary tools are available in the tools section. These are updated infrequently and are licensed as LGPLv3.
Use the free 7-zip utility to open .7z files.
libraries in essentials build
                           avisynth+

                           libaom

                           libass

                           libfreetype

                           libfribidi

                           libharfbuzz

                           libgme

                           libgsm

                           libmp3lame

                           libopencore-amrnb

                           libopencore-amrwb

                           libopenjpeg

                           libopenmpt

                           libopus

                           librubberband

                           libspeex

                           libsrt

                           libssh

                           libtheora

                           libvidstab

                           libvmaf

                           libvo-amrwbenc

                           libvorbis

                           libvpx

                           libwebp

                           libx264

                           libx265

                           libxvid

                           libzimg

                           libzmq

                           mediafoundation

                           sdl2
additional libraries in full build
                           chromaprint

                           frei0r

                           ladspa

                           lcms2

                           libaribb24

                           libaribcaption

                           libbluray

                           libbs2b

                           libcaca

                           libcdio

                           libcodec2

                           libdav1d

                           libdavs2

                           libdvdnav

                           libdvdread

                           libflite

                           libilbc

                           libjxl

                           liblc3

                           liblensfun

                           libmodplug

                           libmysofa

                           libplacebo

                           libqrencode

                           libquirc

                           librav1e

                           librist

                           libshaderc

                           libshine

                           libsnappy

                           libsoxr

                           libsvtav1

                           libtwolame

                           libuavs3d

                           libvvenc

                           libxavs2

                           libxevd

                           libxeve

                           libzvbi

                           opencl

                           vulkan
hardware-support libraries in all builds
                           amf

                           cuda

                           cuvid

                           d3d11va

                           d3d12va

                           dxva2

                           libvpl

                           nvdec

                           nvenc

                           vaapi
FFmpeg is a command-line audio and video converter available for Linux, macOS, and Windows. This open-source tool helps users manipulate multimedia content and offers free access to several audio and video libraries.
Even though FFmpeg doesn’t have a clickable GUI, the installation process is straightforward.
In this guide, you will learn how to install FFmpeg on Windows in four simple steps.
Prerequisites
- A system running Windows (This tutorial uses Windows 10).
- A file archiver (This guide uses 7-Zip).
- Command Prompt or Windows PowerShell access.
- Administrator privileges.
How To Install FFmpeg on Windows
Installing FFmpeg on Windows requires adding the utility to the Windows PATH. Additionally, users can manually navigate to the folder containing the executable and run the program. However, the process is time-consuming and impractical.
A straightforward way to work with FFmpeg is to add it to PATH by editing Windows environment variables. Therefore, Windows knows where to look for the executable. Users can run FFmpeg directly from the command line without typing in the full path to the app’s folder.
Step 1: Download FFmpeg for Windows
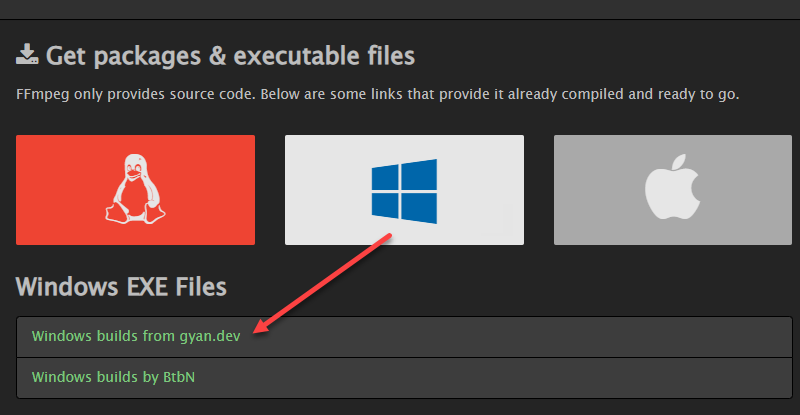
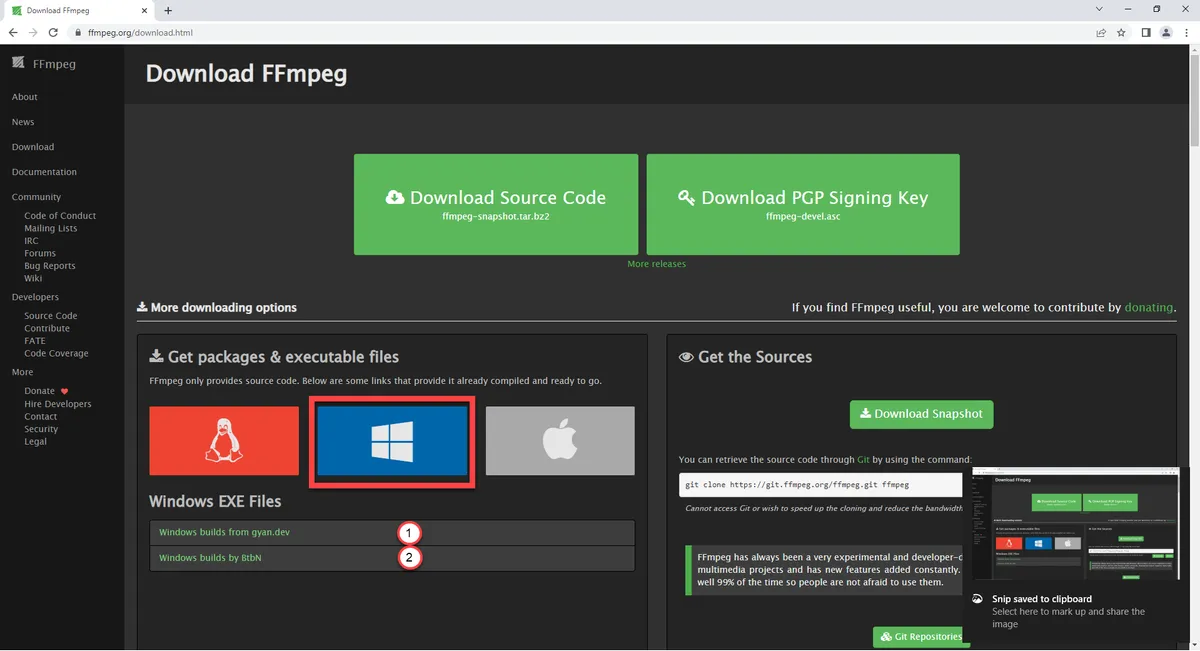
Visit the FFmpeg download page. The More downloading options section has FFmpeg packages and executable files for Linux, Windows, and Mac. To get the Windows version:
1. Hover over the Windows logo and click the Windows builds from gyan.dev link. A new page opens.
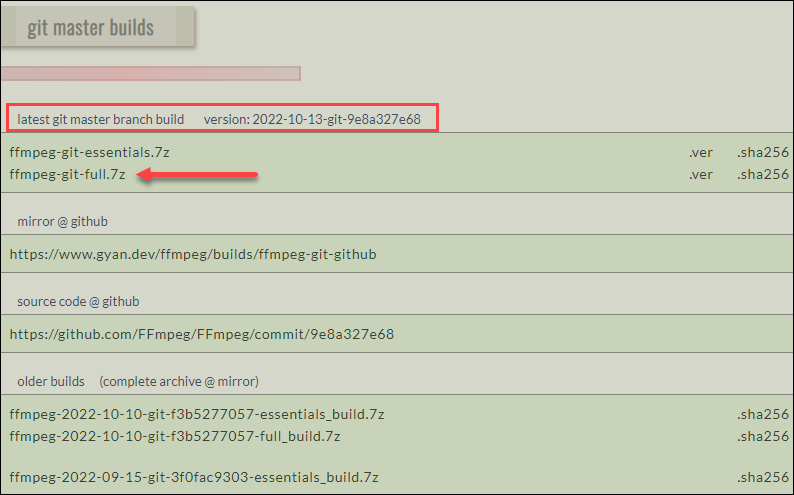
2. In the git master builds section, look for the latest version of the FFmpeg build. Click the ffmpeg-git-full-7z link to download the full build since that version has the most up-to-date libraries.
3. Choose the download location and save the file if the download does not start automatically.
Note: This guide uses the Windows build from gyan.dev. Other builds are available for download, like the one by BtbN. No official documentation confirms any significant differences between different builds.
Step 2: Extract the Downloaded Files
Once downloaded, extract the contents:
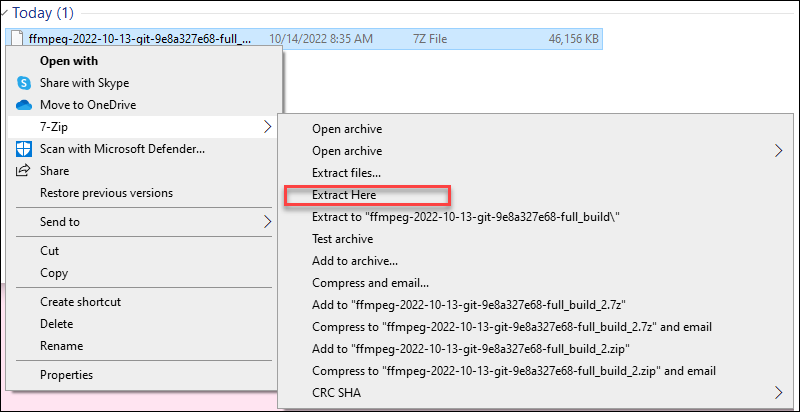
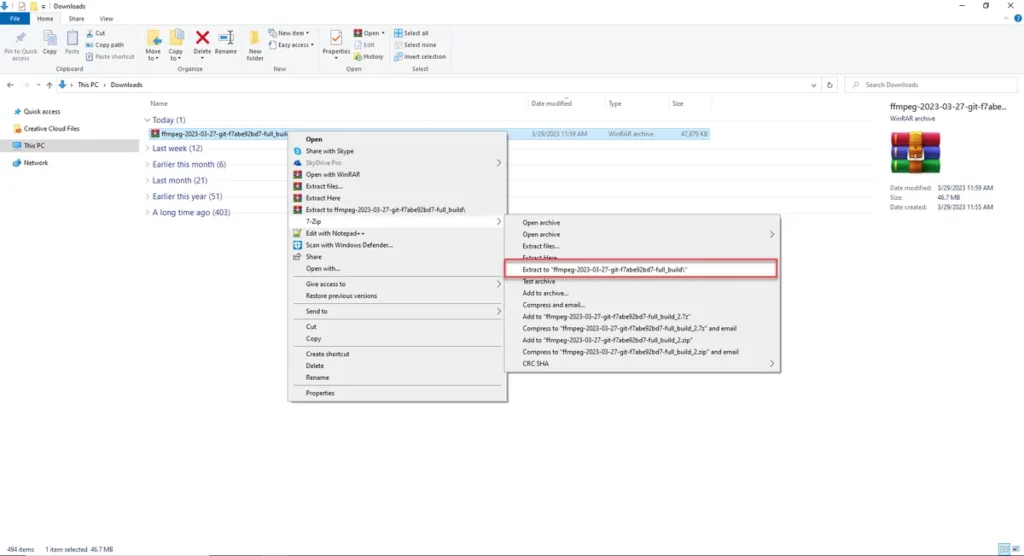
1. Locate the downloaded file. The default location is the Downloads folder.
2. Right-click the file and hover over 7-Zip (or another file archiver of choice).
3. From the archiver submenu, choose Extract here. Wait for a few seconds for the extracting process to complete.
5. Rename the extracted folder to ffmpeg.

6. Move the folder to the root of the C drive or the folder of your choice.

Step 3: Add FFmpeg to PATH
Set Windows environment variables to add FFmpeg to the PATH. Follow these steps:
1. Type system variables into the search bar and click the Edit the system environment variables option.
2. Click the Environment Variables… button under the Advanced tab.
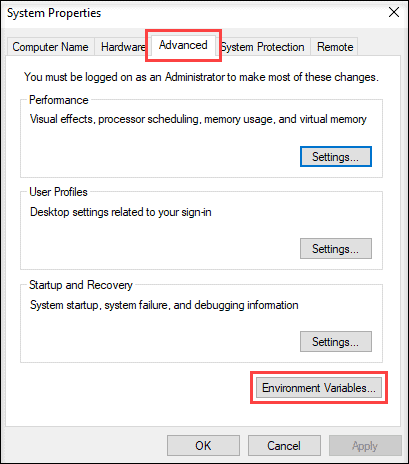
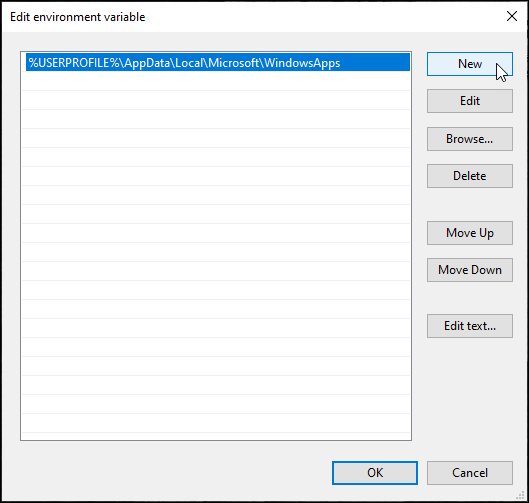
3. Under the User variables section, select Path and click the Edit button.

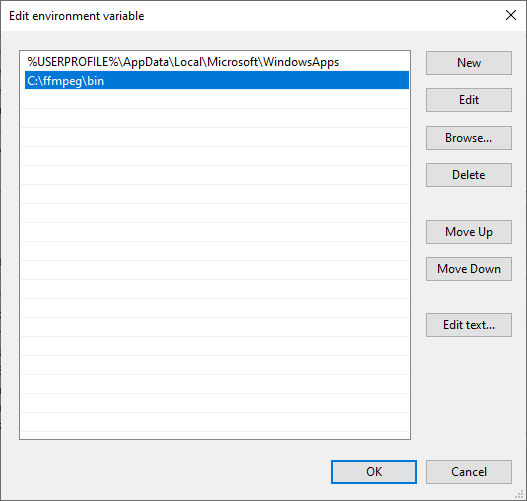
4. Choose New from the side menu.
5. Add C:\ffmpeg\bin to the empty field and confirm changes with OK.
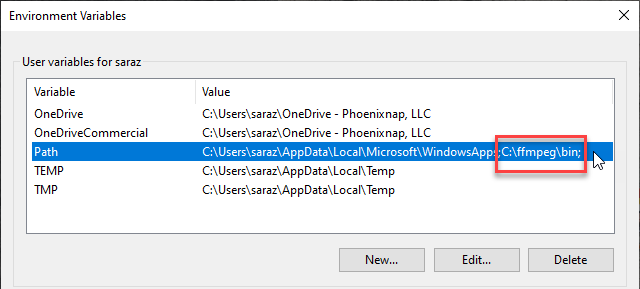
The change in the Path variable line confirms the FFmpeg is added to PATH.
Note: If you stored FFmpeg in a folder other than the C drive, use that path accordingly.
Step 4: Verify FFmpeg PATH
To verify the FFmpeg is correctly added to the Windows PATH, open the Command Prompt or PowerShell and run:
ffmpegThe output confirms the installation:

Conclusion
This article provided an easy step-by-step guide on installing FFmpeg on Windows.
For more tutorials refer to our article and learn how to install FFmpeg on MacOS.
Next, learn how to change or reset the administrator password on the Windows server.
Was this article helpful?
YesNo
Installing Ffmpeg On Windows Step By Step 如图所示,进入官网,在 windows 下任选一个文件: ffmpeg.org download #build windows. 这里我选择第一个文件 windows builds from gyan.dev,跳到到下图界面,在 release builds 模块选择对应的下载文件,这里我选择 ffmpeg release essentials.7z. 解压压缩包后到你要安装到的文件目录(不要有中文),如下所示。 这里复制 bin 目录路径把它添加到环境变量 path 路径中。 右击我的电脑 > 属性 > 高级 系统设置 > 环境变量 > 选择 path 变量(新建或者编辑 ) > 添加 bin目录。. 1、访问ffmpeg官方网站下载页面:ffmpeg download page; 2、选择适合windows的版本(将鼠标移动到windows端)。 通常,你会找到“windows builds from gyan.dev”或者“btbn github releases”等选项,这些是预编译的windows版本;.
Installing Ffmpeg On Windows Step By Step This page hosts packages containing binaries of ffmpeg, ffprobe and ffplay. essentials build compatible with windows 7 or above. full build requires at least windows 10. Step1:下载安装ffmpeg. 官网下载地址: ffmpeg.org download . 选择windows,点击windows builds from gyan.dev,在release builds section 下载ffmpeg release essentials.zip. 在环境变量path下配置解压后的bin目录, 打开cmd,输入ffmpeg version. step2:运行ffmpeg. 在bin目录下执行启动ffmpeg. 选择 windows from gyan.dev. 找到 release builds. 点击 ffmpeg release essentials.zip. 安装. 解压,建议解压到d盘env文件夹下,方便管理所有环境插件. 按 win 键搜索 环境变量 点击编辑系统环境变量 > 环境变量. 点击系统变量中的 path 然后点击编辑. 新建. 输入 d:\env\ffmpeg 6.0. 2、点击windows图标,选第一个:windows builds from gyan.dev 3、跳转到下载页面: 有四种可选: 页面翻译后: 页面往下拉: 选择links下的第一个:[ gyan.dev ffmpeg builds ffmpeg git full.7z]( gyan.dev ffmpeg builds ffmpeg git full.7z) 下载即可。.

Installing Ffmpeg On Windows Tutorial Agate Dragon Games 选择 windows from gyan.dev. 找到 release builds. 点击 ffmpeg release essentials.zip. 安装. 解压,建议解压到d盘env文件夹下,方便管理所有环境插件. 按 win 键搜索 环境变量 点击编辑系统环境变量 > 环境变量. 点击系统变量中的 path 然后点击编辑. 新建. 输入 d:\env\ffmpeg 6.0. 2、点击windows图标,选第一个:windows builds from gyan.dev 3、跳转到下载页面: 有四种可选: 页面翻译后: 页面往下拉: 选择links下的第一个:[ gyan.dev ffmpeg builds ffmpeg git full.7z]( gyan.dev ffmpeg builds ffmpeg git full.7z) 下载即可。. 首先进入官网download ffmpeg. 选择windows版本下载想要的版本. gyan.dev的版本可能会更符合windows标准,而btbn的版本可能会更加开放和跨平台. 往下拉选择想要的版本进行下载. 我下载的是第一个. 下载好之后解压文件复制bin目录的路径. Windows电脑安装配置ffmpeg环境变量教程. 首先下载ffmpeg压缩包. gyan.dev ffmpeg builds ffmpeg git full.7z. 我们以放在电脑d盘为例,解压压缩包,然后进入文件夹内,再进入bin文件夹. 复制当前bin文件夹地址栏的路径地址. 返回电脑桌面,右击【此电脑】选择【属性】,点击右侧【高级系统设置】 点击【环境变量】,选中下面系统变量中的path,点击【编辑】, 点击【新建】,然后粘贴刚才复制的bin的路径地址,然后点击【确定】保存并关闭窗口即可。 然后敲击键盘上的windows r键启动运行,输入cmd回车,启动命令提示符界面. 输入ffmpeg回车,看到下面有输出版本信息等一大片信息就是配置成功了。. 1.首先打开 ffmpeg 官网,找到下载页: ffmpeg.org download . 2.点击 windows 的第一项,windows builds from gyan.dev. 3.找到release,下载full.zip: 4.解压下载后的压缩包: 5.配置环境变量,在系统变量 path中添加 ffmpeg 2021 01 01 git 63505fc60a full build\bin 所在的路径,我这路径里的av是audio video的意思。 6. cmd测试一下: 大功告成。 下面试一下抽取h264码流,从抖音上下载一个短视频,cmd进入到对应的目录,使用ffmpeg命令:. 本文详细指导如何在windows上通过gyan.dev获取预编译ffmpeg,包括下载、解压、重命名文件夹、添加到系统路径等步骤,确保用户可以轻松安装并使用ffmpeg进行视频格式转换。.

Install Ffmpeg On Windows A Step By Step Guide Nolowiz 首先进入官网download ffmpeg. 选择windows版本下载想要的版本. gyan.dev的版本可能会更符合windows标准,而btbn的版本可能会更加开放和跨平台. 往下拉选择想要的版本进行下载. 我下载的是第一个. 下载好之后解压文件复制bin目录的路径. Windows电脑安装配置ffmpeg环境变量教程. 首先下载ffmpeg压缩包. gyan.dev ffmpeg builds ffmpeg git full.7z. 我们以放在电脑d盘为例,解压压缩包,然后进入文件夹内,再进入bin文件夹. 复制当前bin文件夹地址栏的路径地址. 返回电脑桌面,右击【此电脑】选择【属性】,点击右侧【高级系统设置】 点击【环境变量】,选中下面系统变量中的path,点击【编辑】, 点击【新建】,然后粘贴刚才复制的bin的路径地址,然后点击【确定】保存并关闭窗口即可。 然后敲击键盘上的windows r键启动运行,输入cmd回车,启动命令提示符界面. 输入ffmpeg回车,看到下面有输出版本信息等一大片信息就是配置成功了。. 1.首先打开 ffmpeg 官网,找到下载页: ffmpeg.org download . 2.点击 windows 的第一项,windows builds from gyan.dev. 3.找到release,下载full.zip: 4.解压下载后的压缩包: 5.配置环境变量,在系统变量 path中添加 ffmpeg 2021 01 01 git 63505fc60a full build\bin 所在的路径,我这路径里的av是audio video的意思。 6. cmd测试一下: 大功告成。 下面试一下抽取h264码流,从抖音上下载一个短视频,cmd进入到对应的目录,使用ffmpeg命令:. 本文详细指导如何在windows上通过gyan.dev获取预编译ffmpeg,包括下载、解压、重命名文件夹、添加到系统路径等步骤,确保用户可以轻松安装并使用ffmpeg进行视频格式转换。.
FFmpeg is a powerful and versatile tool that can convert, edit, stream, and record audio and video files. It is widely used by professionals and hobbyists alike for various multimedia tasks. However, FFmpeg is not a graphical program that you can just click and run. It is a command-line program that requires proper installation for ease of use.
In this blog post, I will show you how to install FFmpeg on Windows 10 or 11 in four easy steps.
Step 1: Download FFmpeg for Windows
The first step is to download the latest version of FFmpeg for Windows from the official FFmpeg website.
On this page, you will see different options for downloading FFmpeg for various operating systems. To get the Windows version, hover over the Windows logo and you’ll get 2 build options; click on “Windows builds from gyan.dev” or “Windows builds by BtbN”.
The Gyan.dev link will take you to their page that has the FFmpeg packages, and the BtbN link will take you to their GitHub page. The main difference between the 2 builds is the compression: Gyan uses 7-zip, while BtbN uses the more common zip file compression. If you don’t have 7-zip installed or a utility that can unzip .7z files, then I recommend you get the BtbN build.
Now, let me try and explain the options that are available on these pages. A build is a compiled version of FFmpeg that includes all the necessary libraries and dependencies. There are different types of builds available depending on your needs and preferences. For example, there are full builds that include all the features and codecs supported by FFmpeg, minimal builds that only include essential features and codecs, shared builds that use dynamic libraries instead of static ones, etc.
For this tutorial, I recommend downloading the full build since it has the most up-to-date features and codecs. On the BtbN Github page, scroll down to click on ffmpeg-master-latest-win64-gpl.zip. For the Gyan builds, look for and click on ffmpeg-git-full.7z. This will download a compressed file with a .7z extension.
Step 2: Extract the Downloaded File
The next step is to extract the downloaded file using a file archive program such as 7-Zip or WinRAR. If you don’t have one installed on your computer, you can download one from their respective websites: https://www.7-zip.org/ or https://www.win-rar.com/.
To extract the file using 7-Zip:
- – Locate the downloaded file in your Downloads folder or wherever you saved it.
- – Right-click on it and select “7-Zip > Extract to “[Name of the file]”.
- – Wait for a few seconds until the extraction process is complete.
Once the extraction process is complete, you should see a new folder with a name similar to name of the zip file that you downloaded. The name of the file will vary depending on when you downloaded it; the current FFmpeg build.
Rename this folder to “ffmpeg” for simplicity.
Step 3: Copy ffmpeg folder to C: drive
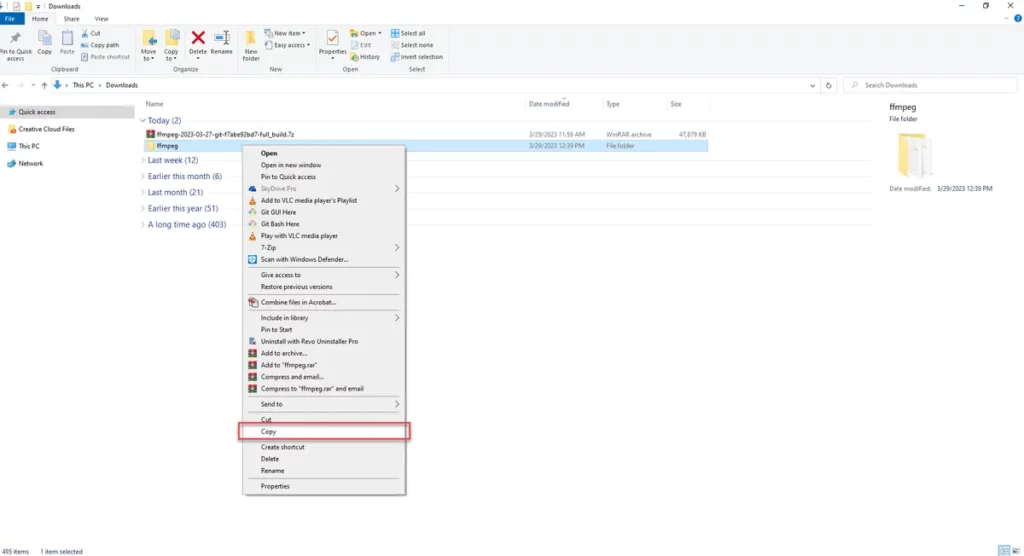
The next step is to copy the folder we just renamed to the C:, the root drive, of your computer. This is so that our FFmpeg installation is in easy path that we can remember: C:\ffmpeg\bin\ffmpeg.exe
Step 4: Test FFmpeg Installation
The final step is to test if FFmpeg installation was successful by running the version command in command prompt.
To open a command prompt window:
- – Press Windows key
- – Type cmd then press Enter key
In the cmd window that opens up, type the following command:
C:\ffmpeg\bin\ffmpeg.exe -version
You should see something like this:
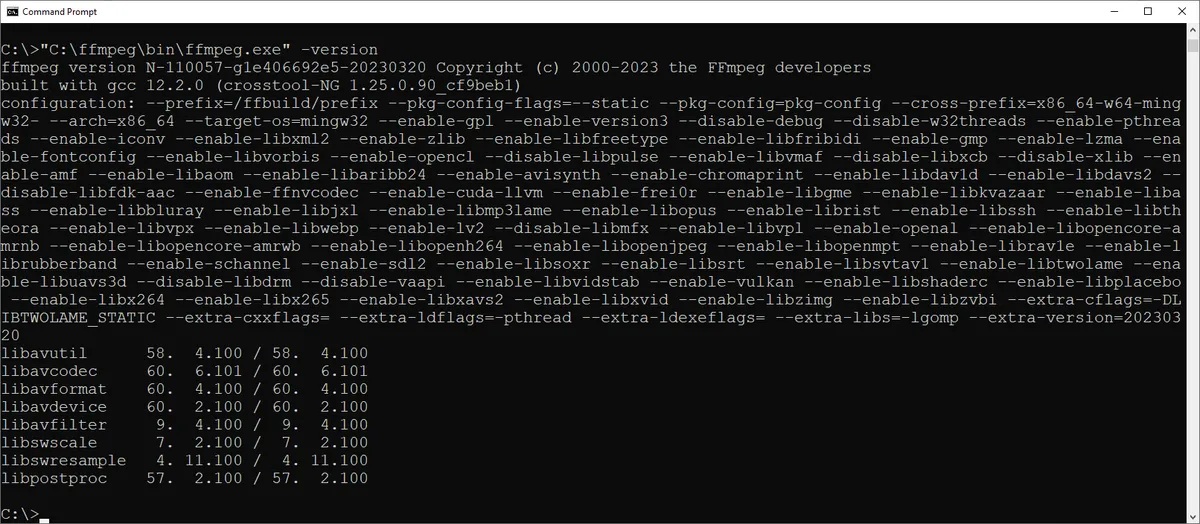
And that’s it. You have successfully installed FFmpeg to your Windows 10 or 11 machine. You can now use FFmpeg to perform various tasks with audio and video files. For more information on how to use FFmpeg, check out the official documentation.
In the next post, I am going to share with you how you can add your FFmpeg installation to the PATH so that you will be able to use FFmpeg from any command prompt or PowerShell window without having to type the full path to the program every time. See you then!
If you are looking for a library to help you out with video compression and processing, FFmpeg is certainly the best open-source library you’d find out there. It can be used for blurring, color conversion, rotation, extraction of frames. As well as offer an interface to various video codecs like H.264/AVC, HEVC, AV1.
Here in this tutorial, I’ll discuss briefly what FFmprg really is and how you can install it on windows. On top of it, there are a few basic commands for FFmpeg to get you started.
What is FFMPEG?
FFmpeg is a free and open-source software project consisting of different libraries and programs for handling video, audio, and other multimedia files and streams. FFMPEG is a command-line tool used for processing video and audio files. It is widely used for format transcoding, basic editing (trimming and concatenation), video scaling, and video post-production effects.
Installing FFMPEG on windows is quite easy, Once the installation process is done we will elaborate on how to set up environment variables in windows for FFMPEG. To install it on your windows machine you need to follow a step-by-step guide as described below.
Before downloading FFMPEG build you must have an app that can decompress files ending with the .7z file extension, such as WinRAR, you must install it before you can continue.
Step 1 – Go to https://ffmpeg.org/download.html and Select the windows icon.
Step 2 – On Clicking the windows icon you will see 2 different options one is Windows build from gyan.dev and other is Windows build by BtbN to download from you can choose anyone. In this article we will follow the first option. Click on Windows build from gyan.dev, It will take you to a page that contains FFMPEG build for windows.
On this page you can see 4 different builds, each build has a specific purpose.
- git full is built from the latest master branch with a large set of libraries.
- git essentials is built from the latest master branch with commonly used libraries.
- release full is built from the latest release branch with a large set of libraries.
- release essentials is built from the latest release branch with a large set of libraries.
Step 3 – To download the latest stable version scroll down to release and click on https://www.gyan.dev/ffmpeg/builds/ffmpeg-release-full.7z , It will start downloading the latest stable release full version in compressed format.
Step 4 – Once the download is finished you can extract the build in the downloads folder and rename the folder to ffmpeg.
Step 5 – Now cut the folder from downloads and paste it into the C drive on your PC.
Now you have FFMPEG installed in your machine. To make it work you need to set its path to environment variables. To set up the path follow below steps:
Step 6 – Search for system variables in windows search, Click on edit system environment variables. It will open a pop up window, in the bottom right corner you will see an option of environment variables, click on it.
Step 7 – Select the Path Variable under “User variables for (your name)” and click edit. It will open up a pop up with a list of paths.
Step 8 – Click on the New button from the right navigation bar in the pop up and add it will show you a new line at the bottom of the path list. Type C:\ffmpeg\bin and click ok.
Now you can see the FFmpeg path in the path list at the end. Click Ok to save your changes. You have now installed FFMPEG and set proper environment variables. To confirm the installation open the command prompt and enter ffmpeg -version.
Some Basic Commands of FFMPEG :
· Convert video from one format to another
ffmpeg -i youtube.flv -c:v libx264 filename.mp4
· Convert a video into an animated GIF
ffmpeg -i video.mp4 -vf scale=500:-1 -t 10 -r 10 image.gif
· Extract image frames from a video
ffmpeg -ss 00:00:15 -i video.mp4 -vf scale=800:-1 -vframes 1 image.jpg
· Convert Video into Images
ffmpeg -i movie.mp4 -r 0.25 frames_%04d.png
· Rotate a video
ffmpeg -i input.mp4 -filter:v ‘transpose=2,transpose=2’ rotated-video.mp4
Conclusion
FFmpeg is a great tool for anyone genuinely interested in video compression and processing. Being an open-source tool it gives you endless capabilities as you can make changes to the source to your requirements.
Supercharge Your Business with Videos
At VdoCipher we maintain the strongest content protection for videos. We also deliver the best viewer experience with brand friendly customisations. We’d love to hear from you, and help boost your video streaming business.
Free 30-day trial →