
I have talked a lot about creating bootable USB of Linux in Windows. How about the other way around? How about creating a bootable Windows 10 USB in Linux?
If you are uninstalling Linux from dual boot or if you want to reinstall Windows completely or you simply want to have a Windows installation disk ready, you’ll need a bootable Windows 10 USB or DVD.
In this tutorial, I am going to show you how to create a Windows 10 bootable USB in Linux.
There are two ways to do that and I have discussed both in this tutorial.
- The first method is mounting the ISO image of Windows to a USB disk formatted in ExFAT system. This works most of the time but there could be instances where it wouldn’t boot.
- The second method is to use a tool like Ventoy. It creates a UEFI compatible bootable disk.
📋
I am using Ubuntu for this tutorial but the steps should be valid for other Linux distributions as well.
Creating a Bootable Windows 10 USB in Linux

Prerequisite: Get Microsoft Windows 10 ISO and a USB of at least 8 GB in size
You can download Windows 10 ISO from Microsoft’s website. You have to specify the Windows 10 version, language and then you should see the link to download Windows 10.
Note that the Windows 10 ISO download link is valid for 24 hours only. So use a download manager in Linux to download the ~5-6 GB file and finish it within 24 hours.
Since the ISO and its content are more than 4 GB in size, I recommend a USB of at least 8 GB in size.
I have also made a video of this tutorial so that you can see the steps in action.
Step 2: Properly format the USB for creating bootable Windows USB
Insert your USB. You have to format it so make sure that you don’t have important data on the USB key.
In Ubuntu, press Super key (Windows key) and search for ‘Disks’. You have to use this tool to format the USB key.

In the Disks tool, make sure to select your USB drive and hit format.
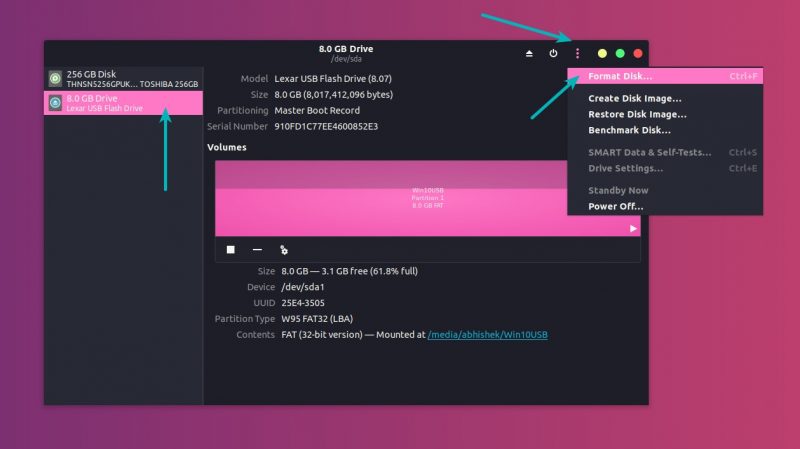
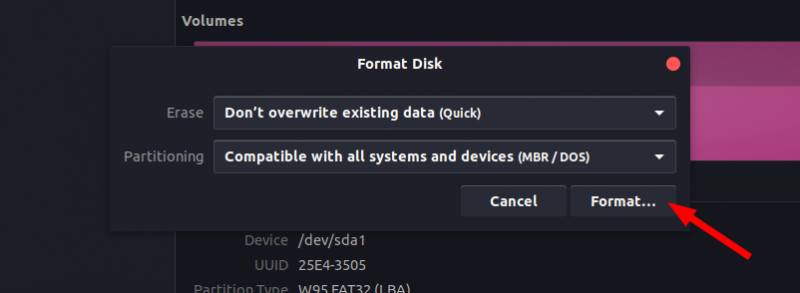
It will ask to choose a partitioning scheme. It could be either MBR or GPT. Select one of them and hit Format.
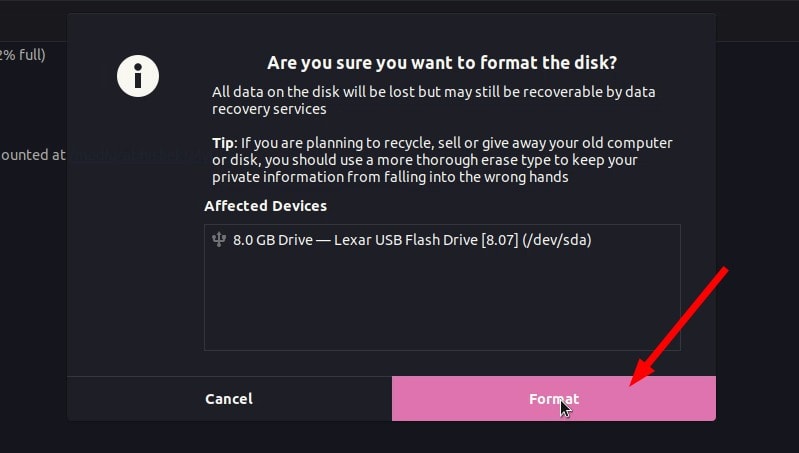
It will show you a warning that you data will be erased.
The formatting of USB is not over yet. Now, you need to create a partition on the newly formatted USB.
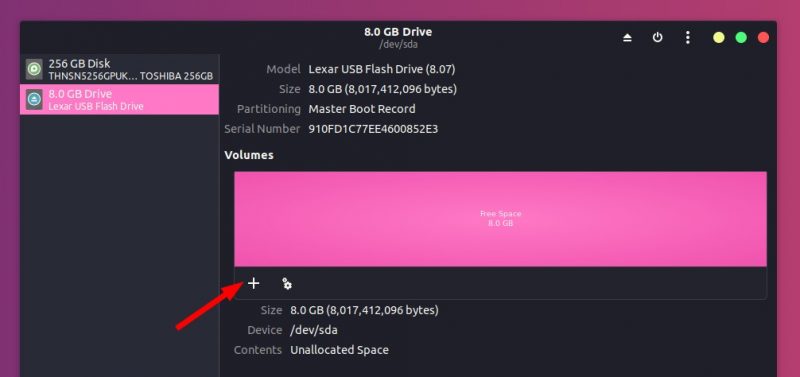
Select the entire USB disk as the partition size.
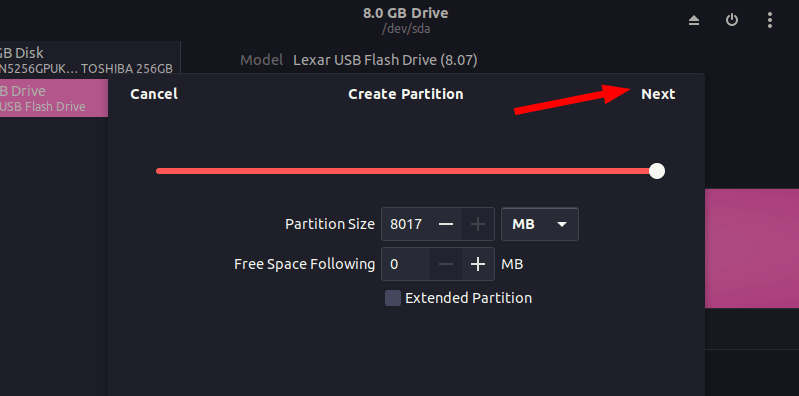
Give a name to your USB and then go to the Other option in the Type of disk. It’s because you have to format the USB in exFAT filesystem.

Here, choose exFAT as the filesystem type. The exFAT file system will you to copy files larger than 4 GB.

Once done, your USB should be automatically mounted. It is now ready for creating a bootable Windows 10 USB disk.
Step 3: Copy the content of the ISO to USB
Now, it’s time to copy the content of the Windows 10 ISO to the newly formatted USB.
You may ask, Abhishek, there is only one file, which is the ISO file itself. What are you talking about?
ISO is basically an archive format and you can see its content like any zip file in Linux. But to do that, you need to use ‘Disk Image Mounter’ tool that is installed by default in Ubuntu.
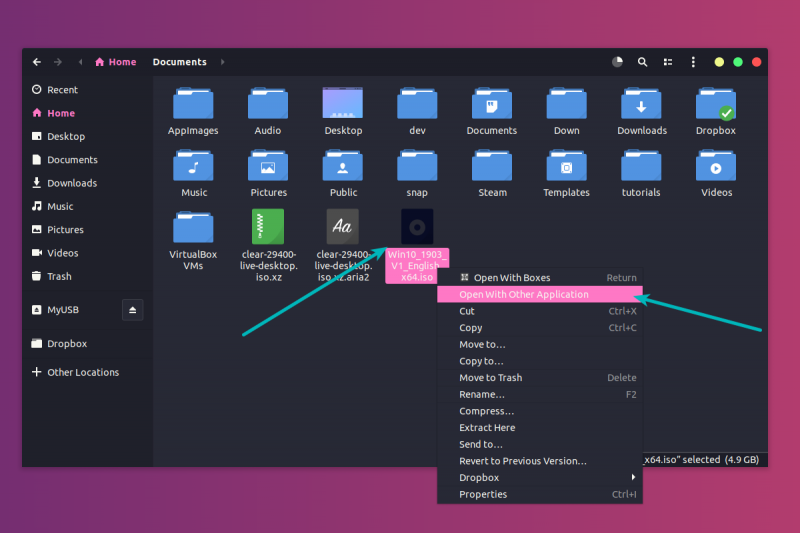
Go to your Windows 10 ISO, select it and right click on it. Now select ‘Open with other application’.
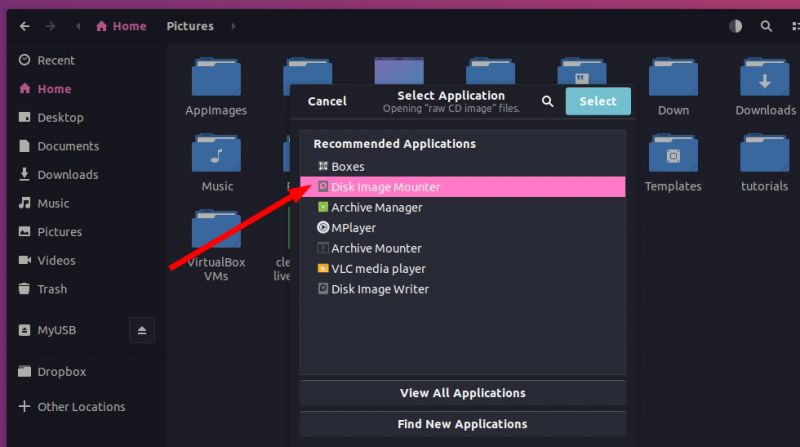
In the applications list, select Disk Image Mounter:
The ISO will be mounted. You may not see it in the left sidebar but if you click on the Other Locations, you should see it. Click on it to enter this mounted ISO folder.
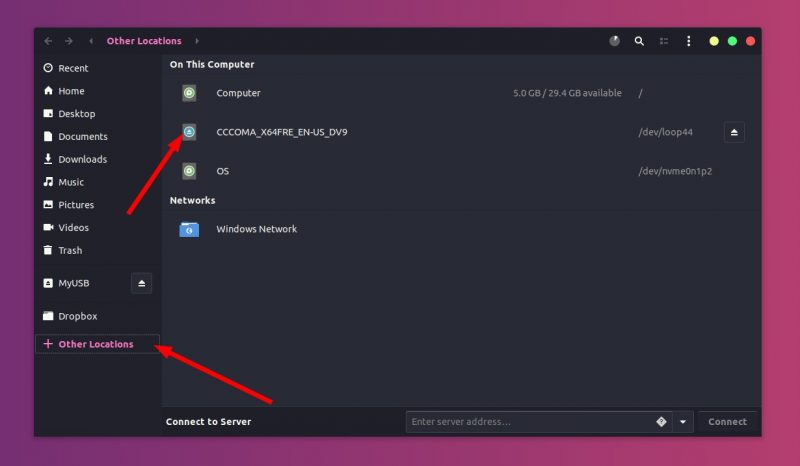
You’ll see its content. All you need to do is select all the files (Ctrl+A), copy it (Ctrl+C) and paste them in the USB drive (Ctrl+V).
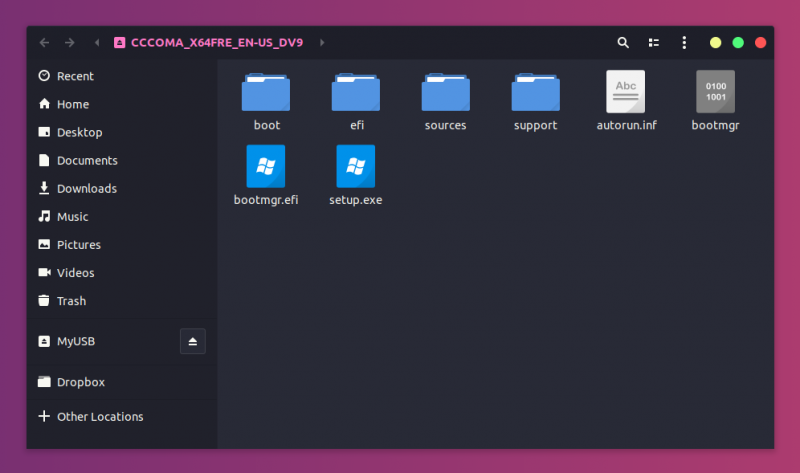
Wait for the copying process to finish as it may take some time in copying 4-5 GB of data. Once it’s done, you have a bootable Windows 10 USB in your hand.
Unmount the USB and use it with any system you want, restart the system and change the boot settings to boot from the USB.
📋
Some readers find that this method is not working well. No worries. You can use Ventoy for your Windows USB.
Method 2: Create bootable Windows 10 USB using Ventoy
Ventoy is an open source tool for making live USBs. You can use it to create a multi-boot USB, persistent Linux live USB and bootable Windows USB.
I find Ventoy an unorthodox tool. It is slightly tricky to use and this is the reason I am writing this step-by-step tutorial.
Step 1: Prepare your USB drive
Ventoy formats the USB disk while creating the bootable disk. However, I noticed it failed to do so for an already bootable Linux disk. For this reason, I advise you to format the USB disk before you proceed further.
Plug in and then format the USB disk. You can do that by right-clicking on the mounted disk and then selecting the format option.
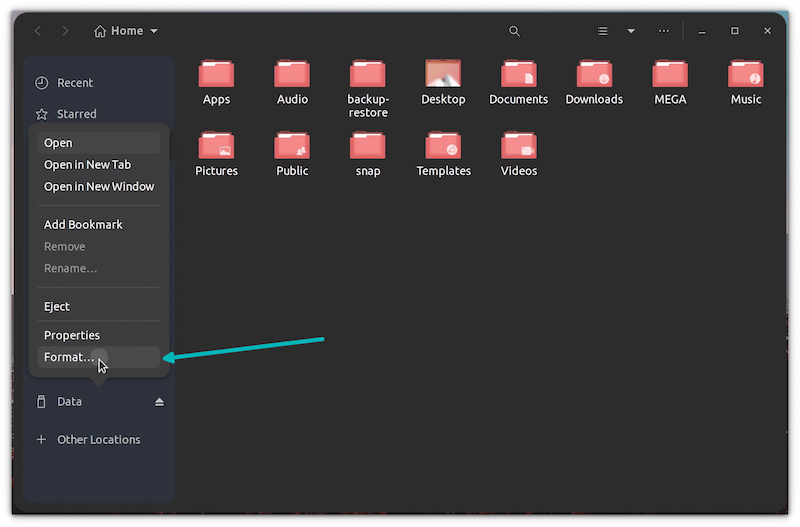
It doesn’t matter which filesystem you choose during formatting. It will be formatted again by Ventoy in the later steps.
💡
Some readers suggested using the NTFS file system gave them better result.
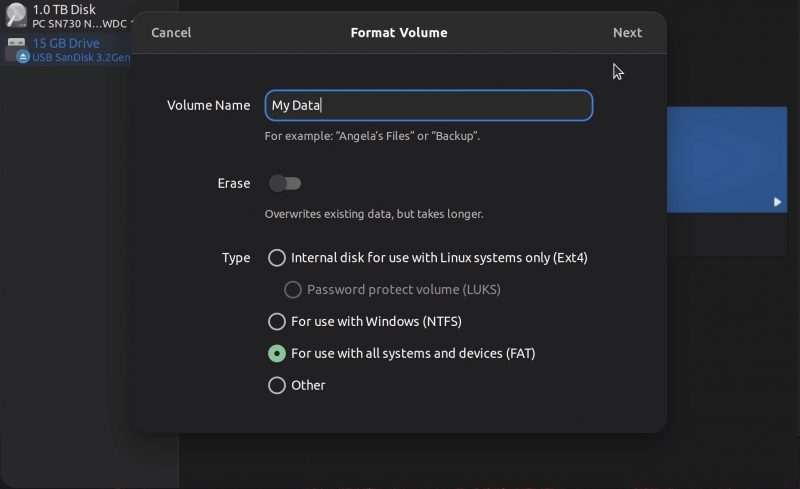
Once it is formatted, keep it plugged in and go on to the next step of installing Ventoy.
Step 2: Download and install Ventoy on Linux
Ventoy is a mix of GUI and CLI tool. It can be used on any Linux distribution. Download Ventoy for Linux from the release page of its GitHub repository.
You’ll find the .tar.gz file with Linux in its name. This is the file you should download.
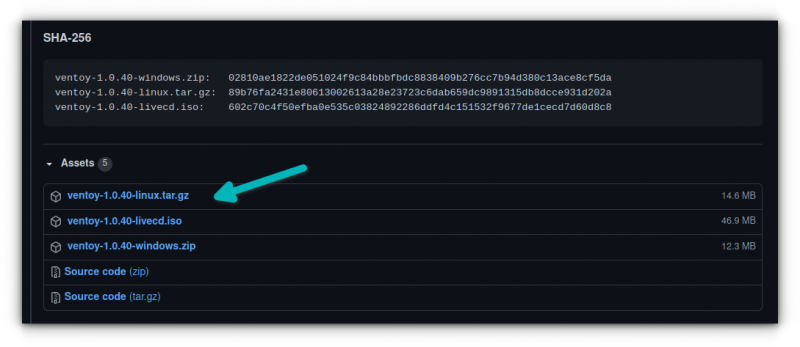
Once downloaded, extract the tar gz file. Simply right click on it and extract it.
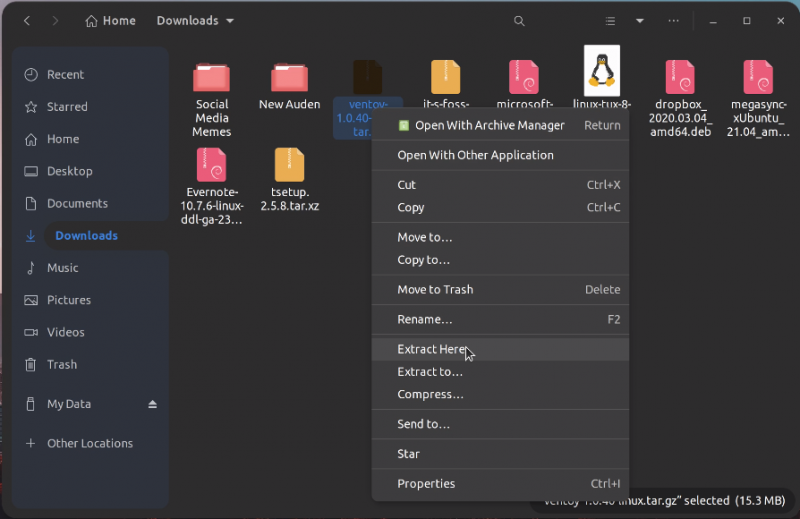
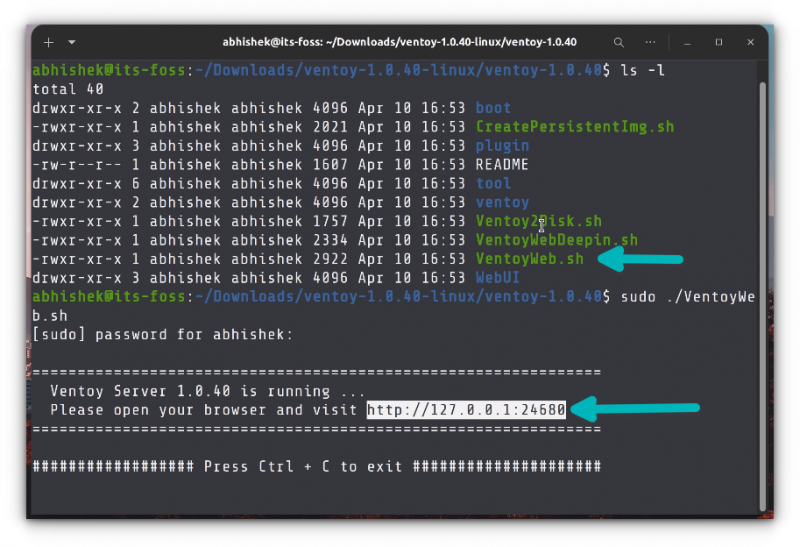
Go inside the extracted folder, and you’ll find a few scripts in it. You need to run one named VentoyWeb.sh. To do that, you’ll have to use the command line.
Now if you are familiar with Linux command line, I presume that you can easily find your way to the file by using the cd command.
Alternatively, you can use the “open in terminal” feature of the file manager to open the location in a terminal.
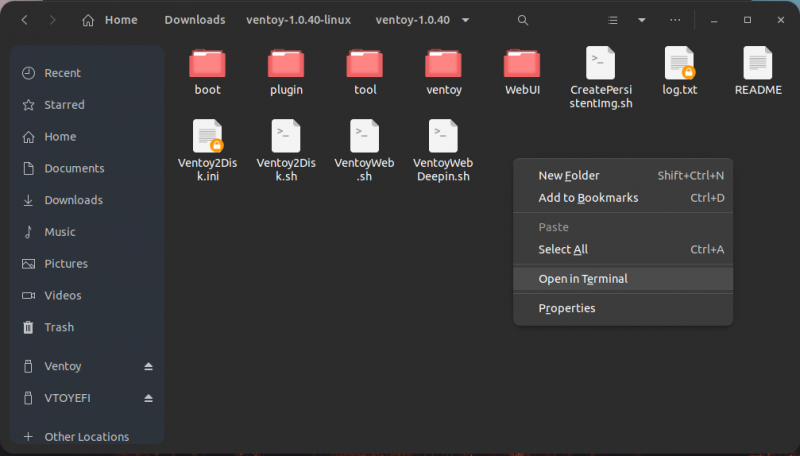
Once you are in the correct directory in the terminal, use the following command to run Ventoy:
sudo ./VentoyWeb.shVentoy runs inside a browser. It will give you the URL when you run it. Copy this URL and paste it in a browser.
It will open a web page with Ventoy running in it and if the USB is already plugged in, it should recognize it. If not, press the refresh button.
Step 3: Use Ventoy to create bootable Windows 10 USB disk
Though Ventoy has the option to create a bootable disk with secure boot, it is experimental and may not work.
Considering you are going for a UEFI installation, it will be wise use GPT for partitioning scheme.
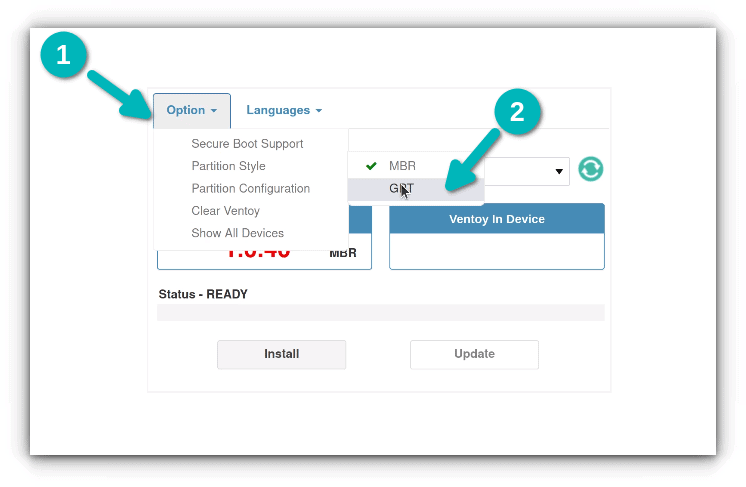
Once things are set, hit the install button. It will show you a couple of obligatory warnings. If the installation completes successfully, you should see a success message.
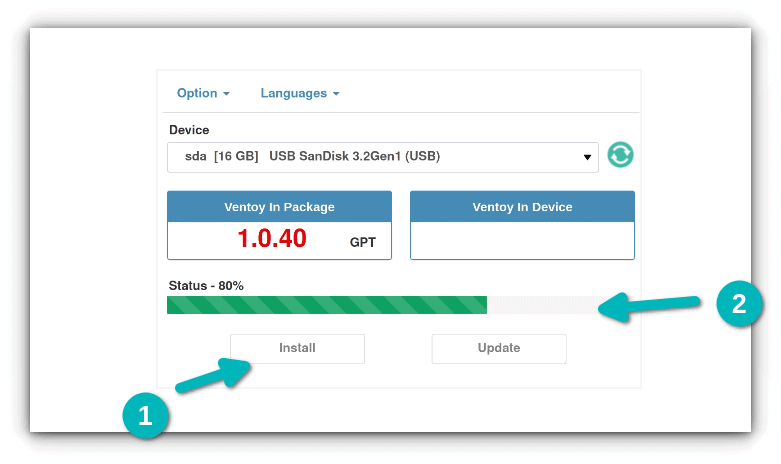
Note: If you do not see Ventoy disk mounted after the successful installation, please plug out the USB and then plug it in again.
When you hit the install button, it creates two partitions on the USB disk.
- VTOYEFI: A small partition for the UEFI files.
- Ventoy: A big, empty partition in ExFAT format where you’ll copy the ISO image.
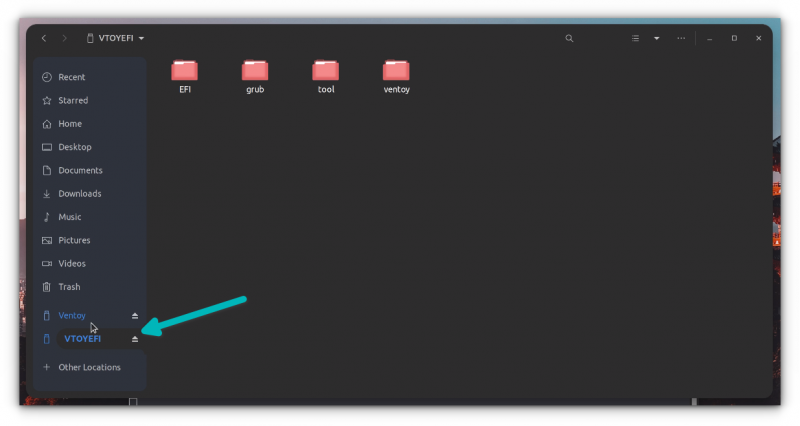
Yes. That’s what you need to do. Copy the ISO image of the Windows 10 into the bigger ExFAT partition on the USB disk.
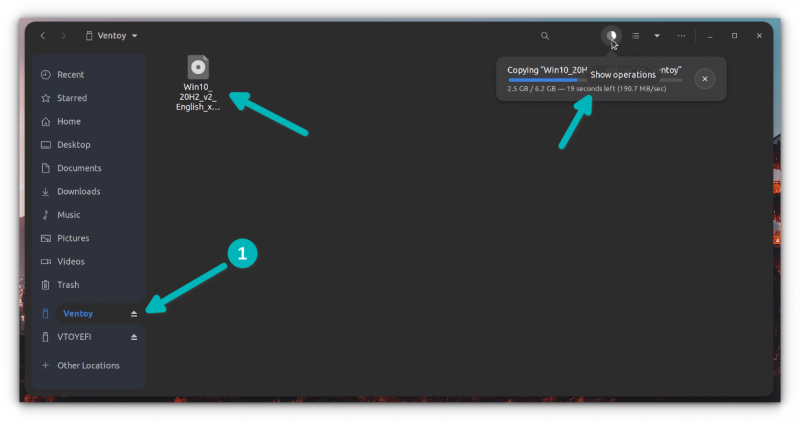
Once the copying finishes, DO NOT RUSH to plug out the USB just yet. Click on the unmount option from the file manager. Chances are that some files are still being written and it may show an error message.

Wait for a few more minutes and you should see a message that it is safe to remove the disk. Now you can unplug it and use it on whichever system you want.
Step 4: Using the bootable Windows 10 disk
Alright! You are almost there. Plug in your bootable Windows USB you created in the previous section. Start the computer and go to the BIOS setting by using the F2/F10 or F12 key at the time you see the logo of your computer’s manufacturer.
In here, look for the secure boot settings and disable it. If the secure boot is enabled, chances are that your system won’t allow you to boot from the USB disk (to secure your system and data at boot time).
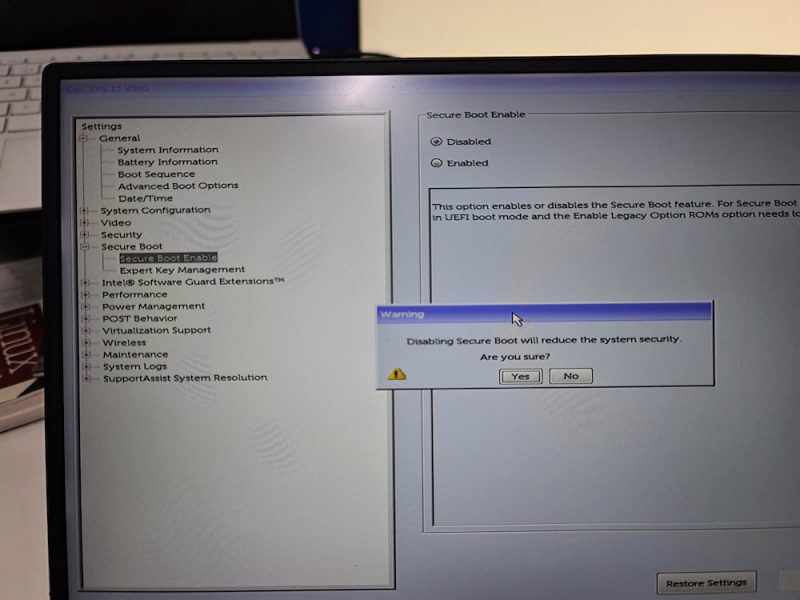
After disabling the secure boot, go into the boot order and then choose the UEFI USB Disk to boot from. Some systems will give this option after you press F12 or F10 button.
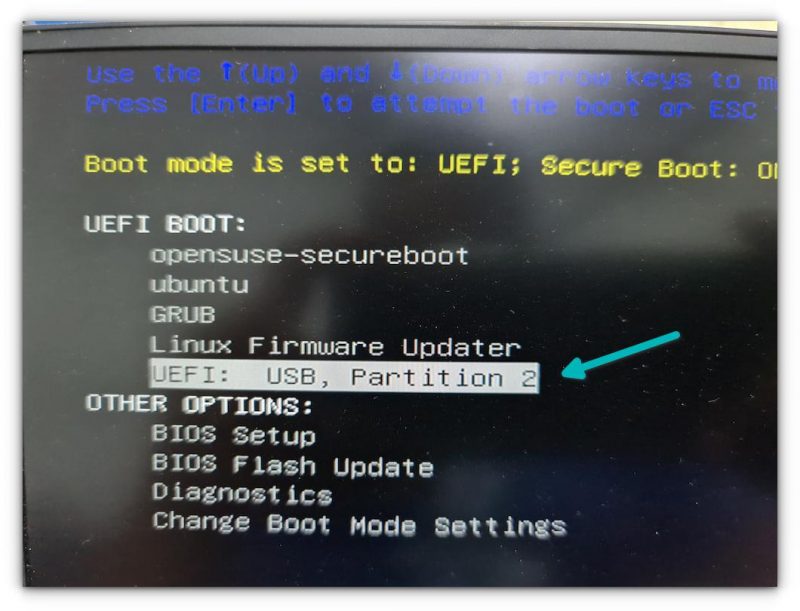
It takes a couple of minutes to start the Windows disk. You should see a screen like this and it will give you the option to repair boot or install Windows.
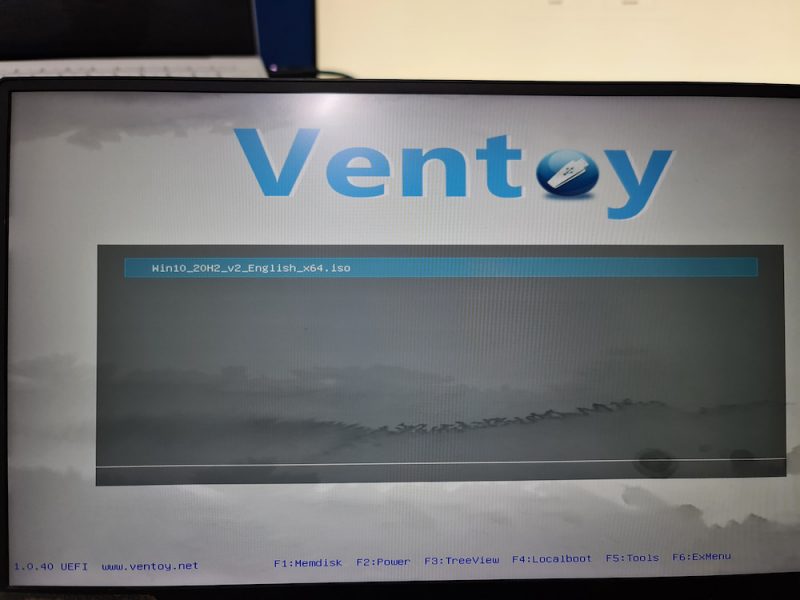
I think you can take things from here. Enjoy it 
There is another popular tool WoeUSB that can also be used for this purpose.
Step 4: Using Windows 10 bootable USB
Once the bootable USB is ready, restart your system. At boot time, press F2 or F10 or F12 repeatedly to go to the boot settings. In here, select to boot from USB.
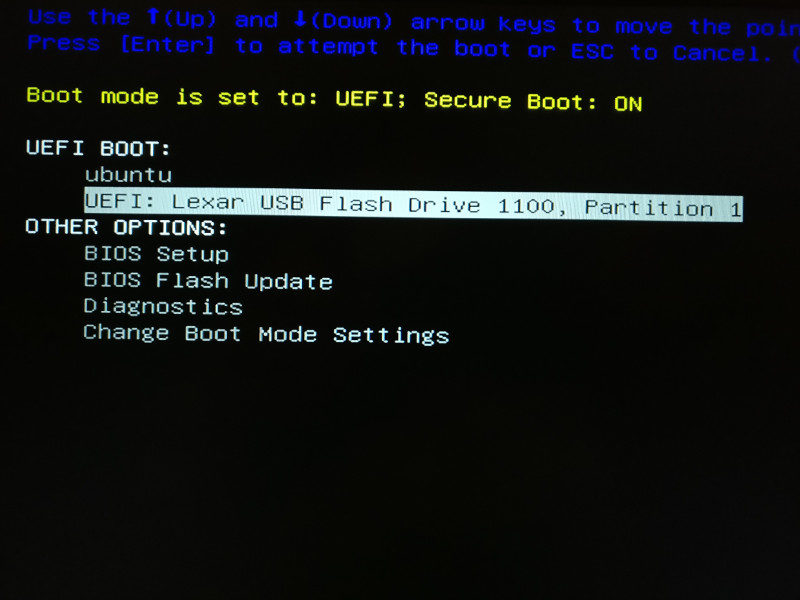
You’ll see that Windows 10 is being booted and it gives you the option to install or repair your system. You know what to do now from here.
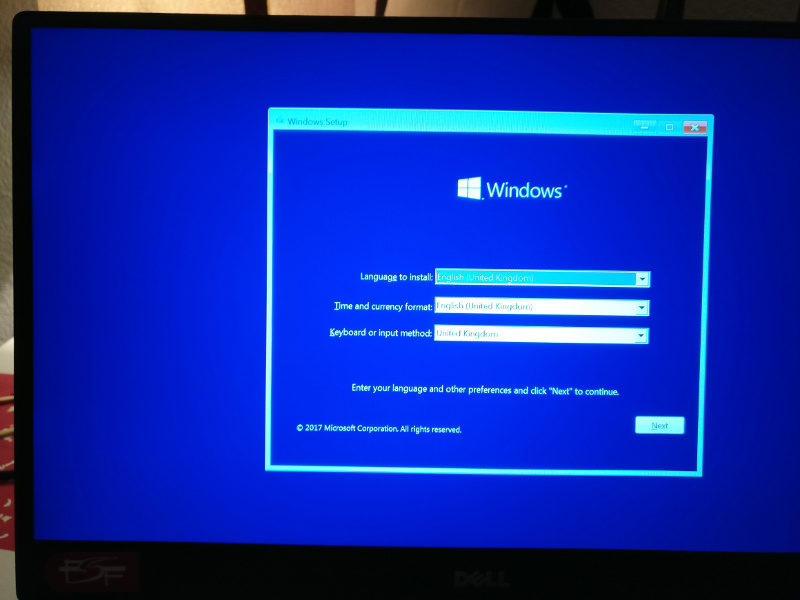
I hope you find this tutorial useful for creating bootable USB of Windows 10 in Linux. If you have questions or suggestions, please feel free to leave a comment.
Если вам по той или иной причине потребовалась загрузочная флешка Windows 10 (или другой версии ОС), при этом на имеющемся компьютере в наличии только Linux (Ubuntu, Mint, другие дистрибутивы), вы сравнительно легко можете записать её.
В этой инструкции пошагово о двух способах создать загрузочную флешку Windows 10 из Linux, которые подойдут как для установки на UEFI-системе, так и для того, чтобы установить ОС в Legacy режиме. Также могут пригодиться материалы: Лучшие программы для создания загрузочной флешки, Загрузочная флешка Windows 10.
Загрузочная флешка Windows 10 с помощью WoeUSB
Первый способ создания загрузочной флешки Windows 10 в Linux — использование бесплатной программы WoeUSB. Созданный с её помощью накопитель работает и в UEFI и в Legacy режиме.
Для установки программы используйте следующие команды в терминале
sudo add-apt-repository ppa:nilarimogard/webupd8
sudo apt update
sudo apt install woeusb
Если эти команды не сработали, попробуйте такой вариант:
wget mirrors.kernel.org/ubuntu/pool/universe/w/wxwidgets3.0/libwxgtk3.0-0v5_3.0.4+dfsg-3_amd64.deb
sudo dpkg -i libwxgtk*_amd64.deb
sudo apt update
sudo apt --fix-broken install
sudo apt install woeusb
После установки порядок действий будет следующим:
- Запустите программу.
- Выберите ISO образ диска в разделе «From a disk image» (также, при желании, можно сделать загрузочную флешку с оптического диска или смонтированного образа).
- В разделе «Target device» укажите флешку, на которую будет записан образ (данные с неё будут удалены).
- Нажмите кнопку Install и дождитесь завершения записи загрузочной флешки.
- При появлении ошибки с кодом 256 «Source media is currently mounted», размонтируйте образ ISO с Windows 10.
- При ошибке «Target device is currently busy», размонтируйте и отключите флешку, затем снова подключите её, обычно помогает. Если не сработало, попробуйте предварительно отформатировать её.
На этом процесс записи завершен, можно использовать созданный USB накопитель для установки системы.
Создание загрузочной флешки Windows 10 в Linux без программ
Этот способ, пожалуй, ещё проще, но подойдет только в том случае, если вы планируете загружаться с созданного накопителя на UEFI-системе и устанавливать Windows 10 на GPT диск.
- Отформатируйте флешку в FAT32, например, в приложении «Диски» в Ubuntu.
- Смонтируйте образ ISO с Windows 10 и просто скопируйте всё его содержимое на отформатированную флешку.
Загрузочная флешка Windows 10 для UEFI готова и с неё можно без проблем загрузиться в EFI-режиме.
В данной статье мы расскажем как создать загрузочную флешку с Windows в системе Linux с помощью утилиты под названием «Ventoy».
Для начала вам потребуется:
— Сама утилита Ventoy под Linux, скачать вы ее можете с официального сайта.

— ISO Образ нужной вам Windows, скачать его можно в нашем каталоге.
— Так же вам потребуется активировать будущую Windows, оригинальные ключи активации вы можете приобрести у нас в магазине по выгодным ценам от 1140 ₽.
1) После того как вы скачали архив с программой, распаковываем его в удобное для вас место.
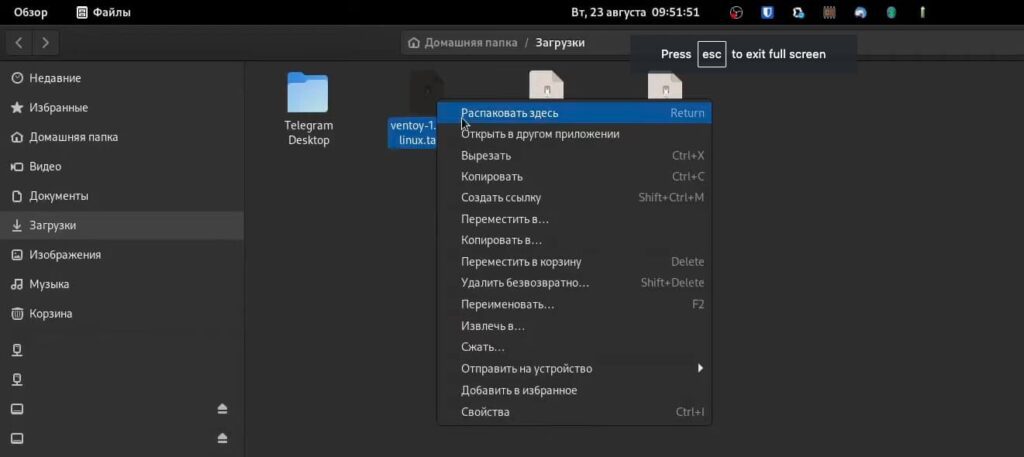
2) Переходим в папу с программой, и нажимаем «Свойство» на файле «VentoyGUIx86_x64».
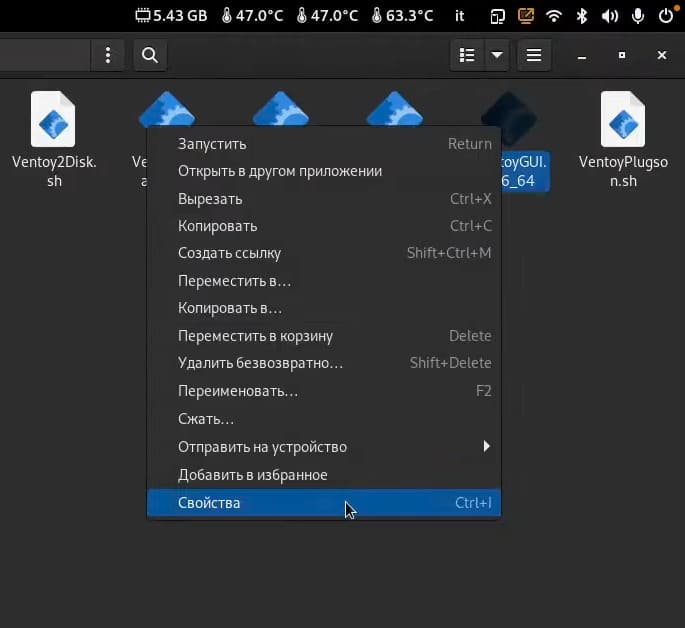
3) В разделе «Права» ставим галочку напротив «Разрешить выполнение файла как программы», чтобы сделать файл исполняемым.

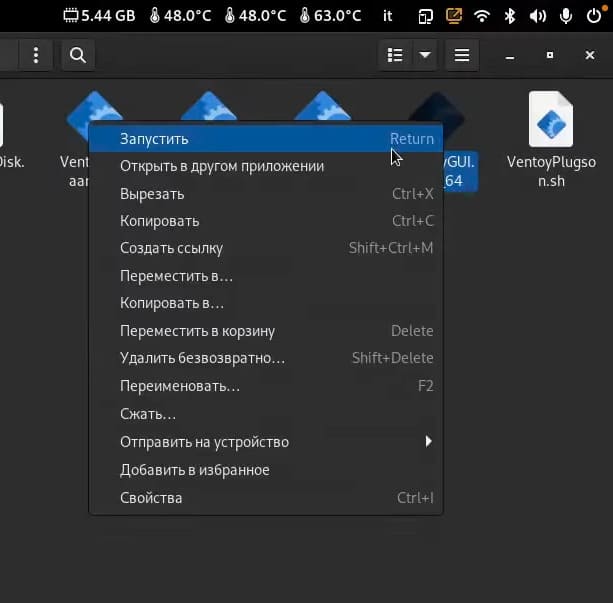
4) После этого запускаем файл.
5) После запуска открывается интерфейс утилиты, если вы будете устанавливать Windows на старый ПК c Legacy Boot, то в разделе Option => Partition Style выбираем «MBR». Если же установка будет производиться на новый ПК с UEFI, тогда выбираем разметку «GPT».
6) После выбора нужной вам разметки, жмем «Install» и ждем какое-то время.
7) После записи программы на флешку, появится два раздела.
— Первый раздел, куда установилась сама утилита с ее файлами.
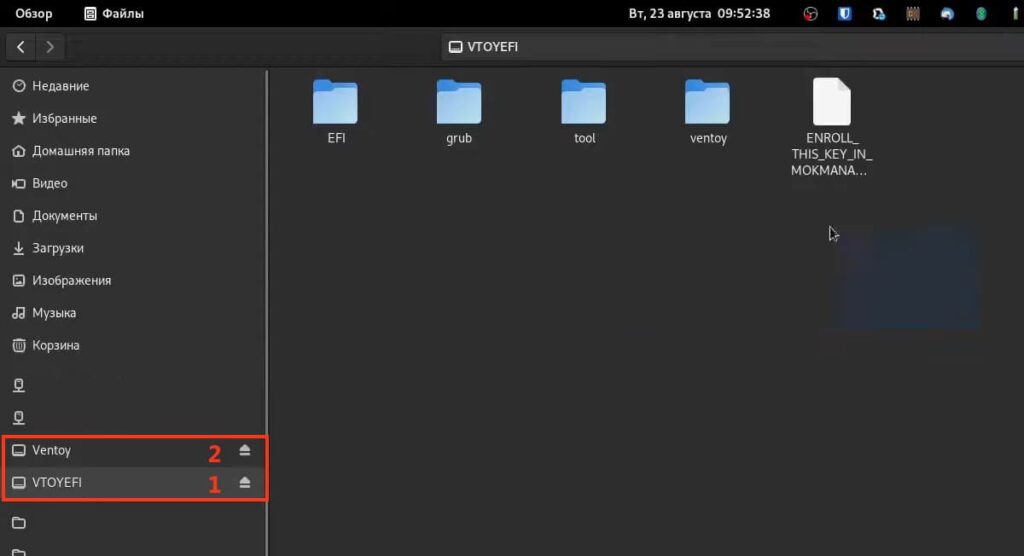
— Второй раздел, куда нужно будет поместить ISO образ Windows.
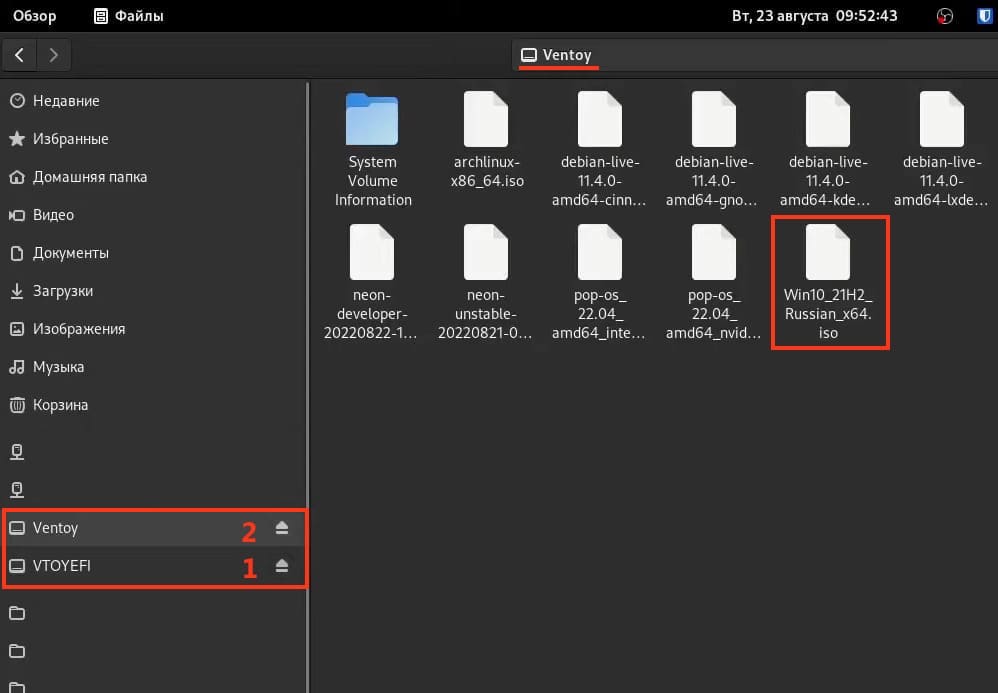


9) После чего запуститься с этой флешки, выбрать второй раздел и начать процедуру установки системы.
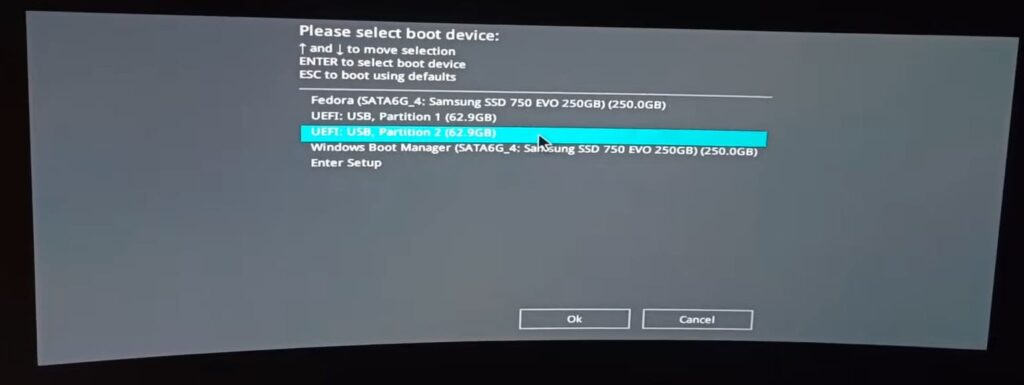
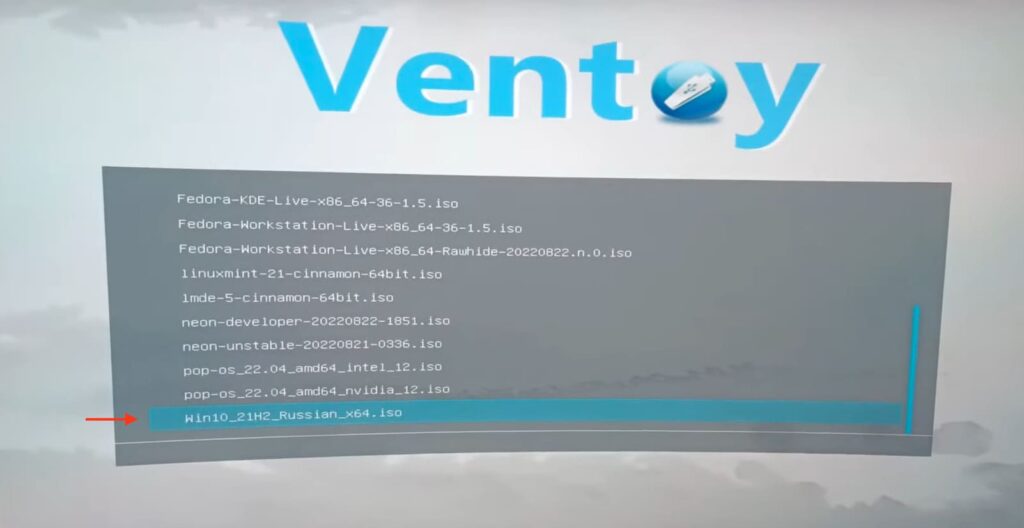
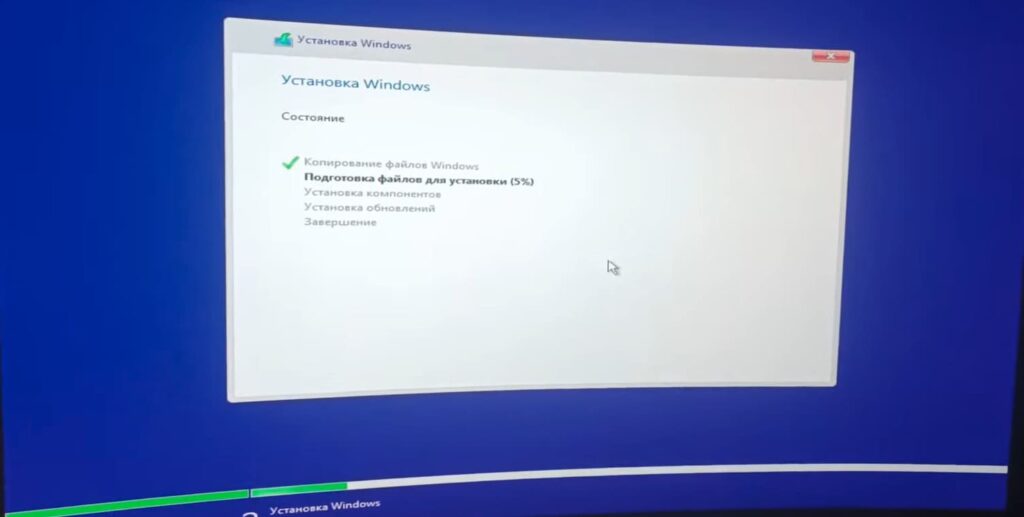
Хотим напомнить что все популярные ISO образы Windows вы можете скачать в нашем каталоге.
— Windows 11
— Windows 10
— Windows 8.1
— Windows 7
Иногда из-под Linux необходимо создать загрузочную флешку с Windows.
Способы
UEFI
Последние версии Windows могут загружаться в UEFI если просто отформатировать флешку в FAT32 и распаковать на нее образ.
Для этого делаем следующее:
- Через Gparted форматируем флешку в FAT32.
- В том же Gparted делаем RCM по разделу ▷ Управление флагами
- Отмечаем флаг BOOT
- Закрываем Gparted
- Монтируем флешку
- Монтируем ISO образ
- Копируем содержимое ISO-образа на флешку
MBR
Делаем тоже самое, что и для UEFI, но кроме этого выполняем следующее:
- ставим загрузчик GRUB2
# grub-install --target=i386-pc --boot-directory="/media/$user/$drive/boot" /dev/sdX
где boot — каталог на установочной флешке
- создаем в boot/grub файл grub.cfg со следующим содержимым:
default=1
timeout=15
color_normal=light-cyan/dark-gray
menu_color_normal=black/light-cyan
menu_color_highlight=white/black

menuentry "Start Windows Installation" {
    insmod ntfs
    insmod search_label
    search --no-floppy --set=root --label $USB_drive_label --hint hd0,msdos1
    ntldr /bootmgr
}

menuentry "Boot from the first hard drive" {
    insmod ntfs
    insmod chain
    insmod part_msdos
    insmod part_gpt
    set root=(hd1)
    chainloader +1
    boot
}
Автоматический способ с помощью WoeUSB
Облегчить создание загрузочной флешки помогают различные утилиты для создания из-под Linux загрузочной флешки с Windows.
К примеру, woeusb (подробнее см. man woeusb).
$ su -
# apt-get install woeusb
# woeusb --device Win10_21H2_Russian_x64.iso /dev/sde
Примечание: Win10_21H2_Russian_x64.iso — тут укажите iso-образ (если вы находитесь в каталоге с ним) или полный путь к нему, /dev/sde — тут укажите путь к устройству флешки, без указания раздела.
Источники
- youtube.com/Алексей Лещенко
- the-bosha.ru
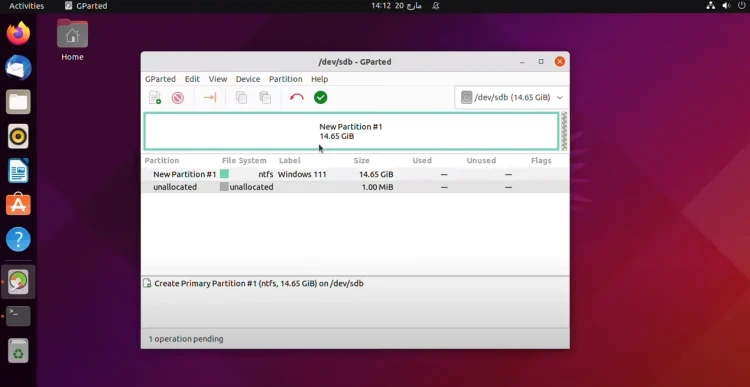
Hello everyone. In this article, I am going to show you how to create a Windows 11 bootable USB on Ubuntu using the GParted project.
Updating Your System
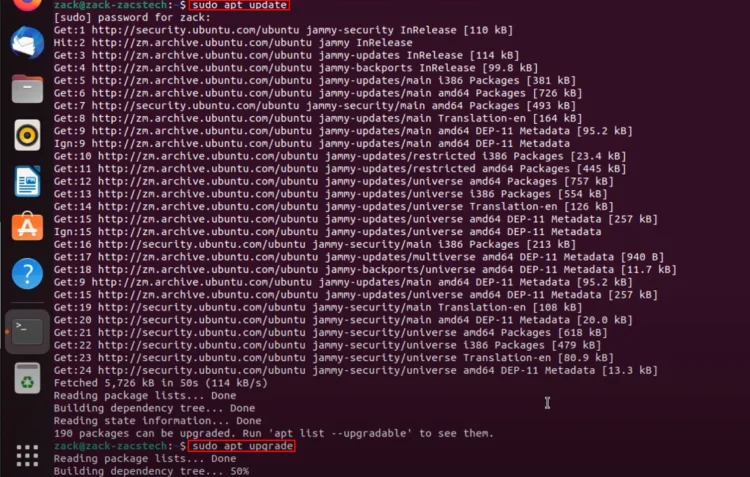
Before we begin, if you’re using Ubuntu, it’s a good practice to update your system. I will show you how to create a Windows 10 or 11 bootable USB in Ubuntu. You can start by updating your system by typing “sudo apt update” in Terminal. If there are any packages that need to be upgraded, you can upgrade them by typing “sudo apt update“.
Downloading the Windows 10/11 ISO
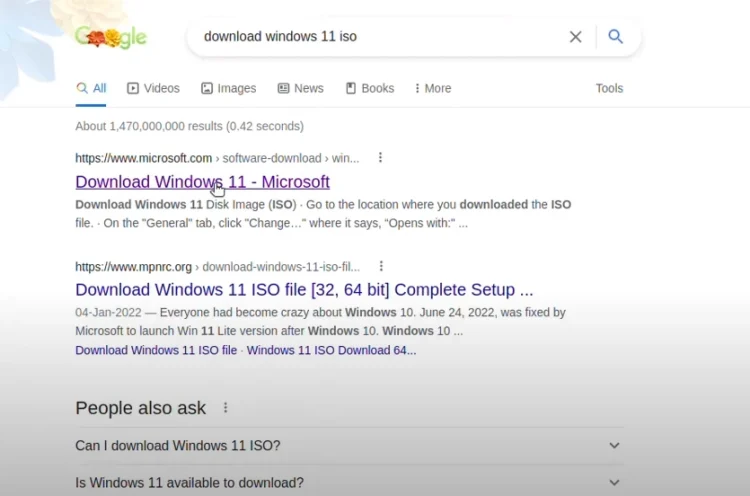
So, the first step is to download the Windows 11 ISO image. Open your favorite browser or simply use the default browser that comes with Ubuntu. Simply search for “download Windows 11 ISO” and you’ll get the Windows 11 ISO image from Microsoft’s official website.
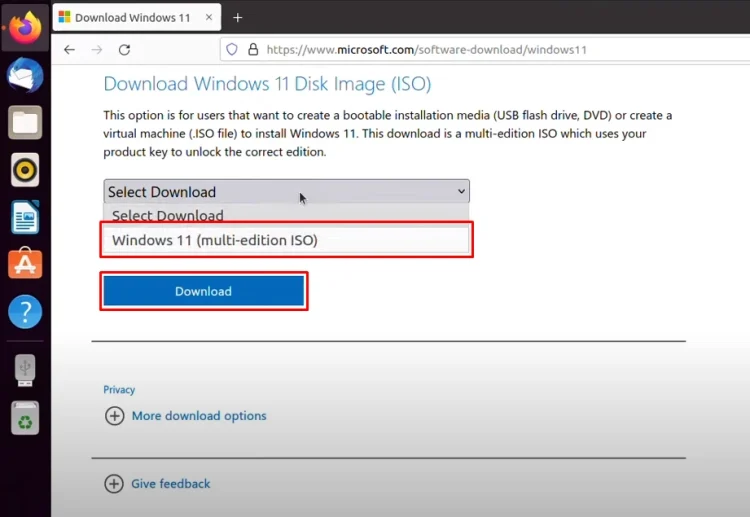
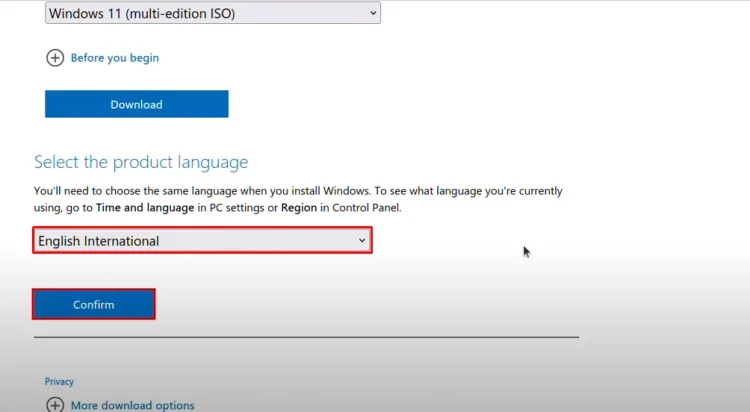
After that, you have to select the Windows 11 ISO image edition and click Download.
Choose a language and click Confirm.
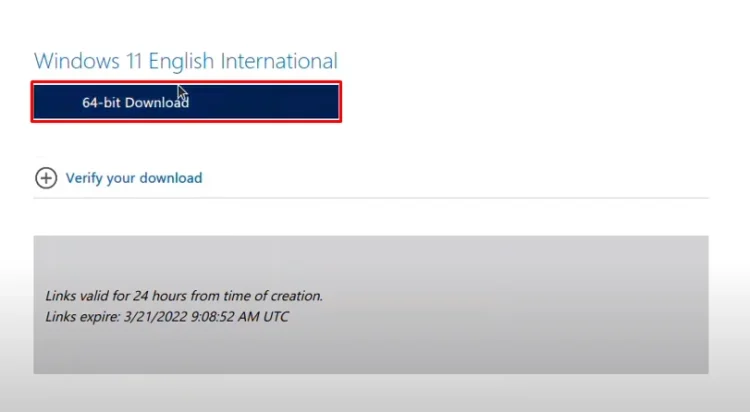
Then click 64-bit Download and save it. It will save the file to your computer.
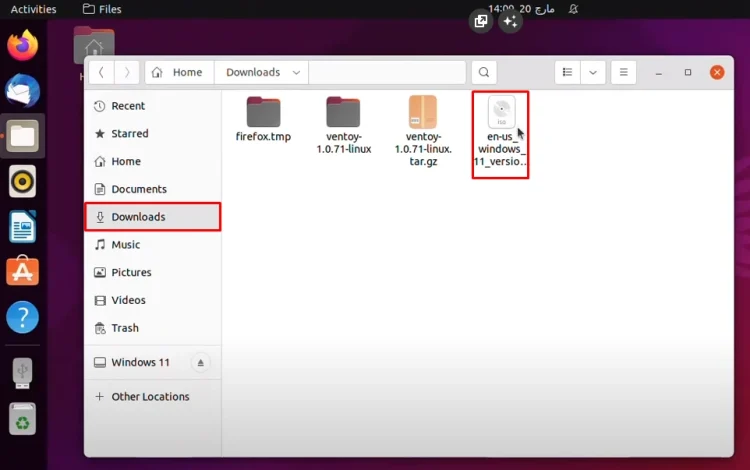
Now, I’m going to insert it because I already have it. If I have to show you, it’s in the Downloads directory, which I have simply imported from my main PC. The size is around 4 GB.
Preparing the USB Flash Drive
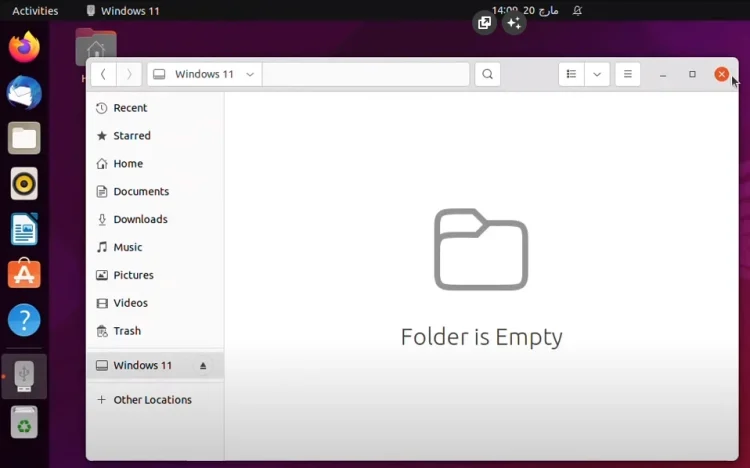
The second step is to attach the USB flash drive to your computer. I’ve already done that, so there’s no need for me to attach it.
The third step is to install GParted onto your computer.
You can use the Ubuntu Software or the Terminal. I prefer the terminal because it’s faster. Once it’s launched, simply type “sudo apt install gparted“.
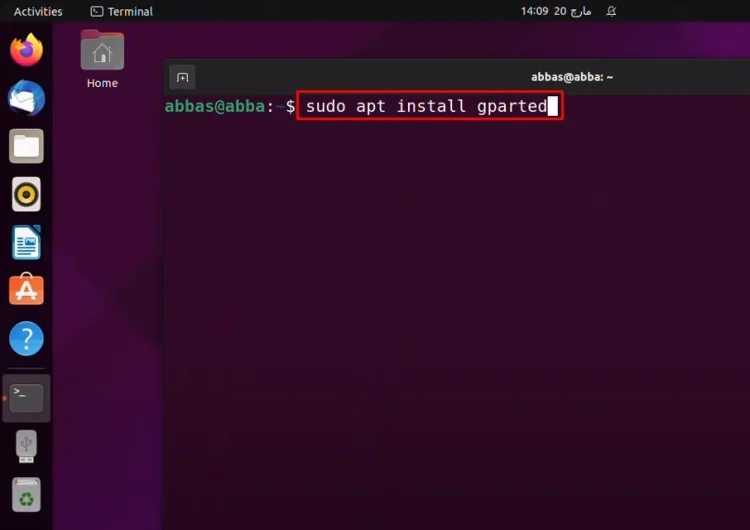
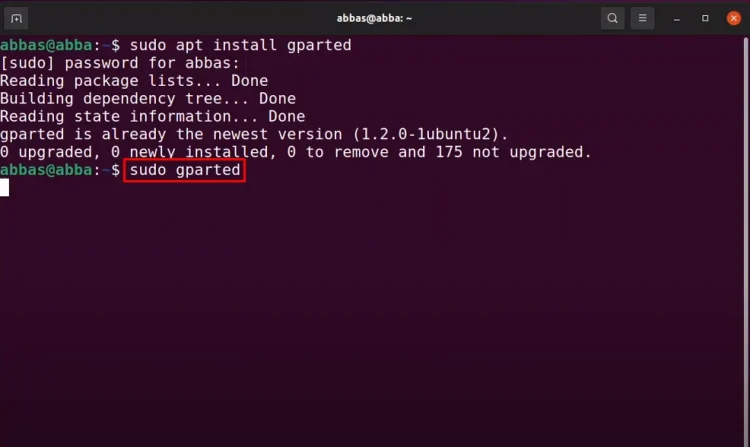
The next step is to launch GParted, typing “sudo gparted” in Terminal.
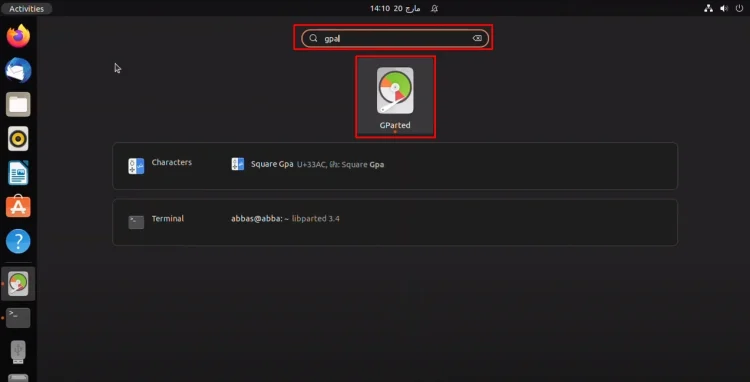
You can also launch GParted from Launchpad. Just simply search for GParted and launch it.
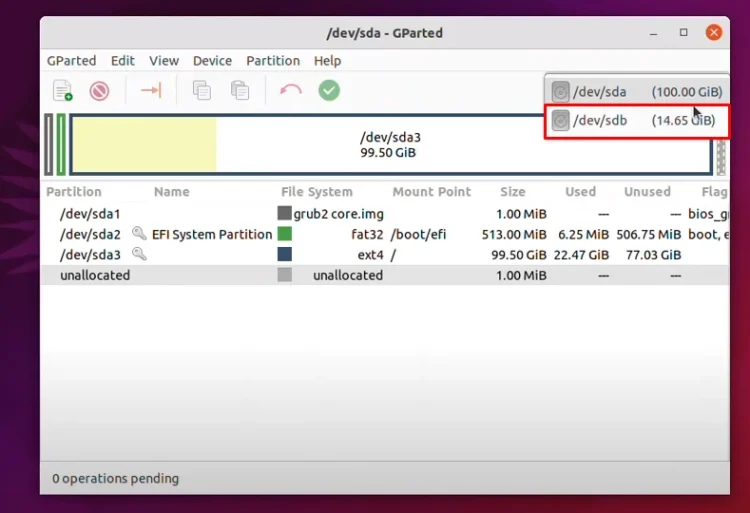
Once it’s launched, select the USB flash drive.
Partitioning the USB Flash Drive
By default, you can see that it’s a bootable USB flash drive of Windows 11.
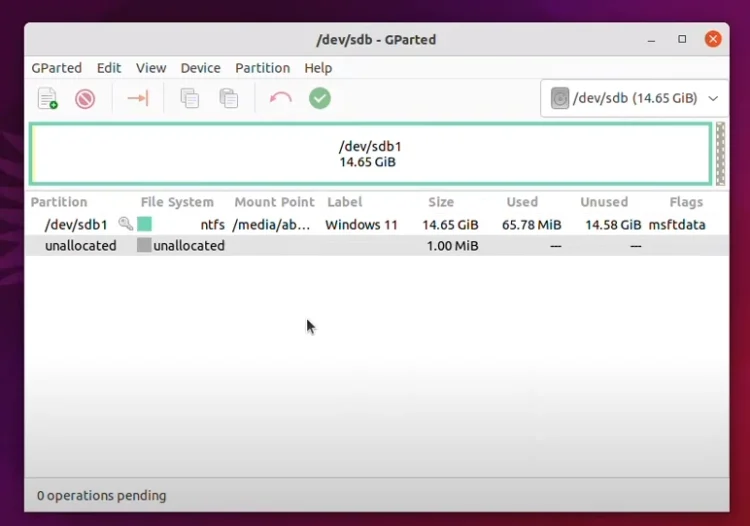
For now, I have to delete all of them and then I’ll show you how to create them again from the beginning.
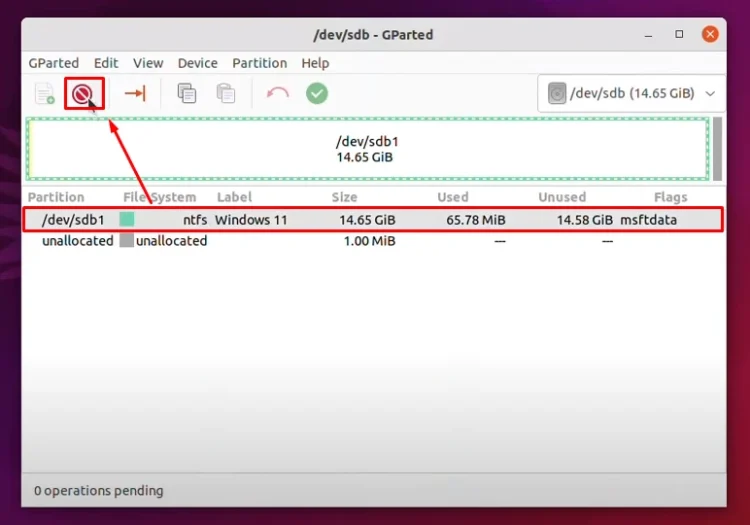
Let me delete it first. You have to unmount it, then delete it. Sorry for that. Now delete.
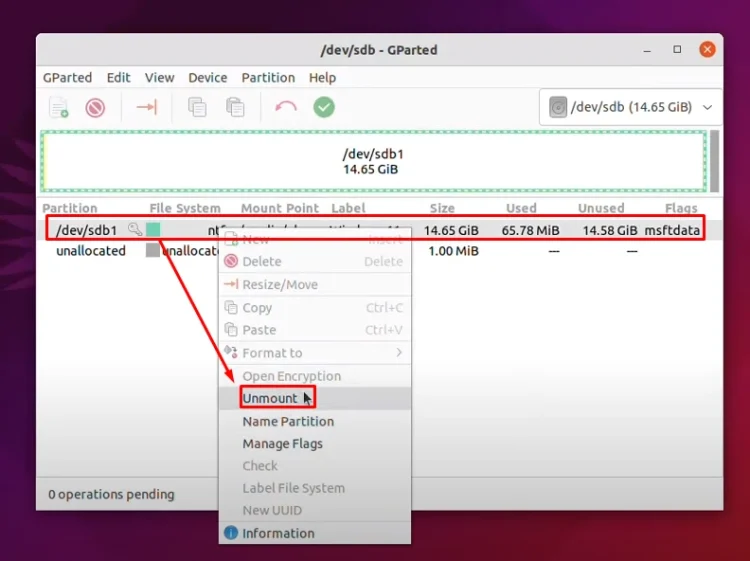
Okay, it is deleted.
Now click Apply.
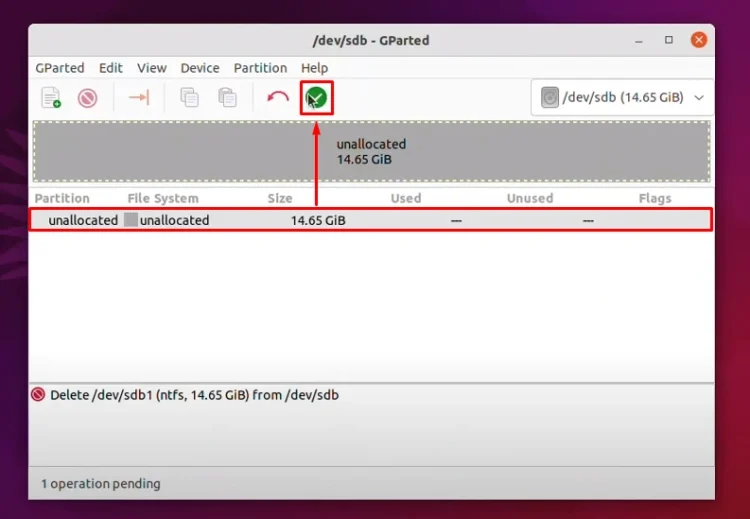
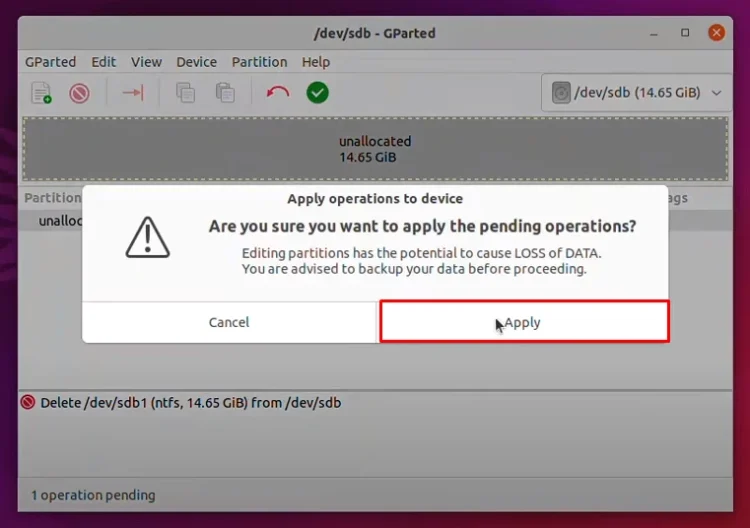
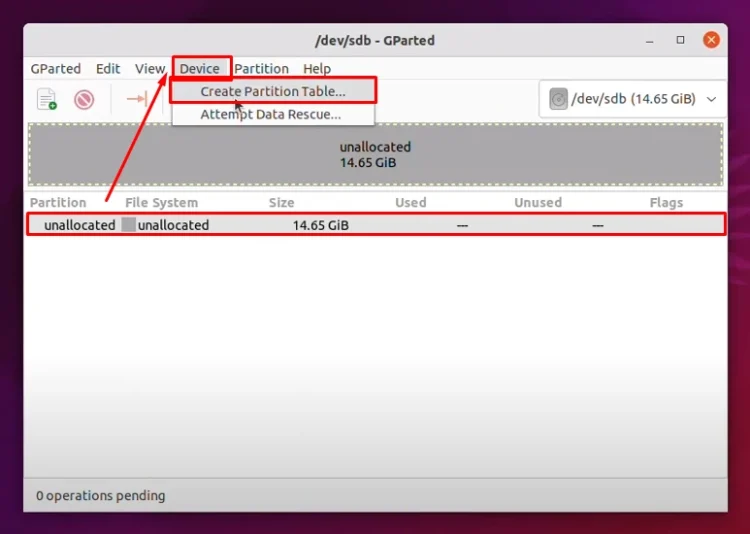
Once it’s removed, we need to create a partition for it. Go to Device and click Create partition table.
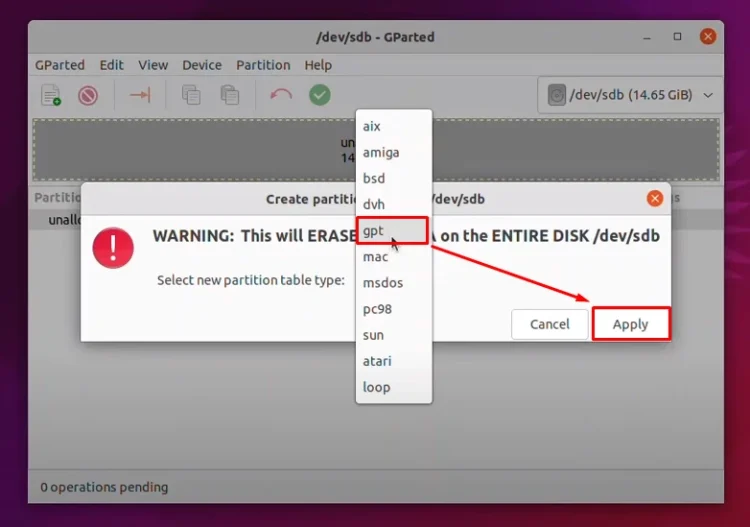
From here, select a partition style for Windows. We are going to choose gpt. Click Apply.
Remember, it’s going to remove everything from your USB flash drive, so back up your files.
Formatting and Copying Files
The next step is to create a file system for it.
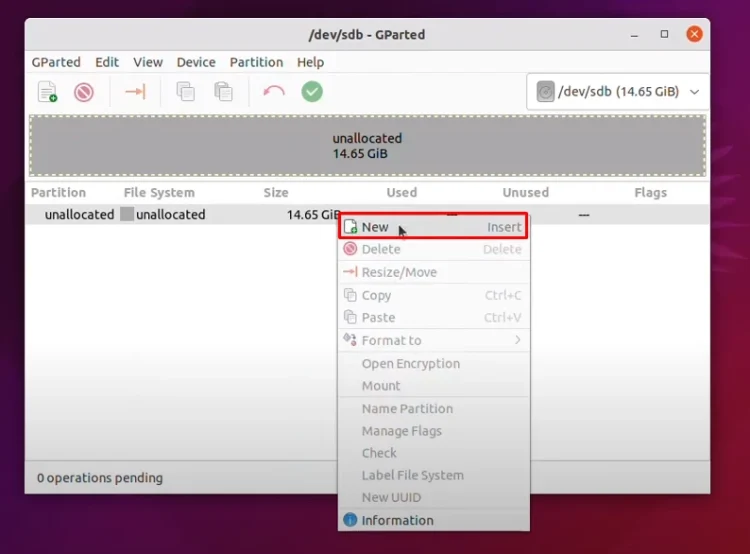
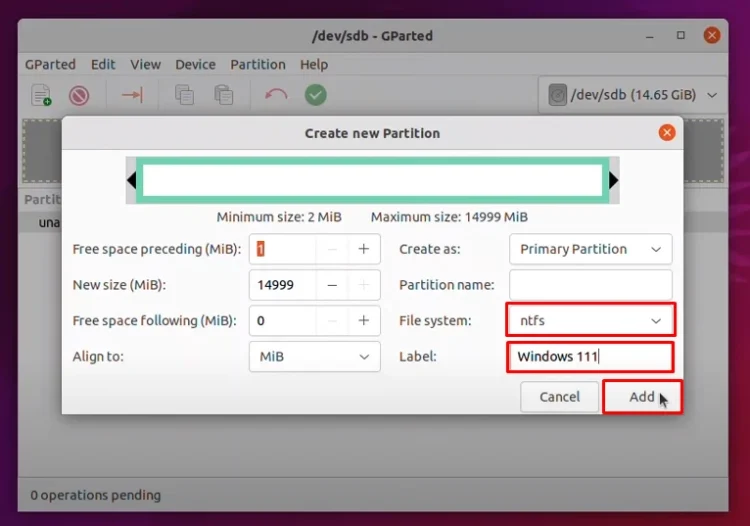
By default, Linux personal file system is ext4. Windows is using NTFS. We’re going to choose NTFS. We can also label the USB flash drive. I’m going to name it “Windows 111“. Click Add.
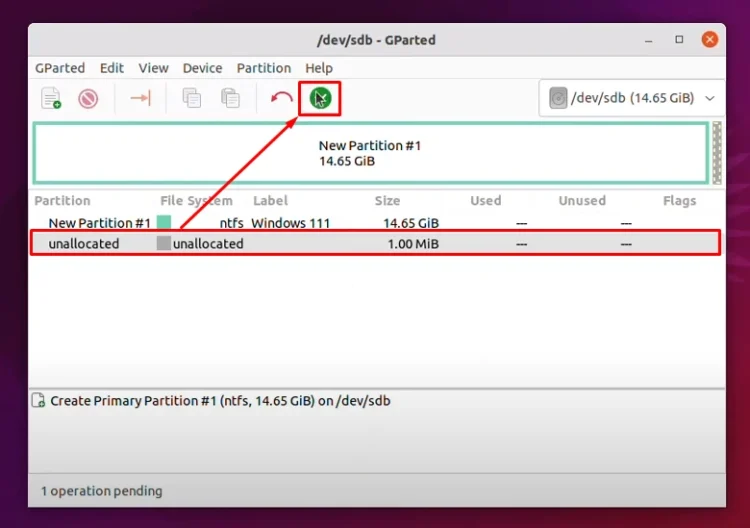
Now you can see that it’s done, but the changes have not applied. Click Apply and wait for it.
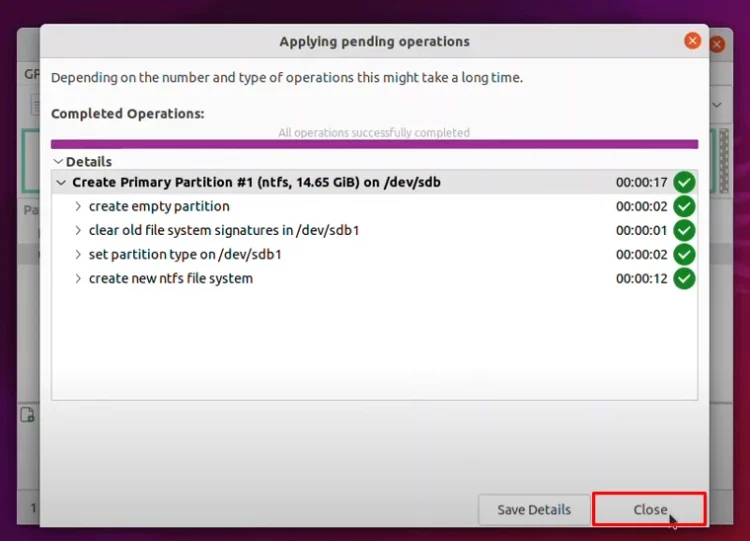
Once it’s done, you can close it.
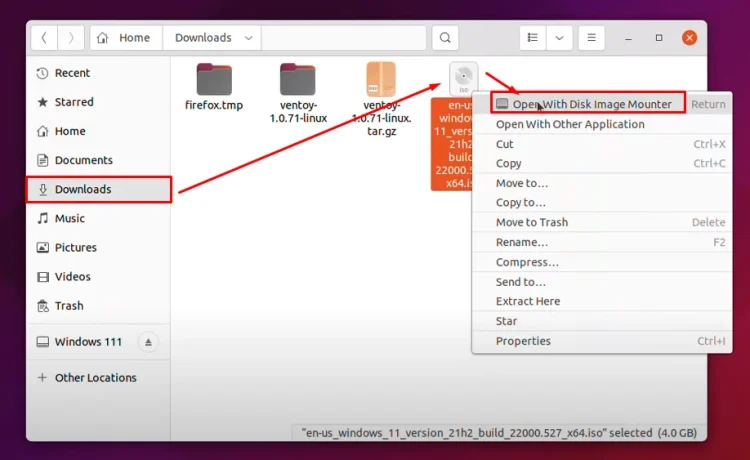
The next step is to open files and go to the Downloads folder where Windows 11 is located. Right-click on it and choose Open With Disk Image Mounter.
Finalizing the Bootable USB
Here you can see that Windows 11 is mounted. Right-click, copy, and now go to the USB flash drive and paste them here.
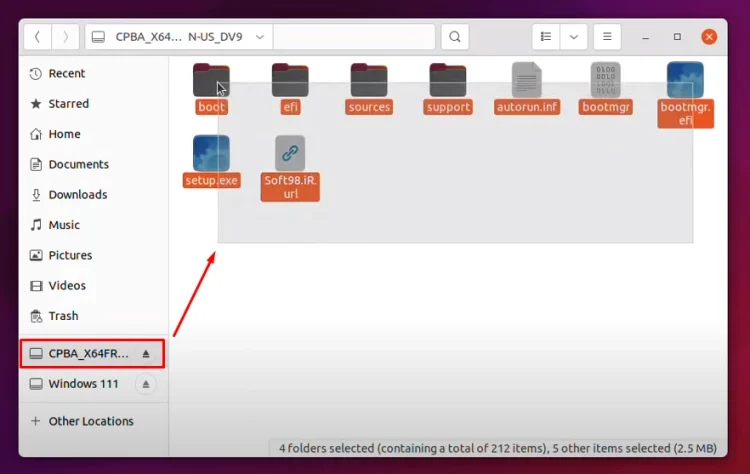
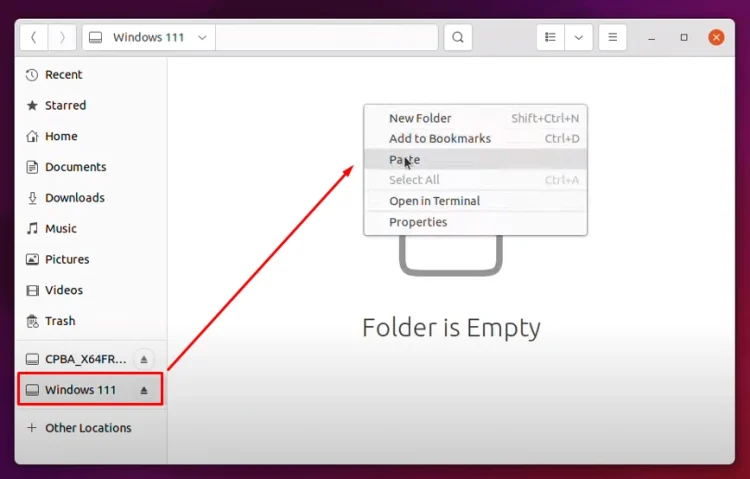
During the copy of the files, you will not face any type of error. If you face any type of error, it means the Windows 11 ISO that you downloaded from the internet has been corrupted. Maybe the speed of your internet connection was not fast and somehow it got corrupted.
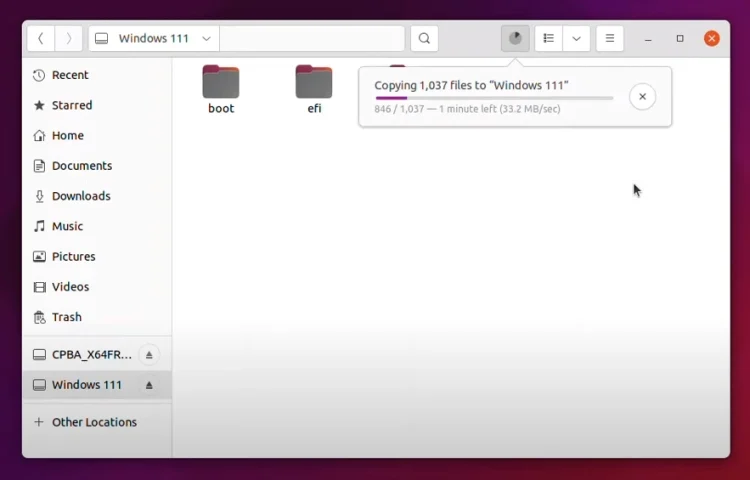
So basically, this is how you can create a Windows 11 bootable USB. For now, I am going to wait until the files are copied from the ISO inside the USB flash drive.
Post Views: 4,752


