
Как вернуть меню выбора ОС после установки Windows рядом с Linux? Рассказываем о двух способах восстановления загрузчика GRUB — для новичков (с утилитой boot-repair) и для продвинутых пользователей (с помощью chroot).
Поставили Windows рядом с Ubuntu, и теперь можете запустить только ОС от Майкрософт? Рассказываем, как восстановить загрузчик GRUB после установки Windows 10 или 11 — вам хватит 20 минут, даже если вы новичок в администрировании VPS.
Аренда VPS/VDS виртуального сервера от AdminVPS — это прозрачная и честная услуга с доступной ценой
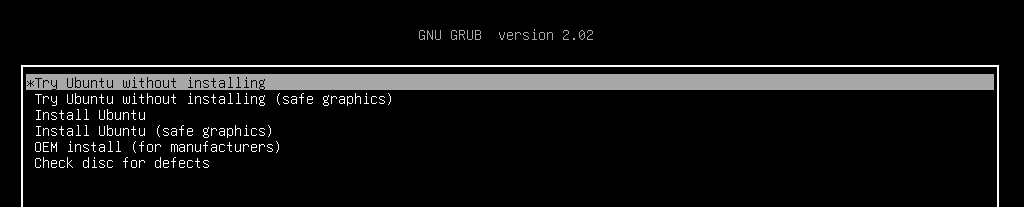
Представьте: вы установили Ubuntu, настроили систему, а потом решили поставить Windows рядом. Но после перезагрузки вместо привычного меню GRUB (grand unified bootloader) вы увидите только загрузчик Windows. Это происходит потому, что Windows не дружит с альтернативными загрузчиками: при установке она перезаписывает главную загрузочную запись (MBR) или заменяет файлы в разделе EFI. И если GRUB, стандартный загрузчик для Linux, может работать с несколькими ОС, то загрузчики NTLDR (Windows 11) и Bootmgr (Windows 10) не умеют. Когда вы ставите Windows после Ubuntu, они просто «не видят» ОС, установленную первой.
Что нужно знать перед восстановлением GRUB
Прежде всего разберёмся с базовыми понятиями — это поможет избежать ошибок и сэкономит время.
UEFI или BIOS
Современные компьютеры используют два типа firmware (микропрограммы для управления железом):
- BIOS — это устаревший стандарт, загрузчик записывается в первый сектор диска (mbr);
- UEFI — современная замена BIOS, работает с разделом EFI (fat32), где хранятся файлы загрузчиков в формате .efi.
Чтобы проверить, какой режим на вашем компьютере, зайдите в bios/uefi (нажмите клавишу del, f2 или f12 при запуске). Если в настройках есть пункты Secure Boot, UEFI Mode — значит, у вас используется UEFI.
Или выполните в Linux:
ls /sys/firmware/efi Если директория существует — система загрузилась через UEFI.
Live USB с Linux
Чтобы восстановить GRUB, понадобится загрузочная флешка с любым дистрибутивом (Ubuntu, Fedora, Mint).
Как создать Live USB:
- Скачайте iso-образ с официального сайта ОС.
- Создайте Live USB с помощью специальных программ:
- Rufus (на Windows) — выберите «GPT для UEFI» или «MBR для BIOS» в зависимости от прошивки вашего компьютера;
- BalenaEtcher (на Linux/Mac).
- Проверьте целостность образа после записи (в некоторых программах есть опция «verify»).
Как восстановить GRUB из-под Windows: два способа
Восстановление через boot-repair (для новичков)
Если вы не хотите работать в терминале, воспользуйтесь утилитой boot-repair. Она автоматизирует 90 % работы.
Шаг 1. Загрузка с Live USB
- Вставьте флешку, перезагрузите компьютер.
- Нажмите клавишу выбора загрузочного устройства (обычно f12, ESC или f8).
- Выберите флешку в меню.
Если у вас UEFI, загружайтесь в режиме UEFI, а не в Legacy! Иначе раздел EFI не будет обнаружен.
Шаг 2. Установка boot-repair
- Откройте терминал в Live-системе.
- Добавьте репозиторий и установите утилиту (далее все команды выполняются в режиме суперпользователя):
add-apt-repository universe   # добавляйте репозиторий в Ubuntu до версии 22.04
apt update
apt install -y boot-repair
Шаг 3. Запуск и настройка
- Запустите boot-repair:
boot-repair - Выберите «recommended repair».
- Следуйте инструкциям на экране: утилита сама определит установленные ОС, восстановит GRUB и обновит конфигурацию.
Если возникли ошибки:
- проверьте подключение к Интернету (boot-repair иногда скачивает дополнительные пакеты);
- убедитесь, что live-система загружена в правильном режиме (uefi/bios).
Ручное восстановление через chroot (для продвинутых пользователей)
Если первый метод не сработал или вы хотите понять процесс изнутри, восстановите GRUB вручную.
Шаг 1. Определение разделов
- Загрузитесь с Live USB.
- Откройте терминал и узнайте список дисков:
fdisk -l или
lsblk -f Команда lsblk -f показывает типы файловых систем и точки монтирования.
- Пример вывода lsblk:
NAME  FSTYPE LABEL   UUID  MOUNTPOINT
sda
├─sda1 ntfs Windows ABCD-1234
├─sda2 ext4 Ubuntu 5678-90AB
└─ sda3 vfat  ESP CDEF-1234
Обратите внимание на:
- корневой раздел Linux (ext4, btrfs и т. д.) — нам нужен именно он;
- раздел EFI (vfat) — если система на UEFI;
- раздел подкачки (swap) — не нужен для восстановления.
Шаг 2. Монтирование разделов
- Создайте точку монтирования:
mkdir /mnt/Linux - Примонтируйте корневой каталог с Ubuntu:
mount /dev/sda2 /mnt/Linux Для UEFI примонтируйте каталог EFI:
mount /dev/sda3 /mnt/Linux/boot/efi Если у вас отдельный раздел /boot, монтируйте его:
mount /dev/sdaX /mnt/Linux/boot Шаг 3. Вход в chroot
Chroot (change root) — это команда, которая изменит видимый корневой каталог, чтобы вы вошли в систему из live-окружения.
- Привяжите системные директории:
mount --bind /dev /mnt/Linux/dev
mount --bind /proc /mnt/Linux/proc
mount --bind /sys /mnt/Linux/sys - Войдите в среду chroot:
chroot /mnt/Linux Шаг 4. Установка GRUB
- Если прошивка BIOS (MBR):
grub-install /dev/sda  # здесь sda — диск, а не раздел
update-grub - Если прошивка UEFI (GPT), убедитесь, что пакет grub-efi установлен:
apt install grub-efi-amd64Перед grub-install нужно обновить загрузочный список в efibootmgr, иначе в некоторых UEFI-системах GRUB не будет загружаться:
efibootmgr -c -d /dev/sda -p 1 -L "GRUB" -l "\EFI\GRUB\grubx64.efi"Здесь -d /dev/sda — диск, -p 1 — номер EFI-раздела (уточните их с помощью lsblk).
Установите GRUB в раздел EFI:
grub-install --target=x86_64-efi --efi-directory=/boot/efi --bootloader-id=GRUB- Обновите конфигурацию:
update-grub - После update-grub в выводе должны появиться строки «found Windows» или «found os probe entries».
Шаг 5. Выход и перезагрузка
- Выйдите из chroot:
sync  # запись данных
exit - Отмонтируйте разделы:
sudo umount -R /mnt/Linux- Перезагрузите компьютер.
Возможные проблемы и их решение
Даже если вы всё сделали правильно, могут возникнуть проблемы.
GRUB не видит Windows
Причина: os-prober не активирован (утилита для автоматического обнаружения установленных ОС).
Решение. В /etc/default/grub раскомментируйте строку:
GRUB_DISABLE_OS_PROBER=false Установите os-prober:
apt install os-prober Обновите загрузчик (update-grub).
Ошибка «grub-install: error: cannot find efi directory»
Причина: неправильно указан путь к разделу EFI.
Решение. Проверьте, примонтирован ли раздел EFI в /boot/efi. Проверьте тип раздела: он должен быть vfat (FAT32).
Загрузчик установился, но система не загружается
Причина: неверный порядок загрузки в uefi/bios или повреждённые файлы GRUB. Также включённый Secure Boot может блокировать работу GRUB.
Решение. Зайдите в настройки UEFI/BIOS и выберите GRUB в качестве первого загрузочного устройства. Отключите Secure Boot в UEFI. Если это не помогло — переустановите GRUB через chroot.
Как избежать проблем в будущем
- Если планируете устанавливать две операционные системы, то сначала установите Windows, потом Linux.
- Создайте резервную копию EFI/MBR.
Для BIOS:
dd if=/dev/sda of=backup.mbr bs=512 count=1 Для UEFI — просто скопируйте содержимое раздела EFI в место для хранения.
- Создайте отдельный раздел EFI для Linux. Это минимизирует конфликты с Windows.
Заключение
Восстановить загрузчик GRUB после установки Windows — задача, которая кажется сложной только на первый взгляд. Даже если вы новичок, boot-repair справится за пару кликов. Для тех, кто хочет глубже разобраться в процессе, подойдёт ручной способ через chroot.
Наши технические специалисты помогут вам определиться с конфигурацией и настроят ваш VPN-сервер под ключ, если это будет необходимо.
Читайте в блоге:
- Как поменять TTL для раздачи Интернета: настройка Default TTL и изменение значения на 64 или 65
- Что такое директория в Linux
- Как сменить владельца папки и изменить права доступа в Linux
Readers help support Windows Report. We may get a commission if you buy through our links.
Read our disclosure page to find out how can you help Windows Report sustain the editorial team. Read more
Due to the aggressive and territorial nature of Windows 10, problems like this will often emerge. That’s why installing Windows 10 before installing Linux in a dual-boot mode is advised. And you can also fix the Windows bootloader from Linux.
Linux is much less intrusive and won’t damage Windows 10 bootloader. Despite that, things can still go wrong after major updates. If that happens, you can fix it with Linux (Ubuntu).
How to repair Windows 10 bootloader errors from Linux?
1. Use the Boot Repair utility on Ubuntu
- Download Ubuntu live distro version.
- Mount it to your USB. You can do it with the Universal USB Installer (preferably) tool. Using this application is essential, or the drive won’t be bootable.
- Plug in the drive and boot from it.
- Go for the Try Ubuntu without installing option (If this fails, open BIOS/UEFI settings, disable Secure Boot, and try again).

- Once Ubuntu boots, press Ctrl+Alt+T to open the Terminal.
- In the command line, run the following string and press Enter after each:
sudo add-apt-repository ppa:yannubuntu/boot-repair

sudo apt update

sudo apt install boot-repair
- This should install Boot Repair application, which you can now find in the Application menu.
- Open it and choose Recommended repair and wait until it’s done.


Let’s start with the simplest method to fix the Windows bootloader from Linux. Probably knowingly, Ubuntu comes with a small utility called Boot Repair which fixes Windows 10 bootloader corruption upon running.
You’ll need to have the latest version of bootable Ubuntu mounted on your USB drive. After that, you’ll need to install the utility and, without meddling in the Terminal, repair the Windows 10 bootloader.
2. Use Terminal
- Boot again with the bootable USB drive.
- Open Terminal.
- In the command line, type the following strings and press Enter after each:
sudo apt-get install extlinux
sudo dd if=/usr/lib/extlinux/mbr.bin of=/dev/sdasudo extlinux -i /boot/extlinux - Don’t forget to replace sda with the Windows 10 system drive.
- Reboot after that, and Windows 10 should boot without any issues.

The second method relies on the Syslinux run through the Terminal. You’ll need to run a batch of commands to install and utilize Syslinux to fix the Windows 10 bootloader.
3. Use LILO
- Boot again with the bootable USB drive and open Terminal.
- In the command line, type the following string and press Enter after each:
sudo apt-get install lilo
sudo lilo - M/dev/sda mbr
- Reboot, and you’re good to go. The Windows 10 bootloader is fixed.


The final method utilizes LILO (Linux Loader), a small program responsible for managing dual boot. The procedure is similar to the previous one, at least for the unaccustomed eye.
If the previous two steps weren’t working for you (the first one should resolve bootloader issues), LILO is certainly a handy alternative.
If you’re still having trouble after going through all the solutions above, we recommend using a third-party tool to repair your PC and keep it healthy.
Hopefully, you managed to resolve the issue with the Windows 10 bootloader. We encourage you to tell us which fix worked in the comment below.
Aleksandar Ognjanovic
Aleksandar’s main passion is technology. With a solid writing background, he is determined to bring the bleeding edge to the common user. With a keen eye, he always spots the next big thing surrounding Microsoft and the Windows OS.
Focused on Windows errors and how to solve them, he also writes about the OS’s latest features as well as its interface.
In his free time, he likes to read, listen to music, and enjoy the nature. Hiking is one of his newly found passions.
When dual-booting with Linux and Windows, a common issue users face is a corrupted or missing Windows bootloader. This can happen for various reasons, such as upgrading Linux, modifying partitions, or simply due to updates from Windows itself. Fortunately, it’s possible to fix the Windows bootloader using Linux tools. In this article, we will explore three effective methods to restore your Windows bootloader using Linux without the need for Windows installation media.
Understanding the Boot Process
Before we jump into the methods, it’s crucial to understand how the boot process works in a dual-boot system. The boot process involves several components:
- BIOS/UEFI Firmware: This initializes the hardware and finds the bootloader.
- Bootloader: This small program starts the operating system. For Windows, this is
bootmgr, while for Linux, it might be GRUB (GNU GRand Unified Bootloader). - Operating System: After the bootloader executes, it loads the operating system.
When you install Linux alongside Windows, GRUB typically becomes the primary bootloader. If Windows updates modify the bootloader, or if GRUB is not configured correctly, it can lead to boot issues.
Method 1: Using boot-repair
One of the simplest and most user-friendly methods to fix the Windows bootloader is by using a utility called boot-repair. This tool is included in many Linux distributions, and it automates the repair process. Here’s how to use it:
Step 1: Install Boot-Repair
On various Linux distributions, you can install boot-repair easily through the terminal. Here are the commands for some popular distributions:
For Ubuntu/Debian:
sudo add-apt-repository ppa:yannubuntu/boot-repair
sudo apt-get update
sudo apt-get install -y boot-repair
For Fedora:
sudo dnf install boot-repairFor Arch Linux:
sudo pacman -S boot-repairMake sure to update your software repositories before installing.
Step 2: Launch Boot-Repair
Once installed, you can launch boot-repair from the terminal by typing:
boot-repairStep 3: Generate Boot-Repair Information
After launching, you’ll be greeted with a graphical interface. Here, you can attempt a «Recommended Repair.» If you receive prompts about necessary packages, follow the instructions to install them.
Step 4: Perform Recommended Repair
Select the «Recommended Repair» option. This will automatically detect issues with your bootloader and attempt to fix them. Follow the instructions on-screen. When the process completes, it will provide a summary and suggest further actions if necessary.
Step 5: Reboot Your System
Once the repair is complete, restart your system. Check to see if you can boot into Windows successfully.
Method 2: Using GRUB Command Line
If you prefer a more hands-on, manual approach, you can fix the Windows bootloader directly from the GRUB command line. Here’s how you can do this.
Step 1: Boot into GRUB
When you power on your system, you will enter the GRUB menu. If GRUB does not appear, hold down the Shift key (for BIOS systems) or ESC key (for UEFI systems) immediately after powering on.
Step 2: Identify the Windows Partition
In GRUB, you can use two commands to find the Windows partition. Press c to enter the command-line mode and then run:
lsThis command will show all available partitions. They may look something like hd0,msdos1, hd0,msdos2, etc. Identify the partition where Windows is installed. It often has the ntfs filesystem.
Step 3: Set the Root and Chainload
Once identified, you can set the GRUB root to the appropriate partition and attempt to chainload Windows. For example, if Windows is on (hd0,msdos1), enter:
set root=(hd0,msdos1)
chainloader +1
boot
This sends control to the Windows bootloader, allowing Windows to boot directly.
Step 4: Update GRUB Configuration
If the above steps allow you to boot into Windows, you should update your GRUB configuration file to make this change permanent. Boot into your Linux system and run:
sudo update-grubThis command will add the Windows boot entry back into GRUB.
Method 3: Using ntfsfix
In some scenarios, particularly if the Windows partition is hibernated or in a corrupted state, you may need to use ntfsfix, a utility that can help repair NTFS filesystems. Here’s how to use it:
Step 1: Install ntfs-3g
First, ensure that ntfs-3g is installed on your Linux system, as ntfsfix is part of this package. Use the following command for installation:
For Ubuntu/Debian:
sudo apt-get install ntfs-3gFor Fedora:
sudo dnf install ntfs-3gStep 2: Identify the Windows Partition
You can use the lsblk or fdisk command to identify your Windows partition.
sudo fdisk -lLook for the NTFS partition. It usually has a designation like /dev/sdaX, where X is the partition number.
Step 3: Run ntfsfix
In order to fix the NTFS filesystem, execute the following command:
sudo ntfsfix /dev/sdaXReplace /dev/sdaX with your actual Windows partition.
Step 4: Reboot Your System
After running ntfsfix, reboot your system. This could resolve issues related to the Windows bootloader caused by filesystem errors.
Additional Considerations
- Backup Important Data: Before attempting any repair operations, make sure to back up important data from both partitions.
- Fast Startup in Windows: If you are dual-booting, ensure that the fast startup option in Windows is disabled. This feature can lead to issues with a hibernated filesystem and should be turned off to prevent access problems when switching between OSes.
- Check BIOS/UEFI Settings: Sometimes boot issues may arise from BIOS/UEFI settings. Ensure that the boot order is correct and that the settings are compatible with your OS configurations.
Conclusion
Repairing the Windows bootloader from a Linux environment is absolutely possible and often straightforward if you use the right tools. Whether you prefer automated solutions like boot-repair, manual command line adjustments via GRUB, or fixing filesystem issues with ntfsfix, there’s a method to suit your comfort level and situation.
With a little patience and the right knowledge, you can restore the Windows bootloader and get back to enjoying your dual-boot system in no time. Remember to always be cautious and back up your important data before performing upgrades or repairs.
This simple tutorial shows you how to repair your Windows 7 boot loader (MBR) from Ubuntu dual boot or Ubuntu Live CD / USB. This can be useful if you don’t have a Windows CD or DVD on hand.
To do so, first boot into your Ubuntu system. When you’re in Ubuntu, press Ctrl+Alt+T on your keyboard to open terminal and follow below steps:
1.) First run below command to check your disk:
sudo fdisk -l
The output tells you the disk information:
Disk /dev/sda: 320.1 GB, 320072933376 bytes
255 heads, 63 sectors/track, 38913 cylinders, total 625142448 sectors
Units = sectors of 1 * 512 = 512 bytes
Sector size (logical/physical): 512 bytes / 4096 bytes
I/O size (minimum/optimal): 4096 bytes / 4096 bytes
Disk identifier: 0x016c8108Device Boot Start End Blocks Id System
/dev/sda1 * 63 39054014 19526976 7 HPFS/NTFS/exFAT
2.) Now run commnad to install syslinux, which is a suite of lightweight IBM PC MBR bootloaders for starting up computers with the Linux kernel.
sudo apt-get update; sudo apt-get install syslinux

3.) Once installed, you can fix your Windows bootloader by running below command in terminal:
sudo dd if=/usr/lib/syslinux/mbr.bin of=/dev/sda
Replace the startup disk name /dev/sda in the above command according to the output in step 1.

Enjoy!
Содержание статьи:
- Восстановление Grub
- ШАГ 1
- ШАГ 2
- ШАГ 3
- Вопросы и ответы: 4
Всем доброго времени!
Эта заметка будет довольно специфична и пригодится только тем, у кого на компьютере установлено несколько версий ОС: Windows, Linux…
Так вот, при переустановке (обновлении) одной из ОС (обычно, так делает Windows) — может затереться загрузчик Grub, и при включении ПК более не будет появляться «черного» меню с предложением выбрать какую систему загружать… 👀
Разумеется, чтобы не переустанавливать ОС (и не настраивать всё заново) — лучше просто восстановить сам этот загрузчик. Как правило, для этого достаточно загрузиться с LiveCD (👉 Linux Mint, Elementary OS, Ubuntu и пр.), смонтировать корневой раздел Linux и ввести спец. команды для восстановления…
Однако, «ручная» работа через терминал имеет «тонкости» (и не всегда выполняется просто). Поэтому здесь хочу предложить гораздо более легкий вариант! 👌
*
Восстановление Grub
ШАГ 1
Для начала нам нужно подготовить загрузочную флешку (LiveCD) c одним из дистрибутивов Linux. Скорее всего она у вас должна быть!
(Если у вас одна из «разновидностей» Ubuntu — я бы порекомендовал использовать образ 👉 с Linux Mint — т.к. в нем уже предустановлена нужная утилита // Boot Repair).
На всякий случай здесь приведу несколько ссылок в помощь:
1) Как создать загрузочную флешку с Linux;
2) Как загрузиться с USB-флешки или внешнего HDD.
Будем считать, что загрузиться с подготовленной флешки у вас получилось… 👌
*
ШАГ 2
Далее (после загрузки с LiveCD с Linux) нам понадобиться установить утилиту Boot Repair (если у вас последняя версия Linux Mint — то она встроена, и чтобы ее запустить — откройте меню «Пуск / Administration / Boot Repair»).
После можно переходить к ШАГУ 3 (для тех, у кого нет встроенной Boot Repair — чуть ниже я покажу как ее установить).
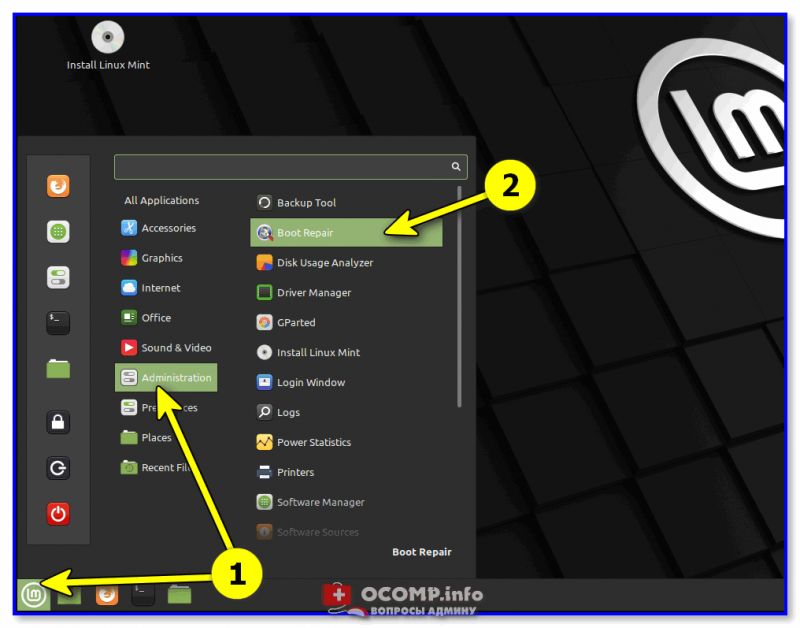
Linux Mint — Boot Repair
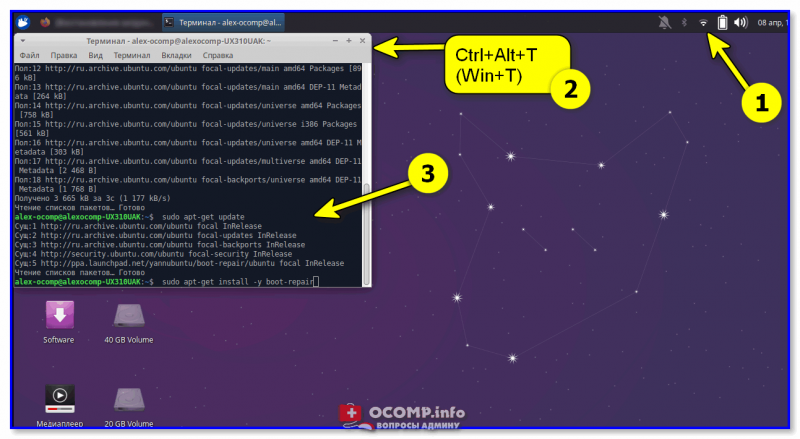
Для инсталляции Boot Repair сначала проверьте, что у вас есть подключение к Интернет.
Далее необходимо открыть терминал (обычно, для этого используют сочетания Ctrl+Alt+T или Win+T) и ввести поочередно следующие три команды (после каждой нажимать Enter!).
sudo add-apt-repository ppa:yannubuntu/boot-repair
sudo apt-get update
sudo apt-get install -y boot-repair
Xubuntu (для примера) — устанавливаем Boot Repair
После в меню «Пуск» должна появиться ссылка на нашу утилиту (обратите внимание, что на русском она называется как «Восстановление загрузки»… 👇). Кстати, запустить Boot Repair можно и из консоли. Команда:
boot-repair
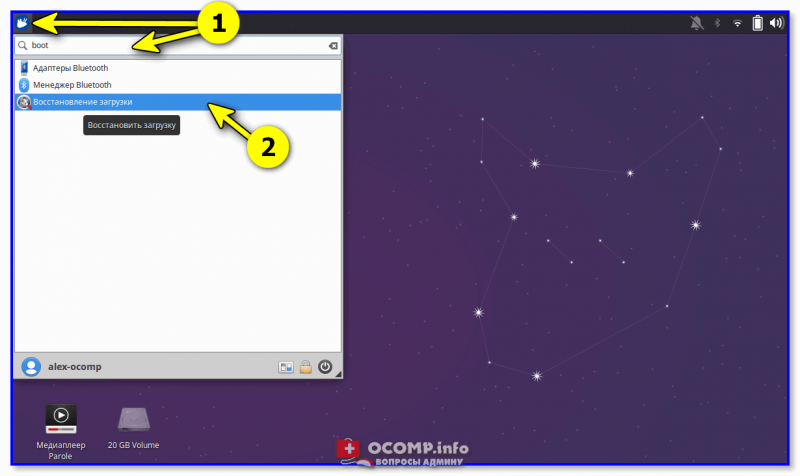
ПУСК — восстановление загрузки (Boot Repair)
*
ШАГ 3
1) В большинстве случаев утилита Boot Repair справляется с восстановлением Grub в автоматическом режиме. Поэтому порекомендую вам сразу же нажать на первый пункт «Recommended Repair». Пару скринов ниже. 👇
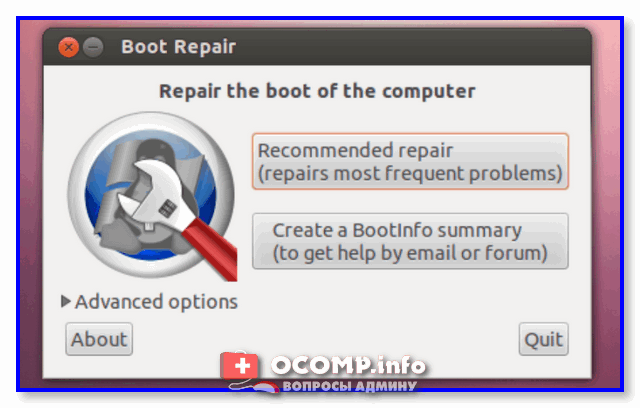
Boot Repair (на английском)
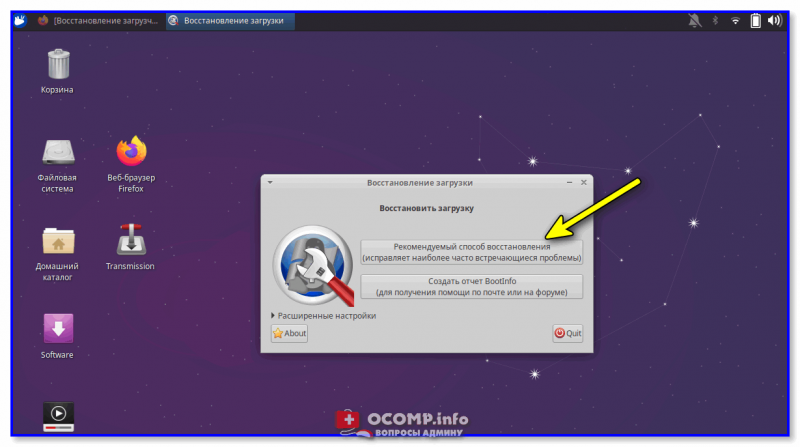
Рекомендуемый способ восстановления (русская версия)
2) Как правило, на весь процесс требуется 1-2 мин. 👇
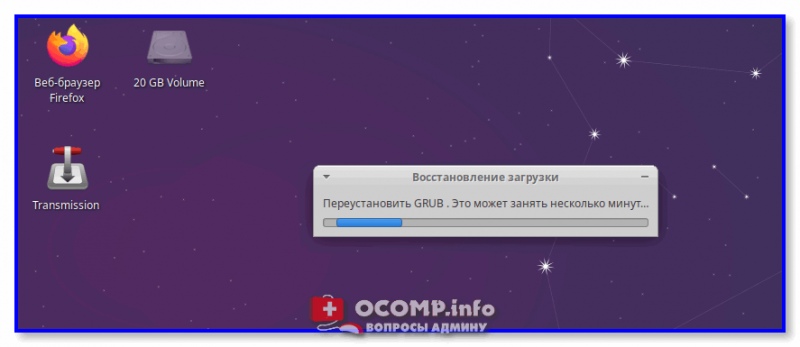
Процесс пошел!
3) Если всё прошло успешно — увидите окно об успешном восстановлении Grub. Теперь можно выключить ПК (ноутбук), вынуть из USB-порта флешку с LiveCD и проверить как загружается устройство: появляется ли меню Grub?.. 👌

Загрузка успешно восстановлена
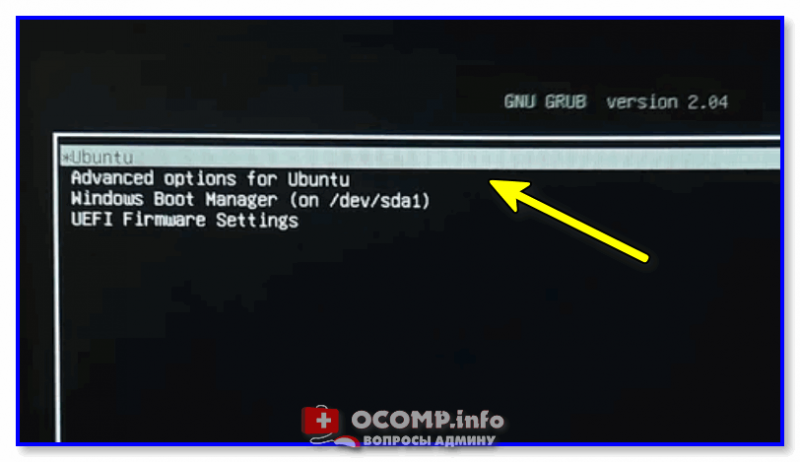
GNU Grub version 2.04 — все заработало!
4) Кстати, иногда утилита Boot Repair может попросить вас выполнить ряд команд в терминале (сочетание клавиш для его запуска: Ctrl+Alt+T или Win+T).
Сами команды, разумеется, утилита приводит в своем окне. После их выполнения — нажмите на кнопку «Forward» (если вы не выполнили команды — утилита снова покажет текущее окно). Ничего «опасного» и удаляющего данные с домашних разделов диска —в них быть не должно!

Эти команды нужно будет ввести вручную в терминал (и нажать Enter)
PS
Кстати, у Boot Repair есть расширенные настройки, в которых можно вручную задать ряд параметров. Если вы слабо представляете «что, где и как…» — то лучше это меню не трогать (во избежание лишних проблем…).
*
Другие простые решения, — само собой, приветствуются!
На сим пока всё, удачи!
👋