Boot Menu (меню загрузки) можно вызывать при включении на большинстве ноутбуков и компьютеров, данное меню является опцией BIOS или UEFI и позволяет быстро выбрать, с какого накопителя загрузить компьютер в этот раз. В этой инструкции покажу, как зайти в Boot Menu на популярных моделях ноутбуков и материнских плат ПК.
Описываемая возможность может быть полезной, если вам потребовалось загрузиться с Live CD или загрузочной флешки для установки Windows и не только — не обязательно менять порядок загрузки в БИОС, как правило, достаточно однократного выбора нужного устройства загрузки в Boot Menu. На некоторых ноутбуках это же меню дает доступ и к разделу восстановления ноутбука.
Сначала напишу общие сведения по входу в Boot Menu, нюансы для ноутбуков с предустановленной Windows 10 и 8.1. А потом — конкретно по каждой марке: для ноутбуков Asus, Lenovo, Samsung и других, материнских плат Gigabyte, MSI, Intel и т.п. Внизу есть так же видео, где показывается и поясняется вход в такое меню.
Общая информация по входу в меню загрузки БИОС
Так же, как для входа в БИОС (или настройки ПО UEFI) при включении компьютера необходимо нажать определенную клавишу, как правило Del или F2, так же и для вызова Boot Menu существует аналогичная клавиша. В большинстве случаев это F12, F11, Esc, но есть и другие варианты, о которых напишу ниже (иногда информация о том, что нужно нажать для вызова Boot Menu появляется сразу на экране при включении компьютера, но не всегда).
Причем, если все что вам требуется — это поменять порядок загрузки и сделать это нужно для какого-то однократного действия (установка Windows, проверка на вирусы), то лучше использовать именно Boot Menu, а не ставить, например, загрузку с флешки в настройках БИОС.

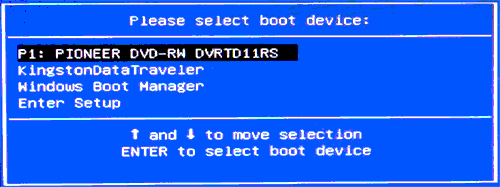
В Boot Menu вы увидите список всех подключенных к компьютеру устройств, с которых в данный момент потенциально возможно загрузка (жесткие диски, флешки, диски DVD и CD), а также, возможно, вариант сетевой загрузки компьютера и запуск восстановления ноутбука или компьютера с резервного раздела.
Особенности входа в Boot Menu в Windows 10 и Windows 8.1 (8)

Для ноутбуков и компьютеров, которые изначально поставлялись с Windows 8 или 8.1, а в скором времени и с Windows 10, вход в Boot Menu с помощью указанных клавиш может не получаться. Связано это с тем, что выключение для этих операционных систем не является в полном смысле этого слова выключением. Это скорее гибернация, а потому меню загрузки может и не открываться при нажатии F12, Esc, F11 и других клавиш.
В этом случае вы можете поступить одним из следующих способов:
- При выборе «Выключение» в Windows 8 и 8.1 удерживать клавишу Shift, в этом случае компьютер должен выключиться полноценно и при включении клавиши для входа в Boot Menu должны сработать.
- Перезагрузите компьютер вместо выключения и включения, при перезагрузке нажмите нужную клавишу.
- Отключите быстрый запуск (см. Как отключить быстрый запуск Windows 10). В Windows 8.1 для этого зайдите в Панель управления (вид панели управления — значки, а не категории), выберите пункт «Электропитание», в списке слева нажмите «Действия кнопок питания» (даже, если это не ноутбук), отключите пункт «Включить быстрый запуск» (для этого может потребоваться нажать «Изменение параметров, которые сейчас недоступны» вверху окна).
Один из указанных способов обязательно должен помочь со входом в меню загрузки, при условии, что все остальное делается правильно.
Вход в Boot Menu на Asus (для ноутбуков и материнских плат)
Практически для всех настольных компьютеров с материнскими платами Asus, вход в меню загрузки осуществляется нажатием клавиши F8 после включения компьютера (тогда же, когда мы нажимаем Del или F9, чтобы зайти в БИОС или UEFI).
А вот с ноутбуками есть некоторая неразбериха. Чтобы зайти в Boot Menu на ноутбуках ASUS, в зависимости от модели, нужно при включении нажать:
- Esc — для большинства (но не для всех) современных и не очень моделей.
- F8 — для тех моделей ноутбуков Asus, название которых начинается с x или k, например x502c или k601 (но не всегда, есть модели на x, где вход в Boot Menu осуществляется клавишей Esc).
В любом случае, вариантов не так много, так что при необходимости можно попробовать каждый из них.
Как зайти в Boot Menu на ноутбуках Lenovo
Практически для всех ноутбуков и моноблоков марки Lenovo для входа в Boot Menu можно использовать клавишу F12 при включении.
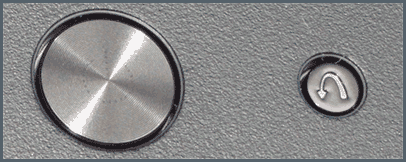
Также дополнительные варианты загрузки для ноутбуков Lenovo можно выбрать, нажав маленькую кнопку со стрелкой рядом с кнопкой питания.
Acer
Следующая по популярности модель ноутбуков и моноблоков у нас — это Acer. Вход в Boot Menu на них для разных версий BIOS осуществляется путем нажатия клавиши F12 при включении.
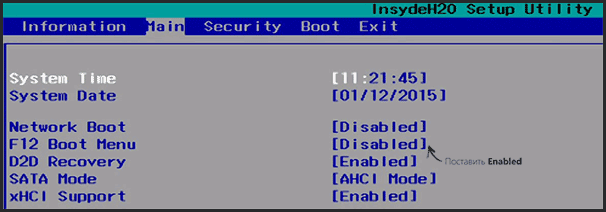
Однако, на ноутбуках Acer есть одна особенность — часто, вход в Boot Menu по F12 на них не работает по умолчанию и для того, чтобы клавиша заработала, необходимо сначала зайти в БИОС, нажав клавишу F2, а потом переключить параметр «F12 Boot Menu» в состояние Enabled, после чего сохранить настройки и выйти из БИОС.
Остальные модели ноутбуков и материнских плат
Для остальных моделей ноутбуков, а также ПК с разными материнскими платами особенностей поменьше, а потому просто приведу клавиши входа в Boot Menu для них в виде списка:
- Моноблоки и ноутбуки HP — клавиша F9 или Esc, а затем — F9
- Ноутбуки Dell — F12
- Ноутбуки Samsung — Esc
- Ноутбуки Toshiba — F12
- Материнские платы Gigabyte — F12
- Материнские платы Intel — Esc
- Материнские платы Asus — F8
- Материнские платы MSI — F11
- AsRock — F11
Кажется, учел все наиболее распространенные варианты, а также описал возможные нюансы. Если вдруг у вас все так же не получается зайти в Boot Menu на каком-либо устройстве, оставляйте комментарий с указанием его модели, я постараюсь найти решение (и не забывайте о моментах, связанных с быстрой загрузкой в последних версиях Windows, о чем я писал выше).
Видео о том, как войти меню устройств загрузки
Ну и, в дополнение ко всему написанному выше, видео инструкция о входе в Boot Menu, возможно, кому-то окажется полезной.
Также может оказаться полезным: Что делать, если БИОС не видит загрузочную флешку в Boot Menu.

Image Credit:
triloks/iStock/GettyImages
On occasion, you may find yourself in a situation where you need your computer to start up in a different way than it usually does. Whether you’re troubleshooting to find the source of an issue with your computer or upgrading your computer’s operating system to the latest version, you’ll sometimes need to load data directly from a CD, a flash drive, secondary hard drive or even a second operating system installed on your computer. Luckily, you don’t have to be a tech professional to do this: you can easily accomplish this task by using the Windows Boot Manager, accessed through your computer’s startup sequence or through a menu option inside your Windows operating system’s settings.
What Is Windows Boot
Manager?
The Windows Boot Manager is a small piece of utility software installed to your boot volume – the small amount of space reserved on your hard drive that controls the way your computer starts up. Usually, Boot Manager works in the background when you turn on your computer, automatically loading your Windows installation. However, you can access the Windows Boot Manager menu manually, allowing you to temporarily modify your computer’s startup sequence. On most computers, this can be accomplished by pressing the «F8» key as soon as your computer turns on. When the Windows Boot Manager menu opens, you can use the arrow keys to select an operating system or external boot source and then press «ENTER» to load it.
Accessing Windows 10 Boot Manager
If you have trouble accessing the Boot Manager during your computer’s startup process, you can access the Windows 10 Boot Manager through your Settings menu after your computer loads your default Windows installation. To do this, click the gear for «Settings» inside your Start menu, then click «Update & Security» in the window that appears. In the menu on the left side of the window, click «Recovery,» then under the «Advanced Startup» heading click «Restart Now.» Your computer will restart and give you access to the Boot Manager.
Boot Manager on
Windows 8.1
You can also access Windows Boot Manager directly through your Windows 8.1 install by following roughly the same procedure. From your Start menu, open «Settings,» then click «Change PC Settings.» Open the «General» settings menu, then click «Restart Now» under the «Advanced Startup» heading. In the menu that appears after your computer restarts, select «Use a Device» to open the Boot Manager.
Download Article
A quick guide to find the Boot menu on Windows to recover or repair
Download Article
- Using a Keyboard
- Using Windows 11, 10, and 8
- Using Windows 7 and Vista
- Using Windows XP
- Video
- Q&A
|
|
|
|
|
Are you trying to get to the Windows Boot menu through the menu or with a key? If you need to access the Boot menu, you can press the F8 key before the Windows starts. You can also open the Boot menu from the Start menu if you’re already logged into your device. Knowing how to access the Boot menu can help troubleshoot your computer if it’s experiencing issues. This wikiHow will show you how to get into the Boot menu on Windows 11, 10, 8, or 7.
Things You Should Know
- Turn on your computer and press the function key for your PC model.
- To reach the menu from Windows, click «Start» → Power button → hold «Shift» and click «Restart». Click «Troubleshoot» → «Advanced options».
- Use the Boot menu to find actions you can use to repair or troubleshoot issues with Windows.
-
To access the Boot menu, you’ll need to press a key before the operating system fully loads.[1]
- If your computer is on, shut it down first. You can also restart it.
-
This will vary depending on your device. Here’s a list of common BIOS keys by manufacturer:[2]
- Acer: Del or F2
- Asus: F9
- Dell: F12
- HP: Esc or F10
- Lenovo: F1 or F2
- Samsung: F2
- You must press this key before the Windows logo appears. When done correctly, your computer will start in Safe mode.
Advertisement
-
It’s usually at the bottom-left corner of the screen.
- On Windows 11, this will be in the bottom center of the screen.
-
This will be underneath the cog icon.
- A pop-up menu will open.
-
You must hold Shift, otherwise your computer will perform a regular restart.[3]
- The computer will power off and back on. Instead of booting to the desktop, you’ll see a blue menu titled “Choose an option.”
-
This will be underneath Continue.[4]
-
You can find this at the very bottom.[5]
-
Advertisement
-
This will open the Shut Down Windows menu.
-
The options will expand.
-
This will be next to Shut down.[6]
-
The computer will now shut down and restart. As soon as the computer restarts, you will need to act quickly—be ready.
-
You’ll need to press it before the Windows logo appears. Continue holding this key until you see the Advanced Boot Options menu.
- If Windows boots to the desktop, repeat this process to try again.
Advertisement
-
This will open the Windows Security menu.
-
You can find this next to Log Off….
-
This will expand the options.
-
This will be next to Shut down.
-
The computer will now restart. As soon as the computer restarts, you will need to act quickly—be ready.
-
Continue tapping this key until you see the Advanced Boot Options menu—this is the Windows XP boot menu.
- If Windows boots to the desktop, repeat this process to try again.
Advertisement
Add New Question
-
Question
My Lenovo turbo boost laptop hangs by showing boot menu when switching on, what to do?
Amin Moghoomi
Community Answer
Try finding your hard drive in the list. And you can try a Windows installation disk to check your hard drive.
-
Question
I want to boot up using my old Windows XP Pro Disk and use it to format my hard drive, which doesn’t have windows XP on it. Can this be done?
Yes, it can. Insert Your disk. Press the bios key. This depends on your computer. Change the boot order. Save the changes. Reboot your computer. When you see «Press Any Key To Boot From CD», press a key. When you get to «Where Would You Like To Install Windows?», select the drive, press Enter, click «Format As Ntfs» Or «Format As Fat».
-
Question
How can I restart my laptop?
Nolan JP
Community Answer
Open the start menu, then push the power button (it looks like an «O» but with an «I» stuck in the top). Then push the button that says «Restart.» The computer will turn off, then back on.
Ask a Question
200 characters left
Include your email address to get a message when this question is answered.
Submit
Advertisement
Video
Thanks for submitting a tip for review!
About This Article
Thanks to all authors for creating a page that has been read 651,206 times.
Is this article up to date?
Содержание статьи:
- Справочная: «горячие» клавиши
- Модель мат. платы (ноутбука) и пр.
- Таблица №1: для компьютеров (по производителю мат. платы)
- Таблица №2: для ноутбуков (BIOS + Boot Menu, и пр.)
- Таблица №3: восстановление из скрытого раздела (для ноутбуков)
- 📌 PS: если не получилось зайти в BIOS
- Вопросы и ответы: 12
Доброго всем дня!
При установке Windows (например), очень часто необходимо выбрать загрузочный носитель, отличный от жесткого диска. Сделать это можно двумя путями:
- 👉 зайти в BIOS и изменить очередь загрузки (т.е. поставить в очередь загрузки флешку перед HDD — таким образом ПК будет сначала проверять флешку на наличие загрузочных записей, а только потом жесткий диск);
- 👉 вызвать Boot Menu и в нем выбрать конкретный носитель для загрузки в данный момент. На мой взгляд, этот вариант даже лучше первого: быстрее и не нужно заходить туда-сюда в BIOS менять очередь загрузки.
*
Чтобы войти в BIOS (вызвать Boot Menu) в большинстве случаев используется клавиши: F2, Del, Esc, F12 (в зависимости от производителя устройства). Кнопку нажимать нужно сразу же после включения компьютера (можно несколько раз, чтобы не пропустить нужный момент.
Кстати, если приглядеться на первый экран, который виден сразу после включения компьютера, то на нем часто пишут кнопку для входа в нужные настройки (вызова меню). Пример на скрине ниже. 👇
👉 Важно!
Войти в UEFI (BIOS) можно из интерфейса Windows 11, 10, 8 (без использования спец. клавиш F2, Del и др.)!
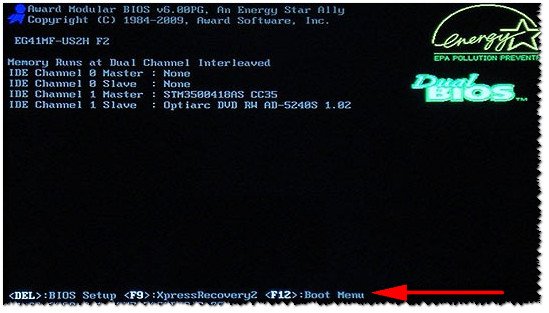
Рис. 1. Dual Bios. Кнопка DEL — вход в настройки BIOS, кнопка F12 — Вызов Boot Menu.
*
Справочная: «горячие» клавиши
Модель мат. платы (ноутбука) и пр.
Чтобы пользоваться таблицами ниже — Вам необходимо точно знать какая у вас материнская плата (модель ноутбука). Узнать это можно несколькими путями, приведу самые быстрые:
- воспользоваться 👉 документацией, которая шла к вашему ПК/ноутбуку (если она еще сохранилась 😉);
- воспользоваться какой-нибудь спец. утилитой 👉 для определения характеристик компьютера. Порекомендую Speccy…
- прочитать мои примеры по определению 👉 модели мат. платы // 👉 модели ноутбука.
*
Speccy
Официальный сайт: https://www.piriform.com/speccy
Простая бесплатная программа, которая расскажет о вашем железе довольно много. Например, можно узнать информацию о: процессоре (CPU), оперативной памяти (Ram), материнской плате (Motherboard), видеокарте (Graphics), накопителях HDD, SSD (Storage) и пр.
Кроме этого, можно узнать и контролировать в режиме онлайн температуру основных компонентов: жесткого диска, видеокарты, процессора.
Скриншот работы данной утилиты показан на рис. 2. 👇
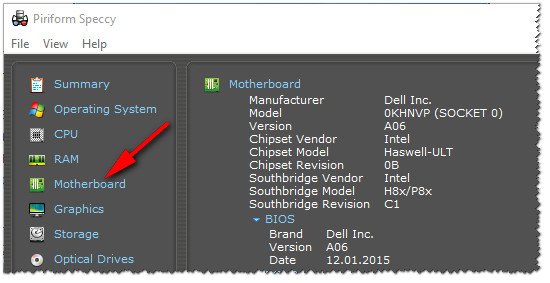
Рис. 2. Speccy — получение информации о материнской плате
*
Таблица №1: для компьютеров (по производителю мат. платы)
| Материнская плата | Версия BIOS | Горячая клавиша | Какое меню будет открыто |
|---|---|---|---|
| Acer | Del | Enter Setup | |
| F12 | Boot Menu | ||
| ASRock | AMI | F2 or DEL | run Setup |
| F6 | Instant Flash | ||
| F11 | Boot Menu | ||
| TAB | switch Screen | ||
| Asus | Phoenix-Award | DEL | BIOS Setup |
| TAB | Display BIOS POST Message | ||
| F8 | Boot Menu | ||
| Alt + F2 | Asus EZ Flash 2 | ||
| F4 | Asus Core Unlocker | ||
| BioStar | Phoenix-Award | F8 | Enable System Configuration |
| F9 | Select Booting Device after POST | ||
| DEL | Enter SETUP | ||
| ChainTech | Award | DEL | Enter SETUP |
| ALT+F2 | Enter AWDFLASH | ||
| ECS (EliteGrour) | AMI | DEL | Enter SETUP |
| F11 | BBS POPUP | ||
| FoxConn (WinFast) | TAB | POST Screen | |
| DEL | SETUP | ||
| ESC | Boot Menu | ||
| GigaByte | Award | ESC | Skip memory test |
| DEL | Enter SETUP/Q-Flash | ||
| F9 | Xpress Recovery Xpress Recovery 2 | ||
| F12 | Boot Menu | ||
| Intel | AMI | F2 | Enter SETUP |
| MSI | F2, Del (реже F1) | Enter Setup | |
| F11 | Boot Menu |
*
Примечание: на современных ноутбуках также работает комбинация клавиш в Windows: зажать кнопку SHIFT + выбрать мышкой кнопку перезагрузки.
Boot Menu представляет из себя небольшое окно, в котором при помощи мышки (стрелок на клавиатуре) вы сможете выбрать устройство, с которого произвести загрузку. Пример такого меню показан на рис. 3. 👇
В зависимости от производителя вашего устройства — меню может несколько отличаться, но принцип работы везде одинаков. 😉
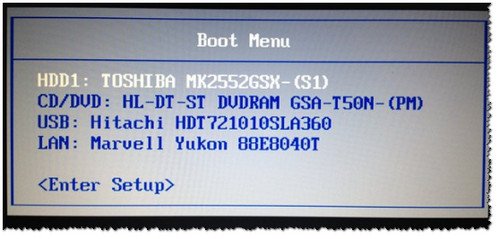
Рис. 3. Классическое Boot Menu (Ноутбук Toshiba)
*
Таблица №2
| Производитель ноутбука | Версия BIOS | Горячая клавиша | Функция / вызов меню |
|---|---|---|---|
| Acer (инструкция) | Phoenix | F2 | Enter Setup |
| F12 | Boot Menu (Change Boot Device,Multi Boot Selection Menu) | ||
| Alt+F10 | D2D Recovery (disk-to-disk system recovery) | ||
| Asus (инструкция) | AMI | F2 | Enter Setup |
| ESC | Popup Menu | ||
| F4 | Easy Flash | ||
| Phoenix-Award | DEL | BIOS Setup | |
| F8 | Boot Menu | ||
| Benq | Phoenix | F2 | BIOS Setup |
| Dell [инструкция] | Phoenix,Aptio | F2 | Setup |
| F12 | Boot Menu | ||
| DEXP [инструкция] |
F2 или Del | BIOS | |
| Digma | ESC (нажимать лучше до вкл. устройства) | BIOS Setup | |
| eMachines (Acer) | Phoenix | F12 | Boot Menu |
| Fujitsu Siemens | AMI | F2 | BIOS Setup |
| F12 | Boot Menu | ||
| Gateway (Acer) | Phoenix | Click mouse or Enter | Menu |
| F2 | BIOS Settings | ||
| F10 | Boot Menu | ||
| F12 | PXE Boot | ||
| Irbis | F2 (ESC) | BIOS Settings | |
| HP (Hewlett-Packard)/ Compaq
[инструкция] |
Insyde | ESC | Startup Menu |
| F1 | System Information | ||
| F2 | System Diagnostics | ||
| F9 | Boot Device Options | ||
| F10 | BIOS Setup | ||
| F11 | System Recovery | ||
| Enter | Continue Startup | ||
| HONOR [инструкция] | F2 (лучше зажать до вкл. устройства) | BIOS Setup | |
| F12 | Boot Device | Menu | ||
| HUAWEI
[инструкция] |
F2 | BIOS Setup | |
| F12 | Boot Device | Menu | ||
| HUAWEI MateBook
[инструкция] |
Кнопка питания и кнопка увел. громкости. | BIOS Setup | |
| Next | F1 | Вызов Boot-Menu | |
| F2 | Настройка BIOS | ||
| Lenovo (IBM)
[инструкция] |
Phoenix SecureCore Tiano | F2 | Setup |
| F12 | MultiBoot Menu | ||
| Клавиша Recovery на корпусе | MultiBoot Menu | ||
| LG (Gram) | Phoenix | F2 | BIOS |
| MSI [инструкция] | *** | DEL (F2 реже) | Setup |
| F11 | Boot Menu | ||
| TAB | Show POST screen | ||
| F3 | Recovery | ||
| Packard Bell (Acer) | Phoenix | F2 | Setup |
| F12 | Boot Menu | ||
| PRESTIGIO | AMI | ESC (нажимать перед включением) | BIOS |
| Tecno [инструкция] | ESC (или F2 на моделях младше 2024г.) | BIOS | |
| F7 | Boot Menu | ||
| Toshiba | Phoenix | Esc,F1,F2 | Enter Setup |
| Toshiba Satellite A300 | F12 | Bios |
*
Таблица №3: восстановление из скрытого раздела (для ноутбуков)
В большинстве современных ноутбуков встроен специальный скрытый раздел с возможностью восстановления ОС Windows с помощью «пары» клавиш (нет необходимости подготавливать загрузочную флешку, скачивать ISO образы с Windows и пр.).
Как правило, чтобы запустить функцию восстановления — после включения ноутбука достаточно нажать одну клавишу (F9, например, на ноутбуках Asus). Далее появиться окно, в котором нужно следовать указанию мастера восстановления.
Примечание: при восстановлении информации, системный диск «C:\» часто форматируется и вся информация с него удаляется. Сделайте заранее копию важных данных с него.
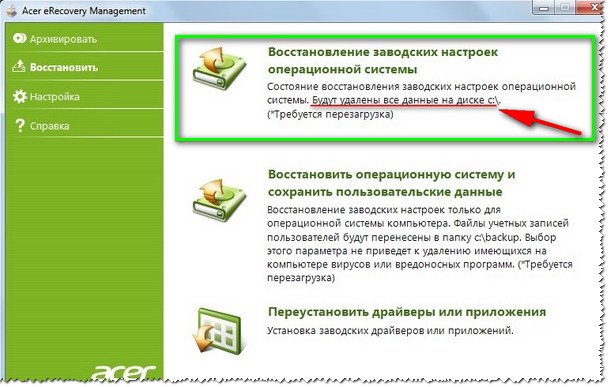
Рис. 4. Ноутбук ACER — сервисная утилита восстановления
Таблица №3
| Производитель ноутбука | Сочетание кнопок | Примечание |
|---|---|---|
| Acer | Alt+F10 | Сначала необходимо войти в Bios ноутбука, и включить функцию D2D Recovery. В системе восстановления, по умолчанию, установлен пароль: 000000 или AIM1R8. |
| Asus | F9 | |
| Dell Inspiron | Ctrl + F11 | |
| Fujitsu Siemens | F8 | |
| HP | F10, F11 | |
| LG | F11 | |
| Lenovo ThinkPad | F11 | |
| MSI | F3 | |
| Packard Bell | F10 | |
| RoverBook | Alt | |
| Samsung | F4 | |
| Sony VAIO | F10 | |
| Tecno | F9 | Recovery Menu |
| Toshiba | F8, F11 |
*
📌 PS: если не получилось зайти в BIOS
Рекомендую ознакомиться с руководством (спецификацией) вашего устройства на его офиц. сайте. Также можете посм. одну мою предыдущую инструкцию: в ней я разобрал основные варианты проблем + привел рекомендации. Ссылочка ниже. 👇
https://ocomp.info/ne-mogu-voyti-v-bios.html
Кстати, таблицы будут пополняться (со временем 😉). За дополнения по теме статьи — заранее большое вам мерси!
Всем удачи!
👋
Первая публикация: 04.11.2016
Корректировка: 31.10.2024
Multi-booting, and particularly dual-booting Windows and Linux, is becoming more and more mainstream with each passing year. On a PC with multiple operating systems (OS), the Windows Boot Manager is what lets the user pick which OS to boot to.
Of course, in single-OS systems, it’s usually better to disable Windows Boot Manager. Unless you’ve made multiple boot entries from a single OS, all it does is make the boot process longer for no reason.
In any case, we’ve listed all the necessary steps to enable or disable Windows Boot Manager via both GUI and Command-Line in the guide below.
Enable or Disable Boot Manager via GUI
As usual, the GUI method is very convenient but doesn’t allow for much flexibility. It’s very easy to enable or disable the Windows Boot Manager, but there’s not much room for further modification. Regardless, here are the necessary steps:
- Press Windows + R, type
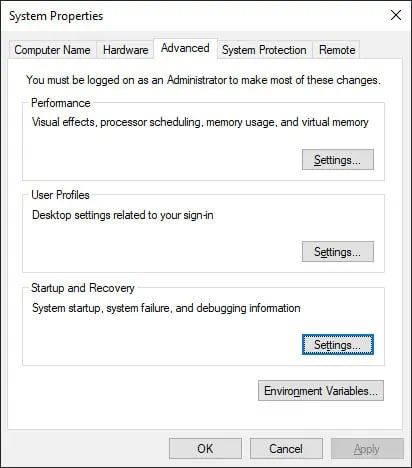
systempropertiesadvanced, and press Enter. - In the Startup and Recovery section, click on Settings.
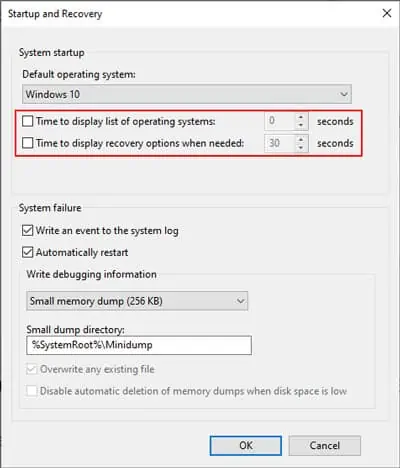
- To enable BOOTMGR, turn on the checkmark for the Time to display list of operating systems options.
- Set the time in seconds. The default value is 30, but you can replace it with however many seconds (3 – 999) you want the Boot Manager screen to display before the timeout expires and loads the default Boot Entry.
- Press OK to apply the changes.
- To disable BOOTMGR, uncheck the Time to display the list of operating systems box.
- Press OK to apply the changes.
Enable or Disable Boot Manager via Command Line
The CLI method is somewhat technical but allows for lots more ways to modify the Windows Boot Manager.
You’ll use the bcdedit command to enable/disable Bootmgr. Keep in mind that you may need to turn off Secure Boot or BitLocker for bcdedit to function properly. With that said, here are the necessary steps:
- Press Windows + R to launch Run.
- Type cmd and press CTRL + Shift + Enter to launch Elevated Command Prompt.
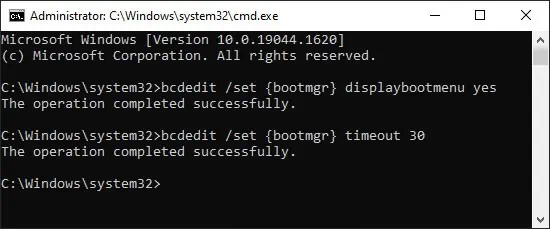
- To enable BOOTMGR, type the following commands and press Enter after each:
bcdedit /set {bootmgr} displaybootmenu yes
bcdedit /set {bootmgr} timeout 30
Note: You can replace 30 with however many seconds (3 – 999) you want the Boot Manager screen to display for before the timeout expires and loads the default Boot Entry. - To disable BOOTMGR, type the following command and press Enter:
bcdedit /set {bootmgr} displaybootmenu no
How to Modify Boot Manager
Modifying bootmgr not only includes enabling and disabling it, but also adding or removing an entry, editing the display order, changing the default entry, and much more.
Add New Boot Entry to Bootmgr
You can create multiple new boot entries for an operating system and customize each to have a different set of configurations. The easiest way to do so is to copy an existing boot entry and then modify it. Here’s how you can do that:
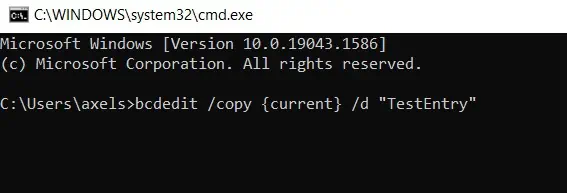
- Type the following command in the elevated command prompt:
bcdedit /copy {current} /d "TestEntry" - Current is the last used boot entry. If you want to use another boot entry, replace current with any other identifier value as appropriate.
- Change TestEntry to whatever you wish to name the new entry.
- Finally, press Enter to execute the command.
- You’ll receive a message similar to:
The entry was successfully copied to {1f126914-2e93-11e5-a85b-be1ae2100b04}.
Here, the value inside the curly brackets is the new entry’s GUID. You can use this ID to modify this boot entry however you wish.
Remove or Delete Boot Entry
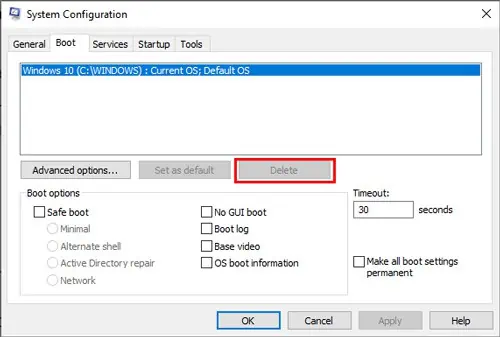
Removing a boot loader entry removes it from the boot menu, but it will still be present in the BCD store. You’ll need to delete it instead to remove it entirely. Here are the steps to do so via GUI:
- Press Windows + R, type msconfig, and press Enter.
- Switch to the boot tab.
- Select the boot entry you wish to delete and press the Delete button.
With the command line, you can choose to remove it or delete it as you prefer. You can do either using the steps listed below:
- Press Windows + R, type cmd and press CTRL + Shift + Enter.
- Type
bcdeditand press Enter. - Under each Windows Boot Loader section, check the value of the device element. Once you’ve identified the appropriate partition, note the value of identifier above it.
- To remove the boot entry, replace identifier with its value from Step 3 and use the following command:
bcdedit /displayorder {identifier} /remove - To delete the boot entry, replace identifier once again and use the following command:
bcdedit /delete {identifier}
Edit Display Order on a Multi-Boot Menu
You can set the display order of boot entries on a multi-boot menu using the /displayorder switch.
- In an elevated command prompt, execute the
bcdeditcommand and note the value of identifier for each entry. - Replace the IDs with the boot entry’s GUID or a reserved identifier like {current} and use the following command:
bcdedit /displayorder {ID1} {ID2} - Add as many more {IDs} as appropriate depending on how many entries you have. Don’t forget the curly brackets and space between the identifiers.
E.g. if you use the following command: bcdedit /displayorder {current} {9f25ee7a-e7b7-11db-94b5-f7e662935912} {e16cd9d6-379f-11e5-99d4-de034410edac}

This sets the display order as:
- current
- 9f25ee7a-e7b7-11db-94b5-f7e662935912
- e16cd9d6-379f-11e5-99d4-de034410edac
Alternatively, you can also use the /addfirst and /addlast modifiers to directly add an entry as the first or last items respectively on the Boot Manager menu. E.g.bcdedit /displayorder {5370b175-2e93-11e5-a85b-be1ae2100b04 } /addfirst
Change Default OS in Windows Boot Manager
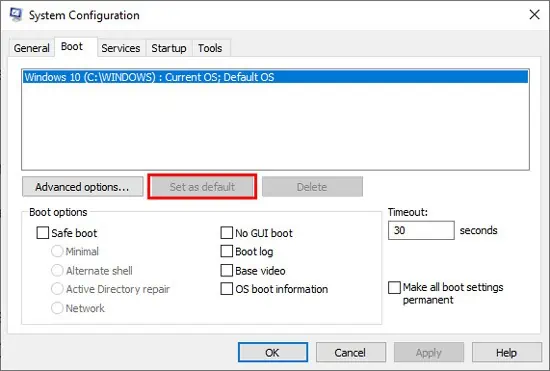
You can easily change the default OS in Windows Boot Manager via System Configuration. Here are the steps to do so:
- Launch System Configuration using the run command msconfig.
- In the boot tab, select the OS you want to set as the default one.
- Click on Set as Default and press OK to apply the changes.
You can also specify the default boot entry by using the bcdedit /default {ID} command in Elevated Command Prompt. Don’t forget to replace ID with the appropriate value of the boot entry though.
How to Get Windows 7 or Windows 10 Style Dual Boot Screen?
Here are the steps to get the dual boot screen you want using the bootmenupolicy parameter:
- Open Elevated Command Prompt and use the commands listed below as appropriate.
- For the Windows 10 style Metro Boot Loader:
bcdedit /set {default} bootmenupolicy standard - For the Windows 7 style Classic Boot Loader:
bcdedit /set {default} bootmenupolicy legacy


