
Инженеры Microsoft реализовали в Windows хранилище загрузки, известное ещё как Boot Configuration Data (BCD), и меню загрузки. Первое содержит в себе идентификаторы загрузчиков всех имеющихся на ПК операционных систем, а второе считывает их и выводит в виде перечня ОС, доступных для запуска. Это значительно облегчает жизнь пользователю, на компьютере которого стоит несколько систем. Ему не нужно что-то мудрить, чтобы переключиться между ними. Достаточно перезагрузить компьютер и выбрать нужную из представленного списка. Как и другие части ОС Windows, меню загрузки поддаётся настройке. В этом руководстве перечислены доступные способы редактирования данного раздела.
Примечание: практически все действия, описанные в этом руководстве, нужно выполнять из-под учётной записи с правами администратора. В противном случае вы должны знать пароль от неё.
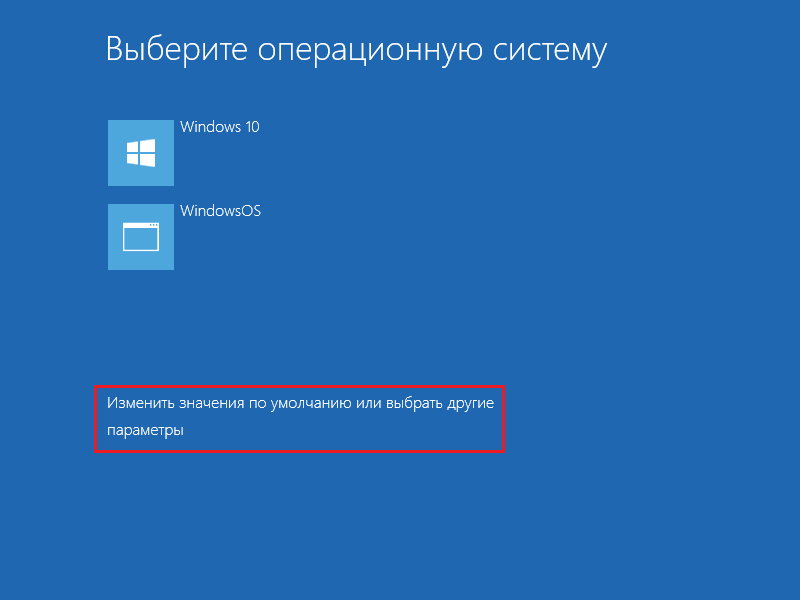
Редактирование меню загрузки Windows 10 в окне загрузчика
Меню загрузки Windows 10 обладает небольшим разделом настроек. Он предоставляет минимальный набор опций — изменение значения таймера автоматического запуска основной системы, смена ОС, загружаемой по умолчанию, а также дополнительный раздел с режимами старта системы и функцией выключения компьютера.
- Чтобы получить доступ к этим настройкам, вам нужно нажать на пункт Изменить значения по умолчанию или выбрать другие параметры во время отображения экрана со списком доступных для запуска систем.

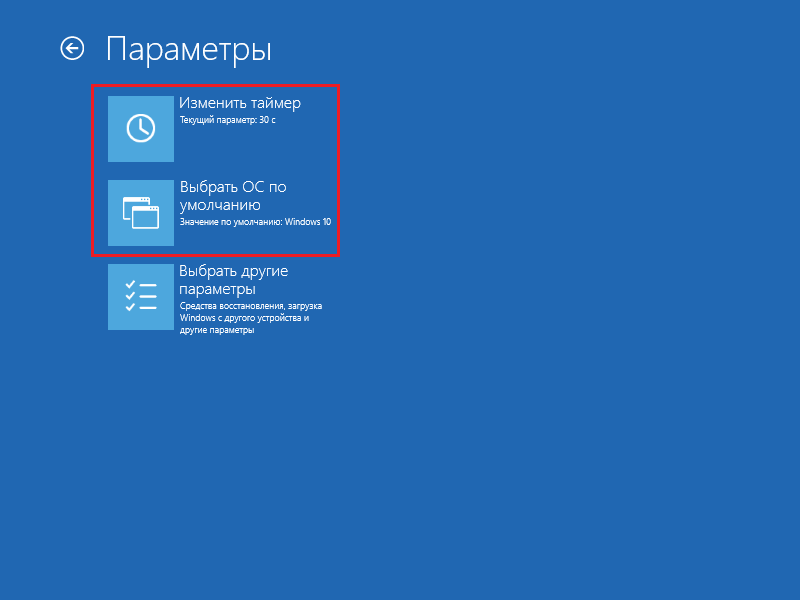
- Далее вам остаётся нажать на пункт Изменить таймер, чтобы установить время отсрочки автоматической загрузки системы (5 и 30 секунд, а также 5 минут) или же на Выбрать ОС по умолчанию, чтобы указать, какую систему стоит грузить по завершению таймаута.
Редактирование меню загрузки Windows 10 в параметрах системы
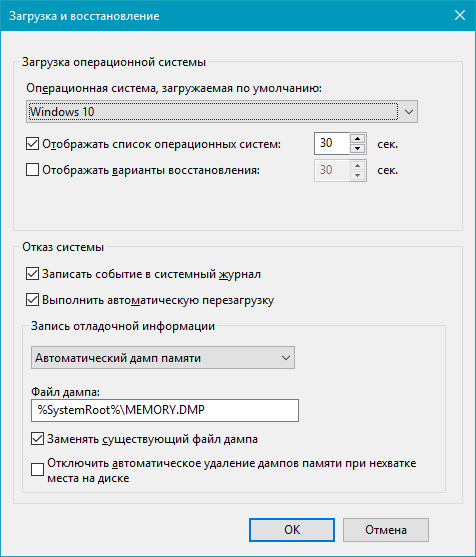
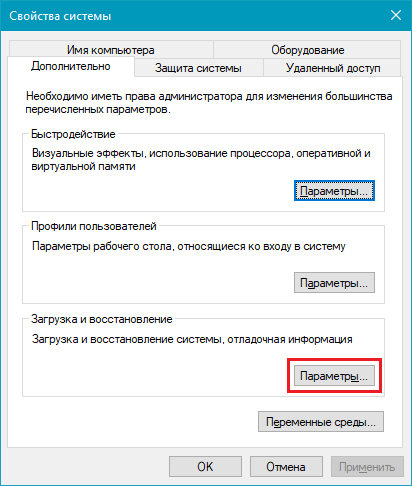
В дополнительных параметрах системы, зайти в которые можно через свойства ОС, находится раздел Загрузка и восстановление. Он хранит в себе небольшой список функций для редактирования меню загрузки, который подойдёт нетребовательным пользователям. Так с его помощью вы можете выбрать, какая операционная система будет загружаться по умолчанию, выставить время отображения списка установленных систем или вовсе выключить таймаут, а также активировать вывод вариантов восстановления.
Чтобы попасть в указанный раздел, вам нужно сделать следующее:
- Нажмите на сочетание Win + Pause (Break).
- Кликните по ссылке Дополнительные параметры системы, расположенную в левой части окна.

- Под заголовком Загрузка и восстановление щёлкните на кнопку Параметры.


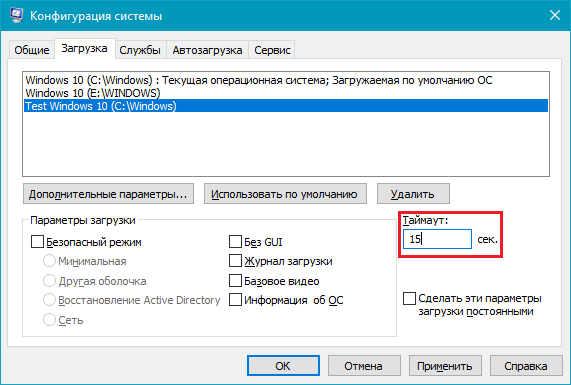
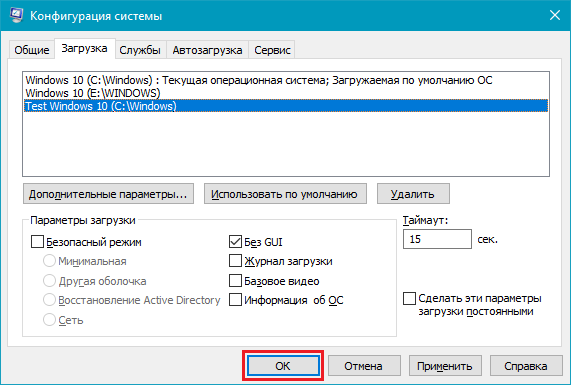
Редактирование меню загрузки Windows 10 в Конфигурация системы
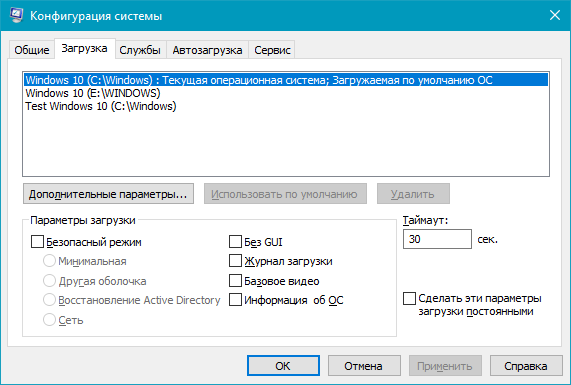
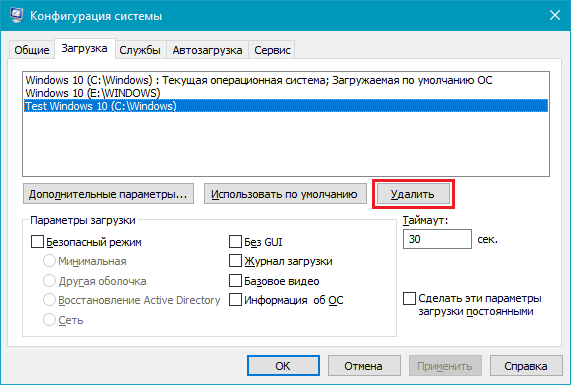
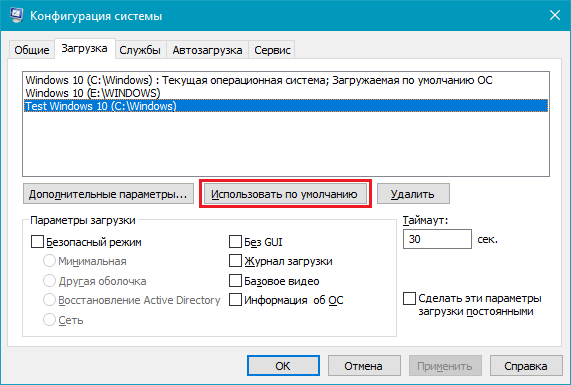
Если вам необходимо немного больше возможностей по настройке, вы можете попробовать утилиту Конфигурация системы. Помимо упомянутых настроек, она предлагает функцию удаления загрузочных записей операционных систем, опцию для вывода информации об ОС, возможность запустить Windows без графической оболочки, выбрать параметры загрузки безопасного режима и ещё несколько второстепенных функций.
Отредактировать меню загрузки с помощью Конфигурация системы можно следующим образом:
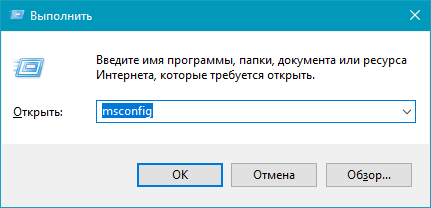
- Нажмите Win + R и введите msconfig. Появится окно утилиты.

- Откройте вкладку Загрузка.

- Выберите из списка интересующую вас запись. Если вы желаете избавиться от неё, нажмите на кнопку Удалить.
- Хотите пометить ОС в качестве основной? Кликните по кнопке Использовать по умолчанию.
- В случае необходимости, установите предпочитаемое время таймаута.
- Нажмите на ОК и перезагрузите компьютер, чтобы система применила изменения.
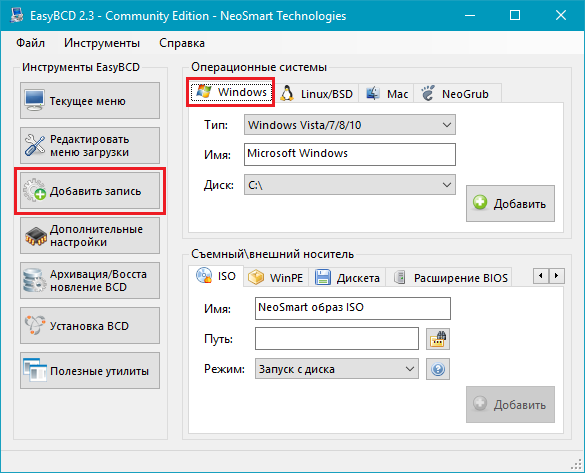
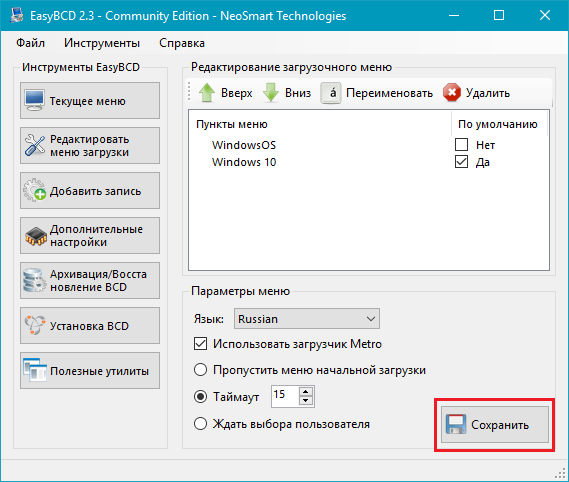
Как отредактировать меню загрузки Windows 10 с помощью EasyBCD
EasyBCD — бесплатная утилита, предоставляющая широкий выбор возможностей для редактирования меню загрузки. В сравнении с ней все стандартные системные инструменты (кроме Командной строки) смотрятся весьма примитивно.
Эта компактная программа позволяет:
- Удалять ОС из списка доступных для запуска.
- Добавлять новые записи Windows (в том числе и устаревших), Linux / BSD, Mac.
- Добавлять записи для установки систем с помощью ISO-образов или отдельных разделов жёсткого диска.
- Переименовывать записи операционных систем.
- Выставлять систему по умолчанию.
- Изменять положение записей в списке.
- Устанавливать язык меню загрузки.
- Выбирать оболочку интерфейса загрузчика (Metro или более раннюю от Windows Vista / 7).
- Выставлять длительность таймаута.
- Архивировать и восстанавливать настройки хранилища загрузки (BCD).
- Просматривать содержимое BCD и меню загрузки.
Интерфейс программы полностью локализован на русский, а сама она достаточно простая в использовании и не требует от пользователя никаких сверхъестественных способностей.
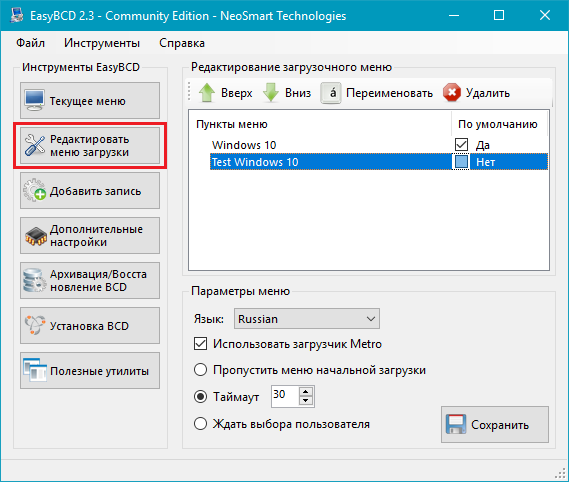
Как добавить запись системы в меню загрузки
- Скачайте и установите EasyBCD. Во время установки укажите, что вы будете использовать программу в личных целях, а не в коммерческих.
Примечание: для редактирования меню загрузки в старших версиях Windows может понадобиться EasyBCD 1.7.2. - Запустите программу и выберите язык интерфейса.
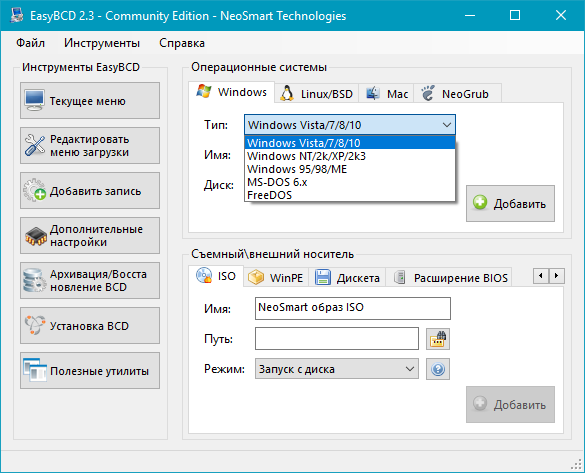
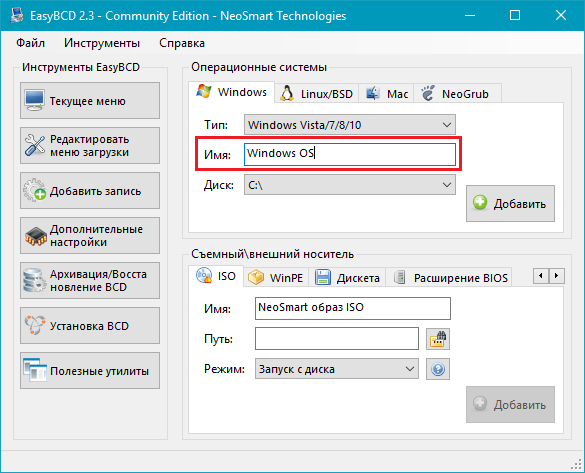
- Нажмите на Добавить запись и выберите вкладку Windows.

- Напротив пункта Тип выберите Vista / 7 / 8 / 10. Если добавляемая запись должна загружать более старую версию «винды», разверните выпадающий список и кликните по подходящему варианту.
- В поле Имя укажите предпочитаемое название записи.
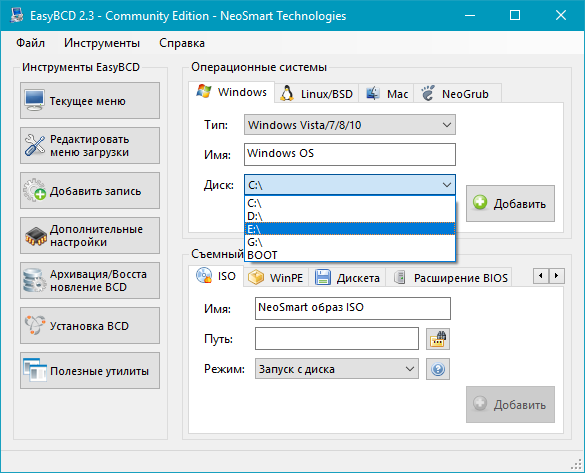
- Напротив пункта Диск откройте список разделов жёсткого диска и выберите тот, где установлена ОС, к которой вы хотите восстановить доступ.
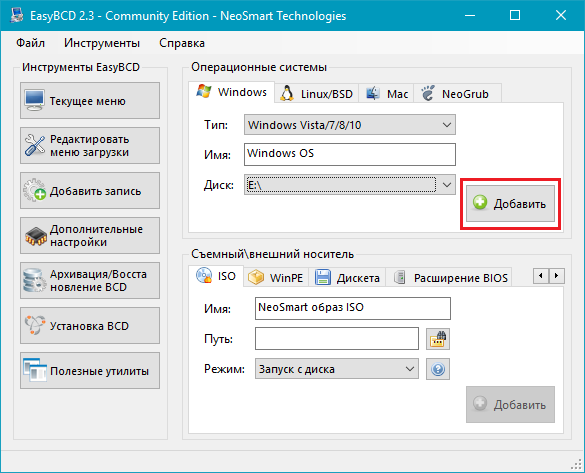
- Нажмите на Добавить.
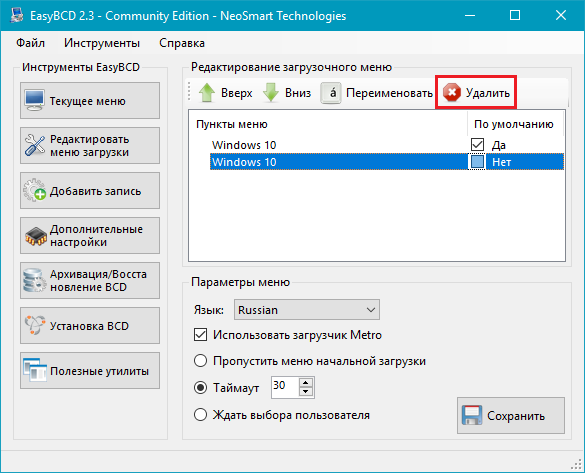
Как удалить запись системы из меню загрузки
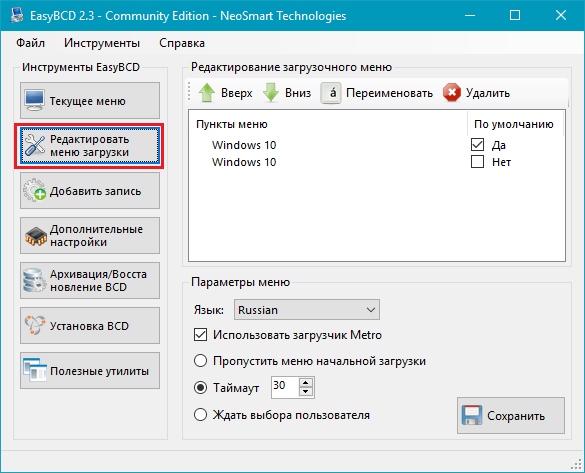
- В программе нажмите на Редактировать меню загрузки.
- Из списка записей выберите нужную и нажмите на Удалить. Подтвердите своё действие.
- Кликните по кнопке Сохранить.
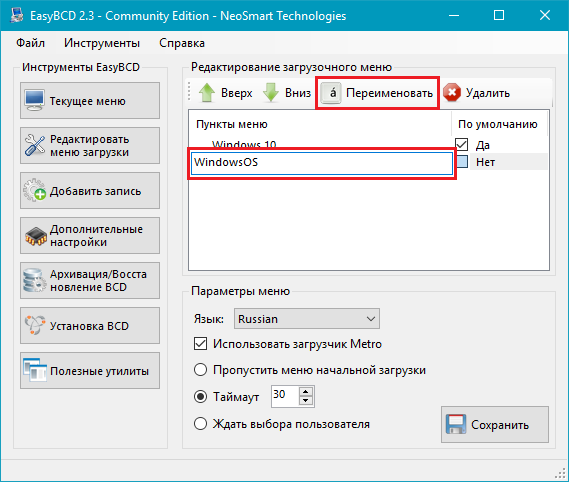
Как переименовать запись системы в меню загрузки
- В разделе редактирования загрузочного меню кликните по записи, имя которой вы хотите сменить.

- Нажмите на кнопку Переименовать и введите новое название.
- Сохраните данное изменение.
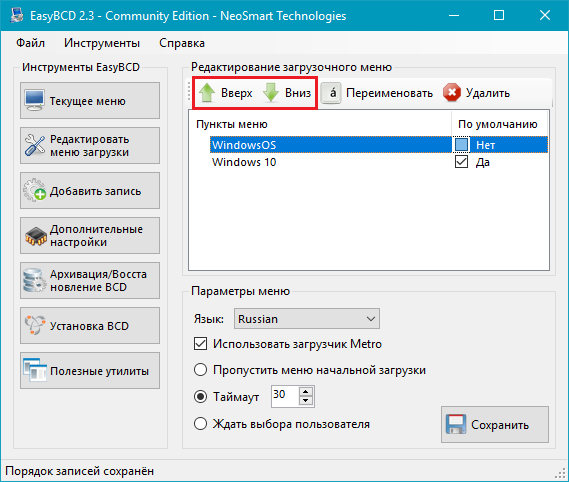
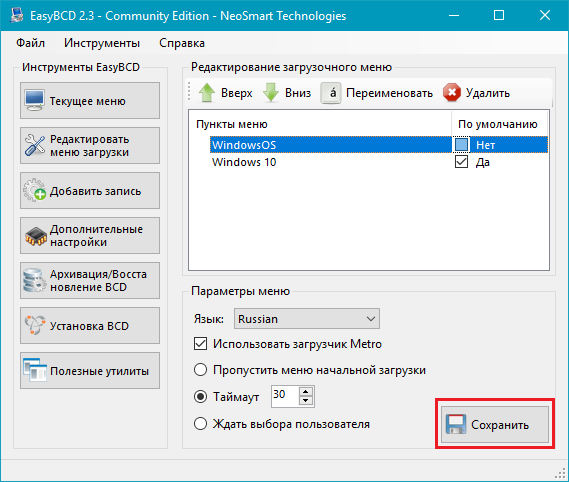
Как переместить запись системы в меню загрузки
- Выберите из списка пункт, позицию которого нужно сменить.
- Используя кнопки Вверх и Вниз измените положение в списке.
- Нажмите на Сохранить.
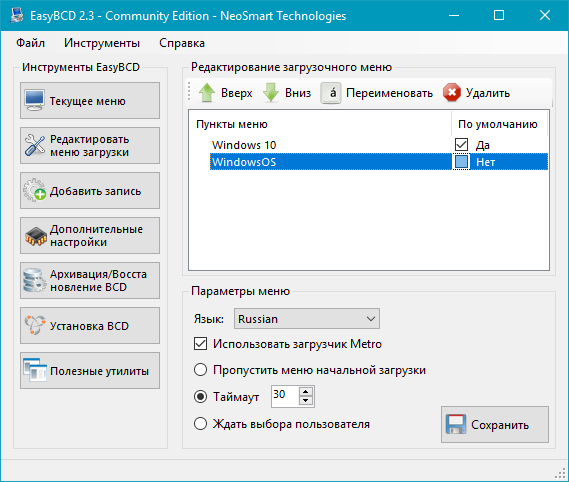
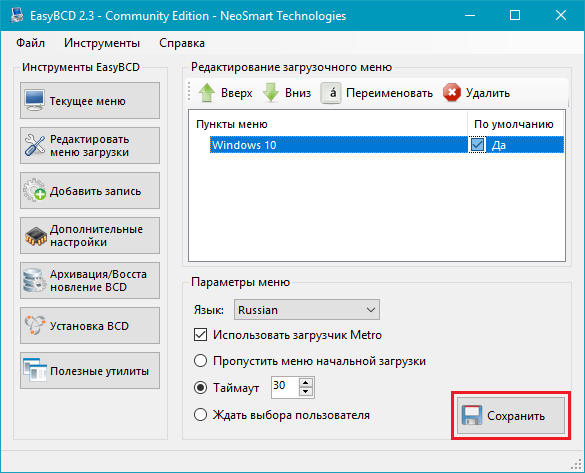
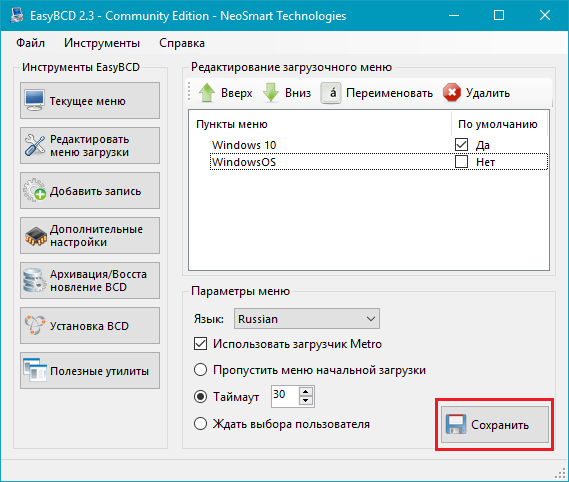
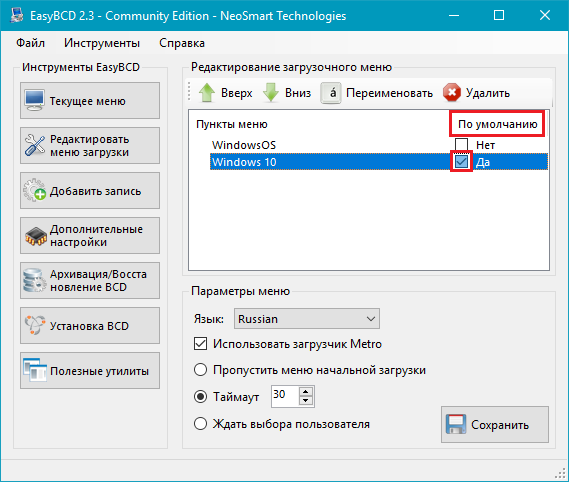
Как выбрать систему для загрузки по умолчанию
- В столбце По умолчанию установите галочку напротив нужной операционной системы.
- Сохраните изменения.
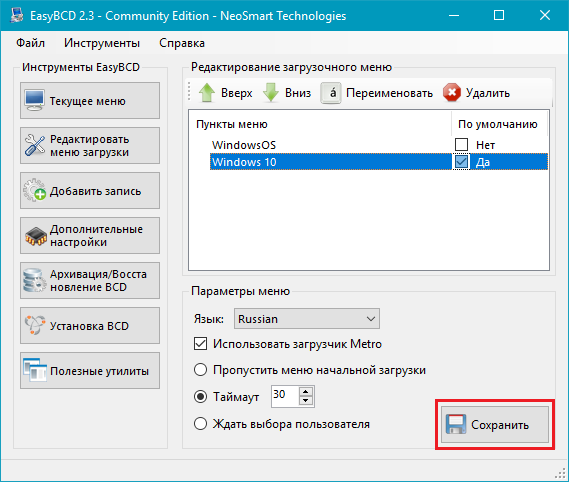
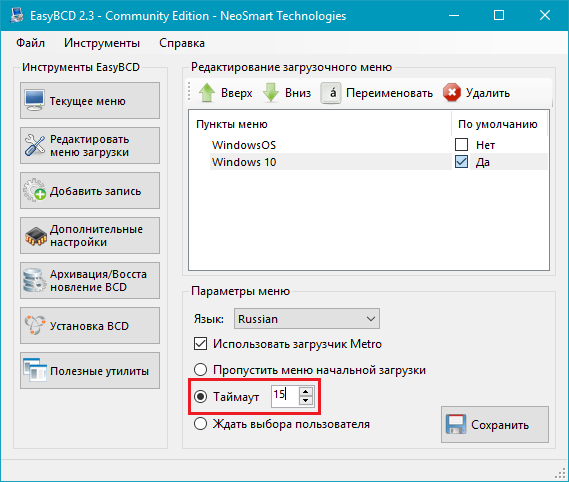
Как изменить время отображения меню загрузки
- Возле пункта Таймаут нажмите на поле и введите оптимальное для вас время. Учтите, что в меню загрузки оно измеряется в секундах.
- После внесения изменений кликните по кнопке Сохранить.

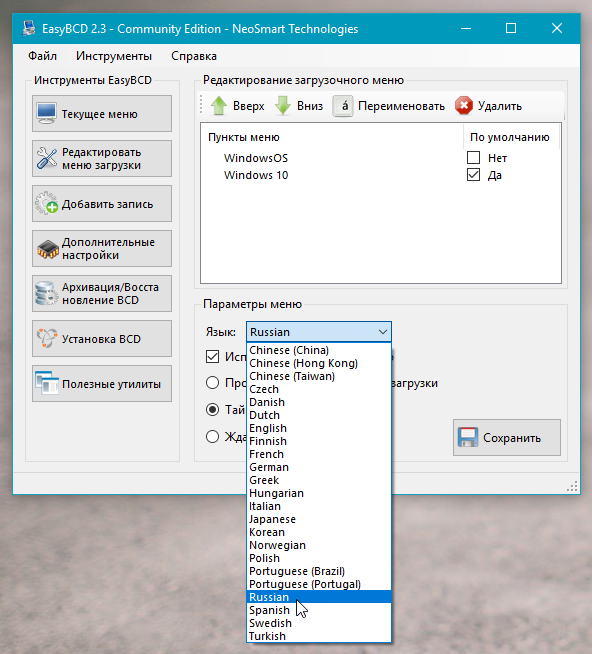
Как изменить язык меню загрузки
- Найдите пункт Язык, разверните список возле него и выберите нужное вам наречие.

- Сохраните внесенные изменения.
Как отредактировать меню загрузки Windows 10 с помощью командной строки
Если вы не доверяете сторонним программам и стараетесь пользоваться исключительно системными инструментами, тогда вам стоит опробовать способы редактирования меню загрузки Windows 10 с помощью командной строки.
Создание или восстановление резервной копии хранилища загрузки Windows
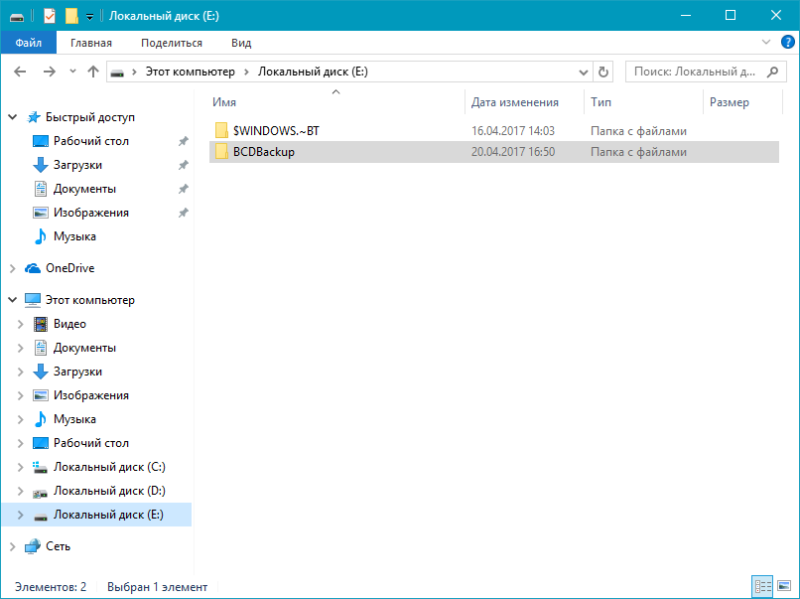
Перед выполнением всех действий создайте резервную копию хранилища загрузки, чтобы вы могли восстановить его в случае необходимости. Создать бекап BCD вы можете следующим образом:
- На любом не системном разделе создайте папку BCDBackup.

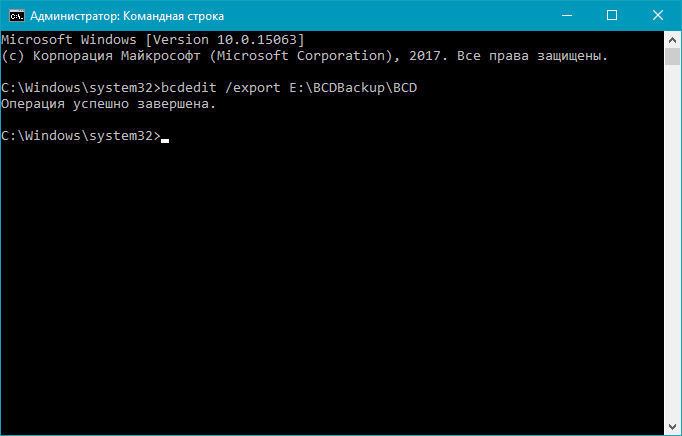
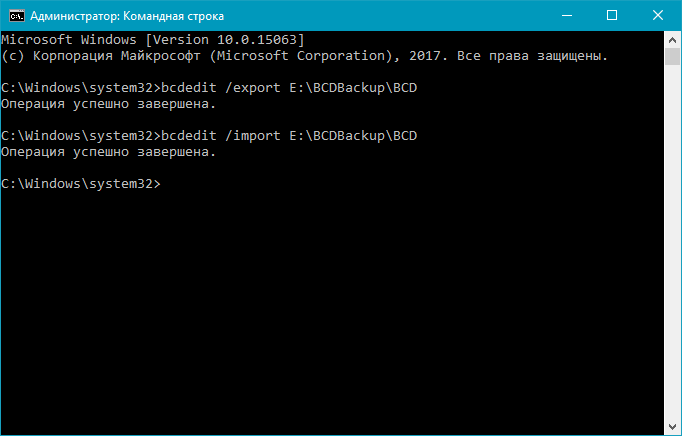
- Запустите командную строку с правами администратора. Для этого нажмите на Win + S, введите Командная строка, кликните правой кнопкой мышки по результату и выберите Запустить от имени администратора.
- Введите команду bcdedit /export E:\BCDBackup\BCD, где E — буква раздела, на котором находится созданная ранее папка.

- Для восстановления рабочей копии BCD вам нужно ввести bcdedit /import E:\BCDBackup\BCD, где Е — буква раздела, содержащего каталог с резервной копией хранилища загрузки.
Как добавить запись системы в меню загрузки
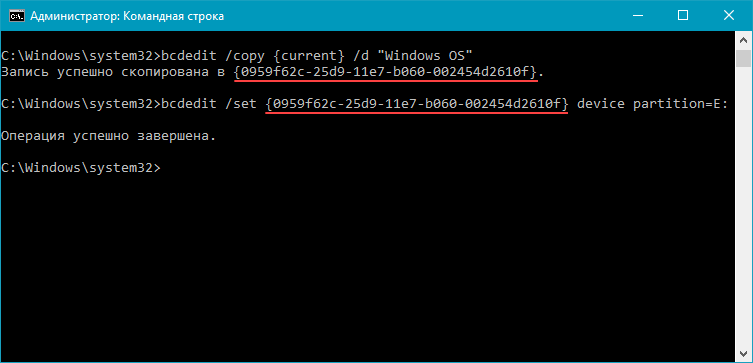
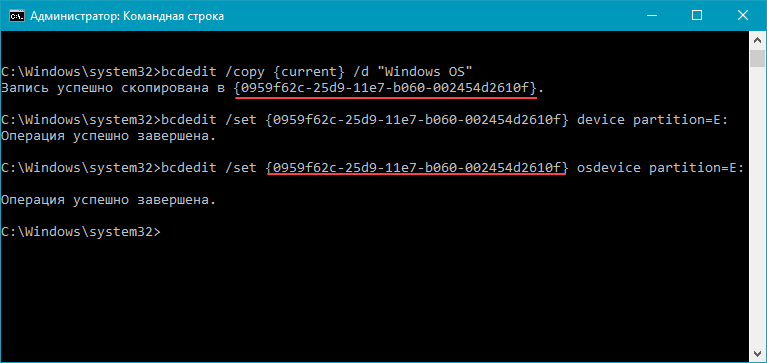
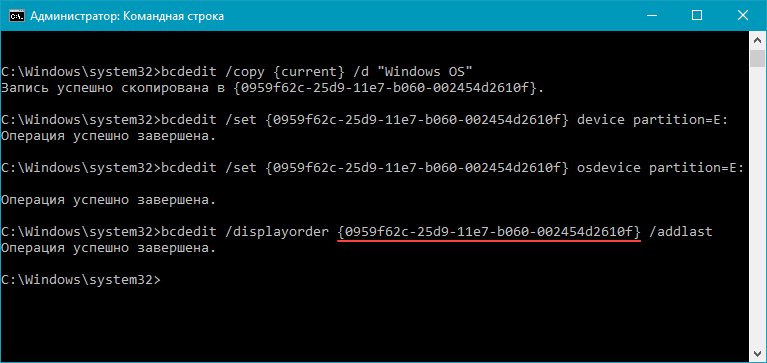
- Всё в ту же командную строку, запущенную от имени администратора, введите bcdedit /copy {current} /d «Windows OS», где Windows OS — произвольное название новой записи. В результате вы должны получить сообщение об успешном копировании существующей записи в новую, а также её уникальный идентификатор.

- Далее наберите bcdedit /set {ИД} device partition=E:, где ИД — идентификатор новой записи, созданной в процессе выполнения предыдущего пункта, а Е — буква локального диска, на котором расположены файлы другой операционной системы. Чтобы не допустить ошибку при вводе длинного ID, скопируйте его в эту команду вместе с фигурными скобками.

- Следом введите bcdedit /set {ИД} osdevice partition=E:, где ИД — код созданной записи, а E — буква раздела, содержащего системные файлы другой ОС.

- В конце всего этого процесса введите команду bcdedit /displayorder {ИД} /addlast, где ИД — код ранее созданной записи операционной системы. Эта команда должна добавить новую запись в самый низ списка ОС, доступных для запуска из меню загрузки.

Как удалить запись системы из меню загрузки
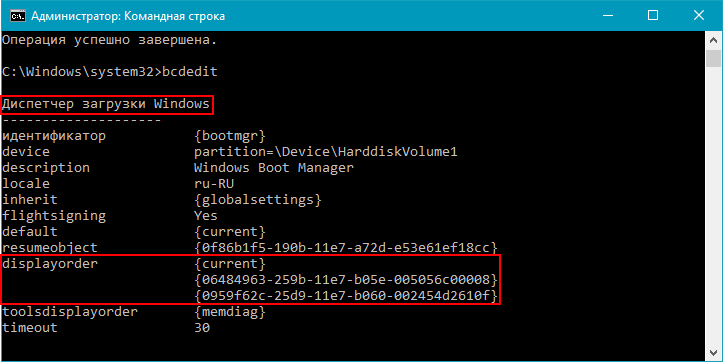
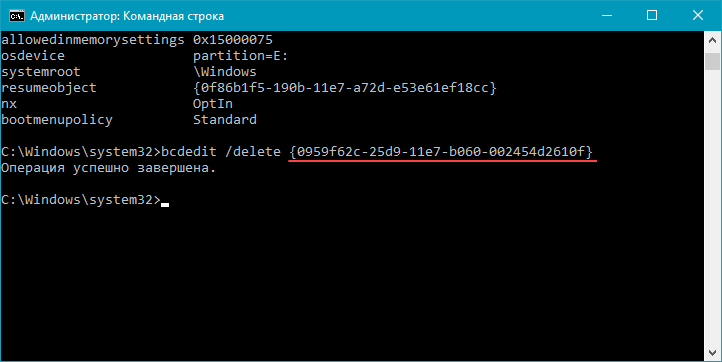
- Введите команду bcdedit, чтобы получить список всех записей установленных ОС. Обратите внимание на пункт displayorder в разделе Диспетчер загрузки Windows. В нём перечислены уникальные коды всех операционных систем. Их порядок точно такой же, как и пунктов установленных систем в меню загрузки.

- Наберите команду bcdedit /delete {ИД}. Вместо ИД вам нужно вставить код записи, которую собираетесь удалить. Его вы можете получить из пункта displayorder. Данная команда уберёт запись не только из диспетчера загрузок, но и из хранилища. Если нужно удалить запись с именем (к примеру, {default}), а не в виде комбинации букв и цифр, тогда команда должна выглядеть так: bcdedit /delete {ИД} /f. Как и во всех остальных случаях, на место ИД нужно вставить идентификатор.

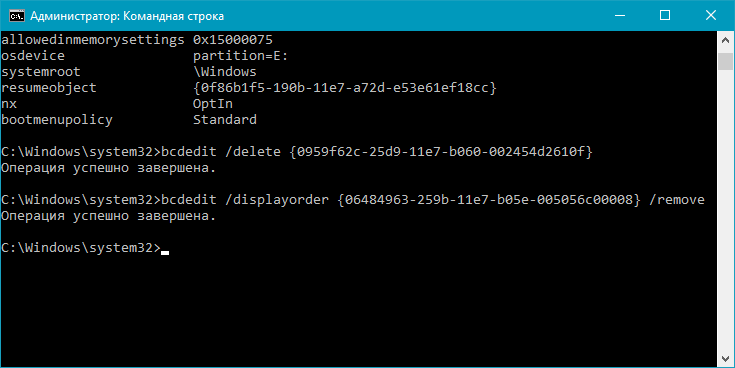
- Если вы желаете лишь на время исключить её из списка, тогда выполните команду bcdedit /displayorder {ИД} /remove. Запись исчезнет из него, но при этом останется в хранилище, что позволит при необходимости восстановить её.

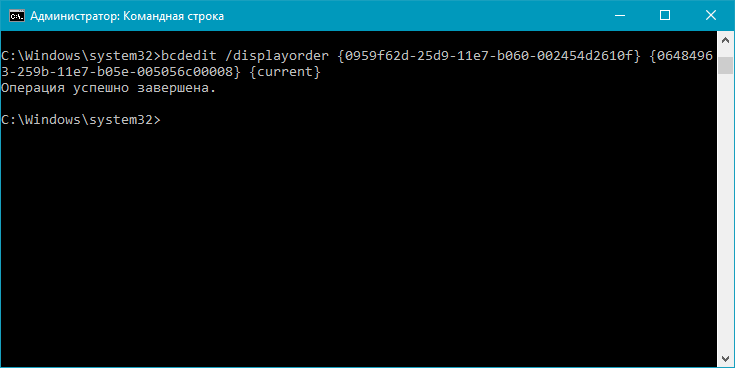
Как изменить порядок отображения систем в меню загрузки
Для редактирования положения записей в загрузчике используйте команду bcdedit /displayorder {ИД2} {ИД1} {ИД3}. Вместо всех ИД укажите реальные коды записей в той последовательности, в которой вы хотите видеть их во время запуска компьютера.
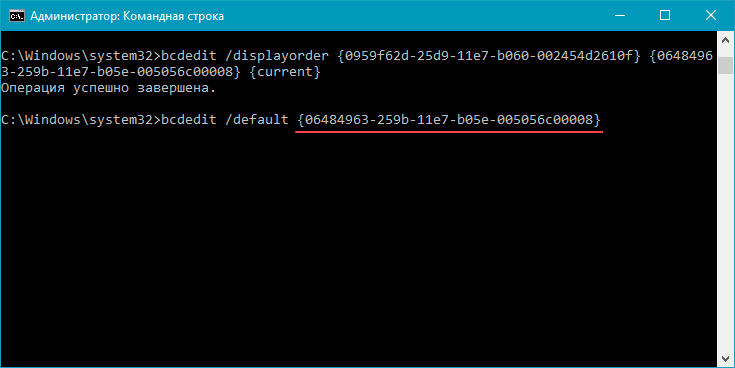
Как выбрать систему для загрузки по умолчанию
Всё, что вы должны сделать, это выполнить команду bcdedit /default с указанием кода системы в фигурных скобках.
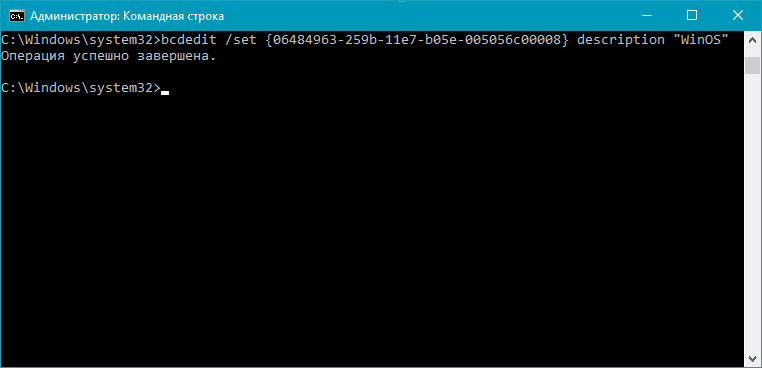
Как переименовать систему в меню загрузки
Для изменения названия операционной системы используйте команду bcdedit /set {ИД} description «Новое имя».
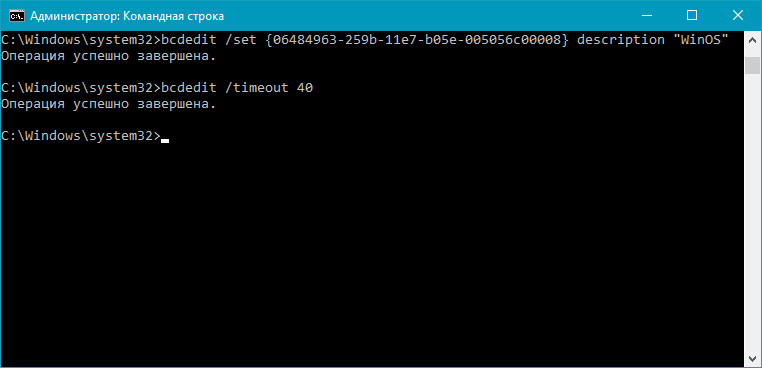
Как изменить время отображения меню загрузки
Чтобы установить оптимальное время отображения меню загрузки наберите команду bcdedit /timeout time, где time — время таймаута в секундах.
Вот, собственно, и все основные способы редактирования меню и хранилища загрузки в операционной системе Windows 10.
Bcdedit.exe: The Boot Configuration Data Editor
bcdedit.exe is a command-line tool in Windows used to manage Boot Configuration Data (BCD). BCD is a firmware-independent database that replaced the boot.ini file used in older versions of Windows (like Windows XP). It controls how the operating system is started. bcdedit.exe allows you to view, modify, and create boot entries, control boot options, and troubleshoot boot-related problems. It’s a powerful tool, and incorrect usage can render your system unbootable. Therefore, understanding its functionalities and exercising caution are crucial.
Origin and Purpose
bcdedit.exe was introduced with Windows Vista and is included in all subsequent versions of Windows. Its purpose is to provide a command-line interface to the BCD store. Before bcdedit.exe, managing boot options was often cumbersome, requiring direct editing of text files (like boot.ini) or using GUI tools with limited capabilities. bcdedit.exe offers a standardized and more robust way to manage the boot process, especially in recovery scenarios.
Is it a Virus?
No, bcdedit.exe itself is not a virus. It is a legitimate and essential part of the Windows operating system. It’s typically located in the %SystemRoot%\System32 directory (usually C:\Windows\System32) and sometimes also in %SystemRoot%\SysWOW64 for 64-bit systems. If you find a file named bcdedit.exe in a different location, it could be a malicious program masquerading as the legitimate tool, but this is rare. You should always verify the file’s digital signature and location if you’re suspicious.
Can it Become a Virus?
bcdedit.exe cannot «become» a virus. It’s a static executable file. However, malware could potentially:
- Replace it: A virus could replace the legitimate
bcdedit.exewith a malicious version. This would allow the malware to control the boot process, potentially preventing the system from starting or loading malicious code during startup. - Exploit it: While highly unlikely, a vulnerability in
bcdedit.exeitself could be exploited, though this would be a very sophisticated attack. Microsoft regularly releases security updates to address such vulnerabilities. - Use it maliciously: Malware or a malicious user could use the legitimate
bcdedit.exeto alter the BCD, making the system unbootable or redirecting the boot process to malicious code. This is the most likely scenario.
Therefore, the danger lies not in bcdedit.exe becoming a virus, but in how it can be manipulated or replaced by malicious actors.
Usage Guide
Important Note: Always run bcdedit.exe from an elevated command prompt (run as administrator). Incorrect commands can make your system unbootable. Back up your BCD store before making significant changes.
Basic Commands
-
/helpor/?: Displays help information for allbcdedit.execommands and options.bcdedit /?provides general help, whilebcdedit /? <command>provides help for a specific command (e.g.,bcdedit /? /create). -
/enum: Lists all active boot entries in the BCD store. This is a crucial command for viewing the current boot configuration.bcdedit /enumYou can also specify the type of entries to list:
bcdedit /enum OS(Lists operating system entries)bcdedit /enum ALL(Lists all entries, including those not currently active)bcdedit /enum ACTIVE(Lists only the active entries)bcdedit /enum {identifier}(Lists a specific entry by its identifier, e.g.,bcdedit /enum {current})
-
/copy: Creates a copy of an existing boot entry. This is useful for creating backups or modifying a copy without affecting the original.bcdedit /copy {current} /d "Windows 10 (Backup)"
This command copies the current boot entry ({current}) and gives the new entry the description «Windows 10 (Backup)». It will generate a new GUID (Globally Unique Identifier) for the copied entry. -
/create: Creates a new boot entry. This is less commonly used directly for creating operating system entries, as Windows setup usually handles that. It’s more often used for creating entries for boot loaders or other special purposes.bcdedit /create /d "My Custom Boot Entry" /application OSLOADERThis creates a new boot loader entry. You’ll need to specify additional parameters (like
/deviceand/path) to make it functional. -
/delete: Deletes a boot entry. Use this with extreme caution!bcdedit /delete {identifier}
Replace{identifier}with the GUID of the entry you want to delete. -
/set: Modifies settings for a specific boot entry. This is the command you’ll use most often to change boot options.bcdedit /set {current} description "My Modified Windows 10"
bcdedit /set {current} path \Windows\System32\winload.exe
bcdedit /set {current} device partition=C:
bcdedit /set {bootmgr} displaybootmenu yes
bcdedit /set {bootmgr} timeout 30
bcdedit /set {current} recoveryenabled No
bcdedit /set {current} nx OptIn
These examples show how to:
* Change the description of the current boot entry.
* Set the path to the boot loader (winload.exeorwinload.efion UEFI systems).
* Specify the partition where the operating system is installed.
* Enable the boot menu.
* Set the boot menu timeout (in seconds).
* Disable automatic recovery.
* Set the Data Execution Prevention (DEP) setting. -
/importand/export: These commands allow you to back up and restore the BCD store.bcdedit /export C:\BCDBackup (Backs up the BCD to a file)
bcdedit /import C:\BCDBackup (Restores the BCD from a file)Always export your BCD before making any significant changes!
-
/bootsequence: Specifies the order in which the boot manager attempts to load operating systems.
bcdedit /bootsequence {identifier1} {identifier2} ...
Replace{identifier1},{identifier2}, etc. with the GUIDs of the boot entries in the desired order. -
/default: Sets the default boot entry.
bcdedit /default {identifier} -
/displayorder: Sets the display order of the boot menu.
bcdedit /displayorder {identifier1} {identifier2} /addfirst -
/timeout: Sets the boot menu timeout.
bcdedit /timeout 10 -
/toolsdisplayorder: Sets the display order of the tools menu.
bcdedit /toolsdisplayorder {memdiag} /addlast
Advanced Options and Troubleshooting
-
/ems: Enables or disables Emergency Management Services (EMS) for a boot entry. EMS allows remote management of a server even if the operating system is not running. -
/bootems: Enables or disables EMS for the boot manager. -
/dbgsettings: Configures kernel debugging settings. -
/bootdebug: Enables or disables boot debugging. -
/hypervisorsettings: Configures hypervisor settings. -
/deletevalue: Deletes a specific value from a boot entry.bcdedit /deletevalue {current} nx
This removes thenx(DEP) setting from the current boot entry. -
/v(Verbose Mode): Some commands support a/voption to display more detailed output, which can be helpful for troubleshooting.
Troubleshooting Scenarios
-
System Won’t Boot: If your system won’t boot, you can often use
bcdedit.exefrom the Windows Recovery Environment (WinRE). WinRE is usually accessible by booting from a Windows installation disc or USB drive and selecting «Repair your computer.» From WinRE, you can open a command prompt and usebcdedit.exeto:- Check the BCD entries (
/enum). - Repair corrupted entries (
/importa backup). - Set the correct default boot entry (
/default). - Rebuild the BCD from scratch (more complex, requires careful use of
/createand/set).
- Check the BCD entries (
-
Dual-Boot Problems: If you’re having issues with a dual-boot configuration,
bcdedit.execan be used to:- Add or remove boot entries for different operating systems.
- Set the boot order (
/bootsequenceor/displayorder). - Adjust the boot menu timeout (
/timeout).
-
Incorrect Boot Options: If you’ve accidentally changed a boot setting (like disabling DEP), you can use
bcdedit /setto correct it. -
«Boot Manager is Missing» Error: This often indicates a problem with the BCD store itself or the boot sector. You might need to use the
bootrec.exetool (another command-line tool in WinRE) to fix the boot sector and then usebcdedit.exeto repair the BCD.
Best Practices
- Always run as administrator.
- Back up your BCD before making changes (
/export). - Understand the commands before using them. Use
/helpextensively. - Double-check identifiers (GUIDs) to avoid modifying the wrong entry.
- Document your changes.
- Test your changes after making them.
- If you’re unsure, seek help from a qualified professional.
Conclusion
bcdedit.exe is a powerful and essential tool for managing the Windows boot process. While it offers a significant degree of control and flexibility, it also requires careful usage. Understanding its commands, options, and potential pitfalls is critical for maintaining a stable and bootable system. By following the guidelines and best practices outlined in this article, you can effectively use bcdedit.exe to manage your boot configuration and troubleshoot boot-related issues. Remember to always back up your BCD before making any major changes.
This guide explains how to use the BCDEdit (bcdedit.exe) utility for the following Windows versions: Vista, 7, 8, 8.1or10
BCDEdit is the command-line utility that you can use to manage BCD stores on your computer. BCDEdit works similarly to Bootcfg.exe available on Windows XP systems, but with more options available and various improvements.
BCDEdit on Windows
You must be logged-in as an Administrator in order to use BCDEdit.
Always create a backup of your current BCD file before using the utility with the help of the /export parameter:
bcdedit /export C:\exportBCDfile
To open bcdedit, you need to:
- Open Command Prompt
- Type:
bcdedit
- Press Enter
When you type bcdedit in Command Prompt, the output is your computer’s current BCD configuration:
Microsoft Windows [Version 6.0]
 Copyright (c) 2006 Microsoft Corporation. All rights reserved.

 C:\Windows\system32>bcdedit

 Windows Boot Manager
 --------------------
 identifier {bootmgr}
 device partition=C:
 description Windows Boot Manager
 locale en-US
 inherit {globalsettings}
 default {current}
 resumeobject {0}
 displayorder {current}
 toolsdisplayorder {memdiag}
 timeout 30

 Windows Boot Loader
 -------------------
 identifier {current}
 device partition=C:
 path \Windows\system32\winload.exe
 description Microsoft Windows Vista
 locale en-US
 inherit {bootloadersettings}
 recoverysequence {0}
 recoveryenabled Yes
 osdevice partition=C:
 systemroot \Windows
 resumeobject {0}
 nx OptIn
BCDEdit on Windows XP
Windows XP doesn’t have a bcdedit.exe utility available, but the bootcfg.exe utility instead. Bootcfg.exe is part of the Windows XP’s Recovery Console.
To read about bootcfg, follow our guide: Bootcfg – Guide for Windows XP.
BCDEdit on Windows Vista
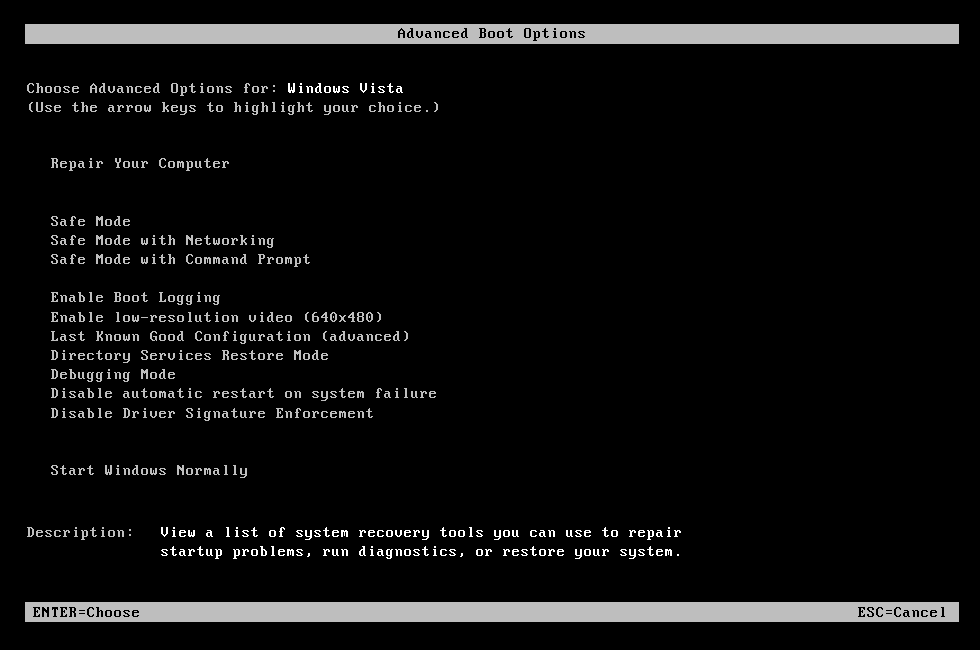
To run bcdedit.exe on a Windows Vista system, you have these options available:
- Use the original Windows Vista installation media to access Command Prompt
- If Repair Your Computer option is available on Advanced Boot Options menu, boot into this mode to access Command Prompt
- Use Easy Recovery Essentials
If you have the Windows Vista installation DVD, follow these steps:
- Insert the installation media and boot from it
- Select a language, time and keyboard and click Next
- Click Repair your computer
Windows Vista Repair Your Computer Menu
- Select the operating system
- Click Next
- At the System Recovery Options screen, click Command Prompt
Windows Vista System Recovery Options
- Type:
bcdedit.exe
- Press Enter
If you have the “Repair Your Computer” option available, you can access Command Prompt from there:
- Restart the computer
- Press the F8 key to open the Advanced Boot Options menu
- Select Repair Your Computer and press Enter

- If Repair Your Computer isn’t available, the recovery tools aren’t installed on your computer.
- At the System Recovery Options screen, click Command Prompt
- Type:
bcdedit.exe
- Press Enter
If you use Easy Recovery Essentials Command-line:
- Download Easy Recovery Essentials
- Burn the ISO Image. Follow our instructions on how to burn a bootable ISO image. If you’d like to have a recovery USB instead, follow our instructions on how to make a recovery USB.
- Boot Easy Recovery Essentials from the CD, DVD or USB
- Select Launch Command Line


To download Easy Recovery Essentials, click here.
BCDEdit on Windows 7
The options to run bcdedit.exe on Windows 7 systems are similar to those of Windows Vista.
If you have the Windows 7 installation DVD available, follow these steps:
- Insert the DVD in the optical drive
- Boot from it by restarting the computer and pressing any key when prompted
- Select a language, time and keyboard
- Click Next
- Click Repair your computer
Install Now (Windows 7)
- Select the operating system from the list and click Next
- At System Recovery Options, click Command Prompt
- Type:
bcdedit.exe
- Press Enter

If you have the “Repair Your Computer” available at “Advanced Boot Options” (most Windows 7 systems have these recovery tools installed), follow these steps:
- Restart the computer
- Press the F8 key to open Advanced Boot Options
- Select Repair your computer

Advanced Boot Options on Windows 7
- Press Enter
- At the System Recovery Options, click Command Prompt
- Type:
bcdedit.exe
- Press Enter

If you use Easy Recovery Essentials Command-line:
- Download Easy Recovery Essentials
- Burn the ISO Image. Follow our instructions on how to burn a bootable ISO image. If you’d like to have a recovery USB instead, follow our instructions on how to make a recovery USB.
- Boot Easy Recovery Essentials from the CD, DVD or USB
- Select Launch Command Line
To download Easy Recovery Essentials, click here.
BCDEdit on Windows 8
On Windows 8 or Windows 8.1 systems, you need to have the original installation media (DVD or USB drive) in order to access Command Prompt.
If you have the installation media, follow these steps:
- Insert the Windows 8 DVD or Windows 8.1 USB drive
- Restart the computer and boot from the DVD/USB
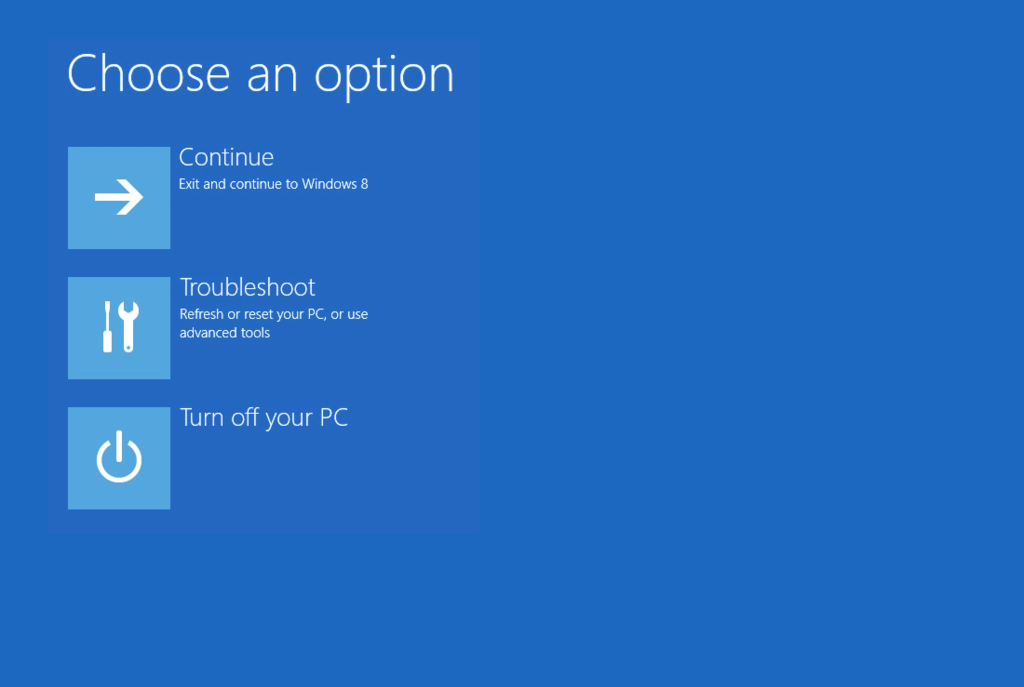
- Click Repair your computer

Windows 8 Repair Your Computer Menu
- Click Troubleshoot

Troubleshoot in Windows 8 recovery options screen
- Click Command Prompt
- Type:
bcdedit.exe
- Press Enter

If you use Easy Recovery Essentials Command-line:
- Download Easy Recovery Essentials
- Burn the ISO Image. Follow our instructions on how to burn a bootable ISO image. If you’d like to have a recovery USB instead, follow our instructions on how to make a recovery USB.
- Boot Easy Recovery Essentials from the CD, DVD or USB
- Select Launch Command Line
To download Easy Recovery Essentials, click here.
BCDEdit on Windows 10
On Windows 10 systems, you need to have the original installation media (DVD or USB drive) in order to access Command Prompt.
If you have the installation media, follow these steps:
- Insert the Windows 10 media
- Restart the computer and boot from the DVD/USB
- Click Repair your computer

- Click Troubleshoot

- Click Command Prompt
- Type:
bcdedit.exe
- Press Enter


If you use Easy Recovery Essentials Command-line:
- Download Easy Recovery Essentials
- Burn the ISO Image. Follow our instructions on how to burn a bootable ISO image. If you’d like to have a recovery USB instead, follow our instructions on how to make a recovery USB.
- Boot Easy Recovery Essentials from the CD, DVD or USB
- Select Launch Command Line
To download Easy Recovery Essentials, click here.
Commands and parameters
For the complete list of commands and parameters you can use with BCDEdit, type:
bcdedit /?
Whenever you are using this utility to modify a BCD store, make use use of these parameters:
/createstoreto create a new empty boot configuration data (BCD) store./exportto export the current configuration of the BCD store./importto import a previously exported configuration file./createto create a new entry in the BCD store./deleteto delete an entry from the BCD store./deletevalueto delete a specified value./setto set a new value./defaultto specify the default entry./timeoutto specify the timeout at startup value.
For example, to create a new entry in the BCD file to load Windows XP, run these commands:
-
bcdedit /create {ntldr} /d "Windows XP" -
bcdedit /set {ntldr} device partition=C: -
bcdedit /set {ntldr} path \ntldr -
bcdedit /displayorder {ntldr} /addlast
More Information
Linked Entries
- bootcfg
Support Links
- Easy Recovery Essentials for Windows – our repair and recovery disk.
It’s an easy-to-use and automated diagnostics disk. It’s available for Windows 8, Windows 7 and Windows Vista. It’s also available for Windows XP and Windows Server.
Read more at Windows Recovery Disks.
- The NeoSmart Support Forums, member-to-member technical support and troubleshooting.
- Get a discounted price on replacement setup and installation discs: Windows XP, Windows Vista, Windows 7, Windows 8, Windows 10.
Applicable Systems
This Windows-related knowledgebase article applies to the following operating systems:
- Windows XP (all editions)
- Windows Vista (all editions)
- Windows 7 (all editions)
- Windows 8 (all editions)
- Windows 8.1 (all editions)
- Windows 10 (all editions)
Propose an edit
Visual BCD Editor is a free program for Vista and newer versions of the Windows operating system that is enabling you to edit the boot menu of the system. The program displays a visual representation of the BcdStore containing the operating system’s boot configuration data. It displays the structure in a tree-like view on the left sidebar, and the selected item in detail on the right pane.
Here you for instance see all boot loaders currently available with their specific data types allowing you to analyze, verify and edit all boot related parameters. This includes the system root directory and other parameters like the preferred localy or application path for the system loader.

More interesting than that may be options to backup and restore the boot storage. Especially the backup option may come in handy, for instance before you start to install a second or third operation system on the computer as it allows you to restore the previous setting if things do not turn out the way they are supposed to be.
To backup the boot information you simply click on store > backup store or press f4. You can then later import the store again by selecting store > import store or by pressing f3. This is also recommended before you make changes to individual boot parameters.
You can furthermore use the program to repair the BCD or boot records, which is an automated process, create missing Windows loaders in case boot loaders are missing from the boot menu, or add Linux/Mac, Windows NT or Vista/7 boot loaders to the list.The program offers capabilities to remove entries from the boot loader as well. This can be useful if you have reinstalled Windows and notice that the old operating system is still listed in the boot manager.
The latest version of Visual BCD Editor requires the Microsoft .Net Framework 2.0. It is fully compatible with all versions of Windows Vista and newer editions of the Windows operating system. You can alternatively check out Easy BCD, another popular boot editor for Vista and newer versions of Windows.
Advertisement
Introduction
In the world of operating systems, especially with Windows, the ability to manage boot configurations efficiently is crucial for any user, whether they are tech enthusiasts, developers, or system administrators. One of the fundamental components of Windows boot management is the Boot Configuration Data (BCD), a crucial part that contains boot time configuration parameters. While Microsoft provides a command-line interface for managing BCD entries, this can often be cumbersome and intimidating for many users. This is where visual editors come into play, particularly the Advanced Visual BCD Editor, which simplifies the process of managing BCD entries with a graphical user interface.
Understanding Boot Configuration Data (BCD)
Before diving into the specifics of the Advanced Visual BCD Editor, it’s essential to understand what BCD is and why it is significant.
The Boot Configuration Data store replaces the older boot.ini file used in earlier Windows versions. It serves as a database for boot applications and settings. BCD contains various settings, including:
- Boot Entry: Each operating system or application you can boot.
- Boot Manager Settings: Configurations that define how the system interacts with BCD.
- Path to Boot Loader: The location of the operating system’s boot loader file.
The Need for a Visual Editor
Managing BCD via the command line involves using commands that can be unintuitive and error-prone for the average user. Mistakes in the command line could lead to a non-bootable system. This creates the demand for visual tools that can simplify the process, providing users with an easier way to interact with system settings.
Features of Advanced Visual BCD Editor
The Advanced Visual BCD Editor is a powerful tool tailored for Windows PC users looking to modify boot entries and manage their boot environment efficiently. Here are some of its standout features:
User-Friendly Interface
At the core of the Advanced Visual BCD Editor’s appeal is its intuitive user interface. Unlike the command line, which can seem daunting, this application presents all options visually. Users can easily navigate through different options, making it accessible even for those without technical backgrounds. The layout is designed for clarity, displaying boot entries in a tree structure for straightforward navigation and management.
Full BCD Backup and Restore
One of the most significant risks when editing BCD entries is potential misconfiguration that could render a system unbootable. The Advanced Visual BCD Editor addresses this concern by providing full backup and restore capabilities. Prior to making any changes, users can create a complete backup of their current BCD store. If something goes wrong, they can restore the previous state effortlessly with just a few clicks.
Add, Edit, and Remove Boot Entries
Managing boot entries is one of the most common tasks associated with BCD editing. The Advanced Visual BCD Editor allows users to efficiently add new operating systems or applications to boot options, modify existing entries, or remove outdated ones. This functionality is crucial for systems that run multiple operating systems or for users who frequently install and uninstall software.
Configuration of Boot Options
The editor enables users to configure various boot options easily:
- OS Selection: Set the default operating system, time-out for selection, and more.
- Advanced options: Change parameters such as debugging options, safe mode, etc.
- Boot Image: Alter the path to the boot loader and add custom operating system loaders.
This level of configurability can help users optimize their boot experience based on their preferences or troubleshooting requirements.
Multilingual Support
Recognizing the diverse user base of Windows PCs, the Advanced Visual BCD Editor includes multilingual support. This feature allows users from different regions to operate the tool in their preferred language, further enhancing its accessibility.
Validation of BCD Entries
To avoid system faults, the tool provides a validation feature that scans the BCD entries for inconsistencies. This ensures that users can detect issues before they manifest as boot errors, helping to maintain system integrity.
User Guidance and Documentation
For users unfamiliar with BCD and its intricacies, the Advanced Visual BCD Editor provides comprehensive help documentation. It guides users through various features, ensuring that even novices can navigate advanced settings without the fear of incorrect configurations.
Installing Advanced Visual BCD Editor
To begin utilizing the Advanced Visual BCD Editor, users will need to download and install it on their Windows PC. Here is a step-by-step guide to the installation process:
Step 1: Download the Software
Visit the official website or trusted software repositories to download the Advanced Visual BCD Editor. Ensure that you are downloading the version compatible with your Windows system, whether it’s a 32-bit or 64-bit version.
Step 2: Installation Process
- Open the downloaded file and run the installer.
- Follow the prompts to complete the installation. Ensure you agree to the terms of service and select the installation directory.
- Once installation is complete, launch the Advanced Visual BCD Editor from the desktop shortcut or the start menu.
Step 3: Creating a Backup
Before making any changes, it’s crucial to create a backup of your current BCD settings. Click on the backup option in the main interface, and follow the prompts to save a copy of your BCD data safely.
Using the Advanced Visual BCD Editor
Now that the tool is installed, let’s explore how to use it effectively to manage BCD entries.
Adding a New Boot Entry
- Open the Advanced Visual BCD Editor.
- Click on “Add New Entry” from the main menu.
- Fill in the necessary details:
- Type of entry (e.g., Windows, Linux, etc.)
- Name of the operating system
- Path to the boot loader file
- Save changes, and the new entry will be added to the boot menu.
Modifying an Existing Entry
- Select the boot entry you wish to modify from the tree view.
- Click on “Edit” or right-click and select “Edit Entry.”
- Change the required fields, such as name or path.
- Save your changes and exit.
Deleting a Boot Entry
- Navigate to the entry you wish to remove in the list.
- Right-click on the entry and select “Delete.”
- Confirm the deletion when prompted, and the entry will be removed from the BCD store.
Setting Default Boot Entry
To set a default boot entry, simply navigate to the desired entry, right-click and select “Set as Default.” This will make the selected entry the default operating system that loads on startup.
Changing Boot Options
To alter boot options like timeout or advanced settings, click on the specific entry and modify the options in the right panel. Save changes to implement the new boot configurations.
Troubleshooting Common Issues
Like any advanced software, users might encounter issues while using the Advanced Visual BCD Editor. Here are some common problems and their solutions:
Non-Bootable System After Modification
If your system fails to boot after modifying BCD entries, boot into Windows Recovery Environment using a Windows installation media.
- Select “Repair your computer.”
- Go to “Troubleshoot” and then “Command Prompt.”
- In the command prompt, type
bcdeditto view current entries. - You can restore the backup if you created one or use the
bootrec /rebuildbcdcommand to repair the BCD.
Unable to Open the Editor
If the application fails to open, make sure that there are no installation issues or corrupt files. Consider reinstalling the application, and ensure that your Windows version is compatible with the version of the Advanced Visual BCD Editor you downloaded.
Performance Lag
If the tool runs slowly or freezes, it might be due to system resource issues. Ensure that you close unnecessary programs to free up memory. You might also want to check for updates or reinstall the application if the issue persists.
Conclusion
The Advanced Visual BCD Editor for Windows PC is an indispensable tool for anyone who requires an intuitive and powerful way to manage boot configurations. Its user-friendly interface, comprehensive features, and robust backup options make it suitable for both novice and experienced users. With the ability to add, edit, and remove boot entries with ease, it simplifies the boot management tasks that can often prove challenging when using command-line tools.
In today’s computing world, where many users run multiple operating systems or regularly install new software, having a reliable tool like the Advanced Visual BCD Editor enhances efficiency and productivity. By offering robust capabilities and a simple interface, it serves not only as a functional tool but also as a safeguard against the inevitable complexities of modern computing. Whether you’re troubleshooting boot issues, configuring system preferences, or simply looking to streamline your boot process, the Advanced Visual BCD Editor is an essential addition to your toolbox.