
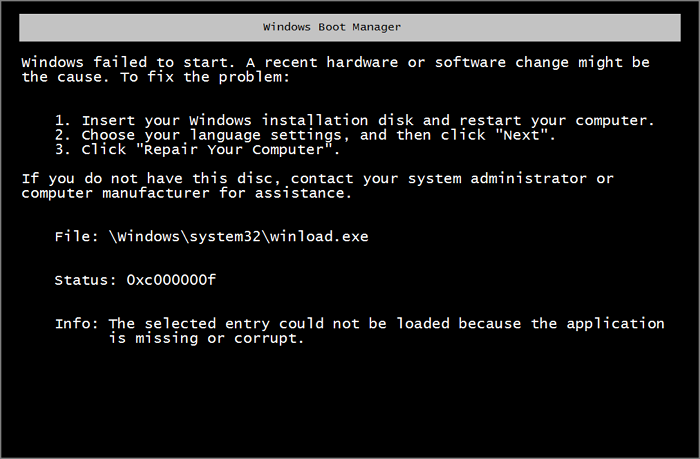
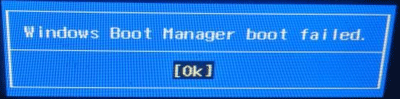
Windows manager software enables a computer to boot into an operating system. In certain scenarios, the boot manager cannot load the operating system and start the computer normally. An error may be prompted, or the system may be stuck on a black screen.
However, there are ways to troubleshoot Windows Boot Manager Boot Failed. But if you’re unaware, you’ve come to the right place. In this article, you’ll discover the finest ways to boot windows normally. Let’s get into the details!
Why Windows Boot Manager Boot Failed
Before moving forward, you need to understand the reason behind the occurrence of this supervening event. There are several reasons why the Windows Boot Manager may fail to boot:
- Corrupt Master Boot Record (MBR): The MBR is a critical data structure located on the hard drive’s first sector. It contains the boot code and a table that lists the partitions on the drive. If the MBR is corrupt, the boot manager may be unable to load the operating system.
- Damaged hard drive cable: If the cable that connects the hard drive to the motherboard is damaged, the boot manager may not be able to access the operating system files on the hard drive.
- Improper shutdown of the computer: If the computer is shut down improperly, it can cause the system files that the boot manager relies on to be corrupted or damaged.
- Hardware missing: If a hardware component is missing or not properly installed, it can cause the boot manager to fail.
A boot failure can generally occur due to any issue that prevents the boot manager from loading the operating system. These issues can be caused by hardware or software problems and may require different solutions.
If you want to know more about repair tools on Windows 11, click the link below:
Now you know what windows boot manager boot failure is, you must be wondering how to fix it. Let’s jump onto that in the next section.
How to Fix Windows Boot Manager Boot Failed
Looking for possible ways to troubleshoot the windows boot manager boot failed? This is the section for you! In this section, you’ll get some of the finest ways to load your operating system properly:
- Fix 1. Rebuild MBR
- Fix 2. Repair the Boot Manager
- Fix 3. Edit Windows Boot Manager
- Fix 4. Update Your BIOS or UEFI
Let’s look at how each method works to fix the Windows boot manager boot failed error.
How to Fix Boot Manager Failed to Find OS Loader [100% Working]
Resolve the «Boot Manager Failed to Find OS Loader» problem effortlessly by exploring our expert-backed solutions. Follow step-by-step instructions to troubleshoot and resolve this issue.
Fix 1. Rebuild MBR
If the MBR is damaged or corrupt, it can cause the Windows Boot Manager to fail to boot the computer. To fix this issue, you may need to rebuild the MBR. Rebuilding the MBR involves replacing the damaged or corrupt MBR with a new, functional one.
One tool that can be used to rebuild the MBR is EaseUS Partition Master. EaseUS Partition Master is a partition management software that provides a range of features for managing hard drive partitions. It includes a rebuild MBR function that can repair or rebuild the MBR on a hard drive. This can be a useful tool for fixing a Windows Boot Manager boot failure caused by a corrupt MBR.
With EaseUS Partition Master rebuild MBR function, you can eradicate the damaged MBR with a new function MBR causing normal booting of the operating system.
Step 1. Create a WinPE bootable disk
- Launch EaseUS Partition Master, and click «Bootable Media» on the toolbar. Select «Create bootable media».
- Click «Next» to finish the process.

Step 2. Boot EaseUS Partition Master Bootable USB
- Connect the bootable USB or CD/DVD to your PC.
- Press F2 or Del when you restart the computer to enter the BIOS screen. Set and boot your computer from «Removable Devices» or «CD-ROM Drive». And then EaseUS Partition Master will run automatically.
Step 3. Rebuild MBR
- Click «Toolkit» and choose «Rebuild MBR».

- Select the disk and the type of MBR. Then, click «Rebuild».

- After that, you can see «MBR has been successfully rebuilt on Disk X».

You can also use the Diskpart command in Windows to repair the corrupted MBR. But EaseUS Partition Master simplifies the process, and you can also Your VAIO Failed to Start Windows easily.
Fix 2. Repair the Boot Manager
To repair the Boot Manager, you can use a tool called «Bootrec.exe,» which is included in the Windows Recovery Environment (RE). Here is a step-by-step guide on how you can use Bootrec.exe to repair the Boot Manager:
Step 1: Boot up your system with windows installation media.
Step 2: Select your language, time and currency format, and keyboard or input method, and then click Next.
Step 3: Use the arrow keys to select Repair Your Computer and click Troubleshoot.
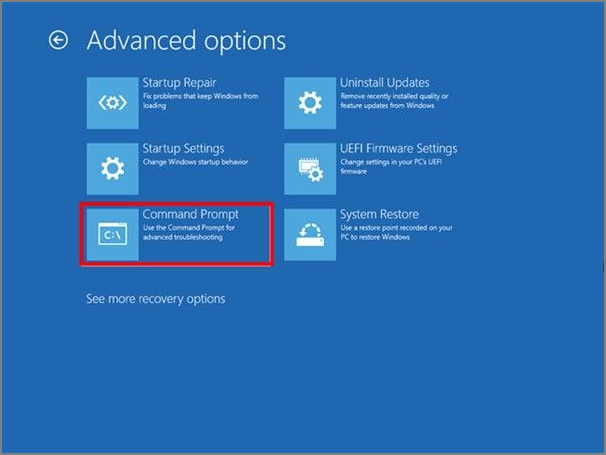
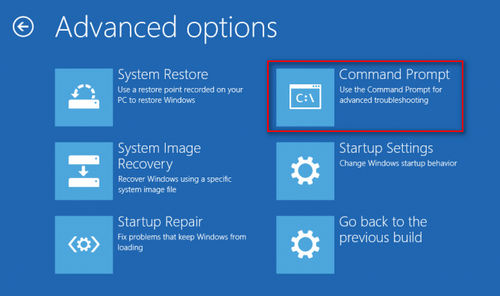
Step 4: Click on Advanced Options, then click on the Command Prompt option.
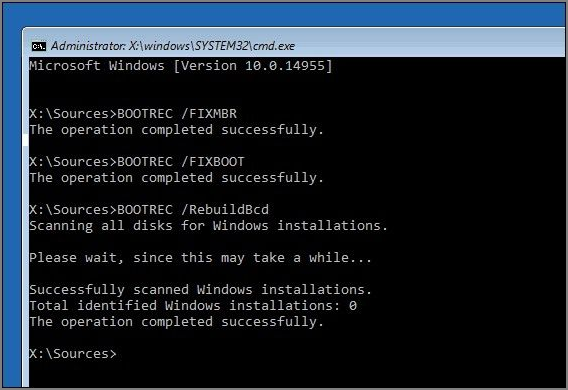
Step 5: Type bootrec.exe /fixmbr and press Enter. This will repair the Boot Manager.
Step 6: Type bootrec.exe /fixboot and press Enter. This will repair the boot sector.
Step 7: Type bootrec.exe /rebuildbcd and press Enter. This will rebuild the BCD.
Step 8: Remove the media and restart your computer. Entering the above commands successfully will assist you in normally booting your system.
Fix 3. Edit a Windows Boot Manager
Sometimes, the Windows Boot Manager can become corrupted or damaged, causing issues with booting into the operating system. By editing the Windows Boot Manager, you may be able to fix issues such as a corrupt boot configuration or an incorrect boot order. To edit the Windows Boot Manager, follow these steps:
Step 1: Run your system with the help of windows installation media.
Step 2: Select your language, keyboard or input method, and time format, and then click next
Step 3: Select «Repair Your Computer» and click troubleshoot using the arrow keys.
Step 4: Select «Advanced Options,» then select «Command Prompt.»
Step 5: Enter bcdedit/? to check commands for editing.
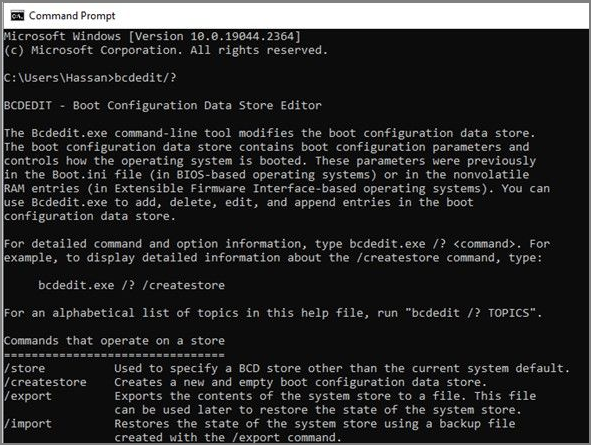
Step 6: Enter bcdedit/? default to set the default entry.
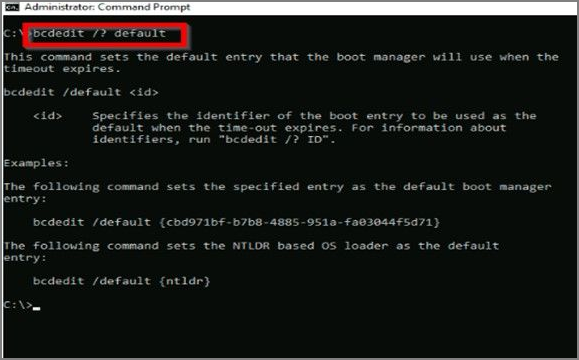
After entering the above commands, your system will no longer face the booting problem.
Fix 4. Update Your BIOS or UEFI
Updating your BIOS or UEFI (Unified Extensible Firmware Interface) can provide several benefits. It can fix bugs, improve your system’s overall performance, and enable support for new hardware or devices.
Here are the steps to update your BIOS or UEFI:
Step 1: Open the Microsoft store and search MSI center.
Step 2: Click on the Get button to download.
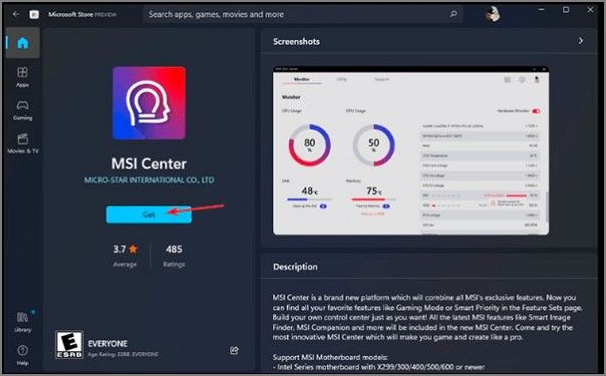
Step 3: Navigate to Support and select Advanced Options. Select BIOS update and wait until its complete
It’s important to note that updating your BIOS or UEFI can be risky, as it can potentially brick your system if something goes wrong.
You May Also Like:
Conclusion
To wrap up the discussion, we thoroughly explained various fixes for the normal booting of the operating system, and we hope this helped you to overcome the Windows Boot Manager Boot Failed. These fixes can troubleshoot and resolve issues preventing your system from booting properly.
To improve your system’s efficiency, we recommend using EaseUS Partition Master as a powerful tool for managing and optimizing your system’s disk space. It can solve all partition errors except for rebuilding MBR.
FAQs About «Windows Boot Manager Boot Failed» Error
After finding out how to troubleshoot the Boot error, you might have some questions, and you’ll get the answers here:
1. How do I fix Windows Boot Manager failed to start?
This article discussed four ways to fix Windows Boot Manager failed to start. You can use EaseUS Partition Master to rebuild MBR:
Step 1. Launch EaseUS Partition Master and click «Bootable Media» on the toolbar. Select «Create bootable media.»
Step 2. Connect the bootable USB to PC and press F2 to BIOS.
Step 3. Click «Toolkit» and choose «Rebuild MBR.»
2. What is Boot Manager failure?
When the boot manager cannot boot the operating system, it starts displaying an error message, or the system gets stuck on a black screen. This phenomenon is called Boot Manager failure.
3. How do I get past Windows Boot Manager?
There are several steps you can follow to repair Windows Boot Manager boot and get past it:
Step 1: Boot up with installation media and select language and formatting.
Step 2: Select repair your computer > Troubleshoot > Advanced options> Command prompt.
Step 3: Write bootrec.exe /fixboot, then click Enter.
Step 4: Type bootrec.exe /fixmbr, then click Enter. After that, input bootrec.exe /rebuildbcd, then again click Enter.
-
Home
-
News
- Windows Boot Manager Failed To Start In Windows 10
By Sarah |
Last Updated
The Windows boot manager is actually a piece of small software that helps you load your system. It is part of the volume boot record, which is responsible for the boot process. If any problems are found on the Windows boot manager, you won’t be able to access your system or disk data. In this case, you need to find solutions to fix the error.
Windows boot manager, also called BOOTMGR, is located in the root directory and responsible for starting a system & interacting with users. The BOOTMGR configuration data is located in the Boot Configuration Data (BCD) store, which is a database similar to registry; it is used in new Windows system to replace the boot.ini file used in some old Windows like Windows XP.
Stay Calm When Windows Boot Manager Failed
When you find the Windows boot manager failed, please don’t panic. You should try the methods that will be introduced in the next part to fix the Windows boot manager error. To prevent the possible data loss resulted from the boot failure, you should go to the home page to get reliable data recovery software and backup program.
Error: Inaccessible Boot Device, How To Fix It Yourself?
Windows Boot Manager Failed to Start
The error message Windows Boot Manager boot failed sometimes appear on your computer screen during startup process. The most possible cause of this error is a damaged or corrupted Master Boot Record. You can press F8 to boot into Windows Recovery Menu or perform a System Restore to fix the Boot Manager failure.
Definitely, you are not able to enter your system when Windows Boot Manager is failed. You’ll probably see the following errors on the screen:
- 0xc00000f
- 0xc00000e
- 0xc00000d
- 0xc00000e9
- …
What are the possible causes for a failed Windows boot manager?
- The file integrity is damaged.
- The HDD data cable is not working.
- The BCD file is missed or corrupted due to disk write errors, power outages or boot sector viruses. (How to recover files lost by virus attack?)
In fact, the root reason is a corrupted Master Boot Record (MBR). What’s more important is how to fix when you find Windows boot manager not working.
How to Fix Windows Boot Manager Boot Failed
This part will show you how to fix Windows boot manager in Windows 10.
Solution 1: Make Use of Bootrec.exe Tool
- Restart your system and press F8 to see the Windows Recovery Menu.
- Select Troubleshoot.
- Select Advanced options.
- Select Command Prompt. (How to recover files using CMD?)
- Type bootrec /RebuildBcd command and press Enter.
- Type bootrec /fixMbr and press Enter.
- Type bootrec /fixboot and press Enter.
- Type bootsect /nt60 SYS (or bootsect /nt60 ALL) and press Enter.
- Wait for the commands to complete.
You can also use the Rebuild MBR function in the bootable version of MiniTool Partition Wizard to try to fix the Windows boot manager error caused by damaged MBR.
Solution 2: Perform a System Restore
- Restart your computer and boot from the Windows installation disk.
- Choose to change language & other settings in Windows Setup or not; then, click Next.
- Click Repair your computer.
- Select Troubleshoot > Advanced options > System Restore.
- Choose the target operating system.
- Click Next in the System Restore wizard.
- Select the proper restore point and click Next.
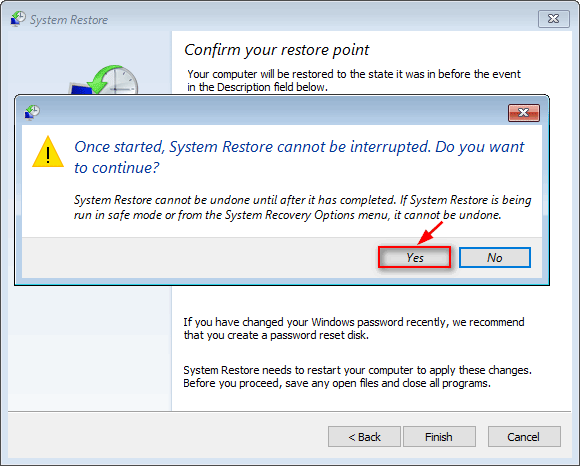
- Confirm your selection and click Finish.
- Click Yes in the prompt window to confirm system restore.
- Wait for the restore to complete.
- Restart your PC.
In addition, you can also try to fix Windows boot manager failed to start by removing newly installed hardware & external devices and then reboot.
Verdict
The Windows boot manager file is very essential for the PC startup, so it is protected by the system (hidden and read-only). It is actually located in the root directory of the active partition. In most PCs, it has a System Reserved label. When it is damaged, you won’t be able to boot into the system. You must follow the solutions given above to try to troubleshoot Windows boot manager failed issue.
About The Author
Position: Columnist
Sarah has been working as an editor at MiniTool since she graduated from university. Sarah aims at helping users with their computer problems such as disk errors and data loss. She feels a sense of accomplishment to see that users get their issues fixed relying on her articles. Besides, she likes to make friends and listen to music after work.
Windows Boot Manager is a program responsible for loading the OS files when you start your computer. Sometimes, when the boot manager fails to load some system files due to an error or damaged files, it shows an error stating that the Windows boot manager failed accompanied by an error code, i.e., 0xc000000f, 0xc000000e, or 0xc000000d. Each of these error codes demonstrates the cause of the error. This article will teach you how to tackle Windows boot manager windows failed to start errors in Windows 7/8/10/11.
Part 1: Overview of Windows Boot Manager
1. What is Windows Boot Manager?
Windows Boot Manager (BOOTMGR) is a small file located in System Reserved Partition or System/Boot sector. It contains the instructions to load the operating system when you start your computer. The data required to configure Windows Boot Manager is stored in Boot Configuration Data (BCD) file. When you turn your computer on, the first code that executes is the BIOS which reads MBR from the boot device and transfers the control to the boot code there. The Windows Boot Manager then reads the boot codes from BCD and makes them available to the loader to show the Boot menu to the user.
2.What causes Windows Boot Manager Windows Failed to Start?
Various reasons cause the system errors in Windows, so it is difficult to find the real culprit behind the boot manager Failure: Windows failed to start issue. However, here are some known reasons.
- Missing or corrupt BCD file
- Damaged or corrupt MBR
- Compromised file integrity
- Damaged HDD cable
- Forceful Shutdown while some crucial data was being written to the boot sector or an update, was being installed
- Some critical hardware or software is missing
3.What will Happens When Windows Boot Manager Windows Failed to Start?
When the boot manager fails, and Windows do not load normally, you will see a pop-up message on the screen stating that Windows Boot Manager boot failed upon startup. In such a situation, you will be unable to use your system or access the disk data.
4.Most Common Problems during the Boot Loader Phase
As stated earlier, many factors can cause Windows Boot manager to fail. However, you can easily identify the cause of the issue with the help of the error codes. If you see a black screen with a blinking cursor, it shows that the boot manager failed on the Windows Boot Loader phase. This happens due to any one of the following error codes during the Windows Boot Loader phase.
- Corrupted boot file or MBR
- Corrupted or missing boot sector
- Corrupt BCD
- Bootmgr is missing Windows 10
If you are facing issues with starting up your computer and you want to fix Windows boot manager, follow the methods given below:
Part 2: One-stop Solution to Fix Windows Boot Manager Windows Failed to Start Error
PassFab FixUWin is the ultimate solution to all the problems you might face with your Windows system. This amazing tool scans your computer and looks for the damaged files, or whatever reason is causing the error. It then repairs your computer automatically by replacing the damaged files. It can resolve any blue/black screen errors, system crashing, stuck on boot loop and other problems. Here is how you can fix Windows 10 bootloader with PassFab FixUWin:
Part 3: Other Solutions to Fix Windows Boot Manager Windows Failed to Start Error
1. Update BIOS or UEFI Settings
If you use a new processor with old BIOS and UEFI settings, your boot manager will eventually fail to load upon startup. You should update the BIOS or UEFI settings by visiting the manufacturer’s website. To do so, reinstall the old processor, go to the manufacturer’s website, and install updates by following the on-screen instructions.
Note: Be cautious while performing the BIOS or UEFI update, as a tiny mistake can cause a significant loss. It is recommended to back up your data before updating such settings.
2. Use Bootrec.exe Tool to Rebuild MBR
Bootrec.exe is a built-in tool in Windows 10 that is used to update Master Boot Record (MBR), partition boot sector code, and Boot Configuration Data (BCD). You can use it for Windows boot manager repair as follows:
- Boot Windows 10 and press the F8 key when you see the Windows logo.
- Navigate through Troubleshoot -> Advanced Options -> Automatic Repair and open Command Prompt.
- Type bootrec /rebuildbcd and press Enter.
- Type bootrec /fixMbr and hit Enter.
- Type bootrec /fixboot, press Enter.
- Type bootsect /nt60 SYS or bootsect /nt60 ALL and press Enter key.
3. Perform Automatic Repair
Performing Windows Automatic Repair can be used for Windows 10 bootloader repair. However, you will need a Windows Installation Media to work through this method. Once you get the Installation Media, proceed by following these steps:
4. Perform System Restore
If you encounter a Windows bootmgr error after installing an update or making changes to your system, you can perform a system restore to revert to the previous version. However, this method only applies if you create a restore point after making changes to the system. Here is how to perform a system restore using Windows Installation media:
5. Restore Windows Boot Manager
When nothing else works, the only option you are left with is restoring Windows Boot Manager to its default settings as follows.
- Open Command Prompt by navigating Advanced Options -> Troubleshoot -> Advanced Options -> Command Prompt.
- Now type BCDEdit /? Default and press Enter.
6. Replace Bootmgr File
Another option to fix the Windows boot manager is replacing the Bootmgr file from the C drive with System Reserved Partition. Usually, the System Reserved Partition does not have any drive letter, so to identify it, first assign it a letter by running the following command in Windows PowerShell:
Get-Partition -DiskNumber 0 -PartitionNumber 1|Set-Partition -NewDriveLetter P
Now open the Command Prompt and follow the following steps:
- Change the directory to system reserved partition.
- Now, type attrib -r -s -h and hit Enter.
- Type ren bootmgr bootmgr.old and press Enter.
- Change the directory to C, type attrib -r -s -h and press Enter.
- Lastly, run copy C:\bootmgr P:\ command and restart your computer.
7. Manually Restore System Hive
If you have tried all the methods given above and still the boot manager fails upon startup, you can try manually restoring the system hive as follows:
- Open the Command Prompt using Advanced options via Windows Installation Media.
- Go to the CONFIG directory by typing CD /D C:\WINDOWS\SYSTEM32\CONFIG and pressing Enter.
- Type the following commands one by one and press Enter after typing each:
- REN DEFAULT DEFAULT.OLD
- REN SAM SAM.OLD
- REN SECURITY SECURITY.OLD
- REN SOFTWARE SOFTWARE.OLD
- REN SYSTEM SYSTEM.OLD
- Now run the following commands step-by-step:
- copy C:\Windows\System32\config\RegBack\DEFAULT C:\Windows\System32\config\
- copy C:\Windows\System32\config\RegBack\SYSTEM C:\Windows\System32\config\
- copy C:\Windows\System32\config\RegBack\SOFTWARE C:\Windows\System32\config\
- copy C:\Windows\System32\config\RegBack\SECURITY C:\Windows\System32\config\
- copy C:\Windows\System32\config\RegBack\SAM C:\Windows\System32\config\
Once the commands have run successfully, restart your computer, and you will not see the Windows Boot Manager Windows Failed to start error.
Conclusion
When you see the Windows boot manager Windows failed to start error on the screen upon startup, you might panic. But wait! We have gathered some tested and proven ways to fix Windows boot manager. The best yet most recommended method proposed in this article is using the PassFab FixUWin Windows repair tool.
COMMENT
Доброго времени суток.
Имеется ноутбук Lenovo G500, работал хорошо, но в один прекрасный момент перестал загружать Windows. Ноутбук знакомых.
При запуске ноутбука черный экран с надписью windows boot manager boot failed и потом просто черный экран и ничего не происходит, только перезагружать.
Пробовал с разными настройками в Биос загружать, всё одно и тоже. В безопасный режим зайти не могу. В Биос тоже не мог зайти, пока не почитал в интернете как это делать.
Выключил ноут и нажал не на кнопку включения, а рядом на кнопку с кривой стрелочкой. OneKey Recovery вроде называется, ноут с нее загрузился и предложил выбор загрузки, там есть обычная, Биос, выбор с чего загрузить и Recovery.
Recovery выбирал, ничего не происходит, тоже черный экран и только перезагружаться.
В итоге вставил с диск с Windows XP и когда дошло до момента выбора куда его устанавливать, я увидел, что есть только 1 раздел неизвестный, с полной свободной помятью всего жесткого диска.
Это значит, что все данные удалились и теперь ничего не вернуть? Или здесь где-то подвох есть? Запутался, рисковать и удалять раздел не стал, сначала решил уточнить. Спасибо
Владельцы компьютеров или ноутбуков Lenovo и Acer могут столкнуться с ошибкой «Default Boot Device Missing or Boot Failed» при включении ноутбука, при этом загрузка операционной системы или загрузка с флешки не происходит.
В этой инструкции подробно о возможных причинах ошибки и о том, что делать, если вы с ней столкнулись. На близкую тему: Как исправить ошибку Reboot and Select Proper Boot Device.
Быстрые способы решения проблемы

Ошибка говорит о том, что не удалось выполнить загрузку с устройства (диска), выбранного в качестве устройства загрузки по умолчанию. Несмотря на то, что полный текст сообщения об ошибке «Default Boot Device Missing or Boot Failed. Insert Recovery Media and Hit Any key» предлагает пользователю использовать отдельный загрузочный накопитель для восстановления загрузки или операционной системы, это не всегда необходимо.
В некоторых случаях ошибка не свидетельствует о каких-то серьезных проблемах и, если вы знаете, что система установлена на вашем ноутбуке, замены оборудования не производилось, неисправности также не предполагаются и требуется загрузить установленную Windows, можно использовать следующие простые способы, которые могут сработать:
- На экране с ошибкой выключите ваш ноутбук долгим удержанием кнопки питания, отключите любые флешки, внешние диски, карты памяти и устройства, подключенные по USB, и снова включите устройство — возможно, в этот раз оно загрузится.
- Если ошибка возникает каждый раз после завершения работы Windows, а после перезагрузки или принудительного выключения (долгим удержанием кнопки питания) и включения всё снова работает, попробуйте отключить быстрый запуск в Windows — это может решить проблему.
Если эти варианты не помогли, переходим к следующим шагам.
Выбор устройства и режима загрузки
Проблема может возникнуть по причине неправильно выбранного устройства загрузки или режима загрузки, что может произойти:
- После сброса настроек БИОС/UEFI
- После изменения конфигурации дисков ноутбука (установки новых накопителей или отключения старых).
- При попытке загрузки с флешки для UEFI-загрузки, в то время, когда в БИОС выбран режим загрузки только Legacy.
Изменить параметры загрузки можно в БИОС/UEFI вашего устройства, на ноутбуках Acer и Lenovo это можно сделать следующим образом:
- Сразу после начала включения ноутбука многократно нажимайте клавишу F2, пока не откроются настройки БИОС/UEFI. Если с F2 не сработает, повторите, но уже нажимая Fn+F2 (Fn удерживаем, F2 нажимаем).
- С помощью стрелки «вправо» перейдите на вкладку «Boot», где вы увидите информацию о режиме загрузки (UEFI или Legacy) и приоритете устройств загрузки.
- Интерфейс может слегка отличаться в зависимости от конкретной модели ноутбука или компьютера, но логика действий одна: поставить HDD или SSD с системой на первое место в порядке загрузки, а при наличии пункта «Windows Boot Manager» — лучше установить первым его, а уже после — локальные диски. Перемещение выбранного элемента загрузки выполняется клавишами F5 и F6, а для сохранения изменений требуется нажать F10 и подтвердить их сохранение.

- Если правильное устройство загрузки уже выбрано, попробуйте переключить режим загрузки — Boot Mode из UEFI в Legacy или наоборот (также пункт может называться UEFI Boot со значениями Enabled — включено или Disabled — отключено), сохранить настройки и выполнить перезагрузку.

- При наличии опции для отключения Secure Boot (может находиться на вкладке Security) попробуйте также отключить и её.
- Если требуется выполнить загрузку с флешки, а в БИОС присутствует пункт «External Device Boot», переключите его в Enabled, а затем установите External Device первым в порядке загрузки.


В ситуации, когда на вашем устройстве нет установленной ОС, и вы пробуете загрузиться с загрузочной флешки, получая сообщение о рассматриваемой ошибке, причина чаще всего в неправильно выбранном режиме загрузки. Решение: изменить его в БИОС, либо пересоздать флешку под другой режим.
Поврежденный загрузчик или файловая система на диске
Следующий возможный вариант, при условии, что на ноутбуке была установлена Windows и всё до недавнего времени исправно работало — повреждение файловой системы или загрузчика на диске или файловой системы на нем.
Рекомендую учитывать следующие нюансы, касающиеся загрузчика:
- Если ранее на компьютере было более одного диска и один вы отключили, после чего и появилась проблема, может оказаться, что загрузчик был именно на отключенном диске (хотя сама система — на оставшемся диске). В этом случае для UEFI загрузки используйте последний способ из приведенной далее инструкции про восстановление загрузчика Windows 11 — в нем описано как создать раздел с EFI-загрузчиком на диске (способ подойдет и для Windows 10).
- Если при выполнении восстановления загрузчика вы увидите, что какой-то из разделов диска имеет файловую систему RAW, запустите проверку диска с помощью команды chkdsk C: /f — как попасть в командную строку и посмотреть буквы дисков рассматривается в приведенных далее инструкциях, буква диска может отличаться от C.
- В ситуации, когда ошибка «Default Boot Device Missing or Boot Failed» появилась после конвертации диска из MBR в GPT, причина так же в загрузчике и режиме загрузки: для GPT-диска требуется раздел с EFI-загрузчиком и выбранный режим загрузки UEFI в БИОС.
На тему восстановления загрузчика на сайте доступны отдельные инструкции:
- Восстановление загрузчика Windows 11
- Восстановление загрузчика Windows 10
Диск не виден на вкладке Boot в БИОС/UEFI
Если вы не видите нужного диска доступного для выбора в порядке загрузки, это может говорить об одном из:
- Включен режим загрузки UEFI, но на диске нет загрузчика для UEFI — в этом случае он не будет отображаться в списке.
- Для USB-накопителей есть отдельная инструкция: Что делать, если ПК или ноутбук не видит загрузочную флешку в БИОС/UEFI.
- Установлен неподдерживаемый диск, например, в разъем M.2, поддерживающий только SATA-накопители, установлен PCI-e NVMe SSD.
- Есть проблема с подключением диска или его работоспособностью.
В зависимости от конкретного сценария появления ошибки в вашем случае действия могут быть разными: от отключения UEFI Boot (переключения в Legacy) до отключения и повторного подключения или замены диска.
В завершение ещё несколько моментов, которые могут пригодиться в ходе решения рассматриваемой проблемы:
- Если есть основания полагать, что причина проблемы — вышедший из строя жесткий диск или SSD, его можно подключить в качестве второго диска к отдельному работающему компьютеру и выполнить его проверку на нем из работающей системы.
- Есть сообщения, что в некоторых случаях причиной ошибки стал неправильно работающий оптибэй (для замены оптического привода на HDD или SSD), что приводило к невозможности чтения в том числе и внутреннего накопителя ноутбука.
- В крайнем случае, если другие варианты решения не помогают, вы можете создать загрузочную установочную флешку с операционной системой на другом компьютере и установить систему заново на ПК или ноутбуке с ошибкой — это должно решить проблему, при условии, что HDD или SSD на нем исправен.
Задать дополнительные вопросы, описать конкретную ситуацию в вашем случае или предложить дополнительные подходы к избавлению от проблемы вы можете в комментариях ниже.