
Hi, Windows Boot Manager (BOOTMGR) is a small piece of software, called a boot manager, that’s loaded from the volume boot code, which is part of the volume boot record. BOOTMGR helps your Windows 10, Windows 8, Windows 7, or Windows Vista operating system start. BOOTMGR eventually executes winload.exe, the system loader used to continue the Windows boot process.
It is recommended to have Windows Boot manager. You can’t actually remove the Windows Boot Manager. What you can do is reduce the time that it waits on the screen for you to answer which operating system you want to start. You can do this by pre-choosing the operating system and then lowering the timeout time, basically skipping the Windows Boot Manager altogether.
This is accomplished through the System Configuration (msconfig.exe) tool. However, be careful when using the System Configuration tool — you might make unnecessary changes that can just cause more confusion in the future.
Here’s how to do this:
1. Open System Configuration via Administrative Tools, which is accessible through the System and Security link in Control Panel.
Another option for opening System Configuration is to use its command line command. Open the Run dialog box (Windows Key + R) or Command Prompt and enter the msconfig.exe command.
2. Access the Boot tab in the System Configuration window.
3. Choose the operating system you want to always boot to. Remember that you can always change this again later if you decide to boot to a different one.
4. Adjust the «Timeout» time to the lowest possible time, which is probably 3 seconds.
5. Click or tap the OK or Apply button to save the changes.
Note: A System Configuration screen might pop up after saving these changes, to inform you that you might need to restart your computer. It’s safe to choose Exit without restart — you’ll see the effect of making this change the next time you restart.
If you think I’ve answered your question, please hit the Accept Answer
Acer is one of the most famous brands of computers and other related products. Although it is widely used around the world, some of you may not know what is the Acer Boot Menu. This post on MiniTool will give useful information about the Acer boot menu including how to access and operate it. Besides, it introduces the process of recovering data from a dead computer with the cooperation of BIOS and MiniTool Power Data Recovery.
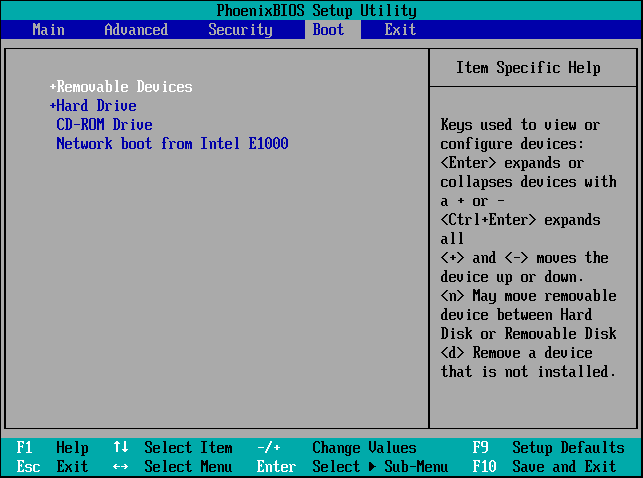
The boot menu, as its name refers, is responsible for your computer boot. The boot menu doesn’t show up by default when starting up the computer. But you can access the boot menu by pressing a specific key easily.
A lot of options are provided by the boot menu including system information, boot device options, BIOS setup, etc., which is the same as the Acer boot menu. All these options are utilized in handling problems that occur in special situations, like booting from USB/CD/DVD instead of the hard drive or needing to be fixed by changing settings in the boot menu.
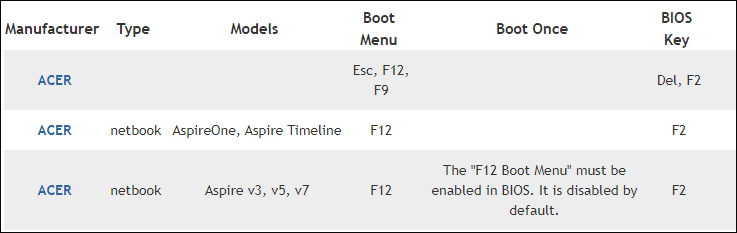
Considering the importance of the boot menu, knowing how to access and operate it is required. But the Acer Boot Menu key is varied on your device. For Acer laptops, the most common hotkey to open the boot menu is F12. A few steps are present in the following content.
Step 1: Shut down your Acer laptop.
Step 2: Press F12 on your keyboard when restarting the laptop. (Although it is only required when the Acer logo appears, you’d better press it in case missing the window.)
Step 3: Entering the Boot Menu, you can navigate to different menu options by pressing the arrow keys.
How to Enable Acer Boot Menu
The F12 Boot Menu gives a way to boot the computer’s Operating System, but in some computers, the F12 Boot Menu is disabled by default. If you can’t open the Boot Menu by pressing F12, you can follow the next steps to enable it.
Step 1: Restart your computer.
Step 2: Press F2 to enter BIOS Setup during Power-On Self-Test during the process of restarting to avoid missing the time.
Step 3: Press the right arrow key to select the Main menu.
Step 4: Press the down arrow to select the F12 Boot Menu and click Enter.
Step 5: Change the status from Disable to Enable.
Step 6: Press F10 and click Enter to save the change.
How to Change BIOS
BIOS (Basic Input/Output System) is a part of the Boot Menu. It allows you to run another Operating System even if the computer has one. You can decide which device is used to boot the computer and the device’s order by changing the BIOS. Therefore, you can change the BIOS setting when your computer doesn’t work accidentally. How to change the Acer laptop BIOS will be introduced in the following content.
Step 1: Restart your computer and hold F2 to open the BIOS setup window. F2 is the most common Acer BIOS key. If it doesn’t work, you can try the Del key, which is also available on some computers.
Step 2: Use arrow keys to adjust the order of devices. You can find detailed information about how to use a keyboard to operate at the bottom of the BIOS setup window.
Step 3: Save the changes you’ve made by clicking F10 and Enter button.
Once you exit BIOS, the computer will restart automatically under your settings.
How to Enable Secure Boot on an Acer Laptop
Secure Boot is a security feature included in Windows 8/10/11 to protect your computer from viruses and malicious software attacks. If Secure Boot is enabled, your computer will only run the signed software during the startup process; thus, those unauthorized programs are more difficult to run when the computer starts up.
First, you need to check whether secure boot is enabled on your computer with the following instructions:
- Type msinfo32 in the Windows search bar and press Enter to open the System Information window.
- Look through the Item list to find Secure Boot State. If the Value shows On, the secure boot is enabled. If it says Off, please keep reading to enable it.

Here, I will show you how to enable secure boot on your computer.
Tips:
To enable the secure boot, you should change the boot mode from the Legacy BIOS to UEFI BIOS on your Acer laptop. Additionally, the secure boot requires GPT rather than MBR. You can learn how to convert MBR to GPT from this post: Free Convert MBR to GPT Without Data Loss.
Step 1: Press Win + I to open Windows Settings.
Step 2: Go to Update & Security > Recovery, then click Restart now under the Advanced startup section.
Step 3: Wait for your computer to restart. You need to choose Troubleshoot > Advanced options > UEFI Firmware Settings > Restart.
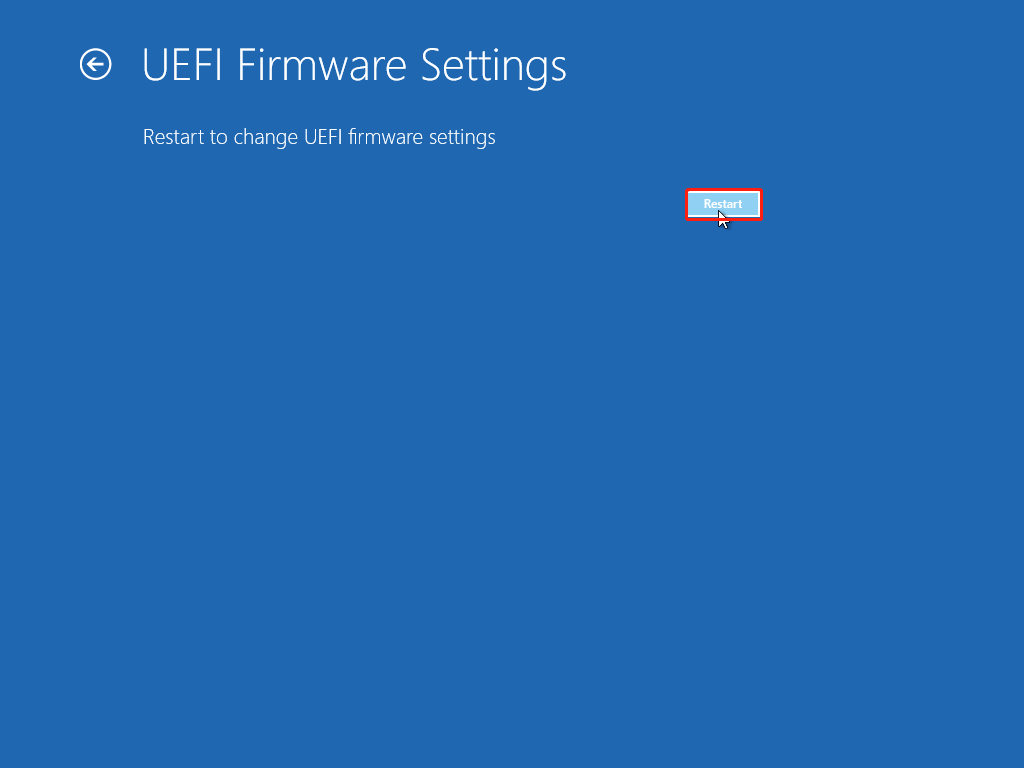
Step 4: Now, the computer will enter into the UEFI setting menu. You can use the arrow keys to find the Secure Boot option. Generally, you can find it under the BIOS section.
Step 5: Choose Secure Boot, hit Enter to open the menu, then select Enabled.
Step 6: Save changes and exit the menu.
After all these steps, your computer will start using the secure boot feature.
How to Recover Data from A Dead Computer
During the process of computer use, Operating System crashes may happen accidentally. At this time, you can’t boot the computer successfully, thus data in it are unavailable. But you can retrieve your data with professional software by booting your computer from USB. Here we introduce you to MiniTool Power Data Recovery to help you recover data from a dead computer.
Before starting to recover files, you’re supposed to get an appropriate version of MiniTool Power Data Recovery with the Snap-in WinPE Bootable Builder. Several licenses are provided for users. You can browse more information from the License Comparison page and choose a suitable one.
MiniTool Power Data Recovery FreeClick to Download100%Clean & Safe
Please save the setup program on another computer and install this data recovery software following the instructions.
Step Guide to Recover Data from Dead Acer Computer
Recovering data from a dead computer includes two parts. In the first part, you need to create a bootable USB disk or CD/DVD disk from a working computer. The second part is using this bootable disk to boot your computer and recover data from it. Let’s work step by step.
Part 1: Create a Bootable USB Disk
Step 1: Open the software and click on the key icon to register. You need to input the license key which is sent to you by email after you buy an upgraded version. If you haven’t got one, please feel free to contact [email protected] for help.
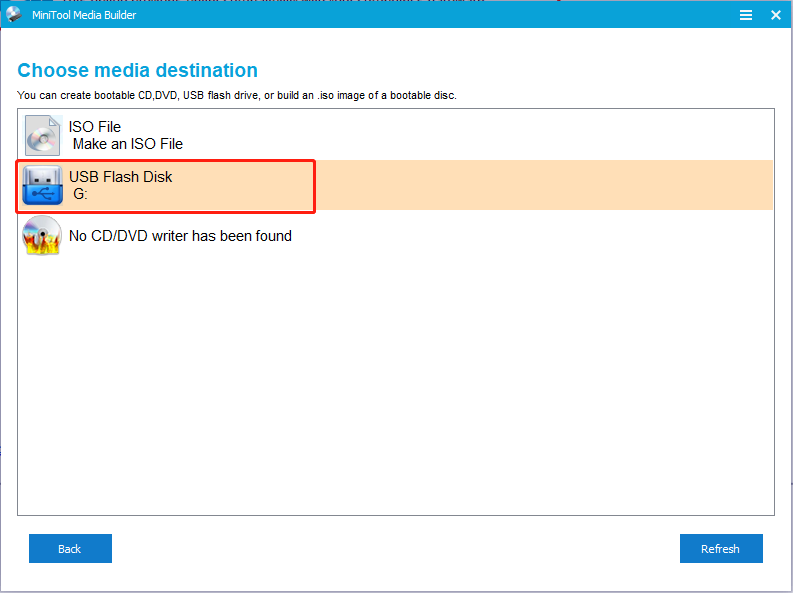
Step 2: Connect a USB flash disk to your computer and click on the Bootable Edition on the right top bar.
step 3: Select WinPE-based media with MiniTool Plug-in to continue.
Step 4: To create a USB bootable disk, choose USB Flash Disk and click Yes in the following window. The suggested USB driver size is 4GB-64GB.
Step 5: Wait patiently until the bootable files are fully generated by MiniTool Power Data Recovery in your flash drive. Finally, click the Finish button.
Part 2: Recover Data with Bootable USB Disk
Step 1: Connect the bootable USB disk to your dead computer before you start your computer.
Step 2: Enter the BIOS menu by pressing a key, which is different from the computer you use. You can find the message from the beginning. If you miss it, please restart your computer and try again.
Step 3: Set the Bootable Disc as the first boot device and save configuration changes.
If you use CD/DVD to create a bootable media, the CD-ROM Device selection should be adjusted to the 1st place.
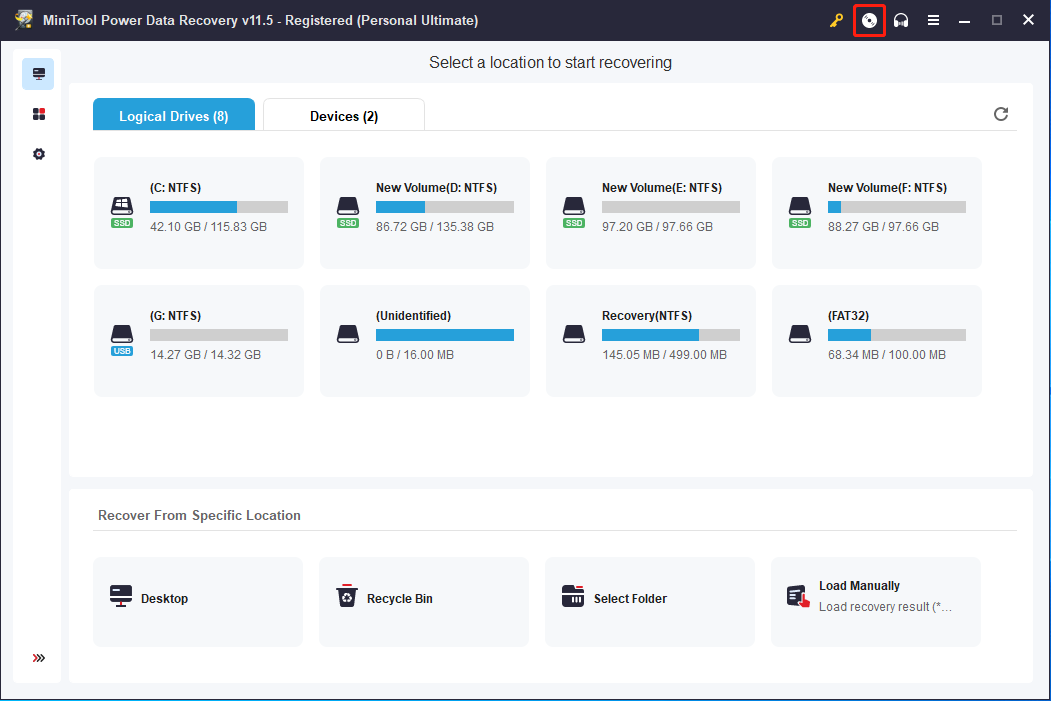
Step 4: Click MiniTool Power Data Recovery in the MiniTool PE Loader interface to enter its main window. MiniTool Power Data Recovery can be opened whether your dead computer downloads this software or not.
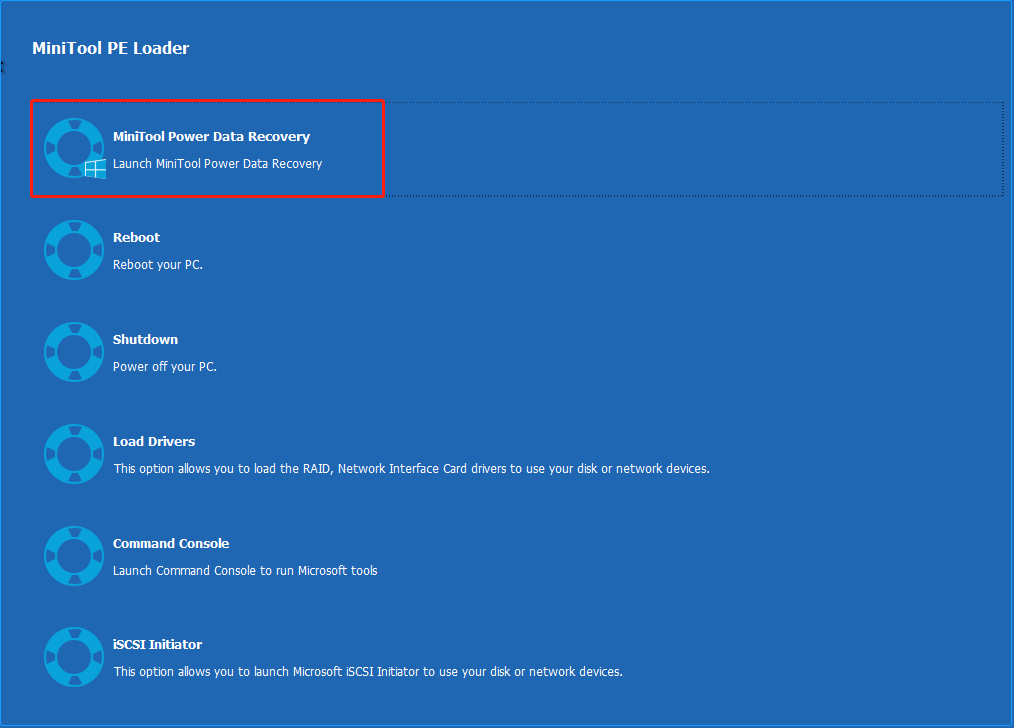
Step 5: In the main interface of this software, you can select the target drive under the Local Devices tab and click the Scan button. Or you can alternate to the Devices tab to scan the whole disk at one time.
When the scanning process ends, you can use Filter, Type, and Search functions to quickly locate aimed files, and Preview before recovering files.
Step 6: Select all the aimed files and click the Save button.
This way can help you recover data from a dead computer conveniently. If you want to try other ways, you can read the passage: How to Recover Data When PC Won’t Boot.
Final Words
This post gives much detailed information about the Acer Boot Menu and BIOS. They are really useful in operating computer systems. The BIOS setup works extremely well when your computer can’t boot properly. If your computer is stuck in this situation, hope this post can resolve your problem either in accessing BIOS or recovering data from it.
Acer is one of the most famous computer brands, and its computers are widely used worldwide. In this post offered by EaseUS, let’s talk about the Acer boot menu. What is in the startup menu? How do you access it?
What Is Acer Boot Menu
The boot menu, as its name implies, is a menu that is responsible for booting your computer. By default, you do not see the boot menu (also known as the startup menu) when you normally boot your computer. But if you are careful enough, you will find a prompt on the screen that tells you which button to press for easy access to the boot menu.
You may want to know the hottest Acer computers and laptops.
The Acer boot menu contains many options: system information, boot device options, BIOS settings, etc., just like the startup menu on other computers. These options are helpful and useful when you have special needs or have problems that need to be solved by changing the settings in the boot menu.
Tips to Access Acer Boot Menu
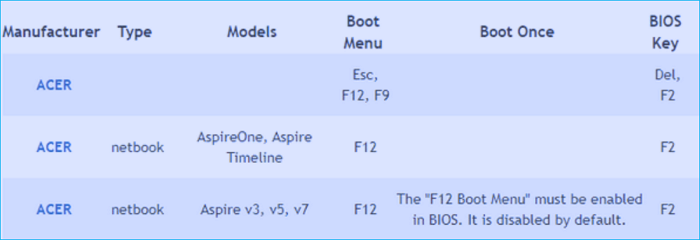
After knowing the basic information about the Acer boot menu, it is time to describe how to access the Acer boot menu. Acer has many computer models, but the Acer startup menu key differs. F12 is the most commonly used button for accessing the Acer Startup menu on laptops.
How to Access Acer Boot Menu
Step 1. Shut down the Acer laptop.
Step 2. Press F12 on your keyboard from the start.
Step 3. Once in the startup menu, you can navigate to the appropriate boot options and change them by pressing the arrow keys.
Esc and F9 are the two other keys commonly used to access the Acer startup menu for Windows 10.
- Warning
- Some Acer laptops disable the F12 boot menu by default. Therefore, it must be enabled in the BIOS if necessary.
How to Enable F12 Boot Menu on Acer
Step 1. Hold down F12 to access the boot menu on your Acer laptop.
Step 2. Press the right arrow button to access the Main menu tab.
Step 3. Tap the down arrow to choose F12 Boot Menu.
Step 4. Tap Enter to alter the status from Disabled to Enabled.
You may want to know the hottest Acer computers and laptops.
Tips to Access Acer BIOS
The Acer BIOS (basic input/output System) is part of the Acer boot menu. You can define the devices to use, boot order, and settings for BIOS-related functions in the BIOS Settings menu. The Acer BIOS key most frequently pressed to access the BIOS Settings menu is F2. If this does not work, you can access the BIOS menu by pressing Del, another key commonly used on Acer computers.
You can pause the boot sequence by pressing the F2 key after starting/restarting the computer. This is a simple way to trigger the Acer BIOS menu, but you should keep pressing the button to avoid missing the correct window and time. Once the Acer Laptop Startup menu appears on your computer screen, you can use the left, right, up, and down arrow keys to get the information you need or change certain Settings.
Final Thoughts
This article tells you what the Acer boot menu is. The boot menu is important for you to boot Acer. You should know the Acer boot menu and BIOS, especially if you want to change the boot order (boot from another device) or experience boot failure. Hopefully, you can get what you want to know in this article.
Boot Menu (меню загрузки) можно вызывать при включении на большинстве ноутбуков и компьютеров, данное меню является опцией BIOS или UEFI и позволяет быстро выбрать, с какого накопителя загрузить компьютер в этот раз. В этой инструкции покажу, как зайти в Boot Menu на популярных моделях ноутбуков и материнских плат ПК.
Описываемая возможность может быть полезной, если вам потребовалось загрузиться с Live CD или загрузочной флешки для установки Windows и не только — не обязательно менять порядок загрузки в БИОС, как правило, достаточно однократного выбора нужного устройства загрузки в Boot Menu. На некоторых ноутбуках это же меню дает доступ и к разделу восстановления ноутбука.
Сначала напишу общие сведения по входу в Boot Menu, нюансы для ноутбуков с предустановленной Windows 10 и 8.1. А потом — конкретно по каждой марке: для ноутбуков Asus, Lenovo, Samsung и других, материнских плат Gigabyte, MSI, Intel и т.п. Внизу есть так же видео, где показывается и поясняется вход в такое меню.
Общая информация по входу в меню загрузки БИОС
Так же, как для входа в БИОС (или настройки ПО UEFI) при включении компьютера необходимо нажать определенную клавишу, как правило Del или F2, так же и для вызова Boot Menu существует аналогичная клавиша. В большинстве случаев это F12, F11, Esc, но есть и другие варианты, о которых напишу ниже (иногда информация о том, что нужно нажать для вызова Boot Menu появляется сразу на экране при включении компьютера, но не всегда).
Причем, если все что вам требуется — это поменять порядок загрузки и сделать это нужно для какого-то однократного действия (установка Windows, проверка на вирусы), то лучше использовать именно Boot Menu, а не ставить, например, загрузку с флешки в настройках БИОС.

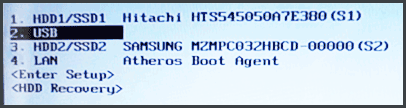
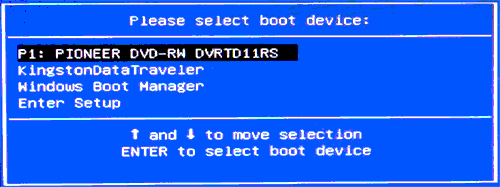
В Boot Menu вы увидите список всех подключенных к компьютеру устройств, с которых в данный момент потенциально возможно загрузка (жесткие диски, флешки, диски DVD и CD), а также, возможно, вариант сетевой загрузки компьютера и запуск восстановления ноутбука или компьютера с резервного раздела.
Особенности входа в Boot Menu в Windows 10 и Windows 8.1 (8)
Для ноутбуков и компьютеров, которые изначально поставлялись с Windows 8 или 8.1, а в скором времени и с Windows 10, вход в Boot Menu с помощью указанных клавиш может не получаться. Связано это с тем, что выключение для этих операционных систем не является в полном смысле этого слова выключением. Это скорее гибернация, а потому меню загрузки может и не открываться при нажатии F12, Esc, F11 и других клавиш.
В этом случае вы можете поступить одним из следующих способов:
- При выборе «Выключение» в Windows 8 и 8.1 удерживать клавишу Shift, в этом случае компьютер должен выключиться полноценно и при включении клавиши для входа в Boot Menu должны сработать.
- Перезагрузите компьютер вместо выключения и включения, при перезагрузке нажмите нужную клавишу.
- Отключите быстрый запуск (см. Как отключить быстрый запуск Windows 10). В Windows 8.1 для этого зайдите в Панель управления (вид панели управления — значки, а не категории), выберите пункт «Электропитание», в списке слева нажмите «Действия кнопок питания» (даже, если это не ноутбук), отключите пункт «Включить быстрый запуск» (для этого может потребоваться нажать «Изменение параметров, которые сейчас недоступны» вверху окна).


Один из указанных способов обязательно должен помочь со входом в меню загрузки, при условии, что все остальное делается правильно.
Вход в Boot Menu на Asus (для ноутбуков и материнских плат)
Практически для всех настольных компьютеров с материнскими платами Asus, вход в меню загрузки осуществляется нажатием клавиши F8 после включения компьютера (тогда же, когда мы нажимаем Del или F9, чтобы зайти в БИОС или UEFI).
А вот с ноутбуками есть некоторая неразбериха. Чтобы зайти в Boot Menu на ноутбуках ASUS, в зависимости от модели, нужно при включении нажать:
- Esc — для большинства (но не для всех) современных и не очень моделей.
- F8 — для тех моделей ноутбуков Asus, название которых начинается с x или k, например x502c или k601 (но не всегда, есть модели на x, где вход в Boot Menu осуществляется клавишей Esc).
В любом случае, вариантов не так много, так что при необходимости можно попробовать каждый из них.
Как зайти в Boot Menu на ноутбуках Lenovo
Практически для всех ноутбуков и моноблоков марки Lenovo для входа в Boot Menu можно использовать клавишу F12 при включении.

Также дополнительные варианты загрузки для ноутбуков Lenovo можно выбрать, нажав маленькую кнопку со стрелкой рядом с кнопкой питания.
Acer
Следующая по популярности модель ноутбуков и моноблоков у нас — это Acer. Вход в Boot Menu на них для разных версий BIOS осуществляется путем нажатия клавиши F12 при включении.
Однако, на ноутбуках Acer есть одна особенность — часто, вход в Boot Menu по F12 на них не работает по умолчанию и для того, чтобы клавиша заработала, необходимо сначала зайти в БИОС, нажав клавишу F2, а потом переключить параметр «F12 Boot Menu» в состояние Enabled, после чего сохранить настройки и выйти из БИОС.
Остальные модели ноутбуков и материнских плат
Для остальных моделей ноутбуков, а также ПК с разными материнскими платами особенностей поменьше, а потому просто приведу клавиши входа в Boot Menu для них в виде списка:
- Моноблоки и ноутбуки HP — клавиша F9 или Esc, а затем — F9
- Ноутбуки Dell — F12
- Ноутбуки Samsung — Esc
- Ноутбуки Toshiba — F12
- Материнские платы Gigabyte — F12
- Материнские платы Intel — Esc
- Материнские платы Asus — F8
- Материнские платы MSI — F11
- AsRock — F11
Кажется, учел все наиболее распространенные варианты, а также описал возможные нюансы. Если вдруг у вас все так же не получается зайти в Boot Menu на каком-либо устройстве, оставляйте комментарий с указанием его модели, я постараюсь найти решение (и не забывайте о моментах, связанных с быстрой загрузкой в последних версиях Windows, о чем я писал выше).
Видео о том, как войти меню устройств загрузки
Ну и, в дополнение ко всему написанному выше, видео инструкция о входе в Boot Menu, возможно, кому-то окажется полезной.
Также может оказаться полезным: Что делать, если БИОС не видит загрузочную флешку в Boot Menu.
Все способы:
- Параметры BIOS на Acer
- Базовые настройки БИОС
- Вкладка «Information»
- Вкладка «Main»
- Вкладка «Security»
- Вкладка «Boot»
- Вкладка «Exit»
- Заключение
- Вопросы и ответы: 53
Лэптопы тайваньской компании Acer пользуются популярностью у пользователей, которым нужны функциональные устройства за небольшую стоимость. К их плюсам можно отнести и довольно простой в настройке BIOS, и именно об этой процедуре мы и хотим сегодня поговорить.
Параметры BIOS на Acer
В качестве микропрограммы на ноутбуках Эйсер используются решения AMI либо Award, с некоторыми специфическими особенностями. Одна из не самых приятных – отсутствие графического интерфейса даже в UEFI-вариантах микропрограммы. Впрочем, особой проблемой это не назовёшь, поскольку вне зависимости от типа БИОС интерфейс унифицирован.
Базовые настройки БИОС
Само собой разумеется, что для корректировки тех или иных параметров микропрограммы потребуется войти в её интерфейс. На ноутбуках Acer обычно используется широкий набор клавиш или их сочетаний.
Подробнее: Входим в BIOS ноутбуков Acer
После успешного входа в интерфейс перед пользователем появляется главное меню микропрограммы. Для начала рассмотрим структуру интерфейса. Доступные опции расположены на нескольких вкладках.
Коротко опишем содержание каждой из них:
| Вкладка | Описание |
|---|---|
| Information | Здесь расположены сведения об устройстве и текущем состоянии BIOS |
| Main | Основные параметры девайса, такие как режим работы жесткого диска, настройки частоты процессора и оперативной памяти (доступно не на всех устройствах), опции восстановления и тому подобное |
| Security | Параметры безопасности и доступа, как следует из названия закладки |
| Boot | Конфигурация устройств загрузки и их последовательность, а также некоторые параметры вроде включения режима USB Legacy Support |
| Exit | Параметры сохранения изменений и выход из интерфейса BIOS |
Теперь перейдём к более подробному обзору настроек каждого раздела.
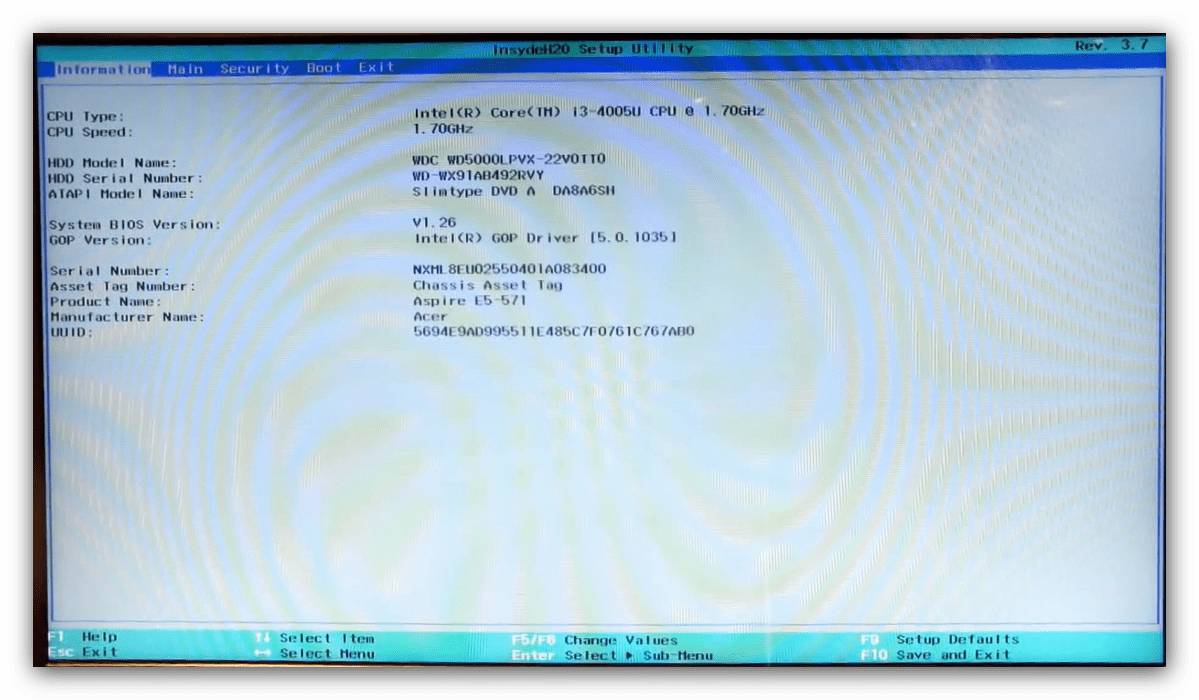
Вкладка «Information»
В разделе «Information» нет настроек, которые пользователь может отредактировать – это страница сведений, чем она впрочем и полезна. Здесь можно узнать версию текущего БИОС, точную модель устройства, состояние основных комплектующих.

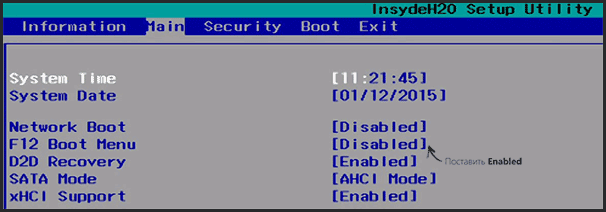
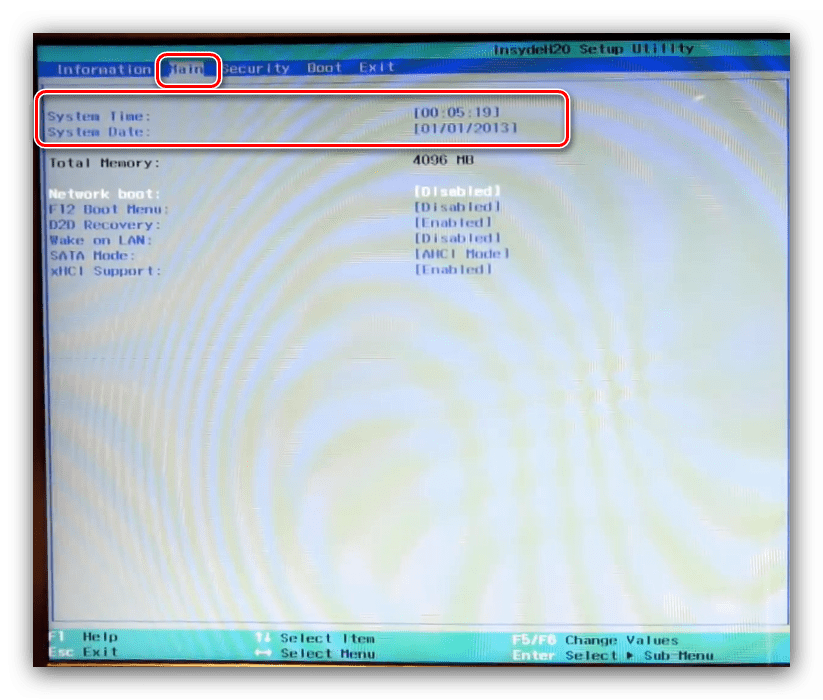
Вкладка «Main»
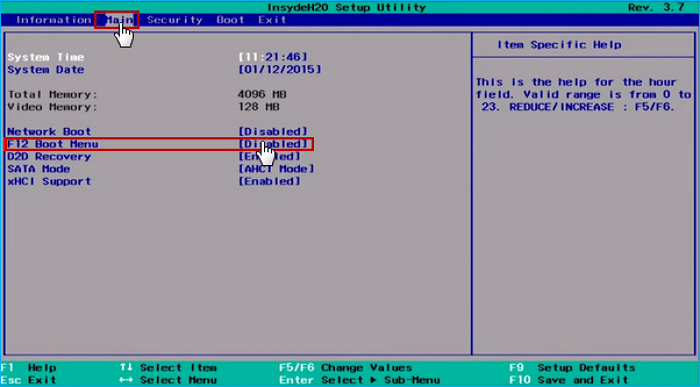
Вкладка «Main» содержит в себе основные опции ноутбука, поэтому на ней остановимся более подробно.
- Параметры «System Time» и «System Date» отвечают за настройку системных даты и времени соответственно. Важно устанавливать соответствующие действительности значения, поскольку от этого параметра зависит работоспособность как самого BIOS, так и операционной системы.
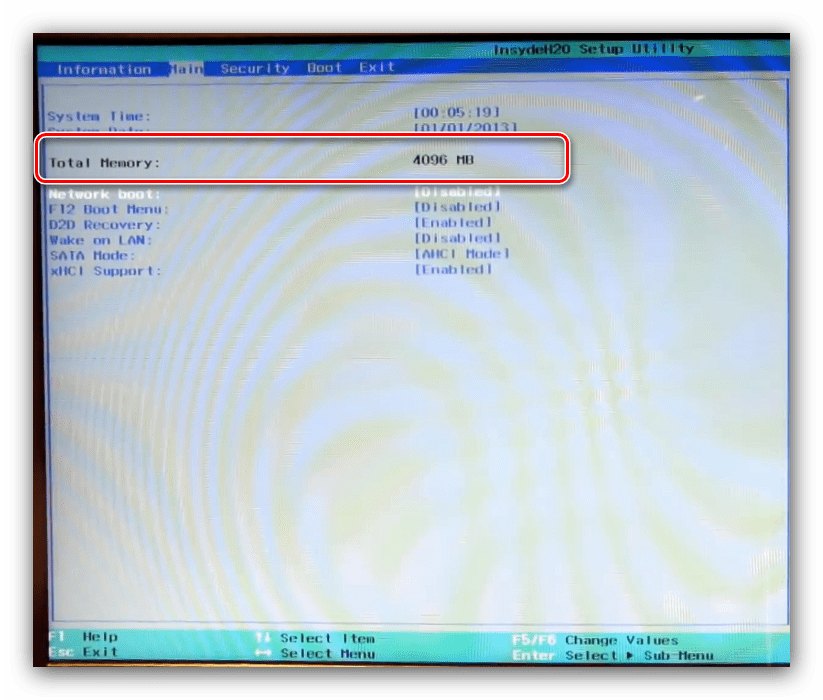
- Опция «Total Memory» показывает объём оперативной памяти ноутбука. Внести в него какие-либо изменения нельзя – этот параметр чисто индикативный.
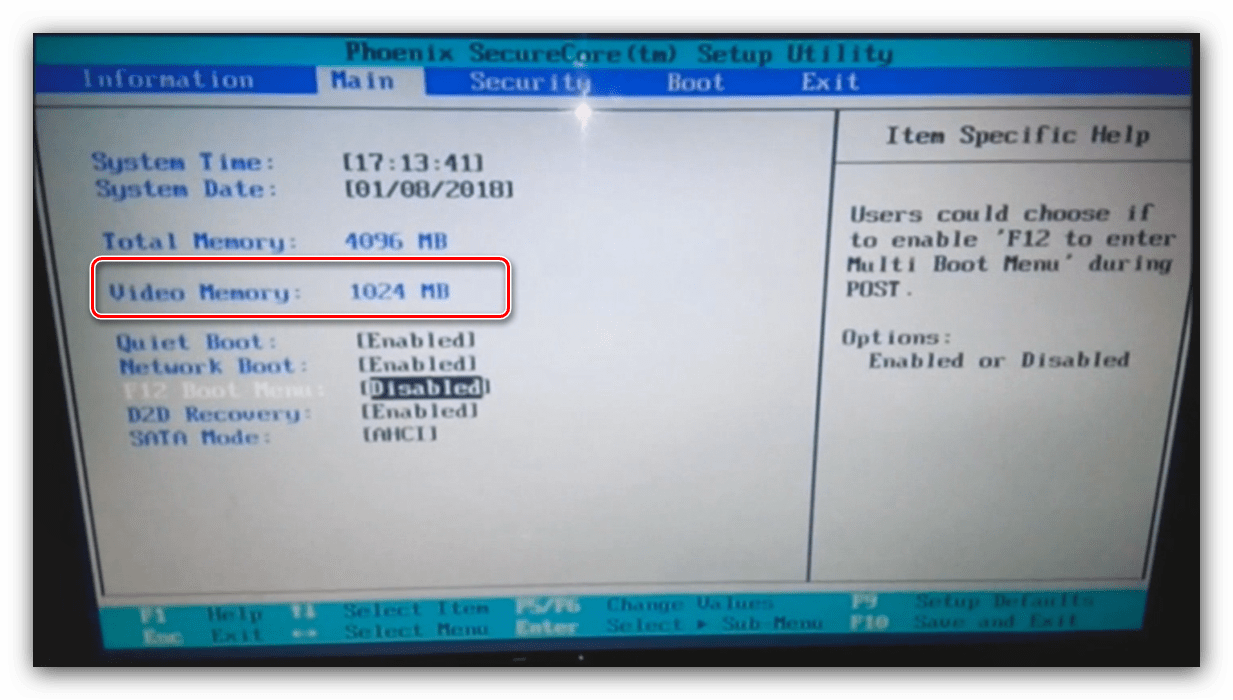
- Настройка «Video Memory» позволяет скорректировать потребление памяти встроенным GPU. Доступные значения зависят от заданных производителем значений, имеющегося чипа и объёма ОЗУ. Как правило, как-либо менять этот параметр не требуется. В некоторых моделях ноутбуков он и вовсе отсутствует.
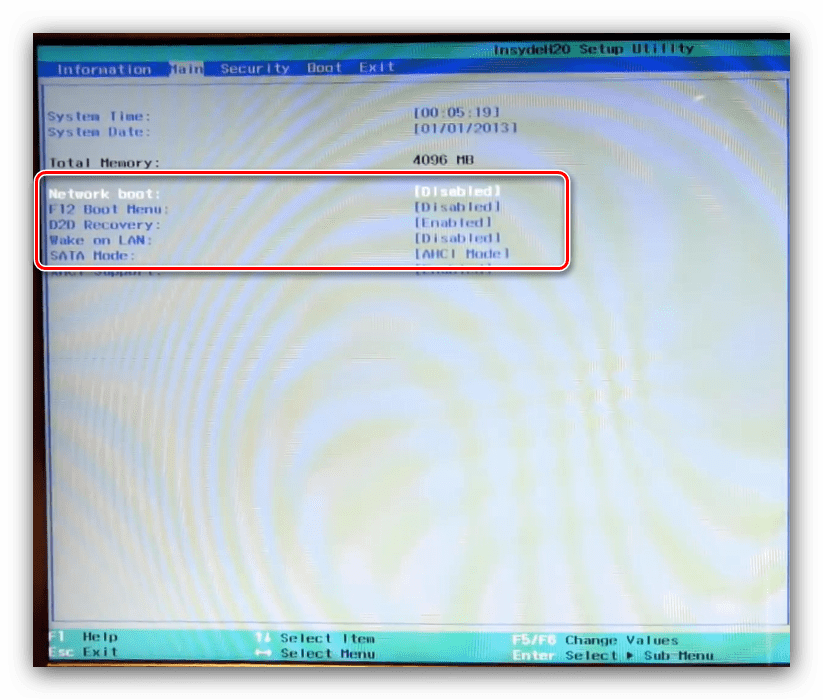
- Далее присутствует ряд специфических опций, редактирование которых по умолчанию заблокировано. Изменение этих параметров обычно доступно после включения парольной защиты, о чём мы поговорим чуть позже. Сейчас же коротко опишем заблокированные настройки.

Параметр Описание Quiet Boot Отвечает за включение или выключение так называемой «тихой загрузки», при которой в процессе включения ноутбука на экране отображается только логотип производителя без служебной информации Power On Display Эта настройка позволяет задать поведение встроенного дисплея ноутбука при подключении внешнего монитора. В зависимости от выбранного значения, встроенный дисплей будет отключаться или же оба экрана будут работать вместе Network Boot Позволяет ноутбуку загружать ядро сети из предварительно настроенного сервера. Эта опция рассчитана на корпоративных пользователей, и в домашнем использовании почти бесполезна. Её можно без опаски отключить F12 Boot Menu Включение этого параметра позволяет вызывать список подключённых загрузочных носителей по нажатии клавиши F12 и выбирать среди них нужный. Опция полезна для устройств с несколькими HDD и SSD, на которых установлены разные операционные системы D2D Recovery Специфичная только для устройств Acer опция, которая активирует режим восстановления. Мы уже рассматривали его особенности в отдельной статье SATA Mode Эта настройка переключает режимы работы шины SATA. По умолчанию установлен AHCI, менять который требуется в редких случаях. Отметим, что этот параметр может отсутствовать в некоторых вариантах БИОСа на ноутбуках Acer
В BIOS некоторых продвинутых моделей лэптопов (в частности, серий Nitro и Predator) на вкладке «Main» могут находиться дополнительные параметры – например, включение или отключение тачпада.
Вкладка «Security»
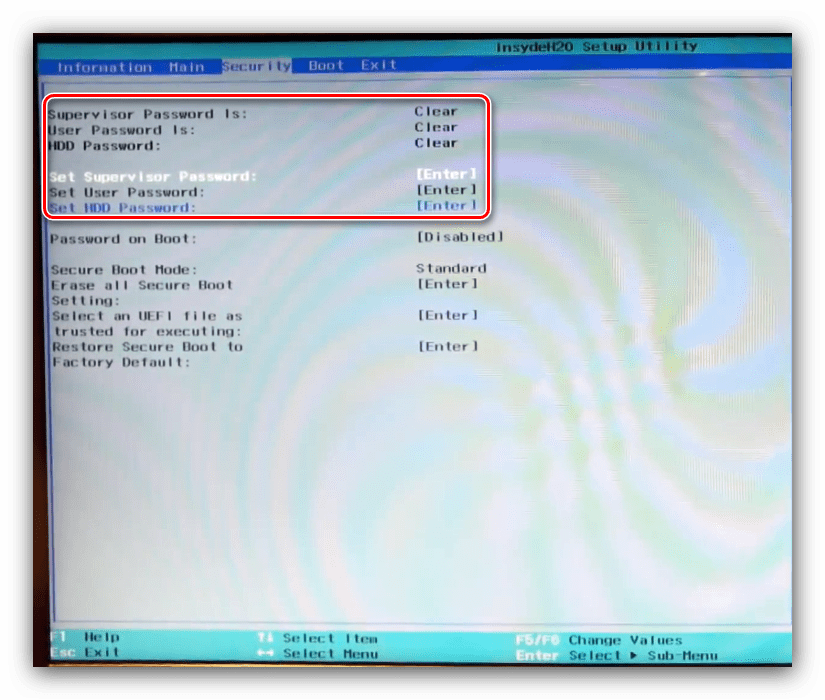
Из названия раздела становится очевидно, что все присутствующие в нём опции отвечают за параметры безопасности. Большинство из них рядовому пользователю не требуется, поэтому остановимся только на самых примечательных.
- Первые три опции отвечают за установку пароля на доступ к BIOS (административный и пользовательский) и к жесткому диску. Три следующие опции позволяют задать эти пароли.

Для доступа к некоторым настройкам на вкладке «Main» потребуется задать административный пароль – опция «Set Supervisor Password».
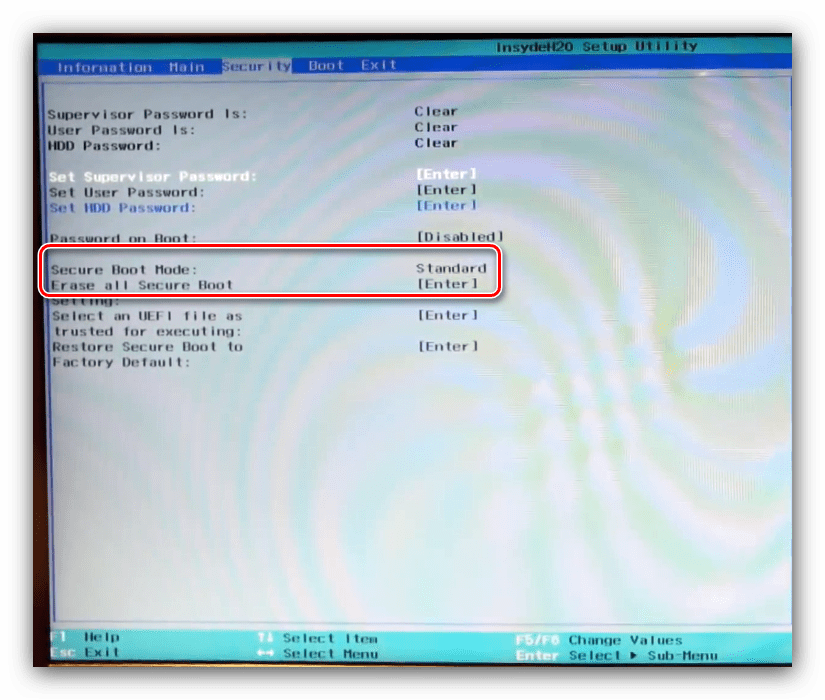
- Вторая примечательная опция этого раздела – «Secure Boot Mode». Режим «Secure Boot» служит своего рода защитой от переустановки системы или создания мультибута, поэтому некоторым пользователям эту опцию потребуется сперва активировать, а потом отключить.
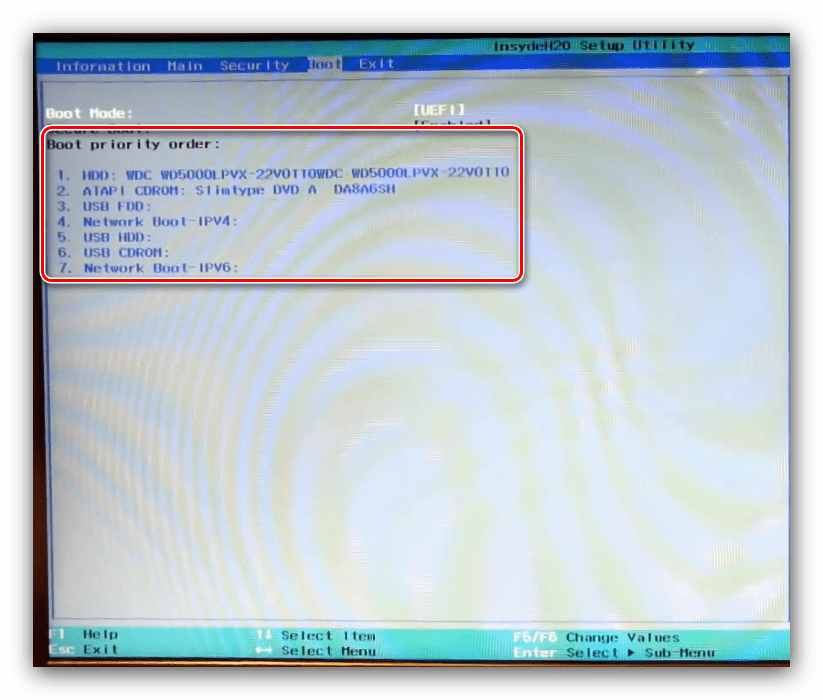
Вкладка «Boot»
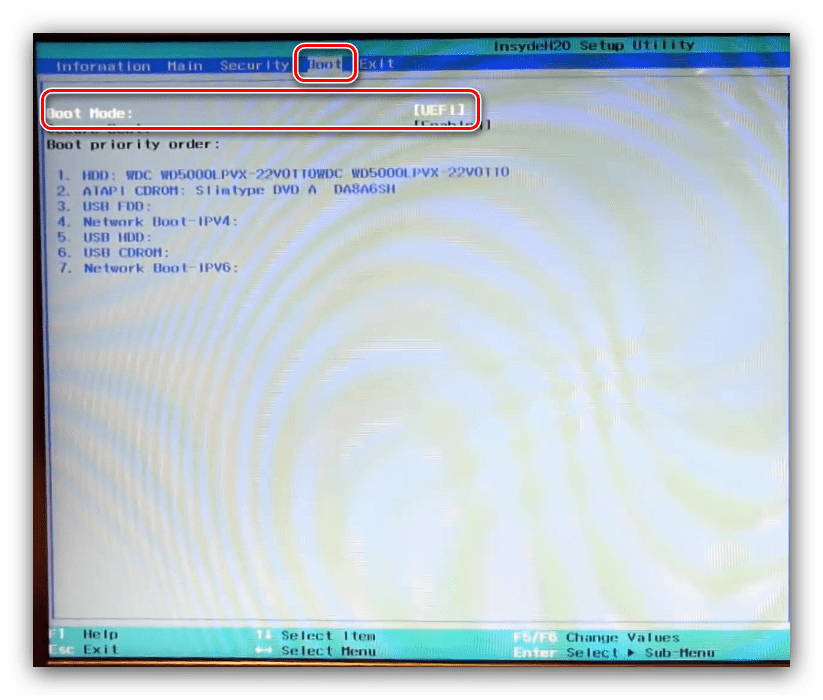
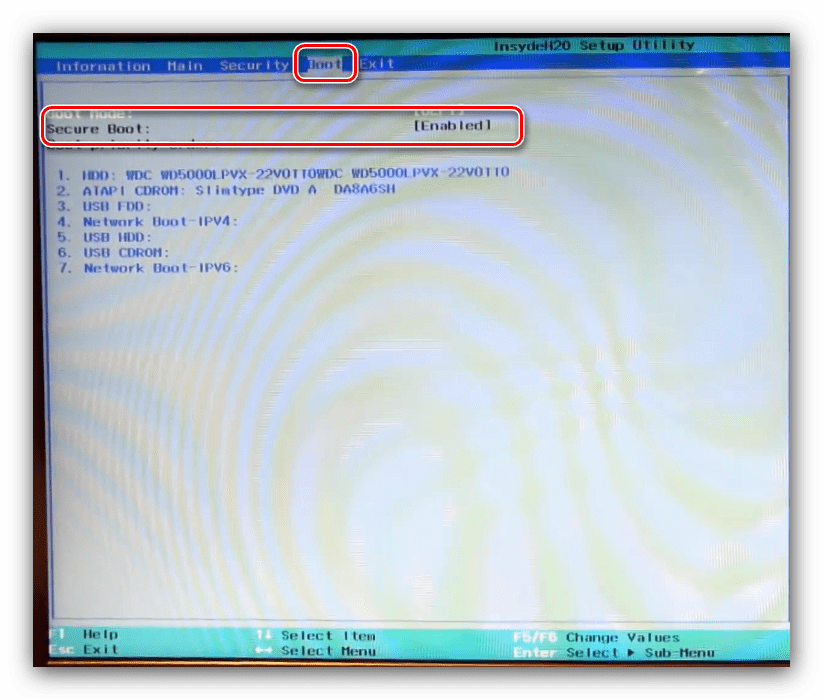
Этот раздел посвящён в основном параметрам загрузки ноутбука.
- Настройка «Boot Mode» переключает режимы загрузки – вариант «UEFI» нужен для Windows 8 и выше, тогда как вариант «Legacy» предназначен для седьмой и ниже версии ОС от Майкрософт.
- Об опции «Secure Boot» мы уже говорили в предыдущем разделе – если требуется переустановить систему или инсталлировать другую, эту настройку нужно переключить в положение «Disable».
- Из этой вкладки также можно настроить список приоритета загрузки.
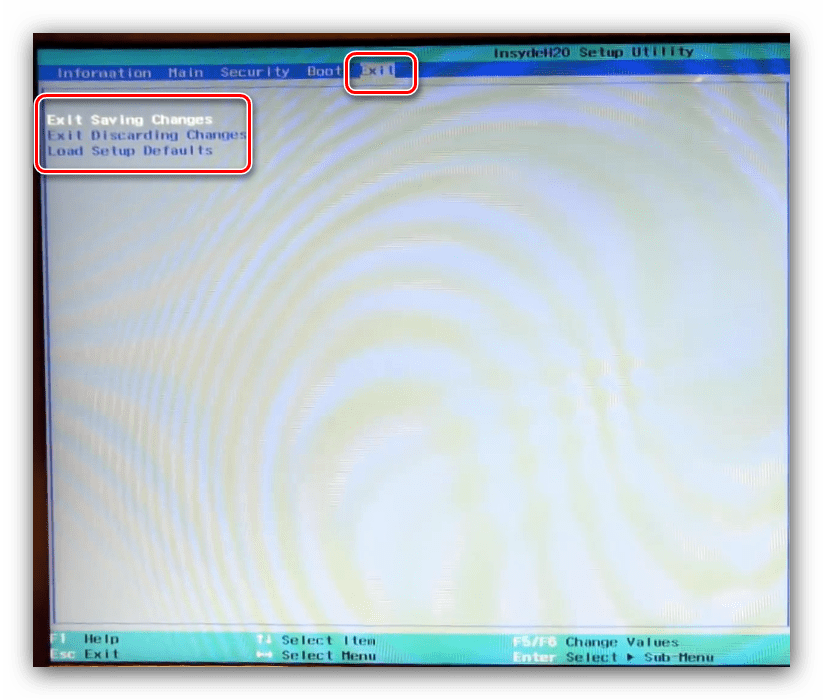
Вкладка «Exit»
Последний набор опций предполагает сохранение или сброс настроек к заводским: «Exit Saving Changes» позволяет сохранить внесённые изменения, «Exit Without Changes» закрывает BIOS без внесения изменений, а «Load Setup Defaults» сбрасывает настройки микропрограммы к заводским значениям.
Заключение
Мы рассмотрели основные параметры BIOS ноутбуков компании Acer. Как видим, настройки довольно ограничены сравнительно с микропрограммами настольных ПК.
Наша группа в TelegramПолезные советы и помощь