
If you have a modern computer where Windows 7 Setup halts at boot time when displaying OS logo, then you need to apply the patch for Windows 7 UEFI loader in FlashBoot Pro. This patch provides emulation of VGA BIOS (INT 10H) over UEFI GOP framebuffer, thus enabling installation and use of Windows 7 on the modern purely UEFI-based computers without CSM.
And if you have a dual-boot configuration of Windows 10/11 and Windows 7, you need to have two UEFI loaders simultaneously: a new one, capable of booting Windows 10/11 (with modern features, frequently updated by Windows Update); and older one, dedicated for booting Windows 7, patched by FlashBoot Pro for VGA BIOS emulation (thus, Windows Update preferrably should leave it alone).
This article explains in detail how to establish such a dual-boot configuration.
| Contents |
|
1. Problem statement
When there’s a single EFI System Partition, Windows 7 and Windows 10/11 have a conflict
over two file objects in that partition, that must be resolved somehow:
- UEFI bootloader (\EFI\Microsoft\Boot\bootmfgw.efi with .mui localizations): either
patched for Windows 7 VGA emulation or with new features to boot Windows 10/11. - Registry hive with Boot Configuration Data (\EFI\Microsoft\Boot\BCD with .LOG1 and
.LOG2 integrity logs): is it for Windows 10/11 or for Windows 7, and if for both,
then how to make multiple UEFI loaders (if there are multiple UEFI loaders in
the single EFI System Partition) not to display boot menu with two options.
2. Simple workaround
If form factor of your device allows multiple internal storage devices (such as SSDs and HDDs),
e.g. if this is not a tablet, sealed down by a glue, then install Windows 7 and Windows 10/11
to a different physical storage devices (in any order, but please temporarily disconnect bootable
storage with first OS before installing second OS, so Setup of the second OS won’t find
EFI System Partition prepared by Setup of the first OS and won’t mess with it).
After the installation, you will have two EFI system partitions and so you can choose OS
(storage device) to boot from in the boot menu provided by UEFI firmware of your computer.
3. Solution for hard cases
If you must have single bootable physical storage device and so single EFI system partition
(because your tablet does not allow disassembly/teardown, or your laptop does not have a bay
for second storage device), then there’s a harder way (but it’s still possible):
- Erase all partitions on that storage device, make sure it has GPT layout.
- Reserve 500 Mb for EFI system partition (create data partition).
- Install Windows 7 and let it create its own EFI System Partition (100 Mb) ahead of
Windows Partition, and leave some unpartitioned space for Windows 10/11. - Format empty FAT32 filesystem in 500 Mb reserved data partition.
- Install rEFInd bootloader
to 500 Mb reserved data partition. - Change Type GUID for 100 Mb EFI system partition from
C12A7328-F81F-11D2-BA4B-00A0C93EC93B (EFI system partition) to
EBD0A0A2-B9E5-4433-87C0-68B6B72699C7 (basic data partition). - Change Type GUID for 500 Mb reserved data partition from
EBD0A0A2-B9E5-4433-87C0-68B6B72699C7 (basic data partition) to
C12A7328-F81F-11D2-BA4B-00A0C93EC93B (EFI system partition). - Reboot, make sure that rEFInd works, Windows 7 UEFI Loader is detected by rEFInd,
and Windows 7 still boots OK. - Install Windows 10/11 from USB thumbdrive as usually. It will hijack 500 Mb EFI System
Partition for itself, and insert its own UEFI loader ahead of rEFInd in the UEFI boot order,
but otherwise it will work OK. - Restore previous boot order: rEFInd ahead of Windows 10/11 UEFI loader.
Now rEFInd should detect both Windows 10/11 and Windows 7 and offer a choice
between these operating systems. Windows 10/11 and its UEFI loader has full
control over 500 Mb EFI System Partition, and Windows 7 UEFI loader is
located in separate 100 Mb data partition (former EFI System Partition)
but still works OK.
Then Windows 7 will have its own kinda-sorta EFI System Partition (actually,
it’s just bootable data partition), with its own separate UEFI loader and BCD hive,
and Windows 10/11 and its Setup and its Windows Update will leave this partition
and patched Windows 7 UEFI loader alone.
4. Other dual-boot considerations
Please be aware that in dual-boot configurations of Windows 10/11 and Windows 7, CheckDisk
may kick in on every reboot of Windows 7. This is totally unrelated to the aforementioned
UEFI boot shenanigans, and happens on CSM/Legacy systems too. Why it happens and what can
be done about it, please
read in the separate article (in short: a small registry tweak in Windows 10/11 is necessary
to make it use old format of NTFS log compatible with Windows 7 and its CheckDisk).
5. Questions and answers
Q: How to change Type GUIDs for partitions?
A: Most convenient way is to use
Emergency Boot Kit,
see User Guide
for Partition Manager: pages 36, 37, 39 and 40 demonstate this process step-by-step.
If you do not have a paid version of Emergency Boot Kit, you can do this for free in a
live Linux distribution like SLAX: run lsblk command to list
all block devices, then run fdisk -l /dev/sda,
fdisk -l /dev/sdb, fdisk -l /dev/mmcblk1
etc (substitute your block device name after /dev as necessary)
to determine which Linux block device is your main internal bootable storage device,
then run fdisk -l /dev/(chosen_device_name) to start
editing partition table, then p subcommand to print partition
table, thent subcommand to change partitition type, then
1 for «EFI system» type or 11
for «basic data» type, then w subcommand to write
altered partition table to the disk. Alternatively, q subcommand
exits fdisk program without saving altered partition table to the disk.
Q: How to change UEFI boot order?
A: Most convenient way is via the UEFI firmware setup utility, but that depends on
UEFI firmware vendor (consult user manual for your motherboard or laptop). Also there is
a vendor-neutral method of changing UEFI boot order: using efibootmgr
tool in live Linux distribution like SLAX. When run without parameters,
efibootmgr displays current boot order (list of comma-separated
numbers) and a table below (which explains a meaning of each number: for example, an OS name,
or PXE network boot device name, or rEFInd boot loader name or whatever). Then you can run
efibootmgr —bootorder XXXX,YYYY,ZZZZ,… with reordered list
of the same comma-separated numbers. In such way boot order will be changed by
efibootmgr and written into the UEFI configuration
variables in the NVRAM.
This is an article detailing different methods of Arch/Windows coexistence.
Important information
Windows UEFI vs BIOS limitations
Microsoft imposes limitations on which firmware boot mode and partitioning style can be supported based on the version of Windows used:
Note: The following points only list configurations supported by the Windows Setup even though Windows itself may still work on these unsupported configurations. A good example of this is Windows 11 which still works on a BIOS/MBR configuration once the Windows Setup check is bypassed.
- Windows 8/8.1 and 10 x86 32-bit support booting in IA32 UEFI mode from GPT disk only, OR in BIOS mode from MBR disk only. They do not support x86_64 UEFI boot from GPT/MBR disk, x86_64 UEFI boot from MBR disk, or BIOS boot from GPT disk. On market, the only systems known to ship with IA32 (U)EFI are some old Intel Macs (pre-2010 models?) and Intel Atom System-on-Chip (Clover trail and Bay Trail) Windows Tablets, which boot ONLY in IA32 UEFI mode and ONLY from GPT disk.
- Windows 8/8.1 and 10 x86_64 versions support booting in x86_64 UEFI mode from GPT disk only, OR in BIOS mode from MBR disk only. They do not support IA32 UEFI boot, x86_64 UEFI boot from MBR disk, or BIOS boot from GPT disk.
- Windows 11 only supports x86_64 and a boot in UEFI mode from GPT disk.
In case of pre-installed Systems:
- All systems pre-installed with Windows XP, Vista or 7 32-bit, irrespective of Service Pack level, bitness, edition (SKU) or presence of UEFI support in firmware, boot in BIOS/MBR mode by default.
- MOST of the systems pre-installed with Windows 7 x86_64, irrespective of Service Pack level, bitness or edition (SKU), boot in BIOS/MBR mode by default. Very few late systems pre-installed with Windows 7 are known to boot in x86_64 UEFI/GPT mode by default.
- ALL systems pre-installed with Windows 8/8.1, 10 and 11 boot in UEFI/GPT mode. Up to Windows 10, the firmware bitness matches the bitness of Windows, ie. x86_64 Windows boot in x86_64 UEFI mode and 32-bit Windows boot in IA32 UEFI mode.
An easy way to detect the boot mode of Windows is to do the following[1]:
- Boot into Windows
- Press
Win+Rkeys to start the Run dialog - In the Run dialog type
msinfo32and press Enter - In the System Information windows, select System Summary on the left and check the value of BIOS mode item on the right
- If the value is
UEFI, Windows boots in UEFI/GPT mode. If the value isLegacy, Windows boots in BIOS/MBR mode.
In general, Windows forces type of partitioning depending on the firmware mode used, i.e. if Windows is booted in UEFI mode, it can be installed only to a GPT disk. If Windows is booted in Legacy BIOS mode, it can be installed only to an MBR disk. This is a limitation enforced by Windows Setup, and as of April 2014 there is no officially (Microsoft) supported way of installing Windows in UEFI/MBR or BIOS/GPT configuration. Thus Windows only supports either UEFI/GPT boot or BIOS/MBR configuration.
Tip: Windows 10 version 1703 and newer supports converting from BIOS/MBR to UEFI/GPT using MBR2GPT.EXE.
Such a limitation is not enforced by the Linux kernel, but can depend on which boot loader is used and/or how the boot loader is configured. The Windows limitation should be considered if the user wishes to boot Windows and Linux from the same disk, since installation procedure of boot loader depends on the firmware type and disk partitioning configuration. In case where Windows and Linux dual boot from the same disk, it is advisable to follow the method used by Windows, ie. either go for UEFI/GPT boot or BIOS/MBR boot. See https://support.microsoft.com/kb/2581408 for more information.
Boot loader UEFI vs BIOS limitations
Most of the Linux boot loaders installed for one firmware type cannot launch or chainload boot loaders of the other firmware type. That is, if Arch is installed in UEFI/GPT or UEFI/MBR mode in one disk and Windows is installed in BIOS/MBR mode in another disk, the UEFI boot loader used by Arch cannot chainload the BIOS installed Windows in the other disk. Similarly if Arch is installed in BIOS/MBR or BIOS/GPT mode in one disk and Windows is installed in UEFI/GPT in another disk , the BIOS boot loader used by Arch cannot chainload UEFI installed Windows in the other disk.
The only exceptions to this are GRUB in Apple Macs in which GRUB in UEFI mode can boot BIOS installed OS via appleloader command (does not work in non-Apple systems), and rEFInd which technically supports booting legacy BIOS OS from UEFI systems, but does not always work in non-Apple UEFI systems as per its author Rod Smith.
However if Arch is installed in BIOS/GPT in one disk and Windows is installed in BIOS/MBR mode in another disk, then the BIOS boot loader used by Arch can boot the Windows in the other disk, if the boot loader itself has the ability to chainload from another disk.
Note: To dual-boot with Windows on same disk, Arch should follow the same firmware boot mode and partitioning combination used by the Windows installation.
Windows Setup creates a 100 MiB EFI system partition (except for Advanced Format 4K native drives where it creates a 300 MiB ESP), so multiple kernel usage is limited. Workarounds include:
- If you are installing Windows from scratch, you can dictate the size of the EFI system partition during installation. See #The EFI system partition created by Windows Setup is too small
- Mount ESP to
/efiand use a boot loader that has file system drivers and is capable of launching kernels that reside on other partitions. - Reduce the size of the Windows partition and replace the existing ESP with a new, larger one.
- Backup and delete unneeded fonts in
esp/EFI/Microsoft/Boot/Fonts/[2]. - Backup and delete unneeded language directories in
esp/EFI/Microsoft/Boot/(e.g. to only keepen-US). - Use a higher, but slower, compression for the initramfs images making sure to decompress the loadable kernel modules and firmware. E.g.
COMPRESSION="xz"
COMPRESSION_OPTIONS=(-9e)
MODULES_DECOMPRESS="yes"
UEFI Secure Boot
All pre-installed Windows 8/8.1, 10 and 11 systems by default boot in UEFI/GPT mode and have UEFI Secure Boot enabled by default. This is mandated by Microsoft for all OEM pre-installed systems.
Arch Linux install media does not support Secure Boot yet. See Secure Boot#Booting an installation medium.
It is advisable to disable UEFI Secure Boot in the firmware setup manually before attempting to boot Arch Linux. Windows 8/8.1, 10 and 11 SHOULD continue to boot fine even if Secure boot is disabled. The only issue with regards to disabling UEFI Secure Boot support is that it requires physical access to the system to disable secure boot option in the firmware setup, as Microsoft has explicitly forbidden presence of any method to remotely or programmatically (from within OS) disable secure boot in all Windows 8/8.1 and above pre-installed systems
Note:
- If Windows used BitLocker and stored the key in the TPM for automatic unlock on boot, it fails to boot when Secure Boot is disabled, instead showing a BitLocker recovery screen. This is not permanent however, and you can easily boot Windows again by simply re-enabling Secure Boot.
- On Windows 11, disabling Secure Boot after install will not cause problems as long as TPM is working normally.
Warning:
The factual accuracy of this article or section is disputed.
Reason:
Secure Boot changes should not affect BitLocker: the issue might be self-signing the windows boot loader and chain-loading it from a boot loader: as long as the Windows boot loader stays signed with MS keys, and the Microsoft certs enrolled it should be fine.
Is the issue disabling it and booting Windows or disabling, reenabling it and then booting Windows?
The first one would be understandable, the second one is something to warn about.
(Discuss in Talk:Dual boot with Windows)
If you intend to use Secure Boot for Linux as well, you may need to perform changes to the Secure Boot settings. Those changes prevent unlocking the BitLocker disk without the recovery key, leading to permanent data loss. Before proceeding, check if this is the case and save your BitLocker recovery key if not already done. This is especially important if Windows was preinstalled by the vendor.
Fast Startup and hibernation
There are two OSs that can be hibernated, you can hibernate Windows and boot Linux (or another OS), or you can hibernate Linux and boot Windows, or hibernate both OSs.
Warning: Data loss can occur if Windows hibernates and you dual boot into another OS and make changes to files on a filesystem (such as NTFS) that can be read and written to by Windows and Linux, and that has been mounted by Windows [3]. Similarly, data loss can occur if Linux hibernates, and you dual boot into another OS etc. Windows may hibernate even when you press shutdown, see section #Windows settings.
For the same reason, if you share one EFI system partition between Windows and Linux, then the EFI system partition may be damaged if you hibernate (or shutdown with Fast Startup enabled) Windows and then start Linux, or hibernate Linux and then start Windows.
ntfs-3g added a safe-guard to prevent read-write mounting of hibernated NTFS filesystems, but the NTFS driver within the Linux kernel has no such safeguard.
Windows cannot read filesystems such as ext4 by default that are commonly used for Linux. These filesystems do not have to be considered, unless you install a Windows driver for them.
Windows settings
Fast Startup is a feature in Windows 8 and above that hibernates the computer rather than actually shutting it down to speed up boot times.
There are multiple options regarding the Windows settings for Fast Startup and hibernation that are covered in the next sections.
- disable Fast Startup and disable hibernation
- disable Fast Startup and enable hibernation
- enable Fast Startup and enable hibernation
The procedure of disabling Fast Startup is described in the tutorials for Windows 8, Windows 10 and Windows 11. In any case if you disable a setting, make sure to disable the setting and then shut down Windows, before installing Linux; note that rebooting is not sufficient.
Disable Fast Startup and disable hibernation
This is the safest option, and recommended if you are unsure about the issue, as it requires the least amount of user awareness when rebooting from one OS into the other. You may share the same EFI system partition between Windows and Linux.
In a Windows command-line shell with administrator privileges:
> powercfg /H off
Disable Fast Startup and enable hibernation
This option requires user awareness when rebooting from one OS into the other.
If you want to start Linux while Windows is hibernated, which is a common use case, then
- you must use a separate EFI system partition (ESP) for Windows and Linux, and ensure that Windows does not mount the ESP used for Linux. As there can only be one ESP per drive, the ESP used for Linux must be located on a separate drive than the ESP used for Windows. In this case Windows and Linux can still be installed on the same drive in different partitions, if you place the ESP used by linux on another drive than the Linux root partition.
- you can not read-write mount any filesystem in Linux, that is mounted by Windows while Windows is hibernated. You should be extremely careful about this, and also consider Automount behaviour.
- If you shut down Windows fully, rather than hibernating, then you can read-write mount the filesystem.
Note: You can avoid this issue for a drive by mounting a drive as an external drive in Windows and ejecting the drive in Windows before hibernating.
Enable Fast Startup and enable hibernation
The same considerations apply as in case «Disable Fast Startup and enable hibernation», but since Windows can not be shut down fully, only hibernated, you can never read-write mount any filesystem that was mounted by Windows while Windows is hibernated.
Note: Windows updates may re-enable Fast Startup, as reported in [4][dead link 2024-07-30 ⓘ].
Windows filenames limitations
Windows is limited to filepaths being shorter than 260 characters.
Windows also puts certain characters off limits in filenames for reasons that run all the way back to DOS:
<(less than)>(greater than):(colon)"(double quote)/(forward slash)\(backslash)|(vertical bar or pipe)?(question mark)*(asterisk)
These are limitations of Windows and not NTFS: any other OS using the NTFS partition will be fine. Windows will fail to detect these files and running chkdsk will most likely cause them to be deleted. This can lead to potential data-loss.
NTFS-3G applies Windows restrictions to new file names through the windows_names option: ntfs-3g(8) § Windows_Filename_Compatibility (see fstab).
Installation
The recommended way to set up a Linux/Windows dual booting system is to first install Windows, only using part of the disk for its partitions. When you have finished the Windows setup, boot into the Linux install environment where you can create and resize partitions for Linux while leaving the existing Windows partitions untouched. The Windows installation will create the EFI system partition which can be used by your Linux boot loader. If you are installing Windows from scratch, do note that the EFI System partition created by Windows Setup will be too small for most use cases. See #The EFI system partition created by Windows Setup is too small.
Windows before Linux
BIOS systems
Using a Linux boot loader
You may use any multi-boot supporting BIOS boot loader.
Using the Windows Vista/7/8/8.1 boot loader
This section explains how to:
- install a linux boot loader on a partition instead of the MBR;
- copy this boot loader to a partition readable by the Windows boot loader;
- use the windows boot loader to start said copy of the linux boot loader.
Note: Some documents state that the partition being loaded by the Windows boot loader must be a primary partition but usage of an extended partition has been documented as working.
- When installing the boot loader, install it on your
/bootpartition rather than the MBR. For details on doing this with GRUB, see GRUB/Tips and tricks#Install to partition or partitionless disk, for Syslinux, see the note at Syslinux#Manually, for LILO see LILO#Install to partition or partitionless disk.
- Make a copy of the VBR:
dd if=/dev/disk of=/path/to/linux.bin bs=512 count=1
where
/dev/diskis the path of the partition on which your boot loader is installed and/path/to/is the mounted filesystem on which you want the copy to be readable by the Windows boot loader.
- On Windows, the linux.bin file should now be accessible. Run cmd with administrator privileges (navigate to Start > All Programs > Accessories, right-click on Command Prompt and select Run as administrator):
bcdedit /create /d "Linux" /application BOOTSECTOR
BCDEdit will return a UUID for this entry. This will be referred to as
UUIDin the remaining steps.bcdedit /set UUID device partition=c: (or the drive letter on which linux.bin is kept) bcdedit /set UUID path \path\to\linux.bin bcdedit /displayorder UUID /addlast bcdedit /timeout 30
On reboot, both Windows and Linux should now show up in the Windows boot loader.
Note: On some hardware, the Windows boot loader is used to start another OS with a second power button (e.g. Dell Precision M4500).
For more details, see https://www.iceflatline.com/2009/09/how-to-dual-boot-windows-7-and-linux-using-bcdedit/
UEFI systems
If you already have Windows installed, it will already have created some partitions on a GPT-formatted disk:
- a Windows Recovery Environment partition, generally of size 499 MiB,
- an EFI system partition with a FAT32 filesystem, containing the Windows Boot Manager,
- a Microsoft Reserved Partition, generally of size 128 MiB,
- a Microsoft basic data partition with a NTFS filesystem, which corresponds to
C:, - potentially system recovery and backup partitions and/or secondary data partitions (corresponding often to
D:and above).
Using the Disk Management utility in Windows, check how the partitions are labelled and which type gets reported. The Reserved Partition may not be visible in the Disk Management utility in which case it can be identified using diskpart in windows cmd. This will help you understand which partitions are essential to Windows, and which others you might repurpose. The Windows Disk Management utility can also be used to shrink Windows (NTFS) partitions to free up disk space for additional partitions for Linux.
Warning: The first 4 partitions in the above list are essential, do not delete them.
You can then proceed with partitioning, depending on your needs. The boot loader needs to support chainloading other EFI applications to dual boot Windows and Linux. An additional EFI system partition should not be created, as it may prevent Windows from booting.
Note: It only appears when Linux is installed on the second hard disk and a new EFI system partition is created on the second hard disk.
Simply mount the existing partition.
Tip:
- rEFInd and systemd-boot will autodetect Windows Boot Manager (
\EFI\Microsoft\Boot\bootmgfw.efi) and show it in their boot menu automatically. For GRUB follow either GRUB#Windows installed in UEFI/GPT mode to add boot menu entry manually or GRUB#Detecting other operating systems for a generated configuration file. - To save space on the EFI system partition, especially for multiple kernels, increase the initramfs compression.
Computers that come with newer versions of Windows often have Secure Boot enabled. You will need to take extra steps to either disable Secure Boot or to make your installation media compatible with secure boot (see above and in the linked page).
Linux before Windows
Even though the recommended way to set up a Linux/Windows dual booting system is to first install Windows, it can be done the other way around. In contrast to installing Windows before Linux, you will have to set aside a partition for Windows, say 40GB or larger, in advance. Or have some unpartitioned disk space, or create and resize partitions for Windows from within the Linux installation, before launching the Windows installation.
UEFI firmware
Windows will use the already existing EFI system partition.
Follows an outline, assuming Secure Boot is disabled in the firmware.
- Boot into windows installation. Watch to let it use only the intended partition, but otherwise let it do its work as if there is no Linux installation.
- Follow the #Fast Startup and hibernation section.
- Fix the ability to load Linux at start up, perhaps by following #Cannot boot Linux after installing Windows. It was already mentioned in #UEFI systems that some Linux boot managers will autodetect Windows Boot Manager. Even though newer Windows installations have an advanced restart option, from which you can boot into Linux, it is advised to have other means to boot into Linux, such as an arch installation media or a live CD.
Windows 10 with GRUB
The following assumes GRUB is used as a boot loader (although the process is likely similar for other boot loaders) and that Windows 10 will be installed on a GPT block device with an existing EFI system partition (see the «System partition» section in the Microsoft documentation for more information).
Create with program gdisk on the block device the following three new partitions. See [5] for more precise partition sizes.
| Min size | Code | Name | File system |
|---|---|---|---|
| 16 MB | 0C01 | Microsoft reserved | N/A |
| ~40 GB | 0700 | Microsoft basic data | NTFS |
| 300 MB | 2700 | Windows RE | NTFS |
Create NTFS file systems on the new Microsoft basic data and Windows RE (recovery) partitions using the mkntfs program from package ntfs-3g.
Reboot the system into a Windows 10 installation media. When prompted to install select the custom install option and install Windows on the Microsoft basic data partition created earlier. This should also install Microsoft EFI files in the EFI system partition.
After installation (set up of and logging into Windows not required), reboot into Linux and generate a GRUB configuration for the Windows boot manager to be available in the GRUB menu on next boot.
Troubleshooting
Couldn’t create a new partition or locate an existing one
See #Windows UEFI vs BIOS limitations.
Cannot boot Linux after installing Windows
See Unified Extensible Firmware Interface#Windows changes boot order.
Restoring a Windows boot record
By convention (and for ease of installation), Windows is usually installed on the first partition and installs its partition table and reference to its boot loader to the first sector of that partition. If you accidentally install a boot loader like GRUB to the Windows partition or damage the boot record in some other way, you will need to use a utility to repair it. Microsoft includes a boot sector fix utility FIXBOOT and an MBR fix utility called FIXMBR on their recovery discs, or sometimes on their install discs. Using this method, you can fix the reference on the boot sector of the first partition to the boot loader file and fix the reference on the MBR to the first partition, respectively. After doing this you will have to reinstall GRUB to the MBR as was originally intended (that is, the GRUB boot loader can be assigned to chainload the Windows boot loader).
If you wish to revert back to using Windows, you can use the FIXBOOT command which chains from the MBR to the boot sector of the first partition to restore normal, automatic loading of the Windows operating system.
Of note, there is a Linux utility called ms-sysAUR that can install MBR’s. However, this utility is only currently capable of writing new MBRs (all OS’s and file systems supported) and boot sectors (a.k.a. boot record; equivalent to using FIXBOOT) for FAT file systems. Most LiveCDs do not have this utility by default, so it will need to be installed first, or you can look at a rescue CD that does have it, such as Parted Magic.
First, write the partition info (table) again by:
# ms-sys --partition /dev/sda1
Next, write a Windows 2000/XP/2003 MBR:
# ms-sys --mbr /dev/sda # Read options for different versions
Then, write the new boot sector (boot record):
# ms-sys -(1-6) # Read options to discover the correct FAT record type
ms-sys can also write Windows 98, ME, Vista, and 7 MBRs as well, see ms-sys -h.
Restoring an accidentally deleted EFI system partition
If you have a GPT-partitioned disk and erased (e.g. with mkfs.fat -F32 /dev/sdx) the EFI system partition, you will notice that Windows Boot Manager will either disappear from your boot options, or selecting it will send you back to the UEFI.
To remedy it, boot with a Windows installation media, press Shift+F10 to open the console (or click NEXT > Repair Computer > Troubleshoot… > Advanced > Command Prompt), then start the diskpart utility:
X:\Sources> diskpart
DISKPART> list disk
Select the appropriate hard drive by typing:
DISKPART> select disk number
Make sure that there is a partition of type system (the EFI system partition):
DISKPART> list partition
Select this partition:
DISKPART> select partition number
and assign a temporary drive letter to it:
DISKPART> assign letter=G:
DiskPart successfully assigned the drive letter or mount point.
To make sure that drive letter is correctly assigned:
DISKPART> list vol
 Volume ###  Ltr  Label        Fs     Type        Size     Status     Info
 ----------  ---  -----------  -----  ----------  -------  ---------  --------
 Volume 0     E                       DVD-ROM         0 B  No Media
 Volume 1     C                NTFS   Partition    195 GB  Healthy    Boot
 Volume 2         WINRE        NTFS   Partition    400 MB  Healthy    Hidden
 Volume 3     G                FAT32  Partition    499 MB  Healthy    System
Close diskpart:
DISKPART> exit
Navigate to C:\ (or what your system drive letter is):
X:\Sources> cd /d C:\
Next is the «magic» command, which recreate the BCD store (with /s for the mount point, /f for firmware type, optionally add /v for verbose):
C:\> bcdboot C:\Windows /s G: /f UEFI
Tip: If it hangs up after a minute, hit Ctrl+c. This happens sometimes, but you will get a message like boot files successfully created and it will have worked just fine.
You should now have Windows Boot Manager working as a boot option, and thus have access to Windows. Just make sure to never format your EFI system partition again!
Note: Remove the drive letter G assigned to the EFI system partition to keep it from showing up in My Computer.
See [6], [7] and [8].
The EFI system partition created by Windows Setup is too small
By default, Windows Setup creates a 100 MiB EFI system partition (except for Advanced Format 4K native drives where it creates a 300 MiB ESP). This is generally too small to fit everything you need. You can replace the existing EFI system partition with a new, larger one.
If you are installing Windows from scratch, you can dictate the size of the EFI system partition during installation[9]:
- Select your installation target and make sure it has no partitions.
- Click New and then the Apply buttons. The Windows installer will then generate the expected partitions (allocating nearly everything to its primary partition) and just 100MB to the EFI.
- Use the UI to delete the
System,MSR, andPrimarypartitions. Leave theRecoverypartition (if present) alone. - Press
Shift+F10to open the Command Prompt. - Type
diskpart.exeand pressEnterto open the disk partitioning tool. - Type
list diskand pressEnterto list your disks. Find the one you intend to modify and note its disk number. - Type
select disk disk_numberwith the disk number to modify. - Type
create partition efi size=sizewith the desired size of the ESP in Mebibytes (MiB), and pressEnter. See the note at EFI system partition#Create the partition for the recommended sizes. - Type
format quick fs=fat32 label=Systemand pressEnterto format the ESP - Type
exitand pressEnterto exit the disk partitioning tool andexitfollowed byEnteragain.
Once Windows is installed, you can resize the primary partition down within Windows and then reboot and go about your usual Arch install, filling the space you just created.
Alternatively, you can use the Arch install media to create a single EFI system partition of your preferred size before you install Windows on the drive. Windows Setup will use the EFI system partition you made instead of creating its own.
Unable to install Windows Cumulative Update on BIOS system
On BIOS systems, Windows cumulative updates may fail with the error We couldn’t complete the updates. Undoing changes. Don’t turn off your computer. In such case, while in Windows, you need to set the Windows partition as active.
C:\> diskpart
DISKPART> list disk
DISKPART> select disk number
DISKPART> list partition
DISKPART> select partition number
DISKPART> active
DISKPART> exit
After successfully installing the Windows update, mark back your Linux partition as active, using the commands above.
Note: Setting a partition as active in the diskpart tool in Windows has the same effect as setting the boot flag in GParted.
Time standard
- Recommended: Set both Arch Linux and Windows to use UTC, following System time#UTC in Microsoft Windows. Some versions of Windows revert the hardware clock back to localtime if they are set to synchronize the time online. This issue appears to be fixed in Windows 10.
- Not recommended: Set Arch Linux to localtime and disable all time synchronization daemons. This will let Windows take care of hardware clock corrections and you will need to remember to boot into Windows at least two times a year (in Spring and Autumn) when DST kicks in. So please do not ask on the forums why the clock is one hour behind or ahead if you usually go for days or weeks without booting into Windows.
Bluetooth pairing
When it comes to pairing Bluetooth devices with both the Linux and Windows installation, both systems have the same MAC address, but will use different link keys generated during the pairing process. This results in the device being unable to connect to one installation, after it has been paired with the other. To allow a device to connect to either installation without re-pairing, follow Bluetooth#Dual boot pairing.
See also
- Booting Windows from a desktop shortcut
- One-time boot into Windows partition from desktop shortcut
- Windows 7/8/8.1/10 ISO to Flash Drive burning utility for Linux (MBR/GPT, BIOS/UEFI, FAT32/NTFS)
Can we dual-boot Windows 10 and Windows 11? Yes, we can! And dual-booting Windows 10 and Windows 11 can be quite helpful if you need to work with both operating systems. It’s also a good choice if you want to see what Windows 11 is all about, but you don’t want to let go of your old Windows 10 setup. Whatever your reasons are, in this article, we’re going to guide you through the steps of installing Windows 10 and Windows 11 in a dual-boot configuration. So, if you want to know all the details on how to dual boot Windows 11 with Windows 10 on the same computer, read on:
NOTE: For the purpose of this tutorial, we’re going to show you how to dual boot Windows 10 and Windows 11 when you first install Windows 10, and afterward, you install Windows 11. However, keep in mind that the other way around is also possible (install Windows 11 first and Windows 10 second), and the steps are exactly the same.
1. Install Windows 10
The first step to dual-boot Windows 10 and Windows 11 is to have Windows 10 installed on your PC. If you’re already running Windows 10, skip to the next step of this guide. Otherwise, if you have a new computer with no operating system on it or you simply want to start from zero for a completely clean experience, first install Windows 10. We’ve covered all the necessary steps in detail in this separate tutorial: How to install Windows 10 from DVD, ISO, or USB. In short, what you need to do is create a Windows 10 installation USB memory stick or DVD, boot from it, and follow the instructions of the Windows 10 setup wizard.
Installing Windows 10
2. Prepare a partition for Windows 11
When you have Windows 10 up and running on your computer, the next step you must take to dual boot with Windows 11 is to prepare a partition for the latter. There are two ways to do that:
- Shrink your Windows 10 partition, if the drive containing it is large enough to hold both operating systems
- Ensure that you have another partition or drive with enough free space on it, available to install Windows 11 on it
Let’s see how both methods work:
2.1. Shrink your Windows 10 partition
If you want to use the same partition on which Windows 10 is installed, you need to shrink it in order to have enough space to create a new partition for Windows 11. In case you don’t know how to do that, this tutorial explains everything in detail: 2 ways to resize a partition in Windows (all versions). However, if time is of the essence, here’s the condensed explanation of the steps you should take:
Open Disk Management — right-click on the Start button and select Disk Management from the WinX menu. Then, right-click on your Windows 10 partition and choose Shrink Volume from the contextual menu.
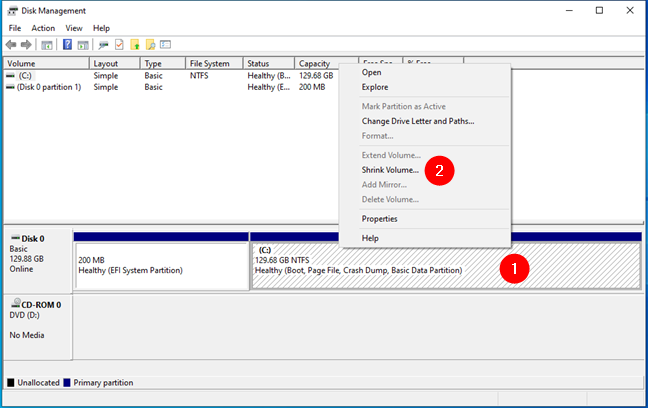
Shrink volume reduces the size of the Windows 10 partition
In the Shrink C: dialog box, enter the number of megabytes you want to shrink the Windows 10 partition by. Make sure that you choose a value that’s large enough for Windows 11, which requires at least 64GB (65,536MB) of free space. Once done, press the Shrink button.
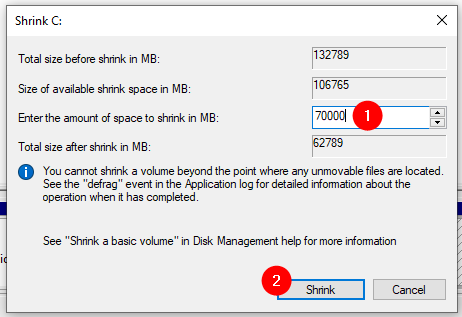
Specifying the size to shrink the Windows 10 partition
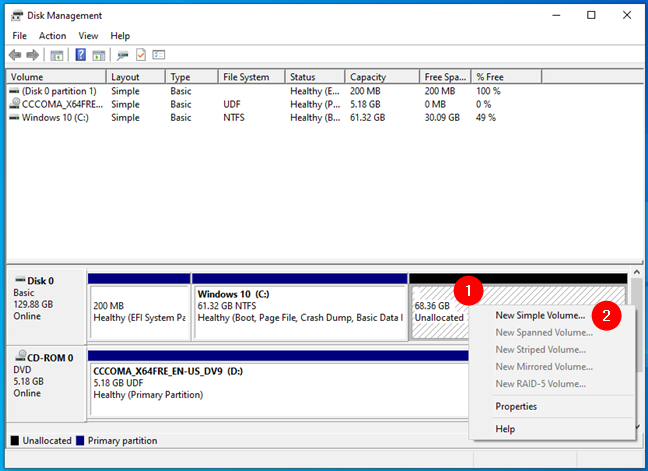
After the shrinking is done, it’s time to create a new partition for Windows 11. Right-click on the Unallocated space on your drive and select New Simple Volume from the context menu.
Creating a new partition for Windows 11
Follow the wizard’s steps and, when you get to the Format Partition settings, make sure you choose NTFS.
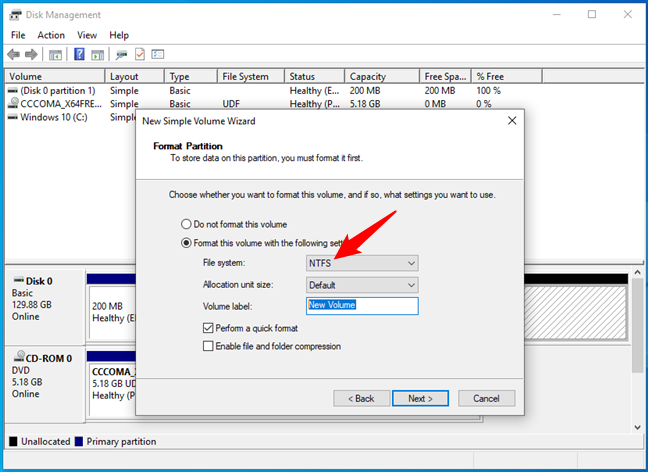
Format the Windows 11 partition using NTFS
TIP: For more help, read this guide: 2 ways to create a partition in Windows (all versions).
Once you’ve created the partition for Windows 11, follow the instructions from the third chapter of this guide.
2.2. Choose another empty drive or partition on your PC
You may want to install Windows 10 and Windows 11 in dual-boot on different drives, or you already have a partition on your PC that you want to use for Windows 11. In this case, make sure that you don’t have any data on it. If you do, move the files you want to keep to another storage unit before installing Windows 11 or you risk losing them. Then, move on to the next step:
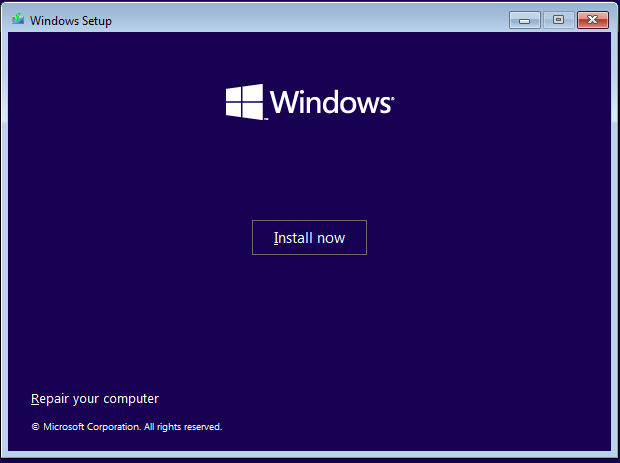
3. Install Windows 11
Now comes one of the essential steps of dual-booting Windows 10 with Windows 11: actually installing Windows 11. If you don’t already have a Windows 11 installation media, create one now, and use it to boot your Windows 10 computer. For instructions on how to do that, follow the steps from this guide: How to install Windows 11 from USB, DVD, or ISO.
After you boot your PC using the Windows 11 installation media, follow the wizard’s steps like you normally would, right until you get to the “Where do you want to install Windows?” question. When you get there, be very careful to select the partition you’ve prepared for Windows 11, as explained in the second step of this guide. Then, press Next and continue installing Windows 11 and configuring it as you like.
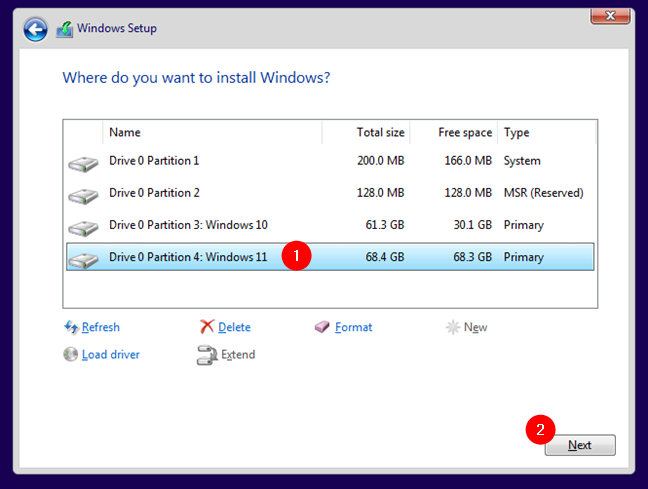
Selecting the Windows 11 partition
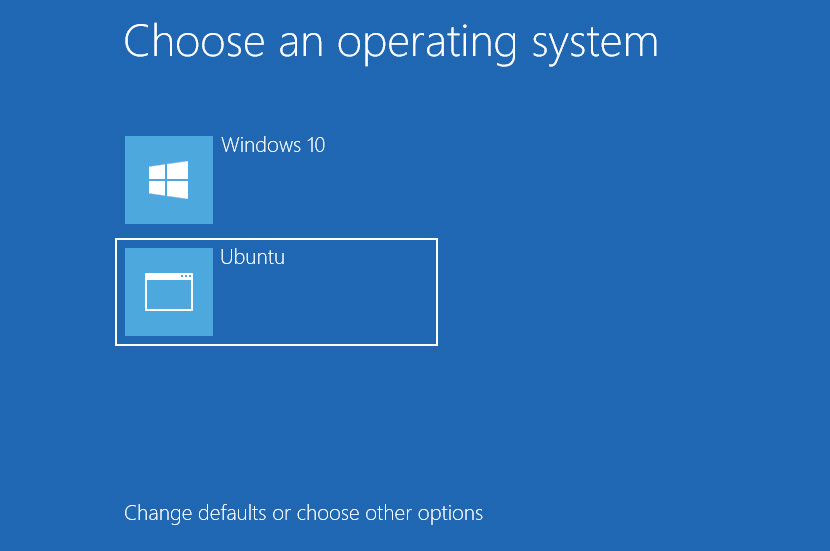
4. Dual boot Windows 10 and Windows 11
Once you finish installing Windows 11, your computer is ready to dual-boot. Whenever you start or restart your PC, you’ll be asked what operating system you want to boot into: Windows 10 or Windows 11.
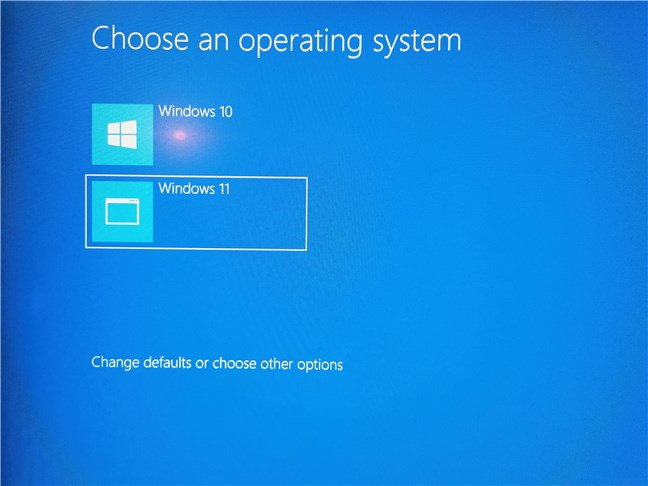
The boot loader allows you to dual boot Windows 10 and Windows 11
Congratulations! You’re now dual-booting Windows 10 and Windows 11! 🙂
Additional configuration: How to set the default operating system for dual boot (Windows 10 or Windows 11)
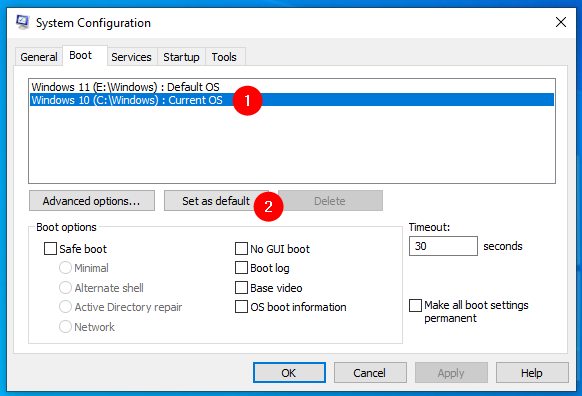
Finally, there’s one more thing you might want to do for your dual-boot configuration: choose the default operating system and, maybe, the timeout of the “Choose an operating system” boot loader screen. That is because, after the standard 30 seconds, the boot loader automatically starts the default operating system. To set these as you want, open the System Configuration tool: search for msconfig and press the System Configuration result.
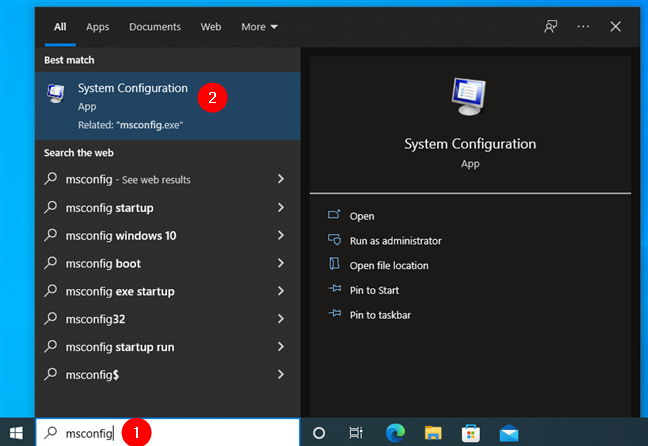
Opening System Configuration
In the System Configuration window, select the Boot tab, and you should see Windows 10 and Windows 11 listed as dual-boot options. Click or tap the one you want as default and, if it’s not already the default choice, press the Set as default button.
Set the default operating system
If you want to increase or decrease the display time of the boot loader, enter the number of seconds you prefer in the Timeout field on the right.
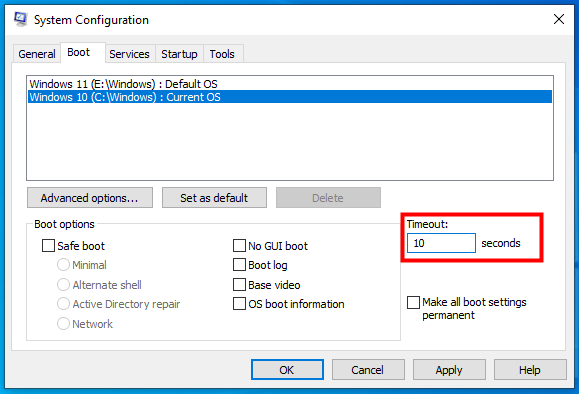
Choose the timeout for the boot loader
Press OK to save your changes and close System Configuration. Then, reboot your computer to see how you like them.
Why did you want to dual boot Windows 10 and Windows 11?
Now you know how to dual boot Windows 11 with Windows 10. Before you close this page, please indulge our curiosity. Why did you want to learn how to do that? Why do you need both operating systems on the same PC? Let us know your reasons and whether everything worked well in the comments section below.
How to dual-boot Linux and Windows on the same hard disk? Typically a computer will have a single operating system installed on them, for those that want to dual-boot multiple OS such as a combination of Windows and Linux, you will need to make some changes and enable the option to choose which OS to boot from during startup.
Continue ➤ 3 Free Boot Camp Alternatives – Run Windows Applications And Games On macOS
You can install 2 operating systems provided that you partition your SSD or Hard Disk into 2 drives. When you install a Linux distribution, it typically installs the Grub boot loader. Grub loads instead of the Windows boot loader at boot time if Windows was already installed, allowing you to choose the operating system you want to boot by modifying the Boot Configuration Data.
1. Grub2Win

Grub2Win supports 64 and 32 bit EFI and BIOS on Windows. Safely dual boot Windows and Linux from GPT or MBR disks. Grub2Win boots native GNU Grub version 2 code. Everything is contained in a single 20 MB directory on your Windows C: drive. On EFI systems a few small modules are installed to your EFI partition.
Using the simple Windows GUI and instructions you can install Grub2Win quickly and safely. Select from many OS choices. Supports Antergos, Android, Ubuntu, Debian, Suse, Fedora, Mint, Clover and Windows. Also boots ISO files. You can enter your own custom commands for each menu entry.
- Supports 64 and 32 bit EFI as well as BIOS firmware.
- Requires just one directory on the Windows C: drive, about 20 MB disk space.
- Simple Windows GUI easily sets up Grub2Win in seconds.
- Lets you set your EFI firmware boot order from within Windows.
- Preview and customize the 9 included graphic background themes.
- Works with all filesystems including Mac hfs and Btrfs.
- Can search for and boot a partition by its label. Supports advanced scripting.
- Works with both GPT and MBR disks – up to 128 primary partitions per drive.
- Supports extremely large (over 40 TB) disks and partitions.
- Safely multiboot Windows, Antergos, Android, Ubuntu, Debian, Suse, Fedora, Mint, Clover and more.
- Grub customization is done from Windows – Configuration in Linux is not required.
2. EasyBCD
Free for personal, non-commercial use
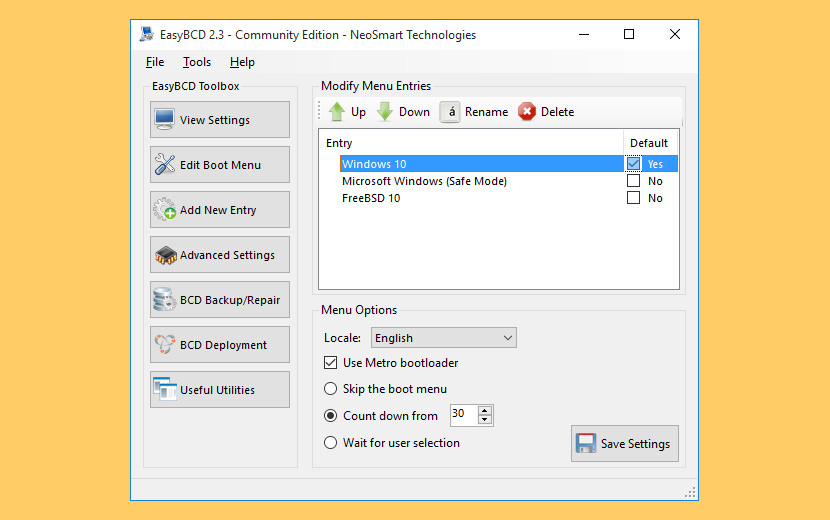
Take control of your boot loader, EasyBCD supercharges your Windows PC, allowing you to dual-boot to your heart’s content. Also boot into legacy systems Microsoft doesn’t support: MS-DOS, Windows 9x, Windows ME, and Windows 2000!
EasyBCD is geared for users of all kinds. Whether you just want to add an entry to your old XP partition or want to create a duplicate for testing purposes; if you’re interested in debugging the Windows Kernel or septuple-booting your seven test operating systems, EasyBCD is the key.
- Boot anything – Windows, Linux, macOS, & BSD! Boot both from and into USB drives, ISO images, virtual disks, and more.
- Boot anywhere – Create bootable USB sticks with repair utilities that you can take with you anywhere.
- Protect against disaster – Create entries to boot into recovery utilities or safe mode to prepare for a rainy day.
- Painless editing – Add, rename, remove, configure, and reorder entries at whim.
- Solve difficult problems – Use EasyBCD to troubleshoot Windows, back up and repair the bootloader, and more.
- Powerful scripting with NeoGrub – You’ll have the power to hide partitions, change active flags, and create complex boot scenarios.
3. rEFInd Boot Manager
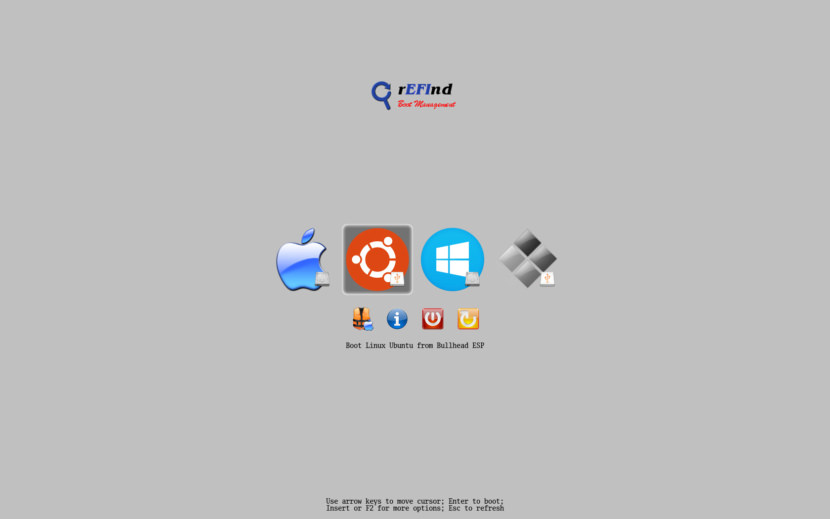
rEFInd is a fork of the Small rEFIt boot manager for computers based on the Extensible Firmware Interface (EFI) and Unified EFI (UEFI). Like rEFIt, rEFInd is a boot manager, meaning that it presents a menu of options to the user when the computer first starts up, as shown below. rEFInd is not a boot loader, which is a program that loads an OS kernel and hands off control to it.
4. Clover EFI bootloader
This is an EFI-based bootloader for BIOS-based computers created as a replacement to the EDK2/Duet bootloader. Clover is an operating system boot loader for computers already equipped with an UEFI firmware and for those equipped with legacy BIOS firmware. An operating system (OS) may support (U)EFI (macOS, Windows, Linux) or not (Windows XP). Legacy boot is used for the last one, that is, the old BIOS system is used to handle boot sectors.
- Boot macOS, Windows, and Linux in UEFI or legacy mode on Mac or PC with UEFI or BIOS firmware
- Boot using UEFI firmware directly or CloverEFI UEFI firmware emulation
- Customizable GUI including themes, icons, fonts, background images, animations, and mouse pointers.
- Ability to boot previously selected boot entry after default timeout
- Boot entries menu scrolls if screen resolution is too low for menu
- Create custom boot entries for personalizing boot entries and add support for other operating systems
- Create Clover boot entry in NVRAM with tool from GUI
5. Grub

GNU GRUB is a Multiboot boot loader. It was derived from GRUB, the GRand Unified Bootloader, which was originally designed and implemented by Erich Stefan Boleyn.
Briefly, a boot loader is the first software program that runs when a computer starts. It is responsible for loading and transferring control to the operating system kernel software (such as the Hurd or Linux). The kernel, in turn, initializes the rest of the operating system (e.g. GNU).
6. Super Grub2 Disk

Super GRUB2 Disk helps you to boot into most any Operating System (OS) even if you cannot boot into it by normal means. Super Grub2 Disk is a live CD that helps the user to boot into almost any operating system even if the system cannot boot into it by normal means. This allows a user to boot into an installed operating system if their GRUB installation has been overwritten, erased or otherwise corrupted.
Super Grub2 Disk can detect installed operating systems and provide a boot menu which allows the user to boot into their desired operating system. Super Grub2 Disk is not an operating system itself, but a live boot loader which can be run from a CD or USB thumb drive. Everything option to detect most Operating Systems.
- grub.cfg – (GRUB2 configuration files)
- menu.lst – (GRUB legacy configuration files)
- core.img – (GRUB2 installation (even if mbr is overwritten))
- Bootable ISOs (in /boot-isos or /boot/boot-isos)
- Enable GRUB2’s LVM support
- Enable GRUB2’s RAID support
- Enable GRUB2’s PATA support (to work around BIOS bugs/limitation)
- Mount encrypted volumes (LUKS and geli)
- Enable serial terminal
7. Ventoy
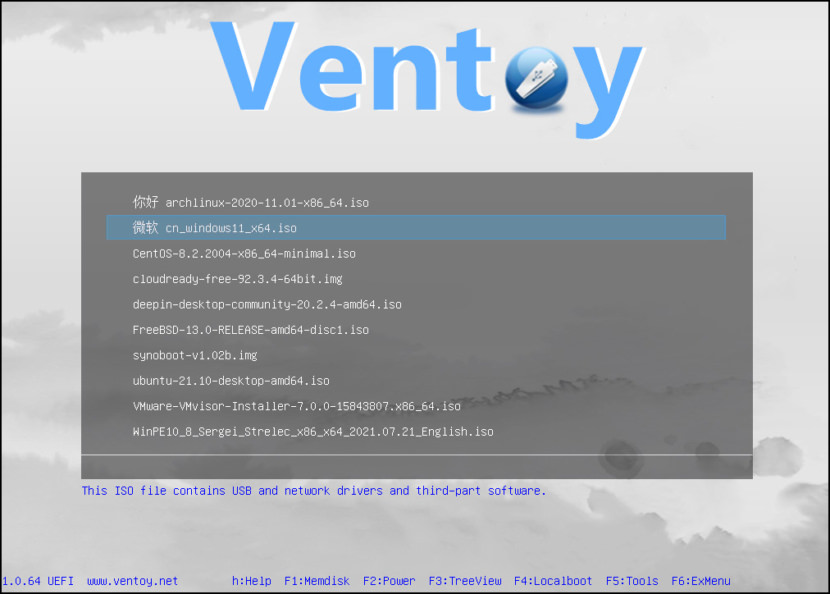
Ventoy is an open source tool to create bootable USB drives for ISO/WIM/IMG/VHD(x)/EFI files. With ventoy, you don’t need to format the disk over and over, you just need to copy the ISO/WIM/IMG/VHD(x)/EFI files to the USB drive and boot them directly.
MBR and GPT partition styles, x86 Legacy BIOS and various UEFI boot methods (including persistence) are supported. ISO files larger than 4 GB can be used. Ventoy supports various operating system boot and installation ISO files including Windows and above, Debian, Ubuntu, CentOS, RHEL, Deepin, Fedora and more than a hundred other Linux distributions; various UNIX releases, VMware, Citrix XenServer, etc. have also been tested.
- x86 Legacy BIOS, IA32 UEFI, x86_64 UEFI, ARM64 UEFI, MIPS64EL UEFI supported
- IA32/x86_64 UEFI Secure Boot supported Notes
- Linux Persistence supported Notes
- Windows auto installation supported Notes
- Linux auto installation supported Notes
- Variables Expansion supported for Windows/Linux auto installation script Notes
- FAT32/exFAT/NTFS/UDF/XFS/Ext2(3)(4) supported for main partition
- ISO files larger than 4GB supported
Dual booting Arch linux & Windows 10
There are already dozens of tutorials to setup an Arch and Windows dual boot — welcome to a dozen + 1. Like most others this is a step by step guide. Unlike most others the steps are ordered in a way that makes sense (starting with the download first — duh!) so you won’t have to restart your computer a gazillion times.
I did this on a single SSD Dell XPS 15 with windows 10 preinstalled. It’s obviously possible to follow this guide if you’re installing Arch onto a different drive or if you’re running older hardware. If you run into any problems please be sure to read through the Arch Installation Guide and the Arch Dual boot with Windows wiki.
To get started you will need:
- a stable internet connection
- a USB key with 1GB storage
- a cup of coffee & and a can do attitude
Warmup
Download the Arch image
Let’s begin by downloading the .iso preferably using BitTorrent and verifying the checksum [1].
Check the partition table type in Windows
If you recently purchased a laptop it will most likely be using UEFI. In case you’re performing this dual-boot installation on an old laptop you should check this by:
- starting the run dialog with
Win key + R - type
msinfo32and press enter - in the System information section open System Summary and take note of the value of BIOS mode
Make some space for Arch
Let’s begin by doing some wiping. In Windows 10 launch the Disk Management tool and create a partition of the desired size by reducing the size of the existing windows installation:
- start the run dialog with
Win key + R - type
diskmgmt.mscand press enter - shrink the partition to the desired size
Create a bootable USB with Arch
I recommend you use Etcher but you can also use Rufus. Simply download the tool, plug in your USB and flash it with the .iso.
Note: I recommend that you keep the .iso installed on the USB key. You might need it after completing the setup since Windows updates may overwrite your boot partition (see FAQ for more info)
Disable Fast Boot & Secure Boot & optionally switch from RAID to AHCI
This may sound dumb but trust me on this one: since you’ll be restarting your computer, read all the steps in this section before following through:
- use your favourite search engine to lookup what key to press during boot to enter the UEFI settings
- restart your computer and press it
- the UEFI interface varies depending on your motherboard but they shouldn’t be too hard to find:
- disable Fast Boot
- disable Secure Boot
- change the boot order to prioritise your USB over the Windows Boot Loader
- (optional) if you have problems partioning your disk switch from RAID to AHCI
- save & exit & restart your computer & drop into the Arch root prompt!
Fun stuff
Keyboard setup
If you’re using a particular keyboard layout, search for it with:
# list available layouts
$ ls /usr/share/kbd/keymaps/**/*.map.gz

# modify the layout by running
$ loadkeys whatever-your-layout-is1
Connect to the interwebs
# Find your interface name
$ iw dev

# use an network manager to do the work for you
$ wifi-menu whatever-your-interface-is

# check your connection
$ ping cloudflare.com
Create partitions for your new system
Here you will need to create 3 partitions: boot (>200MB), swap (match your RAM [3]), and a root partition (whatever space you have left)
# find out the name of your drive (sometimes /dev/sda - I'll be using /dev/nvme0n1)
$ fdisk -l

# make sure to check the storage of the drive to verify that you're not formatting your USB stick
$ fdisk /dev/nvme0n1
n                    # create a new partition
<Enter>              # use default partition number
<Enter>              # use default starting sector
+256MB               # or whatever size you want your boot sector to be

n                    # create a new partition
<Enter>              # use default partition number
<Enter>              # use default starting sector
+256MB               # or whatever size you want your swap to be
t                    # change the partition type
<Enter>              # use default partition
82                   # use Linux swap partition type

n                    # create a new partition
<Enter>              # use default partition number
<Enter>              # use default starting sector
<Enter>              # fill the rest of the disk
t                    # change the partition type
<Enter>              # use default partition
83                   # use Linux partition type
w                    # write the changes to disk & exit
You should end up with something similar to this:
$ lsblk
NAME        MAJ:MIN RM   SIZE RO TYPE MOUNTPOINT
nvme0n1     259:0    0   477G  0 disk
├─nvme0n1p1 259:1    0   680M  0 part
├─nvme0n1p2 259:2    0   128M  0 part
├─nvme0n1p3 259:3    0 204.8G  0 part
├─nvme0n1p4 259:4    0   990M  0 part
├─nvme0n1p5 259:5    0  13.2G  0 part
├─nvme0n1p6 259:6    0   1.3G  0 part
├─nvme0n1p7 259:7    0   244M  0 part
├─nvme0n1p8 259:8    0   954M  0 part
└─nvme0n1p9 259:9    0 254.8G  0 part
Prepare your partitions
# create & enable your swap
$ mkswap /dev/nvme0n1p8
$ swapon /dev/nvme0n1p8

# format the partitions
$ mkfs.ext4 /dev/nvme0n1p9
$ mkfs.ext4 /dev/nvme0n1p7

# mount the partitions
$ mount /dev/nvme0n1p9 /mnt
$ mount /dev/nvme0n1p7 /mnt/boot

# mount your UEFI boot partition
$ mkdir /mnt/boot/efi
$ mount /dev/nvme0n1p1 /mnt/boot/efi
Install the base arch packages
# optionally add base-devel at the end of the following command for development tools
$ pacstrap /mnt base linux linux-firmware
Generate your fstab file so that partitions are mounted when your reboot
The fstab (short for filesystems table) is used to list disk partitions or various block devices and specify how they should be mounted into the filesystem.
# generate the fstab file
$ genfstab -U /mnt >> /mnt/etc/fstab

# verify that /, /boot, /boot/efi, and swap are here
$ cat /mnt/etc/fstab
# /dev/nvme0n1p9
UUID=UUID-should-be-here       /               ext4            rw,relatime     0 1

# /dev/nvme0n1p7
UUID=UUID-should-be-here       /boot           ext4            rw,relatime     0 2

# /dev/nvme0n1p1 LABEL=ESP
UUID=UUID-should-be-here       /boot/efi       vfat            rw,relatime,fmask=0022,dmask=0022,codepage=437,iocharset=iso8859-1,shortname=mixed,utf8,errors=remou
nt-ro   0 2

# /dev/nvme0n1p8
UUID=UUID-should-be-here       none            swap            defaults        0 0
Change root & install GRUB
Now that your base packages have been installed and that your partitions are mounted, let’s change the root directory for the current running process. These steps are the exact same as arch’s installation guide configure the system section, so feel free to switch, follow those instructions and come back before you start the boot loader setup. If you prefer to stay here, the commands are the exact same except you won’t get the usefull documentation links in case of a boo-boo.
# change root
$ arch-chroot /mnt

# set the timezone
$ ln -sf /usr/share/zoneinfo/Region/City /etc/localtime
$ hwclock --systohc

# set your locale by uncommenting en_US.UTF-8 UTF-8 in /etc/locale.gen (and any other locales you may use)
$ locale-gen
$ echo "LANG=en_US.UTF-8" > /etc/locale.conf

# set the keyboard layout
$ echo "KEYMAP=whatever-your-keymap-from-the-keyboard-setup-section-is1" > /etc/vconsole.conf

# set your hostname
$ echo "whatever-you-want-your-hostname-to-be" > /etc/hostname

# set the root password
$ passwd
And now for the main event: the boot loader installation! For this step to work, the partitions must be properly mounted:
$ lsblk
NAME        MAJ:MIN RM   SIZE RO TYPE MOUNTPOINT
nvme0n1     259:0    0   477G  0 disk
├─nvme0n1p1 259:1    0   680M  0 part /boot/efi
├─nvme0n1p2 259:2    0   128M  0 part
├─nvme0n1p3 259:3    0 204.8G  0 part
├─nvme0n1p4 259:4    0   990M  0 part
├─nvme0n1p5 259:5    0  13.2G  0 part
├─nvme0n1p6 259:6    0   1.3G  0 part
├─nvme0n1p7 259:7    0   244M  0 part /boot
├─nvme0n1p8 259:8    0   954M  0 part
└─nvme0n1p9 259:9    0 254.8G  0 part /
$ pacman -S grub efibootmgr os-prober
$ grub-install --target=x86_64-efi --efi-directory=/boot/efi --bootloader-id=grub
$ grub-mkconfig -o /boot/grub/grub.cfg
$ os-prober
To check that grub has properly detected the windows boot loader have a look in /boot/grub/grub.cfg you should see a menuentry that looks a little like this:
menuentry 'Windows Boot Manager (on /dev/nvme0n1p1)' --class windows --class os $menuentry_id_option 'osprober-efi-UUID-XXXX' {
	insmod part_gpt
	insmod fat
	if [ x$feature_platform_search_hint = xy ]; then
	  search --no-floppy --fs-uuid --set=root  UUID-XXXX
	else
	  search --no-floppy --fs-uuid --set=root BUUID-XXXX
	fi
	chainloader /EFI/Microsoft/Boot/bootmgfw.efi
}
One last thing
You’ve partitoned your system, installed your base packages and your bootloader — what could you possibly be missing? Oh yeah the wpa_supplicant package used for key negociation when you want to connect via WiFi… I made these mistakes so that you don’t have too:
# update & install wpa_supplicant along with the easy to use wifi-menu
$ pacman -Syyu wpa_supplicant wifi-menu dialog
Finally we got here
If you got to this stage without any errors, crashes or additional reboots — please let me know because you’re probably the one we’ve all been waiting for and I could use you to debug some C. I hope this guide helped you, give me a thumbs up if you liked it and don’t forget to subscribe to my youtube channel /s
$ exit
$ umount -R /mnt
$ reboot
Next steps
There are so many different ways forward from here but I recommend following the Arch general recommendations to secure your system by doing some system administration before you move on to more exciting stuff. If you want to dive into the rabbit hole you should have a look at i3. You can find my Arch + i3 setup guide here.
FAQ
Q: After a Windows update my computer boots directly to Windows instead of grub, how do I fix this?
Windows updates can sometimes mess with your boot partition. To fix this you will need a USB key with the Arch .iso on hand. It’s quite simple to fix if you follow these steps.
- Plug-in the USB key with the Arch .iso
- Boot into BIOS settings and switch from RAID to AHCI
- Boot into Arch
- Reinstall grub by using these commands
Links
[1] This is recommended to guarantee that the file you downloaded hasn’t been tampered with. You shouldn’t compare the checksum of the downloaded .iso with the checksum provided to you in the install since if the torrent or ftp server has been compromised it is likely both image and the checksum will have been modified. To verify the checksum, simply follow these steps:
- open a command line by running
Win key + Rand typingcmdand pressing enter - run
certutil -hashfile C:\path\to\arch-linux.iso MD5and compare the output to the MD5 checksum on the arch download page
[2] As you can see in the output of lsblk I only allocated 1GB for my swap. Since then, I have upgraded this to 8GB. It is also possible to use a swapfile instead of creating a swap partition.
[3] Although this guide is for setting up an encrypted arch linux system it is clear & easy to follow