
Download Article
A step-by-step guide to booting your PC or Mac from an external USB drive
Download Article
This wikiHow teaches you how to have your computer boot from an attached external hard drive rather than from its built-in hard drive. Doing so is useful when attempting to run a different operating system (e.g., Linux) or install a tool that requires your built-in hard drive to be inactive.
-

Skip this step on Mac. If you want to set your computer to boot from an external hard drive, you’ll need to access the BIOS, which is a control panel that you open by pressing repeatedly a key (usually a function key such as F12) as your computer starts up. You can usually find out what key to use by doing the following:[1]
- Open a search engine (e.g., Google).
- Type in your computer’s manufacturer, model name, and the phrase «bios key».
- Press ↵ Enter, then search for a result that matches your search and determine your BIOS key.
- You can also check your computer’s manual (or, if you don’t have the manual, the online documentation for your computer that you can find on the manufacturer’s website).
-
Plug one end of the external hard drive’s USB cable into a free USB port on your computer, then plug the other end of the cable into the external hard drive.
- The external hard drive will usually have an indicator light that blinks slowly or stays constant when your drive is connected.
- On a Mac, you may need to buy a USB to Thunderbolt 3 adapter if you don’t have any USB 3.0 (rectangular) ports.
Advertisement
-
Format the hard drive if necessary. If the hard drive isn’t compatible with your computer out of the box, you may encounter an error message stating that the drive is corrupted or otherwise unreadable. Formatting the drive for your computer’s file system (NTFS for Windows and Mac OS Extended (Journaled) for Mac) will allow you to access the drive.[2]
- When formatting the drive, you can choose exFAT at the file system to make the drive accessible to both Windows and Mac computers.
- Depending on the type of data you plan on putting on the drive, you may have to format it again later. For example, using the Live Linux tool to burn a Linux Disc Image to the external hard drive will automatically format it again.
- Formatting will erase any data that’s already on the drive.
-
You can’t boot from an empty hard drive; in most cases, booting from a hard drive will require you to have a Disc Image (abbreviated to «ISO») file on the hard drive. Examples of ISO files include the ones used to install Linux and Windows.
- Other examples of bootable images include a File History backup on Windows or a Time Machine backup on a Mac.
- Third-party services such as Clonezilla are also bootable.
-
You can usually do this by dragging the ISO file (or other file, if different) into the external hard drive’s window and dropping it there.
- If you’re using a program such as the Windows 10 installation tool or LiveLinux to create your bootable external drive, skip this step.
-
Make the external hard drive bootable. The final step before you can boot from your external hard drive is to tell your computer to view it as a bootable item. You can use Command Prompt (Windows) or Terminal (Mac) to do so.[3]
- If you’re using a program such as LiveLinux to burn an ISO file onto the external hard drive, the hard drive will be made bootable in the process.


Advertisement
-
Your external hard drive’s cable should be connected firmly to both your computer and the external hard drive, and the external hard drive should be in a position where it doesn’t create any tension on the cable.
-
Click the Windows logo in the bottom-left corner of the screen.
-
It’s in the lower-left side of the Start menu. Doing so prompts a pop-up menu.
-
This is in the pop-up menu. Your computer will begin restarting.
-
As soon as your computer’s screen turns off, you’ll need to begin pressing repeatedly the key specified by your computer’s manufacturer.
-
The BIOS is usually a minimal interface with white or colored letters on a blue or black background.
-
Scroll over to the «Boot Order» tab using the right arrow key, or look for the «Boot Order» option in one of the menus on the main page if you don’t see a «Boot Order» tab.
- You may first need to select an Advanced tab to see the «Boot Order» menu.
- The BIOS menu varies from PC to PC, so don’t be afraid to look around for the «Boot Order» section.
-
Find your external hard drive’s name or classification (e.g., External Hard Drive) in the «Boot Order» list, then press the «Down» arrow key until the external hard drive is selected.
- In some cases, you’ll only be able to select USB devices (or similar) in this menu. If so, make sure that your external hard drive is the only USB storage attached to your computer when booting from it.
-
Press the «Move Up» key (usually the + key) as specified by the key legend on the right side of the screen until your hard drive’s name is at the top of the «Boot Order» list.
- In some cases, the key legend will be at the bottom of the screen instead.
-
Usually, you’ll press a key to do this, so check the key legend for a «Save and Exit» option.
- You may need to confirm this step by pressing another key.
-
Once your external hard drive is selected as the boot location, your boot program or service will open; follow the on-screen prompts to open, install, or set up the program or service.[4]
- For example, if you’re installing Linux, you’ll be asked to select a language and country, enter your user information, and so on.
- If you already have an operating system installed and set up on the external hard drive, completing the BIOS setup will open the operating system.


Advertisement
-
Your external hard drive’s cable should be connected firmly to both your computer and the external hard drive, and the external hard drive should be in a position where it doesn’t create any tension on the cable.
-
Click the Apple logo in the top-left corner of the screen. A drop-down menu will appear.
-
It’s in the drop-down menu.
-
Your Mac will begin to restart.
-
Once your Mac’s screen goes black, you can start holding down the ⌥ Option key.
-
You’ll do this until the Startup Manager window opens.
-
This window, which will appear in the middle of the screen, will have a list of your available boot locations.
-
Click your external drive’s name in the Startup Manager window.[5]
-
Click the upward-facing arrow below the external drive. Doing so will prompt your Mac to begin booting from the external hard drive.[6]
-
Once your external hard drive is selected as the boot location, your boot program or service will open; follow the on-screen prompts to open, install, or set up the program or service.
- For example, if you’re installing Linux, you’ll be asked to select a language and country, enter your user information, and so on.
- If you already have an operating system installed and set up on the external hard drive, confirming your hard drive selection will open the operating system.


Advertisement
Add New Question
-
Question
Does my hard drive need to have an OS installed on it?
Yes, an OS is required to boot from an external hard drive.
-
Question
Will my computer boot normally when the hard drive is not connected?
No; the hard drive contains the OS files required.
Ask a Question
200 characters left
Include your email address to get a message when this question is answered.
Submit
Advertisement
Video
-
If you want your Mac to start from your external hard drive by default rather than just once, open System Preferences, click Startup Disk, click the lock icon and enter your login information, select your external hard drive, and click Restart….[7]
Thanks for submitting a tip for review!
Advertisement
-
Unplugging your external hard drive from your computer while booting from it will cause your computer to crash.
Advertisement
About This Article
Thanks to all authors for creating a page that has been read 373,163 times.
Is this article up to date?
«Hi, what’s the best way to make an external hard drive bootable? You see. Like copying all the Windows boot files to it so that I can boot Windows 10 from the bootable drive. Please, an easier way is much more appreciated.»
There are many significant reasons for creating a bootable HDD or USB drive that carries a user’s customized Windows operating system. For example, when your PC unexpectedly shuts down and can be never turned on due to hard disk failure or system corruption, you can still easily start the computer from the bootable drive. A bootable external hard drive also does great help when a computer’s dead or crashed. Besides, with a bootable external USB drive, you can use your own operating system wherever you go and whenever you like. To enjoy these advantages through creating a bootable external hard drive, you have three workable methods to choose from.
Method 1. How to Make an External Hard Drive Bootable with EaseUS OS2Go
Applies to: Windows 11/10/8.1/8/7/Vista/XP (32-bit and 64-bit)
The simplest and quickest way to make an external hard drive bootable is to use the Windows portable creator software — EaseUS OS2Go. It is recognized as the best Windows OS cloning software, Windows To Go USB alternative, bootable USB creation tool and portable Windows USB creator. The software will clone all system files, boot files and other personalized data files to the target drive. Simply prepare your external hard drive in which you’re going to make bootable, and follow the detailed steps below to make an external hard drive bootable in Windows 10 or other supportable OS.
Detailed guide:
Step 1. Install EaseUS OS2Go on your Windows computer, it will display your system drive’s used space. Plug in a USB drive that is larger than the system drive used space. Choose the target USB drive and click Next to continue.

Step 2. EaseUS OS2Go will notify you that the following operation would delete all data on your drive. Make sure that you have backed up all the important data. Click the Continue button to proceed.

Step 3. Adjust disk layout. The default disk layout on the target drive will be exactly the same as the resource drive. You could also edit the layout according to your needs. Tick the option there if you’re using a Solid State Drive as the Windows bootable drive. Next, click Proceed.

Step 4. Then EaseUS OS2Go will start to create the portable USB drive. It usually takes a while depending on your OS and Network condition. When the progress reaches 100%, the USB drive should be bootable now.

Step 5. Insert the portable Windows USB and start your computer. Press the required key (F2, DEL, F10…) to access BIOS. Choose to boot from the USB disk.
Note: Please make sure that the boot mode (UEFI or Legacy) of the portable USB and your target computer are the same, otherwise you may not be able to boot.
In addition to being a bootable HDD/SSD/USB creator for Windows use, EaseUS OS2Go also enables Mac users to run particular Windows apps and games from the bootable external drive. Following are useful posts for Mac users:
- How to Run Windows Apps on Mac
- How to Play Windows Games on Mac
Method 2. Make an External Hard Drive Bootable with CMD
Applies To: Windows 10/8/7
Windows Command Prompt can also be useful method to create a bootable external hard drive in Windows 10, 8 or 7. But compared with method 1, this solution is more complex and is likely to cause a boot failure. Be cautious during this process.
1. Format the external hard drive
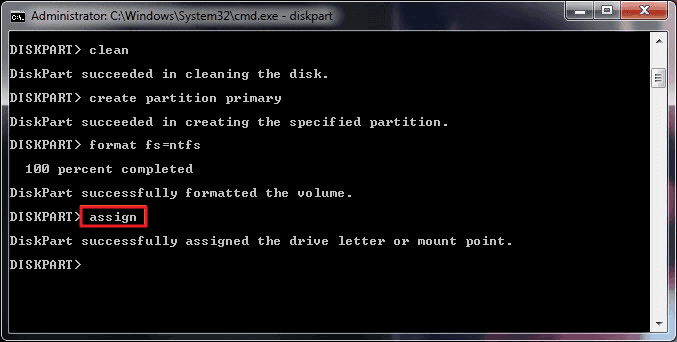
To format a drive using cmd via Command Prompt, follow the diskpart commands below carefully. Try your best to avoid any mistakes.
Step 1. Type cmd in the search box, you can get the best match called Command Prompt. Right-click on it and choose «Run as administrator».
Step 2. On the Command Prompt black window, enter the following commands in the same order here:
- X is the number corresponding to your disk. You have to replace it with the corresponding letter from your own system.
- Press «Enter», every time you enter your command
diskpart
list disk
select disk X
clean
create partition primary
format fs=ntfs
assign
exit
If everything goes well, this is how your cmd screen will look like
2. Copy the Windows 10 installer files
Step1. Insert your Windows DVD into the optical drive. To open «dism.exe» in CMD, open Command Prompt Admin (Windows + X), enter the command in the following:
g:
cd boot
G:\bootbootsect /nt60 d:
- «g» is your DVD drive letter
- «d» is your external drive letter
Step 2. Copy all files from the Windows CD to the drive using xcopy by entering the command in the following:
cd\
G:\xcopy g:\*.* /s/h/f d:\
All those commands are used to make your external hard drive bootable. Select the bootable drive at the Windows startup, it will boot Windows immediately. If you receive a message says: «Could not open the BCD template store. Status = [c000000f]», try the following commands to repair console to rebuild BCD or, you can watch the video to fix your boot problems (BCD problems are included).
attrib c:\boot\bcd –h –r –s
del c:\boot\bcd
bootrec /rebuildbcd
Method 3. Install Windows 10/8 on External Hard Drive with Windows Built-in Feature
Applies To: Windows 10 Enterprise/Education/Pro and Windows 8/8.1 Enterprise
In Windows 10 Enterprise/Education/Pro and Windows 8/8.1 Enterprise, there is a built-in feature that enables you to create a Windows To Go workspace by creating an imaged version of Windows on Windows-compatible external hard drives. However, unlike OS2Go that is available for all Windows versions. This feature is only accessible for Windows 10 Enterprise/Education/Pro and Windows 8/8.1 Enterprise users and only certified USB drives can be made bootable.
Useful post: How to Create Windows To Go USB Without the Enterprise Edition
Requirements for USB Drives:
- Has high random read/write speeds and can run Windows workloads smoothly
- Has been tuned to ensure they boot and run on hardware certified for use with Windows 7 and later
- Is backed with manufacturer warranties and should continue operating under normal usage
If you are using the right Windows version and have a certified external hard drive, you can make the external hard drive bootable. (This process will format your external hard drive, back up your external hard drive in advance.)
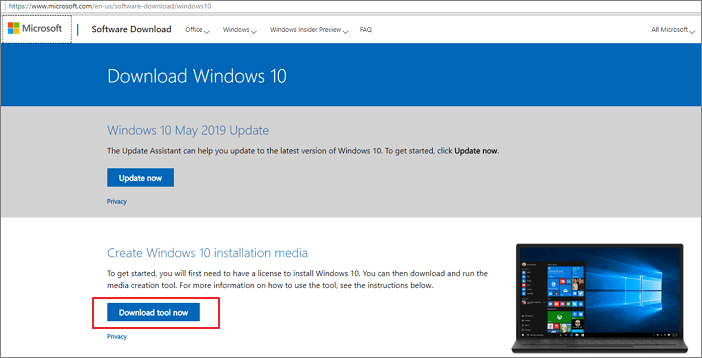
Step 1. Download the related installation ISO file from Microsoft and connect the hard drive to your computer.
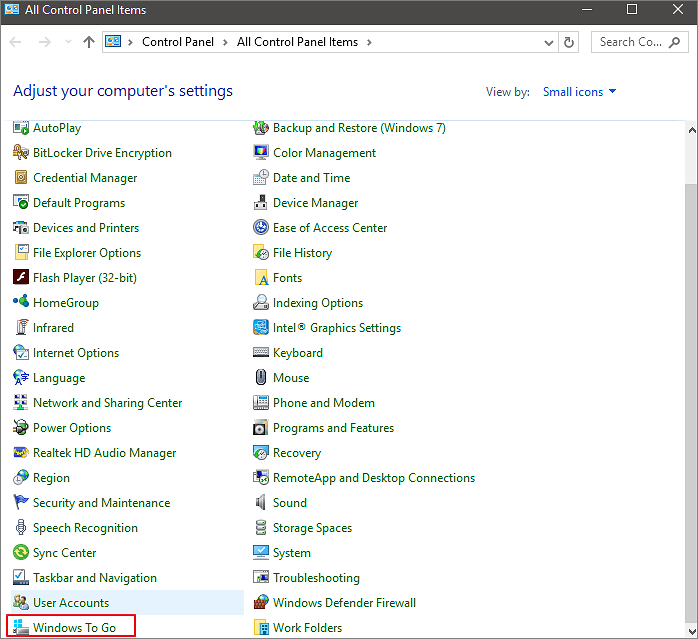
Step 2. Go to «Control Panel» and find «Windows To Go».
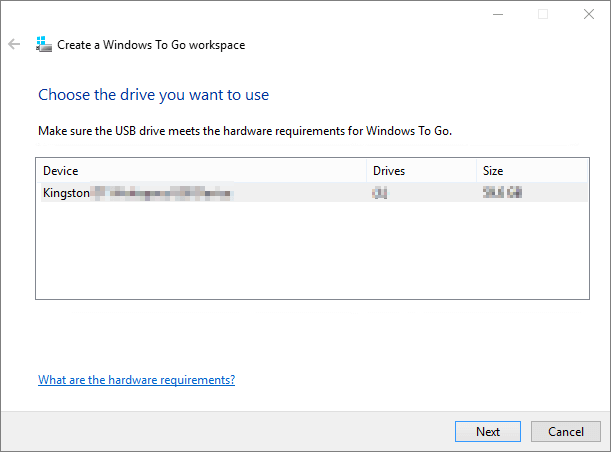
Step 3. Choose the external hard drive and click «Next».
Step 4. Click «Add search location» to search for the ISO file.
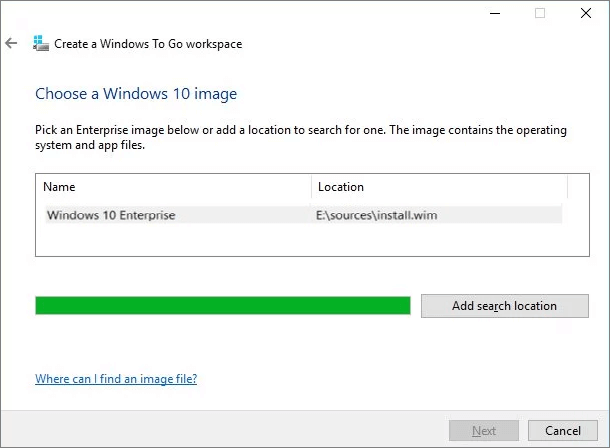
Step 5. Select the ISO file to make the external hard drive bootable.
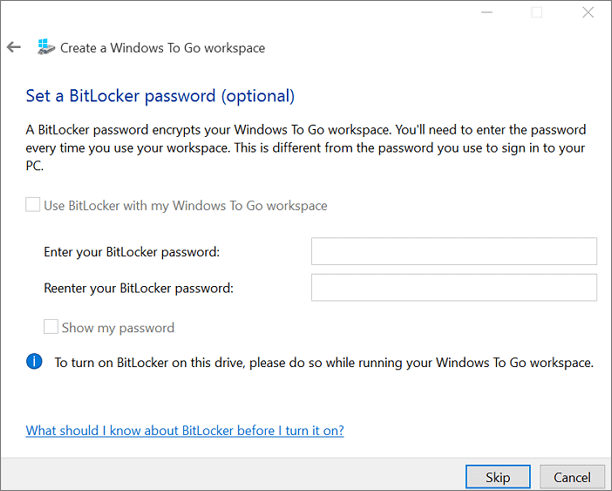
Step 6. Choose whether to use BitLocker or not. If you do, be sure you won’t forget the password.
Step 7. Click «Create» to confirm. (Windows will format your external hard drive during the process. If there is any data you want to recover, learn how to recover data from the external hard drive here.)
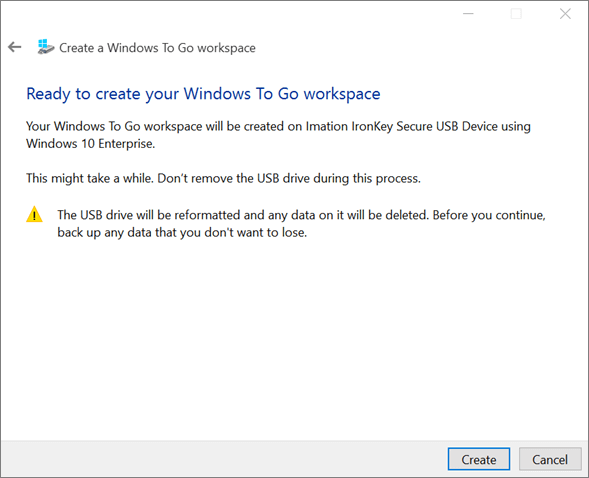
Step 8. Wait for the process to finish. When it’s done, a bootable external hard drive is successfully created.
To Sum Up
Three methods have been used to make the external hard drive bootable, which offers you different choices. Method 1 clones the system to your external disk by means of system cloning. Method 2 copies the startup file on the CD to the external disk by means of the command line. Method 3 uses Windows 10 built-in features. But using Windows 10 built-in features not only has several limitations but also may cause data loss. So if you want a simple and safe solution, choose Method 1. If you have a good knowledge base, three methods are applicable. Br the way, if your drive fails to boot, you can always refer to the video in method 2 to fix the boot problem.
FAQ on Make External Hard Drive Bootable
1. Can you make a bootable external hard drive for Windows 10?
Three methods are available to make a bootable external hard drive for Windows 10. You can use a third-party tool, like EaseUS OS2Go, or use CMD, or install Windows 10/8 on an external hard drive. EaseUS OS2Go is the easiest way among them, you can use it to create a bootable hard drive with a few clicks.
2. How do I make my Seagate external hard drive bootable?
Seagate external hard drives can be made bootable by using a third-party tool or by using CMD. You can read the passage for detailed steps.
Booting from an external hard drive on Windows 11 is a handy trick that lets you load a different operating system or troubleshoot your computer without using the internal drive. To do this, you’ll need to change the boot order in your computer’s BIOS settings. First, connect your external hard drive to your computer. Then, restart your PC and enter the BIOS/UEFI settings during the boot process. Once inside, adjust the boot order to prioritize the external drive. Save these settings, exit the BIOS, and your computer should now boot from the external hard drive.
Booting from an external hard drive can be a game changer when you need to access another OS or fix system issues. Follow these steps to boot your Windows 11 computer from an external hard drive.
Step 1: Prepare the External Hard Drive
Ensure your external hard drive is properly formatted and contains the necessary files or operating system you want to boot from.
Make sure the external hard drive is in a bootable format like NTFS or FAT32. You’ll also need bootable files such as an OS installation image or recovery tools on the drive.
Step 2: Connect the External Hard Drive
Attach the external hard drive to your computer using a USB port.
To ensure a stable connection, use a USB port directly on the computer rather than a USB hub. This minimizes the risk of disconnection during the boot process.
Step 3: Restart Your Computer
Perform a restart of your Windows 11 computer to access the BIOS settings.
It’s essential to restart rather than shut down and power on to ensure any updates are installed correctly before accessing the BIOS.
Step 4: Enter BIOS/UEFI Settings
During the boot process, press the appropriate key to enter BIOS/UEFI settings. This key is often F2, F12, Delete, or ESC.
Check your PC’s documentation or look for a prompt on the screen during startup that indicates which key to press to enter BIOS settings.
Step 5: Change the Boot Order
In the BIOS/UEFI menu, find the Boot Order settings and move the external hard drive to the top of the list.
Use the arrow keys to navigate and adjust the boot order. Save the changes before exiting.
Step 6: Save and Exit BIOS
Confirm your changes and exit the BIOS settings to reboot your computer.
Upon saving and exiting, your computer will restart, and if everything is set correctly, it will boot from the external hard drive.
After you complete these steps, your computer will start loading from the external hard drive instead of the internal one. This allows you to run a different operating system, access recovery tools, or troubleshoot issues.
Tips for Booting from External Hard Drive on Windows 11
- Ensure the external hard drive is bootable and contains the correct files or operating system.
- Use a high-quality USB 3.0 or higher to ensure fast data transfer rates.
- Double-check the BIOS key for your specific computer model to avoid frustration.
- Make sure the external hard drive is securely connected to avoid boot interruptions.
- Keep your BIOS firmware updated to avoid compatibility issues with external drives.
Frequently Asked Questions
What should I do if the external hard drive doesn’t appear in BIOS?
Ensure the drive is securely connected and recognized by the computer. Try using a different USB port or cable.
Can I boot any version of Windows from an external hard drive?
Yes, but you must have a valid license for the Windows version you want to boot from the external drive.
Is it safe to boot from an external hard drive?
Yes, as long as the drive is properly configured and contains legitimate, uncorrupted files.
Will booting from an external drive affect my internal hard drive’s data?
No, booting from an external drive doesn’t affect the data on your internal hard drive unless you deliberately make changes.
Can I use the same external hard drive on different computers?
Yes, but ensure compatibility with each computer’s hardware and BIOS settings.
Summary of Steps
- Prepare the external hard drive with necessary files.
- Connect the drive to the computer.
- Restart the computer.
- Enter BIOS/UEFI settings.
- Change the boot order.
- Save changes and exit BIOS.
Conclusion
Congratulations, you’re now equipped with the know-how to boot from an external hard drive on Windows 11! This skill is an excellent addition to your tech toolkit, whether you’re a seasoned computer user or just getting started. It’s like having a Swiss Army knife for your PC—versatile and ready for any situation. Whether you’re trying to install a fresh operating system, run diagnostics, or fix a pesky problem, booting from an external drive can save the day.
For further reading, consider exploring how to create a bootable external drive using different operating systems or check out advanced BIOS/UEFI settings for more control over your boot process.
Remember, technology is all about trial and error, so don’t be afraid to experiment and learn. Feel free to share this guide with others who might find it useful. Keep exploring, stay curious, and know that with each new skill, you’re demystifying the complex and making it your own. Happy computing!
Matthew Burleigh has been writing tech tutorials since 2008. His writing has appeared on dozens of different websites and been read over 50 million times.
After receiving his Bachelor’s and Master’s degrees in Computer Science he spent several years working in IT management for small businesses. However, he now works full time writing content online and creating websites.
His main writing topics include iPhones, Microsoft Office, Google Apps, Android, and Photoshop, but he has also written about many other tech topics as well.
Read his full bio here.
Introduction
In the realm of computing, flexibility and efficiency are paramount. As technology advances, users often find themselves in need of more storage space, quicker boot times, or even the ability to run alternate operating systems. One of the most practical solutions to these needs is booting from an external hard drive. In this comprehensive guide, we will walk you through the process of booting from an external hard drive on Windows 11, exploring the reasons, prerequisites, and the step-by-step procedure involved.
Understanding Booting from an External Hard Drive
Booting from an external hard drive allows you to run an operating system that is installed on a portable external drive rather than relying solely on the internal drives of your computer. This functionality is especially useful for several reasons:
- Portability: Carry your OS and applications wherever you go.
- Backing Up: A secondary OS can also serve as a robust backup strategy.
- Testing: You can test new operating systems or software without altering your internal configuration.
- Gaming: Some avid gamers prefer using external drives to store games to free up internal storage.
While Windows 11 is designed to work optimally with its internal storage configurations, external drives can yield impressive performance when set up correctly.
Prerequisites for Booting from an External Hard Drive
Before diving into the nitty-gritty details, it’s essential to prepare adequately. Here’s what you need:
1. Compatible External Hard Drive
Ensure you have a reliable external hard drive that is compatible with your system. SSDs are preferred for their speed, but traditional HDDs can also be used. The drive should preferably have a USB 3.0 connection for faster data throughput.
2. A Bootable Version of Windows 11
You’ll need a bootable version of Windows 11 installed on your external hard drive. This can be accomplished using the Microsoft Media Creation Tool or other disk-imaging software.
3. A Computer Capable of Booting from External Drives
Most modern computers support booting from external devices, but some older systems may not. Check your BIOS/UEFI settings to ensure that external devices are selectable as boot sources.
4. Backup Data
Before proceeding, back up important files. Booting from an external drive can sometimes lead to data risk, especially if partitioning is involved or if the system needs a reinstall.
5. USB Ports
Ensure the available USB ports are functioning correctly, as booting from USB requires a stable connection.
Preparing the External Hard Drive
Creating a bootable external hard drive involves several steps. Here’s a detailed overview:
1. Using the Windows Media Creation Tool
Step 1: Download the Tool
- Go to the Microsoft website.
- Download the Media Creation Tool.
Step 2: Run the Tool
- Launch the tool once downloaded.
- Accept the license agreement.
Step 3: Create Installation Media
- Select «Create installation media (USB flash drive, DVD, or ISO file) for another PC» and click Next.
- Choose language, edition, and architecture.
Step 4: Select USB Drive
- Opt for USB flash drive and ensure your external hard drive is connected.
- Choose the external hard drive from the list. (Note: this will erase any existing data on that drive.)
Step 5: Complete the Process
- Allow the tool to download and create the bootable drive. Once done, safely eject the drive.
2. Using Disk Management (Alternative Method)
You can also configure an external hard drive for booting using a software like Rufus or WinToUSB. For this method, follow these steps with Rufus:
Step 1: Download and Install Rufus
- Obtain Rufus from its official website.
- Install and run the application.
Step 2: Select the External Drive
- In Rufus, select the external hard drive as the device.
- Choose the partition scheme (MBR or GPT) that aligns with your system’s firmware (BIOS/UEFI).
Step 3: Select the Windows 11 ISO
- Browse for the Windows 11 ISO file you’ve downloaded.
- Click «Start» to create the bootable disk, which will format the drive.
3. Adjusting Partition Settings
If you are using the external hard drive for additional functionality (like carrying files along with bootable OS), it may require some partitioning. Use Disk Management:
- Right-click on Start and choose Disk Management.
- Locate your external drive, create a new volume, and format it if necessary.
Change BIOS/UEFI Settings to Boot from the External Hard Drive
Once your external hard drive is prepared, it’s time to ensure your computer can recognize it as a bootable device. This requires accessing the BIOS/UEFI firmware settings.
1. Access the BIOS/UEFI
- Restart your computer.
- As the system begins rebooting, repeatedly press the appropriate key for accessing BIOS/UEFI. Common keys include F2, F10, DEL, or ESC (the specific key will typically be displayed briefly during startup).
2. Modify Boot Order
- Look for the Boot Menu or Boot Order section within the BIOS/UEFI interface.
- Change the boot order to prioritize USB or external devices before the internal hard drive.
3. Enable Legacy USB Support (if required)
If disabling Secure Boot is required for some machines, you might need to enable Legacy USB Support:
- Locate the option (usually found under «Security» or «Boot»).
- Change the status to Enabled.
4. Save and Exit
- After making the changes, save the settings and exit the BIOS/UEFI (usually by pressing F10).
Booting from the External Hard Drive
With all the preparations completed and your system set to prioritize USB booting, now it’s time to boot from your external hard drive.
1. Connect the External Hard Drive
- Make sure your external hard drive is connected to a USB port on your computer.
2. Start Your Computer
- Restart your computer. If everything is configured correctly, it should detect the external hard drive as a bootable device.
3. Select the External Drive
- In the boot menu, you might be prompted to choose the boot device. Select your external hard drive.
4. Installation
If the external drive is bootable with Windows 11, you will either see the installation screen (if booting from installation media) or be taken to the operating system directly if it’s a full installation.
Follow the on-screen instructions as needed.
Troubleshooting Common Issues
Despite careful preparation, issues may arise when attempting to boot from an external hard drive. Here are some common problems and their solutions:
1. Drive Not Recognized
- Ensure that the drive is properly connected.
- Try using different USB ports.
- Check if the external drive is working on another computer.
2. Boot Menu Not Displayed
- Confirm BIOS/UEFI settings were saved correctly.
- Restart and try hitting the boot menu key repeatedly.
3. Installation Fails
- If there’s a problem with the bootable media itself, recreate it using the tools mentioned.
- Make sure you’re using a compatible version of Windows.
4. Secure Boot Issues
If using UEFI mode, you may need to disable Secure Boot. This setting can limit external devices from being used as boot options.
Conclusion
Booting from an external hard drive can significantly enhance your computing experience by offering flexibility, convenience, and additional functionality. Although the setup process may seem daunting, following these steps diligently will allow you to successfully create a bootable external drive for Windows 11. Whether you aim to test new configurations, enhance your gaming experience, or have a portable OS, this method presents numerous opportunities.
By preparing meticulously, understanding your BIOS settings, and troubleshooting effectively, you can maximize the use of your external hard drives in a Windows 11 environment. As technology continues to evolve, such tactics stand to pave the way for more robust solutions in computing, ensuring that you remain ahead in the ever-changing landscape of technology.