
Last Updated :
29 Aug, 2024
Renaming multiple files individually can be a time-consuming task, especially when you have a large number of images or other files to manage. Fortunately, Windows offers several methods to batch rename files efficiently. Whether you need to batch rename images on Windows or organize other types of files, this article will walk you through the most effective ways to rename files in bulk.
By following the steps provided, you’ll be able to quickly and easily batch rename files on Windows without the need for additional software.
Table of Content
- Why Batch Rename?
- Steps to Batch Rename By File Explorer
- Steps Batch Rename By PowerRename
- Built-in Tools: Exploring Windows Explorer
- Advanced Renaming: Leveraging Third-Party Software
- Best Practices for Batch Renaming
- How to Batch Rename Images (or other Files) on Windows — FAQs
Why Batch Rename?
Imagine you have a folder with hundreds of images in it. Each file is named in a way, that provides a little context. Manually renaming the reach file to include relevant details such as location, date, and event can be difficult and time-consuming. This is where batch renaming comes into the picture, it enables you to automate the process and describe the filename across all your files.
Steps to Batch Rename By File Explorer
Step 1: Select all the images from Windows Explorer to rename by pressing the CTRL key and select one by one.
Step 2: Right-click on the image and click on «Rename» then enter the name and click Enter.
.png)
Step 3: Now your all files are saved with similar name and withe the some serial number.
.png)
Steps Batch Rename By PowerRename
Step 1: Select images by pressing CTRL and image one by one.
Step 2: Right Click on the image.
.png)
Step 3: Click on the «Rename with PowerRename».
.png)
Step 4: Enter the current image name and what you want to make change.
.png)
Step 5: Click on Apply Button.
.png)
Windows Explorer or File Explorer the default file management tool in Windows, offers basic batch renaming functionality that caters to most users’ needs. Here’s how to utilize it:
- Select Multiple Files: Navigate to the folder containing the files you wish to rename. Hold down the Ctrl key on your keyboard and click on each file you want to include in the batch renaming process.
- Rename Files: Once the files are selected, right-click on one of them and choose «Rename» from the context menu. This action allows you to modify the filename of the first selected file.
- Apply to All Files: After entering the desired filename, press Enter to apply the change to the selected file. Windows automatically increments the filenames of the remaining selected files, appending a number within parentheses to maintain uniqueness.
While Windows Explorer’s built-in renaming feature is convenient for basic tasks, it lacks advanced options for customizing filenames and may not suffice for more complex renaming requirements.
Advanced Renaming: Leveraging Third-Party Software
For users seeking more control and flexibility over their batch renaming tasks, several third-party software solutions offer comprehensive features and intuitive interfaces. One popular option is Advanced Renamer, a free program designed specifically for batch renaming files on Windows.
- Download and Install: Begin by downloading and installing Advanced Renamer from the developer’s website. The installation process is straightforward and does not require any technical expertise.
- Add Files: Launch Advanced Renamer and navigate to the folder containing the files you wish to rename. Drag and drop the files into the program’s main window to add them to the list.
- Configure Renaming Rules: Advanced Renamer provides various renaming methods, including text replacement, insertion of metadata, numbering, and case conversion. Choose the desired renaming methods and configure the settings according to your preferences.
Preview and Execute: Before applying the renaming changes, use the preview feature to ensure that the new filenames meet your requirements. Once satisfied, click on the «Start Batch» button to execute the renaming process.
Best Practices for Batch Renaming
Regardless of the method or tool you choose, adhering to best practices can enhance the efficiency and accuracy of your batch renaming endeavors:
- Plan Ahead: Before initiating the renaming process, carefully consider the desired naming convention and organizational structure to ensure consistency and clarity.
- Backup Files: It’s always prudent to create a backup of your files before performing batch renaming operations, especially when using third-party software.
- Test with a Subset: When dealing with a large number of files, test the renaming process with a small subset to verify the desired outcome before applying changes to the entire dataset.
- Use Descriptive Names: Incorporate relevant details such as dates, locations, or keywords into filenames to facilitate easier identification and retrieval in the future.
- Avoid Special Characters: Steer clear of special characters, symbols, or reserved characters in filenames to prevent compatibility issues across different platforms and applications.
Conclusion
With the right approach, batch renaming files on Windows can be a simple and straightforward process. Whether you’re using built-in tools or exploring third-party utilities, the ability to rename multiple files in Windows at once can save you a significant amount of time. We hope this guide has helped you understand how to batch rename images or other files effectively. Start organizing your files today and take advantage of these efficient methods.
Also Read
- Rename Multiple Files Using Python
- How to Rename File in Linux | rename Command
- How to Rename Files and Folders Using CMD?

Renaming files one by one might not take much time if there are only a few files. However, if you need to rename multiple miles, you definitely want to batch or bulk rename the files.
So we have created this article to help provide you with different methods to rename your files in bulk. They provide different options, so we advise you to go through all of them and pick one according to your preference.
Why Batch Rename Files?
There are many reasons why you may want to batch rename files, such as:
- Many files available on the internet have generic or indistinguishable filenames.
- The default filenames of photos or videos captured by cameras use the date and time to create names, which you may want to change.
- Organizing your files, for instance, renaming music files to listen to them in the order you prefer.
- Uploading or transferring multiple files on a platform with a different naming convention.
How to Batch Rename Files in Windows
There are a few ways to batch rename files in Windows. You can either use the limited GUI rename ability or use the Command-line Interfaces for more options. There are dedicated naming applications available on the internet, along with Microsoft’s own PowerRename utility.
People usually want to rename files in the following manner:
- Replacing or removing parts of a file.
- Changing extensions.
- Adding a sequence of numbers to the file.
- Changing case or capitalization.
- Naming files based on input from a text file.
So, we have explained how you can perform these tasks in detail in the following subsections:
Using File Explorer’s Rename Feature
The first method to batch rename files in Windows is the one most users are familiar with, i.e., using the File Explorer’s rename feature.
However, keep in mind that it provides very limited options on the names you can set. To explain more, all the renamed files will have the same file name along with ascending numbers inside parenthesis.
To rename the files,
- Make sure all the files you want to rename are in the necessary order.
- Select all the files and right-click on the first item.
- Click Rename or Show more options > Rename.
- Type the new filename and press Enter.
 14")
 14")
Using PowerRename Feature of PowerToys
PowerToys is a Microsoft Developed Tool that you can use to perform varieties of extended functions on your Windows system. One of the utilities included in the PowerToys package is the PowerRename utility.
It helps bulk rename your files while providing advanced options for searching and replacing the name parts.
To use it to batch rename your file,
- Download and install PowerToys from Microsoft’s Platform.
- Open the File Explorer and navigate to the files you want to rename.
- Select all such files and choose PowerRename or Show more options > PowerRename.
- Select the options you want and click Apply.
 15")
 15")
There are many options you can use with this utility, such as:
- Searching and replacing characters on the filename.
- Changing the case style of the names.
- Adding sequential numbers to the end of the names.
- Adding date and time information in a different format to the names. (Click on the ‘i’ icon next to the Replace with the textbox)
- By enabling Use regular expressions, you can use specific wildcards on the Search for the textbox (click on the ‘i’ icon next to this box)
Using Command Prompt
You can also use the Command Prompt command ren or rename to batch rename files in Windows. The syntax for the command is, ren [<drive>:][<path>]<filename1> <filename2> where, the parameters in the brackets ([ ]) are optional.
There are more than one ways to rename files using this command. Moreover, you can also use such commands as a batch script for future uses.
First, open the Command Prompt and change your directory to the folder whose files you wish to rename. To do so,
- Open Run and enter
cmdto open Command Prompt. - Enter
cd /d <full path of the folder>while replacing the full path.
You can also open the folder in the File explorer and enter cmd on its address bar to open the Command Prompt directly at the working path.
Then, apply the steps below depending on how you want to rename the files.
Rename Extension
- To rename an extension, you can use the following command:
ren *.<ext 1> *.<ext 2>
You can replace <ext 1> and <ext 2> as per your need. For example,ren *.png *.jpg 16")
- Similarly, to remove an extension. the command is
ren *.<ext> * - And, to add an extension, use ren
*. *.<ext>
 16")
Note: Please bear in mind that the above command only changes the name of the extension but not the encoding of the file.
Removing the Initial Characters
Many users think it’s a bug, however, you can remove the initial characters from the filenames in the following manner:
- The command is
ren “*.*” “<slashes>*.*”
For example, to remove the first three characters, the command isren “*.*” “///*.*” - Keep in mind that both the filenames must be enclosed in quotes.
- However, it doesn’t remove the ‘.’ icon and the truncating process stops after the point is reached no matter how many forward slashes you use. For example,
ren “*.*” “///////*.*”renamesabc.b.c.txtto.b.c.txt
Removing Parts of the Filename
It is possible to remove parts of a filename if the parts are separated by delimiters, such as space, tab, or a non-alphanumeric symbol. It helps you rename some of the portions separated by the delimiters as the new name.
In the filename abc_def xyz.txt, the underscore ‘_’, the space ‘ ’ and the point ‘.’ are the delimiters.
However, you can’t use the parts of the filename that are not separated by such delimiters as the new filename.
Let’s take an example of removing the parts on the filenames where the delimiter is an underscore “_”.
If there’s only one underscore, you can remove everything before the underscore by using the command below:
for /f "tokens=1,2,* delims=_" %F in ('dir /b "*_*"') do ren "%F_%G" "%G"
 17")
where,
- delims specifies the delimiter for this process, in this case, the underscore “_”.
- tokens specify which parts of the filename to assign new variables.
- In this case, where
tokens=1,2,*and the starting variable is %F, the command assigns the two parts of the filename to variables %F and %G respectively. - You can use other variables in place of F as well.
If there are multiple underscores, such as a_b_c.txt, to remove everything except the parts after the last underscore,
The command is,
for /f "tokens=1,2,3,* delims=_" %F in ('dir /b "*_*_*"') do ren "%F_%G_%H" "%H"
 18")
Here, tokens 1, 2, and 3 take the three portions of the filename separated by the two _ and set them to %F, %G, and %H in order. Then, it renames %F_%G_%H to %H only.
Similarly, you can rename it to other parts of the filenames, such as %F or %G (second part) by replacing the last part of the command. However, this removes the extension as well.
You can also specify multiple delimiters. For example, if we want to batch rename files in the form of a_b-c.txt to a.txt, we can enter
for /f "tokens=1,2,3,4,* delims=_-." %F in ('dir /b "*_*-*.*"') do ren "%F_%G-%H.%I" "%F.%I"
where %F, %G, %H, %I take a,b,c and txt respectively.
However, you should keep in mind that you can’t use the same name for multiple files. So if this method results in renaming more than one file to the same name, the command loop stops immediately.
Also, if you want to use the for-loop in a batch script, you need to replace the ‘%’ sign with two % signs. For instance, you need to replace the variable %F with %%F. For more information on using for-loop in Command Prompt, refer to the for Microsoft Documentation.
Appending Characters at Start or End
If you think that using the ‘*’ or the ‘?’ wildcards allows appending characters to the name, you would be incorrect. For instance, using ren *.mp3 ab*.mp3 does not rename file.mp3 to abfile.mo3, but to able.mp3. So you need a different method.
This method uses a similar command syntax as the above method. Usually, you can use it to append some characters at the start or the end of the filename. However, if there are other delimiters in the filename, you can also add characters to the start or the end of these delimiters.
Let’s use a simple example,
- To rename
a.txttofile a name.txt, the command isfor /f "tokens=1,2,* delims=." %F in ('dir /b "*.*"') do ren "%F.%G" "file %F name.%G"
- You can similarly add characters at only the start or only the end.
 19")
Together with the above method (using part of a filename), appending characters to the name offers high customization for batch renaming files in Windows.
Appending Sequential Numbers
The above method only allows adding the same sets of characters to the filenames. If you want to append sequential numbers to the files, you need to use a batch file. Follow the steps below to do so,
- Open Run and enter
notepadto open Notepad. - Enter the script given below while replacing the components as we have directed.
- Press Ctrl + Shift + S to Save As the file with different extension.
- Set the Save as type to All files and File name to any name you want with a
.batextension, e.g,rename_sequence.bat 20")
- Move the batch file to the location of the files you wish to rename.
- Run the script by double-clicking on it.
 20")
setlocal enabledelayedexpansion
set /a Number=1

for /r %%F in (*.txt) do (
    ren "%%F" "%%~nF !Number!.txt"
    set /a Number+=1
)
endlocal
Here,
- You need to replace
.txtwith the extension of the files you wish to rename. Don’t use the wildcard * for the extension as you need to place the batch file in the same folder. So, if you use the wildcard, the command also includes the batch file while renaming the files. - The Number variable works as a counter starting from 1 that you append to the file. You can replace it with the starting number of your choice.
- The
%%~nF !Number!adds a space and the sequential number to the files. You can place!Number!anywhere in the new filename as your preference. %%~nFexpands %%F to the filename without the path and extension. If you just use,%%F, it will include the extension as well as the path of the files resulting in an error.- The command
setlocal enabledelayedexpansionallows using multiple commands on the for-loop. If you don’t enter it, the value of Number won’t change in the successive executions.
Together with the previous methods, you can take out some parts of the filename and add numbers to it for easier recognition and organization. For example, 11001.picfile.2022198.1211.png and 11001.picfile.2022198.1215.png to picfile 1.png and picfile 2.png
Moreover, if you want to use numbers with 0 at the start like 01, 02, 03, etc., you need to add conditions on the script, such as:
setlocal enabledelayedexpansion
set /a Number=1

for /r %%F in (*.txt) do (
    if !Number! lss 10 (
        ren "%%F" "%%~nF 0!Number!.txt"
    ) else (
        ren "%%F" "%%~nF !Number!.txt"
    )
    set /a Number+=1
)
endlocal
Similarly, for 001, 002, 003, etc., number format, use the else if branch to append 00 if less than 10 and append 0 if less than 100.
Taking Input From Text File
It is also possible to batch rename files by taking inputs from a text file. You also need to use a batch script for this method.
- First, create a text file with the new filenames in each line. In our example, the file is
filename.txt. - Make sure the files you wish to rename are in the correct order. Arbitrarily rename them if they aren’t.
- Use the steps from the above method to make the
.batfile with the script below (after making changes as necessary) and run it.
 21")
setlocal EnableDelayedExpansion

< filename.txt (
    for %%F in (*.mp3) do (
        set /P name=
        ren "%%F" "!name!.mp3"
    )
)
endlocal- Here, the
filename.txtincludes the name for all the files and you can change the extension.mp3to the one you need. - Also, if you are renaming
.txtfiles, you need to add a condition to avoid renaming thefilename.txtfile. The complete script is,
setlocal EnableDelayedExpansion

< filename.txt (
    for %%F in (*.txt) do (
        if NOT %%F==filename.txt (
            set /P name=
            ren "%%F" "!name!.txt"
        )
    )
)
endlocal
Convert to Uppercase or Lowercase
It is very easy to convert all letters to lowercase. The command is:
for /f "Tokens=*" %f in ('dir /l /b /a-d') do (ren "%f" "%f"),
where, the /l flag gives the directory’s files in lowercase, causing the ren command to use lowercase for all files. Windows Command line is not case-sensitive so it thinks both uppercase and lowercase are the same characters, making it possible to use this replacement.
However, the dir command does not have any flags for providing the filenames in uppercase. So you need to use the following batch script using the steps in the Adding Sequential Numbers method:
setlocal enableDelayedExpansion

for %%F in (*.mp3) do (
   set "name=%%~nF"
   for %%I in (A B C D E F G H I J K L M N O P Q R S T U V W X Y Z) do (
      set "name=!name:%%I=%%I!"
   )
    ren "%%f" "!name!%%~xF" >nul 2>&
)
endlocal
You should change .mp3 to the extension of your files.
This script doesn’t change the case of the extensions. However, if you also want to change the extensions to uppercase, replace:
name=%%~nFwithname=%%F!name!%%~xFwith!name!
Wildcard Behavior in Rename Command
As we mentioned earlier, the * and ? wildcards do not behave as you would normally think if you use them on both the source and the destination filenames
A superuser forum user dbenham has explained this behavior in detail in the forum. We recommend you check the forum page to get the complete information.
Using Windows PowerShell
Windows PowerShell is a very powerful Command-line Interface that provides more options and functionalities.
Similar to Command Prompt, first, type powershell on the address bar of the folder whose files you need to rename and press Enter. Or you can open Windows PowerShell in any other way and change to the directory.
After that, apply the methods below depending on how you want to batch rename the files.
Rename Extension
- The Windows PowerShell command to batch rename extension is:
Get-ChildItem *.<ext 1> | Rename-Item -NewName { $_.Name -replace ".<ext 1>",".<ext 2>" } - Similarly, you can put just
"."in place of".<ext 2>"to remove the extension. - To add an extension, use the command
Get-ChildItem *.<ext> | Rename-Item -NewName { $_.Name + ".<ext>" }
You can use the End-of-file (eof) character $ after the old extension to only allow the last instance of the extension to change. For example,
Get-ChildItem *.jpg | Rename-Item -NewName { $_.Name -replace ".jpg",".png" }changesa.jpg.jpgtoa.png.pngGet-ChildItem *.jpg | Rename-Item -NewName { $_.Name -replace ".jpg$",".png" }changesa.jpg.jpgtoa.jpg.png
There’s also another way to rename the extension, which uses the System.IO class. The syntax for this method is:
Get-ChildItem *.<old ext> | Rename-Item -NewName { [io.path]::ChangeExtension($_.Name, ".<new ext>") 22")
 22")
You can also use the -Recurse flag for Get-ChildItem to allow the command to work on all the files in the working directory’s subfolders.
Removing or Replacing Specific Characters
Unlike Command Prompt, in PowerShell, you normally use the character replacing operator -replace to rename files. So, you can directly replace particular sets of adjacent characters with a new one or set the replacement to an empty value to remove the characters.
For example, to rename file 01.mp3 to Music01.mp3, you can use the command:
Get-ChildItem *.mp3 | Rename-Item -NewName { $_.Name -replace "file ","Music" }
Removing or Replacing Characters at Any Position
To replace characters at any position in Windows PowerShell, you can use the command:
Get-ChildItem *.<ext> | Rename-Item -NewName { $_.Name.SubString(<StartIndex>,<Length of Characters>) }
while replacing the following portions:
- <StartIndex> with the position you want to start for the new filename.
- <Length of Characters> with the length you want for the new filename.
For instance, Get-ChildItem *.mp3 | Rename-Item -NewName { $_.Name.substring(2,$_.Name.length-5) } renames abcdefgh.mp3 to cdefgh
A filename’s first position is zero, so the character of the new name starts from the third character. And the length is determined from the final position, which is 11 including the extension. So you are taking 11-5=6 characters to form the new name.
You need to take note of the extension length in this method. You can directly add the extension in the command to avoid having to change it again. To do so, the command for the example would be:
Get-ChildItem *.mp3 | Rename-Item -NewName { $_.Name.substring(2,$_.Name.length-5) + “.mp3” } 23")
 23")
Appending Characters at the Start or the End
Appending the characters is more convenient with PowerShell than Command Prompt, specifically because you can use the ‘+’ operator to add the names and $_.Name value to get the original filename.
- The command is something like the following:
Get-ChildItem *.<ext> | Rename-Item -NewName { “Starting Appending Part” + $_.Name + “Ending Appending Part" } - However, to append on the end part of the name excluding the extension, you need to use the
$_.BaseNameand$_.Extensionvariables in the following manner:Get-ChildItem *.<ext> | Rename-Item -NewName { “Starting Appending Part” + $_.BaseName + “Ending Appending Part" + $_.Extension } 24")
 24")
Appending Sequential Numbers
Similar to the above methods, it is much easier to append sequential numbers on PowerShell. Here’s how you can do so:
- On PowerShell, type
$i = 1and press Enter to set the counter value. You can change it to the number you want the sequence to start at. - Then, enter
Get-ChildItem *.<ext> | Foreach-Object {Rename-Item $_ -NewName ($_.BaseName + “ {0:D3}” + $_.Extension ) } 25")
 25")
You can replace D3 with how many digits you want. For instance, {0:D3} appends the three-digit numbers: 001, 002, and so on.
You can also place the number anywhere on the name.
Taking Input From Text File
Taking input from a text file is slightly more complex, so the best way to do so using this Command Line is by creating a PowerShell script. Here’s how you can do so:
- Open Run and enter
notepad. - Copy and Paste the script below while changing the relevant components as we have directed.
- Press Ctrl + Shift + S.
- Set the Save as type to All files and File name to any name you want with a
.ps1extension, e.g,rename_from_text.ps1 - Move the batch file to the location of the files you wish to rename.
- Create another text file where each lines contains the new name for the files in order. Save it as a text file (
.txt) on the same location. In the example, we have usedfilename.txt - Run the PowerShell script by right-clicking on it and selecting Run with PowerShell.
$FilesToChange = Get-ChildItem *.mp3
$NameFile = Get-Content filename.txt
if($FilesToChange.FullName.Count -eq $NameFile.Count)
{
    for($i=0; $i -lt $NameFile.Count; $i++)
    {
        Rename-Item -Path $FilesToChange.FullName[$i] -NewName ($NameFile[$i]+".mp3")
    }
}
Note: If you get the Cannot Be Loaded Because Running Scripts Is Disabled On This System error message, open PowerShell as admin and enter the command:
Set-ExecutionPolicy -Scope CurrentUser -ExecutionPolicy RemoteSigned
You need to change .mp3 to the extension of your files and filename.txt to the text file with the list.
If you want to convert the names of text files, you need to add a condition to the script. The complete script is:
$FilesToChange = Get-ChildItem *.mp3
$NameFile = Get-Content filename.txt
$j=0
if($FilesToChange.FullName.Count -eq $NameFile.Count)
{
    for($i=0; $i -lt $NameFile.Count; $i++)
    {
        if ($FilesToChange.BaseName[$i]+$FilesToChange.Extension[$i] -eq "a.mp3")
        {
            continue
        }
        Rename-Item -Path $FilesToChange.FullName[$i] -NewName ($NameFile[$j]+".mp3")
        $j++
    }
}
Convert to Uppercase or Lowercase
Here are the commands you can use to change the case of your files:
- To Change All to Lowercase
Get-ChildItem | Rename-Item -NewName {$_.BaseName.ToLower() + $_.Extension.ToLower()}
- To Change All to Uppercase
Get-ChildItem | Rename-Item -NewName {$_.BaseName.ToUpper() + $_.Extension.ToUpper()} - To Change The Name Without Extension to Uppercase
Get-ChildItem | Rename-Item -NewName {$_.BaseName.ToUpper() + $_.Extension.ToLower()}
 26")
Using Third Party Tools
Many third-party tools like Bulk Rename Utility, File Renamer Basic, Advanced Renamer, etc., are available on the internet, which you can use to batch rename your files. These apps provide more customization and features compared to the PowerRename Utility.
You can download and use any one of them by following the tutorials from their official website.
The following article will teach how to rename multiple files in a folder with the bulk method using Command Line (CMD). Besides the CMD, we will show how you can do it using Powershell and VBS Script. Together with them, we will play using some tricks like how to trim multiple names or add a prefix to file names. Just in case if you want to do this for a single file check our previous article – “script rename file using Command Line”.
Bulk File Rename on Windows
Use Windows Explorer to rename files
Before we move to the commands ant batch, let’s see how we can rename multiple files at once in bulk using file explore.
You can simply use Windows Explorer to rename files If you don’t have a fancy renaming task at hand, or don’t want to install anything.
- Copy all the files which you want to rename, in a single folder.
- Highlight each file which you want to rename. Press Ctrl+A to highlight them all, if not, then press and hold Ctrl and click on each file you want to highlight.
- Once all the files are highlighted, right-click on the first file and click on “Rename” (press F2 to rename the file without making more actions).
Note! Arrange them properly if you want to provide any specific order. Do this task before renaming. The renaming process will start from the first selected file and end on the last with proper numbering sequence.
- Just enter the name which you would like to give and press enter. All the files will be given the same name with a numbering sequel in the end. It’s a pity that Windows is adding spaces, and ( ) characters in names, instead of having a simple _number option. Below we will teach how you can remove the space and other characters that you don’t want in the naming.
How to batch rename multiple files in bulk using CMD
- Open Start.
- Search for Command Prompt and click the result to open the app.
- Type the below command to navigate to the folder where are located the files you want to rename and press Enter:
cd c:\TestPath
- Type the following command to rename multiple files in bulk and press Enter:
rename *.FILE-EXTENSION ???-FILE-NAME.*
In the command, the wildcard ”*” tells the rename command to rename everything with a “.txt” extension. The “?” is also a wildcard, but it represents a character of the original file name.
This command example renames all “.txt” files in the target folder leaving the first three letters (which works as a unique identifier to avoid duplication) and appends “-Test1” to the name:
rename *.txt ???-Test1.*
How to create a simple batch script to rename all files in a folder
If you are going to automate the above activities or to execute over the network you will need to create a batch file. For example, you need to rename all files in a folder located on all computers of the network:
- Open a notepad file
- Copy the below command
@echo off
rename “c:\*.txt” “???-Test1.*”
- Save as rename.bat
- Execute the file and all the changes will be done
Note! On this file, you can change the “rename “c:\*.txt” “???-Test1.*” command with the command you want, based on the task you want to archive described in this article.
You can use the batch files for many other simple actions like to delete files in bulk or to delete folders.
How to add a prefix to file names in batch
If you want to add any prefix to file names, it can be done as in the below example. Here we try to add ‘Work’ to every txt file in the current folder and subfolders.
forfiles /S /M *.txt /C "cmd /c rename @file Work@file"
Similarly, we can add a number to a file name.
forfiles /S /M *.txt /C "cmd /c rename @file 112@file"
How to Handling names with white spaces
If the new name you want to assign to the files has white space within it, it can be done by adding double quotes around the file name. So that forfiles does not misinterpret these double-quotes, you need to escape them with ‘\’
For example, to add ” – pic.txt” to each of the jpg files, the command would be as below.
forfiles /M *.txt /C "cmd /c rename @file \"@fname - pic.txt\""
How to create vbs script to rename multiple files in bulk
Consider a case like in the example image above where you have a folder of many images each named Copy of and then a word or two, like Copy of Black Tea.jpg.
Instead of manually renaming each file to delete “Copy of” or to change those words to something else, you could run a vbs script to do all the renaming for you. To create it follow the steps:
- Open a notepad file
- Copy the below command
Set objFso = CreateObject(“Scripting.FileSystemObject”)
Set Folder = objFSO.GetFolder(“Path”)
For Each File In Folder.Files
    sNewFile = File.Name
    sNewFile = Replace(sNewFile,”ORIGINAL”,”REPLACEMENT”)
    if (sNewFile<>File.Name) then
        File.Move(File.ParentFolder+”\”+sNewFile)
    end if
Next
- Edit the file rename script to make it apply to your unique situation.
You need to change the text called “Path” to the folder name where your soon-to-be-renamed files are located. In our example c:\Test\
To make the script always apply to the folder it’s currently located in, just change the path to .\.
Also, change ORIGINAL to the characters you want to replace, and delete REPLACEMENT so that you can enter the text that should replace the original characters.
Note: Make sure you keep the quotes in every instance you see them. They need to remain in the folder path and the replace section.
- Save as rename.vbs
- Execute the VBS file to apply the script.
How to Trim Multiple Names
Here is how to trim multiple names simultaneously if you want to make the file names shorter.
For instance, you may have .txt files that you need to trim with names that have already been customized. Inside the target directory, you can add the “ren*.* ?????.*” function. This function will trim the original photos to the number of characters designated by the question marks.
This example will turn a file named “test1_test.txt” into “test1.txt” Of course, if the file name is six characters or less in length, it will remain the same. This is useful where short file names are a better option than long ones.
To make long file names shorter with Command Prompt, use these steps:
- Open Start.
- Search for Command Prompt and click the top result to open the app.
- Type the following command example to navigate to the folder with the files you want to rename and press Enter:
cd c:\TestPath
- Type the following command to make file names shorter and press Enter:
ren *.* CHARACTER-COUNT.*
In the command, the wildcard “*” matches all the file names and extensions in the folder, and the wildcard “?” indicates how many characters to use for the new file name.
This example trims the file names longer than five characters:
ren *.* ?????.*
If the file name is less than five characters, then the name will not change. (If you want to make the file name longer, add extra question marks.)
Once you complete these steps, you’ll end up with shorter file names depending on the question marks (?) you specified in the command.
How to Modify Multiple Names
If you want to rename a specific part of multiple filenames with similar names, here’s how to do it. For example to rename multiple filenames that all start with “Testing_2020” so that they start with “Test_20”
- Open Start.
- Search for Command Prompt and click the top result to open the app.
- Type the following command example to navigate to the folder with the files you want to rename and press Enter:
cd c:\TestPath
- Type the following command to make file names shorter and press Enter:
ren Testing_2020*.* Test_20*.*
This is a handy command for shortening file names.
How to Change Files with Specific Extensions
Now suppose that you have multiple file types within a folder and you want to rename only the ones with the .txt extension. This is very easy on command Prompt. Let us say that you want to rename all files titled “Testing_2020” to “Test_20,” but only those with the .txt extension. Then, type:
ren Testing_2020*.txt Test_20*.txt.
This command will rename all said filenames, like the one above, but it will only do so for .txt files.
How to Change Extensions of multiply files in bulk
Sometimes, you may want to change file extensions for multiple files. You could do this by using the above-mentioned function that allows you to change name parts, but there is an easier way to go about things here.
Once in the desired directory, type in “ren *.txt *.xml” to change all .txt files to .xml files. We have described this better in the following article here.
Powershell rename multiple files at once
- Open Start.
- Search for PowerShell and click the top result to open the app.
- Type the following command to rename a single file and press Enter:
Dir | Rename-Item –NewName { $_.name –replace “ “,”_” }
- The command replaces blank spaces with underscores (_).
This feature offers the most options, but using this method can by time-consuming, and complicated for beginners, which is why we assume that most users will skip this solution.
There you go, PowerShell is the most powerful tool for renaming multiple files in Windows 10. You can experiment with various options and commands, in case you have some free time, and want to learn more about this tool.
Other PowerShell commands:
To replace open bracket:
dir | rename-item -NewName {$_.name -replace [Regex]::Escape("("),""}
To replace close bracket:
dir | rename-item -NewName {$_.name -replace [Regex]::Escape(")"),""}
Conclusion:
So those are the trick to save your daily time and to rename multiple files in folder with the bulk methods. Using CMD, Powershell, or VBS Script. Let’s hope that you find and customize your needs.
-
Home
-
Partition Magic
- 3 Easy Ways to Batch Rename Multiple Files in Windows 10
By Amanda |
Last Updated
Do you want to rename a bunch of files without performing the operation of renaming on them one by one? Don’t worry. In this post, MiniTool will introduce 3 feasible methods to batch rename multiple files in Windows 10.
When you get multiple files to rename, you might choose to change the file names one by one if there are small number of files.
Then how about a huge number of files? For example, after transferring your photos from camera SD card to your computer, you might want to change the default names of these photos. However, the photos in camera are commonly over hundred.
Such a time-consuming task! Now, you might choose to download a third-party bulk rename utility to help you complete this tedious operation.
Actually, Windows provides 3 ways to quickly change the name of multiple files. You can batch rename files under the same folder either in File Explorer or using Command Prompt or PowerShell.
Batch Rename Files in File Explorer
To rename multiple files in Windows 10, it should be the easiest way to use File Explorer.
With File Explorer, you can rename a bunch of files in the same folder with totally different names or names with the same structure. Here are the detailed steps.
#1 Rename Multiple Files with Different Names
You may have known that there are 4 commonly-used ways to rename a single file.
- Right-click the file and select Rename from the context menu.
- Select the file and the click the name of it.
- Select the file and press F2 key.
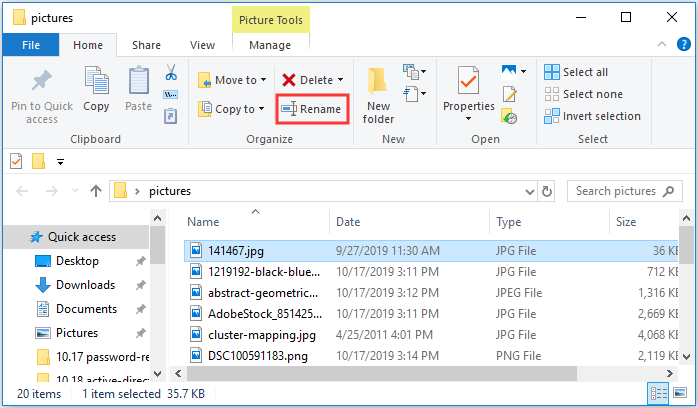
- Click to select the file and hit Rename under Home tab of File Explorer.
The name of the selected file will be editable once you do either operation mentioned above. Then you can input the desired name for the file and press Enter or click somewhere else to save the new name.
Renaming multiple files is just based on these simple tricks.
At first, you can rename the first file using the mentioned ways. After you input the new name, press Tab key this time. In addition to saving the name, this will also jump to the next file and trigger the rename action.
Tip: For convenience, you’d better select the Details view.
In this way, you just need to input new names for these files after pressing Tab each time. You don’t have to spend time on selecting files every time.
#2 Rename Multiple Files with the Same Name Structure
If you want to set file names with the same structure in File Explorer, there are much easier way.
Step 1: Open the folder with files to rename in File Explorer and choose to view with Details.
Step 2: Select all the items by pressing Ctrl + A or clicking Select all under Home tab.
Note: If you just want to rename some of these files, you can press and hold Ctrl and click the target files. Alternatively, you can select the first file, and then click the last file while pressing and holding Shift to select a contiguous group.
Step 3: Now, press F2 and input a new name. Press Enter.
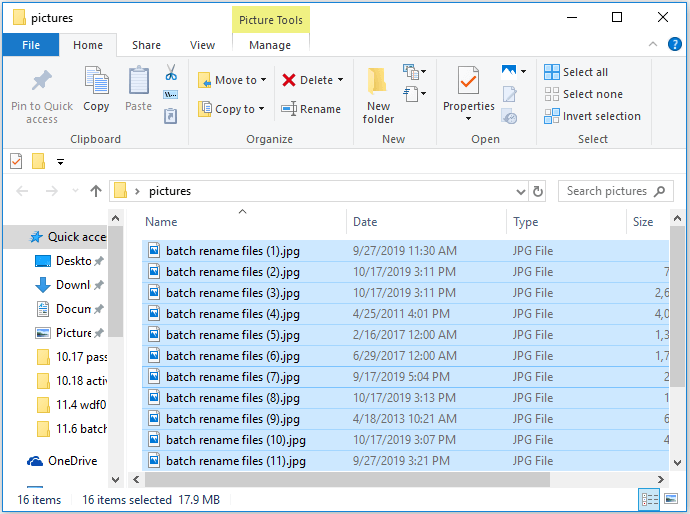
After that, you can see that all the selected files are displayed with the same new name followed by different numbers.
Sometimes you may receive “The action cannot be completed because the file is open in another program” error when you rename files. Just click here to get the solutions.
Batch Rename Files Using Command Prompt
You can also use Command Prompt to batch rename files.
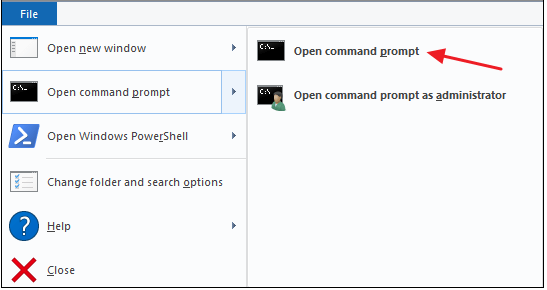
After open the target folder, click File button and choose Open command prompt > Open command prompt.
To rename a single file, you should type the following command and press Enter: ren “current_filename.extension” ” new_filename.extension “. The quotation marks are only required when the name includes spaces.
To rename multiple files, here are some commands:
- ren *.file-extension ???-file-name.* — rename all the files with the specific extension by leaving the first three characters of the old names and appending other content to the name.
- ren *.* ?????.* — rename files by trimming the old names longer than five characters.
- ren old-file-name-part*.* new-filename-part*.* — rename files by replace a part of the old names with a new part.
Note: Here, the wildcard * matches any extension or combination of characters. The wildcard ? represents any single character
Batch Rename Files Using Windows PowerShell
PowerShell is another powerful tool to batch rename files. You can also open this tool in a certain folder by clicking File and select Open Windows PowerShell.
To rename a single file, use the command Rename-Item “old-file-name.extension” “new-file-name.extension” and press Enter.
To rename multiple files, input the following command and press Enter: Dir | %{Rename-Item $_ -NewName (“batch-rename-files{0}.jpg” -f $nr++)}
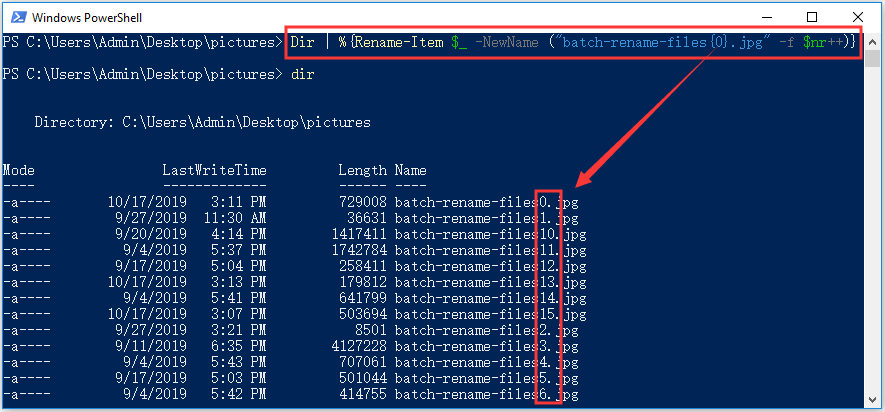
As you can see in this screenshot, you should replace the new name and file extension of your file for this command. And {0} will make the file name followed by different numbers, which is the same as renaming in File Explorer.
About The Author
Position: Columnist
Amanda has been working as English editor for the MiniTool team since she was graduated from university. She enjoys sharing effective solutions and her own experience to help readers fix various issues with computers, dedicated to make their tech life easier and more enjoyable.
Amanda has published many articles, covering fields of data recovery, partition management, disk backup, and etc. In order to provide more useful tips and information, she is still committed to expand her technical knowledge.