
Last Updated :
28 Nov, 2021
In this article, we are going to learn how to take input from users using Batch Script.
Taking User Input:
@echo off
echo Batch Script to take input.
set /p input= Type any input
echo Input is: %input%
pause
Explanation :
- The first ‘echo’ command is used to print a string.
- In the next line, ‘set /p’ command is used to take user input followed by a variable that will hold user input.
set /p input= Type any input
- Then for printing the user input we will use ‘%’ on both ends of our variable which is used for holding user input in the previous step.
echo Input is : %input%
- ‘ pause ‘ is used to hold the screen until any key is pressed.
Input Code :

Execution of the above code :
1. After saving the above code with .bat format. When we will run the file, the below cmd screen will be shown.

2. In the next step we will provide any input, as shown.

3. After pressing enter we will get user input data as Output, as shown in the below image.


Sometimes we need some user interaction in our batch files.
We may need to know to which directory a file is to be copied, for example.
Or which drive needs to be formatted.
There are many ways to achieve this user interaction.
The most basic form of user interaction, of course, is the PAUSE command, which halts the batch file until the user presses «any key» (apart from Ctrl, Alt, Shift, CapsLock, NumLock or ScrollLock).
Maybe not really sophisticated, but it works and is always available, in all DOS, Windows and OS/2 versions.
How you can manage to retrieve user input depends on the OS version used, and whether you want to allow «third party» tools or use «native code» only.
- Windows 2000 and later versions
- Windows NT 4 and later versions
- MS-DOS only
- Batch Tools
- KiXtart
- OS/2
- PowerShell
- VBScript (using Internet Explorer) (discontinued in 2022)
Windows 2000 and later versions
As of Windows 2000, user input can be obtained quite easily by using SET /P
SET /P variable=[promptString]
This command will display an optional promptString where the user can type in a string and press Enter.
The typed string will then be stored in the specified environment variable variable.
| Warning: | Working with a stored string containing ampersands and doublequotes may cause your batch file to fail or even to execute «unexpected» code (code insertion). Do not use SET /P in batch files running with elevated privileges! |
Windows NT 4 and later versions
In NT we don’t need temporary files and we can skip a few lines by using TYPE CON and FOR /F:
-
@ECHO OFF
-
:: UserInNT.bat -
:: How to use the TYPE CON command to receive user input -
:: Written by Rob van der Woude -
:: http://www.robvanderwoude.com -
-
ECHO. -
ECHO Demonstration of receiving user input through the TYPE CON command.
-
ECHO Type in any string and close by pressing Enter, F6 (or Ctrl+Z), Enter.
-
ECHO Only the last non-empty line will be remembered, leading spaces are ignored. -
ECHO. -
-
:: Only one single command line is needed to receive user input -
FOR /F "tokens=*" %%A IN ('TYPE CON') DO SET INPUT=%%A
-
:: Use quotes if you want to display redirection characters as well -
ECHO You typed: "%INPUT%"
-
It is still just as un-intuitive as the first COPY CON example, though.
| Update: | Replace TYPE CON by MORE in the above NT batch file and you can save yourself pressing Enter once — you’ll need to press F6, Enter only instead of Enter, F6, Enter, though the latter will still work.[Tip posted by «Frank» on alt.msdos.batch.nt] |
Walter Zackery posted two interesting solutions to obtain user input in NT, on the alt.msdos.batch.nt news group.
One solution uses the FORMAT command, which will fail since it tries to format a diskette in drive A: at 160KB.
If you have a 5¼» drive as your A: drive don’t use this one.
The second solution uses the LABEL command.
It will actually change drive C:’s volume label and then restore it again to its old value.
The volume label in NT is restricted to 32 characters, and so is the input string when using this LABEL trick for user input.
Besides that the batch file limits the string to 2 words (1 space) only.
I adapted the original postings so that the batch files no longer need to use temporary files. You can view the original postings at my Solutions found at alt.msdos.batch page.
Using FORMAT:
-
@ECHO OFF
-
:: Obtaining user input in Windows NT -
:: with the use of the FORMAT command -
:: posted August 20,1999 -
:: Author: Walter Zackery -
:: Adapted by Rob van der Woude -
:: (no longer uses temporary file) -
:: http://www.robvanderwoude.com -
-
SET INPUT= -
CLS
-
ECHO\ -
ECHO Enter your input string and press ENTER when done. -
ECHO\ -
FOR /F "tokens=5* delims= " %%A IN ('FORMAT /F:160 A: ^| FIND "..."') DO SET INPUT=%%B
-
SET INPUT -
Using LABEL:
-
@ECHO OFF
-
:: Obtaining user input in Windows NT -
:: with the use of the LABEL command -
:: posted August 20,1999 -
:: Author: Walter Zackery -
:: -
:: Adapted by Rob van der Woude -
:: (no longer uses a temporary file; -
:: redirection of label command's -
:: standard error prevents label command's -
:: own prompt to be displayed on screen) -
-
CLS
-
ECHO. -
FOR /F "tokens=5* delims= " %%A IN ('VOL C: ^| FIND "drive C"') DO SET OLDLABEL=%%B
-
ECHO Enter some input string, containing no more than 32 characters: -
FOR /F "TOKENS=*" %%? IN ('LABEL C: 2^>NUL') DO SET INPUT=%%?
-
SET INPUT -
LABEL C: %OLDLABEL%
-
Clay Calvert posted another interesting solution to obtain Yes or No input in most DOS versions by using DEL’s /P switch (prompt for confirmation).
Another great solution by Eric Phelps uses a temporary HTA file to obscure a password while it is being typed.
MS-DOS
In the MS-DOS 3 days, a simple Yes/No question could be answered by changing to a temporary directory where two temporary batch files were located, Y.BAT and N.BAT.
Guess what happened if a user typed a completely different answer . . .
Since MS-DOS 6 we have CHOICE.COM (CHOICE.EXE in later versions), a much more versatile and reliable way to solve one character answers like Yes/No.
The CHOICE command was discontinued in Windows NT 4, only to be reintroduced again in Windows 7 (and maybe Vista?).
If you work with one of these «challenged» Windows versions, you may want to try my Poor Man’s Choice instead, or use DEBUG to create REPLY.COM (16-bit, won’t work in a 64-bit OS), as published in Microsoft Knowledge Base article Q77457: Accepting Keyboard Input in Batch Files.
There is another way to receive user input: COPY CON
The command:
COPY CON filename
copies the user input on the command line to the file filename.
To stop entering user input, the user has to type Ctrl+Z (or F6), followed by the Enter key.
Many PC users and batch file authors (including myself), find this approach «less intuitive», to say the least.
One would expect that pressing the enter key is enough, and once you find out it isn’t, the previous line of input cannot be removed anymore.
The following trick uses ANSI to perform some key translation: the Enter key is translated to the F6 key followed by the Enter key.
Thus only one line of input can be entered, and pressing the Enter key sends the input to the temporary file USERINP.TMP.
-
ECHO Enter some input, and press Enter when ready . . . -
ECHO ←[13;0;64;13p -
COPY CON USRINPUT.TMP
-
ECHO ←[13;13p -
CLS
-
ECHO You typed: -
TYPE USRINPUT.TMP
| Note: | The ← character is the Esc character, or ASCII character 27 (or 1B Hexadecimal).It is a representation of the Esc key. This Esc character is not to be confused with escape characters! How to create the Esc character depends on the editor you use: • In EDIT, use You may have to change the codepage to 437 in some editors. |
The previous example is only a bare minimum. The following example not only asks for user input, but stores it in an environment variable USRINPUT as well:
-
@ECHO OFF
-
REM * Ask for USeR INPUT and store it in variable USRINPUT -
REM * Assumes ANSI.SYS is loaded -
REM * Written by Rob van der Woude -
-
SET USRINPUT= -
-
REM * Turn on ANSI key translation (translate Enter -
REM * key to F6+Enter sequence) and ask for input: -
ECHO ←[13;0;64;13pEnter one word only . . . -
-
REM * Copy entered text to temporary file: -
COPY CON %TEMP%.\~USRINP.TMP
-
-
REM * Turn off ANSI key translation and clear irrelevant screen output: -
ECHO ←[13;13p←[3A←[K←[1B←[K←[1B←[K←[2A -
-
REM * Add empty line to temporary file. The empty line -
REM * will be used to stop DATE asking for new date. -
ECHO.>> %TEMP%.\~USRINP.TMP
-
ECHO.>> %TEMP%.\~USRINP.TMP
-
-
REM * Create a temporary batch file that will store the -
REM * entered text into the environment variable USRINPUT: -
TYPE %TEMP%.\~USRINP.TMP | DATE | FIND "):" > %TEMP%.\~USRINP.BAT
-
-
REM * Create more temporary batch files. Add -
REM * more command line parameters if necessary, -
REM * as in: ECHO SET USRINPUT=%%3 %%4 %%5 %%6 %%7 %%8 %%9>CURRENT.BAT -
ECHO SET USRINPUT=%%3>CURRENT.BAT
-
-
REM * VOER.BAT and TYP.BAT are replacements for CURRENT.BAT for Dutch -
REM * DOS versions; add your own language versions if necessary: -
ECHO SET USRINPUT=%%6>VOER.BAT
-
ECHO SET USRINPUT=%%4>TYP.BAT
-
-
REM * This temporary batch file now sets the variable USRINPUT: -
CALL %TEMP%.\~USRINP.BAT
-
-
REM * Display the result: -
ECHO You typed: ←[1m%USRINPUT%←[0m
-
ECHO. -
PAUSE -
-
REM * Finally, clean up the mess of temporary files: -
FOR %%A IN (%TEMP%.\~USRINP.BAT %TEMP%.\~USRINP.TMP VOER.BAT TYP.BAT CURRENT.BAT) DO DEL %%A
-
The previous batch file should work in every DOS version, assuming ANSI.SYS (or one of its replacements, like ANSI.COM) is loaded.
With a few minor adjustments (replace .BAT with .CMD everywhere) it can be used in OS/2 as well.
Use READLINE instead, however, in OS/2’s DOS sessions.
The following batch file checks if ANSI.SYS is loaded.
If so, it will tell the user to press the Enter key only.
If not, it will tell the user to press F6 first, followed by the Enter key.
However, to check if ANSI.SYS is loaded, this batch file needs MS-DOS 6 or later.
-
@ECHO OFF
-
REM * Asks for USeR INPut and store it in variable USRINPUT -
REM * Uses ANSI if available, but works without ANSI too -
REM * Assumes MS-DOS 6 or later -
REM * Written by Rob van der Woude -
-
SET USRINPUT= -
-
REM * Check if ANSI sequences can be used (needs at -
REM * least MS-DOS 6 to get an errorlevel from FIND): -
SET ANSI=1 -
MEM /C | FIND "ANSI" > NUL
-
IF ERRORLEVEL 1 SET ANSI=0
-
-
REM * Turn on ANSI key translation (translate Enter -
REM * key to F6 + Enter sequence) if possible: -
IF "%ANSI%"=="1" ECHO ←[13;0;64;13p
-
-
REM * Ask for input: -
IF "%ANSI%"=="0" ECHO Enter one word only, and press F6 followed by Enter . . .
-
IF "%ANSI%"=="1" ECHO Enter one word only, and press Enter . . .
-
-
REM * Copy entered text to temporary file: -
COPY CON %TEMP%.\~USRINP.TMP
-
-
REM * Turn off ANSI key translation and clear irrelevant screen output: -
IF "%ANSI%"=="0" CLS
-
IF "%ANSI%"=="1" ECHO ←[13;13p←[3A←[K←[1B←[K←[1B←[K←[2A
-
-
REM * Add empty line to temporary file. The empty line -
REM * will be used to stop DATE asking for new date. -
ECHO.>> %TEMP%.\~USRINP.TMP
-
ECHO.>> %TEMP%.\~USRINP.TMP
-
-
REM * Create a temporary batch file that will store the -
REM * entered text into the environment variable USRINPUT: -
TYPE %TEMP%.\~USRINP.TMP | DATE | FIND "):" > %TEMP%.\~USRINP.BAT
-
-
REM * Create more temporary batch files. Add -
REM * more command line parameters if necessary, -
REM * as in: ECHO SET USRINPUT=%%3 %%4 %%5 %%6 %%7 %%8 %%9>CURRENT.BAT -
ECHO SET USRINPUT=%%3>CURRENT.BAT
-
-
REM * VOER.BAT and TYP.BAT are replacements for CURRENT.BAT for Dutch -
REM * DOS versions; add your own language versions if necessary: -
ECHO SET USRINPUT=%%6>VOER.BAT
-
ECHO SET USRINPUT=%%4>TYP.BAT
-
-
REM * This temporary batch file now sets the variable USRINPUT: -
CALL %TEMP%.\~USRINP.BAT
-
-
REM * Display the result: -
IF "%ANSI%"=="0" ECHO You typed: %USRINPUT%
-
IF "%ANSI%"=="1" ECHO You typed: ←[1m%USRINPUT%←[0m
-
ECHO. -
PAUSE -
-
REM * Finally, clean up the mess of temporary files: -
FOR %%A IN (%TEMP%.\~USRINP.BAT %TEMP%.\~USRINP.TMP VOER.BAT TYP.BAT CURRENT.BAT) DO DEL %%A
-
SET ANSI= -
There are many batch utilities on the web that help ask for user input.
I will list some of them here:
- ASK
Part of the «DOS Utilities Collection» by Jem Berkes. - WBAT
Dialog boxes for DOS batch (menus, buttons, input fields, checkboxes, radio buttons, list selection) by Horst Schaeffer. - InputBox.exe is a batch tool I wrote in C# to popup an InputBox, like VBScript, with an extra option (width).
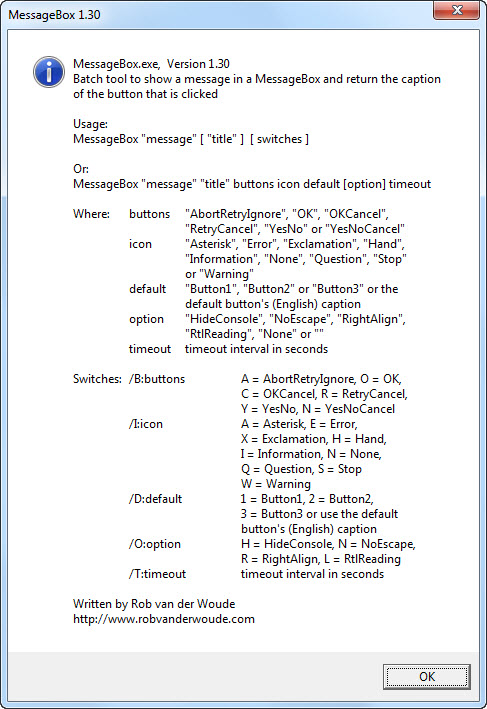
- MessageBox.exe is a batch tool I wrote in C# to display messages in a MessageBox, like VBScript, with more options.

- More dialog tools for batch files: Neat Dialog Boxes in Batch Files
KiXtart
A non-batch solution for Windows 95/98/NT/2000 users is the GetS( ) function in KiXtart:
-
@ECHO OFF
-
:: UsrInKix.bat, Version 1.00 for Win32 -
:: Batch file using Kix to retreive user input -
:: Written by Rob van der Woude -
:: http://www.robvanderwoude.com -
-
:: Create a temporary Kix script that will -
:: in turn create a temporary batch file: -
> %TEMP%.\UserIn.kix ECHO REDIRECTOUTPUT( "NUL" )
-
>>%TEMP%.\UserIn.kix ECHO GETS $UserIn
-
>>%TEMP%.\UserIn.kix ECHO IF OPEN( 1, "@SCRIPTDIR\UserIn.bat", 5 ) = 0
-
>>%TEMP%.\UserIn.kix ECHO WRITELINE( 1, "SET UserIn=" + $UserIn )
-
>>%TEMP%.\UserIn.kix ECHO ELSE
-
>>%TEMP%.\UserIn.kix ECHO ? "Error opening temporary file, errorcode = " + @ERROR
-
>>%TEMP%.\UserIn.kix ECHO ENDIF
-
:: Prompt for user input: -
ECHO Type anything you like and press Enter when finished: -
:: Retreive user input using the Kix script, and -
:: then store the result in a temporary batch file: -
KIX32.EXE %TEMP%.\UserIn.kix
-
:: Call the temporary batch file to store -
:: the result in an environment variable: -
CALL %TEMP%.\UserIn.bat
-
:: Clean up the temporary files: -
IF EXIST %TEMP%.\UserIn.* DEL %TEMP%.\UserIn.*
-
:: Finaly, display the result: -
ECHO You typed: %UserIn%
-
OS/2
OS/2 users may want to take a look at UserInPM, a utility written in VX-Rexx, displaying a small PM window asking for user input.
It creates a temporary batch file to set an environment variable to the typed input.
An example batch file, with the resulting PM window:
-
SET USRINPUT= -
USRINPUT.EXE Type whatever you like:
-
CALL USRINPUT.CMD -
ECHO User input: %USRINPUT%
You will need the VX-Rexx runtime library VROBJ.DLL to run UserInPM.
PowerShell
For a login dialog, you can also use the following PowerShell code:
-
# Dialog asking for credentials -
$cred = Get-Credential $username
-
# Return username and password, delimited by a semicolon -
Write-Host $cred.GetNetworkCredential( ).UserName -NoNewline
-
Write-Host ";" -NoNewline
-
Write-Host $cred.GetNetworkCredential( ).Password
Save it as login.ps1, and use it to return the user name and password to a batch file:
-
FOR /F "tokens=1* delims=;" %%A IN ('PowerShell ./login.ps1 %UserName%') DO (
-
SET Usr=%%A
-
SET Pwd=%%B
-
)
Without a script, a so called «one-liner»:
-
FOR /F "usebackq tokens=1* delims=;" %%A IN (`PowerShell -Command "$cred = Get-Credential %UserName%; '{0};{1}' -f $cred.GetNetworkCredential( ).UserName, $cred.GetNetworkCredential( ).Password"`) DO (
-
SET Usr=%%A
-
SET Pwd=%%B
-
)
My LoginDialog.ps1 is based on the code above, with some error handling added:
-
param(
-
[string]$UserName = $null,
-
[switch]$TabDelimited,
-
[switch]$h,
-
[parameter( ValueFromRemainingArguments = $true )]
-
[object]$invalidArgs
-
) -
-
if ( $h -or $invalidArgs ) {
-
Write-Host -
Write-Host "LoginDialog.ps1, Version 1.01"
-
Write-Host "Present a login dialog, and return the user name and password"
-
Write-Host -
Write-Host "Usage: " -NoNewline
-
Write-Host "./LoginDialog.ps1 [ username ] [ -TabDelimited ]" -ForegroundColor White
-
Write-Host -
Write-Host "Where: " -NoNewline
-
Write-Host "username " -ForegroundColor White -NoNewline
-
Write-Host "is the optional user name presented in the dialog"
-
Write-Host " -TabDelimited " -ForegroundColor White -NoNewline
-
Write-Host "tab delimited output (default delimiter: semicolon)"
-
Write-Host -
Write-Host "Written by Rob van der Woude"
-
Write-Host "http://www.robvanderwoude.com"
-
Exit 1 -
} else {
-
Try
-
{ -
# Dialog asking for credentials -
$cred = Get-Credential $UserName
-
-
# Return username and password, delimited by a semicolon (default) or tab (switch -TabDelimited) -
Write-Host $cred.GetNetworkCredential( ).UserName -NoNewline
-
if ( $TabDelimited ) {
-
Write-Host "`t" -NoNewline
-
} else {
-
Write-Host ";" -NoNewline
-
} -
Write-Host $cred.GetNetworkCredential( ).Password
-
} -
Catch
-
{ -
Write-Host "-- Canceled --"
-
Exit 1 -
} -
}
With LoginDialog.ps1, catching a login error in the batch file is easy:
-
FOR /F "tokens=1* delims=;" %%A IN ('PowerShell ./LoginDialog.ps1 %UserName%') DO (
-
SET Usr=%%A
-
SET Pwd=%%B
-
) -
IF "%Usr%"=="-- Canceled --" (
-
SET Usr= -
SET Pwd= -
ECHO The login was canceled -
)
My GetHDDStatusGUI.ps1 combines several GUI techniques:
-
<# -
.SYNOPSIS -
Display the SMART status for all local harddisks in a popup window and in Windows' Notification Area (a.k.a. System Tray) -
-
.DESCRIPTION -
This script uses WMI to query the status of all local physical harddisk drives, and displays the results in a popup window and in Windows' Notification Area (a.k.a. System Tray). -
In the status display, each physical harddisk is associated with the drive letter of one of its volumes. -
Since Windows 10 limits the number of lines in desktop notifications, any errors will be placed at the top of the displayed status list, otherwise the list is sorted by drive letter. -
If all disks report OK, the script returns True and return code ("ErrorLevel") 0, otherwise False and return code 1. -
Since this script uses WMI and drive letters, it will not work in Linux. -
-
.PARAMETER Modal -
Make the popup window always stay on top -
-
.PARAMETER Hide -
Hide the console window when the script is started, restore it (but minimized) afterwards -
-
.PARAMETER Version -
Show this script's version number; if combined with -Verbose show full script path, version number and last modified or release date -
-
.PARAMETER Debug -
Display intermediate results for each disk drive in console; if combined with -Verbose show intermediate results for each associated volume too -
-
.PARAMETER Help -
Show this script's help screen -
-
.OUTPUTS -
True and return code 0 if all disks report OK, otherwise False and return code 1 -
-
.EXAMPLE -
. ./GetHDDStatusGUI.ps1 -
Will display a popup window with the drive letters in use and the SMART status of the associated physical harddisk drive. -
-
.EXAMPLE -
. ./GetHDDStatusGUI.ps1 -Debug -Verbose -
Will list details for all physical harddisk drives and volumes in the console, and display a popup window with the drive letters in use and the SMART status of the associated physical harddisk drive. -
-
.EXAMPLE -
. ./GetHDDStatusGUI.ps1 -Version -Verbose -
-
Will display this script's full path, version number and last modified or release date. -
-
.LINK -
Script written by Rob van der Woude: -
https://www.robvanderwoude.com/ -
-
.LINK -
Disk check based on code by Geoff: -
http://www.uvm.edu/~gcd/2013/01/which-disk-is-that-volume-on -
-
.LINK -
System Tray ToolTip Balloon code by Don Jones: -
http://blog.sapien.com/current/2007/4/27/creating-a-balloon-tip-notification-in-powershell.html -
-
.LINK -
Extract icons from Shell32.dll by Thomas Levesque: -
http://stackoverflow.com/questions/6873026 -
-
.LINK -
Hide and restore console by Anthony: -
http://stackoverflow.com/a/15079092 -
-
.LINK -
Capture common parameters by mklement0: -
https://stackoverflow.com/a/48643616 -
#> -
-
param (
-
[parameter( ValueFromRemainingArguments = $true )]
-
[string[]]$Args, # Leave all argument validation to the script, not to PowerShell
-
[switch]$Modal,
-
[switch]$Hide,
-
[switch]$Version,
-
[switch]$Help
-
) -
-
$progver = "1.04"
-
-
[bool]$Debug = ( $PSBoundParameters.ContainsKey( 'Debug' ) )
-
[bool]$Verbose = ( $PSBoundParameters.ContainsKey( 'Verbose' ) )
-
-
# Show help if any unnamed argument is given -
$Help = $Help -or ( $Args.Length -gt 0 )
-
-
# Show help if running in Linux -
$Help = $Help -or ( $HOME[0] -eq '/' )
-
-
# Help disables Hide parameter -
$Hide = $Hide -and -not $Help
-
-
# Debug disables Hide parameter -
$Hide = $Hide -and -not $Debug
-
-
if ( $Help ) {
-
Get-Help "$PSCommandPath" -Full
-
exit 1 -
} -
-
if ( $Version ) {
-
if ( $Verbose ) {
-
$lastmod = ( [System.IO.File]::GetLastWriteTime( $PSCommandPath ) )
-
if ( $lastmod.ToString( "h.mm" ) -eq $progver ) {
-
"`"{0}`", Version {1}, release date {2}" -f $PSCommandPath, $progver, $lastmod.ToString( "yyyy-MM-dd" )
-
} else {
-
# if last modified time is not equal to program version, the script has been tampered with -
"`"{0}`", Version {1}, last modified date {2}" -f $PSCommandPath, $progver, $lastmod.ToString( "yyyy-MM-dd" )
-
} -
} else {
-
$progver -
} -
exit 0 -
} -
-
####################################### -
# Hide console window # -
# by Anthony on StackOverflow.com # -
# http://stackoverflow.com/a/15079092 # -
####################################### -
-
$signature1 = @'
-
public static void ShowConsoleWindow( int state ) -
{ -
var handle = GetConsoleWindow( ); -
ShowWindow( handle, state ); -
} -
-
[System.Runtime.InteropServices.DllImport( "kernel32.dll" )] -
static extern IntPtr GetConsoleWindow( ); -
-
[System.Runtime.InteropServices.DllImport( "user32.dll" )] -
static extern bool ShowWindow( IntPtr hWnd, int nCmdShow ); -
'@
-
-
$hideconsole = Add-Type -MemberDefinition $signature1 -Name Hide -Namespace HideConsole -ReferencedAssemblies System.Runtime.InteropServices -PassThru
-
-
# Hide console -
if ( $Hide ) {
-
$hideconsole::ShowConsoleWindow( 0 )
-
} -
-
################## -
# Disk inventory # -
################## -
-
[System.Collections.SortedList]$volumedetails = New-Object System.Collections.SortedList
-
[System.Collections.SortedList]$volumestatus = New-Object System.Collections.SortedList
-
-
if ( $Debug ) {
-
Write-Host "Disk#`tStatus`tSize (GB)`tModel"
-
Write-Host "=====`t======`t=========`t====="
-
} -
-
$diskdrives = Get-WmiObject -Namespace "root/CIMV2" -Class Win32_DiskDrive
-
$warnings = $false
-
foreach ( $disk in $diskdrives ) {
-
$diskindex = $disk.Index
-
$diskmodel = $disk.Model -replace "Disk Device","Disk"
-
$disksize = "{0,5:F0} GB" -f ( $disk.Size / 1GB )
-
$diskstatus = $disk.Status
-
if ( $Debug ) {
-
if ( $Verbose ) {
-
Write-Host -
} -
Write-Host ( "{0}`t{1}`t{2}`t{3}" -f $diskindex, $diskstatus, $disksize, $diskmodel )
-
} -
$part_query = 'ASSOCIATORS OF {Win32_DiskDrive.DeviceID="' + $disk.DeviceID.replace('\','\\') + '"} WHERE AssocClass=Win32_DiskDriveToDiskPartition'
-
$partitions = @( Get-WmiObject -Query $part_query | Sort-Object StartingOffset )
-
foreach ( $partition in $partitions ) {
-
$vol_query = 'ASSOCIATORS OF {Win32_DiskPartition.DeviceID="' + $partition.DeviceID + '"} WHERE AssocClass=Win32_LogicalDiskToPartition'
-
$volumes = @( Get-WmiObject -Query $vol_query )
-
foreach ( $volume in $volumes ) {
-
# 0 = Unknown; 1 = No Root Directory; 2 = Removable Disk; 3 = Local Disk; 4 = Network Drive; 5 = Compact Disc; 6 = RAM Disk -
# DriveType 3 means harddisks only -
if ( $volume.DriveType -eq 3 ) {
-
if ( $Debug -and $Verbose ) {
-
Write-Host ( "{0}`t{1,2}`t{2}`t{3}" -f $diskindex, $volume.Name, $disksize, $diskmodel )
-
} -
if ( -not $volumedetails.Contains( $volume.Name ) ) {
-
$volumedetails.Add( $volume.Name, "[Disk {0,2}] {1} {2}" -f ( $diskindex, $disksize, $diskmodel ) )
-
$volumestatus.Add( $volume.Name, $diskstatus )
-
} -
} -
} -
} -
} -
-
-
################# -
# Dialog window # -
################# -
-
Add-Type -AssemblyName System.Windows.Forms
-
-
[System.Windows.Forms.Application]::EnableVisualStyles( )
-
-
$form = New-Object System.Windows.Forms.Form
-
$form.Width = 640
-
$form.Height = 25 * $volumedetails.Count + 120
-
$form.Font = 'Courier New, 10'
-
$form.BackColor = 'White'
-
$form.MaximizeBox = $false;
-
$form.FormBorderStyle = 'FixedSingle'
-
$form.TopMost = $Modal
-
-
$y = 0
-
$even = $false
-
$volumedetails.Keys | ForEach-Object {
-
$label = New-Object System.Windows.Forms.Label
-
$label.Size = '35, 20'
-
$label.Location = New-Object System.Drawing.Point( 10, ( 15 + $y ) )
-
$label.Text = "$_"
-
if ( $even ) { $label.BackColor = 'ButtonFace' }
-
$form.Controls.Add( $label )
-
-
$status = ( $volumestatus[$_] )
-
$label = New-Object System.Windows.Forms.Label
-
$label.Size = '40, 20 '
-
$label.Location = New-Object System.Drawing.Point( 45, ( 15 + $y ) )
-
$label.Text = $status
-
if ( $status -eq "OK" ) {
-
$label.ForeColor = 'Green'
-
} else {
-
$label.ForeColor = 'Red'
-
$warnings = $true
-
} -
if ( $even ) { $label.BackColor = 'ButtonFace' }
-
$form.Controls.Add( $label )
-
-
$label = New-Object System.Windows.Forms.Label
-
$label.Size = '490, 20'
-
$label.Location = New-Object System.Drawing.Point( 85, ( 15 + $y ) )
-
$label.Text = $volumedetails[$_]
-
if ( $even ) { $label.BackColor = 'ButtonFace' }
-
$form.Controls.Add( $label )
-
-
$y = $y + 25
-
$even = -not $even
-
} -
-
if ( $warnings ) {
-
$form.Text = "HDD Status Warning"
-
} else {
-
$form.Text = "HDD Status OK"
-
} -
-
$buttonOK = New-Object System.Windows.Forms.Button
-
$buttonOK.BackColor = 'ButtonFace'
-
$buttonOK.Text = "OK"
-
$buttonOK.Size = '60,24'
-
$buttonOK.Location = New-Object System.Drawing.Point( 85, ( 30 + $y ) )
-
$form.Controls.Add( $buttonOK )
-
$form.AcceptButton = $buttonOK # Pressing Enter closes the dialog
-
$form.CancelButton = $buttonOK # Pressing Escape closes the dialog
-
-
-
######################################## -
# System tray balloon tip notification # -
######################################## -
-
[System.Windows.Forms.ToolTipIcon]$icon = [System.Windows.Forms.ToolTipIcon]::Info
-
$title = "HDD Status OK"
-
$systraymessage = ""
-
$volumedetails.Keys | ForEach-Object {
-
$status = ( $volumestatus[$_] )
-
if ( $status -eq "OK" ) {
-
$systraymessage = $systraymessage + "$_`t$status`n" # list in alphabetical sort order
-
} else {
-
$systraymessage = "$_`t$status`n$systraymessage" # errors at top of list
-
$icon = [System.Windows.Forms.ToolTipIcon]::Error
-
$title = "Warning: HDD Errors"
-
} -
} -
-
-
################################################################ -
# Extract system tray icon from Shell32.dll # -
# C# code to extract icons from Shell32.dll by Thomas Levesque # -
# http://stackoverflow.com/questions/6873026 # -
################################################################ -
-
$signature2 = @'
-
[DllImport( "Shell32.dll", EntryPoint = "ExtractIconExW", CharSet = CharSet.Unicode, ExactSpelling = true, CallingConvention = CallingConvention.StdCall )] -
private static extern int ExtractIconEx( string sFile, int iIndex, out IntPtr piLargeVersion, out IntPtr piSmallVersion, int amountIcons ); -
-
public static Icon Extract( string file, int number, bool largeIcon ) -
{ -
IntPtr large; -
IntPtr small; -
ExtractIconEx( file, number, out large, out small, 1 ); -
try -
{ -
return Icon.FromHandle( largeIcon ? large : small ); -
} -
catch -
{ -
return null; -
} -
} -
'@
-
-
$iconextractor = Add-Type -MemberDefinition $signature2 -Name IconExtract -Namespace IconExtractor -ReferencedAssemblies System.Windows.Forms,System.Drawing -UsingNamespace System.Windows.Forms,System.Drawing -PassThru
-
-
# System tray icon depends on status -
if( $title -eq "HDD Status OK" ) {
-
$systrayicon = $iconextractor::Extract( "C:\Windows\System32\shell32.dll", 223, $true )
-
} else {
-
$systrayicon = $iconextractor::Extract( "C:\Windows\System32\shell32.dll", 53, $true )
-
} -
-
# Show system tray icon and balloon tip -
$notify = New-Object System.windows.Forms.NotifyIcon
-
$notify.BalloonTipText = $systraymessage
-
$notify.BalloonTipTitle = $title
-
$notify.BalloonTipIcon = [System.Windows.Forms.ToolTipIcon]$icon
-
$notify.Icon = $systrayicon
-
$notify.Visible = $true
-
$notify.ShowBalloonTip( 30000 )
-
-
# Show dialog -
[void] $form.ShowDialog( )
-
-
-
########################################## -
# Restore console minimized (2) # -
# Change to 1 to restore to normal state # -
########################################## -
-
if ( $Hide ) {
-
$hideconsole::ShowConsoleWindow( 2 )
-
} -
-
################################# -
# Exit code 1 in case of errors # -
################################# -
-
if ( $warnings ) {
-
$false -
exit 1 -
} else {
-
$true -
exit 0 -
} -
PowerShell on-the-fly
It is possible to write batch files using PowerShell without requiring a (temporary) PowerShell script.
This is where PowerShell’s -Command switch comes in handy.
However, don’t expect it to make your code readable, and maintenance will be a real nightmare.
The messagebox below is a fairly simple example:
-
FOR /F «usebackq» %%A IN (`Powershell.exe -Command «Add-Type -AssemblyName System.Windows.Forms; [System.Windows.Forms.MessageBox]::Show( ‘Are you sure you want to continue?’, ‘Be Careful’, [System.Windows.Forms.MessageBoxButtons]::YesNoCancel, [System.Windows.Forms.MessageBoxIcon]::Exclamation, [System.Windows.Forms.MessageBoxDefaultButton]::Button2, [System.Windows.Forms.MessageBoxOptions]::ServiceNotification )«`) DO SET Answer=%%A
| Notes: | 1. | The code above is wrapped to allow a quick overview, but should be entered as a single line in a batch file. |
| 2. | Use single quotes for strings inside the PowerShell code, and backquotes for the batch file’s FOR command. |
|
| 3. | Do not use backquotes for PowerShell literals! If you have to use PowerShell literals, enter them as [char] as shown in the following code:
|
OK, even simpler, a plain popup message:
-
Powershell.exe -Command «Add-Type -AssemblyName System.Windows.Forms; [void] [System.Windows.Forms.MessageBox]::Show( ‘Just a popup message’, ‘Message’ )»
One more example, using the code of our previous PowerShell login dialog example:
-
FOR /F «usebackq tokens=1* delims=;» %%A IN (`PowerShell.exe -Command «$cred = Get-Credential %UserName%; Write-Host ( ‘{0};{1}’ -f $cred.GetNetworkCredential( ).UserName, $cred.GetNetworkCredential( ).Password )«`) DO (SET Login.Name=%%A&SET Login.Passwd=%%B)
| Notes: | 1. | The code above is wrapped to allow a quick overview, but should be entered as a single line in a batch file. |
| 2. | Credentials are stored in the environment variables Login.Name and Login.Passwd |
VBScript and Internet Explorer (discontinued in 2022)
Advanced dialog boxes, output and input, including (masked) password prompts, can also be created using VBScript and Internet Explorer, but I would not recommend creating them on the fly.
See the VBScript Scripting Techniques section for some of these advanced user message windows.
| Note: | For peace of mind, I would recommend not using this technique at all: every now and then a Windows/IE update and/or too «tight» security settings will break the code, forcing you to rewrite it. My «educated guess» is that PowerShell code as shown above will last longer. |
| Update: | On June 15, 2022, Microsoft ended support for Internet Explorer, and announced that it would be removed in a future Windows Update. Do not use this technique any longer. |
page last modified: 2022-06-29; loaded in 0.0514 seconds
Batch Script — Prompting for user input
Batch Script — Prompting for user input
Would you like to learn how to prompt for user input using the command line? In this tutorial, we are going to show you how to use the command line to request input to Batch scripts on a computer running Windows.
• Windows 2012 R2
• Windows 2016
• Windows 2019
• Windows 10
• Windows 7
Equipment list
Here you can find the list of equipment used to create this tutorial.
This link will also show the software list used to create this tutorial.
Windows Related Tutorial:
On this page, we offer quick access to a list of tutorials related to Windows.
Batch Script — Prompting for user input
Start a command-line prompt.
Request a user input using the command line.
In our example, the user input was stored in a variable named MYNAME.
On the notepad application, create a Batch script named TEST.
Here is the script result.
Congratulations! You are able to request user input using Batch scripts.
Batch script — Prompting for user input using a function
Start a command-line prompt.
Create a function to request the user input.
Call the function of the Batch script.
In our example, we created a function named MYPING.
On the notepad application, create a Batch script named TEST.
Here is the script result.
Congratulations! You are able to prompt a user for input using a Batch script function.
VirtualCoin CISSP, PMP, CCNP, MCSE, LPIC22021-09-02T00:58:55-03:00
Related Posts
Page load link
Ok
Batch Script supports the concept of command line arguments where arguments can be passed to a batch file when called.
Using the /p switch and the SET command, you can define variables from an Input.
/p switch allows you to set the value of a variable to the input line entered by the user.
The following script is an example of getting input from the user using the keyboard.
@echo off
echo Enter your variable :
set /p variable=
echo Your variable is %variable%
The result of the script
You can simplify the script to .
@echo off
SET /P variable=Enter your variable :
echo Your variable is %variable%
Result
Здравствуйте, будущие программисты! Сегодня мы погружаемся в fascинирующий мир скриптов Batch, сосредоточившись на операциях ввода и вывода. Как ваш доброжелательный сосед-преподаватель информатики, я рад помочь вам в этом путешествии. Не волнуйтесь, если вы никогда не писали ни одной строки кода раньше — мы начнем с основ и постепенно поднимемся выше. Так что возьмите杯 свой любимый напиток и начнем!

Понимание Ввода и Вывода в Контексте Скриптов Batch
Прежде чем мы углубимся в детали, давайте поговорим о том, что такое ввод и вывод в контексте скриптов Batch.
- Ввод — это информация, которая поступает в ваш скрипт. Это как подача данных в вашу программу.
- Вывод — это то, что ваш скрипт производит или отображает. Это результат работы вашего скрипта.
Представьте это как кухню: ввод — это ингредиенты, которые вы используете, а вывод — это вкусное блюдо, которое вы создаете!
Основной Ввод: Команда SET /P
Давайте начнем с最常见的 способа получения ввода в скриптах Batch: команда SET /P. Эта команда позволяет нам запросить ввод у пользователя и сохранить его в переменную.
@echo off
SET /P name=Как ваше имя?
echo Привет, %name%! Добро пожаловать в мир скриптов Batch!
pause
В этом примере:
-
@echo offпредотвращает отображение команд на экране. -
SET /P name=Как ваше имя?запрашивает у пользователя ввод имени и сохраняет его в переменнуюname. -
echo Привет, %name%!отображает приветствие, используя введенное имя. -
pauseудерживает окно открытым, чтобы вы могли увидеть результат.
Попробуйте запустить этот скрипт. Это как будто у вас occurs小小的 разговор с компьютером!
Основной Вывод: Команда ECHO
Мы уже видели команду ECHO в действии. Это основной способ отображения вывода в скриптах Batch. Давайте рассмотрим его подробнее:
@echo off
echo Это простой вывод.
echo.
echo Эта строка имеет пустую строку сверху.
echo "Кавычки" отображаются как есть.
echo.
echo Текущая дата: %date%
echo Текущее время: %time%
pause
Вот что происходит:
-
echo.выводит пустую строку. - Мы можем использовать ECHO для отображения текста, переменных и даже системной информации, такой как дата и время.
Перенаправление Вывода (Stdout и Stderr)
Теперь давайте поговорим о перенаправлении вывода. В скриптах Batch у нас есть два основных типа вывода:
- Стандартный Вывод (stdout): Обычный вывод команды.
- Стандартная Ошибка (stderr): Сообщения об ошибках или диагностическая информация.
Мы можем перенаправить эти выводы в файлы, используя операторы > и >>.
Перенаправление Стандартного Вывода
@echo off
echo Это будет сохранено в файл > output.txt
echo Это будет добавлено в файл >> output.txt
type output.txt
pause
В этом скрипте:
-
>создает (или перезаписывает) файл и записывает вывод в него. -
>>добавляет вывод в существующий файл (или создает его, если он не существует). -
type output.txtотображает содержимое файла.
Перенаправление Стандартной Ошибки
Чтобы перенаправить сообщения об ошибках, мы используем 2> вместо просто >.
@echo off
dir несуществующий_файл 2> error.txt
type error.txt
pause
Этот скрипт пытается列出 несуществующую папку и перенаправляет сообщение об ошибке в файл.
Перенаправление Оба Вида Вывода
Мы можем перенаправить оба вида вывода в один и тот же файл:
@echo off
dir 2>&1 > output.txt
type output.txt
pause
Здесь 2>&1 означает «перенаправить stderr в то же место, что и stdout».
Подавление Вывода Программы
Иногда вы можете захотеть запустить команду, не отображая ее вывод. Мы можем сделать это, перенаправив вывод в специальное устройство под названием NUL.
@echo off
echo Это будет отображено
echo Это не будет отображено > NUL
dir > NUL
echo Список каталогов был подавлен
pause
В этом скрипте вывод второго ECHO и команды DIR подавляется.
Продвинутые Техники Ввода/Вывода
Теперь, когда мы рассмотрели основы, давайте посмотрим на некоторые более продвинутые техники.
Использование CHOICE для Ввода Пользователя
Команда CHOICE предоставляет более структурированный способ получения ввода пользователя:
@echo off
echo Вы любите программирование?
choice /c YN /m "Введите Y для Да или N для Нет"
if errorlevel 2 goto No
if errorlevel 1 goto Yes
:Yes
echo Отлично! Давайте узнаем больше!
goto End
:No
echo Не волнуйтесь, вам很快 понравится!
:End
pause
Этот скрипт:
- Предлагает пользователю Да/Нет вопрос.
- Использует
/c YNдля указания допустимых вариантов (Y или N). - Использует
/mдля отображения пользовательского сообщения. - Использует
if errorlevelдля проверки выбора пользователя и перехода к соответствующему метке.
Чтение из Файла
Мы также можем читать ввод из файла:
@echo off
for /f "delims=" %%a in (input.txt) do (
echo Прочитана строка: %%a
)
pause
Этот скрипт читает каждую строку из input.txt и отображает ее.
Запись в Несколько Файлов
Давайте создадим скрипт, который пишет в несколько файлов:
@echo off
echo Содержимое файла 1 > file1.txt
echo Содержимое файла 2 > file2.txt
echo Содержимое файла 3 > file3.txt
echo Файлы успешно созданы!
pause
Этот скрипт создает три отдельных файла с различным содержимым.
Итог Ввода/Вывода Методов
Давайте подведем итог методы ввода/вывода, которые мы изучили в удобной таблице:
| Метод | Описание | Пример |
|---|---|---|
| SET /P | Получение ввода пользователя | SET /P name=Введите имя: |
| ECHO | Отображение вывода | echo Привет, мир! |
| > | Перенаправление вывода в файл | echo Текст > file.txt |
| >> | Добавление вывода в файл | echo Больше текста >> file.txt |
| 2> | Перенаправление вывода ошибки | command 2> error.txt |
| 2>&1 | Перенаправление обоих выводов | command > output.txt 2>&1 |
| NUL | Подавление вывода | command > NUL |
| CHOICE | Структурированный ввод пользователя | choice /c YN /m "Да или Нет?" |
| FOR /F | Чтение из файла | for /f "delims=" %%a in (file.txt) do ... |
И вот мы и добрались до конца, друзья! Мы совершили путешествие через землю скриптов Batch ввода и вывода. Помните, ключ к овладению этими концепциями — это практика. Попробуйте написать свои скрипты, экспериментируйте с различными командами и не бойтесь ошибок — это как раз то, как мы учимся!
Как ваш старый преподаватель информатики всегда говорит: «В программировании каждая ошибка — это новая возможность для обучения в маскировке.» Так что идите вперед, пишите скрипты Batch, и да будет ваш вывод всегда таким, как вы задумали!
Credits: Image by storyset