
Если какой-то из дисков HDD или SSD на вашем компьютере отображается как динамический, при этом функции динамических дисков вами не используются, вы можете преобразовать его в базовый несколькими способами: как без потери данных (сложнее), так и с их потерей (легко, встроенными средствами Windows).
В этой инструкции подробно о том, как преобразовать динамический диск в базовый в Windows 11, Windows 10 и других версиях системы, а также о том, что это за тип диска.
Как сделать динамический диск базовым встроенными средствами системы
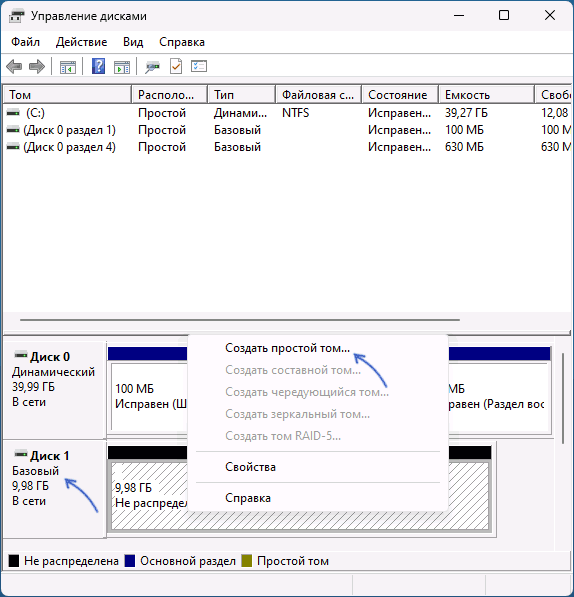
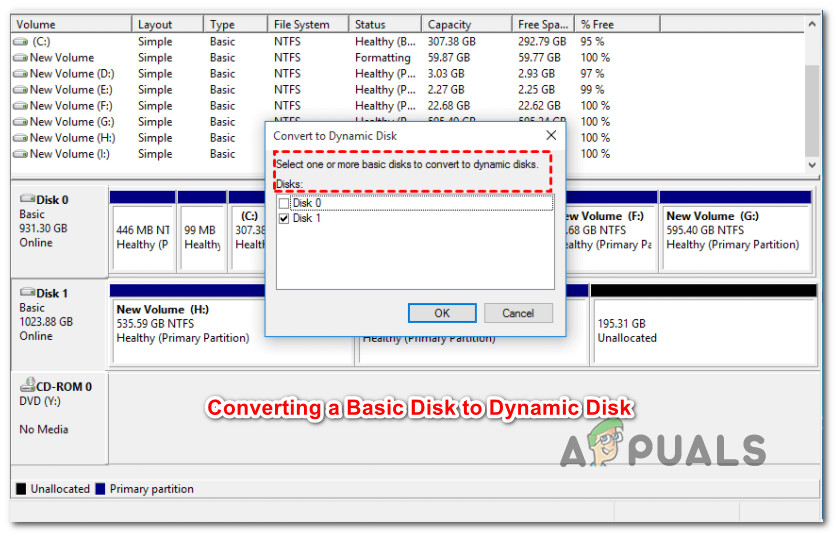
Если каких-либо важных данных ни на одном из разделов диска нет, вы можете преобразовать динамический диск в базовый в утилите «Управление дисками» или в командной строке. В первом случае шаги будут следующими:
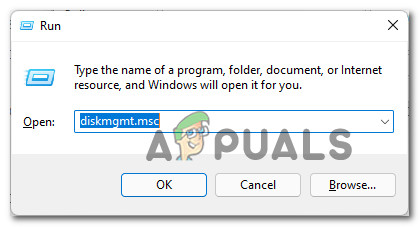
- Нажмите правой кнопкой мыши по кнопке «Пуск» и выберите пункт «Управление дисками», либо нажмите клавиши Win+R на клавиатуре, введите diskmgmt.msc и нажмите Enter
- В Управлении дисками удалите все разделы с динамического диска: для этого нажмите по соответствующему разделу правой кнопкой мыши и выберите пункт «Удалить том», повторите то же самое для всех разделов диска.

- После того, как разделов на диске не останется, он автоматически будет преобразован в «Базовый», вам останется создать новые разделы на нем, нажав правой кнопкой мыши по пространству «Не распределено» и выбрать пункт «Создать простой том».
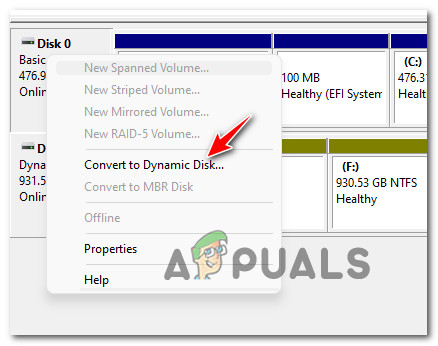
- Если диск всё ещё динамический, но не содержит разделов, нажмите по имени диска правой кнопкой мыши: теперь опция «Преобразовать в базовый диск» должна быть активна.


Обычно, если данные с диска не требуются, этого способа достаточно, в том числе и для динамического диска, который отображается как «Чужой» или «Недопустимый» (обычно после подключения диска с другого компьютера, либо изменения конфигурации дисков).
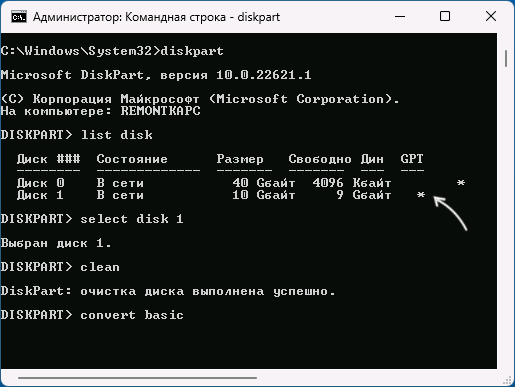
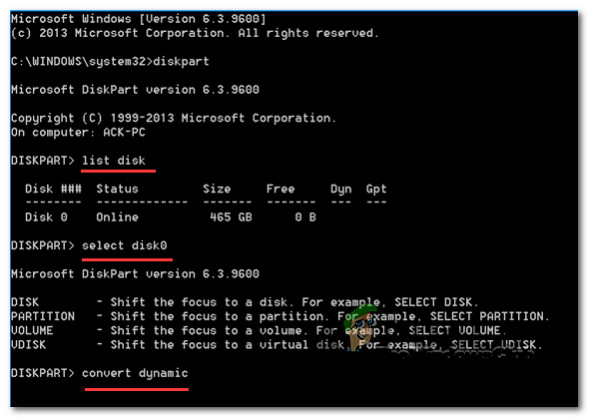
Также вы можете преобразовать диск в базовый в командной строке:
- Запустите командную строку от имени администратора.
- Введите команды
diskpart
list disk
и обратите внимание на номер диска, который нужно преобразовать (далее — N).
- Введите команды (все данные будут удалены):
select disk N
clean
- Сразу после очистки диска он должен автоматически стать базовым, но вы можете проверить, так ли это, введя команду convert basic

- Далее вы можете создать разделы на диске в «Управлении дисками» или здесь же, в diskpart, например, для создания раздела NTFS, занимающего всё свободное пространство достаточно ввести следующе команды:
create partition primary
format fs=ntfs quick
Преобразование динамического диска в базовый без потери данных
Если вам требуется сделать динамический диск базовым, при этом не потерять данные, потребуется использовать сторонние программы для работы с разделами дисков. К сожалению, в большинстве таких утилит функция преобразования диска в базовый недоступна в бесплатной версии, но варианты есть.
Внимание: все описанные способы подойдут для случаев, когда ваш динамический диск не был объединен вами с другими динамическими дисками (не используются «Составной том», «Чередующийся том» или том RAID-5)
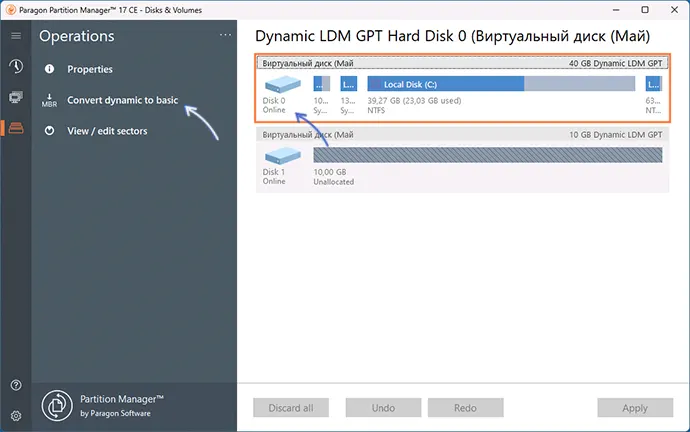
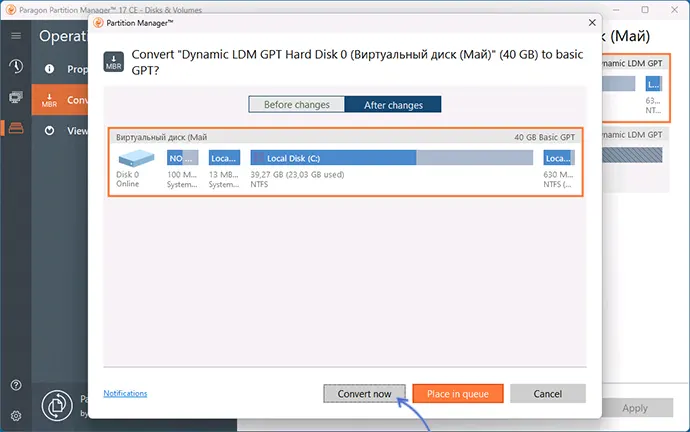
Paragon Partition Manager Community Edition
Бесплатная версия Paragon Partition Manager, доступная на официальном сайте позволяет выполнить преобразование динамического диска в базовый:
- После установки и запуска программы выберите нужный диск (весь диск, а не отдельный раздел на нём) и нажмите «Convert dynamic to basic».

- Нажмите кнопку «Convert now» для запуска конвертации в следующем окне.
- Если преобразуется системный диск, вам будет предложено перезагрузить компьютер, нажмите «Restart the computer».

- После перезагрузки начнется процесс преобразования динамического диска в базовый, после чего система загрузится как обычно, но уже с базовым диском.

Некоторые нюансы использования этой утилиты:
- Если программа запросила перезагрузку, но после неё ничего не произошло и система загрузилась в обычном режиме, попробуйте отключить Secure Boot на время преобразования дисков.
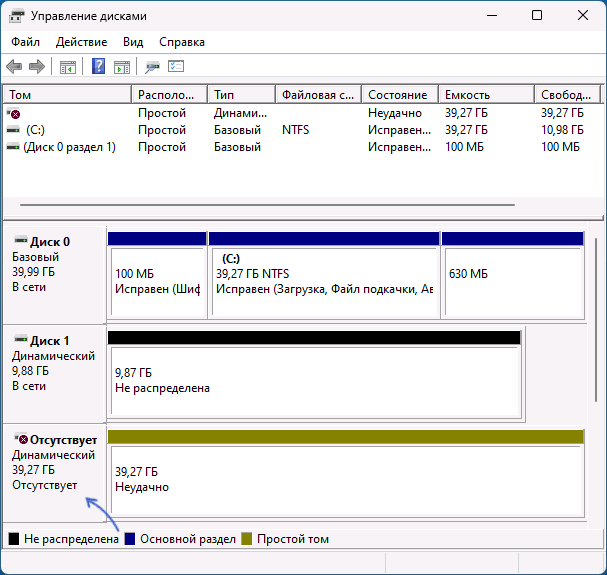
- Если после преобразования в окне «Управление дисками» вы видите, что нужный диск стал базовым, но появился еще один динамический диск, для которого указано «Отсутствует» — нажмите по тому правой кнопкой мыши и выберите «Удалить том», несуществующий диск пропадёт из списка.

Средства работы с разделами дисков в WinPE
Почти все популярные образы дисков с утилитами на базе WinPE содержат утилиты для работы с разделами дисков, который подойдут и для нашей задачи. Самый популярный из таких образов (но в ином контексте) и процесс записи на флешку описан в этой статье.
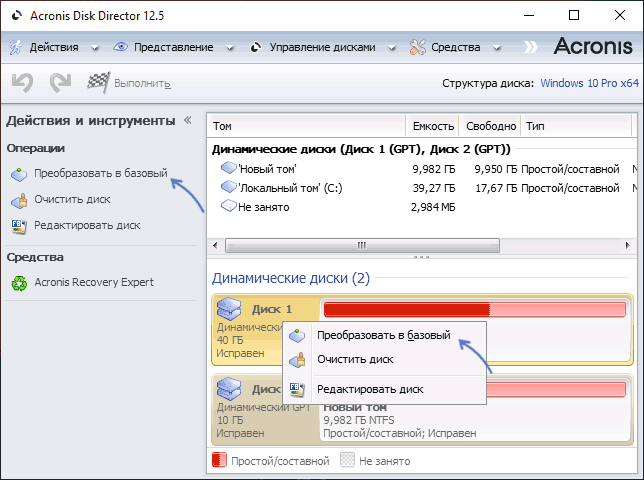
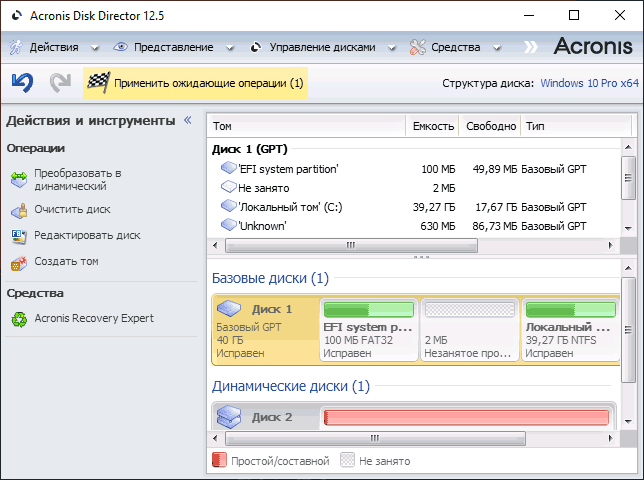
Например, для преобразования диска в базовый в Acronis Disk Director в WinPE достаточно:
- Выбрать диск (не раздел на нём), а затем опцию «Преобразовать в базовый» в панели слева или в контекстном меню диска.

- Нажать «Применить ожидающие операции» и дождаться конвертации.
Похожи действия будут в DiskGenius:
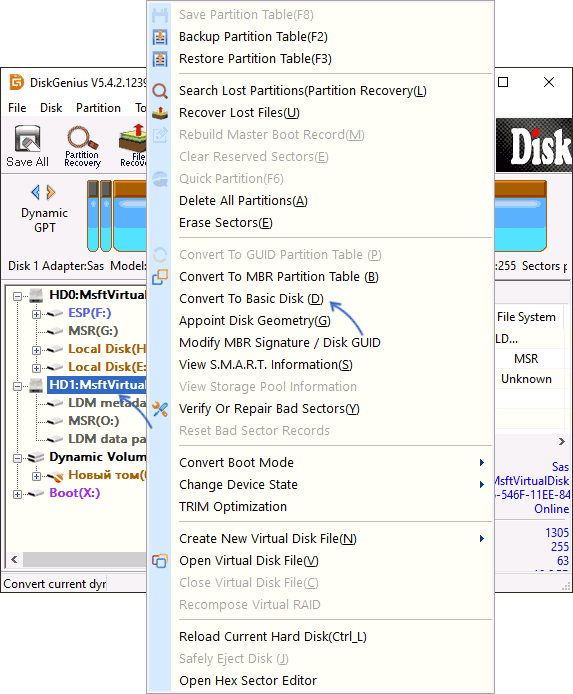
Нажмите правой кнопкой мыши по диску, который требуется преобразовать и выберите опцию «Convert To Basic Disk», подтвердите преобразование.
Диск не конвертируется в базовый
Возможные причины проблем преобразования динамического диска в базовый:
- Диск имеет размер более 2 Тб и схему разделов MBR. Решение — преобразовать его в GPT, в Windows 10 и Windows 11 — это возможно сделать встроенными средствами системы с помощью инструмента mbr2gpt.exe
- Большинство ошибок при преобразовании средствами Windows, такие как «Ошибка службы виртуальных дисков. Диск не пуст» бывают вызваны тем, что на диске остались разделы.
- Ошибка «Недопустимое имя пакета» при преобразовании диска говорит о наличии неподдерживаемых двухбайтовых символов в имени компьютера. Решение — изменить имя компьютера.
Если вы столкнулись с другими ошибками в процессе конвертации, опишите их в комментариях ниже статьи, я постараюсь подсказать решение.
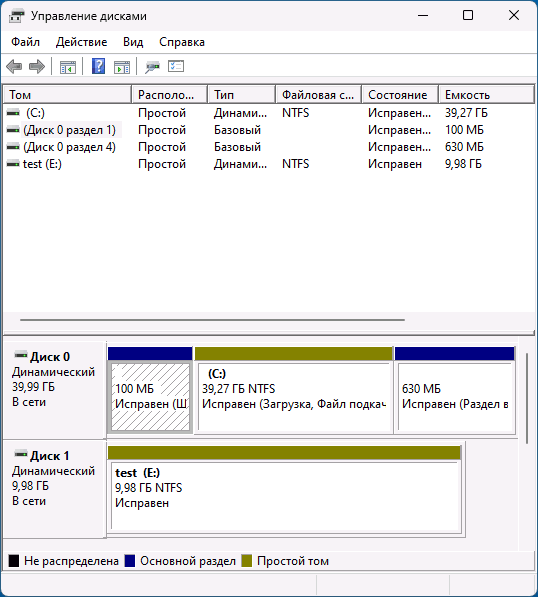
Динамический диск в Windows — специальный тип диска, который позволяет использовать дополнительные функции по сравнению с базовым диском. В частности:
- Чередующиеся и составные тома (разделы, находящиеся на нескольких физических дисках).
- Зеркальные тома и программные тома RAID-5 для дублирования данных на нескольких дисках.
- Размещение до 2000 динамических томов как на GPT, так и на MBR дисках.
Это может быть удобно, но не всегда: например, работа дисков может нарушаться при изменении их конфигурации или подключении к другому компьютеру (например, определение динамического диска как «Чужой» или «Недопустимый»), в некоторых случаях возможны проблемы с доступом к данным на таких дисках извне ОС, где они были настроены.
Поэтому в большинстве случаев, кроме ситуации, когда пользователь точно значет, зачем ему требуется «Динамический диск», для домашнего использования оптимальным вариантом будет использование базовых дисков. А часть функций, доступных для динамических дисков можно использовать по-новому, подробнее: Дисковые пространства Windows 11 (подойдет и для Windows 10).
Download Windows Speedup Tool to fix errors and make PC run faster
This post compares Basic Disk and Dynamic Disk and shows how to convert basic disk to dynamic disk and dynamic disk to basic disk, using Disk Management and CMD/diskpart, without losing the data in Windows 11/10/8/7.
Basic Disk and Dynamic Disk
There are two types of computer hard disks: Basic Disks and Dynamic disks. Basic disks are the commonly used storage media with Windows. They contain partitions like Primary partitions and Logical drives, which are typically formatted with a file system. Dynamic disks can create fault-tolerant volumes that may even span multiple disks – which Basic disks cannot.
Most home personal computers are configured using Basic disks. However, IT professionals usually prefer to use Dynamic disks, as they offer more functionality and increased reliability and performance. While Home editions of Windows support Basic Disks, Enterprise/Pro/Ultimate versions of the Windows operating system support Dynamic Disks as well.
Microsoft has listed the operations that can be performed on each of these types.
Operations that can be performed on both, Basic and Dynamic disks:
- Check Disk properties, Partition properties, and Volume properties
- Establish drive-letter assignments for disk volumes or partitions
- Support both MBR and GPT partition styles.
- Convert a basic disk to a dynamic disk or a dynamic disk to a basic disk.
Operations that can be performed only on Dynamic disks:
- Create and delete simple, spanned, striped, RAID-5 and mirrored volumes.
- Extend a simple or spanned volume.
- Remove a mirror from a mirrored volume
- Break the mirrored volume into two volumes.
- Repair mirrored or RAID-5 volumes.
- Reactivate a missing or offline disk.
Before you start this process, you should know that there could be data loss as a result of this operation, so it is imperative that you first take a backup of your data to an external hard disk. So proceed only if you know what you are doing and be careful.
If you are using a basic disk as a storage area for shadow copies and you intend to convert the disk into a dynamic disk, it is important to take the following precaution to avoid data loss. If the disk is a non-boot volume and is a different volume from where the original files reside, you must first dismount and take offline the volume containing the original files before you convert the disk containing shadow copies to a dynamic disk. You must bring the volume containing the original files back online within 20 minutes, otherwise, you will lose the data stored in the existing shadow copies. If the shadow copies are located on a boot volume, you can convert the disk to dynamic without losing shadow copies, states Microsoft.
1] Using UI
In Windows, open the WinX Menu and select Disk Management. Right-click on the Disk and select Convert to Dynamic Disk. You will be asked to once again confirm the Disk and click on Convert later on. The process will start, and the Disk will be converted to a Dynamic disk.
Read: Windows cannot be installed to this hard disk space. The partition contains one or more dynamic volumes that are not supported for installation
2] Using Command line
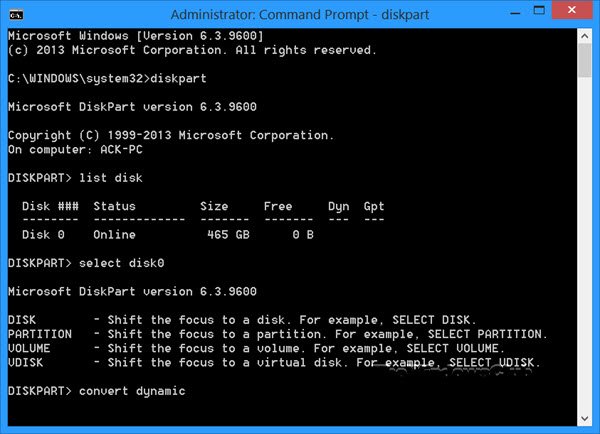
Open an elevated command prompt, type diskpart and hit Enter.
Next, type list disk. Make a note of the disk number of the disk you want to convert to Dynamic.
Now type select diskn and press Enter.
Next type convert dynamic and hit Enter.
Read: How to create Mirrored Volume for Instant Hard Drive Backup in Windows.
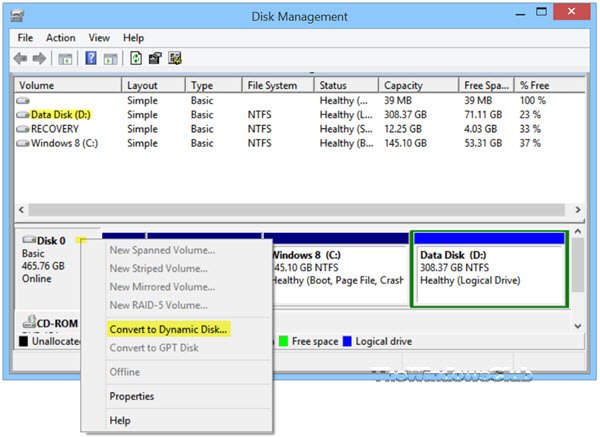
Convert Dynamic disk to Basic disk in Windows
1] Using Disk Management
To change a Dynamic Disk to a Basic disk, using Disk Management, right-click each volume you want to convert to a basic disk, and select Delete Volume for each volume on the disk. When all volumes on the disk have been deleted, right-click the Disk, and select Convert to Basic Disk. The operation will start.
2] Using CMD
Open an elevated command prompt and type diskpart and hit Enter.
Next type list disk and note the disk number, of the disk you want to convert to basic. Now type each of these and hit Enter, one after the other:
Type select disk <disknumber>.
Type detail disk <disknumber>.
For each volume on the disk, type select volume= <volumenumber> and then type delete volume.
Type select disk <disknumber>.
Specify the disk number of the disk that you want to convert to a basic disk.
Finally, type convert basic and hit Enter. The operation will start.
Remember to always back up first before you carry out any of these operations. And also never convert a Basic disk that contains your operating system to a Dynamic disk, as it could make your system unbootable.
Anand Khanse is the Admin of TheWindowsClub.com, a 10-year Microsoft MVP (2006-16) & a Windows Insider MVP (2016-2022). Please read the entire post & the comments first, create a System Restore Point before making any changes to your system & be careful about any 3rd-party offers while installing freeware.
Last Updated :
28 Dec, 2024
When managing storage in Windows operating systems, you might come across two primary kinds of disk configurations: Basic Disk and Dynamic Disk. To do this well and make sure that your data is organized according to your needs, it becomes important to know the differentiation between these disk types. This article will explore the main features and differences between basic and dynamic disks, as well as their advantages and limitations.
What is Basic Disk?
A basic disk is a type of hard drive configuration, available with the Windows operating system. To manage all partitions and data on the hard disk, normal partition tables or logical drives are used. They are the storage types most often used with Windows. It can contain up to four primary partitions, or three primary partitions and an extended partition with multiple logical drives.
Operations to be Performed
- Create and delete primary and extended partitions.
- Create and delete logical drives within an extended partition.
- Format a partition and mark it as active.
Advantages of Basic Disks
- Compatibility: Basic Disks are compatible with all Windows versions. They provide an appropriate choice for those systems that use many different operating system versions, and there is a need to maintain the same type of disk.
- Ease: Basic Disks have a simple partitioning structure that leaves no room for questions as to what is primary and what may be an extended partition, which makes them easier to manage.
- Ease of use: Basic disks are much easier to configure and administrate compared to dynamic disks, so they’re a good option if you don’t need advanced disk management.
Disadvantages of Basic Disks
- Limited Flexibility: Basic disks are unable to support such advanced features as spanning volumes or mirroring, which restricts their functionality in complicated storage setups.
- Partition Limitations: In a Basic Disk, you are allowed to have no more than four primary partitions or three primary partitions and an extended partition. Given modern systems’ demands, this would tend to be a bit limiting for users who require more than four partitions.
What is Dynamic Disk?
A disk that has been initialized for dynamic storage is called a dynamic disk. It gives more flexibility than a basic disk because it does not use a partition table to keep track of all partitions. The partition can be extended with dynamic disk configuration. It uses dynamic volumes to manage data.
Operations to be Performed
- Create and delete simple, spanned, stripped, mirrored, and RAID-5 volumes.
- Extend a simple or spanned volume.
- Repair mirrored or RAID-5 volumes.
- Reactivate a missing or offline disk.
Advantages of Dynamic Disks
- Advanced Volume Types: Dynamic Disks support a range of volume types, including spanned, striped ( RAID 0 ), mirrored ( RAID 1 ), and RAID-5 volumes for more complex and flexible storage solutions.
- Volume Extension: The volumes can be extended on Dynamic Disks, extended space at your needs without the need to reformat or repartitioning a disk.
- Improved Redundancy: Mirroring and RAID-5 allow for redundancy by enhancing fault tolerance, hence protection against loss of data.
Disadvantages of Dynamic Disks
- Compatibility Issues: Dynamic disks are incompatible with previous versions of Windows and may be quite problematic in the event of moving the disks between systems or OS versions.
- Further complication means that compared to Basic Disks, more demands are made from the management by the advanced functionality implemented in Dynamic Disks.
- Performance Impact: Some high-end settings, such as RAID-5, may on their own be resource-intensive and thus bottleneck the system performance at times.
Difference Between Basic Disk and Dynamic Disk
Basic and dynamic disks serve different purposes in terms of storage management. While a basic disk uses primary and extended partitions, a dynamic disk provides more flexibility with volumes that can span multiple disks.
|
Feature |
Basic Disk |
Dynamic Disk |
|---|---|---|
|
Definition |
Traditional disk type using primary and extended partitions. |
Advanced disk type supporting complex volume types and configurations. |
|
Partition Types |
Primary and extended partitions. |
Spanned, striped, mirrored, RAID-5 volumes. |
|
Maximum Partitions |
Up to 4 primary partitions, or 3 primary and 1 extended partition. |
No fixed limit; depends on available disk space and volume types. |
|
Compatibility |
Compatible with all versions of Windows. |
Supported on Windows 2000 and later versions. |
|
Volume Expansion |
Limited; requires repartitioning or reformatting. |
Supports dynamic volume expansion without reformatting. |
|
Advanced Features |
Basic partitioning only. |
Supports advanced features like RAID, spanning, and mirroring. |
|
Data Redundancy |
No built-in redundancy; relies on external backup solutions. |
Supports data redundancy through mirroring and RAID configurations. |
|
Flexibility |
Less flexible; limited to simple partitioning. |
More flexible; allows for complex volume setups and management. |
|
Management Complexity |
Simple and straightforward. |
More complex; requires understanding of dynamic volume management. |
|
System Performance Impact |
Minimal impact. |
May have performance overhead depending on configuration (e.g., RAID-5). |
|
Conversion |
Can be converted to Dynamic Disk without data loss (backups recommended). |
Conversion to Basic Disk may require data backup and reformatting. |
Conclusion
In brief, Basic Disks and Dynamic Disks are applied to Windows for different types of storage management. Basic Disks are simple and work in almost all versions of Windows. Dynamic Disks feature advanced functions like disk spanning and RAID Configurations that help work with more complicated storage requirements and allow data redundancy and volume expansion. Compared to Basic Disks, Dynamic Disks offer greater flexibility and better fault tolerance. However, they involve more complexity and possible incompatibility. Which one is better depends upon particular storage needs and expertise, along with system environment.
Depending on how you plan on using your Windows computer, it might make a lot of sense to convert your basic disk into a dynamic disk since it gives you access to a whole plethora of features that are not available if you stick to the traditional hard disk type.
Before we dive into the actual methods, it’s important to understand the differences between a basic and dynamic disk. This will help you decide if converting is the best option for you.
Basic Disk vs Dynamic Disk
Although there are instances where it makes a lot of sense to change your disk type to dynamic, there are also situations where you’re better of sticking with a Basic Disk.
To put it simply, basic disks are more suitable for ordinary computer users that do, well, ordinary things. Unless you’re an IT administrator or an advanced Windows user passionate about fine-tuning your computer performance by using more than one hard disk, using a dynamic disk should be your choice.
Here are the 3 main advantages of using a dynamic disk over a basic disk:
- Dynamic disks are capable of creating volumes that span multiple disks. By using this technique, you’ll get better use of your available disk space since you’ll be able to combine areas of unallocated space in volumes that are shared across multiple disks.
- You can only create fault-tolerant volumes (either RAID-5 or mirrored) if you’re using dynamic disks.
- Using a dynamic drive, you have the ability to save data to different hard disks and form so-called ‘stiped volumes. These will improve the disk performance by letting in more than one disk drive to drive read and write data.
Now that you are familiar with the advantage of creating a dynamic disk, let’s go over all the ways that will allow you to make the transition from a Basic Disk to a Dynamic disk under Windows.
There are three conversion ways that will allow you to upgrade to a dynamic disk without causing data loss, but this is not a given fact. Things that are entirely beyond your control can go wrong during the conversion process, so our recommendation is to take the time and back up your hard drive data before taking any additional steps.
Now that you have the safety measure in place, let’s go over all the available solutions that will allow you to convert to a dynamic disk without data loss:
- Using Disk Management
- Using Diskpart from an elevated Command Prompt
- Using a 3rd party tool
Below we’ll give you the steps for each of these methods. Feel free to follow whichever method you feel most comfortable with.
PRO TIP: Generally speaking, using a 3rd party tool is considered safer since most solutions currently on the market have a few additional safety mechanisms that will protect you against an eventual data loss. But depending on the tool you choose, you might need to invest in a software license.
1. Convert to a Dynamic Disk using Disk Management
If you prefer the built-in tool that’s backed up by Microsoft, using Disk Management is probably the option to go in your case.
Using Disk Management, you can easily convert a basic disk to a dynamic disk without downloading any type of third-party software. The drawback is that in some cases, the operation will fail due to a computation error and you run the risk of data loss.
If you are prepared to go this route, follow the instructions below to convert a basic disk to a dynamic disk using Disk Management:
- Press Windows key + R to open up a Run dialog box. Next, inside the text box, type ‘diskmgmt.msc’ and press Enter to open up Disk Management.

Opening up a Disk Management window - When you’re prompted by the User Account Control (UAC) prompt, click Yes to grant admin access.
- Once you’re inside the Disk Management interface, select the basic disk that you want to convert to dynamic from the bottom-side menu, right-click on it and choose to Convert to Dynamic disk from the context menu that just appeared.

Convert to a dynamic disk Note: Double-check to make sure that you are converting the right disk to dynamic before proceeding any further.
- Once you are certain that you are trying to convert the correct disk, click Ok to finish the process and complete the transition to a dynamic disk.
If you’re looking for a different way of converting your basic drive to a dynamic equivalent, move down to the next method below.
2. Use a CMD Command to Convert a Basic Disk to Dynamic
If you don’t shy away from using terminal commands to get things done under Windows, you’ll be happy to know you can also use Diskpart inside Command Prompt to convert to a dynamic disk from a basic equivalent.
This method is also without data loss and will arguably give you more control over the transition process.
Follow the instructions below to make the conversion to a Dynamic Disk from a Basic equivalent:
- Press Windows key + R to open up a Run dialog box. When you’re prompted by the Run text box, type ‘cmd’ and press Ctrl + Shift + Enter to open an elevated Command Prompt.
Open up an elevated CMD prompt - When you’re prompted by the User Account Control prompt, click on Yes to grant admin access to the CMD prompt.
- Once you’re inside the elevated Command Prompt window, run the following commands in the same order as below and press Enter after each one to convert your basic disk to dynamic:
diskpart

list disk

select disk X

convert dynamic
Note: Keep in mind that X is simply a placeholder for the disk that you want to convert. Make sure to adjust the select disk X command in order to select the correct drive E.G. ‘select disk0‘. You can ensure that fetch the disk number from the return you get after you run the ‘list disk‘ command.

Convert the disk from Basic to Dynamic using CMD - Once every command is successfully imputed, type ‘exit’ and press Enter to end the disk conversion process.
- Close the elevated Command prompt.

If you want the conversion process to be handled by a 3rd party tool, move down to the next method below.
3. Use a 3rd party tool to Convert a Basic Disk to Dynamic
If you feel comfortable with using a 3rd party tool to facilitate the conversion process from basic to dynamic, there are a few reliable utilities that you can use to get the job done:
- EaseUS Partition Master
- Partition Wizard
- DiskGenius
- Recover.IT
All of these tools will get the job done, but with some of these, you might need to get the PRO versions in order to be able to use the conversion feature.
Fortunately, EaseUS offers this feature with the free version of the app. Follow the guide below for step by step instructions on converting a basic disk to dynamic:
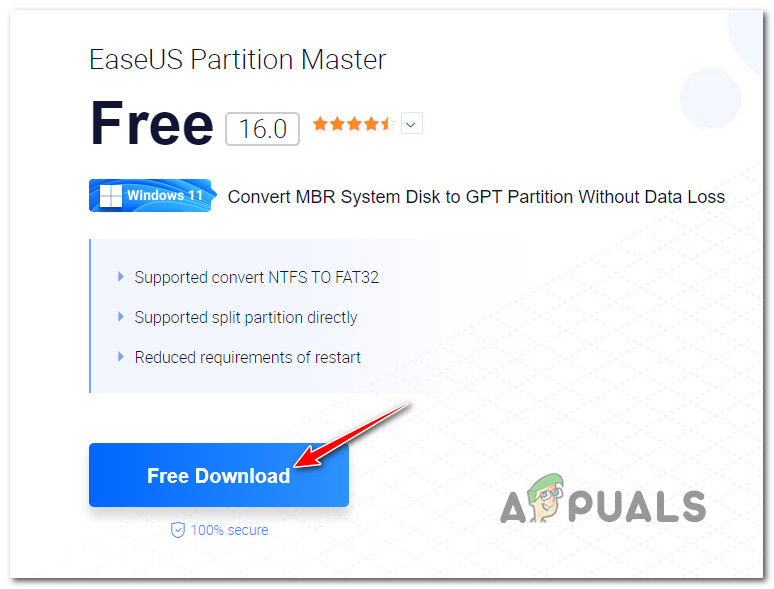
- Open up your browser and download the latest version of EaseUS from the official download page.
- Once you arrive on the correct page, click on Free Download and follow the instructions to download the installer locally.

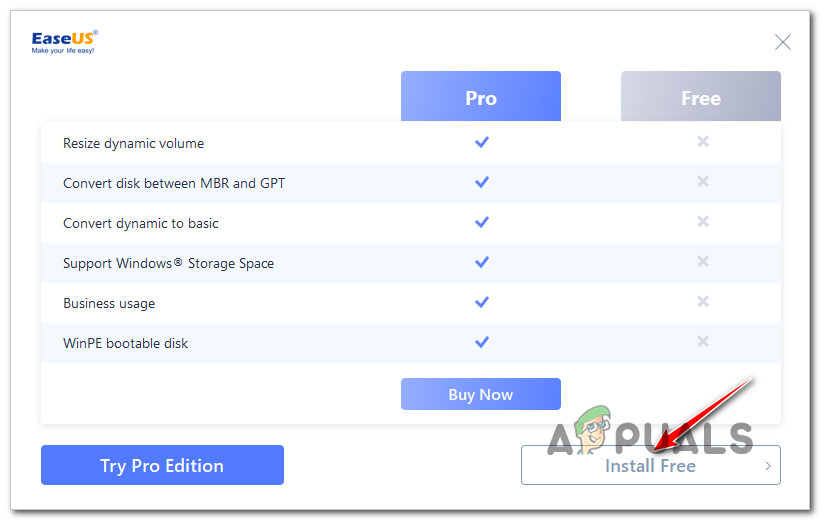
Downloading the Ease.US installer Note: When you’re prompted about the package you want to go for, make sure to download the free version. EASE.US allows you to convert a basic disk to dynamic with the free version, but you’ll need the PRO version to convert a dynamic disk back to basic.
- Once the installer is downloaded locally, open the installer, give it admin access at the UAC (User Account Control) and click on Install Free at the second prompt to install the free version.

Installing the free version of Ease.US - Wait until the installer downloads the install files locally and finishes the installation on your computer.
- Once the installation is complete, click on Start Now to open the tool.
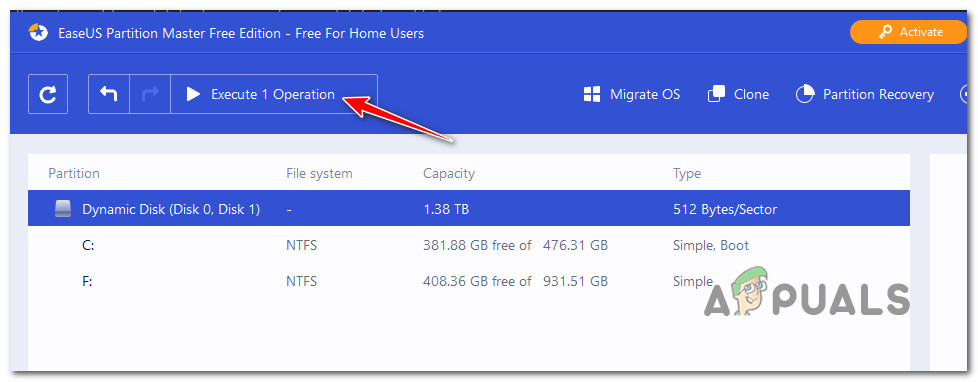
- Inside EaseUs Partition Master, simply right-click on the basic disk that you want to convert and choose Convert to Dynamic from the context menu that just appeared.

Convert to Dynamic disk using EaseUS Partition Master - Once the command is loaded, click on Execute Operation (from the ribbon bar at the top) to start the conversion process.

Execute the operation inside Partition Master - Wait until the operation is complete, then reboot your PC.

Kamil Anwar
Kamil is a certified MCITP, CCNA (W), CCNA (S) and a former British Computer Society Member with over 9 years of experience Configuring, Deploying and Managing Switches, Firewalls and Domain Controllers also an old-school still active on FreeNode.
Basic disks and dynamic disks are 2 types of hard disk configurations most often used in Windows. The former appears along with hard disk while the latter was introduced since Windows 2000. Different disk configurations have different features, but they are related.
What Is Basic Disk
Basic disk uses partitions to manage data, and one partition cannot share and split data with other partitions (the late versions of Windows OS like Windows 7, Windows 8 and Windows 10 also call partitions volumes).
On a basic disk, we can create 2 styles of partitions, namely MBR style partition and GPT style partition. To create MBR style partitions, we need to initialize the hard disk to MBR (master boot record). To create GPT style partitions, we should initialize the disk to GPT (GUID partition table).
For more information, please see MBR VS GPT (Focus on Difference and How to Convert Safely).
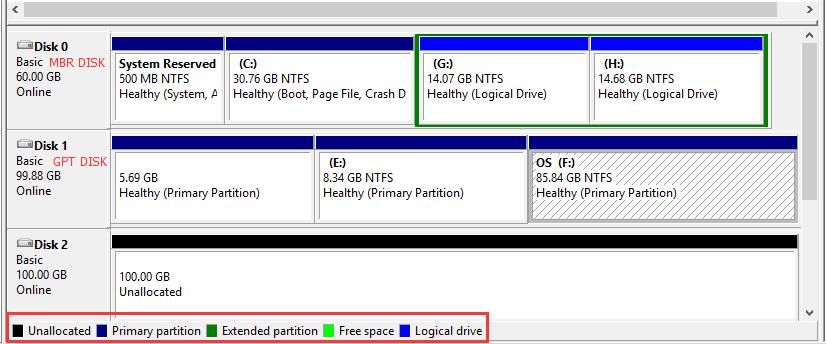
On MBR disks, partitions are called primary partition, extended partition, or logical partition while all partitions on GPT disk are called GPT partitions which function like primary partitions. An MBR based basic disk can have either four primary partitions OR three primary plus one extended partition, but the extended partition can contain an unlimited number of logical drives. And a GPT based hard disk can hold up to 128 partitions.
We can extend a primary partition by adding contiguous unallocated space on the same disk or extend a logical drive by adding free space contained in extended partition, but these partitions should be formatted with NTFS file system. Otherwise, Extend Volume feature is grayed out.
What Is Dynamic Disk
Dynamic disk uses dynamic volumes to manage data. It is a separate form of volume management that allows one volume to have noncontiguous extents on one or more physical disks. Dynamic disks use a database to track information about all volumes on the disk as well as information about other dynamic disks, and the location of the database is determined by partition style of the disk.
On MBR partitions, the database is contained in the last 1 megabyte (MB) of the disk while database on GPT partitions is located in a 1MB reserved partition. In addition, each dynamic disk in a computer saves a copy of the database, so that Windows can repair a damaged database by using the database on other dynamic disks.

On a dynamic disk, we can create 5 types of dynamic volumes to enhance computer performance, including simple volume, mirrored volume, striped volume, spanned volume, and RAID-5 volume.
- Simple volume functions like primary partitions on basic disk;
- Mirrored volume provides fault tolerance by creating a copy of data contained in this volume;
- Striped volume improves disk input/output performance by distributing I/O requests across disks;
- Spanned volume combines spaces on 2 hard disks at least to a dynamic volume;
- RAID-5 volume stripes data and parity across three or more disks.
For more information about these volumes, please see Dynamic Disk.
In Windows snap-in Disk Management utility, we are only allowed to extend simple volumes and spanned volumes except for the system and boot one; or we can extend a mirrored volume after breaking the mirror. However, with a third party partitioning program, we can extend any types of dynamic volumes.
Relationship Between Basic Disk and Dynamic Disk
Although basic disk and dynamic disk are 2 types of hard disk configurations, they are not completely irrelevant. Actually, we can convert a basic disk to dynamic disk or turn a dynamic disk to basic disk without data loss when there is a need.
Detailed steps of converting basic disk to dynamic disk:
Right click the basic disk -> choose “Convert to Dynamic Disk” from the popup menu -> click “OK” -> tap “Convert” to get the window below:
Then we will see the following message:
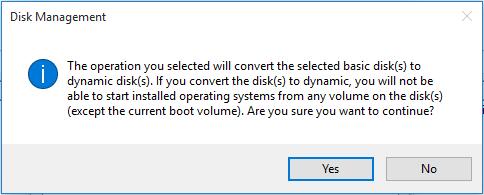
This message shows we cannot start installed operating systems from any volume on this disk except the current boot one. That is to say, all Windows OS except the current running one will be unbootable. Therefore, users who are dual or multi booting Windows on one disk had better not convert the basic disk to dynamic disk if they want to run all Windows well.
Moreover, when converting a basic disk to dynamic, users may be troubled by the error:
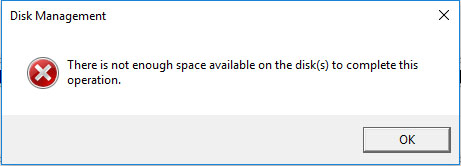
This will appear if there is not enough free space that is not partitioned at the end of the disk to create the database for the dynamic disk. To fix the error, we need to shrink the last partition to create such a space via the feature “Shrink Volume”.
However, once a disk has been converted to dynamic disk, we will be unable to convert it to basic disk in both Disk Management and Diskpart unless we delete all existing dynamic volumes. Needless to say, this operation will lead to data loss. But fortunately, there is an excellent partitioning tool which makes it possible to restore a dynamic disk to basic without deleting any information.
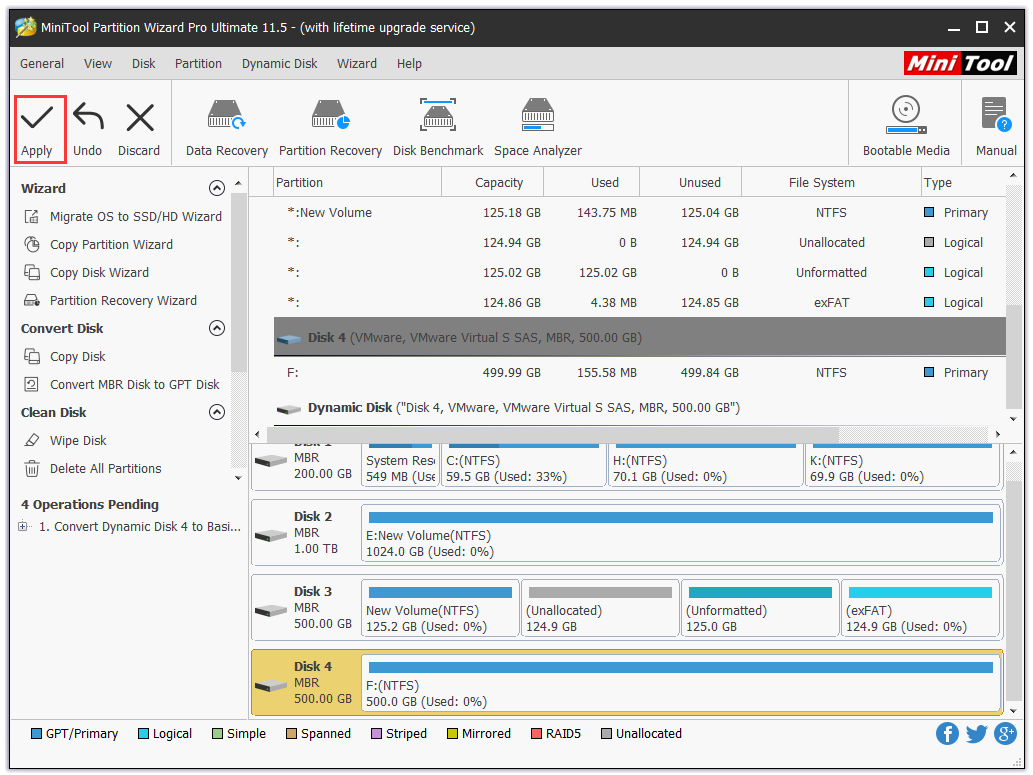
Detailed steps of converting dynamic disk to basic disk:
Note:
1. MiniTool Partition Wizard Free Edition does not support converting dynamic disk to basic. We need to purchase advanced editions to do this job.
2. MiniTool Partition Wizard requires a reboot when converting dynamic disk to basic.
Step 1. After installing and registering MiniTool Partition Wizard, click the dynamic disk that needs converting and choose “Convert Dynamic Disk to Basic” from the action panel.

Step 2. Then we can preview that the selected disk will become a basic disk. At this moment, click “Apply” on the tool bar to confirm the conversion.
Hopefully, this article has explained the general knowledge of basic disk and dynamic disk.