
Салимжанов Р.Д
Part 3 Basic Configuration of Windows Server 2019(DNS, AD)
Salimzhanov R.D.
Во второй части, мы рассмотрели, как провести настройку удаленного доступа и установку необходимых служб, таких как, DHCP-сервер.
Сейчас мы рассмотрим настройку DNS-сервера и Active Directory (AD).
Мы знаем, что DNS-сервер — это технология интернет-протокола, которая переводит человеко-читаемые доменные имена в IP-адреса компьютеров, чтобы обеспечить связь между ними. DNS (Domain Name System) серверы хранят базы данных доменных имен и их соответствующих IP-адресов, позволяя пользователям получить доступ к веб-сайтам и другим ресурсам в интернете по их доменным именам.
А если простыми словами, то DNS сервер работает по принципу.
После ввода названия какого-либо сайта в браузер:
1) Запрос, который ввел пользователь переадресуется на DNS-сервер.
2) Интернет-провайдер настраивает на своем сетевом оборудовании локальные DNS-серверы. Далее сервер DNS ищет записи о соответствии запрашиваемого домена IP-адресу.
3) По IP-адресу устройство ищется во всемирной паутине.
4) Если оно найдено, запрос обрабатывается и возвращается ответ. В итоге пользователь видит запрошенный сайт.
5) Если не удалось определить IP-адрес устройства, пользователь получает сообщение об ошибке.
Настройка DNS-сервера внутри компании имеет несколько важных целей:
1. Управление именами: Внутренний DNS-сервер позволяет управлять именами хостов и служб внутри сети, что упрощает доступ к ресурсам.
2. Ускорение доступа: Локальный DNS-сервер может значительно ускорить разрешение имен, так как запросы не нужно отправлять на внешние серверы.
3. Безопасность: Внутренний DNS-сервер позволяет контролировать и фильтровать запросы, что может повысить уровень безопасности сети.
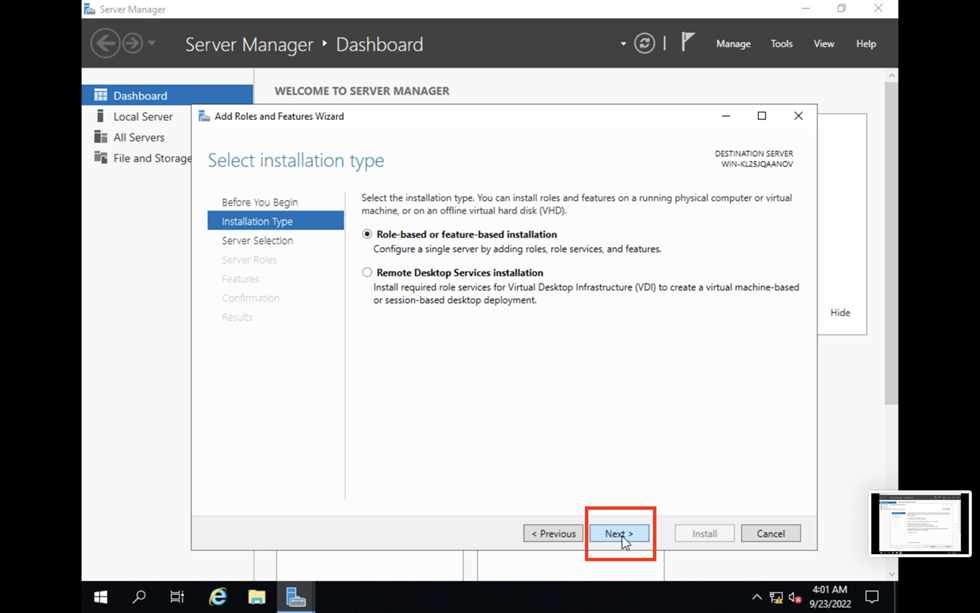
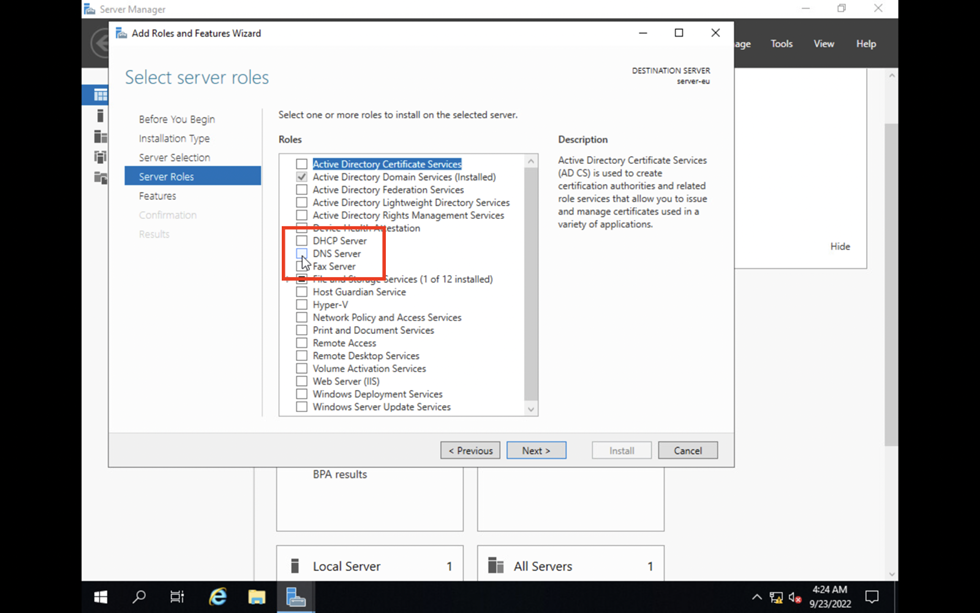
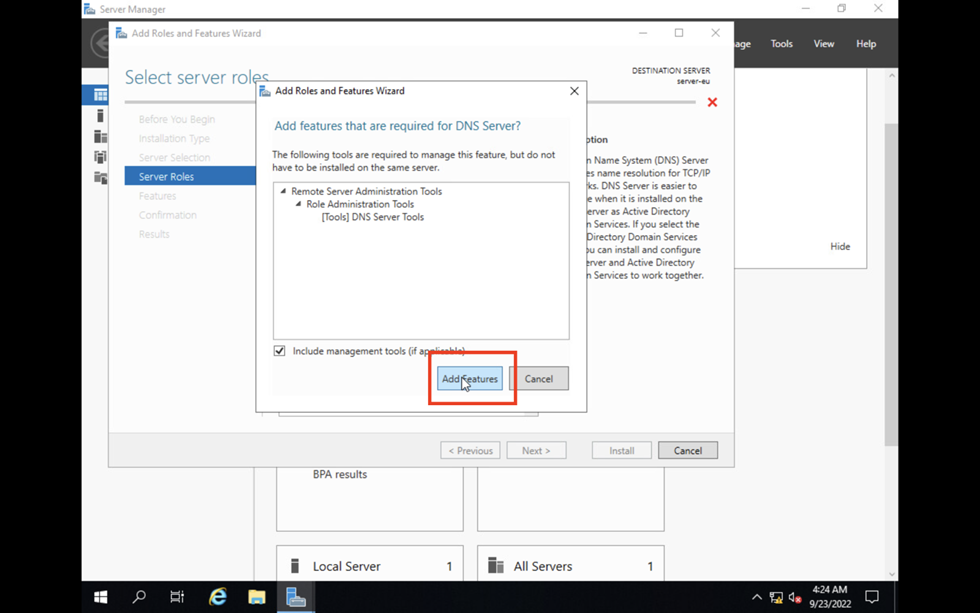
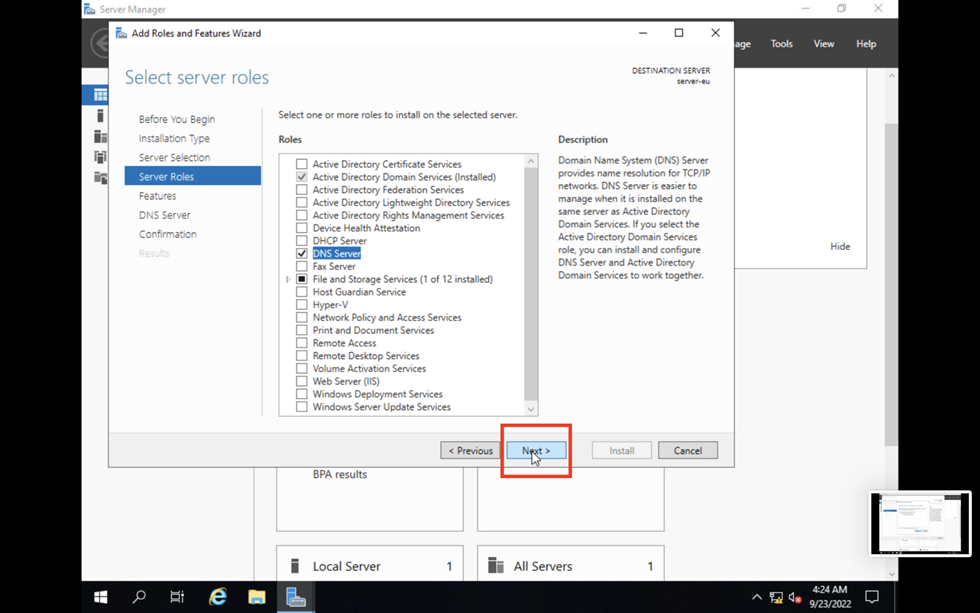
Перейдем к настройке, следуем инструкции в скринах:
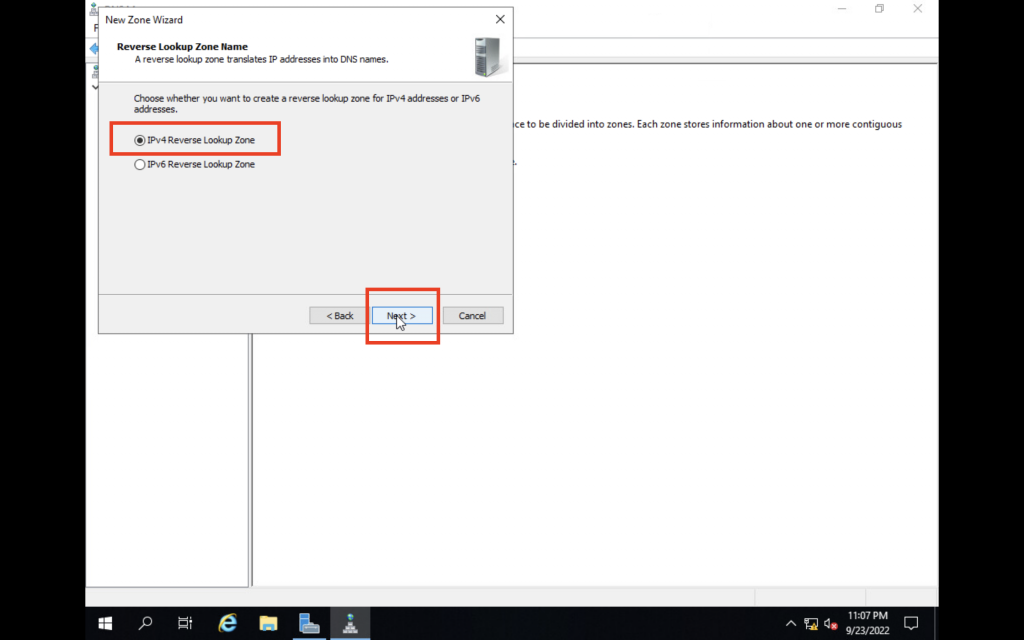
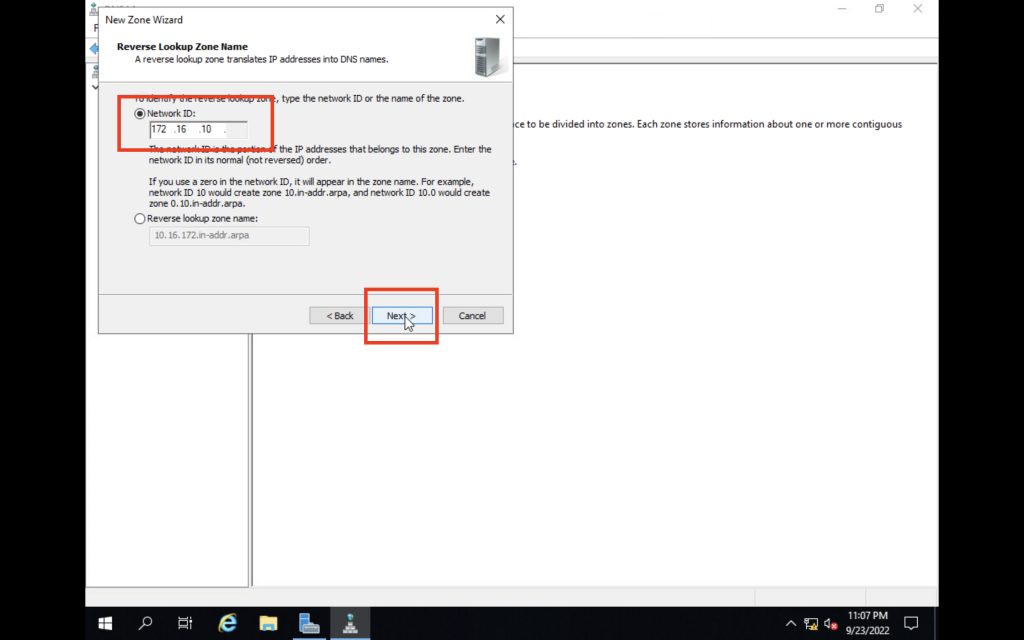
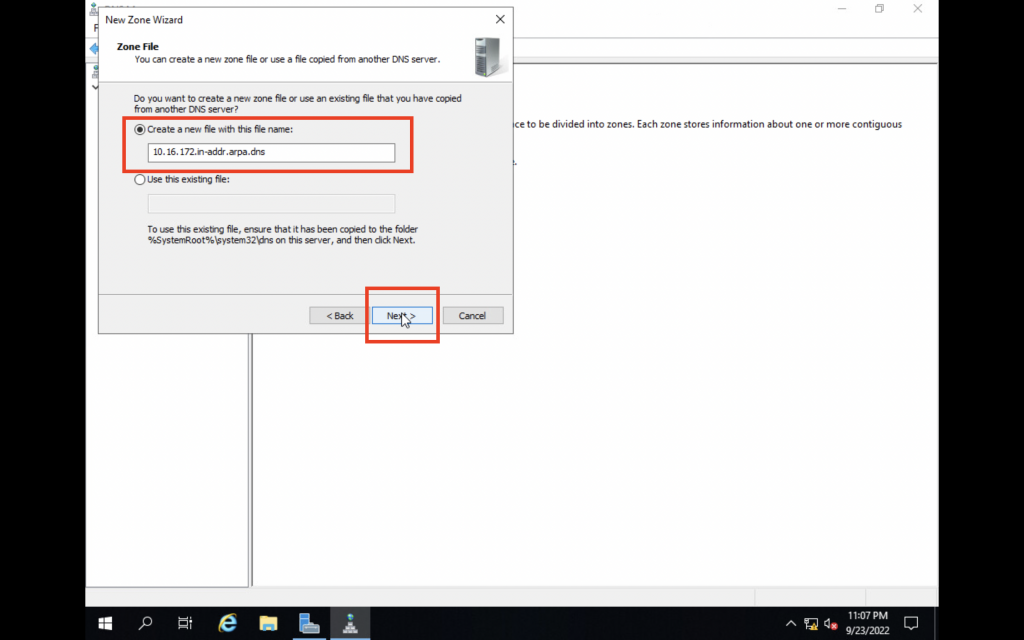
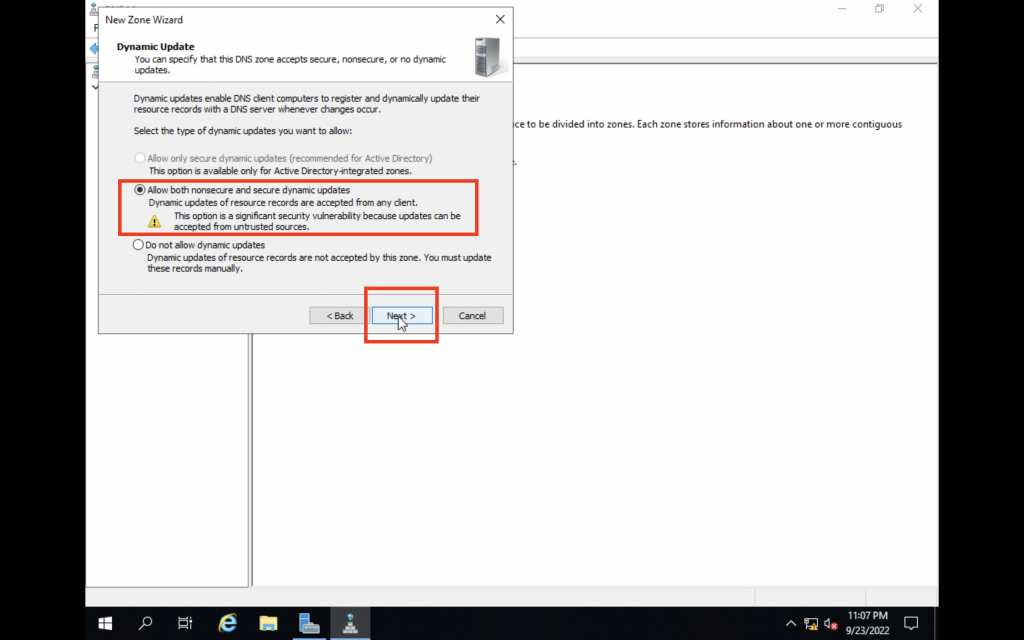
Создадим зону DNS:
Обратная зона DNS (Reverse DNS Zone) используется для преобразования IP-адресов в доменные имена. Это обратный процесс по сравнению с обычным DNS, где доменное имя преобразуется в IP-адрес. То есть простыми словами мы присвоим имя нашему серверу для пинга с пользовательского ПК.
DNS и Active Directory (AD) являются взаимосвязанными технологиями, поскольку Active Directory зависит от DNS для обеспечения разрешения имен компьютеров и других сетевых ресурсов.
В среде Windows-сервера Active Directory использует DNS для регистрации и поиска устройств, служб и других ресурсов в сети. Когда компьютер присоединяется к домену Active Directory, он автоматически регистрирует свое имя и IP-адрес в службе DNS. Это позволяет другим компьютерам в сети находить и общаться с ним по его имени вместо IP-адреса.
Таким образом, DNS и Active Directory тесно интегрированы для обеспечения эффективной и безопасной работы сети в среде Windows.
Настроим Active Directory (AD):
Создание дополнительных папок (или контейнеров) в Active Directory (AD) позволяет организовать и управлять объектами более эффективно. К примеру, нам это пригодится, когда будем настраивать групповую политику.
Добавляем пользователя в раздел User:
Далее переходим на другой ПК подключений к нашему серверу и подключаемся через нашего созданного пользователя:
Далее входим от пользователя.
Если выдает ошибку проверьте подключение:
После входа автоматически перезагружается ПК.
После перезагрузки входим под созданного пользователя и работаем, если нужно что-то поменять в системе, то заходим от админа (созданного естественно заранее).
Теперь на сервере в подразделении компьютеров отображается подключение:
Если надо мы его можем перенести в другое нужное нам подразделение:
Следующая часть будет об управлении групповыми политиками.
1) Основные сведения об обратной зоне DNS // [электронный ресурс]. URL: https://learn.microsoft.com/ru-ru/azure/dns/dns-reverse-dns-overview / (дата обращения 16.08.2024).
2) Помощник Админа // [канал]. URL: https://t.me/channel_adminwinru (дата обращения 18.08.2024).
Back to: Technology Guides
A DNS server is an essential building block of any network. It is a database that translates an IP address into a human readable name in a forward lookup zone and the reverse as well in a reverse lookup zone.
Client machines in a network refer to name servers who host a DNS to know which machines are located at which IP address.
In this guide, we will learn how to install a DNS server on a Windows Server 2019 machine. Once a client machine is setup to use it as a name server, it will know the IP address of a machine from a name.
Getting started
In this guide, we are going to assume you already have the following:
-
Microsoft Windows Server 2019 installed on a server.
-
You want to connect two client machines with Microsoft Windows 10 installed to the network.
We are going to be using the following network configuration:
|
ASSET |
NAME |
IP ADDRESS |
SUBNET MASK |
|
Server 1 |
server-eu |
172.16.10.10 |
255.255.255.0 |
|
Client Machine 1 |
wks-1 |
172.16.10.101 |
255.255.255.0 |
|
Client Machine 2 |
wks-2 |
172.16.10.201 |
255.255.255.0 |
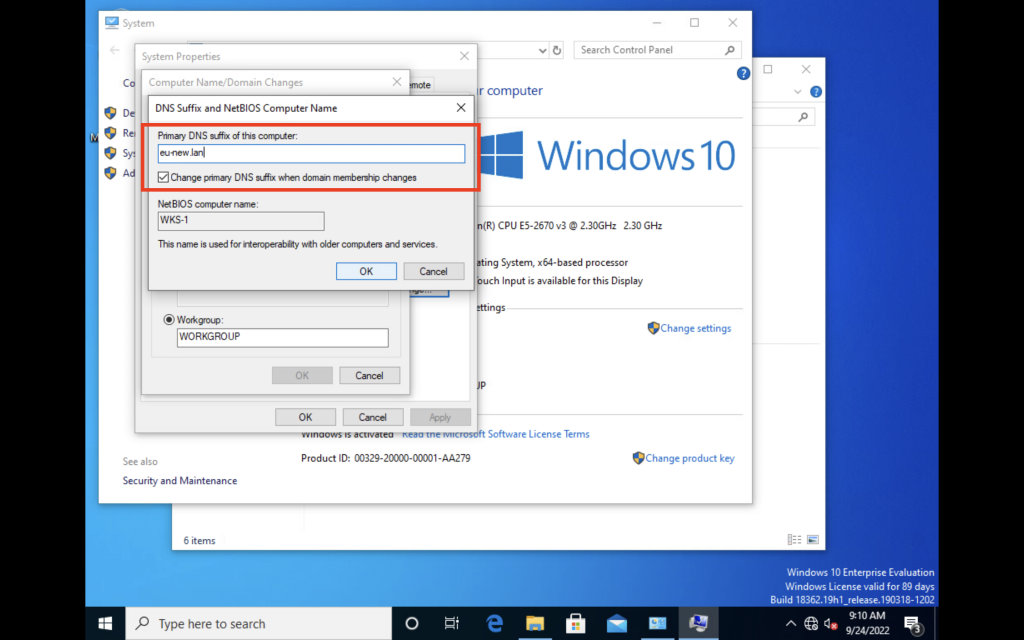
We are going to be using the domain eu-new.lan.
The complete name or Fully Qualified Domain Name (FQDN) of each asset will be:
-
Server 1 will be:
server-eu.eu-new.lan
-
Client 1 will be:
wks-1.eu-new.lan
-
Client 2 will be:
wks-2.eu-new.lan
Server configuration
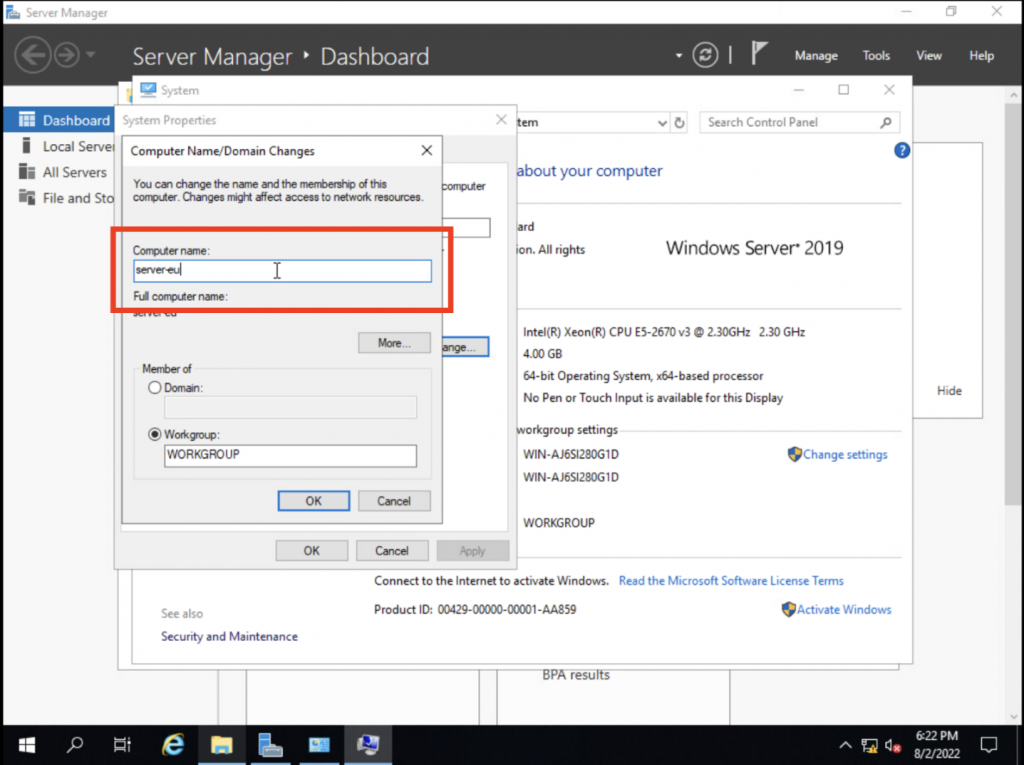
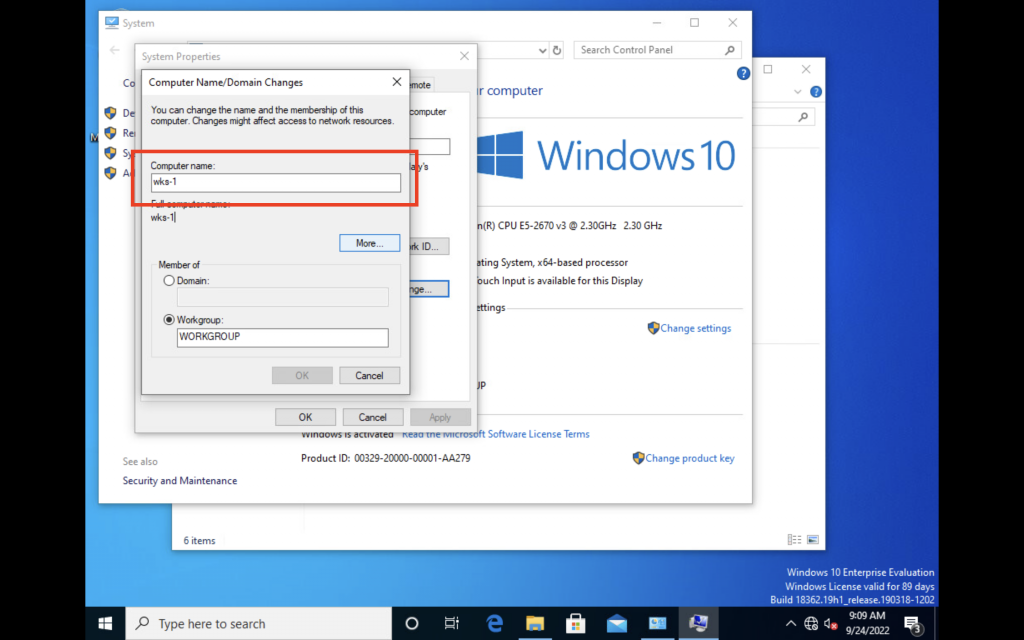
1. Configure NETBIOS name to server-eu
We start by establishing our server’s name to be server-eu.
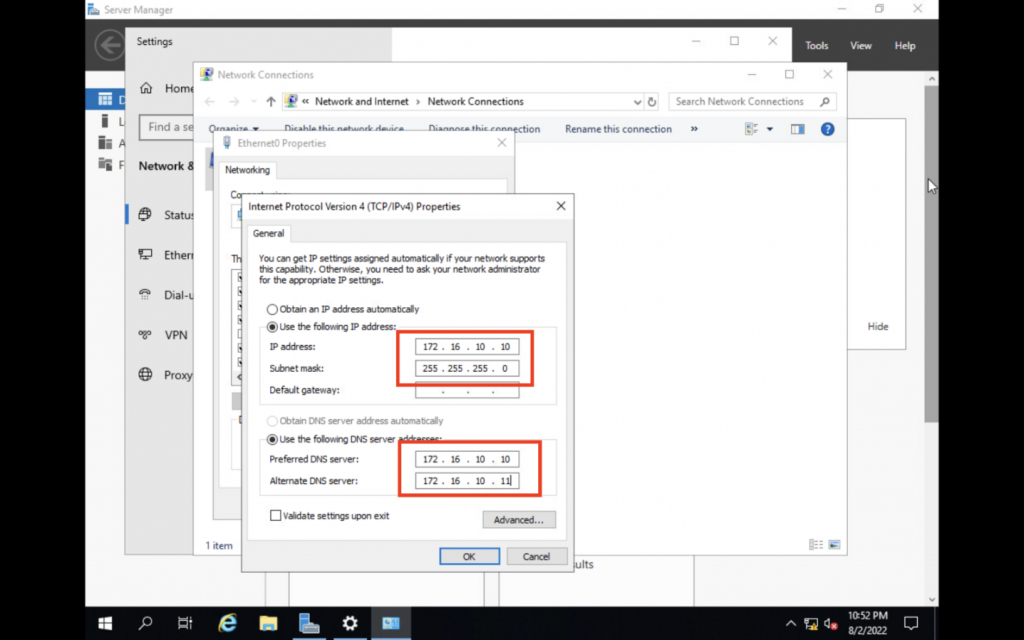
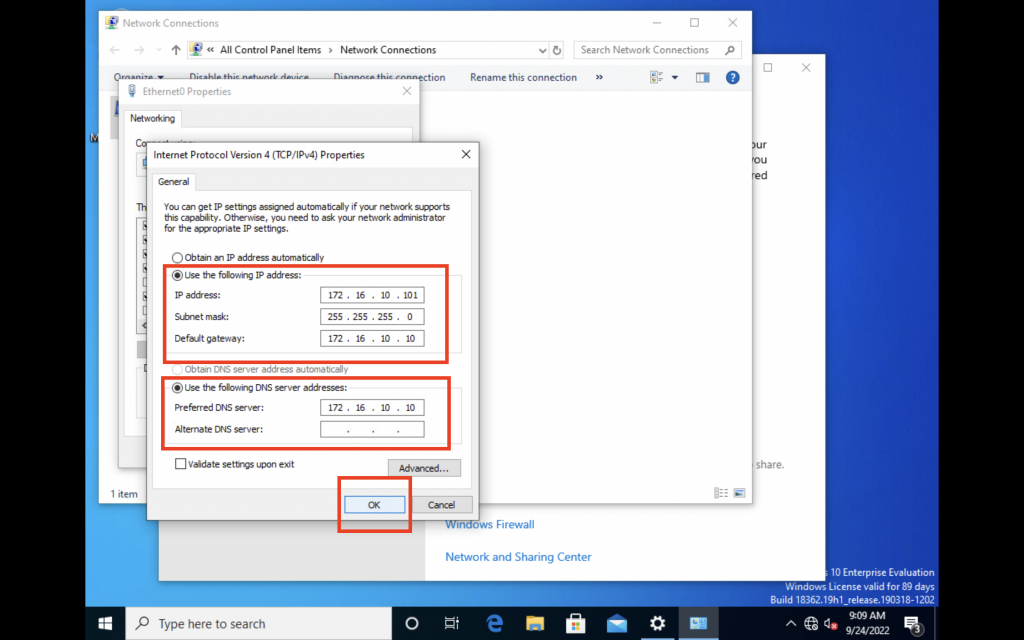
2. Configure network to use 172.16.10.10
We will now configure our server’s network to be a static IP address of 172.16.10.10 so that our client will know which address to connect to.
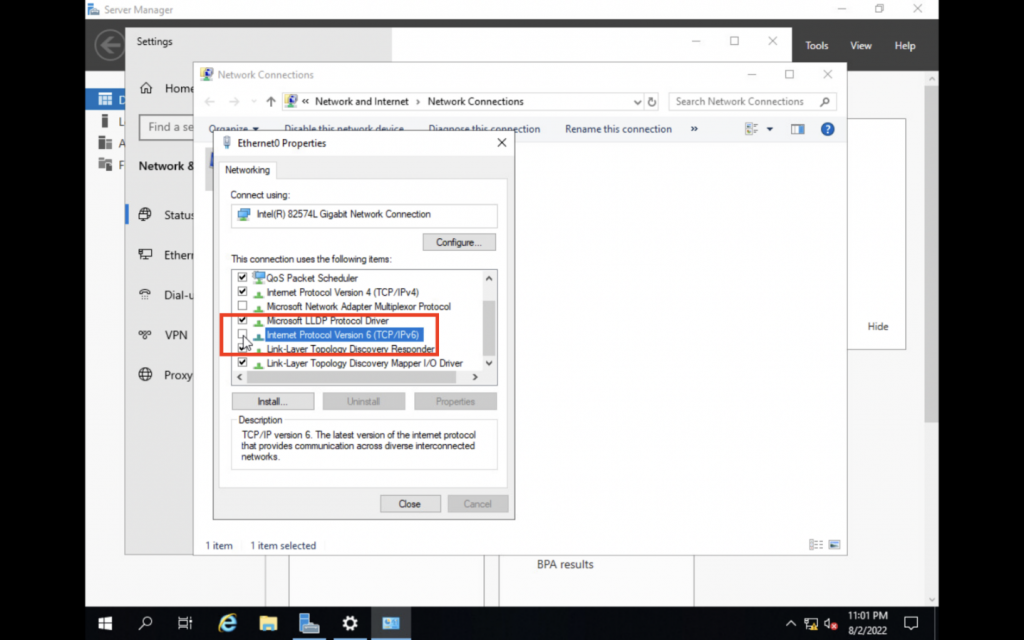
We are disabling IPv6 because we will only be using IPv4 and we want to make sure it will not interfere with our setup.
3. Install the DNS Server.
Now that the basic computer configuration is out of the way, we can start installing the DNS Server.
4. Configure the DNS Server.
Once the installation is completed, we can start configuring our DNS zones.
4.1 Create our Primary Forward Lookup Zone
This zone will take care of translating client names to IP addresses. All records must be part of a domain name. We will be using eu-new.lan.
4.2 Create our Primary Reverse Lookup Zone
This zone will take care of doing the reverse. It will translate IP addresses to client names.
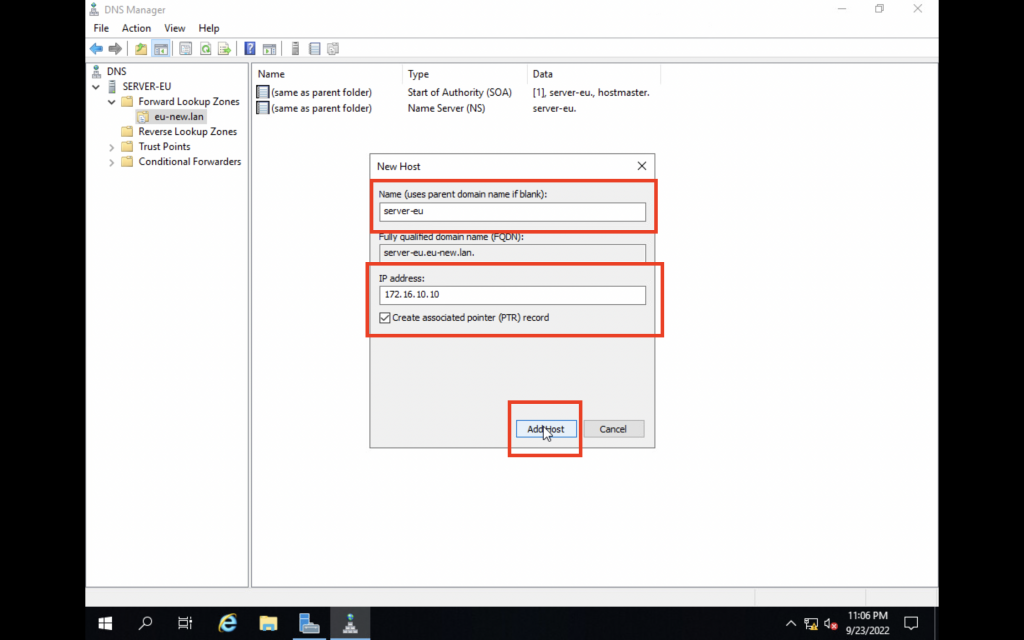
4.3 Add our A record
We will now create an A record that will bind our server name server-eu to the IP address 172.16.10.10.
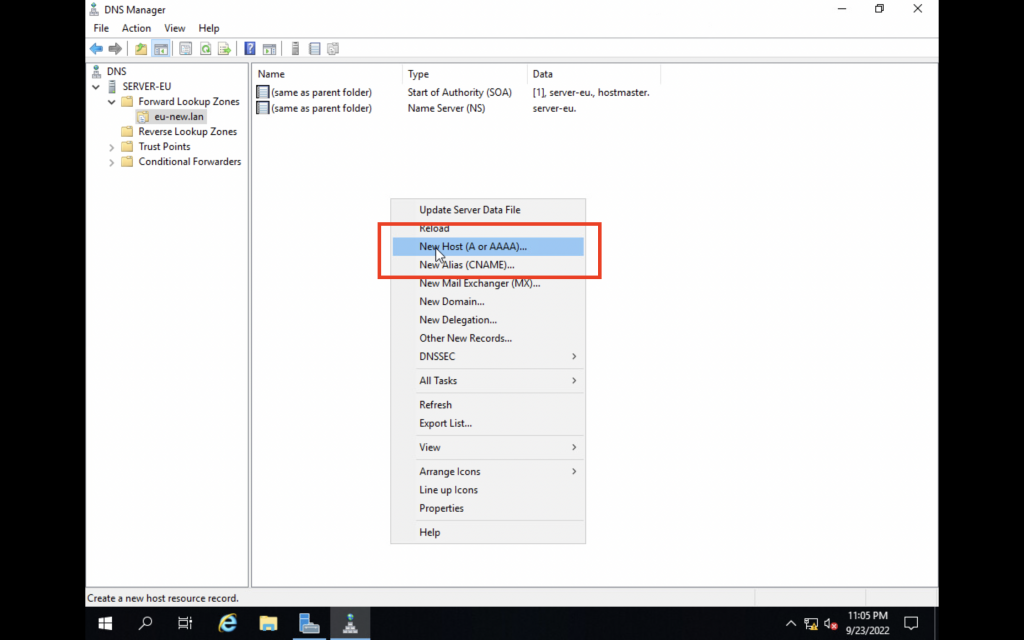
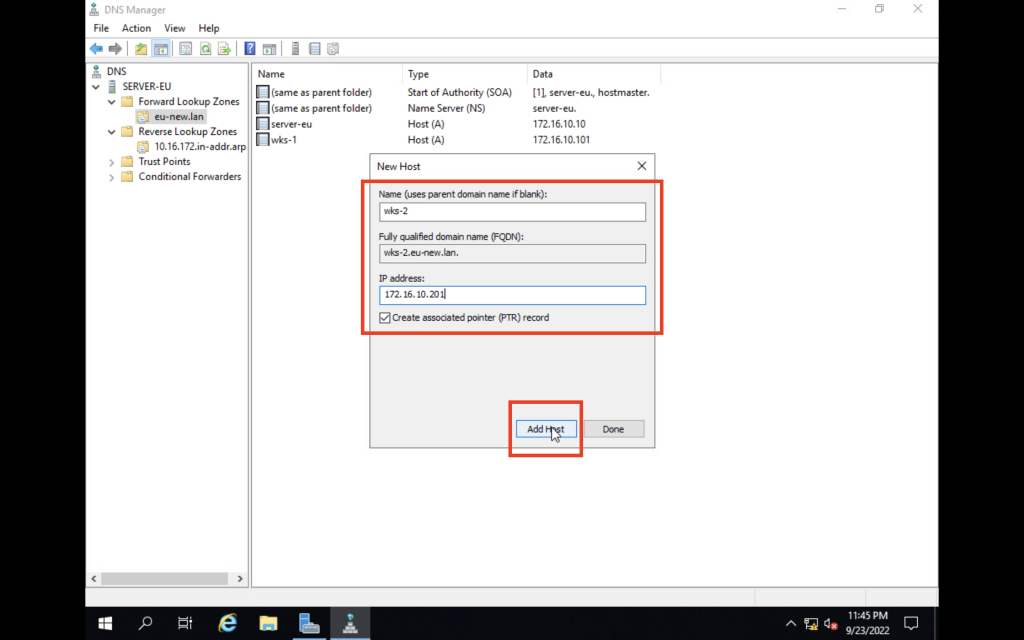
Let’s also create the A records to point to our two clients.
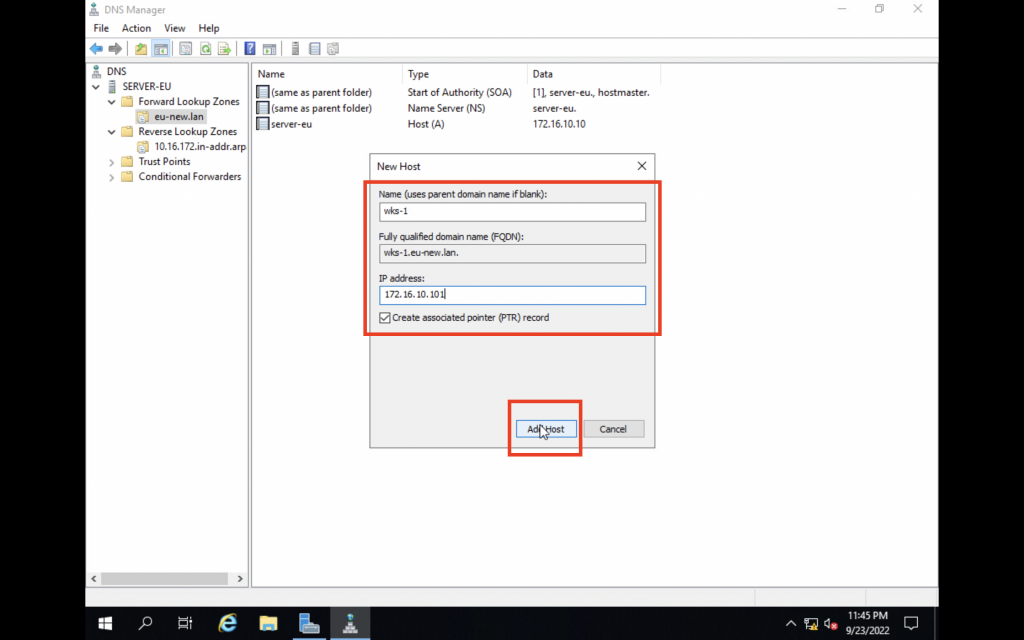
Client 1 and 2 configuration
It is now time to integrate the two client machines into the network test our DNS Server.
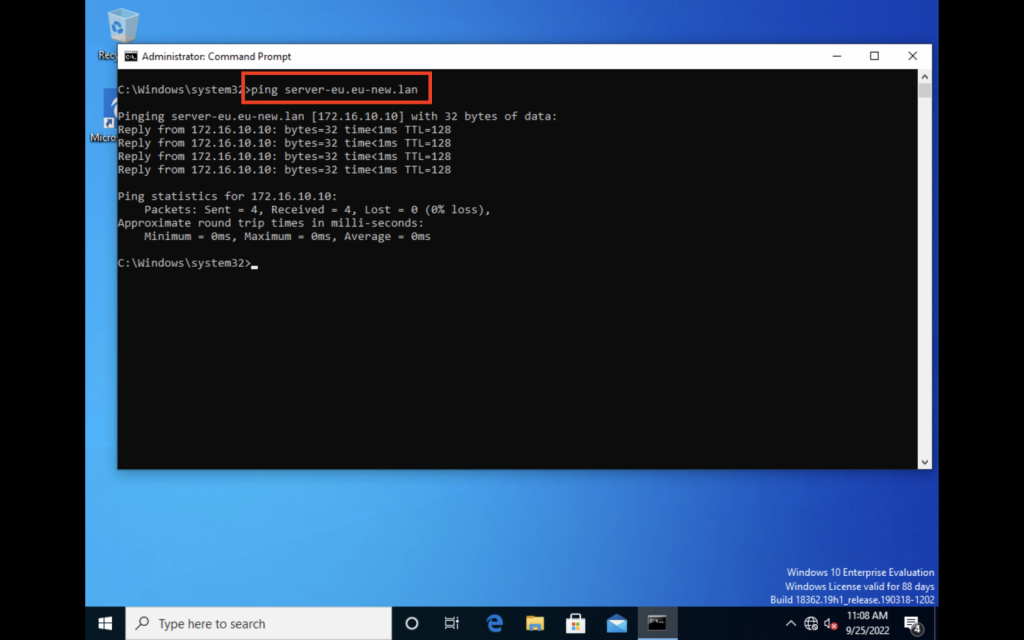
After configuring client 1, we can test the DNS configuration to see if we’re able to resolve the A records with .
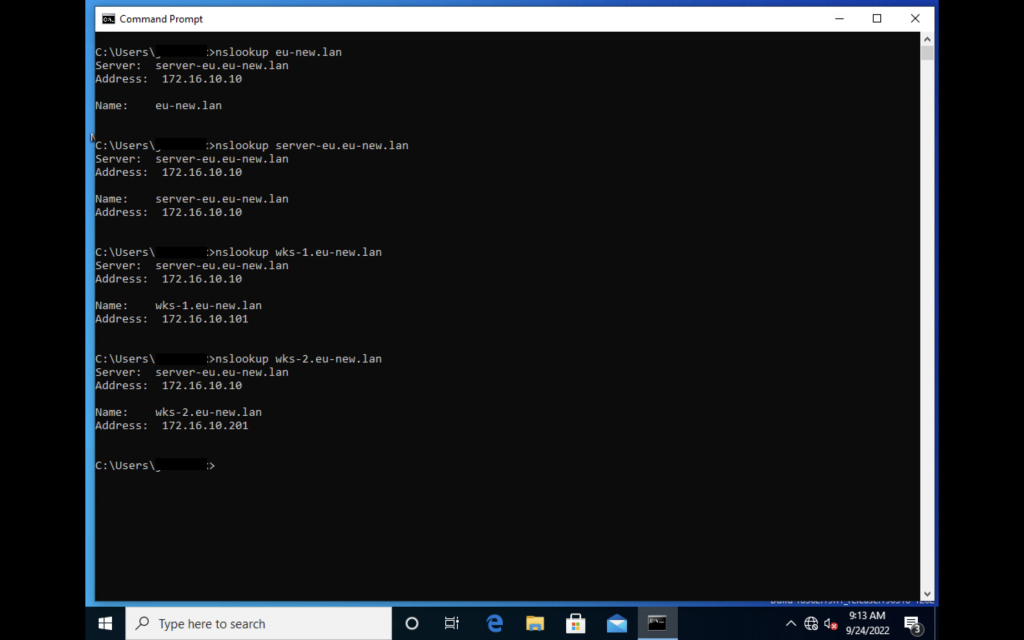
We can see that the records are resolving to the right IP addresses, we can now ping the server using its FQDN instead of its IP address after allowing pings through the firewall.
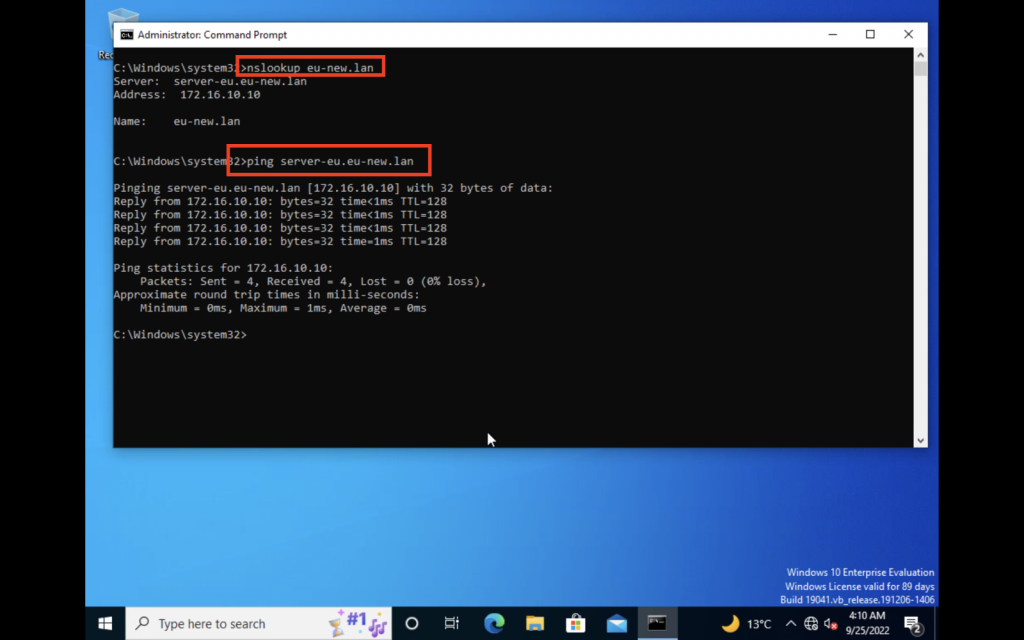
After configuring client 2 to use 172.16.10.201 and use the name of wks-2 with a DNS suffix of eu-new.lan, we can see that the DNS records resolves as well and we can successfully ping the server using its FQDN.
Conclusion
In this guide, we have learned how to setup a proper DNS server on Windows Server 2019 and integrate two client machines running Windows 10 to the network 172.16.10.0.
All devices are now part of the domain eu-new.lan and are looking up the DNS server for A records to resolve FQDN to IP addresses and vice-versa.
Our next step after installing the DNS server is to use Active Directory and integrate it. You can refer to our guide on how to install Active Directory.
Let’s get started today
The Domain Name System (DNS) is a crucial component of the TCP/IP protocol suite that maps human-readable domain names to IP addresses. It enables seamless communication between computers on a network or the internet. In this guide, we’ll walk through the steps to install and configure a DNS Server on Windows Server 2019.
Prerequisites
Before proceeding, ensure that your Windows Server 2019 has a static IP address configured. A static IP address is required for the DNS Server to function correctly.
Step 1: Install the DNS Server Role
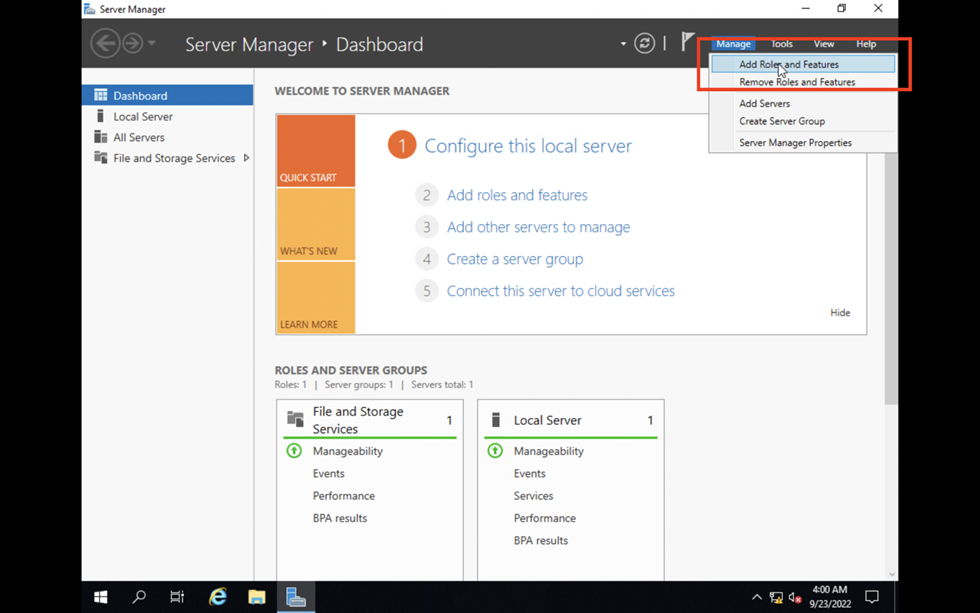
1. Open the Server Manager.
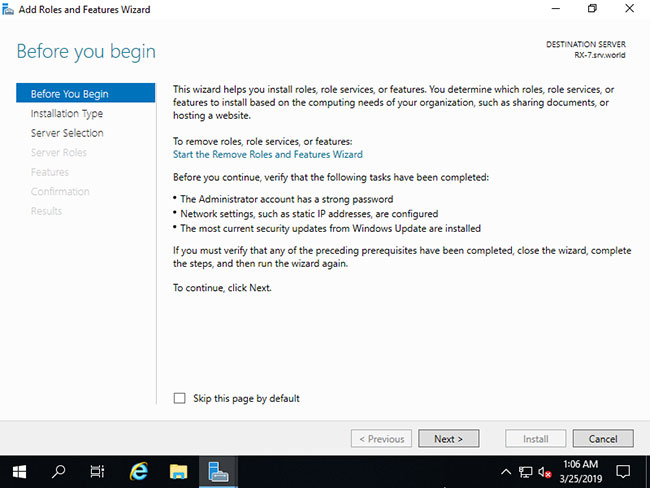
2. Navigate to the “Manage” menu and select “Add Roles and Features.”
3. In the “Add Roles and Features Wizard,” click “Next” until you reach the “Server Roles” page.
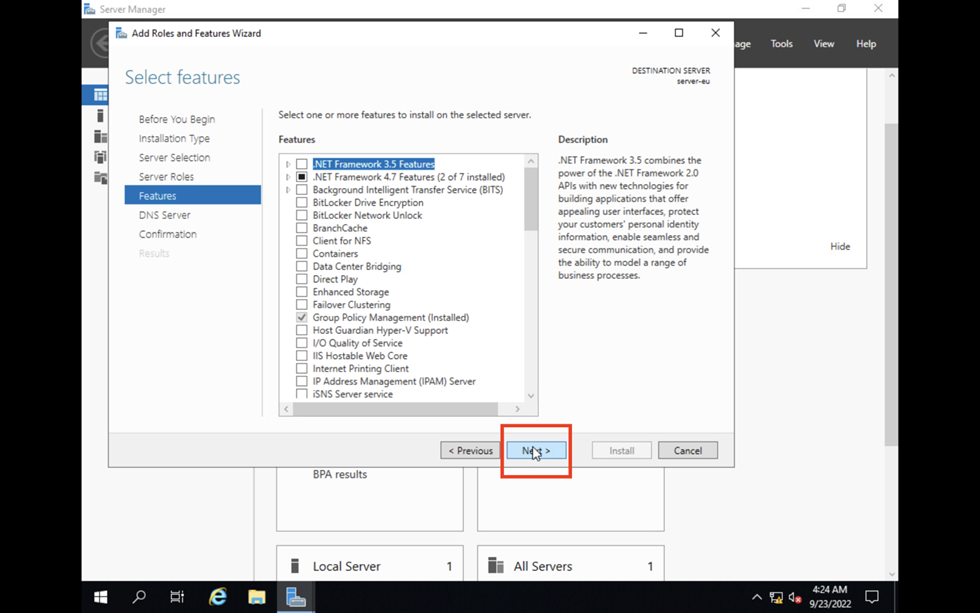
4. Select the “DNS Server” role from the list of available roles.
5. Click “Add Features” when prompted, and then click “Next.”
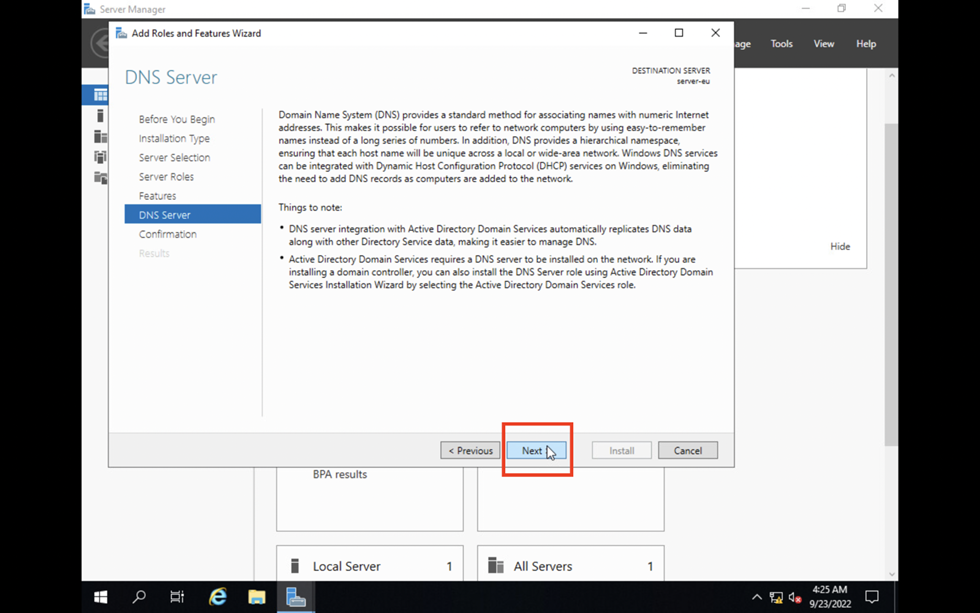
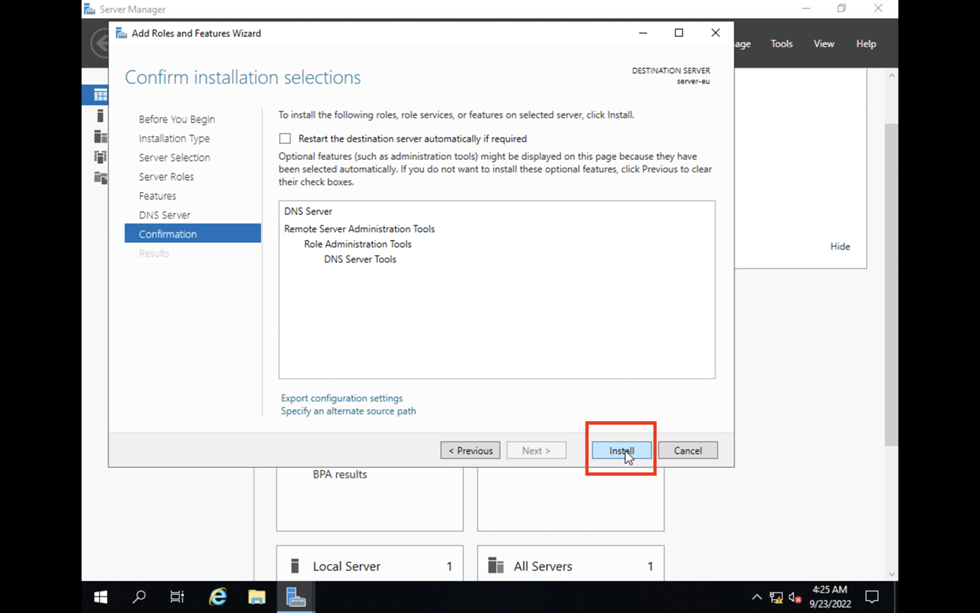
6. Proceed through the remaining prompts, confirming the installation selections.
7. Click “Install” to begin the installation process.
8. Wait for the installation to complete, and then click “Close.”
Step 2: Configure DNS Forward Lookup Zone
With the DNS Server installed, you can now configure a DNS Forward Lookup Zone. A Forward Lookup Zone requests the IP address that corresponds to a fully qualified domain name (FQDN). When you type a domain name like “example.com” in your browser, the DNS Forward Lookup Zone translates that FQDN to the IP address of the server hosting that site.
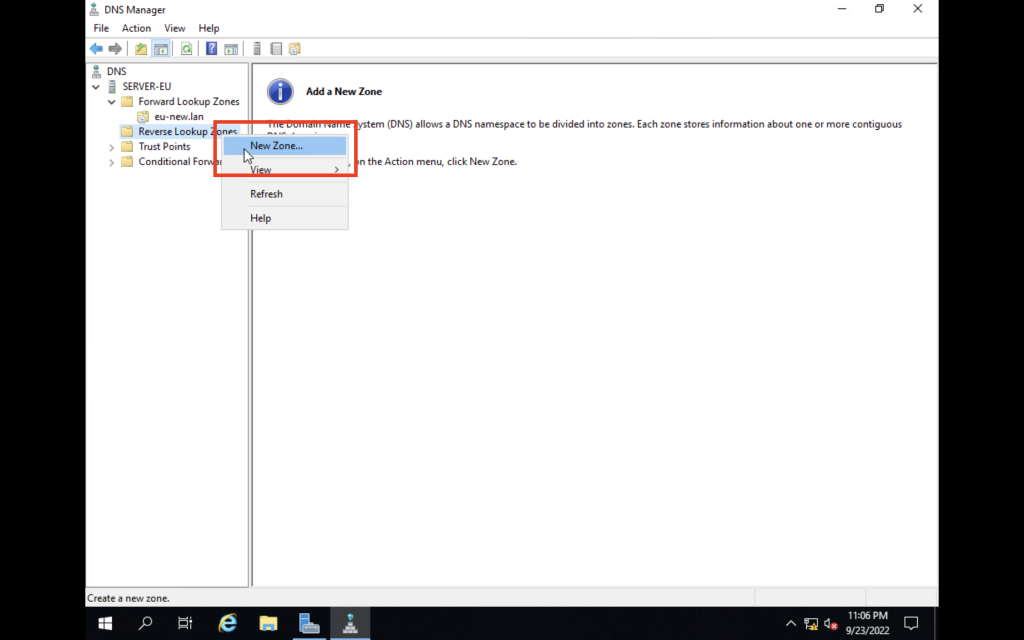
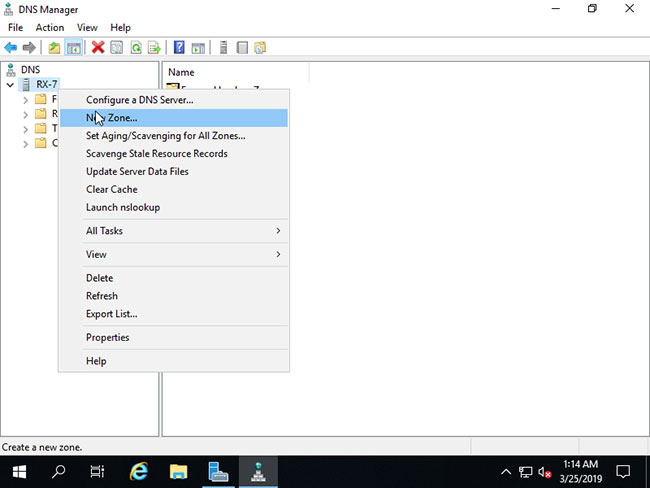
Follow these steps to add a DNS Forward Lookup Zone:
2. Right-click your server name and choose “New Zone…” to open the New Zone Wizard.
3. Click “Next” on the first Wizard screen.
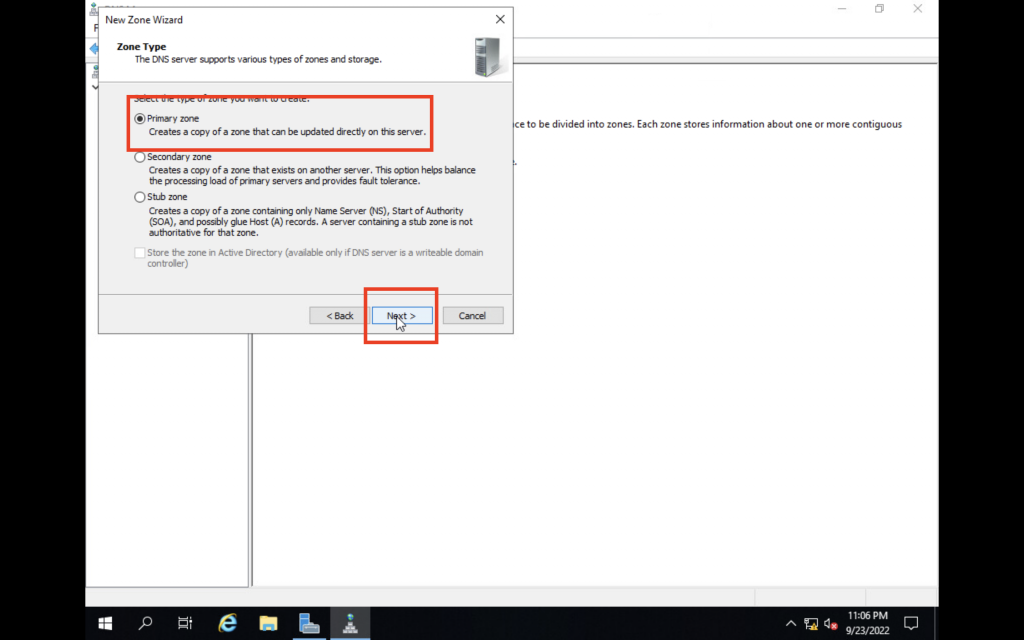
4. Choose the “Primary Zone” option and click “Next.”
5. Select “Forward Lookup Zone” and click “Next.”
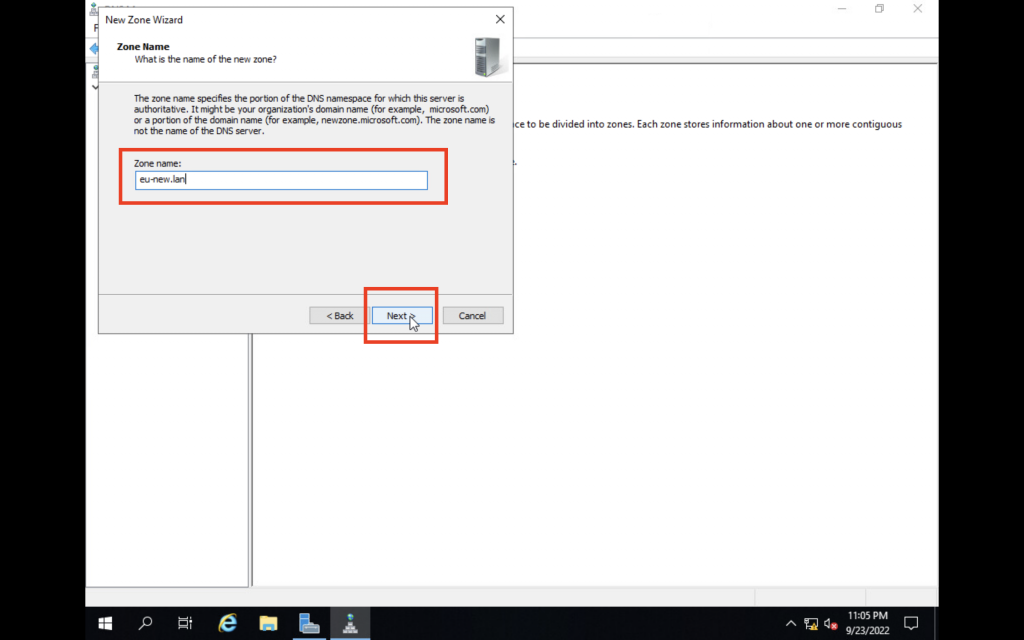
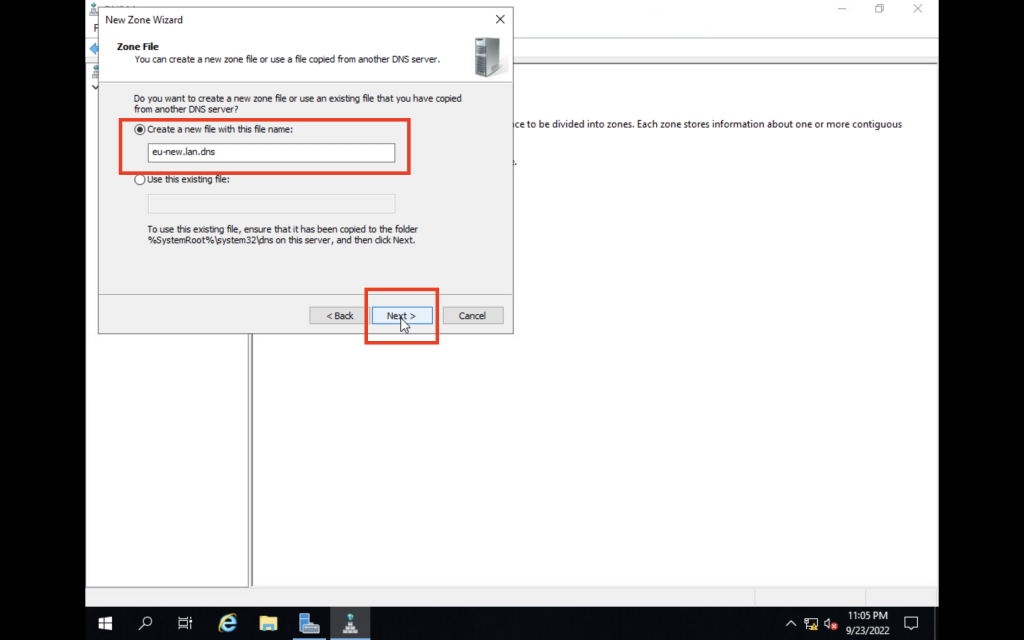
6. Enter the desired “Zone Name” for the lookup and click “Next.”
7. Specify a “Zone File” or use the auto-generated one, then click “Next.”
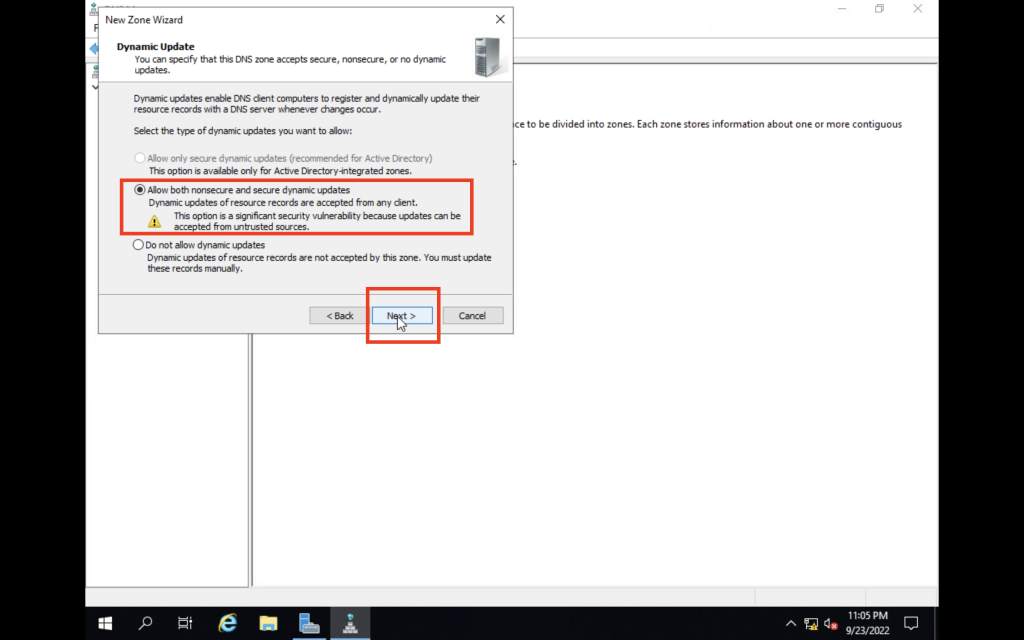
8. Configure dynamic updates if needed, or click “Next” to proceed.
9. Review the settings and click “Finish” to complete the New Zone Wizard.
10. Verify that your Forward Lookup Zone appears in the DNS Manager.
With the Forward Lookup Zone configured, you can now add DNS records for your domain names and their corresponding IP addresses.
Conclusion
You have successfully installed and configured a DNS Server on Windows Server 2019, including setting up a DNS Forward Lookup Zone. With the DNS Server up and running, you can now manage domain name resolution for your network or organization. Remember to follow best practices and keep your DNS Server updated with the latest security patches and updates.
Hello, how are you? Today we will continue to explore the functionalities of Windows Server. Specifically, we will talk about one of the most important roles. Indeed, a DNS server is of paramount importance within the system. Since this role, it has the function of translating IP addresses into domain names and vice versa. As a result, the functionality of the server will be considerably increased. Well, let’s see how to install and configure a DNS server in Windows Server 2019/2016.
How to install the DNS role in Windows Server 2019/2016.
Most commonly, this role has been installed along with the Active Directory role. Most commonly, this role has been installed along with the Active Directory role. So if you have reviewed our posts on Windows Server you should already know how to do it. However, I remind you of the steps. In the first place, from the Server Manager click on Add Roles and Features

Press Next to continue

Now select the type of installation. In this case, we will use the role or feature based installation.

Please select the server where the DNS server will be installed.

Below, you can see the DNS role already installed. If not, check the box and follow the instructions in the wizard.

Setting up a DNS server in Windows Server 2019/2016.
Once the installation is verified, it is time to configure the DNS role. To do this, once again we will use the Server Manager. Once there, please enter the Tools menu. Then, click on DNS:

Then the DNS manager will be displayed. Please right-click on the name of the server. Then select Configure a DNS Server.

The DNS Server Configuration Wizard will be displayed immediately. Press Next to continue.

Now it is time to select the optimal alternative for the zone to be used on the server. If you are using small networks, then I recommend creating a forward lookup zone.

Now please set the location of the primary server. This time, the server maintains the zone.

Then assign the name of the zone.

Now it’s time to set up how to receive updates. For security reasons, I recommend using the first option.

In this option, it is possible to configure the DNS server as a temporary reseller. This is very interesting, as it allows our DNS server to query other external DNS servers. This is in the case of those records that it is not able to resolve itself. With this in mind, please add the IP address of the external DNS server.

After this step, the assistant will have finished his work. After this step, the assistant will have finished his work.

Finally you will be able to see the area created correctly. Consequently, the DNS server administration is now available on Windows Server.

Conclusion
Well, in this simple way we have seen how to install and configure a DNS server in Windows Server 2019/2016. Therefore, the administrator has this important feature. All right, that’s it for now. Before saying goodbye I invite you to see our post about activating Wi-Fi in Windows Server. See you soon!
— Advertisement —
Everything Linux, A.I, IT News, DataOps, Open Source and more delivered right to you.
Subscribe
«The best Linux newsletter on the web»
From Microsoft, the Domain Name System (DNS) is one of the industry standard protocol sets that includes TCP / IP, along with DNS Client and DNS Server that provide name resolution services that map names to the IP addresses of computers. .
In today’s article, TipsMake will explain how to install DNS Server on Windows Server 2019 and then perform other additional configuration. Before proceeding, make sure that you have configured a static IP address on your server.
Install DNS Server on Windows Server 2019
Configure DNS Server to provide hostname resolution or IP address!
On the CUI settings, set up as follows:
Step 1. Run PowerShell as admin and enter the following code to install DNS Server.
Windows PowerShell Copyright (C) Microsoft Corporation. All rights reserved. # install DNS with admin tools PS C:UsersAdministrator> Install-WindowsFeature DNS -IncludeManagementTools Success Restart Needed Exit Code Feature Result ------- -------------- --------- -------------- True Yes SuccessRest. {DNS Server, . WARNING: You must restart this server to finish the installation process. # restart computer to apply changes PS C:UsersAdministrator> Restart-Computer -Force On the GUI settings, set up as follows:
Step 2. Run Server Manager and click Add roles and features .

Step 3. Click the Next button .
Step 4. Select Role-based or feature-based installation .

Step 5. Select a Host for which you want to add services.

Step 6. Check the box DNS Server .

Step 7. Additional features required to add DNS Server. Click the Add Features button and then click Next .

Step 8. Click the Next button .

Step 9. Click the Next button .

Step 10. Click the Install button .

Step 11. After finishing the installation process, click the Close button .

Add the Forward Lookup Zone to the DNS Server
Step 1. Run Powershell as administrator and configure it as follows.
The following example adds a Forward Lookup Zone with the Zone-Name setting «srv.world» , Zone-File «srv.world.dns» . In general, give your domain name or part of your domain name to Zone-Name.
Windows PowerShell Copyright (C) Microsoft Corporation. All rights reserved. PS C:UsersAdministrator> Add-DnsServerPrimaryZone -Name "srv.world" -ZoneFile "srv.world.dns" -DynamicUpdate None -PassThru ZoneName ZoneType IsAutoCreated IsDsIntegrated IsReverseLookupZone IsSigned -------- -------- ------------- -------------- ------------------- -------- srv.world Primary False False False False PS C:UsersAdministrator> Get-DnsServerZone # [srv.world] has been added ZoneName ZoneType IsAutoCreated IsDsIntegrated IsReverseLookupZone IsSigned -------- -------- ------------- -------------- ------------------- -------- 0.in-addr.arpa Primary True False True False 127.in-addr.arpa Primary True False True False 255.in-addr.arpa Primary True False True False srv.world Primary False False False False TrustAnchors Primary False False False False # if remove it, run like follows PS C:UsersAdministrator> Remove-DnsServerZone "srv.world" -PassThru Confirm [Y] Yes [N] No [S] Suspend [?] Help (default is "Y"): Y ZoneName ZoneType IsAutoCreated IsDsIntegrated IsReverseLookupZone IsSigned -------- -------- ------------- -------------- ------------------- -------- srv.world Primary False False False FalseStep 2. Run Server Manager and select Tools> DNS .

Step 3. Select Hostname in the left panel and right click on Hostname to bring up the menu and select New Zone .
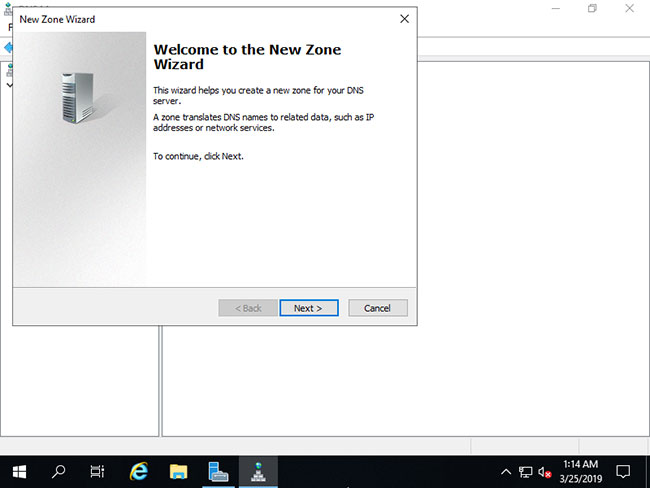
Step 4. Click the Next button .
Step 5. Check the Primary zone box and click the Next button .

Step 6. Check the Forward Lookup Zone box and click the Next button .

Step 7. Enter a name in the Zone name field . As described on the screenshot below, please give the domain name or part of the domain name to this Zone name.

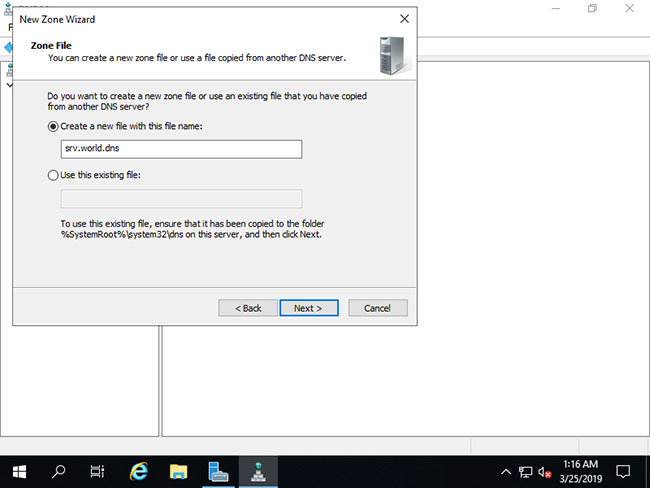
Step 8. Set zone-file-name and click Next button . You can keep the default name for zone-file-name.
Step 9. Click the Next button and keep the default options.

Step 10. Click the Finish button .

Step 11. A new zone has been created in the Forward Lookup Zone.

5 stars4 stars3 stars2 stars1 star4 ★ | 58 Vote