
Let us talk about the best software to update BIOS for Windows 10 and 11 to help you perform BIOS updates automatically and hassle-freely.
Do you know which is the first software that works as soon as you boot your computer? Well, it is BIOS, i.e., Basic Input/Output System. Not many users know about it, but BIOS is the software that initializes the hardware and supports your PC when it gets started.
BIOS is pre-installed software in your computer’s ROM. However, like every other software, it may also get outdated with time. And an out-of-date BIOS does no good to your PC. Hence, it is crucial to update BIOS.
You can perform BIOS updates manually or automatically and hassle-freely using the best BIOS update software. We prefer automatic BIOS updates since they are more convenient, quick, and safe.
If you are looking for simple ways to update BIOS, you can check out the specifically designed BIOS update utilities shared in this article. They make BIOS updates a cakewalk. Hence, let us look at them in the following section without further ado.
Well-Researched List of the Best BIOS Update Software
Below are some of the best software to update BIOS for Windows 10 and 11 to help you upgrade your computer’s BIOS.
1. UEFI BIOS Updater

We believe there is no better way to kickstart the best BIOS update software list than introducing the UEFI BIOS Updater. It is a BIOS modding suite allowing you to update OROM or UEFI modules of an AMI UEFI BIOS without any advanced knowledge of modding methods.
Moreover, it is an easy-to-use tool with the following features that make it one of the best UEFI BIOS updaters.
Key features of UEFI BIOS Updater
- Prevents the occurrence of further problems after updating BIOS
- Compatibility with all Windows versions
- Free and lightweight, the file size is only 18 MB
- Helps you update the CPU microcode
Download Now
Also Read: Must-Have Software For Windows
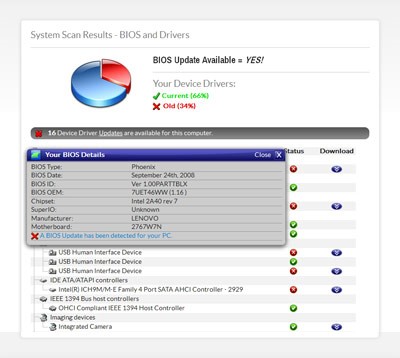
2. BIOSAgentPlus

Here comes BIOSAgentPlus. It is another great free software to update BIOS with a plethora of features to ensure your BIOS software runs smoothly.
For instance, before updating the BIOS, this software checks whether or not your computer needs a BIOS update. Additionally, the following are some impressive BIOSAgentPlus features that brought it to this list of the best BIOS update software for Windows 10.
Key features of BIOSAgentPlus
- Also checks for driver updates
- Fetches BIOS firmware’s report
- Helps you track all BIOS updates
- Seeks your permission to install BIOS updates
Download Now
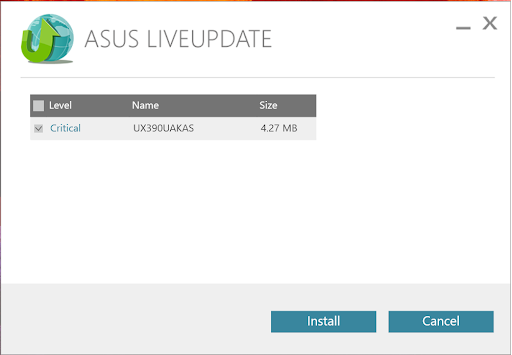
3. ASUS Live Update Utility

ASUS, as you may know, is a renowned PC, software, and smartphone manufacturer. This world-famous manufacturer also delights users with one of the best BIOS firmware update utilities.
ASUS Live Update Utility is a feature-rich software with features like a convenient scheduler to check for updates. Moreover, below are the other noteworthy features of this software.
Key features of ASUS Live Update Utility
- Automatic BIOS updates
- Detects new driver versions
- Finds and updates programs available from ASUS’s official website
- Lets you check BIOS information prior to updates
- Allows you to save the presently installed BIOS file
Download Now
Also Read: Best USB Bootable Software for Windows
4. Biostar BIOS Update Utility

Next, we have Biostar BIOS Update Utility in the fourth position on our post dedicated to the best BIOS update software for Windows 11/10. The most attractive thing about this software is its simple installation. You can install and use this program without being a computer expert.
Additionally, the following features are also a reason we included Biostar BIOS Update Utility on our list.
Key features of Biostar BIOS Update Utility
- Downloads the latest BIOS for your computer
- Step-by-step guides you to update BIOS correctly
- Finds a compatible package from a given location or the web
Download Now
5. Gigabyte @BIOS LIVE Update
Let us now introduce you to Gigabyte @BIOS LIVE Update. It is a smart BIOS update solution for your computer. This software eliminates the need to wander on the manufacturer’s website in search of BIOS updates. This program provides updates with just a few simple clicks.
Talking about the features, below is what we found the most fascinating about this software.
Key features of Gigabyte @BIOS LIVE Update
- A plethora of options to get the BIOS update downloaded
- Internet update to help you download the BIOS and update it directly
- Lets you keep a backup of your currently installed BIOS
- There is a wizard to help you understand the BIOS update process
Download Now
6. ASRock Live Update

We cannot skip ASRock Live Update when discussing the best BIOS update software for Windows 10, 8, and 7. It boasts a straightforward interface so that you can hassle-freely update system drivers and BIOS.
Moreover, it lets you download and update popular PC games and other software. Furthermore, the following are its other notable features.
Key features of ASRock Live Update
- An all-in-one utility for software downloading and system update
- Integrated with many applications and support software
- Free and easy-to-use
Download Now
Also Read: How to Fix or Bypass This PC Can’t Run Windows 11 Issue
7. SMBIOS Explorer

The last spot on our post sharing the best BIOS update software goes to SMBIOS Explorer. It is third-party software that changes original data to the user-readable format or structures that preserve the SMBIOS versions before showing it in hexadecimal mode.
Additionally, you should also take a look at the following SMBIOS Explorer features.
Key features of SMBIOS Explorer
- In-depth data analysis with an advanced data interpreter
- Lets you store System Management BIOS information as a plain or a zipped file
- Imports data from various sources like WMI, the system’s registry, ROM memory, or through API functions
- Easy to use and useful tool for experienced users who understand a Windows PC’s architecture
Download Now
8. Intel BIOS Update

The last tool on this list of the best BIOS update software is Intel BIOS Update. This is a free tool that you can use on your device if you are using an Intel processor on the system. The interface of the software may look a bit outdated but works for high and low-end Windows devices.
Key features of Intel BIOS Update
- The software is quite easy to use for all kinds of users, professional and otherwise.
- The interface of the software is quite simple and multilingual.
- You can update the BIOS with the help of this software as necessary.
Download Now
FAQs Related to the BIOS Update Software for Windows
If you have any doubts related to the best BIOS update software for Windows, then you can take the help of the below frequently asked questions to quench your curiosity.
Q1. Which BIOS update should I choose?
The BIOS update that you should use depends on the type of processor you are using. For example, if you are using a processor from Asus, then you need to use the Asus BIOS update for ease.
Q2. Is it recommended to update BIOS?
Yes, it is recommended to update BIOS as it allows the system to run smoothly and allows you to fix any issue arising because of BIOS.
Q3. Can BIOS update improve performance?
Yes, BIOS update can improve performance as it allows you to get new features to modify BIOS and thus, in turn, allows you to take the performance of the device to the next step.
Q4. Are BIOS updates safe?
Yes, BIOS update is completely safe to execute and use, provided that you know how to use it for your benefit.
Q5. How to update BIOS safely?
To update the BIOS safely, try using the official website of the manufacturer to download the latest versions of the BIOS and then install it on your system.
Summing Up
These were some of the best BIOS update software for Windows 10 and 11. These utilities can help you save a lot of time and effort in updating your computer’s BIOS. You can go through each of them, compare their features, and then choose the most suitable tool for your requirements.
In case of any questions or confusion, feel free to contact us in the comments section. We will be glad to help you.
Today, we are going to discuss some best BIOS update software available in 2020. The term BIOS might be new for some people. Hence before proceeding further, we’ll first understand the term BIOS.
BIOS stands for Basic Input/Output System. It is a firmware that works during the booting process of your Windows PC. It performs hardware initialization and provides support to your Windows PC while getting started. The firmware comes already installed on your PCs. The fun fact is that BIOS is the first software which starts working as soon as you start your PC and many people don’t even know about it. The software is installed in the ROM of your computer, and hence, it is also known as ROM BIOS.
However, the firmware might get outdated with time. In that case, you have to update it either manually or automatically. Updating BIOS manually is also a time-consuming task, just like most of the other manual processes. Instead of going for it, you can update BIOS with some specifically designed utilities. Here we have mentioned some of the best BIOS update software for Windows 10, 8, and 7.
Best BIOS Update Software for Windows in 2020
Below we have listed some of the best BIOS update software that can help you to update BIOS on your computer. So without further ado, let’s have a look at them.
1. UEFI BIOS Updater
When we talk about the best BIOS update software for Windows, the first name that comes to our mind is UEFI BIOS Updater. You can update BIOS in quite minimal time by using this one of the best BIOS updater tool. The software allows you to update modules of AMI UEFI BIOS, including OROM and UEFI. You can perform an update process even if you don’t have any knowledge about BIOS modding methods. Along with this, UEFI BIOS Updater also ensures that updating BIOS doesn’t cause any further BIOS problems. It is compatible with all the major versions of Windows. However, one should always keep in mind that UEFI BIOS Updater can only be used to update AMI UEFI BIOS.
Download Now
Also Know: Best Free Hard Drive Encryption Software for Windows 10
2. BIOSAgentPlus
The second name on our list is BIOSAgentPlus. It is another great BIOS update software that you can download for free. The software provides many useful features and helps you to keep the BIOS firmware running smoothly and updated. Before looking for updates, BIOSAgentPlus prior checks if your system indeed requires a BIOS update or not. Along with BIOS, the tool also keeps a check on various other drivers on your PC and provides you with the necessary updates. The software even provides you with the report of BIOS firmware on your Windows PC, so that you can keep track of further BIOS updates. We consider BIOSAgentPlus as a multi-feature BIOS update utility with minimal drawbacks.
Download Now
3. ASUS Live Update Utility
Here comes one of the most famous names on the list. ASUS is a well-known PC, laptop, software, and smartphone manufacturer across the globe. The manufacturer also provides a utility to update BIOS firmware. ASUS Live Update Utility can be a great solution if you are looking for updating BIOS on your device. It is a feature-rich utility that also provides many other features along with updating BIOS. The utility even allows you to update your drivers and other applications. You can also save a backup of the current BIOS via using ASUS Live Update Utility.
4. Gigabyte @BIOS Live Update
At last, we have Gigabyte @BIOS Live Update on our list. Gigabyte @BIOS Live Update is a smart solution to update BIOS firmware on your Windows system. Now you are no longer required to search for BIOS updates from the motherboard vendors, as this software provides you with them in just a few clicks. The software is smart enough to identify the model of your mainboard. After identifying the model, it provides you with the adequate BIOS firmware updates. The utility provides various other options as well. You can even create a backup of your current BIOS software with Gigabyte @BIOS Live Update. Despite being a feature-rich BIOS update utility, the software is completely free of cost. Hence it is considered as one of the best BIOS update software.
Also Know: Best Free File Backup Software For Windows 10, 8, 7
5. Bios
Here comes another intuitive and multi-feature software to update BIOS firmware. Biostar BIOS Update Utility is a third party BIOS updater software. You are just required to install it on your system, then after that it will automatically provide you with the available BIOS firmware updates. You can download the updates with this tool quite easily, as it just requires a few clicks. While you use Biostar BIOS Update Utility, the tool provides you with step by step instructions, hence, a novice can also use it to update BIOS on his/her system. We can easily consider it among the best BIOS update software for Windows.
Well, these are the best BIOS update software for Windows in 2020. However, you can check BIOS status and update it manually as well. But as we have mentioned earlier that it is quite a time-consuming process and not all people are computer experts. Hence, it is better to do it automatically by using some best utilities. It can even save a lot of time as well.
If you are curious about more such Windows utilities, then subscribe to Innovana blogs and bookmark the page as well.
If for any reason you want to update BIOS, it is important you know exactly what you’re doing. The reason is that if you do it wrongly, you’ll be worse off. If a BIOS update goes wrong, you risk ruining your entire system.
That’s why in this article I’ll be explaining the important information you need to know before even trying the update. I’ll be explaining how to update BIOS also in easy to follow steps.
Do You Really Have To Update Your BIOS?
That’s the first question you have to ask yourself.
If you don’t have a substantial reason (like serious system issues that can only be solved by a BIOS update), then you should probably just find other solutions to fix the problem or get the result you want.
The reason for this high amount of caution is because the BIOS is basically on your motherboard. If anything goes wrong with the update, chances are that Windows won’t even boot at all.
Hardware problems that can only be solved by a BIOS update are one of the few reasons why you should press forward with the update.
There are a few normal advantages to updating your BIOS like getting access to features like Overclocking and also all-round better stability but these are added advantages to folks who need to eke out a little bit more from their systems.
Normal users won’t need that much output. So it is advised to not try it unless it’s necessary.
Important Info You Need To Know Before Updating BIOS
There are a few things you need to know before trying out the update (if you’re really pressing on with the update idea).
You will need to find out some information like your BIOS version and your motherboard model number.
There are also other things to take note of. I’ll explain how to find the info you’ll need and the important things to remember while updating below.
Finding Your BIOS Version On Windows 10
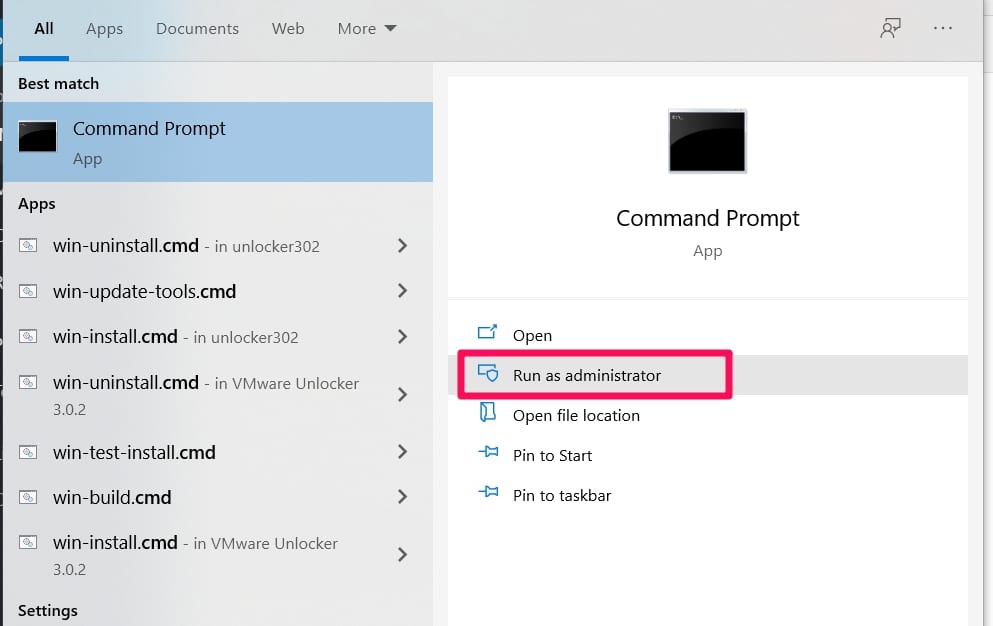
There are a few ways to check your BIOS version but I’ll be explaining one I think is quite easy to carry out. You’ll be using a command prompt (with administrator access).
To open a command prompt, use the shortcut keys (Windows + X) to open a menu.
In that menu, search for and click on the Command Prompt (Admin) option. Remember to choose the Admin option to ensure the steps work out.
The command prompt should now be open. In the command prompt, input this text –
wmic bios get smbiosbiosversion and then click on the Enter key.
When you run the command above, you should see the text –
SMBIOSBIOSVersion
and then just beneath it, you’ll see a few digits. That’s your BIOS version.
![How To Update BIOS on Windows 10 [Step-By-Step]](https://technicalustad.com/wp-content/uploads/2020/11/bios.jpg)
Write it down and then close the command prompt. There’s still something else you need to find.
Finding Your Motherboard Model Number
The steps are quite similar to the above description. You’ll also need the same Command Prompt, so just follow the steps already described above to open the prompt.
When the command prompt is open, input this text –
wmic baseboard get product,Manufacturer,version,serialnumber.
Click on the Enter key after inputting the text above correctly.
When the command runs, you’ll get the information you need about all of the specifics listed.
![How To Update BIOS on Windows 10 [Step-By-Step]](https://technicalustad.com/wp-content/uploads/2020/11/rec.jpg)
The first one is your motherboard model number.
Note then down because you’ll need them when updating your BIOS.
You can also use third-party tools like CPU-Z to get all of the information described above without having to use the command prompt.
Find Out If Your System Has A Built-in BIOS Update Tool
This information is quite important because some notable manufacturers like Lenovo and Dell build-in tools you can use to update BIOS in their systems (some models).
Instead of trying to do it yourself and taking that risk of ruining your system, you can simply use the built-in tool which should be safer than the processes outlined below.
Also, check if your motherboard manufacturer has spelled out a specific way to update your BIOS. If they have, only use that way.
Trying out other ways can severely damage your system.
Now that you’re armed with the info you need, another important thing to note is that if your system goes off during the update, chances are it’ll ruin your system.
So, plug in your laptop or use external power sources like a UPS for your PC.
3 Ways You Can Update BIOS
Now we’re finally at the point of updating your BIOS. There are 3 ways to update your BIOS, I’ll be explaining them in an order of simplicity (based on my research).
You will need the information gathered previously, so keep them close.
1. Accessing Your BIOS And Updating It
This is the way I find the most simple because all you need to do is download the BIOS update file and carry out some simple system settings steps to finish the updates process.
There’s a drawback though, there are a few motherboards that might not have this feature.
You will need to confirm probably from your motherboard’s manufacturer (site) if the feature is available for your version.
If you’re sure it is available, then follow the steps.
How To Update
The first step is to download the BIOS update (from official sources) to a previously empty USB flash drive.
The drive must be totally empty before downloading the update.
Accessing BIOS
Then connect the drive to your system and access BIOS.
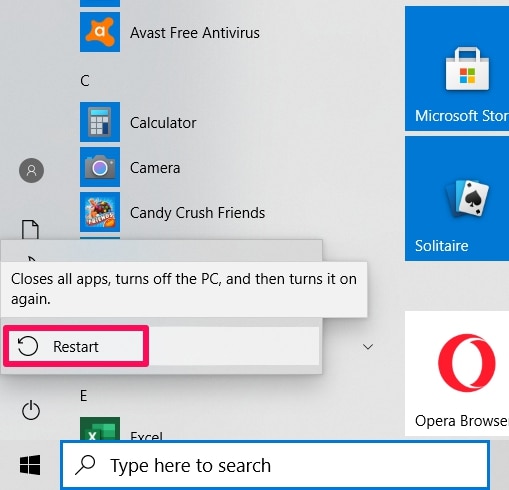
There are a few ways to do that but the easiest is to open the Start Menu.
Click the Power button.
Press, then Hold the Shift key and click on the Restart key.
If the above steps are done properly, you should see some options appear. Search for the Troubleshoot option and click on it.
In the Troubleshoot menu, click on Advanced Options. Then in the menu that opens, locate, and click on UEFI Firmware Settings.
![How To Update BIOS on Windows 10 [Step-By-Step]](https://technicalustad.com/wp-content/uploads/2020/11/firmware.jpg)
Select the Restart option in the menu you just opened. When your system restarts, it should boot to BIOS.
Updating BIOS
Now that you’re in BIOS, click on the BIOS Update option.
Find the BIOS update files in the flash drive you saved it in and inserted previously.
Select the files and then wait while the update process is going on.
2. Using Some Windows Based Programs To Update BIOS
While this method is simple, the level of risk of failure while trying to update your BIOS is a bit higher than the first method above.
The higher level of risk is because if your system freezes or crashes during the process, then your update is ruined and most likely your system with it.
Installed programs also disrupt the process.
It is even advisable to completely disable security apps before trying the update because security programs usually interfere with the process and that can cause serious issues.
How To Use The Programs
If you still want to take the risk and use this method, all you have to do is search for and download your motherboard’s manufacturer’s BIOS update application.
Once the update app is downloaded and installed, you can easily follow the onscreen instructions to update your BIOS.
It is quite easy but remember the elements of risks explained above.
A way to mitigate the risks is to save or backup your current BIOS version as a fail-safe before updating to a new one.
This option is usually available when using windows based BIOS update apps.
3. Creating A DOS USB Drive And Using It To Update BIOS
This is the last method I’ll recommend because it is also the most complicated.
If you’re not comfortable with running a setup script using DOS, you shouldn’t try out this method.
You should also check with your motherboard manufacturer about this method before trying it out.
To carry out this method, you need a few things.
- A script you’ll use to flash the BIOS
- A bootable USB flash with the new BIOS update version
You can usually get the script along with the BIOS update. You’ll find it in the archive with a .bat or .exe extension.
If you can’t find it, you’ll have to download it separately. But it usually comes with the update.
In the issue of creating a bootable USB, you can use some dependable third-party apps.
Use the app (like the one suggested above) to format the drive and check a box that should say something along the lines of Create A Bootable Disk……….
When you’re done creating the bootable USB, move the BIOS update along with the script to the USB.
Restart your PC and boot it from the USB drive. You’ll then need to run the setup script with the help of DOS.
Update Your BIOS in 5 Minutes — Tech Deals Guide
Conclusion
Updating BIOS is not that hard to do. It is the risks attached to it that are usually greater than the rewards, at least to most normal users.
Before trying out any method above, you must confirm from your motherboard’s manufacturer about the required way to update the BIOS.
If you have any issues, use the comments section and I’ll get back to you.
BIOS is a term you must have heard often. In fact, it’s possible that for most of your hardware issues, the IT person may have suggested a BIOS upgrade before troubleshooting the hardware. What is BIOS? BIOS is an acronym for (Basic Input Output System) and is a piece of software that goes along with the PC’s motherboard.
In a nutshell, it forms a layer of communication between the hardware and the operating system. Thus, needless to say, the BIOS is very crucial when it comes to the functionality of your Windows 11/10 computer.
Why update the System BIOS
BIOS is, after all, a piece of software that needs to be regularly updated, just to the operating system or the apps in general. The updates usually bake in enhancements and fixes, which will eventually help the software maintain its compatibility with the hardware and the software. That being said, unlike most other apps, the BIOS needs to be updated manually, which is precisely the very thing that we will be explaining in this segment.
Most do not need to or have to update the BIOS. If your computer is working properly, you do not need to update or flash your BIOS. In any case, should you wish to, we recommend that you do not try to update your BIOS yourself but instead take it to a computer technician who may be better equipped to do it. One needs to consider updating the BIOS only if you are facing some performance issues or other problems that necessitate you to update the BIOS. One needs to be careful and know how to update the BIOS; else, it could brick your entire system.
How to check your BIOS version
Before updating the BIOS, you need to check the version of BIOS from the System Information. We have already seen how to check the BIOS version. You have to type msinfo32 into the search and press Enter. Once the System Information Tool opens, you can check the BIOS version.
One can also run a command in CMD to check the BIOS version. Click on “Start Button” and press Run; once the Run box appears, type system info and then press OK. You can jot down the BIOS number and match it against the latest version from the manufacturer’s website; if needed, update it.
BIOS helps maintain the stability of your system and increases security, and tries to protect the system from any vulnerability.
Before you begin, make sure that you have power backup while upgrading the BIOS. Because if the computer turns off during the process, the BIOS may be corrupted, and you will need a technician to fix it. Your boot CD/DVD may or may not help to depend upon how the BIOS stands after a power cut or a sudden system turn off while rewriting the BIOS.
Generally speaking, to update the BIOS, visit the manufacturer’s site to download the BIOS update. Identify your product by entering the Service Tag or serial number.
- If the system shown is the wrong one, click on “View a different product” and try Browsing for a product manually. Once the correct product is chosen, go to the BIOS from the pull-down category.
- If there are multiple files listed, select the latest one by checking out the update number by clicking on “View Details.”
- Download and save the file to your desktop
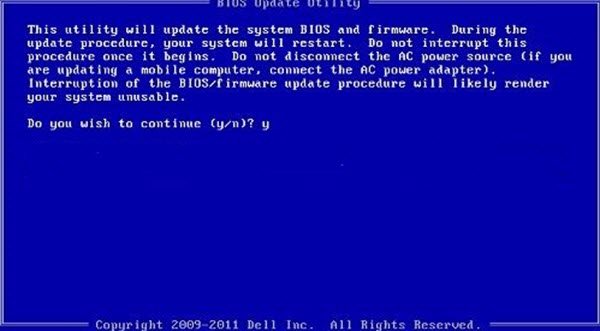
- Double-click on the icon, and this will reboot your system and open up a BIOS update page.
That being said, the update procedure might vary slightly from product to product. It is also worth mentioning that the OEM’s stop updating the BIOS for some of the machines after a certain period.
Read: How to reset BIOS settings to default.
Update BIOS by creating a Bootable USB
One can also download the BIOS update.EXE file to a bootable Flash drive and update the same. To do this, first, you need to head over to the official company website and download the BIOS file.
In order to create a Bootable USB Flash Drive use, Dell Diagnostic Deployment Package and the corresponding instructions are given here.
- Download the BIOS update file, which is usually .exe
- Copy the file to the bootable USB flash drive.
- Now insert the USB stick into the system on which you need to update the BIOS.
- After the reboot, press F12, ensure that the USB with BIOS is plugged in.
- Select USB Storage device from the menu and press Return
- The system will open up a command prompt
- Follow the onscreen instructions and complete the update process.
Read: How to use BIOS settings on Windows computers.
Using BIOS Update applications
This is the easiest part, and I have been using this method to update the BIOS on my HP Laptop for quite some time. The motherboard manufacturers have their own BIOS update applications, and all you need to do is press a button, and voila! The software will take care of the rest. It’s always advisable to turn off firewalls and other security software since they could meddle with the process.
All OEM manufacturers have utilities that help you easily update BIOS, firmware, and drivers. Search for yours and download it from the official site only. This is the safest way to update the BIOS.
- If you own a Dell laptop, you can head over to Dell.com or use Dell Update Utility.
- ASUS users can download the ASUS BIOS update utility from the ASUS support site.
- ACER users can go here. Enter your Serial Number/SNID or search for your product by Model, select BIOS/Firmware, and click the Download link for the file you want to download.
- Lenovo users can use the Lenovo System Update Tool.
- HP users can use the bundled HP Support Assistant.
Updating the BIOS on HP computers
As we explained earlier, the BIOS update process is slightly different for different brands, and in order to leave no stones unturned, we will also be taking you through steps to update the BIOS for HP systems.
- Go to the HP Software & Driver Downloads web page and choose the correct Model.
- Select the operating system
- The web page will display a list of updates for your computer, and you need to check for the BIOS section. If the BIOS option is not available, it means that you are already running the latest BIOS.
- Ensure that the BIOS update is meant for your computer model. If there is some confusion, check your system information. The wrong BIOS can cause severe damage to the motherboard.
- Download the BIOS file and save it
- Disable the anti-virus and other security programs temporarily
- Double-click on the BIOS file and follow the onscreen instruction
- After the installation is complete, restart the PC as prompted by the installer.

You can also use HP Support Assistant to update firmware.
Read: How to downgrade BIOS on Windows computer.
Use Lenovo System Update to update BIOS on Lenovo laptops
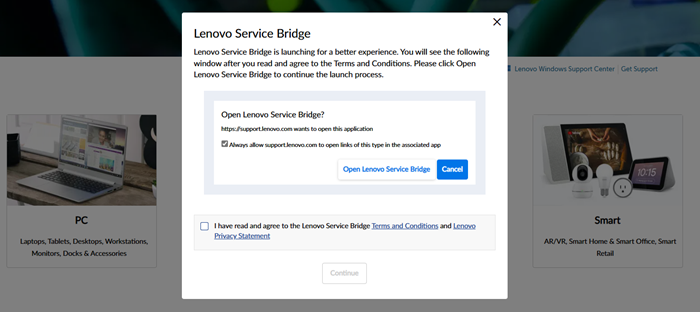
If you own a Lenovo laptop, the best way to update the BIOS would be to use the Lenovo System Update supported on ThinkPad, ThinkCentre, ThinkStation, Lenovo V, B K, and E-Series. Alternatively, you can directly download the BIOS from the Lenovo support site and install the same manually.
- Find the latest version of the BIOS for your machine from the support site.
- Go to the product > Click on Drivers and Software>Select BIOS>Choose your operating system on the support page.
- Lenovo advises users to switch off the anti-virus or any firewall before starting the BIOS update.
- Once the file is downloaded from the support site, extract it and run the same if needed. Follow the onscreen instructions.
- Restart the computer when prompted to, and voila! Your BIOS is updated.
Update BIOS on ASUS using WinFLASH
To update the BIOS on ASUS systems, you will have to use WinFLASH Utility. Detailed instructions can be found on asus.com.
In a nutshell, updating the BIOS is a pretty straightforward process, assuming that you get the model number right. Most of the recent Windows versions like Windows 11/10 handle the update process much more elegantly than, let’s say, Windows XP systems.
How to check BIOS version Windows 11/10?
You can check the BIOS version using the Command Prompt in Windows. In the Command Prompt window, type wmic bios, get smbiosbiosversion, and then press Enter. The string of letters and numbers following SMBBIOSBIOSVersion is the BIOS version. Make sure to check the motherboard model to find the latest version of BIOS available on the manufacturer’s website.
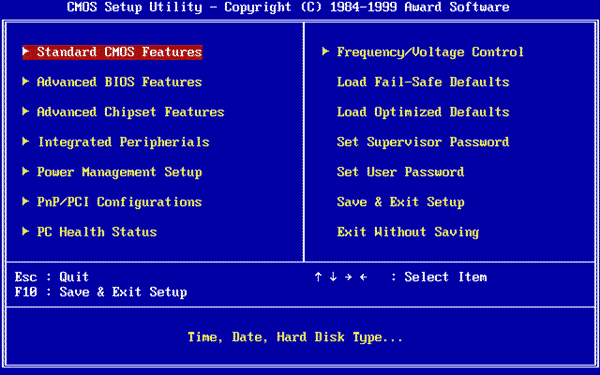
How to change Boot Device in BIOS or UEFI?
BIOS or UEFI offers a dedicated section where the boot order of the connected devices or type can be changed. If you need to boot from a USB driver of an external hard drive, you can change the order here and save the settings. Next time the PC reboots, it will look for the connected devices first and reboot if it finds the boot record; else, it will fall back to the last option.
How to lock BIOS with a Password?
If you do not want anyone else to change the settings, putting a password lock in the BIOS is good. Every BIOS or UEFI has a security section where the BIOS password will be available. That said, if you ever forget the password, you will need to reset it. If it’s a laptop, check with manual, but a dedicated Clear CMOS button on the rear of the cabinet is available for motherboards. Resetting the BIOS doesn’t create any motherboard issue but clears anything change in the settings made.
What is BIOS?
BIOS stands for «basic input/output system» and is a firmware program embedded in older Windows computers. The BIOS connects a computer’s hardware to its operating system, facilitating runtime services for programs and operating systems and helping the microprocessor start hardware operations and oversee data flow to and from the OS while booting up.
While older Windows computers use BIOS, a similar firmware program called UEFI (Unified Extensible Firmware Interface) is embedded into newer PCs and Mac computers, managing the boot process and the firmware that controls hardware components.
Once the start-up process is complete, the BIOS firmware also handles the data flow between the operating system and any connected devices, including the hard disk, video adapter, keyboard, mouse, and printer. That means the operating system and application programs don’t necessarily need to know the details of the peripherals, such as hardware addresses.
What is UEFI?
UEFI (Unified Extensible Firmware Interface), similar to BIOS, is basic software that starts once your computer boots up, but before launching the operating system. Its primary job is to keep all data necessary for startup in an «.efi» file, which is stored on a specialized disk partition known as the EFI System Partition (ESP).
What is the difference between BIOS and UEFI?
BIOS and UEFI are both firmware that manage a computer’s hardware components and boot process. But UEFI is a modernized solution that can handle larger hard drives and faster boot times, and it comes with more sophisticated security features. Those cutting-edge features include components like Secure Boot, which prevents unauthorized apps from booting up.
When should you update your BIOS?
Updating your BIOS isn’t routine, unlike updating your applications or graphics drivers. It’s highly advised to initiate an update only when your PC or motherboard manufacturer suggests it or if you’ve uncovered a Windows update error that needs fixing.
BIOS update methods vary, so it’s critical to follow the guidance of your motherboard manufacturer. Before beginning, research and locate all available recovery options for a corrupted BIOS, ensuring that information is nearby on a second device.
Remember that a BIOS update doesn’t usually speed up a PC’s performance and isn’t recommended for systems already functioning correctly. Ideally, you should only update your BIOS to fix bugs or expand compatibility with existing hardware.
How do I know if my BIOS needs updates?
If some crucial security vulnerabilities require patching or you want to upgrade to a new CPU, you should update your BIOS. Typically, motherboard manufacturers publish a CPU support list for each available motherboard, showcasing the BIOS version you’ll need depending on the CPU upgrade you want.
If your computer generally operates without any troubles, then you likely don’t need to update your BIOS.
How to update your BIOS step-by-step
If you’re running into problems with your BIOS, such as random crashes or bugs, memory problems, or security vulnerabilities, this section will show you step-by-step how to update your BIOS.
Here’s how to launch BIOS updates:
1. Identify the manufacturer and model
First, we’ll review how to identify the manufacturer and model type. There are a couple of different ways you can do this: Command Prompt and System Information.
Find the BIOS/UEFI version using Command Prompt
-
Open Command Prompt using the keyboard shortcut Windows + R. Enter cmd, then click OK.

-
Enter the command wmic bios get smbiosbiosversion to confirm the BIOS version, then hit Enter.

-
The assortment of letters and numbers that follows SMBIOSBIOSVersion is the BIOS version. Write down the BIOS version number. In our example, the BIOS version number is 1.23.1.


Find the BIOS version/date using System Information
-
Open the System Information program using the keyboard shortcut Windows + R. Enter msinfo32, then click OK.

-
The BIOS version and motherboard model information will appear, as seen below.


2. Download updated files from the manufacturer’s support page
Updating BIOS usually varies depending on the company that made your computer and which BIOS version you have installed, so you might have to do some searching before you find the correct link.
If you’re using a custom-built computer, look up the manufacturer of the specific motherboard you have. Usually a quick Google search of the “[manufacturer]” + “BIOS” or “UEFI» + «update» will do the trick.
3. Extract files
After you download the BIOS update files from the manufacturer’s website, you’ll probably have to extract (or «unzip») the files from the folder using the steps below:
-
Open the downloaded ZIP file.
-
Click the Extract tab at the top of the window, then click Extract all.
-
Choose a destination folder where the files will be saved, then click Extract to confirm. The folder containing the extracted BIOS update files will open automatically.
4. Transfer to a formatted USB drive
After downloading the BIOS file, you need to put it on a USB drive. Follow the steps below to complete this step:
-
Insert your USB drive, then right-click it in File Explorer and choose Format.

-
Check that FAT32 is selected in the File system drop-down menu.
-
Press the Start button to reformat the drive if necessary.
-
Copy and paste the downloaded BIOS file onto your USB.

5. Access the BIOS menu
If you need to check your computer’s specs and access the BIOS menu, this section can help you. Here, we’ll cover two options for accessing BIOS: via the boot sequence and via Windows.
Via the boot sequence
-
Click the Windows Start button and press Restart.

-
Press the key assigned by the computer’s or motherboard’s manufacturer for the BIOS startup.
-
The most common keys are F1, F2, F10, F12, Del, or Esc.

If you don’t know your computer’s BIOS key, try searching your computer’s manufacturer name, device model name, and the phrase «BIOS key.» If the BIOS doesn’t launch, restart your device and try another key.
Via Windows
-
Click the Windows Start menu and select Settings (the cog icon).

-
Go to Update & Security.

-
Choose Recovery in the left panel. Under Advanced Startup, select Restart now.

-
Select Troubleshoot in the Windows Recovery options.

-
Choose Advanced options.

-
Select UEFI Firmware Settings and click Restart.


6. Install the update
Now, it’s time to complete the update installation. Note that each BIOS program is slightly different depending on your device and how the BIOS screen is accessed — consult the support site for your computer or motherboard for instructions for your specific device.
Generally, the process to update BIOS involves the following steps:
-
Select the Boot tab and check that your USB drive appears. After that, enable any backup options that appear.

-
Open the Advanced tab, choose USB configuration, and select the option to start updating BIOS. Finally, allow your computer’s BIOS to complete its update.


This process can take from several minutes to over an hour, depending on your computer and the depth of BIOS updates required. Once the updates are complete, your computer should restart on its own, though you might need to confirm.
Don’t turn your computer off while your BIOS is updating — it can cause the corruption of the BIOS, resulting in your device being unable to complete the installation.
Other BIOS update methods
This section will cover three alternative methods for updating your BIOS.
Windows-based flashing tools
Updating BIOS using Windows-based flashing tools involves using specific software applications developed by the device manufacturer specifically for this purpose. It’s a more user-friendly option to update BIOS because it doesn’t involve navigating to BIOS or a separate environment.
While it may reduce user errors by allowing you to update directly from your Windows environment, a crash during a BIOS update with a flashing tool could be catastrophic for your device. When possible, it’s best to update BIOS directly within BIOS.
If you choose to go this route, check directly on the manufacturer’s website for specific instructions on how to do this, as steps will vary greatly depending on your computer, Windows OS, and motherboard manufacturer.
Flashback
For anyone looking to easily update the BIOS on a high-end computer, using USB Flashback allows you to complete this process without entering the BIOS or operating system. To use the USB BIOS Flashback, follow the steps below:
-
Plug your USB device into the USB BIOS Flashback port.
-
Change the filename to X299A.CAP, then copy it to your USB. Note: The filename differs based on your manufacturer — check for the appropriate name for your device before updating BIOS with this method.
-
Turn your computer off.
-
Press the BIOS Flashback button on your motherboard for about three seconds. The Flashback LED will blink three times, showing that the BIOS Flashback is enabled.
-
Once the light goes out, the BIOS update is complete.
Via the internet
Sometimes, your device manufacturer includes an option for downloading and installing BIOS updates directly from the internet within the BIOS environment. This is an ideal option if you have it, because it doesn’t involve reformatting flash drives, specific filenames, or changing settings with BIOS.
Keep your system’s performance optimized with AVG Driver Updater
Keeping your device’s firmware updated is crucial for ensuring optimal performance and device security. But that’s just one part of your digital arsenal.
For even more comprehensive device optimization, add AVG Driver Updater to your PC’s performance toolkit. AVG Driver Updater can help you scan for outdated drivers, such as graphic and audio drivers, and update them with the click of a button — all while ensuring the new versions are free of malware. Get AVG Driver Updater today to help keep your machine running smoothly.
FAQs
Do BIOS updates improve performance?
No, a BIOS update doesn’t necessarily boost your computer’s performance. However, a BIOS update can fix bugs related to updating graphic drivers and audio drivers and helps increase compatibility for new devices. Similarly, a BIOS update shouldn’t affect or alter data saved on your SSD or HDD.
Do you need a USB to update BIOS?
No, you don’t necessarily need a USB to complete a BIOS update, particularly if you use the Windows-based flashing or internet methods explained above. To find out if you can update BIOS without a USB, research the computer’s manufacturer and model to determine which methods are available to you.
Does updating the BIOS reset your PC?
No, updating your BIOS won’t reset your computer or affect anything installed on your HDD or SSD. However, updating your BIOS could affect an overclocked CPU — this overclocking could cause your device to become unstable and incapable of booting up correctly.
Do I need to update BIOS before installing a new CPU?
Yes, you’ll need to update your BIOS before you install a new CPU. A newer CPU might not work correctly or be supported if your BIOS is outdated, making your computer unable to boot up. Most motherboard manufacturers have a CPU support list on their website, showing the BIOS version you’ll need to update to depending on the CPU.