
We are grateful for the trust our customers have placed in Windows Server 2012/R2 as a part of their organizations for the past decade. With this release of Windows Server having launched 10 years ago, it reaches end of support on October 10th, 2023, per our 10-year lifecycle policy. After this date, no more security patches will be released for Windows Server 2012 and 2012 R2. To stay protected and compliant, we wanted to outline three options for customers from Azure.
Modernize with PaaS or upgrade to a newer version in Azure
Modernization provides organizations with a more future-proof solution by using a cloud-first approach or updating to a newer version. One modernization option is moving to platform-as-a-service (PaaS) solutions such as Azure SQL Managed Instance or Azure App Service. By modernizing workloads to a PaaS solution, customers can fully offload management and patching tasks in the cloud. This helps teams stay up-to-date, avoid future end-of-support dates, and focus on delivering innovative apps and experiences for their businesses.
Alternatively, customers can migrate and upgrade their Windows Server 2012/R2 with Azure Migrate, our free tool for discovery, assessment, and migration of workloads to Azure. With this feature, organizations can now elect to move their legacy applications and databases to a fully supported, compatible, and compliant operating system. This includes our latest release in Windows Server 2022, which provides organizations with advanced multi-layer security, hybrid capabilities with Azure, and a flexible platform to modernize applications. Learn more about this feature of Azure Migrate.
Migrate to Azure for free Extended Security Updates
If organizations are not able to modernize Windows Server 2012/R2 in time, they can use Extended Security Updates (ESUs), which provide security patches for up to three years past the end of support date.
When organizations migrate end-of-support workloads to Azure, they get free Extended Security Updates. This includes options such as Azure Virtual Machines, Azure Dedicated Host, Azure VMware Solution, and Azure Stack HCI. Combining this with Azure Hybrid Benefit and consumption models such as reserved instances or savings plan for compute allows even more savings in Azure for Windows Server and SQL Server.
Organizations can get in-depth resources to help them start their cloud journey on Azure with Azure Migrate and Modernize & Azure Innovate—our new offerings that provide end-to-end support from migration and modernization to infusing the latest innovation in analytics and AI.
Stay protected in hybrid and multicloud environments with ESUs enabled by Azure Arc
For organizations who aren’t able to modernize or migrate prior to the Windows Server 2012/R2 end of support date this October, they can protect their hybrid and multicloud workloads with ESUs enabled by Azure Arc. Here are the key benefits:
- Monthly pay-as-you-go: Activate and enroll from Azure to pay for security updates on a monthly basis, giving organizations more flexibility to migrate and modernize to Azure on their terms.
- Seamless delivery: The enrollment of Extended Security Updates on Azure Arc-enabled machines does not require the acquisition or activation of keys. Moreover, customers have the flexibility to use Azure Update Manager or another patching solution of their choice to receive the actual patches.
- Organize and inventory your assets: Gain visibility and reporting across servers spanning your hybrid, multicloud, and edge infrastructure.
- Security and compliance: Extend Azure security and governance services such as Microsoft Defender for Cloud and Microsoft Sentinel to further secure their infrastructure from cloud to edge and stay compliant with supported software. ESUs enabled by Azure Arc also gives free access to Azure Update Manager, Machine Configuration, and Change Tracking and Inventory for further automation and easier delivery of patches.
Connect to Azure Arc today to get started with ESUs enabled by Azure Arc or learn more here.
Prepare for other end of support dates
As organizations continually modernize their estate, there are several other end of support dates to keep in mind for Windows Server and SQL Server customers:
- Upgrade Windows Server 2008 virtual machines (VMs) in Azure. If you are running Windows Server 2008 virtual machines in Azure, the fourth and final year of ESUs end on Jan 9th, 2024. After this date, no more security patches will be provided to virtual machines running this version. Organizations should plan to upgrade to the latest version to run these workloads securely and compliantly. Learn more about how to perform in-place upgrades for Windows Server.
- Prepare for SQL Server 2014 end of support. Many Windows Server customers often run SQL Server for their databases, which also has some end of support dates to be aware of. SQL Server 2012 reached end of support on July 12th, 2022, and the upcoming end of support deadline is for SQL Server 2014, which reaches end of support on July 9th, 2024. Organizations have the same three options outlined above to protect SQL Server 2014 workloads.
See the lifecycle of products supported with Extended Security Updates here.
Start modernizing for end of support
Here are a few key resources to learn more so you can be prepared for current and future end of support scenarios:
- Learn more about your options for Windows Server and SQL Server end of support.
- Learn more about Extended Security Updates on our Frequently Asked Questions (FAQ) page and the documentation.
- Learn more about running Windows Server on Azure.
- Watch our latest webinar to learn more about how you can secure your IT foundation to be AI-ready.
- Protect beyond Extended Security Updates by enhancing security with Microsoft Defender for Cloud—a comprehensive and unified cloud-native security solution to protect hybrid and multicloud environments from code to cloud.
So Microsoft has released the new wave of products into preview, including the next version of Katal (Azure Services) for Microsoft, called Azure Pack. This pack transforms your datacenter into Azure allowing users to sign up using plans and be able to use your infrastructure into a IaaS platform.
You can download the trial for Azure Pack here –> http://www.microsoft.com/en-us/server-cloud/windows-azure-pack.aspx
Now there are some prerequisites for using this pack.
You can read more about them here –> http://technet.microsoft.com/en-us/library/dn296442.aspx
But in order to integrate Azure pack with your on-premise solution it uses Service Provider Foundation (Which is included in the Orchestrator installation media)

Not that this requires the installation of SCVMM 2012 R2 Console on the same machine as SPF since it uses the VMM APIs to communicate with it.
It also requires some other prerequisites such as

WCF Data Services 5.0 can be found here –> http://www.microsoft.com/en-us/download/details.aspx?id=29306
.NET features 4.5 WCF is a part of .Net 4.5 which can be installed from Server Manager
Management ODATA IIS is also a part of 2012 R2 installation media
ASP.NET MVC 4 can be downloaded from here –> http://www.asp.net/mvc/mvc4
Next we configure a database for use for SPF
In this database the SPF stores information such as
Tenants
Usage Records
Gallery Items
Roles
Servers
And Tenants Stamps
Next we choose where to deploy the SPF files and what certificate we want to use.
In my case for this demo I used a self-signed certificate.

Next we define credentials for the admin web service

NOTE: If you choose Network Service here you need to make sure that the machine account is a VMM administrator
In my case I choose a Service Account and entered a domain user.
After that you are done with SPF
Next we move on to the Azure Pack installation
You can download the pack from here –> http://technet.microsoft.com/en-us/library/dn296435.aspx?CR_CC=200142594
All it does is download a profile which uses webdeploy.

Now by default it will install all the web roles on the same servere

Click I accept (ill come back to what the different roles do)
And Note this installing part may take some time.
After that is done, press Continue and ill will start the Service Management Configuration site.

It will open a browser window on the localhost on port 30101, and again we will have to define a Database and server for the Azure Pack.
Here you have the option to use a Windows user or a regular SQL user.
Remember that you have to enable Mixed Mode on the SQL server in order to use regular SQL users.

Make sure that you write down the passphrase. If you forget or lose this passphrase, there is no way to recover it. This is used to encrypt and decrypt the Configuration Store..
Next we define a FQDN for the host

After this is done it will start configuring the different roles on the Server
After that is done we continue on with the configuration

NOTE: You may need to log out of your system and log back in before you can access the management portal for administrators. This is due to Windows authentication and the need to add the security group to your security token.
If you continue to see an access denied error, even after logging back in, close all Internet Explorer windows, and run Internet Explorer as an administrator.
Now the setup will open a browser on port 30091 which is the default port for the management portal for administrators

Now you can see the difference between “Katal” and Azure Pack
Katal (The old version)

(Azure Pack the New one)

New stuff is including
Reporting provider (This is also a feature that is on the Orchestrator installation media)
Service Bus Clouds (Read more about setting up service bus here –> http://msdn.microsoft.com/en-us/library/windowsazure/dn282152(v=azure.10).aspx )
Automation (This requires Service Management Automation web service)
So in my case I define the Service Provider Foundation endpoint for Azure Pack
And then Go to VM Clouds and connect to my VMM Management Server.
Add some bugs when connecting to my cloud but after a IISreset it worked just fine

This gets the cloud container from VMM, from here I can view resources in my cloud

Now for the end-user I can sign up using the tenant portal.
Which is on the same server you installed Azure Pack only on port 30081 remember thou that you need to create a plan and publish it in order for users to subscribe to that plan.
Here I signed up with a regular user account

Choose Add Plan and select a public plan which was created on the management portal.
Note thou that here we have external users created we can also use AD authentication
For the tenant portal you can configure this using ADFS here –> http://technet.microsoft.com/en-us/library/dn296436.aspx#WAP_AddADFSAuth
Note when you sign up for a plan you need to go back to the administration portal and approve the subscription.
Now If I want to automate a task associated with VM create I can do this in the management portal

All for this time, all dive in a bit more when I got the time
Stay tuned
#active-directory, #azure, #service-provider-foundation, #system-center-2012, #windows-server-2012, #windows-server-2012-r2
Расширение локальной инфраструктуры в облако
Время на прочтение8 мин
Количество просмотров12K
С появлением в Windows Azure технологий виртуальных машин (ВМ) и виртуальных сетей реализация гибридных сценариев, когда часть локальной инфраструктуры переносится в облако или расширяется за счет ресурсов облака, становится вполне выполнимой задачей. Подобные сценарии предполагают наличие туннеля между локальной сетью предприятия и облаком. В этом посте я покажу, каким образом строится такой Site-to-Site (S2S) туннель в случае, когда в качестве облака выступает Windows Azure, а шлюзом в локальной сети является сервер под управлением Windows Server 2012 R2. Будет много картинок.
Постановка задачи
Давайте представим себе, что некоторая компания заинтересована в расширении своей локальной ИТ-инфраструктуры и хотела бы перенести часть нагрузок в Windows Azure. Для нас сейчас не принципиально, что конкретно будет переезжать в облако: веб-сервер, база данных, портал SharePoint или что-то еще. Важно, чтобы виртуальные машины, развернутые в Windows Azure, «виделись» как часть локальной инфраструктуры Active Directory (AD), были включены (или могли быть включены) в домен и по сути представляли собой просто еще один сегмент корпоративной сети.
Планируемая конфигурация выглядит следующим образом:
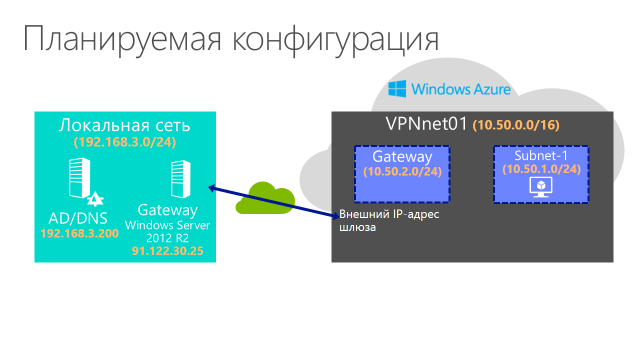
Точнее слева на рисунке то, что уже есть, справа то, что предстоит сделать.
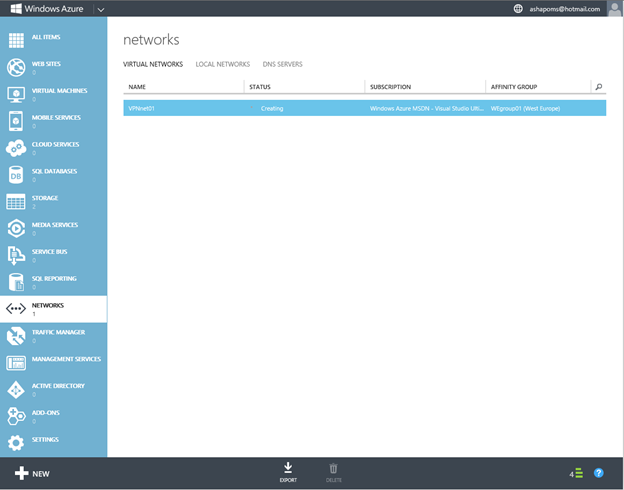
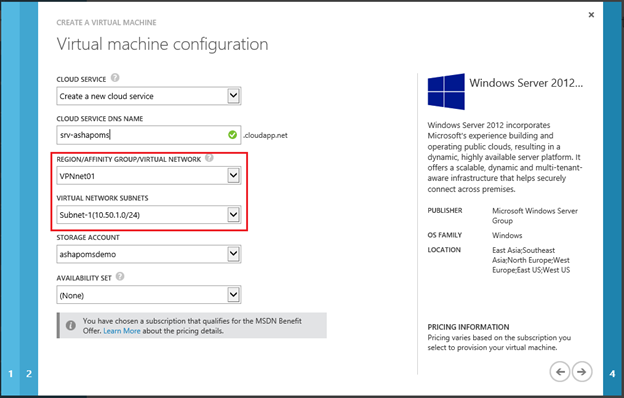
В первую очередь мы создадим в Windows Azure виртуальную сеть с именем VPNnet01. В этой сети необходимо предусмотреть как минимум две подсети – одна (можно несколько) для ВМ, вторая для построения туннеля в локальную AD. Наличие выделенной подсети для шлюза является требованием Windows Azure.
Затем организуем туннель между созданной виртуальной сетью и локальной инфраструктурой, причем сначала этот туннель настраивается со стороны Windows Azure, потом со стороны локальной сети.
Наконец, создадим ВМ в Windows Azure и убедимся, что эта виртуальная машина доступна из локальной сети и наоборот, ВМ может взаимодействовать с контроллером домена, расположенным локально.
Вся процедура, таким образом, сводится к четырем основным этапам:
- Создание виртуальной сети в Windows Azure
- Настройка шлюза в Windows Azure
- Настройка Windows Server 2012 R2 в качестве S2S-шлюза в локальной сети
- Создание ВМ в Windows Azure и проверка конфигурации
Поехали!
Создание виртуальной сети в Windows Azure
Я исхожу из того, что подписка Windows Azure в организации уже есть. Варианты получения подписки перечислены здесь. Я также предполагаю, что вы имеете представление о концепции виртуальных сетей в Windows Azure. Если это не так, можно подчерпнуть информацию в третьем модуле курса «Windows Azure для системных администраторов» на портале MVA. Но основные шаги я прокомментирую.
Итак, необходимо зайти на портал управления Windows Azure и выбрать в разделе NETWORKS создание новой виртуальной сети, нажав кнопку NEW.
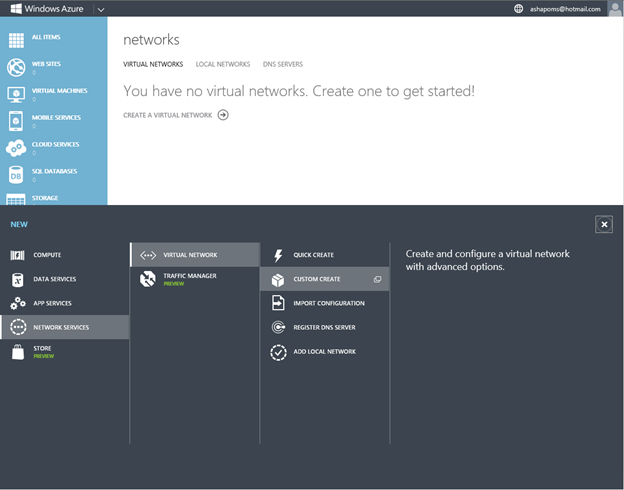
Задаем имя виртуальной сети и выбираем AFFINITY GROUP, которая позволяет расположить ваши ВМ в рамках одного ЦОД Windows Azure для сокращения задержек в сети. Если ни одной AFFINITY GROUP у вас еще нет, вам предложено будет такую группу создать.

На следующей странице необходимо задать имя и IP-адрес сервера(-ов) DNS. Строго говоря, это поле не является обязательным, и его можно заполнить/изменить позже. Но для нашего сценария вся информация о DNS уже есть. Поскольку мы планируем использовать ВМ в Windows Azure как часть AD предприятия, то здесь я указываю имя и IP-адрес контроллера домена, традиционно выполняющего и роль DNS-сервера. Все создаваемые в этой сети ВМ автоматически получат именно этот адрес в качестве адреса DNS-сервера. Если поле оставить пустым, то создаваемые впоследствии ВМ будут использовать для разрешения имен службу DNS Windows Azure и при этом, разумеется, включить такие машины в домен не получится. Технически вы сможете потом зайти на конкретную ВМ, например, с помощью RDP и вручную изменить адрес DNS, но предлагаемый на данной странице вариант гораздо удобнее. Кроме того, надо заметить, что вообще не рекомендуется что-либо менять вручную в настройках TCP/IP виртуальных машин. Этими настройками управляет Windows Azure, чтобы вы, в свою очередь, имели надежный доступ к вашим машинам.
Второй важный параметр на странице – чекбокс Configure site-to-site VPN, который нужно не забыть отметить.

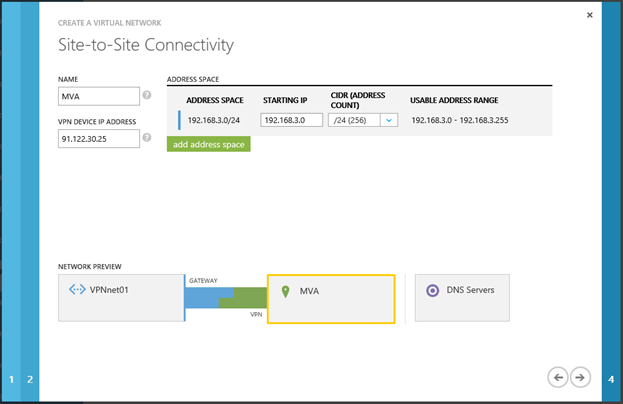
На странице Site-to-Site Connectivity задаем три параметра:
- NAME – имя сайта, оно может быть произвольным и лишь идентифицирует набор настроек, который на данной странице мы и формируем;
- VPN DEVICE IP ADDRESS – внешний IP-адрес VPN-шлюза в локальной сети предприятия, применительно к рассматриваемому сценарию это IPv4-адрес на внешнем сетевом интерфейсе машины с Windows Server 2012 R2;
- ADDRESS SPACE – адресное пространство локальной сети или той ее части, к которой хотим предоставить доступ из Windows Azure.
На странице Virtual Network Address Spaces необходимо сформировать виртуальное адресное пространство создаваемой виртуальной сети. ВМ в облаке будут получать IP-адреса как раз из этого пространства. Указав адресный диапазон всей сети, нужно затем разбить его на подсети. Напомню, что требуется как минимум две подсети: для ВМ и шлюза соответственно. В каждой виртуальной сети может быть только одна подсеть шлюза.
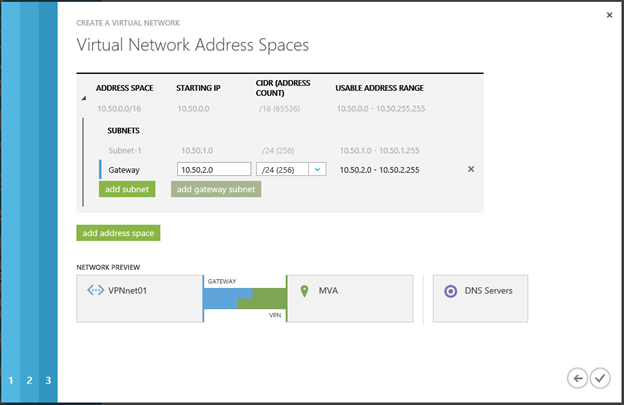
Нажимаем кнопку “Complete” и ждем завершение процесса создания виртуальной сети.
Собственно на этом первый этап завершен, и мы можем переходить к настройке шлюза Windows Azure.
Настройка шлюза в Windows Azure
После того как сеть создана, щелкаем по ней и видим закладку DASHBOARD.
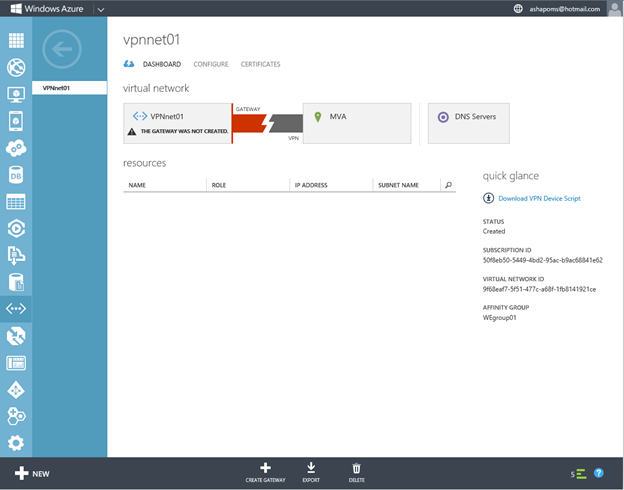
В меню в нижней части экрана нажимаем CREATE GATEWAY и выбираем Dynamic Routing. Два типа маршрутизации поддерживает на текущий момент Windows Azure. Статическая маршрутизация основана на заданных пользователем политиках (списках доступа), динамическая – на заданных маршрутах и туннельном интерфейсе (любой пакет, попадающий на туннельный интерфейс, пересылается через VPN-туннель). В случае динамической маршрутизации, соответственно, если IP-диапазоны виртуального и локального адресных пространств при создании виртуальной сети в Windows Azure были заданы корректно (не пересекаются, не дублируются и пр.), то пакеты должны правильным образом маршрутизироваться между Windows Azure и локальной инфраструктурой.

Выбор типа маршрутизации определяется тем, какой шлюз используется на стороне локальной инфраструктуры. В документации в разделе Known compatible VPN devices можно посмотреть список поддерживаемых шлюзов и соответствующих им типов маршрутизации.
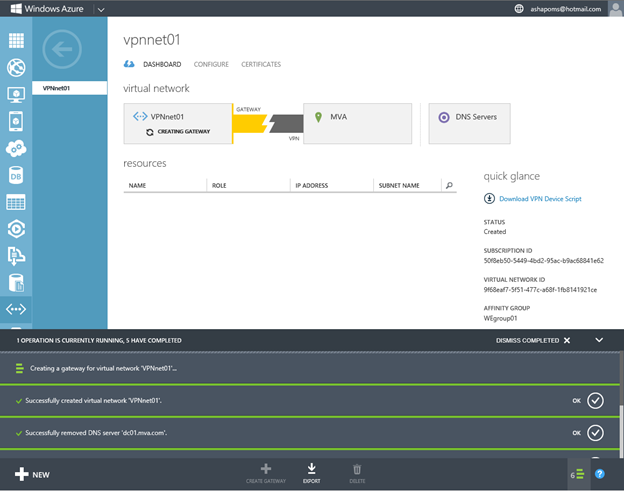
Остается ждать, пока Windows Azure настроит шлюз. Этот процесс занимает в среднем 15-20 мин.
По окончании на странице можно увидеть внешний IP-адрес созданного в Windows Azure шлюза, и этот адрес следует использовать в качестве конечной точки подключения при настройке шлюза в корпоративной сети.
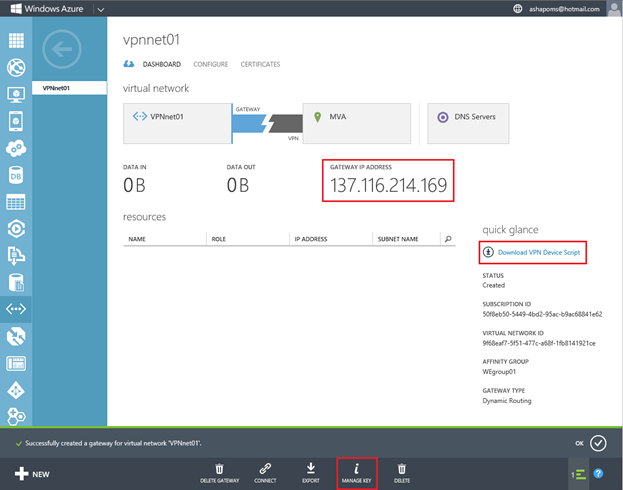
Для определенных моделей шлюзов (VPN-устройств), в том числе для службы RRAS в Windows Server 2012/R2, Windows Azure может сгенерировать скрипт, который затем необходимо запустить на VPN-устройстве и тем самым сконфигурировать это устройство для организации туннеля в Windows Azure. Чтобы загрузить такой скрипт нужно создать ключ, используемый для туннельной аутентификации, нажав MANAGE KEY,
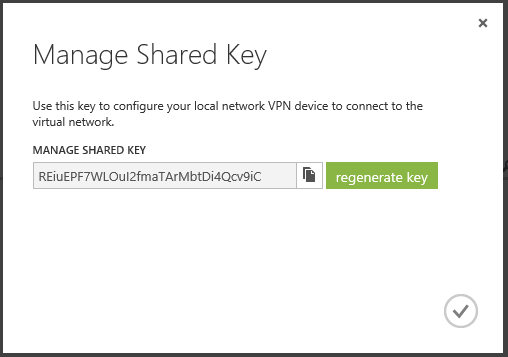
а затем щелкнуть по ссылке Download VPN Device Script справа на странице.
В открывшемся окне выберете производителя шлюза, платформу и операционную систему и загрузите скрипт.

Теперь полученный скрипт необходимо перенести на VPN-устройство и выполнить настройку.
Настройка Windows Server 2012 R2 в качестве S2S-шлюза
Следует убедиться в том, что полученный на предыдущем этапе скрипт содержит корректные значения адресного пространства виртуальной сети и внешнего адреса шлюза Windows Azure. Эти значения выделены в приведенном фрагменте скрипта.
# Install RRAS role
Import-Module ServerManager
Install-WindowsFeature RemoteAccess -IncludeManagementTools
Add-WindowsFeature -name Routing -IncludeManagementTools

# !!! NOTE: A reboot of the machine might be required here after which the script can be executed again.

# Install S2S VPN
Import-Module RemoteAccess
Install-RemoteAccess -VpnType VpnS2S

# Add and configure S2S VPN interface
Add-VpnS2SInterface -Protocol IKEv2 -AuthenticationMethod PSKOnly -NumberOfTries 3 -ResponderAuthenticationMethod PSKOnly -Name 137.116.214.169 -Destination 137.116.214.169 -IPv4Subnet @("10.50.0.0/16:100") -SharedSecret 0pCpWdVuzaJuZtJpQq8TbtUAQWk7PtOk

Set-VpnServerIPsecConfiguration -EncryptionType MaximumEncryption

# Set S2S VPN connection to be persistent by editing the router.pbk file (required admin priveleges)
Set-PrivateProfileString $env:windir\System32\ras\router.pbk "137.116.214.169" "IdleDisconnectSeconds" "0"
Set-PrivateProfileString $env:windir\System32\ras\router.pbk "137.116.214.169" "RedialOnLinkFailure" "1"

# Restart the RRAS service
Restart-Service RemoteAccess

# Dial-in to Azure gateway (optional)
#Connect-VpnS2SInterface -Name 137.116.214.169
Если все верно, остается просто запустить это скрипт на машине с Windows Server 2012 R2, которая будет выполнять роль шлюза. Подчеркиваю, выше приведен лишь фрагмент. Запускать надо, конечно, весь скрипт целиком, причем под учетной записью с правами администратора. Например, это можно сделать в PowerShell ISE.
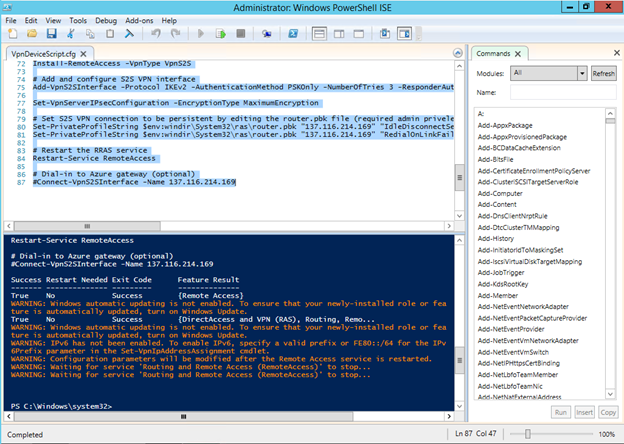
По приведенному фрагменту видно, что скрипт устанавливает и настраивает службу Routing and Remote Access Services (RRAS). Давайте посмотрим, как выглядят некоторые настойки RRAS после успешного выполнения скрипта.
Во-первых, в разделе Network Interfaces можно заметить интерфейс с именем, соответствующим внешнему IP-адресу шлюза в Windows Azure, причем состояние этого интерфейса должно быть Connected. Если это не так, щелкните по нему правой кнопкой мыши и в контекстном меню выберете Connect.
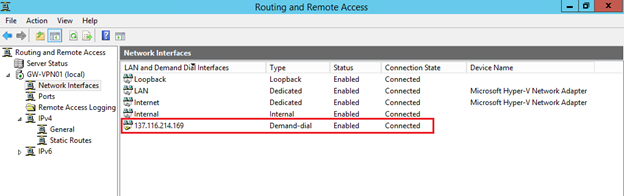
В свойствах этого интерфейса, используемого, как вы понимаете, для построения туннеля, мы найдем IP-адрес шлюза Windows Azure,
а также на закладке Security используемый протокол (IKEv2) и сгенерированный в Windows Azure ключ.
Кроме того, в разделе Static Routes появился статический маршрут, пересылающий по туннелю все пакеты с адресами получателя, принадлежащими виртуальной сети Windows Azure.

Сам RRAS-сервер сконфигурирован в качестве маршрутизатора, в чем можно убедиться посмотрев его свойства.

Используя приведенную информацию, вы сможете вручную настроить службу RRAS, если по каким-либо причинам скрипт отработал с ошибками.
Если же все в порядке, то вернувшись на закладку DASHBOARD виртуальной сети, созданной в Windows Azure, вы увидите примерно такую картину:
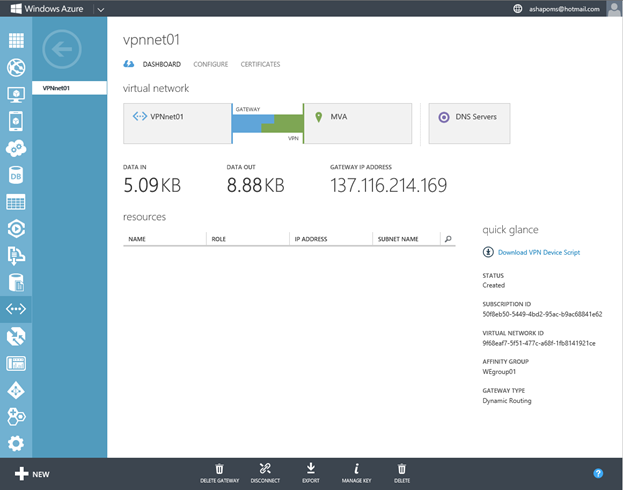
Либо она станет такой после нажатия кнопки CONNECT внизу страницы.
Создание ВМ в Windows Azure и проверка конфигурации
Теперь, когда туннель создан, остается проверить конфигурацию.
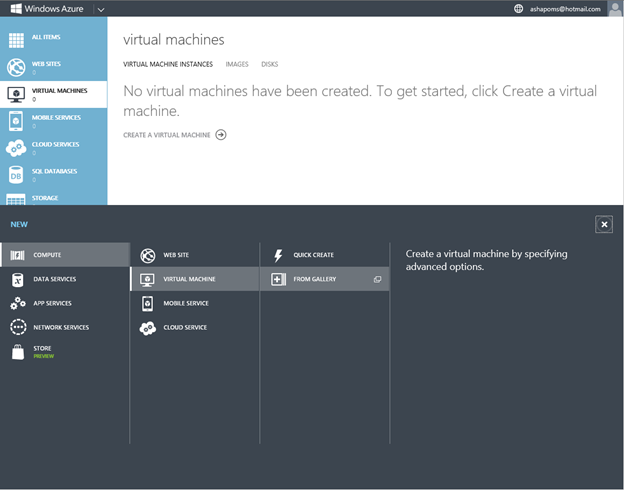
Для этого давайте создадим ВМ в Windows Azure и попробуем включить эту ВМ в AD локальной инфраструктуры. Шаги достаточно стандартные, в разделе VIRTUAL MACHINES нажимаем NEW и выбираем FROM GALLERY,
в качестве гостевой ОС выбираем, например, Windows Server 2012,

задаем имя ВМ, логин и пароль администратора,

и убеждаемся, что машина будет подключена к созданной ранее виртуальной сети.
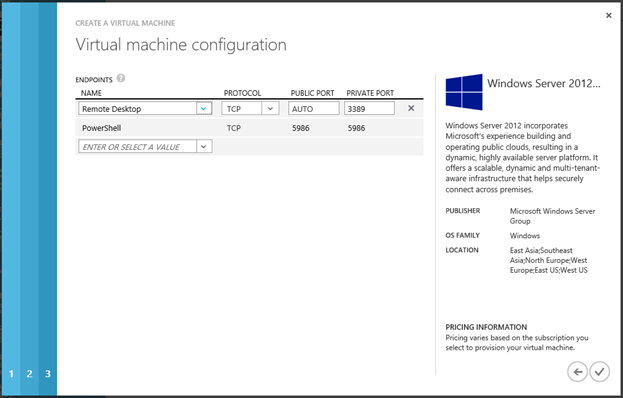
На последней странице оставляем все без изменений.
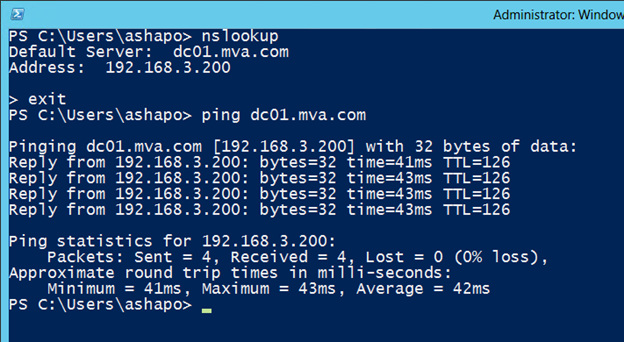
После того как ВМ запустится, можно подключиться к ней по RDP и посмотреть параметры IP. В данном случае видно, что ВМ получила адрес 10.50.1.4 из адресного пространства виртуальной сети, при этом в качестве адреса DNS-сервера указан адрес контроллера домена (192.168.3.200).

Проверим разрешение имен и ping на контроллер домена, если конечно Firewall разрешает ICMP.
Коммуникации настроены, остается просто включить ВМ в домен, и это уже самая обычная процедура, на которой я останавливаться не буду.
Итак, мы прошли все этапы, и теперь наша локальная инфраструктура расширена сетевым сегментом в Windows Azure. В этом сегменте можно создавать дополнительные подсети, запускать ВМ нужной конфигурации, переносить в них требуемые сервисы, настраивать их мониторинг и использовать таким образом ресурсы облака для решения стоящих перед ИТ-департаментом задач.
Я привел достаточно подробное описание настроек для того, чтобы вы смогли при необходимости воспроизвести рассмотренные шаги. Как упоминалось, на сайте Windows Azure вы сможете найти скрипты для разных типов VPN-шлюзов. Но даже если в этом списке нет вашего устройства, вы можете настроить свой шлюз, понимаю логику работы и используемые протоколы и механизмы аутентификации Windows Azure. В общем, лучший способ изучить технологию – попробовать самому. 
Надеюсь, материал был полезен!
In this blog post, you’ll discover the process of onboarding your Windows Server 2012/2012 R2 machines into Azure Arc, creating a new Extended Security Update (ESU) license, and seamlessly linking it to your Arc-enabled servers running Windows Server 2012/2012 R2.
As many of you are likely aware, support for Windows Server 2012 and Windows Server 2012 R2 ended on October 10, 2023. If you continue to use these servers (machines) in your on-premises or other cloud environments, please be aware that Microsoft no longer provides security updates or support.
However, by enabling these machines as Azure Arc-enabled machines, you can enroll them in ESU*, ensuring they receive crucial security patches for ongoing protection. In this blog post, I’ll guide you through the process of setting this up.
*Please be aware that there will be a one-time bill-back charge for the months that have passed after the end of support date. Billing will occur at the end of the first month following the activation of your ESU license.
Table of Contents
- Prerequisites
- Onboarding your Windows Server 2012 machine to Azure Arc-enabled servers
- Create an Azure Arc WS2012 or WS2012R2 ESU license
- Link an ESU license to a Windows Server 2012 or 2012 R2 Arc-enabled server
- Conclusion
Prerequisites
- An Azure subscription, preferably more than one if you plan to follow the Cloud Adoption Framework (CAF) enterprise-scale architecture. This includes a connectivity and/or management subscription, as well as an Arc subscription (landing zone), to deploy your Arc-related resources.
- All the necessary resource providers need to be registered (Microsoft.HybridCompute, Microsoft.GuestConfiguration, Microsoft.Compute, Microsoft.Security, Microsoft.OperationalInsights, Microsoft.Sql, Microsoft.Storage) on the Azure subscription utilized for your ESUs enabled by Azure Arc.
- An existing dedicated resource group on the Arc subscription to include only your Azure Arc-enabled servers.
- An existing dedicated resource group on the Arc subscription to store your Azure Arc WS20212 or WS2012R2 ESU licenses.
- An Azure Administrator account with the necessary RBAC roles, specifically the Contributor role, to carry out essential tasks such as creating and assigning ESUs.
- A service principal to connect machines non-interactively using Azure PowerShell.
- Some Windows Server 2012 (W2K12) or Windows Server 2012 R2 (W2K12R2) machines, whether physical or virtual, running within your hybrid environment.
- To install the Azure Connected Machine agent on your machines, you need an account with elevated privileges (administrator or root) for the installation process.
- To receive the latest ESU patches, the servers must first be updated with the following previous updates, if not already installed: Windows Server 2012: KB5029369 and KB5017221, or a later SSU, and for Windows Server 2012 R2: KB5029368 and KB5017220, or a later SSU.
- The pre-defined installation script to connect your machines has already been generated and made available on a network share.


Onboarding your Windows Server 2012 machine to Azure Arc-enabled servers
Let’s get started by onboarding your Windows 2012 or 2012 R2 machines into Arc through the onboarding script. In this blog post, I’ll demonstrate this process for a single server, but you can automate it for multiple servers using methods like Group Policy Objects (GPO).
Just log in to one of the machines with an account that has administrator privileges, open Windows PowerShell as Administrator and then navigate to the network share to run the OnboardingScript.ps1 script.
You can use the following PowerShell one-liner (adjusted for your environment; replace “servername” and “sharename) to execute the script:
powershell -executionpolicy bypass -file \\"servername"\"sharename"\OnboardingScript.ps1


It’s important to note that in order to utilize ESUs, the Azure Connected Machine Agent must be at least version 1.34 or higher. You can easily check the version by running “azcmagent version” directly on the server from Windows PowerShell or the Command Prompt.
Create an Azure Arc WS2012 or WS2012R2 ESU license
When your servers are onboarded into Azure Arc, the next step is to create Windows Server 2012 or 2012 R2 Extended Security Update licenses from Azure Arc.
To create such a new license, Logon to the Azure Portal and enter “arc” into the global search bar, then select “Azure Arc” from the search results.

On the Azure Arc page, navigate to the “Management” section and choose “Extended Security Updates“.

On the Azure Arc Extended Security Updates page, open the Licenses tab and select Create.

Next, complete all the necessary fields, such as subscription, resource group, and license name. When setting up a new license, I recommend scheduling its activation for a later time.
In the SKU field, specify the SKU*, which can be Windows Server 2012, 2012 R2 Standard Edition, or Datacenter Edition.
In the core type field, choose physical cores if your server is licensed based on its hardware cores, or choose virtual cores if you’re licensing individual VMs without covering all underlying hardware cores.
In my example, I selected virtual cores because I have 3 VMs operating on a Hyper-V host running Windows Server 2022.
When choosing virtual cores, the licensing guidelines stipulate a minimum of 8 virtual cores per VM. This means that even if you’re using a single VM with just 4 cores (vCPUs), you still require an 8-core license. In my situation, all 3 of my VMs are running with 4 cores each, but I still need to activate 3 licenses, each with a minimum of 8 virtual cores, to license all 3 of them.
Before you can proceed and click “Create” to initiate the license provisioning, you must confirm Microsoft’s SA or SPLA coverage**.
*For general guidance on choosing the right license and understanding the differences between each option, you can refer to this Microsoft Learn webpage
**In order to purchase ESUs, you need Software Assurance via Volume Licensing Programs like Enterprise Agreement (EA), Enterprise Agreement Subscription (EAS), Enrollment for Education Solutions (EES), or Server and Cloud Enrollment (SCE). Alternatively, if your Windows Server 2012/2012 R2 machines are licensed through SPLA or with a Server Subscription, Software Assurance isn’t necessary for purchasing ESUs.”


Link an ESU license to a Windows Server 2012 or 2012 R2 Arc-enabled server
After creating your initial ESU license, you can choose one or more Arc-enabled servers to associate with it. Once a server is linked to an activated ESU license, it becomes eligible to receive Windows Server 2012 and 2012 R2 ESUs.
Initially, if you don’t have any activated licenses, you need to activate one.
To do this, click on the name of a deactivated license under the “License” tab. Next, click “Edit“, choose “Activated“, and then click “Save” to activate the selected license.


Once you have at least one active license, navigate to the “Eligible Resources” tab to see a list of all your Arc-enabled servers running Windows Server 2012 and 2012 R2.
To enable ESUs for one or more machines, simply choose them from the list and click “Enable ESUs“.

On the “Enable Extended Security Updates” page, you’ll see the number of selected machines for ESU activation and the available WS2012 licenses. Choose a license to link with the selected machine(s), then click “Enable“.


If everything proceeds smoothly, the status of the selected machine(s) will change to “Enabled“.

If any of your Windows Server 2012 or 2012 R2 machines have an active ESU status, you can configure your preferred patching solution to receive these updates. Whether it’s Azure Update Manager*, Windows Server Update Services (WSUS), Microsoft Updates, Microsoft Endpoint Configuration Manager, or a third-party patch management solution, the choice is yours.
*Azure Arc-enabled servers running Windows Server 2012 ESUs can access Azure Update Management, Machine Configuration, and Change Tracking and Inventory capabilities without any extra charges.
Conclusion
Windows Server 2012 and Windows Server 2012 R2 officially reached the end of support on October 10, 2023. If your hybrid environment still includes these servers, be aware that Microsoft no longer provides new security updates or support for them.
Fortunately, by enabling these Windows Server 2012/2012 R2 machines as Azure Arc-enabled servers, you can choose to enroll them in Extended Security Updates. This option ensures they continue to receive the essential security updates necessary for their protection.
In this blog post, I demonstrated the steps to onboard your Windows Server 2012/2012 R2 machines into Azure Arc, create a new ESU license, and link it to your Arc-enabled servers running Windows Server 2012/2012 R2.
If you have any questions or suggestions about this blog post, feel free to reach out to me through my Twitter handle (@wmatthyssen) or simply leave a comment, and I’ll be more than happy to assist.
In a previous post I covered how to add a Linux image to Azure Stack. In this post I am going to detail a simple (if slow) way of adding a Server 2012 R2 image to Azure Stack as well. With Azure Stack TP3 (original and extra-crispy) there are no default VM Images included in the install. You are prompted to download a Windows Server 2016 ISO as part of the Azure Stack POC download, and there is a script in the AzureStack.ComputeAdmin module called New-Server2016Image that will take that ISO and turn it into a Core or Datacenter image. But what if you wanted that good ole Server 2012 R2 image?
For whatever reason, VM Images are not yet part of the marketplace syndication. So you are on your own when it comes to creating them. So I figured, why not go to the source? I can spin up a Windows Server 2012 R2 Datacenter VM in Azure, sysprep it, and then copy the VHD down locally. Then using the Add-VMImage cmdlet in AzureStack.ComputeAdmin I’ll add it to the Azure Stack Install. That is essentially what the script below does.
This set of commands is meant to be run from the MAS-CON01 VM, and it assumes that you have installed the proper version of AzureRM PowerShell and the AzureStack tools from Github. You also need to have a valid subscription in Azure, obviously, in which to spin up the VM. The commands assume that you have already logged into Azure Cloud and selected the proper subscription. There are a few fields to change here and there and I have added <> on either side of the text to indicate a necessary change. The ARM template being used is sitting on my GitHub, but feel free to use whatever template you like. The key is to allow WinRM traffic from the public subnet so that the script can remote in and sysprep the server. These commands could easily be repurposed to capture custom VM images using other operating systems too, assuming they support WinRM. I am looking into turning this into a proper script that can take some arguments and do the whole thing for you, but that’s not quite ready yet. Minimum Viable Product right? Lastly, the image is a whopping 128GB in size, so be congizant of that when you select a destination location for the VHD. I picked the SU1Fileserver share as a target since it should have ample space, but your mileage may vary.
Occasionally the token for uploading the VHD and creating the Gallery Item will time out. In that case, you can manually add the image and create the gallery item. I’m working with the Azure Stack team to fix that particular issue, possibly checking for token status after the initial VHD upload and refreshing it if expired.