
LDAP Authentication on Windows Server
ProVision supports LDAP authentication (including Windows Server). To setup an LDAP server for authentication, you must perform the following procedures:
Configuring the LDAP functions on your Windows Server
You should confirm these steps with your LDAP admin — the purpose of this walkthrough is to provide some level of detail on how to extend LDAP functionality to support integration with an application like ProVision.
Step 1: Prepare to extend the Schema (http://technet.microsoft.com/en-us/library/cc961754.aspx)
This is not a minor operation and requires interaction with various control modification areas of Windows Server:
- If you have not modified the schema before, you will need to use the Active Directory Schema console on a DC (Domain Controller) to permit write access to the DC schema.
- Since the schema object has dedicated permissions, admins must be a member of the Schema Administrator group (Schema Admins).
- Note that the DC that is holding the Schema Master Role is the only one allowed to write to it.
Step 2: Decide on method for Installing/executing Schema Extensions (http://technet.microsoft.com/en-us/library/cc961742.aspx)
If you have already used other AD integrations, this should be straightforward. We recommend using the LDIF script method
Step 3: Add and Modify a Schema Object (http://technet.microsoft.com/en-us/library/cc961575.aspx)
To add a new attribute to the schema, you first have to create a attribute object. The you will need to complete the following steps:
- Select a name for the attribute (ProVision assumes that the name will be ‘sixConnGroup‘)
- Get a valid Object Identifier (OID) from an issuing authority (http://msdn.microsoft.com/en-us/library/ms677620.aspx)
-
Generate an Object Identifier
-
- Document the attribute syntax
- Confirm that the attribute should be single-value
- Confirm the attribute indexing behavior
- Decide if the attribute needs to be distributed to the Global Catalog
LDAP Schema — Example
attributetype (1.3.6.1.4.1.5023215.2.3.21 NAME 'sixConnGroup' SYNTAX 1.3.6.1.4.1.1466.115.121.1.15 ) objectclass ( 1.3.6.1.4.1.5023215.2.4.2 NAME 'sixConnectPermissionsV2' DESC '6Connect Permissions Object v2' SUP top AUXILIARY MUST ( sixConnGroup ) )
LDAP User Example
SSH into your openLDAP server and create a new ‘ldif’ file. Example:
dn: cn=JoeSmith,ou=people,dc=6connect,dc=com
cn: JoeSmith
sn: JoeSmith
objectclass: top
objectclass: person
objectclass: sixConnectPermissionsV2
sixConnGroup: "Global Admins"
sixConnGroup: "IT Engineering"
sixConnGroup: "Sales"
sixConnGroup: "Customer Admin"
userPassword: testpass
To create a new user, make a new ldif file and change all instances of «JoeSmith» to whatever username you wish to create and update the password. Keep all of the object class definitions as listed above. Add a sixConnGroup declaration for each ProVision user group a user is in.
After the file is created, run the following command to add the new user to LDAP server:
ldapadd -h [SERVER] -x -f [LDIF FILE] -D [ROOTDN] -w [ROOT PW] -v
Example:
ldapadd -h localhost -x -f 6connect.ldif -D "cn=Manager,dc=6connect,dc=com" -w secret -v
The user will now be active in openLDAP and can be used to login to ProVision.
Test the LDAP Server
To query the LDAP server, run the following command on any server which has openLDAP enabled:
ldapsearch -b [BASE] -h [IPADDRESS] -D [DOMAIN] -w [PASSWORD] [USER]
Note: We have not been able to use a v6 address at with this tool, even though multiple sources say it should work.
At the end of the command where [USER] is specified, user or groups can be used (in LDAP format) to query.
Example:
ldapsearch -b "dc=6connect,dc=com" -h 50.240.195.129 -D "cn=Mayor,ou=people,dc=6connect,dc=com" -w testpass "cn=MajorMiner"
Configure ProVision for LDAP Authentication
To configure the use of LDAP authentication, follow the steps below.
- Log into 6connect ProVision
- Go to Settings Tab → Admin Settings -> Authentication
- Select «LDAP» under «Authentication Options»
- Move the LDAP Enable selector to the «ON» position.
- Fill in the hostname or ip address, authentication port, LDAP Security, Auth DN, Fetch DN, and Filter DN.
- Optionally, enter the LDAP Username and Password in order to allow ProVision to import LDAP Contacts and sync LDAP contact information (see: Contact Manager)
- Click «Save Changes».
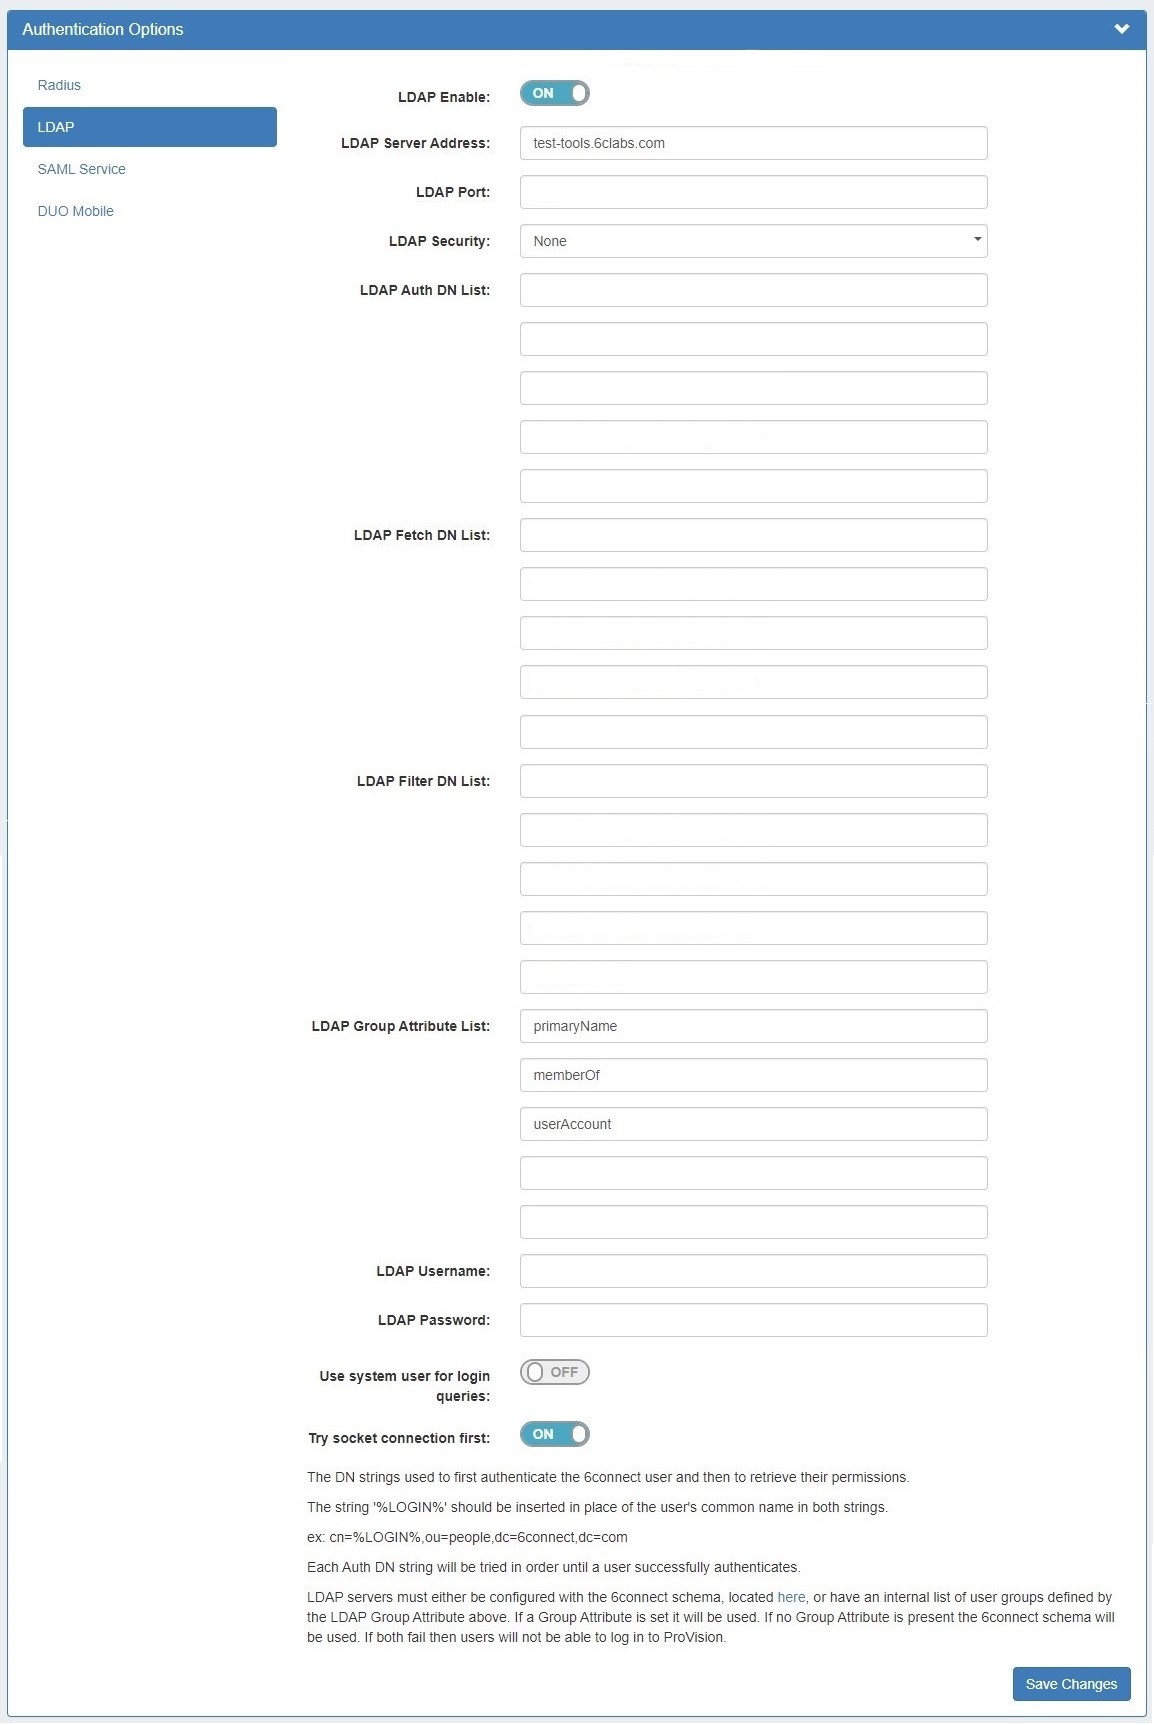
Example values in this case would be:
- LDAP Enable: (Checked)
- LDAP Server Address: 52.240.195.12
- LDAP Port: 389 ( or SSL/TLS port is 636)
- LDAP Security: None
- LDAP Auth DN: cn=%LOGIN%,ou=people,dc=6connect,dc=com
- LDAP Fetch DN: cn=%LOGIN%
- LDAP Filter DN: cn=%LOGIN%
Setting default login authentication options
In the login screen, you would select the authentication method from the dropdown. If you like, you can set the default login option in the following way:
Go to the /data/globals.php and open in vi (or other editor). Add in the following text as the last line of the file (before the closing ?>)
define(‘DEFAULT_LOGIN_TYPE’, ‘radius’);
Acceptable values are «local», «radius» and «ldap». If this line is not present in globals.php, the default option is «local».
Using SSL encryption
To use SSL encryption with LDAP, the ldap.conf file must be correctly configured on the ProVision server.
Typically, the LDAP configuration file is kept at «/etc/ldap/ldap.conf». Make sure the following line is present:
TLS_REQCERT allow
and restart the webserver.
Add or Update LDAP Settings
To add or update LDAP settings, go to the Settings Tab → Admin to enter the Admin area.
Then, click the «Authentication» sub-tab at the top of the Admin Settings page, and select «LDAP» from the «Authentication Options» module.
Enter or update the following settings:
- LDAP Enable: check the box to enable LDAP functionality.
- LDAP Server Address: Set the IP address of your LDAP server.
- LDAP Port: Set the port for your LDAP server
- LDAP Security: Select the security method of your LDAP server — SSL, TLS or None
- LDAP Auth DN/Fetch DN/Filter DN: These strings are used to first authentication the 6connect user and then to retrieve their permissions. The string ‘%LOGIN%’ should be inserted in place of the user’s common name both strings. (ex: cn=%LOGIN%,ou=people,dc=6connect,dc=com)
- LDAP Group Attribute: If using an internal list of user groups instead of 6connect groups, enter the attribute name for the LDAP groups here. If a Group Attribute is set, it will be used first, otherwise the 6connect schema will be used.
- LDAP Username / LDAP Password: Optionally, you may enter LDAP admin credentials to allow ProVision to import and sync LDAP contacts. See Contact Manager for details on LDAP contacts.
- Mapping Permissions to 6connect schema: To integrate 6connect permissions with your existing directory structure then you will need the 6connect schema. It should snap in with any existing LDAP structure and allow you to assign 6connect permissions to your existing users. You can download a copy of the schema from this section.
Once at least one LDAP server has been added, a list will appear at the top of the Radius module. Add an additional Radius server by clicking «Add new server».
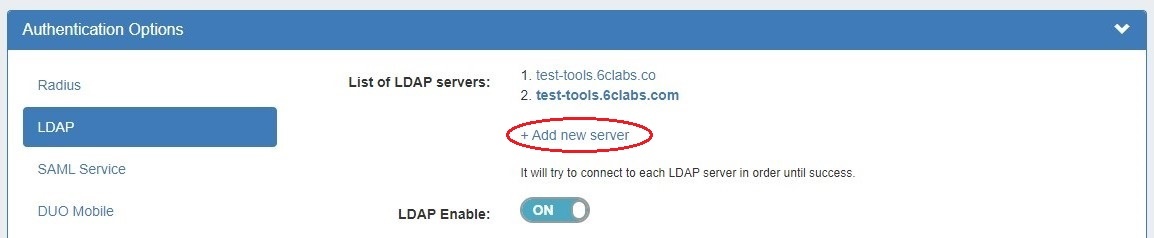
ProVision will try to connect to each server listed in the order listed, until a success is returned. Disabled servers will display in grey, and the currently selected server will display in bold.
When done, click «Save Changes».
Download Windows Speedup Tool to fix errors and make PC run faster
LDAP signing is an authentication method in Windows Server that can improve the security of a directory server. Once enabled, it will reject any request that doesn’t ask for signing or if the request is using non-SSL/TLS-encrypted. In this post, we will share how you can enable LDAP signing in Windows Server and client machines. LDAP stands for Lightweight Directory Access Protocol (LDAP).
Enabling LDAP signing on the server and client machines is essential to ensuring that the attacker doesn’t use a forged LDAP client to change server configuration and data.
- Set the server LDAP signing requirement
- Set the client LDAP signing requirement by using Local computer policy
- Set the client LDAP signing requirement by using the Domain Group Policy Object
- Set the client LDAP signing requirement by using Registry keys
- How to verify configuration changes
- How to find clients that do not use the “Require signing” option
The last section helps you to figure out clients that do not have Require signing enabled on the computer. It is a useful tool for IT admins to isolate those computers, and enable the security settings on the computers.
1] Set the server LDAP signing requirement

- Open Microsoft Management Console (mmc.exe)
- Select File > Add/Remove Snap-in > select Group Policy Object Editor, and then select Add.
- It will open the Group Policy Wizard. Click on the Browse button, and select Default Domain Policy instead of Local Computer
- Click on the OK button, and then on the Finish button, and close it.
- Select Default Domain Policy > Computer Configuration > Windows Settings > Security Settings > Local Policies, and then select Security Options.
- Right-click Domain controller: LDAP server signing requirements, and then select Properties.
- In the Domain controller: LDAP server signing requirements Properties dialog box, enable Define this policy setting, select Require signing in the Define this policy setting list, and then select OK.
- Recheck the settings and apply them.
2] Set the client LDAP signing requirement by using local computer policy

- Open Run prompt, and type gpedit.msc, and press the Enter key.
- In the group policy editor, navigate to Local Computer Policy > Computer Configuration > Policies > Windows Settings > Security Settings > Local Policies, and then select Security Options.
- Right-click on Network security: LDAP client signing requirements, and then select Properties.
- In the Network security: LDAP client signing requirements Properties dialog box, select Require signing in the list and then choose OK.
- Confirm changes and apply them.
3] Set the client LDAP signing requirement by using a domain Group Policy Object
- Open Microsoft Management Console (mmc.exe)
- Select File > Add/Remove Snap-in > select Group Policy Object Editor, and then select Add.
- It will open the Group Policy Wizard. Click on the Browse button, and select Default Domain Policy instead of Local Computer
- Click on the OK button, and then on the Finish button, and close it.
- Select Default Domain Policy > Computer Configuration > Windows Settings > Security Settings > Local Policies, and then select Security Options.
- In the Network security: LDAP client signing requirements Properties dialog box, select Require signing in the list and then choose OK.
- Confirm changes and apply the settings.
4] Set the client LDAP signing requirement by using registry keys
The first and foremost thing to do is take a backup of your registry
- Open Registry Editor
- Navigate to HKEY_LOCAL_MACHINE \ SYSTEM \ CurrentControlSet \ Services \ <InstanceName> \Parameters
- Right-click on the right pane, and create a new DWORD with name LDAPServerIntegrity
- Leave it to its default value.
<InstanceName>: Name of the AD LDS instance that you want to change.
5] How to verify if configuration changes now require sign-in
To make sure the security policy is working here is how to check its integrity.
- Sign in to a computer that has the AD DS Admin Tools installed.
- Open Run prompt, and type ldp.exe, and press the Enter key. It is a UI used for navigating through the Active Directory namespace
- Select Connection > Connect.
- In Server and Port, type the server name and the non-SSL/TLS port of your directory server, and then select OK.
- After a connection is established, select Connection > Bind.
- Under Bind type, select Simple bind.
- Type the user name and password, and then select OK.
If you receive an error message saying Ldap_simple_bind_s() failed: Strong Authentication Required, then you have successfully configured your directory server.
6] How to find clients that do not use the “Require signing” option
Every time a client machine connects to the server using an insecure connection protocol, it generates Event ID 2889. The log entry will also contain the clients’ IP addresses. You will need to enable this by setting the 16 LDAP Interface Events diagnostic setting to 2 (Basic). Learn how to configure AD and LDS diagnostic event logging here at Microsoft.
LDAP Signing is crucial, and I hope this article helped you clearly understand how to enable it in Windows Server and on client machines.
Ashish holds a Bachelor’s in Computer Engineering and is a veteran Windows. He has been a Microsoft MVP (2008-2010) and excels in writing tutorials to improve the day-to-day experience with your devices.
Previous Page | Next Page
LDAP Authentication Support on Windows
LDAP Authentication
on Windows is set up and configured like the Pluggable Authentication Module
(PAM) that is used on UNIX and Linux. Use the LDAP Authentication Support
module when you want to use an LDAP server to authenticate your system users.
The module contains source code that you can modify for your specific LDAP
Authentication Support module.
The authentication module is a DLL that usually resides in the %INFORMIXDIR%\dbssodir\lib\security directory. The parameters of the module
are listed in the %INFORMIXDIR%\dbssodir\pam.conf file.
The source code for a fully functional LDAP Authentication Module and samples
of the required configuration files are included in the %INFORMIXDIR%\demo\authentication directory.
The LDAP Authentication Module provides single-module authentication only.
The module does not support features such as module stacking. The system administrator
can enable or disable the authentication.
Installing and Customizing the LDAP Authentication Support Module
Before you can use the Dynamic Server LDAP Authentication Module to create
your authentication module, you must have an LDAP server and the LDAP client-side
system. Examples of LDAP systems are IBM Directory Server and openLDAP.
Your LDAP client-side system typically includes LDAP libraries and header
files. These libraries and header files are required to compile the LDAP module.
To customize the module
- Customize the pam_ldap.c file that is included with
Dynamic Server. - Compile the pam_ldap.c file into a DLL and place
it in a secure directory.Recommendation: Place the pam_ldap.c file in the %INFORMIXDIR%\dbssodir\lib directory.
Your installation also includes a template of a configuration file, pam_ldap_tmpl, for the LDAP module. This configuration file
contains site specific information. You should store site-specific information
in this configuration file, because the file enables a single LDAP module
to work in different settings.
Configuring the LDAP Module
Use the template of a PAM configuration file to configure your LDAP module.
To configure your LDAP module
- Copy the template file to %INFORMIXDIR%\dbssodir\etc and name it pam.conf.
- Customize the file to accommodate your local security settings. See the
template file, pam.conf_tmpl, for details about how
to customize the file.
Configuring Dynamic Server
To configure a server to use an LDAP Authentication Support
module, edit the sqlhosts file. The system administrator
must know:
- The name of the module.
- Whether the module will raise a challenge in addition to accepting a
simple username and password combination.
The following example shows an sqlhosts entry with
descriptive names:
PAM service: pam_chal

Authentication mode: challenge
ifxserver1   oltlitcp   servermc   portnum1
 s=4, pam_serv=(pam_chal), pamauth=(challenge)

PAM service: pam_password (Needs only a password)

Authentication mode: password
ifxserver2   oltlitcp   servermc   portnum2
 s=4, pam_serv=(pam_pass), pamauth=(password)
Authentication Mode
The LDAP Authentication Support module determines whether a simple
password is sufficient or other challenges are required. Implementation of
the module in Dynamic Server takes advantage of the fact that for explicit
connections, a password is sent to the server by the client. This password
can be used to satisfy the LDAP Authentication Support module in cases where
a simple password is used. If the authentication mode involves responding
to single or multiple challenges, the applications must be able to respond
to the challenges.
Implicit Connections
The LDAP Authentication Support module is a challenge oriented system,
in that the authentication response (the password) is supplied in response
to an LDAP Authentication Support module message. In implicit connections
to the database server, there is no password.
Implicit connections can work under the LDAP Authentication Support module
only in challenge mode. Implicit connections in password mode result in failure.
Enterprise Replication and High-Availability Data Replication
Enterprise Replication and High-Availability Data Replication (HDR)
cannot respond to challenges, if the authentication scheme calls for it. For
this reason, Enterprise Replication and HDR must not be configured on the
port that uses the LDAP Authentication Support module. For information on
the facility to dedicate ports to Enterprise Replication and HDR, see Enterprise Replication and High-Availability Data Replication Connection
Security Option.
Application Development
The process for preparing an application to respond to
challenges raised by LDAP Authentication Support modules is the same process
to use when responding to challenges raised by PAM modules. For more information,
see Application Development for Authentication Modules.
Distributed Transactions with LDAP Support Modules, Client APIs, and
Compatibility Issues
Distributed transactions,
APIs that support LDAP Authentication Support modules, and compatibility issues
with other IBM Informix products and tools are the same for both PAM and LDAP
Authentication Support modules. For more information, see Distributed Transactions, Client APIs and Authentication Support Modules, and Compatibility Issues.
Home |
[ Top of Page | Previous Page | Next Page | Contents |
Index ]
Provide feedback
Saved searches
Use saved searches to filter your results more quickly
Sign up
Appearance settings
Время на прочтение4 мин
Количество просмотров13K
С одной стороны настройка LDAP-аутентификации в Caché не очень сложная — в документации этот процесс описан шестью пунктами. С другой стороны если LDAP-сервер на базе Microsoft Active Directory, то есть несколько не очевидных моментов, которые надо настроить на стороне LDAP-сервера. Так же для тех, кто не часто занимается подобными настройками, есть шанс запутаться в настройках безопасности Caché. В этой статье пошагово опишем процесс настройки LDAP-аутентификации, а также методы диагностики проблем в случае, если что-то не получается.
Настройка LDAP-сервера
1. Создаем пользователя в ActiveDirectory, с помощью которого будет подключаться Caché и искать информацию в базе LDAP. Этот пользователь должен находиться строго в корне домена

2. Для пользователей, которые будут подключатся к Caché, создадим отдельное подразделение. Назовем его «IdapCacheUsers»
3. Регистрируем там пользователей

4. Протестируем доступность LDAP-базы с помощью программы ldapAdmin. Скачать ee можно здесь.
5. Настраиваем подключение к LDAP-серверу:

6. Подключились. Посмотрели, что всё работает:

7. Так как пользователи, которые будут подключаться к Caché, находятся в подразделении «ldapCacheUsers», ограничим поиск только по этому подразделению


Настройка на стороне Caché
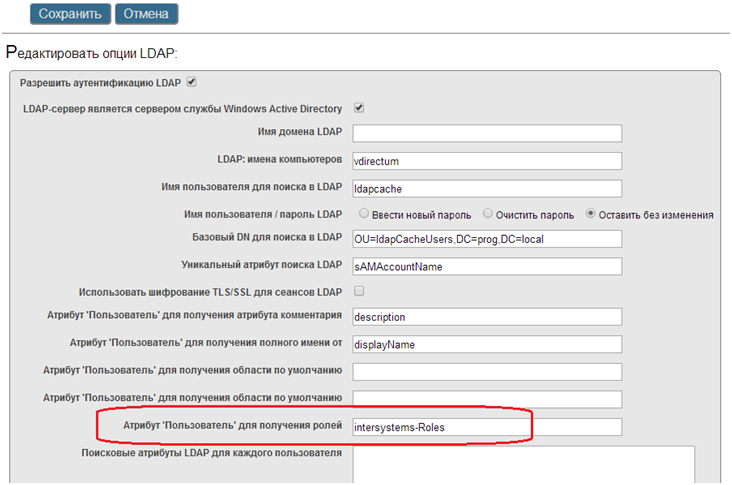
8. LDAP-сервер готов, теперь переходим к настройкам на стороне Caché. Заходим в портал управления -> Администрирование системы ->Безопасность ->Безопасность системы ->Опции LDAP. Поля «Атрибут пользователь для получения области по умолчанию (User attribute to retrieve default namespace)» ,«Атрибут пользователь для получения области по умолчанию (User attribute to retrieve default routine)» и«Атрибут пользователь для получения ролей (User attribute to retrieve roles)» очищаем, так как этих атрибутов пока нет в LDAP-базе.
Комментарий по поводу перевода
Правда, в этом месте русский перевод не совсем удачный правильней было бы перевести так: «Атрибут пользователя для получения области по умолчанию», «Атрибут пользователя для получения программы по умолчанию» и «Атрибут пользователя для получения ролей».
9. Разрешаем LDAP-аутентификацию в разделе Администрирование системы ->Безопасность ->Безопасность системы ->Аутентификация/Настройки CSP-Сессий
10. Разрешаем LDAP-аутентификацию в сервисах. Сервис %Service_CSP отвечает за подключение веб-приложений, сервис %Service_Console отвечает за подключение через терминал.
11. Настраиваем LDAP-аутентификацию в веб-приложениях

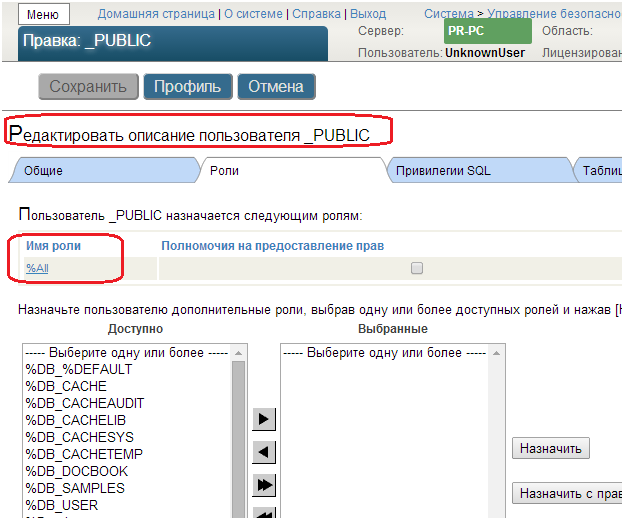
12. Пока, чтобы проверить, что подключение работает, настроим так, чтобы новым пользователям в Caché были полные права. Для этого пользователю _PUBLIC надо добавить роль %All. В дальнейшем мы этот момент доработаем……
13. Пробуем открыть настроенное веб-приложение, оно должно открыться.
14. Терминал также открывается
15. При подключении LDAP-пользователи будут появляться в пользователях Caché
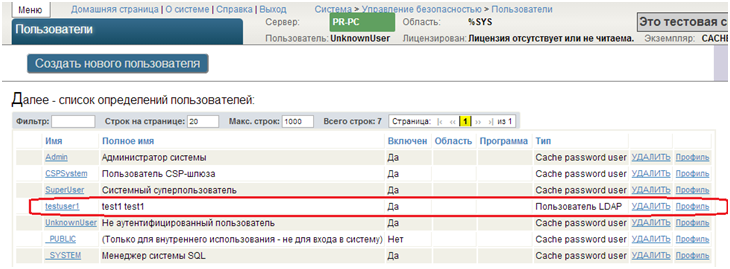
16. Правда, при такой конфигурации все новые пользователи получают полный доступ к системе. Чтобы устранить этот пробел, надо в LDAP-базе добавить атрибут, где будем хранить наименование роли, которая будет присваиваться пользователю при подключении к Caché. Предварительно надо сделать резервную копию контроллера домена, чтобы при неудачной настройке не поломать всю сеть.
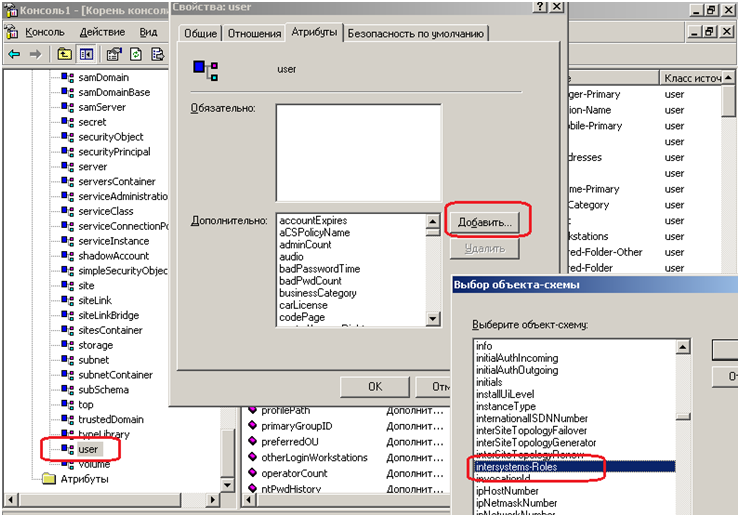
17. Для модификации схемы ActiveDirectory, на сервере, где находится ActiveDirectory, устанавливаем оснастку Схема ActiveDirectory (по умолчанию она не установлена). Инструкция здесь.
18. Создаем атрибут с именем intersystems-Roles, OID 1.2.840.113556.1.8000.2448.2.3, строка с учетом регистра, многозначный атрибут.

19. Далее добавляем этот атрибут в класс user
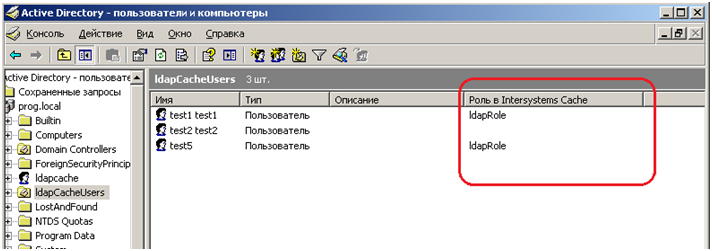
20. Далее сделаем, чтобы при просмотре списка пользователей в подразделении отображалась колонка «Роль в InterSystems Cache», для этого нажимаем Пуск->Выполнить вводим adsiedit.msc. Подключаемся к контексту именования Configuration

21. Переходим к контейнеру CN=409, CN=DisplaySpecifiers, CN=Configuration и выбираем тот тип контейнера, при просмотре которого будут выводится дополнительные атрибуты пользователя. Выберем отображение на уровне подразделения (OU), для чего нам понадобится контейнер organisationalUnit-Display. В свойствах находим атрибут extraColumns и вводим там значение «intersystems-Roles, Роль в IntersystemsCache,1,200,0». Принцип заполнения такой: Название атрибута, название колонки в которой будет отображаться атрибут, будет ли отобраться по умолчанию, ширина колонки в пикселах, зарезервированное значение. Еще замечание CN=409 обозначает код языка: в ветке CN=409 для английской версии, CN=419 для русской версии консоли.

22. Теперь можно заполнить название роли, которое будет присваиваться пользователю при подключении к Caché. Если Active Directory на базе Windows Server 2003, то штатных средств для редактирования этого поля нет. Можно воспользоваться программой ldapAdmin (см. пункт 4) для редактирования значения в этом атрибуте. Если Windows более свежей версии, то атрибут можно редактировать в режиме «Дополнительные функции» — у пользователя появится дополнительная вкладка для редактирования атрибутов.
23. После этого в портале управления Caché в опциях LDAP указываем имя этого атрибута.
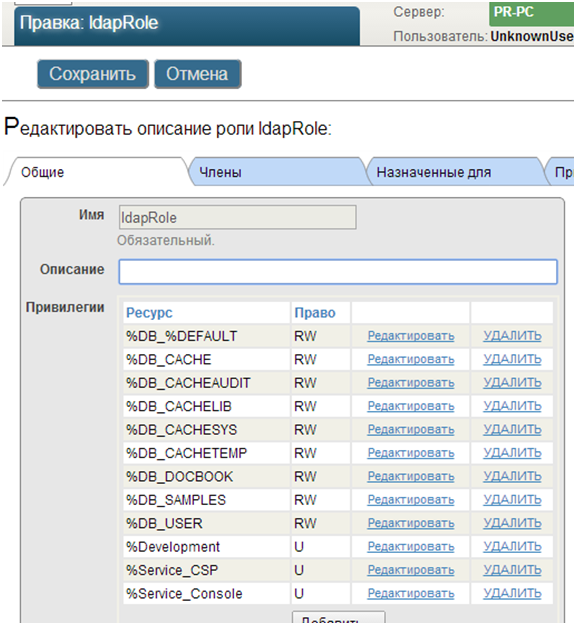
24. Создаем роль ldapRole с необходимыми привилегиями
25. Удаляем роль %ALL из пользователя _PUBLIC
26. Всё готово, пробуем подключиться к системе.
27. Если не получается включаем и настраиваем аудит
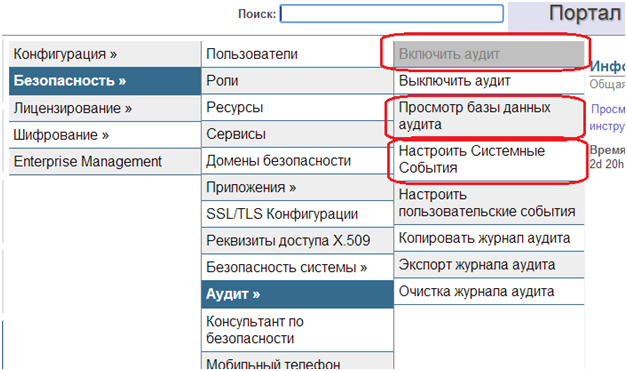
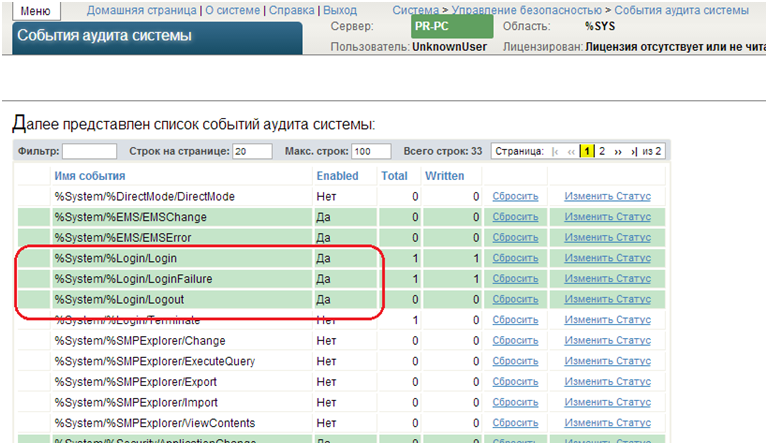
28. Настройки аудита
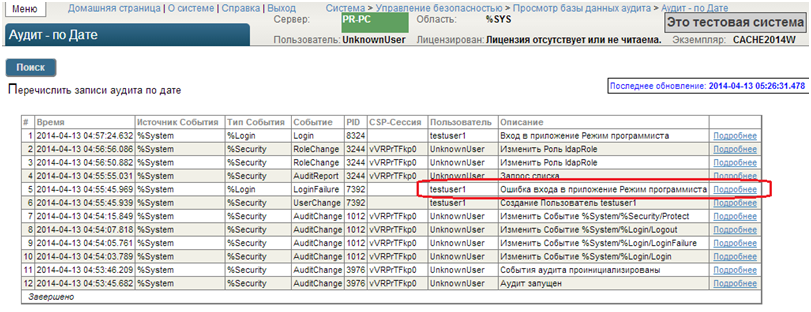
29. Просмотр базы данных аудита.
Заключение
На практике часто бывает, что для работы в приложении не требуется настройка разных ролей для разных пользователей. Если достаточно, что при входе, например, в веб-приложение, всем пользователям присваивается определенный набор ролей, то пункты с 16 по 23 можно не выполнять. Достаточно в настройках веб-приложения на вкладке «Роли приложений» добавить эти роли и убрать все виды аутентификации, кроме LDAP. В этом случае в веб-приложение может попасть только пользователь, который зарегистрирован на LDAP-сервере, и когда пользователь в него заходит, Caché автоматически присваивает ему роли, которые требуются для работы в данном приложении.