
Disabling exclusive mode in Windows 11 is often crucial for users who want to balance audio settings, especially in professional audio environments. Exclusive mode allows a single application to take control over the audio device, bypassing the default audio configuration and potentially causing issues such as audio dropouts or difficulties using multiple applications simultaneously. This article will guide you through understanding exclusive mode, its effects, and a step-by-step process to disable it on your Windows 11 system.
Understanding Exclusive Mode
Exclusive mode is a feature in Windows that lets applications gain full control over an audio device. When an application operates in exclusive mode:
- Audio Performance: The app can output audio without the interference of other applications.
- Lower Latency: This results in lower latency audio, which is vital in applications like gaming and music production where timing is essential.
- Better Sound Quality: Some users prefer exclusive mode for better sound quality when using high-end audio interfaces.
However, there are downsides. Notably, when exclusive mode is active, other applications may struggle to output audio. This can lead to interruptions, a loss of sound, or difficulties managing audio outputs among various applications.
Situations Where Disabling Exclusive Mode Is Beneficial
-
Using Multiple Audio Applications: If you are a music producer or content creator using several applications at once, disabling exclusive mode will allow you to hear sound from all applications simultaneously.
-
Gaming with Background Applications: Gamers who wish to run voice chat applications like Discord alongside their games will benefit from this setting.
-
General Multimedia Use: Everyday users who stream video and music through different applications may find it frustrating when one application monopolizes the audio device.
Given the potential frustrations exclusive mode can introduce, it is often advisable to disable it for most user scenarios.
Step-by-Step Guide to Disable Exclusive Mode in Windows 11
Step 1: Open Sound Settings
-
Right-click on the Speaker Icon: Locate the speaker icon in your taskbar (bottom right corner of your screen). Right-click on the icon.
-
Select ‘Sound Settings’: In the context menu that appears, click on ‘Sound settings.’ This will open the Sound settings window.
Step 2: Access the Sound Control Panel
-
Scroll Down to ‘Advanced Sound Options’: In the Sound settings window, scroll down to the ‘Advanced sound options’ section.
-
Click on ‘More Sound Settings’: Here, you will see a link labeled ‘More sound settings.’ Click on this to open the Sound control panel.
Step 3: Select the Playback Tab
-
Choose the ‘Playback’ Tab: Once in the Sound control panel, go to the ‘Playback’ tab. This tab lists all audio output devices available on your system.
-
Select Your Playback Device: Identify the playback device you are using (for example, your speakers or headphone output). Highlight the device by clicking on it once.
Step 4: Open the Properties of the Playback Device
- Click on ‘Properties’: After selecting the playback device, click on the ‘Properties’ button located at the bottom right of the window. This will bring up the device properties window.
Step 5: Disable Exclusive Mode
-
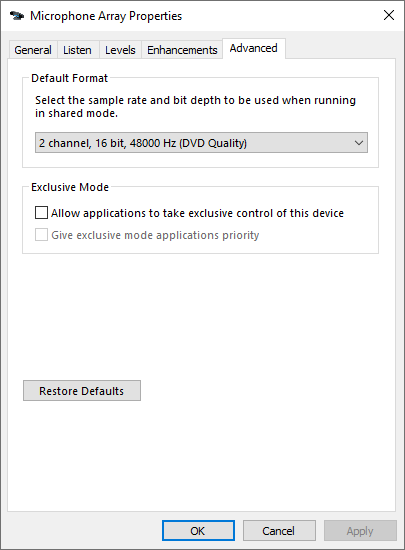
Go to the ‘Advanced’ Tab: In the device properties window, click on the ‘Advanced’ tab.
-
Uncheck ‘Allow applications to take exclusive control of this device’: Look for a section labeled ‘Exclusive Mode.’ You will find a checkbox stating, ‘Allow applications to take exclusive control of this device.’ Uncheck this box.
-
Click ‘Apply’: After you have unchecked the box, make sure to click ‘Apply’ to save your changes.
-
Click ‘OK’: Finally, click ‘OK’ to exit the device properties window.
Step 6: Restart Your Computer (Optional)
Although most changes take effect immediately, it’s a good practice to restart your computer to ensure all settings are applied thoroughly.
Troubleshooting Tips
If you find that exclusive mode is still active after trying these steps, or if audio issues persist, consider the following troubleshooting tips:
Check Audio Drivers
-
Update Drivers:
- Right-click the Start button and select ‘Device Manager.’
- Expand the ‘Sound, video and game controllers’ section.
- Right-click your audio device and select ‘Update driver.’
- Choose ‘Search automatically for updated driver software.’
-
Roll Back Drivers:
- If the problem occurred after a recent driver update, consider rolling back the driver to an earlier version.
- Right-click your audio device in Device Manager, select ‘Properties,’ and then go to the ‘Driver’ tab to find the ‘Roll Back Driver’ option, if available.
Check Application Settings
Some applications (like digital audio workstations and gaming software) have their internal settings where you can enable or disable exclusive mode. Ensure they are configured correctly.
Windows Audio Troubleshooter
If you continue to experience audio issues, it might be helpful to run the built-in Windows audio troubleshooter:
- Open Settings: Press
Windows + Ito open Settings. - Go to ‘System’ > ‘Sound’: In the Sound settings, scroll down to ‘Advanced’ and click on ‘Troubleshoot.’ Follow the on-screen instructions to diagnose the audio issue.
Reinstall Audio Drivers
If all else fails, consider uninstalling your audio drivers and allowing Windows to reinstall them:
- Open Device Manager: Right-click the Start button and select ‘Device Manager.’
- Uninstall Device:
- Expand ‘Sound, video and game controllers.’
- Right-click your audio device and select ‘Uninstall device.’
- Restart your computer. Windows will automatically reinstall the audio driver.
Conclusion
Disabling exclusive mode in Windows 11 can significantly enhance your audio experience, particularly for those users who work with multiple applications or require consistent audio output across various platforms. The step-by-step guide provided here should help you navigate to the required settings with ease.
Understanding the implications of exclusive audio control, troubleshooting potential issues, and managing audio settings can lead to a more stable and enjoyable experience in Windows 11. Whether you’re a casual user or a professional in the audio-visual space, managing exclusive mode effectively opens up a world of seamless sound interactions. Feel free to revisit the steps outlined whenever you encounter issues related to audio connectivity or playback on your Windows 11 system.
Exclusive Mode is a Windows setting that that allows one program in Windows to use the audio. If another program wants to use audio, then either the audio won’t play or the audio will not sound very good. When using CATalyst or MAXScribe, it is recommended to disable exclusive mode for your audio devices. Disabling this mode allows more availability of the audio device to more simultaneous applications. This must be done for each individual device.
Windows 11
-
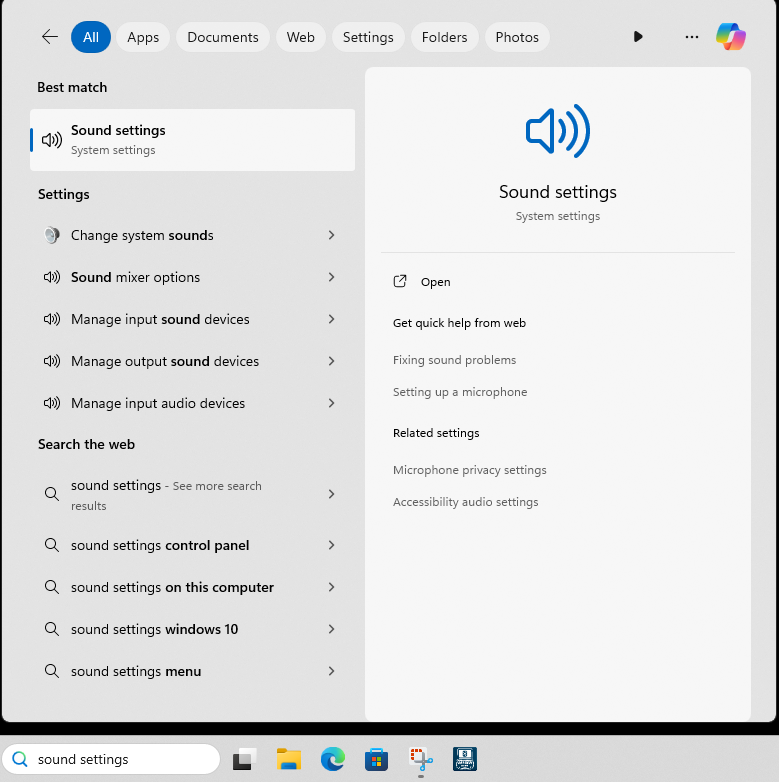
In the Windows Search bar, type “Sound Settings” and press Enter.

-
The Sound Settings window displays. Scroll down, past Output and Input and click on More sound settings.
-
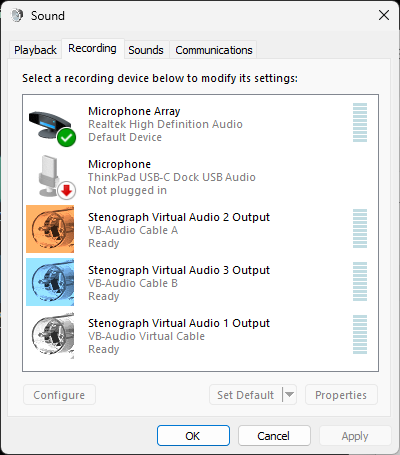
The Sound dialog box displays. Click the Recording tab and then double click on your default microphone.
-
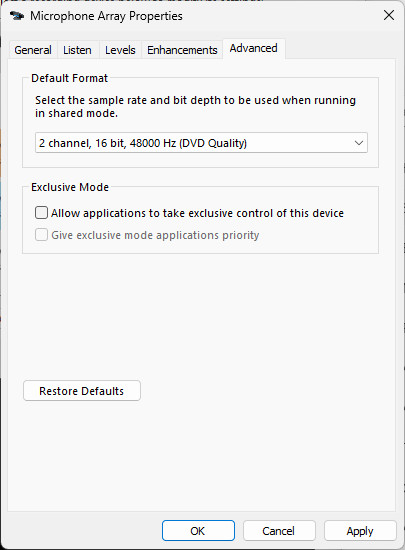
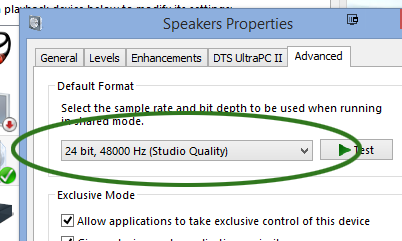
The Speaker Properties window displays. Click the Advanced tab. Uncheck Allow applications to take exclusive control of this device then click Apply then OK. Click the Speaker tab and repeat steps 3 and 4 for your default speaker.
There may also be an option, depending on your sound device, for Signal Enhancements or Audio Enhancements and a check box to Enable Audio Enhancements. Audio Enhancements may cause sub-par sound quality when playing back audio so it is recommended to uncheck this box.

Delete
Windows 10
-
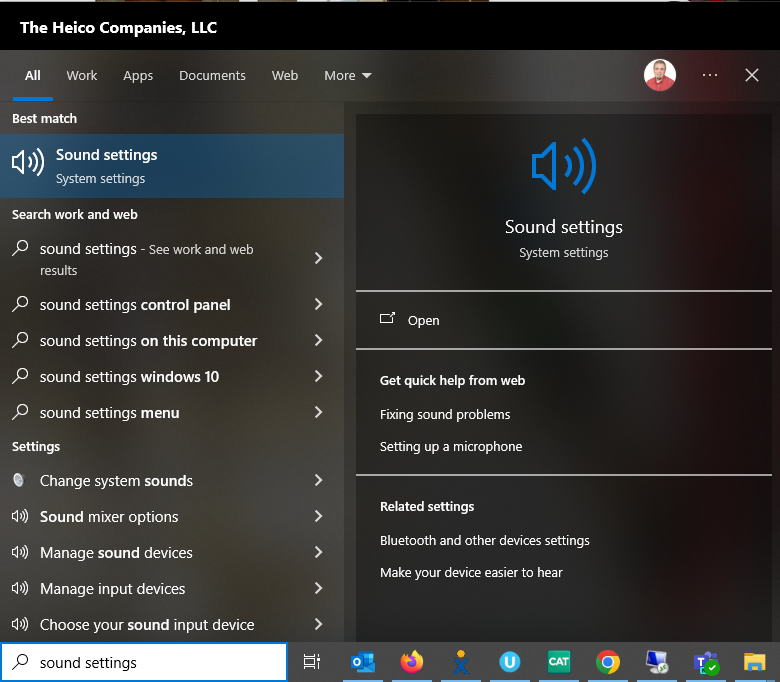
In the Windows Search bar, type “Sound Settings” and press Enter.
-
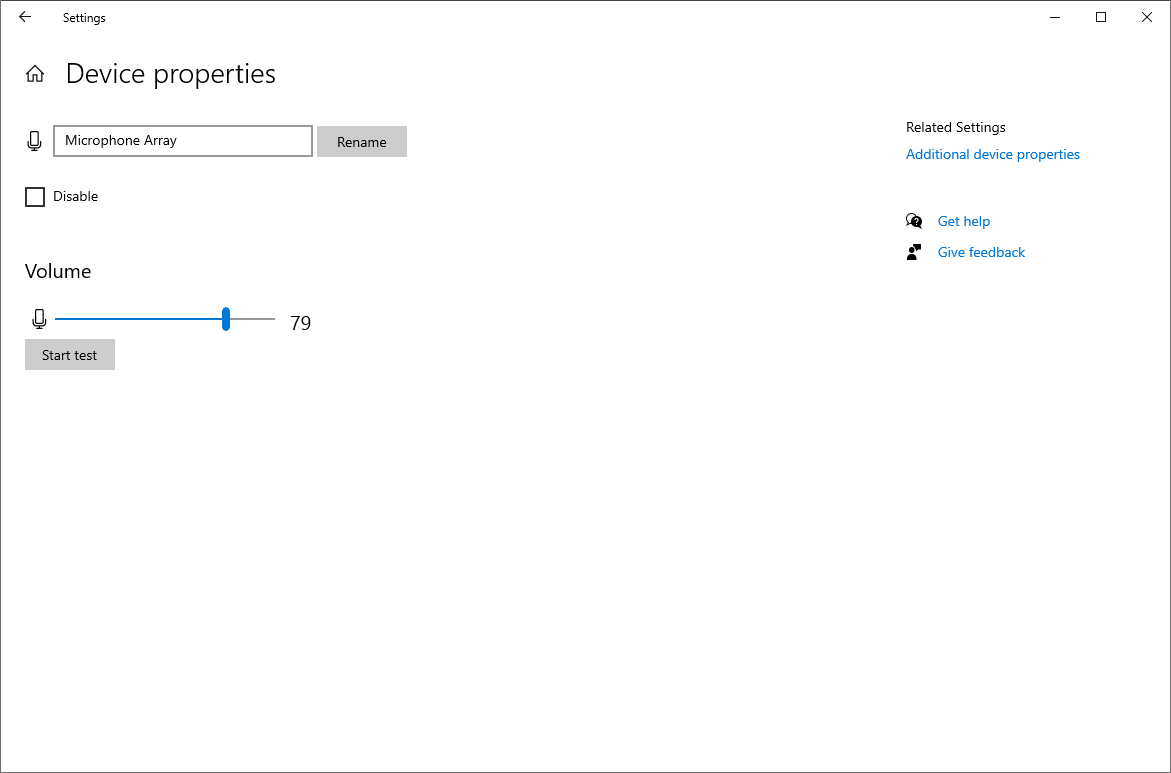
The Sound Settings window displays. On the right side under Input, click Device Properties underneath Choose your input device. The device might have the words “Microphone” or “Realtek” in the name.
-
In Device Properties, on the right side, click Additional device properties.
-
The Speaker Properties window displays. Click the Advanced tab. Uncheck Allow applications to take exclusive control of this device then click Apply then OK. You’ll return to the Device Properties window. Click the back arrow in the upper left corner. Repeat steps 2, 3, and 4 for your default input device.
There may also be an option, depending on your sound device, for Audio Enhancements and a check box to Enable Audio Enhancments. Audio Enhancements may cause sub-par sound quality when playing back audio so it is recommended to uncheck this box.

Delete
Exclusive mode sound windows 10 is a sound mode that allows you to hear audio from your computer through headphones or speakers without any other sounds coming through. To use exclusive mode, you’ll need to go into your sound settings and select the option to use exclusive mode. Once you’ve done that, you’ll be able to hear your computer’s audio through your headphones or speakers without any other sounds coming through.
Should I turn on exclusive mode for audio?
Should I turn off exclusive mode Windows 10?
It is not recommended to turn off exclusive mode in Windows 10 as this can lead to audio playback issues. If you are experiencing audio playback issues, it is recommended to check your audio settings and make sure that exclusive mode is not enabled.
How do I get my microphone off exclusive mode?
If you’re using Windows 10, you can right-click the speaker icon in the taskbar and select «Open Sound settings.» In the Sound settings window, scroll down to the «Input» section and click on the device you’re using. In the «Input device properties» window, go to the «Advanced» tab and uncheck the «Exclusive Mode» option.
What does allow applications to take exclusive control do?
This setting allows applications to take exclusive control of a device, preventing other applications from accessing it. This can be useful if an application is not responding or is causing problems.
What is exclusive mode for audio?
Exclusive mode for audio is a setting that allows an application to take control of the audio device and prevent other applications from using it. This can be useful for applications that need to play high-quality audio, or for applications that need to ensure that their audio is not interrupted by other applications.
Does Windows 11 affect sound quality?
No, Windows 11 does not affect sound quality.
How do I turn off exclusive mode in asio4all?
To turn off exclusive mode in asio4all, open the asio4all control panel and uncheck the box next to «Enable exclusive mode.«
Exclusive mode is a mode of operation for a computer program, device, or resource, in which only one user or process can access or use it at any given time.
How do I turn off listening to this device?
There are a few ways to turn off the listening feature on your device. One way is to go into the settings menu and find the «listening» option. Once you find this option, you can toggle it off. Another way to turn off the listening feature is to say «Hey Siri, turn off listening.» Once you say this, Siri will confirm that listening is turned off.
What is shared mode for audio?
Shared mode audio is a type of audio where multiple devices can access and play audio at the same time. This is in contrast to exclusive mode audio, where only one device can access and play audio at a time.
What does exclusive mode do Amazon music?
Exclusive mode is a setting in the Amazon Music app that allows you to play music offline without an internet connection. This can be useful if you’re going to be in an area with limited or no internet access, or if you want to save data on your mobile plan. When you turn on exclusive mode, you’ll see a message that says «Exclusive mode is on. You can now play music offline.«
How do I get the best sound quality on my computer?
There are a few things you can do to improve the sound quality on your computer:
1. Make sure your computer’s audio drivers are up to date. You can typically find audio drivers for your computer’s make and model on the manufacturer’s website.
2. Use high-quality speakers or headphones. This will make a big difference in the overall sound quality.
3. Adjust your computer’s sound settings. You can usually find the sound settings in the Control Panel. From here, you can change the volume, bass, and treble levels to get the sound mix that you prefer.
4. Use a equalizer to further customize your computer’s sound. Equalizers allow you to fine-tune the frequencies of the sound coming from your computer. This can be helpful if you’re trying to boost the bass or treble, or if you want to reduce the amount of background noise.
5. Use audio enhancement software. There are a number of different programs available that can improve the sound quality of your computer. Some of these programs are free, while others must be purchased.
Why is my Windows 11 sound so quiet?
There could be a few reasons why your Windows 11 sound is so quiet. One reason could be that your computer’s sound system is not configured correctly. Another reason could be that your computer’s speakers are not working properly.
If you are having trouble with your computer’s sound system, you should try adjusting your computer’s sound settings. You can usually find the sound settings in the Control Panel. If you are still having trouble, you may need to contact your computer’s manufacturer for help.
If your computer’s speakers are not working properly, you should try cleaning them. Sometimes, dust and dirt can build up on the speakers and cause them to work less efficiently. If you are still having trouble, you may need to replace your computer’s speakers.
What sound format should I use Windows 11?
The best sound format to use on Windows 11 is the WAV format. This format is compatible with all versions of Windows and provides high-quality audio.
Windows, applications can take exclusive control of an audio device which makes it unavailable to other applications. Unfortunately on Windows this is a very common problem often without an easy solution, apart from only using one program at a time or using a Mac instead. You can try to disable exclusive mode in windows audio control panel, but it is not guaranteed to work.
You might not be able to share your audio device with your DAW and Source-Connect at the same time. One thing you can try to get it working would be to disable exclusive mode for the audio device in the system audio settings.
In the search bar type «Sound Settings» and open, then click on «Sound Control Panel» on the right hand side under Related Settings.

Complete the following steps in BOTH the «Playback» and «Recording» Tabs of the control panel for all the sound devices.
- Choose device, and open it’s «Properties»
- Within the device properties choose the «Advanced» Tab
- Untick «Allow applications to take exclusive control of this device»
- Click «Apply» and «Ok» to close the window
- Repeat with next device

Both Microsoft’s WASAPI system and Apple’s Core Audio API provide software with the ability to open audio streams in exclusive mode. This provides a number of benefits, the primary of which is more direct and lower-latency access to the audio hardware. Media Center enables this option by default when you choose WASAPI or Core Audio as your Audio Output Mode. This setting can be toggled on and off via:
Tools > Options > Audio > Audio Device > Device settings > Open device for exclusive access
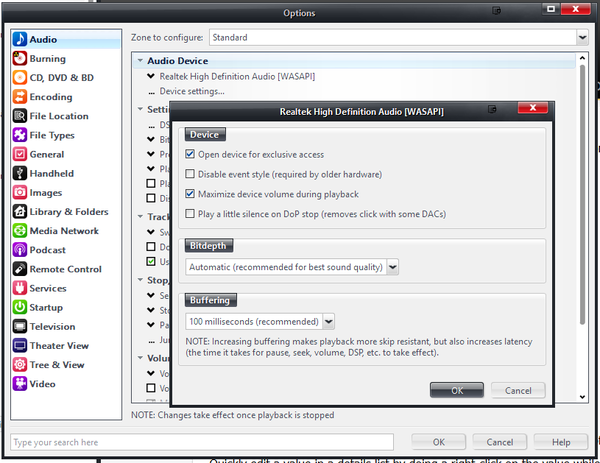
Open device for exclusive access is recommended, but it is good to understand how it works.
When Exclusive Access is enabled, then:
- When you start playback, Media Center sends an exclusive-mode stream. If another audio device is currently using the audio hardware, the request for exclusive access is rejected, and playback fails.
- While playback is active (including while paused) in Media Center, no other application on the system can use the specified audio device. Applications that attempt to play sound (such as system sounds or a web browser) will typically be automatically assigned to an alternate (perhaps disconnected) audio output on the computer, or playback will fail entirely.
- As soon as playback is stopped in Media Center, the audio device again becomes available to the system for use by other applications.
This allows Media Center to completely control the audio output, set any supported bitdepth and sample rate, and prevent other applications from interfering with the audio output. It is the recommended setting for WASAPI and Core Audio, and it is enabled in Media Center by default.
Requirements
Exclusive Access requires:
- An audio device driver that supports this mode.
- A selected Audio Output Mode that supports Exclusive Access (such as WASAPI on Windows, or Core Audio on OSX).
- In Windows under WASAPI, that Allow applications to take exclusive control of this device is enabled in the Advanced tab of the device’s Properties dialog.
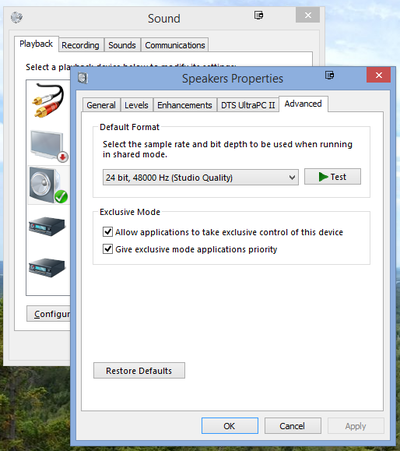
Most standard Windows and OS X drivers for common audio hardware now properly support exclusive mode, though you may have difficulty with older hardware and with virtual sound devices included as part of virtual machines. Windows should default to allowing exclusive access (as described above), but you can verify this by:
- Open the Sound control panel in Windows
- Select your device and click Properties.
- Switch to the Advanced tab.
- Ensure that Allow applications to take exclusive control of this device and Give exclusive mode applications priority are both enabled.
Benefits and Considerations
Exclusive Access provides a number of sound quality and ease-of-use advantages, including:
- It can play files of any sample rate natively, as long as your audio device supports the given sample rate. In Exclusive Mode it does not matter what Default Format is selected in the audio device’s properties dialog on Windows, or in the Audio MIDI Setup utility on OSX. MC can «take control» and play any file supported natively by the audio device without resampling.
- It can use your audio device’s best supported bitdepth (which it does automatically).
- It can directly control the number of output channels. This means that it can use a multichannel output even if the Speaker Configuration in the OS is set to Stereo-only. This is sometimes convenient when using Media Center with a Home Theater surround system and receiver, because you can set the OS default format to Stereo and allow the receiver to upconvert stereo sources to surround (for web browser audio and other applications). In Exclusive Mode, Media Center will still use the number of channels selected in the Output Format DSP, regardless of the OS’s Speaker Configuration setting.
- It allows you to effectively use the Maximize device volume during playback feature to bypass your device’s volume control and enable convenient use of MC’s Internal Volume control.
- It provides a much lower latency and hardware direct method for accessing and controlling the audio device.
However, this means that while MC is playing or paused, your audio device will be locked out from use by other applications on the system. You can’t, for example:
- Play a game with sound effects while listening to music
- Watch a web video with sound while MC is playing something else.
- Capture MC’s audio output through other software applications like Audio Hijack Pro or Camtasia Studio.
- Hear system sound alerts like email notifications and calendar alerts.
Disabling Exclusive Access
You can disable Exclusive Access by either:
- unchecking the Open device for exclusive access box in the Tools > Options > Audio > Audio Device > Device Settings dialog.
- switching the audio output mode to one that does not support Exclusive Access, such as DirectSound.
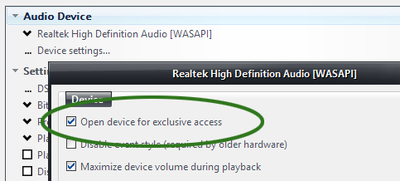
The Exclusive Access setting
Issues with Disabling Exclusive Access in WASAPI
As described above, in WASAPI with Exclusive Mode enabled, Media Center can play any audio file natively without resampling. This means, for example, that audio files sourced from CD will play at their native 44.1kHz and audio from DVD and other video sources will play with their native 48kHz sample rate. It doesn’t matter what the Default Format for the audio device is set to, as the OS does not need to resample and can play the file natively. Therefore, you can set MC’s Output Format DSP to only resample those audio formats that your particular audio device does not support natively.
On the other hand, unlike in the older Direct Sound API, Shared-mode WASAPI on Windows provides no automatic resampling. Therefore, with Exclusive Access disabled, Media Center must resample all audio output to match the currently selected Default format in Windows. Otherwise, playback will fail, because the audio device can’t accept multiple streams in different formats simultaneously without resampling. This often manifests when you try to play files with differing sample rates. So, if the Default Format is set to 44.1kHz, you may not notice until you try to play a 48kHz video file, or the reverse.
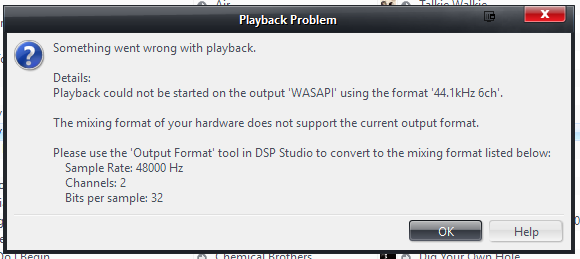
This is the error dialog you’ll see if you play any format other than the system’s Default with Exclusive Mode disabled.
If you disable Exclusive Mode in WASAPI on Windows, then you must set Media Center’s Output Format DSP to resample all audio to match the format you have selected as the Default Format for the audio device. In WASAPI non-Exclusive mode, the Windows Default Format setting now becomes the only output setting that MC can use, and you must resample all other formats to match this format.
Without Exclusive Access, this will be the only format that will play successfully.
- Please Note: Core Audio on OS X does not suffer from the sample rate limitation, as it automatically switches the format and resamples as is needed on the fly. However, if you want to be sure to preserve the original format of your audio file and play them natively, Exclusive Mode is still recommended as it prevents other applications from changing the output format.
Alternatives to Disabling Exclusive Access
As described above, using Exclusive Access in Media Center provides substantial flexibility for MC to provide the best possible sound quality for your hardware. That’s why it is the default and recommended setting. However, there are some cases where you may want to occasionally disable this to accomplish a particular task (such as those described above in the Benefits and Considerations section).
Rather than disabling Exclusive Access entirely, or switching to a lesser quality mode that doesn’t support it, you can make a second Zone in Media Center that uses the same output, and use this Zone instead when you need to accomplish those tasks, while keeping your «regular» Zone set with Exclusive Access enabled for general usage.
To do this:
- Go to Player > Zone > Add Zone.
- In the Add Zone dialog that appears, give the new Zone a clear name (such as «Non-Exclusive»).
- Select your current regular Zone in the Copy combobox.
- Click OK to add the Zone.
Then, switch to your newly created Zone and modify the settings there to either:
- Disable Exclusive Access and enable resampling in the Output Format DSP.
- Switch your Audio Device to a mode that doesn’t support Exclusive Access, such as DirectSound.
Since Audio settings and DSP settings are applied per-Zone, this will not modify the settings in your original «standard» Zone. But, any time you need to play music while you are playing the latest Battlefield, you can switch MC to this alternate zone and you will be able to use it alongside other applications.