
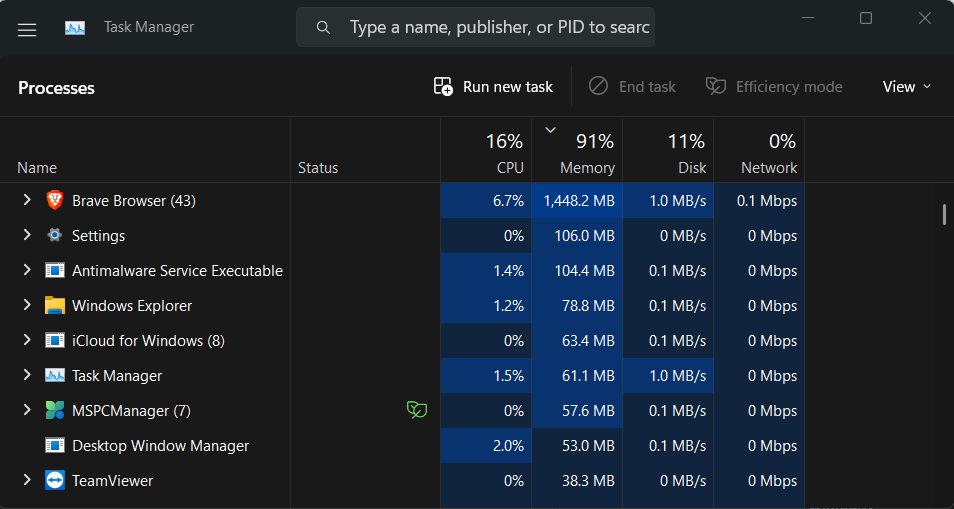
When I first noticed my system fans spinning like they were preparing for takeoff, I panicked a bit. I cracked open Task Manager and there it was: Windows audio device graph isolation, quietly hogging way too much CPU. It’s a process most people don’t notice until it becomes a problem.
I’ve seen this time and again. Whether you’re setting up a workstation for remote collaboration or just trying to keep things running snappy, background processes like this can throttle your system.
After several years of my laptop slowing down in the middle of meetings and countless hours spent troubleshooting. I’ll help you address performance bottlenecks through resource optimization, walk you through security checks to make sure nothing shady is running under the radar, and introduce a smarter, more efficient way to work with your files. This article will explain why it happens and how to fix it safely.
Why Is audio dg.exe Using High CPU/Memory? Root Causes & Fixes
Sometimes, your PC gets overwhelmed. Windows audio device graph isolation (aka audiodg.exe) can spike CPU or memory use out of nowhere. Here’s what I found were the most common culprits and how you can get rid of them.
Outdated Audio Drivers
I didn’t realize it for the longest time, but my system was running on an ancient Realtek driver that just couldn’t keep up. It was like asking a typewriter to run a modern word processor. Once I traced the lag to audiodg.exe, I went straight to the source, Realtek’s official site, though for others it might be Intel or AMD depending on your setup. Don’t rely solely on Windows to update these drivers; sometimes, the automatic option doesn’t fetch the newest release. Manually downloading and installing the latest audio driver gave my system an immediate breath of fresh air.
Audio Enhancements
Techy-sounding features like Dolby Atmos and spatial sound seem like upgrades that should improve everything. But in reality, these enhancements were piling on unnecessary processing. On my machine, enabling spatial sound actually caused Windows Audio Device Graph Isolation to spike like crazy.
Third-Party App Conflicts
Here’s where things got tricky. I noticed the spikes in CPU usually happened when I was in Zoom meetings or juggling Skype calls. Turns out, these apps can conflict with Windows’ audio handling by overloading the threads audiodg.exe depends on. What’s worse is that this kind of issue doesn’t always show up in obvious ways, it’s not a crash, it’s a slow, creeping resource drain.
Quick Fixes
Let’s cut to the chase, if Windows Audio Device Graph Isolation is eating up your CPU, these two fixes can make a huge difference. They’re easy, beginner-friendly, and can be done in just a few minutes. Here’s how to get your system back on track:
How to Update your Audio Driver
Let’s start with the simplest and most effective fix, updating your audio driver. Outdated drivers are often the silent culprits behind high CPU usage, and getting the latest version can make a huge difference.
Step 1: First, press “Windows + X” on your keyboard (that’s the Windows key and X key at the same time). From the list that pops up, click on Device Manager.
Step 2: Look for the section called “Sound”, video and game controllers. Click the little arrow next to it to make it open up. You should see something like Realtek or Intel in the list. That’s your audio driver!
Step 3: Right-click on your audio driver and choose “Update driver”. This will make sure your driver is up to date. If it tells you it’s already updated, don’t worry! You can still go to the manufacturer’s website to grab the newest version.
Turn Off Audio Enhancements
If updating your drivers didn’t solve the issue, the next thing to check is your audio enhancements. While they sound helpful, these features can quietly eat up your system’s resources. Disabling them can instantly lighten the load.
Step 1: Alright, let’s start by turning off those audio enhancements. First, click on the Start menu (yep, the Windows logo down at the bottom-left), then go ahead and select “Settings”.
Step 2: In the Settings window, click on “System”. After that, scroll down a bit and click on Sound, we’re getting there!
Step 3: In the Sound menu, scroll down a bit more and you’ll see “All sound devices” right under the advanced section. Click on it.
Step 4: From there, look for your current output device, that’s the one your sound is coming from, pop it open
Step 5: There you will find “Audio enhancement”, click on the toggle on its right side and turn it off.
That’s it! You’ve now disabled audio enhancements, and your computer should be working smoother without all the CPU spikes. It’s like giving your PC a little break!
Is audiodg.exe a Virus? How to Verify System Safety
Windows Audio Device Graph Isolation (audiodg.exe) might sound suspicious, but it’s actually a legitimate part of the Windows operating system. It’s a core component responsible for managing audio processing. However, sometimes it can get flagged by antivirus programs, leaving you wondering if it’s a virus. Here I’ll walk you through the simple steps to verify that audiodg.exe is safe and not something malicious.
Verify the File Location
Before jumping to conclusions about audiodg.exe being malware, it’s smart to confirm its location. The real file lives in a specific Windows folder, if it’s somewhere else, you might have a problem.
Step 1: First, click the little folder icon on your taskbar, that’s File Explorer.
Step 2: If you do not File Explorer on your taskbar, just click the “Start” button and type File Explorer, then click it when it pops up.
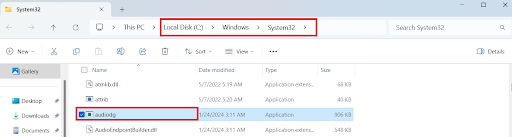
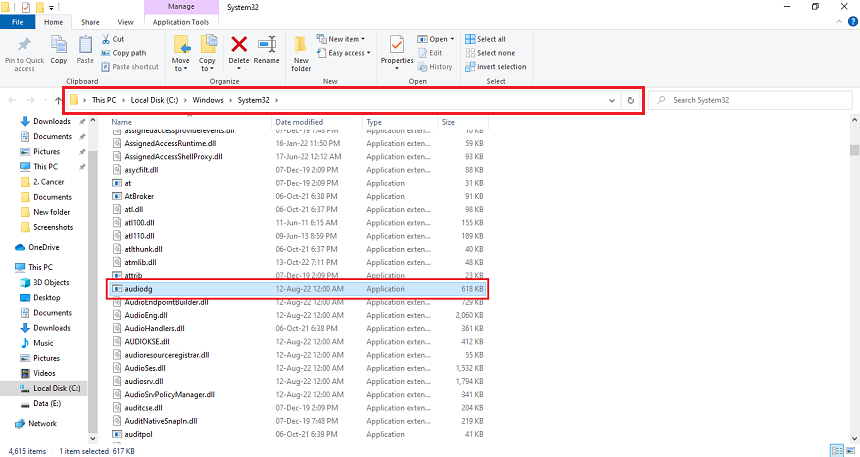
Step 3: First, let’s make sure you’re looking at the legit file. Open File Explorer and head to C:\Windows\System32.
Step 4: Look for audiodg.exe in this folder. If it’s there, you’re good to go! This is the trusted location for the system file.
Scan with Windows Defender
Once you’ve confirmed the file’s location, the next step is to run a quick scan. Windows Defender is built right into your system and does a solid job of spotting threats. Let’s put it to work:
Step 1: Click the “Start” button. Now type “Windows Security” and click it when it shows up. This is where you tell your computer to check if anything weird is going on.
Step 2: Inside Windows Security, click on “Virus & Threat Protection”, you’ll see it on the left. Then choose either “Quick Scan” (faster) or “Full Scan” (super thorough). Let it do its thing. If nothing pops up, you’re all clear!
What the Community Thinks (And Why It Matters)
Alright, let’s talk community smarts, because the best tips don’t come from Microsoft’s official docs but from Reddit threads buried two scrolls too deep.
One thing I noticed? When people suspect something fishy with audiodg.exe, they turn to MD5 hashes. Redditors often share these cryptographic fingerprints so others can cross-check if their file’s legit. It’s simple: if your MD5 doesn’t match the known good one, you might have a tampered file. For techies who want more certainty than a green checkmark, this kind of file integrity check can offer serious peace of mind.
That said, not everything flagged is actually bad. Antivirus tools like Malwarebytes sometimes cry wolf. I’ve personally had it flag audiodg.exe even when everything was fine. The point is, don’t panic. A second opinion (or a Reddit post with hundreds of upvotes) can help separate real threats from false alarms.
Now, here’s where WPS Office comes into the picture. Microsoft Office macros, especially when emailed around or downloaded from shady places, are infamous for being exploited. But WPS? It’s built with lightweight security-first cloud tools that ditch the need for old-school macros entirely. You’re not just avoiding CPU spikes, you’re skipping the entire class of risks that ride in on those bloated macro-enabled Excel sheets.
In a world full of digital landmines, using software that quietly eliminates a whole category of threat? That’s not just efficient. That’s smart.
Can You Disable audiodg.exe? Balancing Performance & Functionality
Thinking about disabling audiodg.exe completely? Yeah, I was tempted too. But the moment I tried it, boom, no sound at all. It basically pulls the plug on your entire audio system. Not exactly the productivity boost I was going for. Heres what you can do instead.
Limit CPU Usage of audiodg.exe (Advanced Method)
Before we start, remember that the Windows Registry is like your computer’s control center. A small mistake can cause issues, so only go forward if you’re feeling confident. You can also back up your Registry first, just to be safe.
Step 1: Click on the Start menu, type the word «regedit» into the search bar, and press Enter on your keyboard. If your computer shows a message asking if you want to allow this app to make changes, go ahead and click “Yes”. That just means Windows is making sure you’re allowed to open it.
Step 2: In the Registry Editor window, look over to the left side where you’ll see a bunch of folders. Start by clicking on the one labeled “HKEY_LOCAL_MACHINE”.
Step 3: Next, from the drop-down under HKEY_LOCAL_MACHINE, click on the SOFTWARE folder to open it.
Step 4: Now scroll down a little in that list and click on the “Microsoft” folder.
Step 5: Inside “Microsoft”, click on “Windows”.
Step 6: From there, click on “CurrentVersion”, and then finally on “Audio”. You’ll know you’ve followed the right path when you see this at the top:
HKEY_LOCAL_MACHINE\SOFTWARE\Microsoft\Windows\CurrentVersion\Audio
Step 7: Now let’s make a new entry. On the right side of the Registry Editor (the big white space), right-click anywhere in that space. A small menu will pop up, hover over New, then click “DWORD (32-bit) Value”.
Step 8: You’ll see a new value appear, ready for naming. Type this in exactly (no spaces!):
AudiodgCpuThrottling
Double-check your spelling before moving on.
Step 9: Once it’s created, double-click on “AudiodgCpuThrottling”. A new window will open.
Step 10: Inside that window, look for the value field. Delete what’s in there and type the number “1”. Also, make sure Hexadecimal is selected just below. Once done, hit “OK”.
Step 11: That’s it for the registry tweak! Go ahead and close the Registry Editor window.
Step 12: Now, restart your computer. This allows Windows to apply the change, and with any luck, the audiodg.exe process will start behaving and use less CPU.
Personally, instead of diving into complex Registry tweaks and risking a big mistake that could cost you, I opted for a smarter solution to lighten the load. I switched from heavy, RAM-hungry software like MS Office to WPS Office. The difference was night and day. Not only did WPS use 30% less memory, but it also came with AI tools that automatically format documents without causing any hiccups. This was a game-changer, especially for systems running on Windows 11 or even the new Windows 12.
Optimize Your Workflow: Replace Resource-Heavy Software
When it comes to system performance, every megabyte of RAM counts, especially if you’re dealing with background processes like audiodg.exe. That’s why I moved away from Microsoft Office’s bulky, subscription-based model and gave WPS Office a serious shot.
The results? Impressive. WPS not only runs smoother, using up to 30% less RAM, but it also doesn’t nickel-and-dime you with monthly fees. Its built-in AI tools are genuinely helpful, too, smart PDF editing, spreadsheet formulas that actually get context, and cloud sync that just works perfectly. On a Windows 11 or 12 machine where speed and security matter, it’s kind of a no-brainer. If you’re looking to trim the fat and give your system room to breathe, you can download WPS Office for free here. I’ve optimized the settings so it plays nicely with audiodg.exe right out of the gate.
FAQs
Q1: Is audiodg.exe a virus?
No, it’s a core Windows audio service. Check its location (System32 folder) and scan with Windows Defender to confirm.
Q2: What happens if I disable audiodg.exe?
Audio services will crash. Instead, limit its CPU usage via driver updates or switch to WPS Office for lighter background tasks.
Q3: Why does audiodg.exe conflict with Zoom/Skype?
Third-party apps may overload audio processing. Close unused apps or use WPS Office’s built-in PDF/Excel tools to free up resources.
Q4: Is WPS Office compatible with Windows 12?
Yes! WPS Office is optimized for Windows 11/12, with AI features like auto-formatting and cloud sync for future-proof productivity.
Smarter Fixes, Smoother Performance
If your PC’s been struggling with audio spikes and sluggish multitasking, the fix often lies in small, smart moves. Start by updating your audio drivers and disabling enhancements to ease the strain on audiodg.exe. Always verify the file’s legitimacy through its location and antivirus scans, no need to mess with risky Registry tweaks. Instead, boost performance with lighter software like WPS Office, which uses 30% less RAM than MS Office and comes packed with AI tools for PDFs, spreadsheets, and cloud sync. On Windows 10, 11, or 12, this combo of system tweaks and efficient software can make a big difference.
If you’re searching for a Windows Audio Device Graph Isolation high CPU fix that actually delivers results, swapping out heavy software might be your best move. And with WPS Office optimized for performance right out of the gate, your system will finally have the breathing room it deserves.
Table of contents
- What Is Windows Audio Device Graph Isolation?
- Why Is Windows Audio Device Graph Isolation Important for Your PC?
- Is Windows Audio Graph Isolation Safe?
- How Does Windows Audio Device Graph Isolation Affect CPU Usage?
- Fixing Windows Audio Device Graph Isolation’s High CPU Usage on Windows 10
- Method 1: Disable every sound effect
- Method 2: Update your audio drivers
- Method 3: Scan your computer for malware
- Method 4: Check for any recent system changes
- Windows Audio Device Graph Isolation: Explained
- FAQ
Windows Audio Device Graph Isolation is a feature in Windows that allows each audio device to control its audio stream, which helps lower system sound latency. However, a Windows Audio Device Graph Isolation high CPU usage can occur for several reasons, slowing down your computer. In this guide, we’ll discuss various solutions to help you correct the problem. Go through each one and find the best one for your situation. Let’s begin.
What Is Windows Audio Device Graph Isolation?
If your audio sounds better and clearer, it’s because of a process in Windows called Windows Audio Device Graph Isolation (audiodg.exe).
This process manages all of the sounds you hear, including special effects and enhanced audio clarity and quality. Audiodg.exe is much better in Windows 11.
Windows Audio Graph Isolation works in the background, processing audio data and ensuring that everything, including your sound card and speakers, functions as it should.
Audiodg.exe operates independently from the regular Windows audio system. This means that if a sound application or driver has an issue, it won’t crash your entire Windows system. This allows third-party audio manufacturers to add their sound improvements without interfering with or affecting how the regular Windows audio system works.
Related: Audio Service Not Responding Error in Windows 10 and 11
Why Is Windows Audio Device Graph Isolation Important for Your PC?
Your computer needs Windows Audio Graph Isolation because it controls all audio tasks and effects, making sure your sound works smoothly without any issues.
If you experience sound distortions, delays, or even crashes when using audio-related apps, one common cause is that your audiodg.exe isn’t working properly.
Is Windows Audio Graph Isolation Safe?
Yes. Audiodg.exe is part of your Windows operating system. So, it’s not a virus or malware . However, cybercriminals can create processes that look like Audio Graph Isolation. But don’t worry; there’s a way to check whether your audiodg.exe is malware using Task Manager . Follow the steps below:
- Press
Ctrl + Shift + Escto open Task Manager. - Search for audiodg.exe, right-click on it, and select Open file location.

- Look for the file’s location. By default, it should be in the C:\Windows\System32 folder. If it’s not, malware could be running on your PC.
How Does Windows Audio Device Graph Isolation Affect CPU Usage?
You can experience Windows Audio Device Graph Isolation high memor y usage due to several factors, such as corrupted audio drivers, viruses, software compatibility issues, etc. In the following sections, we’ll discuss how to fix the Windows Audio Device Graph Isolation high CPU usage.
Fixing Windows Audio Device Graph Isolation’s High CPU Usage on Windows 10
If you’re experiencing Windows Audio Device Graph Isolation high memory usage, follow the methods below to resolve the problem:
Method 1: Disable every sound effect
One way to fix the Windows Audio Device Graph Isolation high CPU usage is to disable the sound effects. Here’s how to do it:
If you usually use sound effects, skip this method because it’ll disable the feature.
- Type
control panelin the search bar and click to open. - Select Large icons beside View by.
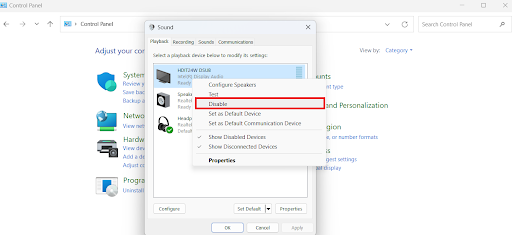
- Click on Sound.
- Select the device, right-click on it, and select Disable. If you have multiple devices, disable them. You can disable the device that’s causing the high memory usage.
Related: Windows 10 Control Panel: Where to Find It
Method 2: Update your audio drivers
One of the factors that can cause the audiodg.exe high CPU usage is outdated drivers. Here’s how to use Device Manager to update your audio drivers:
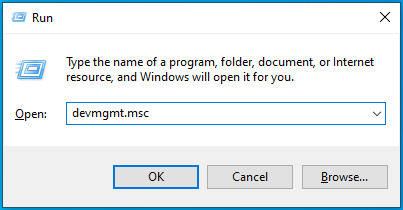
- Press
Windows + Rto open the Run dialog box. - Type
devmgmt.mscin the search bar and click to open.
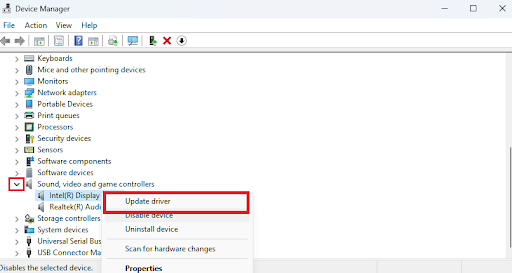
- Expand Sound, video and game controllers.
- Then, right-click on your audio driver and choose Update driver.
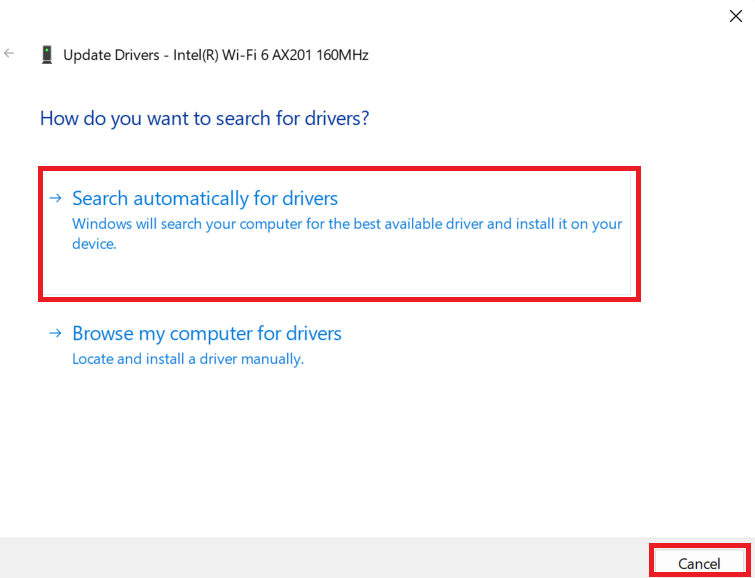
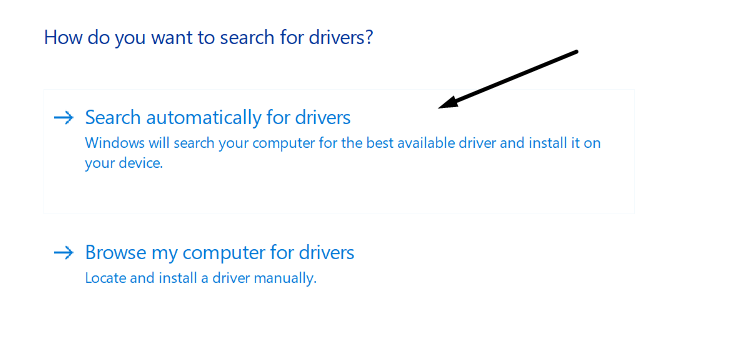
- Click Search automatically for drivers.
- Windows will automatically download and install it if an update is available.
After the update, restart your PC and check for the problem. If you’re still experiencing the issue, proceed with the next method.
Related: How to Update Device Drivers on a Windows 10 PC?
Using Auslogics Driver Updater is the simplest way to update your computer’s audio or other drivers.
This tool examines and reports out-of-date or missing drivers while scanning your computer for possible driver issues.
With Auslogics Driver Updater, you can update your drivers to the most recent version recommended by the manufacturer.
Find out more: Auslogics Driver Updater: New Drivers in One Click!
Method 3: Scan your computer for malware
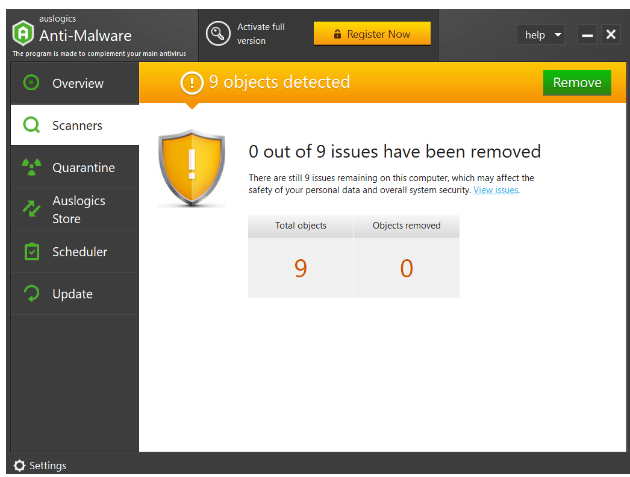
If you’re not sure if malware has infected your computer, you can use Auslogics Anti-Malware to automatically detect and remove all malware from your system. The application safely removes spyware, malware, and viruses from your computer after detecting them. The best part is that it complements your antivirus! Here’s how Auslogics Anti-Malware works:
- Download the program from Auslogics’ official website.

Download Auslogics Anti-Malware to scan your PC for viruses in just a few clicks
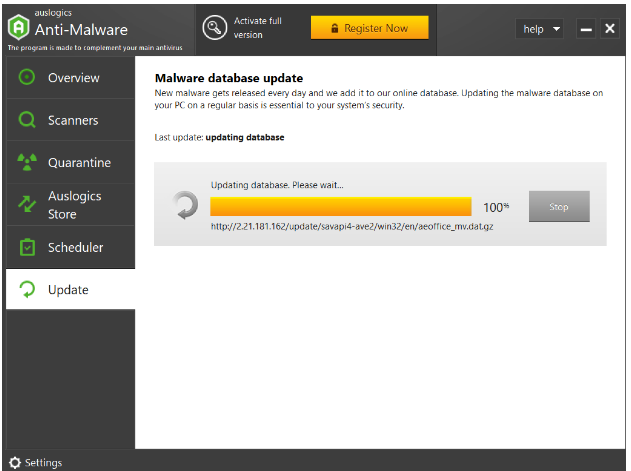
- Install and launch the program. If it’s your first time running the program, it’ll update its database to offer the current and best system security.
- Click on Scanners and choose your preferred scan type: Quick scan, Deep scan, or Custom scan.
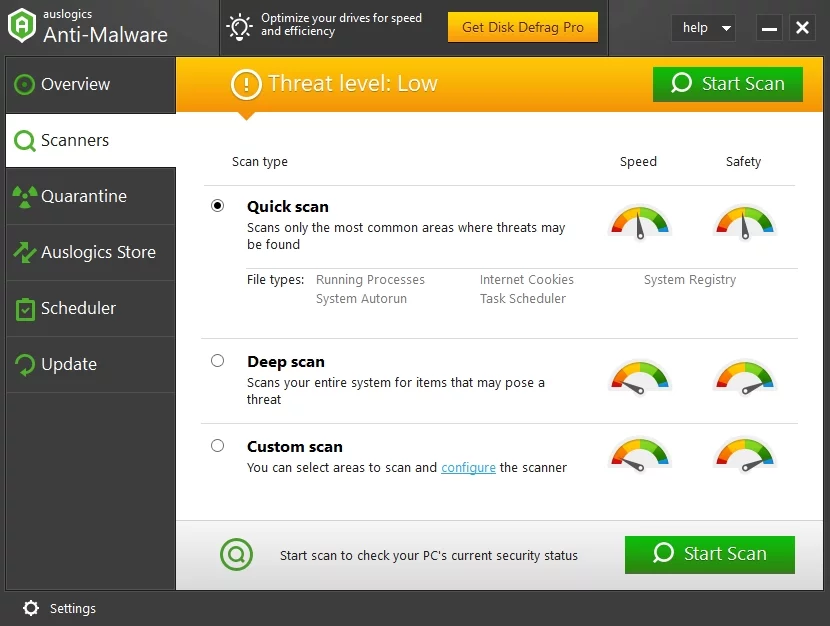
- Click Start Scan and wait for the program to check your system for malware.

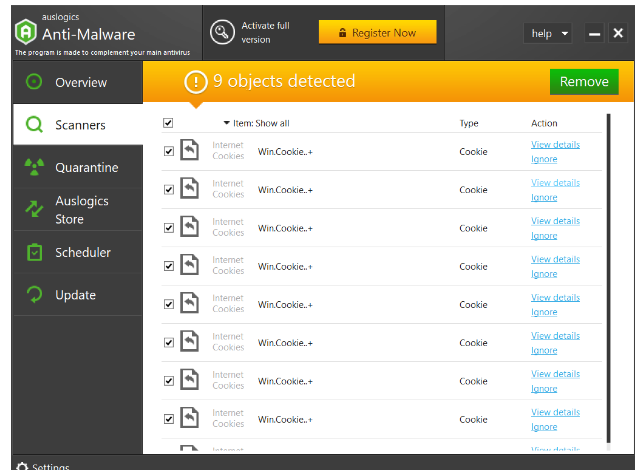
- After the scan, click on Remove to delete any malware found.
Related: Auslogics Anti-Malware: Features and Reviews
Method 4: Check for any recent system changes
Since Windows Audio Device Graph Isolation is a system application, any changes can affect the entire system.
Some applications or hardware changes can affect the system even if you haven’t made any changes.
Here are some tips to remember:
1. Uninstall any suspicious and recently installed application
Installing programs from reliable sites is important to protect your computer’s security.
If an application seems suspect or you observe that it uses a lot of CPU and GPU power after installing it, delete it and check if it fixes the problem.
Also read: How to Uninstall Programs and Delete Unnecessary Files in Windows 10
2. Connect and reconnect the headset or speakers Using the incorrect headset or speaker can lead to issues if your PC experiences system strain due to Windows Audio Graph Isolation . Check to see if the problem still exists by unplugging the connection. Also, the audio drivers will likely consume a lot of CPU and GPU resources if you have upgraded the GPU on your Windows PC or made other hardware changes.
Fix this issue quickly
You can try using a safe and totally free tool developed by the Auslogics team of experts.
A few simple steps to troubleshoot the issue:
Download the tiny Auslogics TroubleShooter tool.
Run the application (no installation is needed).
The app will check for the issue mentioned in the article. When the scan is done, check that this is the issue you were looking to solve and click ‘Apply now’ to apply the recommended fix.
You can use the app to troubleshoot other malfunctions for free by simply typing in a brief description of the issue your PC is experiencing. Or you can scan your PC for performance issues using the My Scanner tab.
Windows Audio Device Graph Isolation: Explained
It’s critical to fix problems with Windows Audio Device Graph Isolation’s high CPU usage if you want to keep your Windows PC running smoothly.
You can effectively manage high CPU consumption caused by Windows Audio Device Graph Isolation by:
- removing unnecessary sound effects,
- updating audio drivers,
- checking for malware, and
- checking for recent system changes.
We hope that this guide has given you valuable solutions to help you resolve problems with Windows Audio Graph Isolation. If you’ve found this article helpful, share it with your friends and leave a comment below with any questions, feedback, or additional tips you might have.
FAQ
Is disabling Windows Audio Device Graph Isolation safe for lower CPU usage?
It’s true that turning off Windows Audio Device Graph Isolation can lower CPU usage, but it’s not always safe. It’s a system process that controls the processing and effects of audio. When you disable the feature, it creates a problem with audio playback or system stability. Do it only if you are certain it’s causing issues and are aware of the risks.
Can Windows Audio Device Graph Isolation impact PC performance?
Yes. Windows Audio Graph Isolation can affect your computer’s performance. It can slow down your system by using too much CPU resources. If you’re sure it’s causing your PC to be slow, troubleshoot or optimize your audio settings. Check the guide on this page for more.
Does high CPU usage by Windows Audio Device Graph Isolation mean a virus?
No. Windows Audio Device Graph Isolation with a high CPU usage doesn’t mean it has a virus. It’s a legitimate system process related to Windows audio features. However, sometimes, malware can affect your system, pretending to be an audiodg.exe system process to avoid detection. You can use Auslogics Anti-Malware to scan your system for malware and remove any threats.
Where is Windows Audio Device Graph Isolation located in my system?
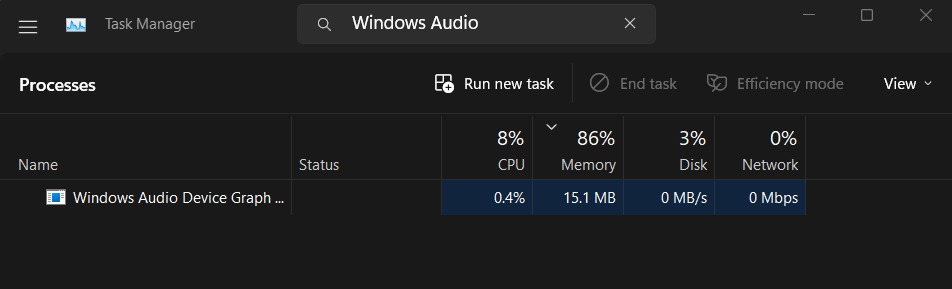
Press “Ctrl + Shift + Esc” to open Task Manager. Then search for “Windows Audio Device Graph Isolation” or “audiodg.exe” in the Processes tab. You can usually find it in the “Background processes” section. If you can’t find it there, enable the “Show processes from all users” feature in Task Manager settings.
Windows Audio Device Graph Isolation is a Windows process that plays an integral part in connecting your Windows system with audio devices. Undoubtedly, it’s a crucial Windows component, but it’s currently affecting many users’ system performance. As per them, this process is consuming an extensive amount of their system’s CPU resources and making it nearly impossible to use.
If you also notice that the Windows Audio Device Graph Isolation process is using a lot of your system’s resources, try the mentioned workarounds to fix it. We’ve shared several working workarounds in this in-depth guide to fix the Windows Audio Device Graph Isolation high CPU usage issue.
Why Is Windows Audio Device Graph Isolation Using So Much CPU Resources?
As per our research, these are some of the most common reasons behind the high CPU usage by the Windows Audio Device Graph Isolation process:
- Viruses & Malware
- Enabled Cortana Service
- Outdated Audio Drivers
- Skype App
- Plugged-In Headset and Other Audio Devices
- Enabled Volume Adjustment
Fix Windows Audio Device Graph Isolation High CPU Usage
Here are some working solutions to fix the Windows Audio Device Graph Isolation high CPU usage issue.
1. Check the Windows Audio Device Graph Isolation’s Source
In some cases, it’s found that a virus camouflaged the authentic Windows process and originated this problem. To know whether it’s the same in your case, we suggest you check the source of the Windows Audio Device Graph Isolation process running in the Services utility.
If it sends you to the C:\Windows\System32 path, then it’s a real process. Otherwise, it’s not. We’ve explained the process to check the same below:
1. Press the Ctrl + Shift + Esc keys combination simultaneously to open the Task Manager utility.
2. Search for the Windows Audio Device Graph Isolation process in the Processes section.
3. Right-click on the process and select the Open file location option from the menu.
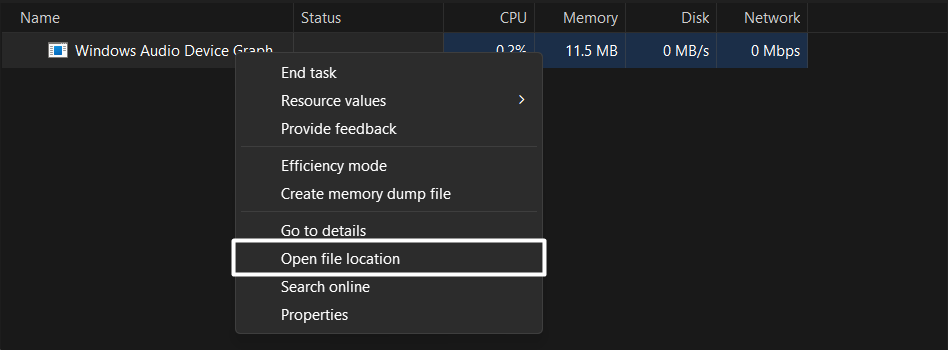
4. If selecting the Open file location option sends you to the C:\Windows\System32 directory, then the process is genuine, and you don’t need to do anything with it.
But if it sends you to any other location or you don’t see it, your system may have some viruses causing this issue.
2. Run a Quick Virus Scan
If it sends you to any other location, the viruses or malware on your system may be causing this issue. In that case, we suggest you run a quick virus scan to find and remove the viruses & malware from the system. So, follow the below-mentioned steps to do the same:
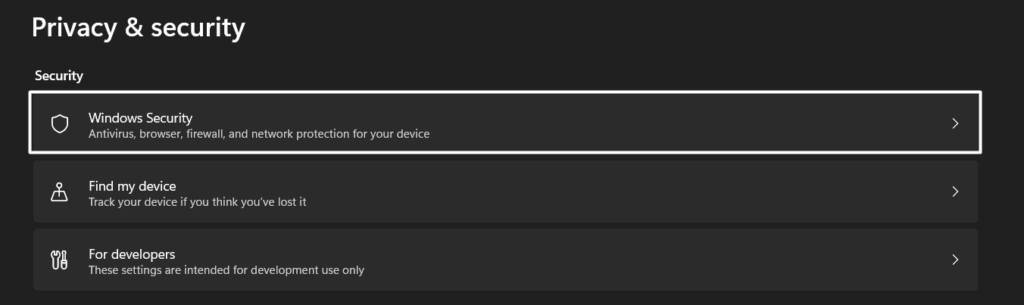
1. Right-click the Windows key in the taskbar and select the Settings option from the popup menu.
2. Select Privacy & security from the left sidebar and click the Windows Security option.
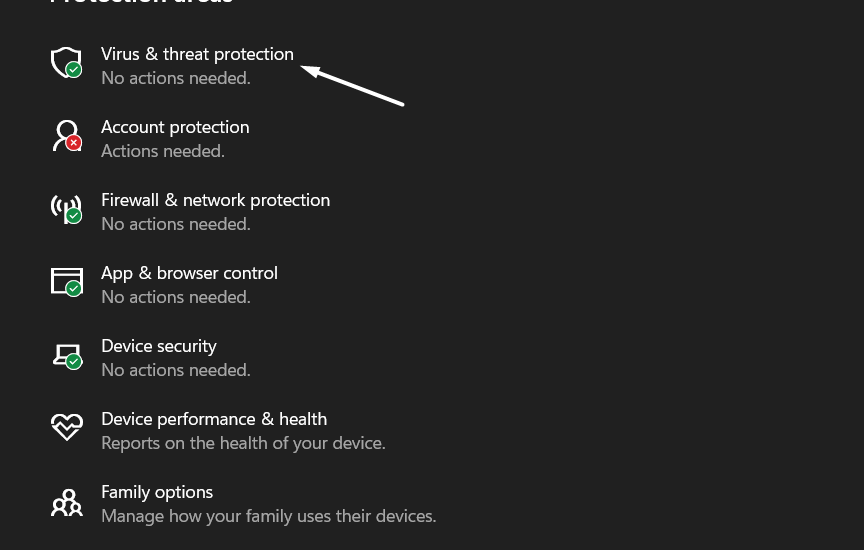
3. On the next window, click on the Virus & threat protection option and then click the Quick scan button.
4. Now, wait for the estimated time mentioned on the screen for the virus scan to get finished.
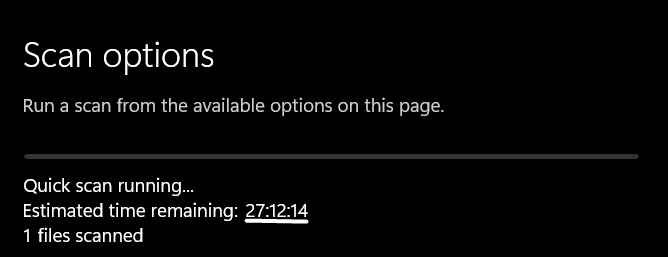
Once the virus scan is completed, check if it has found some viruses on your system. If yes, follow the on-screen prompts to remove them from your Windows system.
3. Run Microsoft Safety Scanner
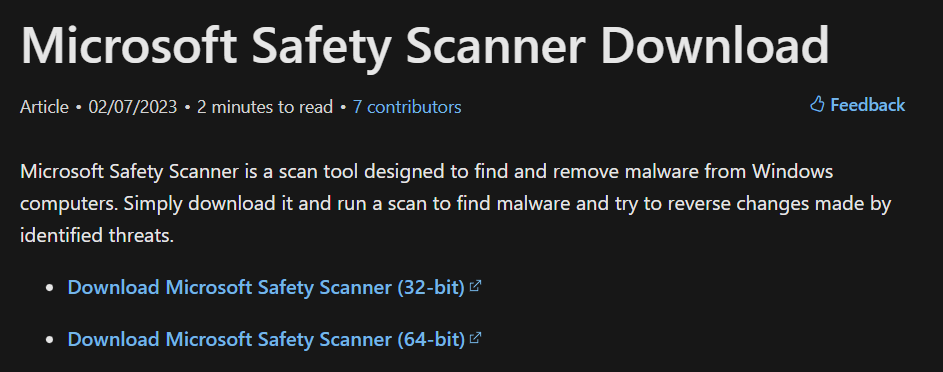
If your system’s built-in Malware Removal tool doesn’t remove the viruses & malware from your system, we suggest you use Microsoft Safety Scanner to run a detailed virus scan. Microsoft Safety Scanner will help you get rid of spyware, viruses, and other malicious apps from your system. So, follow the below steps to use Microsoft Safety Scanner:
1. Click here to move to Microsoft’s website and click on Download Microsoft Safety Scanner (64-bit).
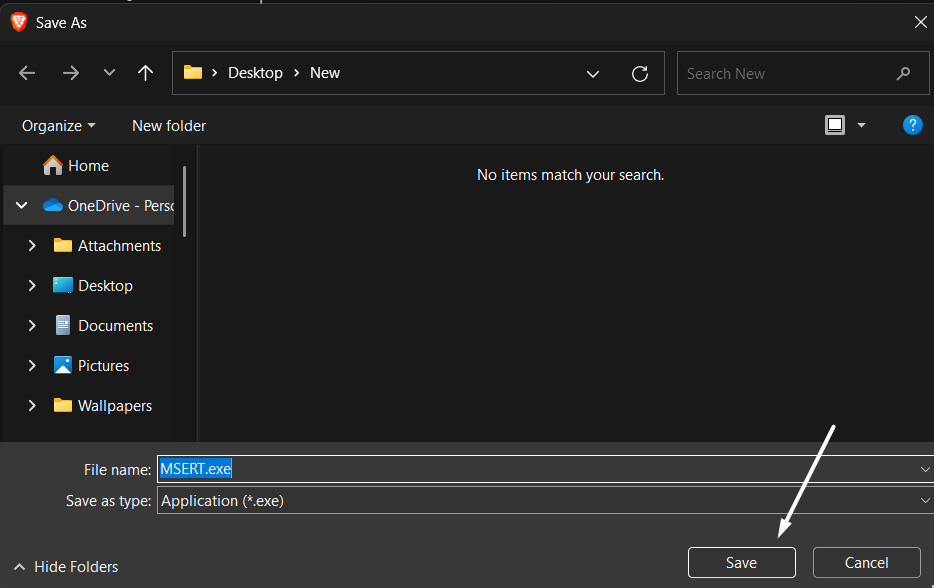
2. Click on Save on the Save As prompt to download Microsoft Safety Scanner on your system.
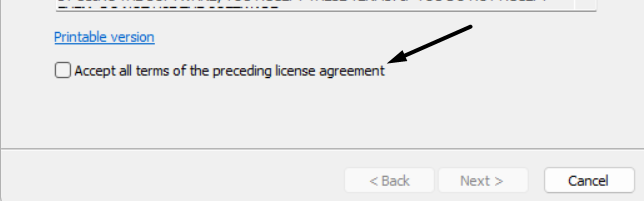
3. Once the Microsoft Safety Scanner’s exe file is downloaded, click on it, then tick the Accept all terms of the preceding license agreement box.
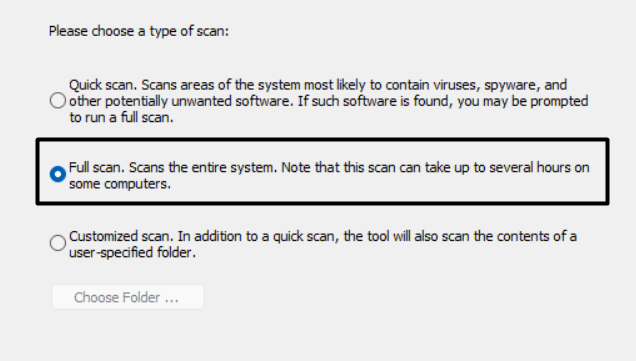
4. After that, click on Next > and select the Full scan radio button on the next window to start the full virus scan.
You must now wait for the estimated time for the virus scan to complete and show the results.
4. Check for Third-party Apps
According to some users, the Windows Audio Device Graph Isolation uses a lot of CPU resources only at the time of using programs like Skype, WhatsApp, Zoom, etc. So, if you’re also using similar programs, then there’s a high possibility that they’re causing this issue.
To check this, we suggest you close similar apps running in the background and check whether it improves the situation.
5. End the Cortana Process
Cortana is Microsoft’s own voice assistant that helps you perform certain tasks by giving voice commands. Since this program’s functioning relies on working the system’s audio components, it’s possible that it’s making the mentioned service consume an extensive amount of CPU resources.
Considering this, we suggest you end the Cortana process and check the issue’s status. You can check the below-mentioned steps to do the same:
1. Right-click on the Windows logo in the system’s taskbar and select Task Manager from it.
2. Search for the Cortana process in the Task Manager utility under the Processes section.
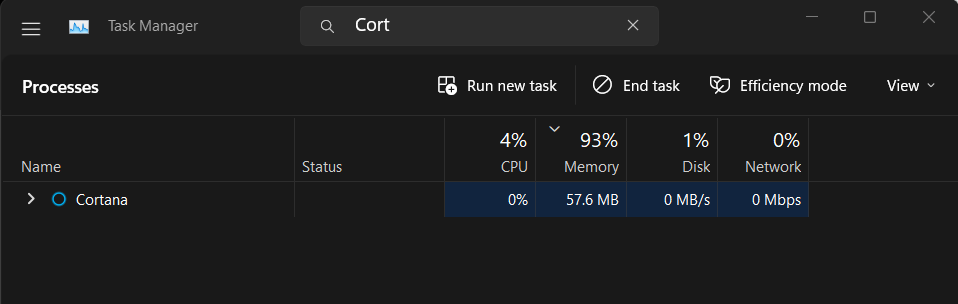
3. Right-click over Cortana and select the End task option from the menu to stop it.

6. Uninstall Skype
Like Cortana, Skype is also an application that constantly uses the system’s audio components to work. So, it could be possible that the Skype app is causing the Windows Audio Device Graph Isolation high CPU usage issue.
To check whether that’s the same, we suggest uninstalling Skype from your system if you’ve it. You can follow the below steps to uninstall Skype from your PC:
1. Press the Windows + I keyboard shortcut to open the Settings app and navigate to the Apps section.

2. Search for the Skype app in the Apps section using the search function and click on three dots (…) next to it.

3. Lastly, select the Uninstall option from the menu and then click Uninstall to delete it.

7. Unplug the Headset and Plug It Back In
One of the easiest workarounds to the Windows Audio Device Graph Isolation high CPU usage issue is to unplug all the USB-based audio or headset devices from the system and then plug them back in.
You would be amazed to know this minor tweak has worked for many users. Thus, we suggest you do the same and check the issue’s status.
8. Turn Off Audio Enhancements
One of Microsoft’s Independent Advisors advised users to disable Audio Enhancements on their PC to fix this issue, and surprisingly, it worked for several Windows users. Thus, we also suggest you do the same by following the below steps and check if it fixes the issue:
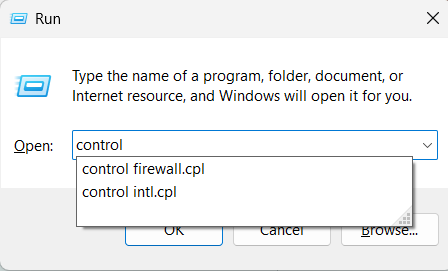
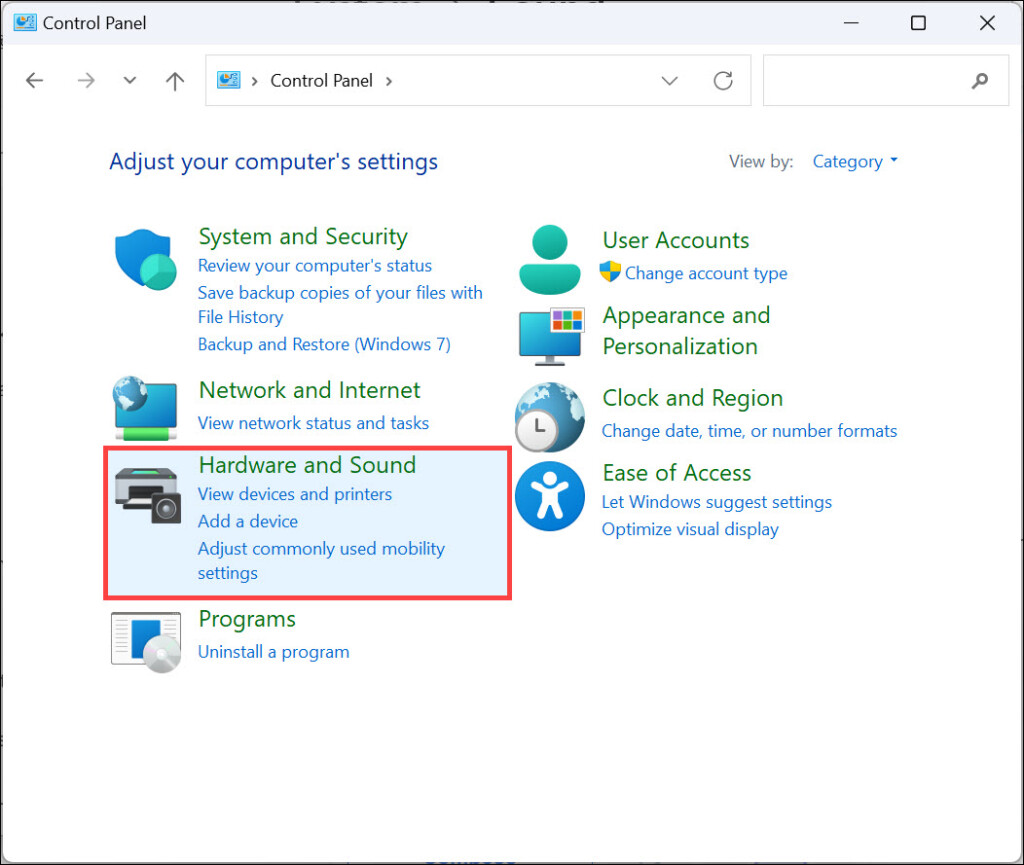
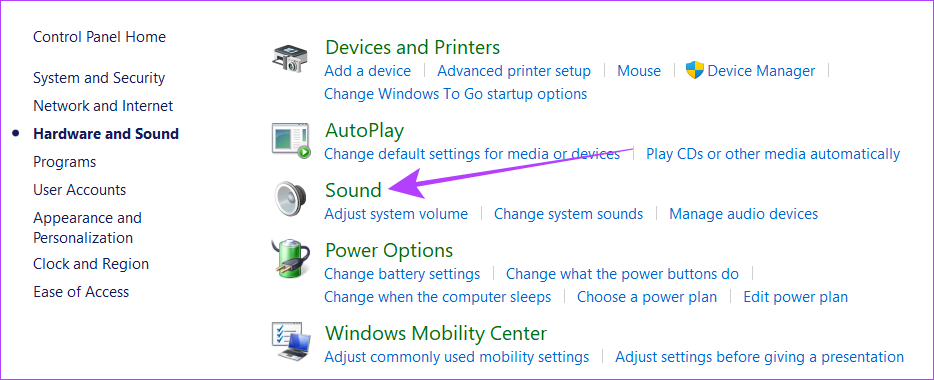
1. Hit the Windows + R keyboard shortcut to open the Run program and type control in it.
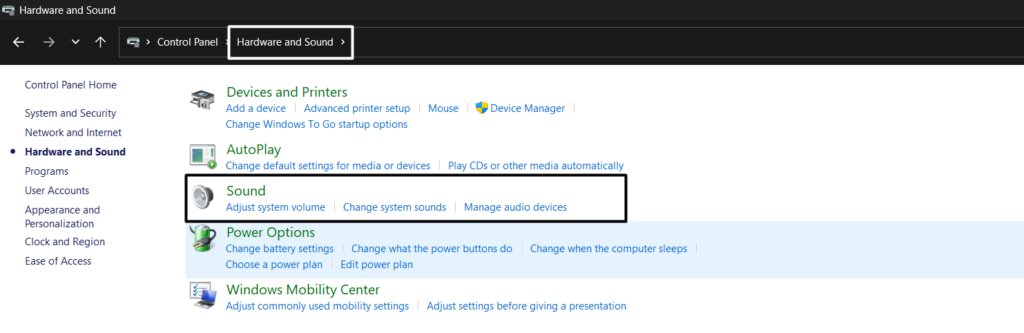
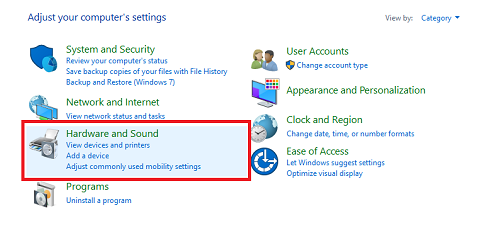
2. Proceed to the Hardware and Sound section and click on Sound to open the system’s sound settings.
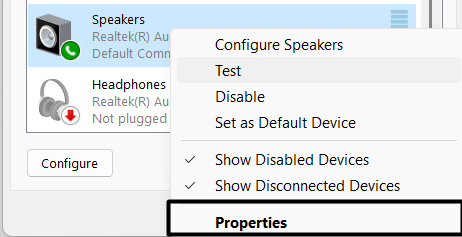
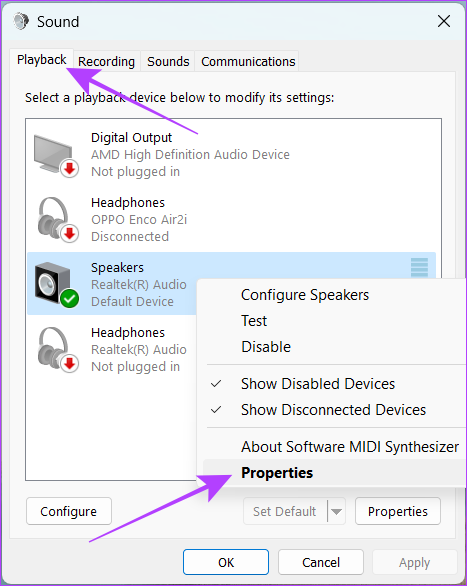
3. Right-click on your current speaker profile in the Playback tab and choose Properties from it.
4. Jump to Enhancements from the top navigation menu and untick the Enable audio enhancements checkbox.
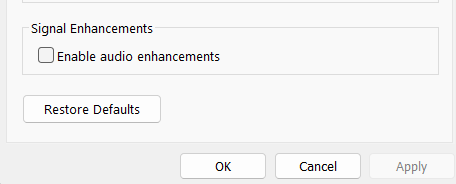
5. Click on the Apply button and then OK to save all the recent changes.

6. Lastly, use the Esc + Shift + Ctrl shortcut to open Task Manager and check if the issue is still there.
9. Modify the Sample Rate and Bit Depth
Another possible solution to make the Windows Audio Device Graph Isolation process use fewer resources is to lower the system’s audio sample rate and bit depth settings. This is because keeping the audio sample rate and bit depth higher consumes a good amount of the system’s resources, which could cause this issue.
So, try keeping your system’s audio sample rate and bit depth low to check if it fixes the issue. Follow the stated process that explains the same:
1. Right-click the Start button in your system’s taskbar and select Run from it to open the Run utility.
2. Type control in the Run’s search box, and press Enter to open the Control Panel.
3. Head to Hardware and Sound and then click on the Sound option to move to the Sound section.
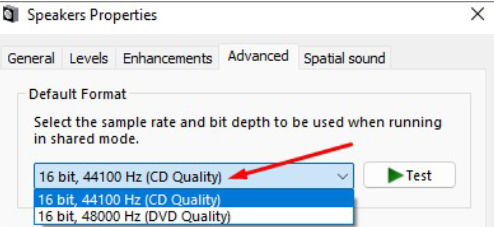
4. Double-click on your audio playback device and navigate to the Advanced section.
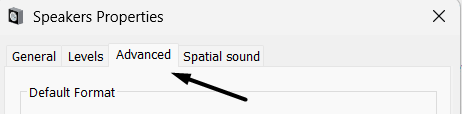
5. Finally, select the CD Quality option from the Default Format dropdown menu.
10. Try Disabling the Exclusive Mode
All Windows systems come with Exclusive Mode that lets third-party apps bypass your system’s audio processing engine and consume as many resources as they want to offer an immersive playback experience.
It could be possible that Exclusive Mode is enabled on your system, which is making the Windows Audio Device Isolation Graph process use this many resources. Due to this, we suggest you disable Exclusive Mode on your system by following the below-mentioned instructions:
1. Hit the Windows + R shortcut to open Run, type control in it, and press Enter.
2. Proceed to the Hardware and Sound section and click on Sound to access the sound settings.
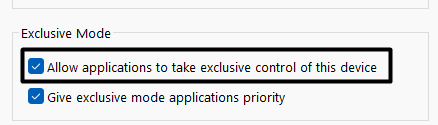
3. Right-click on your current audio device in the Playback tab and select Properties from it.
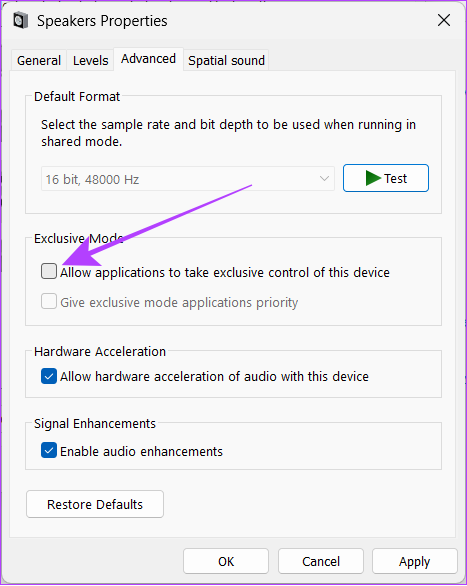
4. Finally, jump to the Advanced tab and untick Allow applications to take exclusive control of this device.
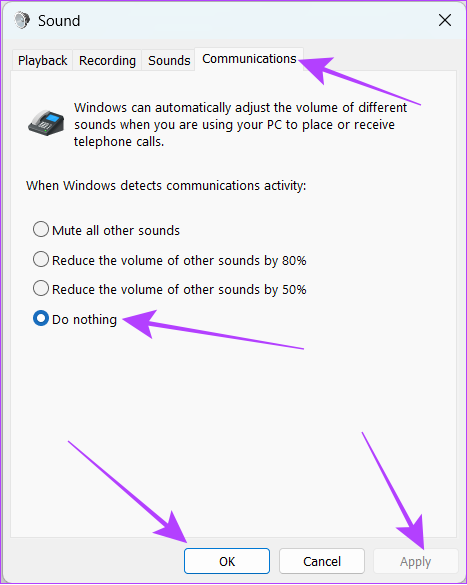
11. Turn Off the Automatic Volume Adjustment
Another effective solution to eliminate the Windows Audio Device Graph Isolation high CPU usage issue is to disable automatic volume adjustment on your Windows PC. This is because Windows automatically adjusts the volume of different sounds, which consumes a lot of CPU resources and causes issues like these.
Due to this reason, turn off volume adjustment on your PC by following the below-mentioned steps:
1. Right-click on the speaker icon in your system’s taskbar and select Sound settings from the popup.
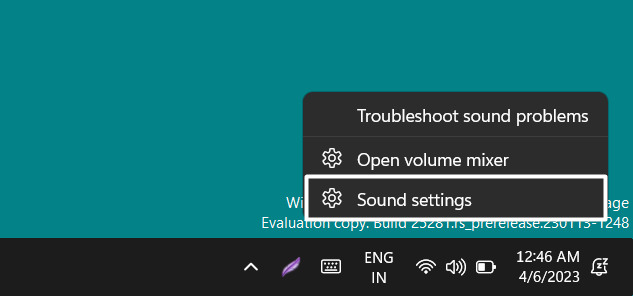
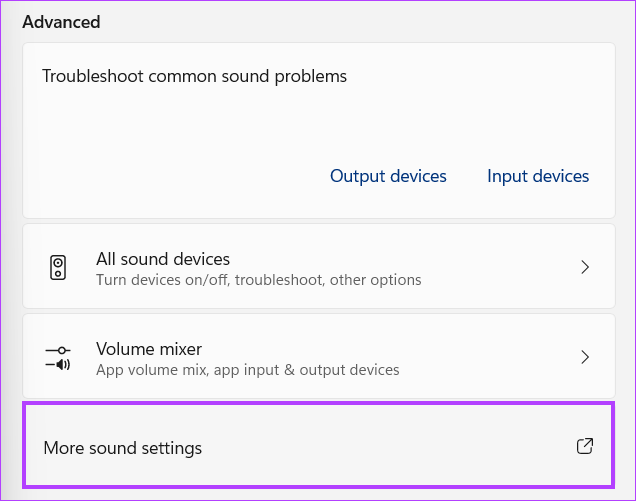
2. Click on the More sound settings option in the Advanced section to open the Sound prompt.
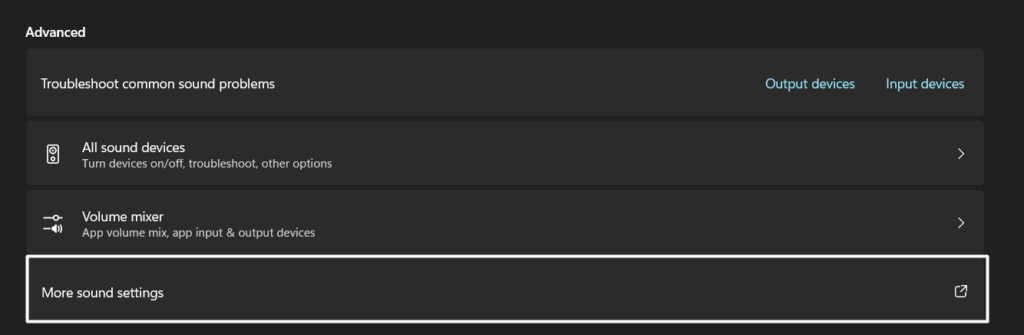
3. Jump to the Communications tab and choose the Do nothing radio button.
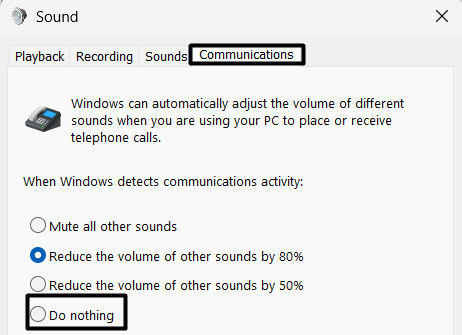
4. Click the Apply at the bottom and then click on the OK button to apply all the changes.
12. Re-enable, Update, & Reinstall the Audio Drivers
If the Windows Audio Device Graph Isolation high CPU usage issue is still there, then it could be possible that your system’s audio drivers have some bugs and glitches which are leading to this issue.
Keeping this in mind, we first recommend you re-enable your system’s audio drivers to refresh them. We’ve mentioned the process to do the same below:
1. Open the Device Manager utility on your PC and expand the Sound, video, and game controllers section.
2. Right-click on one of the mentioned audio drivers in the Sound, video, and game controllers section and select Disable device from the popup menu.
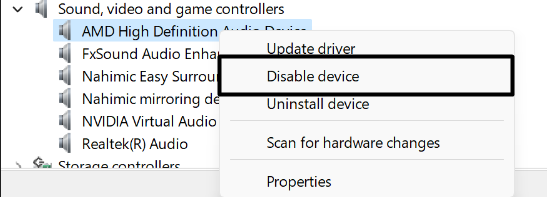
3. Right-click on the disabled audio driver again to get the popup menu and choose Enable device from it.
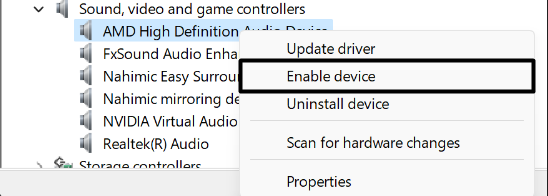
4. In the end, apply the same steps to all other remaining audio drivers and check the status of the issue.
Update the Audio Drivers
If re-enabling the audio drivers doesn’t fix the issue, then we recommend you update them by following the below steps:
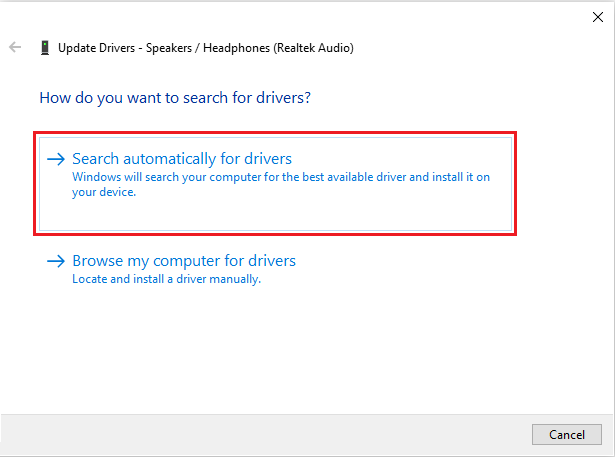
1. Right-click on the audio driver and select the Update driver option from the menu.
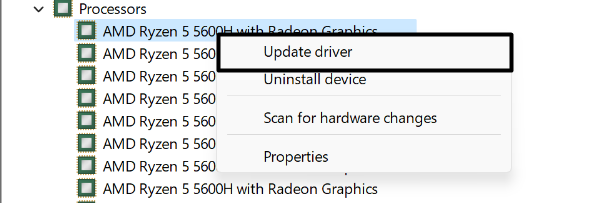
2. Click on Search automatically for drivers on the How do you want to search for new drivers? prompt and wait for the OS to search for the latest updates for the select audio driver and install them.
3. Lastly, apply the same steps to all other audio drivers to see if it fixes the issue.
Reinstall the Audio Drivers
Lastly, if nothing fixes the issue, try reinstalling the audio drivers by following the below steps:
1. Right-click on the audio driver, select the Uninstall device option from the menu and then click on Uninstall.
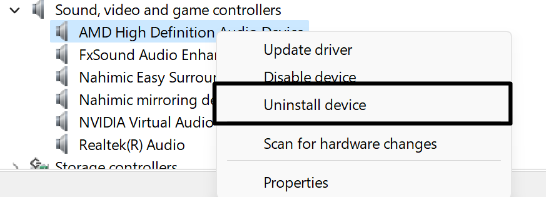
2. After uninstalling the driver, click on Action in the top menu and select Scan for hardware changes.

13. Use the Built-in Playing Audio Troubleshooter
Windows 11 has an Audio troubleshooter that lets you find and fix issues with your system’s audio components and ensure they’re working perfectly. If the issue still exists, we suggest you run the Audio troubleshooter. Follow the below stated steps to run the integrated Audio troubleshooter:
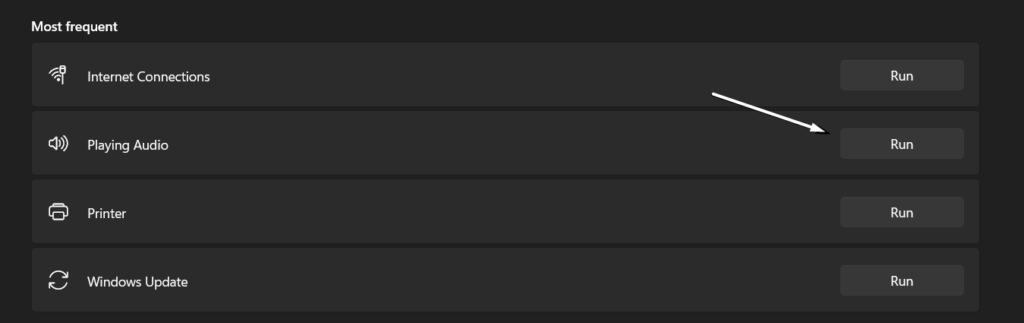
1. Hit the Windows + I shortcut to open the Settings app and move to the Troubleshoot section.

2. Proceed to the Other troubleshooters, search for Playing Audio, and click the Run button next to it.
3. Select your current audio playback device on the next window and click the Next button.
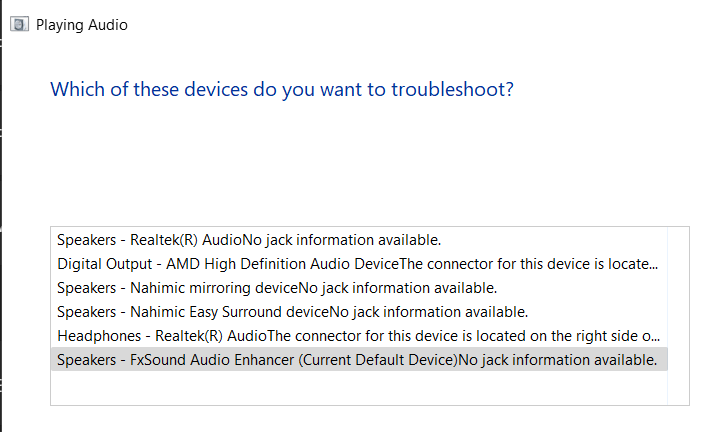
4. Follow the on-screen prompts to continue the troubleshooting process.
14. Update Your Windows 11 PC
There’s a high possibility that your system’s current build has some bugs which are leading to this inconvenience. In that case, we suggest you update your Windows 11 PC to the latest version to eliminate all these bugs. You can follow the below steps to do the same:
1. Use the Windows + I shortcut to open the Settings section and head to the Windows Update section.

2. Click on the Check for updates button at the top to search for available Windows updates.

3. Lastly, click the Download and install all button next to all the available updates to install them.

15. Perform a Clean Boot
One of Microsoft’s Independent Advisors said a third-party program or service could also cause this issue. Thus, this could be the same in your case if the problem is still there. To check whether a third-party app or service is causing this issue, we suggest you boot your PC into Safe mode. So, follow the mentioned steps to boot your PC into Safe mode:
1. Hit the Windows key to open the Windows Search Box and type System Configuration in it.

2. Select the System Configuration option from the Best match section and proceed to the Boot tab.

3. In the Boot tab, check the Safe boot and Network checkboxes under the Boot options section.

4. Once done, move to the Services tab, tick the Hide all Microsoft services checkbox, and press the Disable all button.

5. Proceed to the Startup tab and click the Open Task Manager option to open the Task Manager utility.
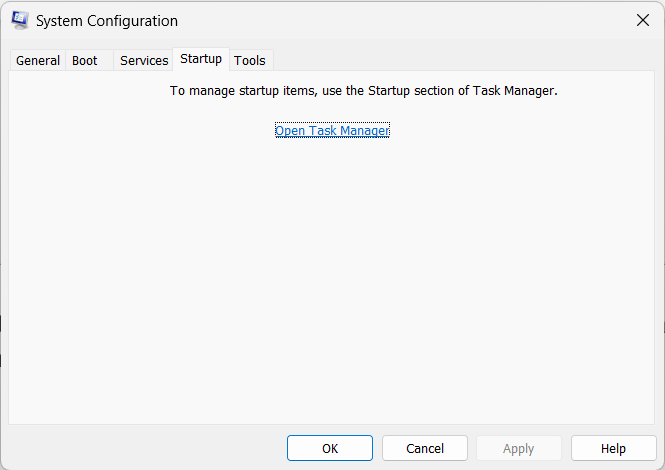
6. In the end, force close all the non-Microcroft processes in Task Manager and check the issue’s status.
Once done, restart your system and check if the issue is fixed. If the issue is fixed, you now know the reason. You can now either use the system in Safe mode or start deleting all third-party apps to find the real culprit.
16. Restore Your System to the Previous Restore Point
As a last resort, if nothing works and eliminates the issue, you should consider reverting your system to a previously created restore point. Doing so will uninstall all the updates that were installed after creating that particular restore point.
This will also revert the system’s settings back to the state they were before the creation of the system restore point. So, if you already have a system restore point, follow the below-mentioned instructions to restore it:
1. Press the Windows key, type restore point in the search box, and select Create a restore point from the results.

2. Click on System Restore… in the System Restore section and select the Choose a different restore point radio button.
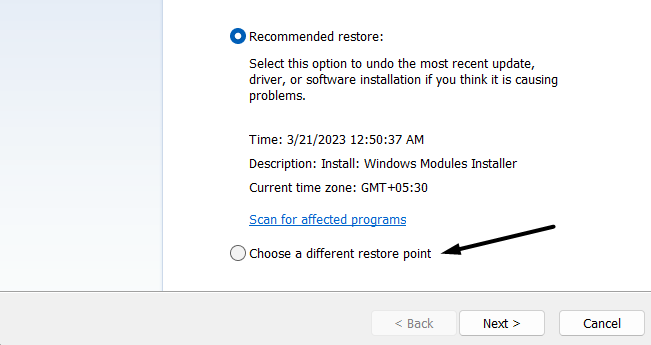
3. Select a restore point and click on the Next > option at the bottom of the prompt.

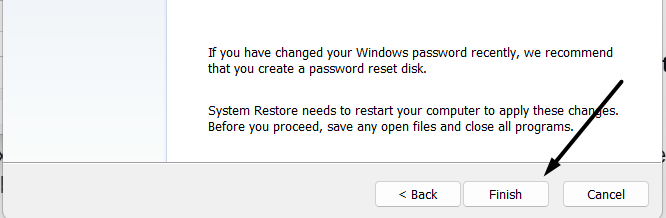
4. Lastly, click on Finish and and wait for the system to return to the selected system restore point.
FAQs
How Do I Fix High CPU Usage by Audio Device Graph Isolation?
One of the most common workarounds to fix the high CPU usage issue by the Windows Audio Device Graph Isolation process is to disable Audio Enhancements. If that doesn’t work, you can try turning off automatic volume adjustment and Exclusive Mode on your system.
Why Is Windows Audio Graph Taking So Much CPU?
There could be varied reasons behind the huge consumption of CPU resources by the Windows Audio Device Graph Isolation process, such as Cortana, outdated audio drivers, malware, etc.
Can I End Windows Audio Device Graph Isolation?
You can end the Windows Audio Device Graph Isolation process. But you shouldn’t do so, as it can cause issues with your system’s audio functionalities.
How Do I Turn Off Windows Audio?
You can follow the below-mentioned steps to turn off Windows audio on your Windows 11 PC:
1. Right-click on the speaker icon in your system’s taskbar and select Sound settings from the popup.
2. Click on More sound settings in the Advanced section and right-click on the audio device you want to switch off.
3. In the end, select Disable from the popup menu to disable the selected playback device.
How Do I Permanently Disable Realtek Audio?
Follow the mentioned instructions to permanently disable the Realtek Audio driver on your Windows system:
1. Hit the Windows key + R keys simultaneously to open Run, type devmgmt.msc in it, and press Enter.
2. Expand the Sound, video, and game controllers section once the Device Manager is opened.
3. Right-click on the Realtek (R) Audio driver in the same section and select Disable device from the menu to disable it.
Windows Audio Device Graph Isolation High CPU Usage Issue Is Fixed
Usually, the Windows Audio Device Graph Isolation process uses very few CPU resources to run. But sometimes, it suddenly starts using a lot of the system’s resources, which affects the overall performance of the system. Sadly, many users are facing performance issues due to the same reason.
If you were also facing the Windows Audio Device Graph Isolation high CPU usage issue, then we hope the fixes we shared in this guide helped you fix it. Also, make sure to share which of the mentioned workarounds helped you fix it.
Audio Device Graph Isolation is a feature that was added to Windows Vista and improved in Windows 10 and 11. It lets users connect multiple audio devices to their computers, such as microphones or webcams, and set them up as separate input/output devices. It reduces system sound latency because each audio device can open and process its audio streams.
The issue of high memory utilization caused by the isolation of audio devices can be solved through several effective methods. These include updating your computer’s audio drivers, disabling sound effects, and repairing audio drivers. Moreover, you can reduce the strain by reducing the background tasks.
Updating Audio Drivers
When a new Windows 10 update is installed, your audio drivers may have these problems and use more memory than usual. With time, your PC’s audio drivers may experience issues like these. The best way to tackle this is to update these corrupted drivers first. Here are two easy methods to do that:
- Open the Windows search bar, type “Device Manager,” and open the application.
- You can also open it through Run by typing devmgmt.msc and pressing OK.

- Once you are in the Device manages, open and expand the “Audio input and output.”
- You will find your “Speaker/Headphone” drivers in the list.

- Click on your device audio, press the “Update device driver” icon from the menu bar, and select Search automatically.
Disabling All Sound Effects
The Windows Audio Device Graph Isolation controls all special sound effects. That is why disabling the unnecessary sound effects may resolve this issue for good.
- Search the Windows search bar for the “Control panel” and open it.
- Go to the “Sound section” and click on
- Once the file is opened, click on “Disable.” It will disable the audio device that causes the high usage issue.
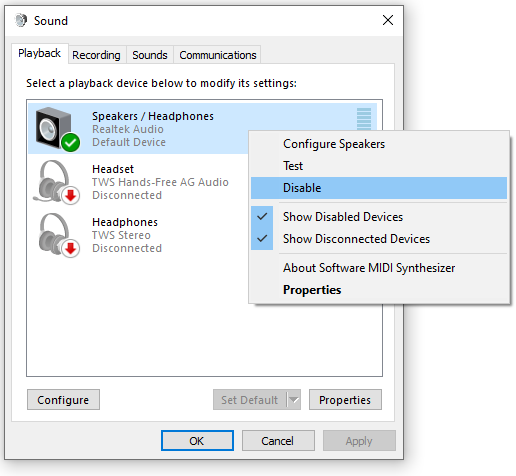
Note: If you have multiple devices, disable each separately and then check the process. Only disable the one device that is causing the issue.
Reinstall The Applications
Skype, Zoom, and AnyDesk are examples of programs that you might have on your PC that use your speakers and microphone. These applications cause high usage errors in your audio device graph isolation. To resolve this issue, delete and reinstall such applications on your PC.
Reinstalling the applications may reset their audio settings and admin permissions. It may allow your PC to run on default audio settings.
Is Windows Audio Device Graph Isolation Process a virus?
The Windows Audio Device Graph Isolation Process is a Windows digital signal processing system that controls all the inputs and outputs of all connected devices on your PC. Because it is a Windows process, it is not a virus or malicious software.
However, those who create malware may manipulate the Windows files, which could create a virus. But the question is, what should you do if it is converted to a malware file?
Use Virus Scanner
The best thing to do is to use the virus scanner to keep malware from messing up the Windows Audio Device Graph Isolation Process. Popular antivirus programs like McAfee and Norton can help you scan for and find viruses, malware, and other possible threats.
If the virus scanner finds anything suspicious on your PC, it will remove these files and prevent them from causing further damage to your computer. You can also use Windows Defender to scan and detect threats on your PC.
Ensure Windows Audio Device Graph Isolation is safe
If you are afraid that your Audio Device Graph Isolation is unsafe and is attacked by any malware, you can check it. The best way to ensure the safety of your audio device graph isolation is to check the location of this application from the task manager.
- Open the task manager from the task menu.
- Right-click the “Windows Audio Device Graph Isolation” task and click “Open location” from the file.

- If the file location is the “System 32” folder, it is safe, and no malware has attacked it.
Keeping your computer free of malware is important because it will help ensure it runs safely and smoothly and won’t hurt the Windows Audio Device Graph Isolation Process.
Can I Disable or Quit Windows Audio Device Graph Isolation?
As it is a Windows task, you can not disable or quit Windows Audio Device Graph Isolation. You can restrict this task from the administrator panel, but it is not recommended. It might cause serious issues with your Windows audio functions.
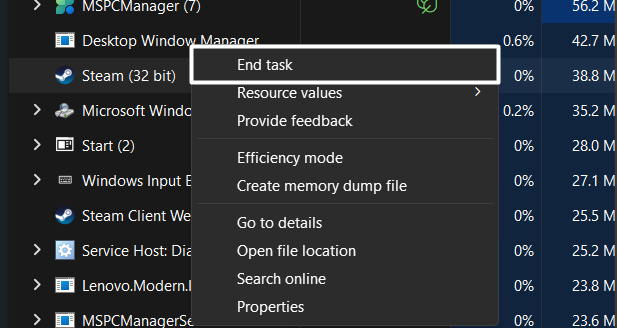
Audio device graph isolation only functions when audio or microphone tasks run. If none of these programs are running on your laptop or PC, you can terminate this process from the task manager. Here’s how you can do it:
- Open the task manager and navigate the “Windows Audio Device Graph Isolation” task.
- Right-click on it and click “End Task” from the file.

Does the Skype app Cause Audio Device Graph Isolation High Memory Usage?
Skype app is reported to be one of the main culprits for high memory usage in the Windows Audio Device Graph Isolation process. This is because Skype uses a lot of audio and microphone functions to allow voice and video calls.
If you frequently use Skype on your PC, the Windows Audio Device Graph Isolation process may be experiencing high memory usage. To resolve the issue, you need to uninstall the Skype application from your PC.
Conclusion
Windows Audio Device Graph Isolation is a procedure designed to assist you in managing all of your computer’s audio inputs and outputs. This method can often create excessive memory utilization on your machine. However, there are solutions. If you’re experiencing high memory use due to the Windows Audio Device Graph Isolation Process, try the above-described solutions to see if they help.
Hey, I’m Hammad. I have been writing for several years now and have amassed a wealth of experience within my field. My focus is on technology and gaming, two areas that I am highly knowledgeable about. Also, I’m writer for iPhonEscape.com and CPUGPUnerds.com as well and where I have written over 350 articles.
Quick Tips
- Use Task Manager to quickly terminate the Windows Audio Device Graph Isolation process to reduce CPU usage.
- Third-party software is one of the most common reasons for CPU spikes.
- High CPU usage for a long time can result in overheating.
Windows Audio Device Graph Isolation, also known as audiodg.exe, is a process that handles digital signal processing, including advanced sound enhancement effects, on your Windows computer. It’s like a manager that organizes audio tasks and prevents problems from crashing your whole system.
It also helps improve your computer’s performance by ensuring all audio tasks run smoothly. Users can adjust specific audio parameters, such as bass, or even create custom sound effects. However, sometimes, even this program can cause issues on your system, leading to high CPU and GPU usage.
7 Ways to Fix Windows Audio Device Graph Isolation High CPU Usage
Try Basic Fixes
- Make sure Windows is updated to the latest version.
- Restart windows to terminate any process that is stuck.
- Close Windows Audio Device Graph Isolation using Task Manager
- Update Audio Driver
- Troubleshoot in Safe Mode to know if the issue is because of third-party apps.
- You can always restore your PC to a previous working state if nothing works out.
Method 1. Use Audio Troubleshooter on Windows
Thankfully, Windows 11 offers GetHelp App, which you can use to identify and resolve almost any issue with your system’s audio components.
Step 1: Open the Get Help App on your PC, and type Troubleshoot audio issues.
Step 2: The app will instantly offer a troubleshooting wizard that can start with your consent. Click on Yes, and get started.

Once the program runs, it will give you suggestions. Agree on what suits you and see if the issue is solved. If not, we suggest you perform the steps again, but choose a different sound source this time.
Method 2: Check if Apps or Mic Usage Spikes the CPU Usage
One of the reported causes of this spike is the apps when it comes to software and the microphone when it comes to hardware.
Some users have reported that apps like Nvida broadcast through the Logitech app are spiking their PC’s GPU. Some even reported that a spike in CPU usage showed up whenever the Microphone was connected.
If that is the case, you can uninstall or update the app. For Microphone, you need to check on another PC or replace it.
Method 3. Check the Origin of Windows Audio Device Graph Isolation
Once malware enters your system, it can act as a system program, such as Windows Audio Device Graph Isolation, to run discreetly in the background. Since it runs in the background, it can consume many resources and slow down your system.
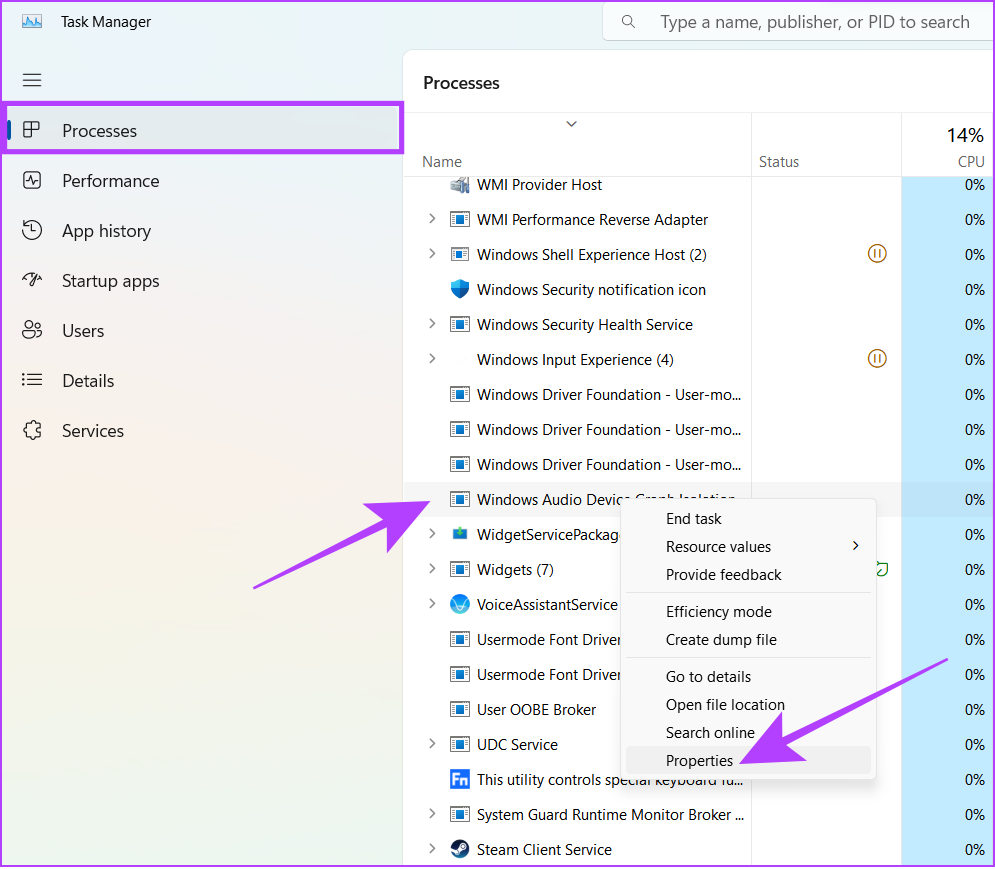
Step 1: Open Task Manager using the key combination Ctrl + Shift + Esc.
Step 2: Switch to Processes and look for the Windows Audio Device Graph Isolation process.
Tip: You can use the search bar to quickly locate the program by searching audiodg.
Step 3: Right-click over the Windows Audio Device Graph Isolation process and select Properties.
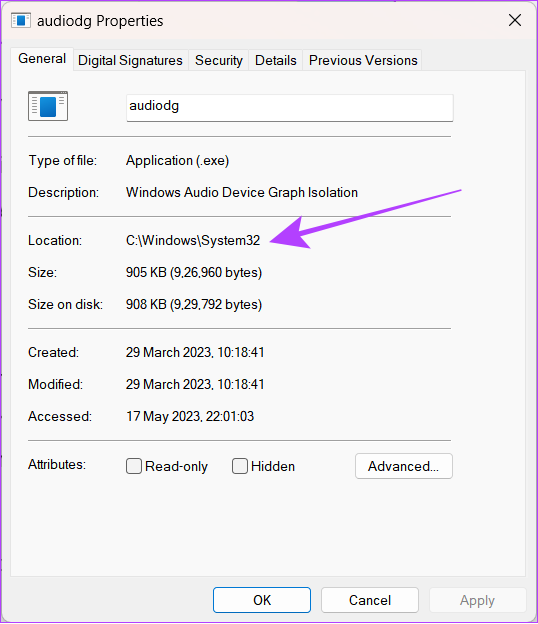
Step 4: Click on the General tab and look at what’s mentioned next to Location.
If the process directs you to the C:\Windows\System32 path, it indicates authenticity. Otherwise, it can be some malicious program acting as a system app. We recommend you perform a system-wide malware scan to check this as a safety measure.
Method 4. Recheck Any Recent Changes Made to System
As you know, Windows Audio Device Graph Isolation is a system application; any changes you make will affect the entire system. While you might not have made any changes manually, they might have been made by some applications or even as a result of any changes you have made to the hardware.
1. Uninstall Suspicious and Recently Installed Software
It’s always suggested that you install applications from authorized sources, or your PC’s security will be at risk. Hence, if you are suspicious or started facing high CPU and GPU usage after installing a specific application, we suggest uninstalling the program on your Windows PC and checking if you are still facing the issue.
2. Unplug and Replug the Headset or Speakers
It can do more harm than good if you haven’t gotten the right headset or speaker for your Windows machine. The device might put more pressure on the system through Windows Audio Device Graph Isolation. Unplug the connection and see if you are still facing the issue.
Additionally, if you recently changed the GPU of your Windows machine or have made many other hardware changes, you might see the audio drivers consuming maximum CPU and GPU power.
Method 5. Disable All Audio Enhancements
While audio enhancements are significant for improving sound quality, they can also be very demanding on your PC. Hence, disable them and see if your PC returns to normal.
Step 1: Open Windows search, type Control Panel, and open it from the results.
Step 2: Click on Hardware and Sound, and then on Sound.
Step 4: Switch to Playback > right-click the current sound source and click on Properties.
Step 5: Navigate to the Advanced tab and uncheck Enable audio enhancements.
Tip: To relieve further pressure on your system, you can also uncheck Allow hardware acceleration of audio with this device.

Step 6: Now, click on the Apply button followed by Ok.
Method 6. Disable Exclusive Mode (Sound)
Windows comes with an Exclusive Mode, enabling third-party applications to bypass the system’s audio processing engine and utilize the resources the app wants. This might be the reason for the high CPU and GPU usage of the Windows Audio Device Graph Isolation (audiodg.exe) application.
Step 1: Go to Sound settings using Control Panel, then switch to the Playback tab.
Step 2: Right-click the current audio device and select Properties.
Step 3: Go to the Advanced tab and uncheck Allow applications to take exclusive control of this device. Click on Apply, followed by Ok.
Method 7. Turn Off Automatic Volume Adjustment
Windows automatically adjusts the volume levels depending on what you hear. For example, using a communication app that can take calls will automatically reduce the PC’s volume.
Step 1: Right-click the speaker icon on the system tray, and Click on Sound settings.
Step 2: Scroll to Advanced settings and click More sound settings.
Step 3: Head over to the Communications tab and choose Do nothing.
Step 4: Click on Apply and then OK to apply changes.
FAQs
Should I Disable the Windows Audio Device Graph Isolation Process?
Windows audio device graph isolation (audiodg.exe) is a system program that ensures all the audio functions work flawlessly. Disabling it won’t benefit you and might even impact the sound output.
Why Is My System Using 50% of My CPU?
Apart from the audio drivers consuming high system resources, there can be many reasons for high CPU usage. These can include some apps installed from unauthorized sources, bugs in Windows, or running resource-intensive applications. You can find and close such apps using the Task Manager.
Does 100% CPU Usage Damage PCs?
CPUs are designed to operate without damage, even at their maximum capacity. However, performance will suffer when the CPU is used 100% constantly.
How Much CPU Usage Is Normal?
CPU usage depends on the kind of application you are running. However, if you’re not actively running any programs, your CPU utilization should typically range from 1% to 10%, as these will be the system applications running in the background. If your idle PC shows any higher CPU usage than that, it could indicate a potential issue that needs to be addressed.
Was this helpful?
Thanks for your feedback!
The article above may contain affiliate links which help support Guiding Tech. The content remains unbiased and authentic and will never affect our editorial integrity.