Папка WindowsApps — стандартная папка Windows 10, в которой хранятся приложения из магазина (UWP приложения). По умолчанию, она присутствует как скрытая папка C:\Program Files\WindowsApps\, но когда вы пользуетесь функциями установки или переноса приложений из магазина на другой диск, аналогичная папка появляется также в корне этого диска — обычно пользователи хотят удалить именно её.
Простое удаление этой папки невозможно, вследствие отсутствия доступа к ней. Однако, если по той или иной причине вам нужно удалить WindowsApps, особенно если речь идет об этой папке на диске D или другом не на системном разделе, вы можете это сделать, настроив права доступа соответствующим образом, об этом — в инструкции.
Удаление папки WindowsApps на диске D или в Program Files
Вне зависимости от того, из какого расположения вам требуется удалить папку WindowsApps, действия будут одинаковыми. Учитывайте, что, удаляя папку вы также удалите и установленные в ней приложения и, если для папки на не системном разделе диска (например, диске D) это относительно безопасно, при удалении WindowsApps из Program Files могут быть проблемы (делайте это только на свой страх и риск) и часть вложенных папок удалены не будут.
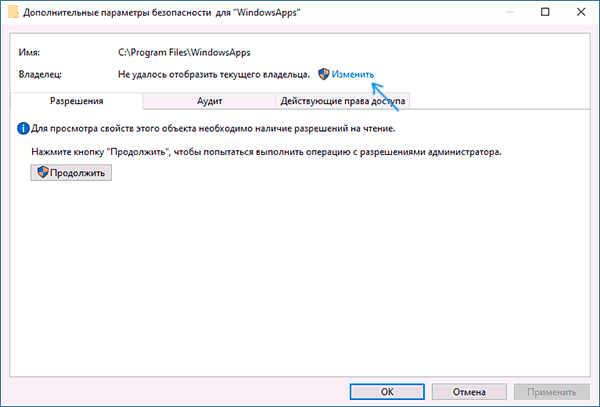
- Нажмите правой кнопкой мыши по папке WindowsApps и откройте её свойства, а затем перейдите на вкладку «Безопасность» и нажмите кнопку «Дополнительно».
- Нажмите «Изменить» в пункте «Владелец».
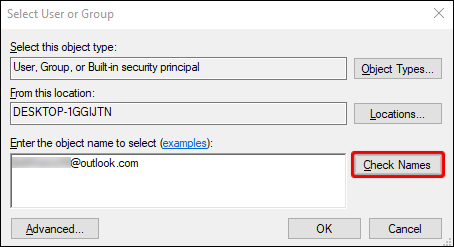
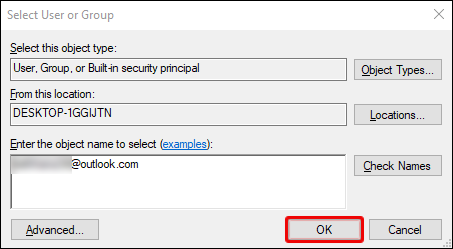
- В поле «Введите имена выбираемых объектов» введите имя вашего пользователя, а затем нажмите кнопку «Проверить имена». Если имя было введено верно, к имени пользователя добавится имя компьютера, как на скриншоте. Для учетной записи Майкрософт можно ввести соответствующий ей E-Mail в качестве имени. Нажмите «Ок».
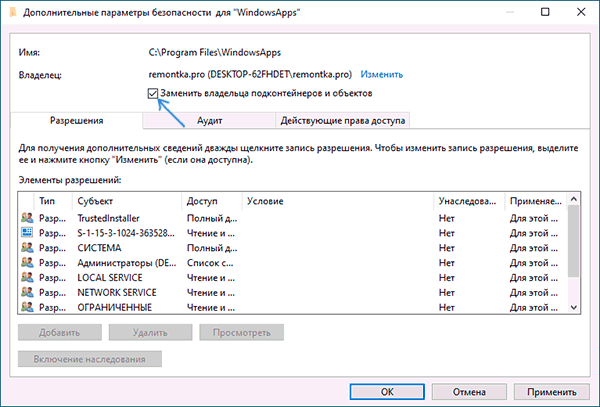
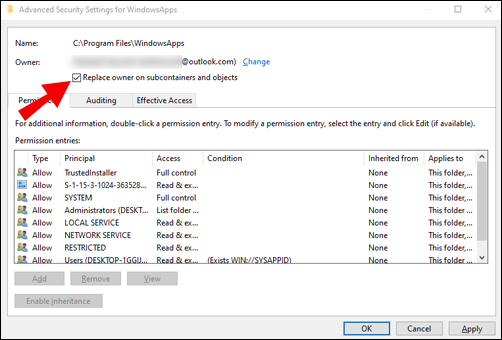
- Отметьте пункт «Заменить владельца подконтейнеров и объектов» и нажмите «Применить». Дождитесь окончания применения изменений.
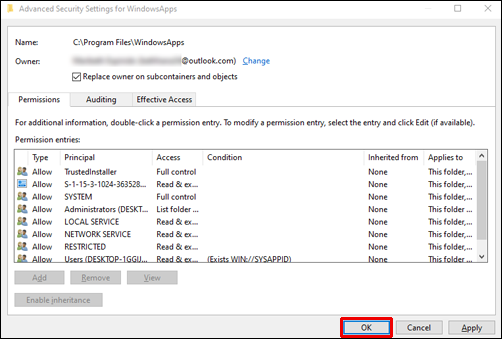
- Нажмите «Ок». Вы вернетесь в окно свойств папки. В нем снова нажмите кнопку «Дополнительно» на вкладке «Безопасность».
- Нажмите «Изменить разрешения», а затем — кнопку «Добавить». В поле «Субъект» укажите вашего пользователя, также как вы это делали на 3-м шаге, а затем установите отметку «Полный доступ» и нажмите «Ок».
- Установите отметку «Заменить все записи разрешений дочернего объекта» и нажмите «Ок». Дождитесь завершения применения параметров безопасности. Учитывайте, что при их изменении для системных приложений (если вы удаляете WindowsApps на диске C), могут быть сбои, придется нажать «Продолжить» (права на указанную вложенную папку изменены не будут).
После применения параметров безопасности удалите папку WindowsApps обычным способом. Учитывайте: в случае если какие-то из приложений, находящихся в папке WindowsApps работают в настоящий момент времени, вы можете получить сообщение о том, что удаление невозможно, так как эти папка или файл открыты в другой программе.
В этом случае вы можете начать удалять папки внутри WindowsApps, пока не будет ясно, какая из папок не удаляется (а по её имени можно установить соответствующее приложение).
Если после удаления вы снова будете скачивать приложения из магазина Windows 10, при этом в качестве места сохранения будет использоваться папка на не системном разделе диска, папка WindowsApps будет снова создана автоматически.
Содержание статьи:
- Что это за папка
- Как найти
- Можно ли удалить
- Альтернативные методы очистки папки
- Способ 1: Ручное удаление приложений
- Способ 2: Сторонний софт
- Вопросы и ответы: 0
Что это за папка
Папка «WindowsApps» — это скрытый каталог, располагающийся на системном локальном диске, где хранятся приложения, установленные из фирменного магазина софта Microsoft Store. Причем данные могут размещаться там без вмешательства пользователя, особенно, если в вашей версии ОС были уже предустановленные стандартные приложения.
Внутри «WindowsApps» ресурсы, которые необходимы для функционирования классических приложений, в том числе исполняемые файлы и другие программные компоненты. За обслуживание каталога отвечает сама операционная система, обеспечивая автоматические обновления и оптимизацию установленных программ.
Как найти
По умолчанию папка «WindowsApps» скрыта от глаз пользователя, поэтому открыть ее без предварительной активации отображения скрытых файлов не удастся.
В Windows 10 и Windows 11, для которых работа с папкой «WindowsApps» актуальна, включение скрытых файлов и папок осуществляется прямо через интерфейс «Проводника».
- Запустите файловый менеджер и, если у вас «десятка», переключитесь на вкладку «Вид» и в меню «Показать или скрыть» отметьте пункт «Скрытые элементы».
- Что касается Windows 11, то нужно кликнуть по кнопке «Просмотреть», расположенной на верхней панели инструментов, затем навести курсор на пункт «Показать» и отметить «Скрытые элементы».
- Чтобы перейти к папке с приложениями, откройте локальный диск, где она располагается. Если настройки сохранения софта из Microsoft Store не менялись, тогда это «Локальный диск (C:)». В этом случае также нужно открыть каталог «Program Files».


Даже если вам удалось найти каталог с данными приложений, не факт, что получится открыть его и просмотреть содержимое. Дело в том, что по умолчанию он защищен даже для просмотра, чтобы пользователь случайно не смог изменить в нем ничего. При попытке открыть папку, появится системное предупреждение, что в доступе к ней отказано. Но также отмечается, что получить доступ возможно, если открыть вкладку «Безопасность», и об этом мы более подробно поговорим в следующем разделе статьи.
Можно ли удалить
В первую очередь стоит отметить, что удалять папку и ее содержимое крайне не рекомендуется. Процедура повлечет за собой необратимые последствия, поскольку вы потеряете программное обеспечение, которое установлено из Microsoft Store. Не исключены и сбои со стороны системы, поэтому прежде чем переходить к инструкции ниже, предварительно создайте точку восстановления системы, что позволит откатить состояние ОС, если что-то пойдет не так.
Стандартная папка хранится на системном диске, однако пользователи часто сталкиваются с тем, что аналогичный каталог появляется в корне другого локального раздела после изменения места хранения приложений через штатные «Настройки», например, чтобы освободить место на системном. Как правило, удалить нужно именно эту папку, и это вне зависимости от того, где она располагается, сделать возможно, если предоставить соответствующие права доступа.
В обоих случаях (с папкой на системном диске в каталоге «Program Files» или в корне другого диска) действовать нужно следующим образом, если вы нацелены полностью удалить содержимое каталога:
- Щелкните правой кнопкой мыши по папке «WindowsApps» и в контекстном меню выберите пункт «Свойства».
- Переключитесь на вкладку «Безопасность» и нажмите на кнопку «Дополнительно».
- В строке «Владелец» щелкните по ссылке «Изменить».
- В поле «Введите имена выбираемых объектов» введите имя учетной записи, которая используется в системе. Также может подойти учетная запись Microsoft (адрес электронной почты), которая привязана к ОС. Нажмите на кнопку «Проверить имена». Если все введено правильно, к значению будет добавлено имя компьютера. Кликните по «ОК», чтобы применить действие.
- Далее под строкой «Владелец» в предыдущем окне отметьте пункт «Заменить владельца подконтейнеров и объектов», затем примените параметры.
- В окне с предупреждением нажмите на кнопку подтверждения, затем снова нажмите на «ОК», чтобы вернуться в окно с дополнительными параметрами безопасности.
- В списке «Элементы разрешений» найдите пользовательскую учетную запись, выделите ее нажатием левой кнопкой мыши и щелкните по кнопке «Добавить» внизу.
- Кликните по ссылке «Выберите субъект», потом в следующем окне снова введите имя локальной учетной записи или профиля Microsoft, проверив имена аналогичным с Шагом 4 образом, сохраните настройки.
- В области «Общие разрешения» отметьте пункт «Полный доступ» и кликните по «ОК».
- В предыдущем окне поставьте галочку у опции «Заменить все записи разрешений дочернего объекта наследуемыми от этого объекта» и сохраните новые параметры.


Дождитесь, пока настройки доступа будут применены. Учитывайте, что в ходе выполнения приведенной выше инструкции периодически могут появляться системные окна с предупреждениями, поскольку происходит изменение параметров безопасности системной папки. На них обращать внимания не стоит, просто продолжайте выполнять шаги.
Теперь можно просмотреть или удалить содержимое папки «WindowsApps» и сам каталог стандартным методом. Просто выделите его или файлы, хранящиеся в нем, затем нажмите на кнопку удаления на панели инструментов или вызовите контекстное меню нажатием правой кнопкой мыши.

Если в фоне работает какое-то приложение, компоненты которого находятся в папке «WindowsApps», тогда деинсталляция прервется ошибкой. В этом случае может потребоваться найти фоновый процесс через «Диспетчер задач» и принудительно завершить его, затем повторить удаление файлов. Либо же по очереди стирайте объекты из папки.
Читайте также: Способы запуска диспетчера задач в Windows
Альтернативные методы очистки папки
Если же нужно просто почистить системный диск и освободить место, часто нет необходимости прибегать к столь радикальным мерам и полностью удалять системную папку, несмотря на то, что она может иногда занимать довольно много места. Иногда достаточно воспользоваться альтернативными методами и вручную стереть ненужные компоненты, и есть несколько методов сделать это.
Способ 1: Ручное удаление приложений
Самый эффективный, но при этом простой и безопасный способ удалить данные из папки «WindowsApps» — это деинсталляция приложений, которые были установлены из маркета Microsoft Store.
- Запустите встроенное приложение «Параметры», затем перейдите в раздел с установленными приложениями.
- В списке найдите программу, которая ранее была скачана из маркета Майкрософт, щелкните по трем точкам справа и выберите «Удалить».


Читайте также: Как полностью удалить программу с компьютера
Если вы не знаете, какие приложения установлены из Microsoft Store, то нужно запустить магазин, затем переключиться на вкладку «Библиотека». В центральной части окна отобразится список приложений, которые установлены либо были ранее на компьютере. Если есть кнопка «Открыть»/«Обновить», значит, софт инсталлирован в систему, и его можно удалить, используя инструкцию выше.

Обратите внимание, что удалить можно далеко не все приложения, которые представлены в списке. Некоторые из них поставляются с системой и выполняют довольно важные задачи, поэтому стандартным методом их стереть не удастся.
Способ 2: Сторонний софт
Для очистки стандартных приложений от компании-разработчика ОС можно прибегнуть к функциям специализированных сторонних инструментов. Например, одним из таких решений является программа IObit Uninstaller, которая позволяет полностью удалить программы, их компоненты и реестровые записи с компьютера. В интерфейсе реализован отдельный раздел с приложениями Windows.
Скачать IObit Uninstaller с официального сайта
- Скачайте и инсталлируйте приложение на компьютер, затем запустите его и переключитесь на вкладку «Приложения Windows» на панели слева.
- В списке отметьте галочками те приложения, которые нужно удалить.
- Нажмите на кнопку «Деинсталлировать» вверху.
- Будет предложено создать точку восстановления, что поможет вернуть состояние системы в случае непредвиденных обстоятельств, которые может повлечь удаление программ. Отметьте пункт с автоматической очисткой остаточных файлов и подтвердите действие.


Начнется удаление стандартных приложений Windows, после чего папка «WindowsApps» может значительно уменьшиться в объеме.
You need to access the WindowsApps folder if you wish to take a backup of your Windows Apps or clear some space from the computer hard disk drive (HDD).
The Microsoft Windows operating system comes with some restricted and hidden folders that usually contain files that help run Windows 11 or 10 smoothly. Disturbing these files could result in system errors or complete Windows OS malfunction.
Some of these folders are Program Data, System32, AppData, WindowsApps, etc. Among these folders, WindowsApps is of particular interest since this drive use ups a lot of disk storage when you do not restrict app installations from Windows Store.
Let’s learn more about the WindowsApps folder, its purpose, and how to access the WindowsApps folder should you need to take backup or clear some disk space.
What Is the WindowsApps Folder?
The WindowsApps folder is available in Program Files of your Windows 10 or 11 OS installation directory and stores app files for Windows Apps. Since Windows 8 OS, Microsoft introduced a set of apps that function differently than conventional software.
In the past, Microsoft called these apps Metro-style apps, Windows Store apps, Universal Windows Platform (UWP) apps, and now simply Windows apps. Windows 10 or 11 OS stores Windows Apps and other UWP apps like Your Phone in the WindowsApps folder.

The folder is a highly secure location within your Windows OS installation directory and is protected by multiple layers of security. First of all, you will not see the folder unless you unhide it.
Secondly, normal user and system administrator user accounts do not have the necessary files access rights to access the folder or check its size, subfolders, files, etc. Microsoft reserved the necessary rights for the TrustedInstaller user account, which is a system account.
TrustedInstaller controls write and read access of the WindowsApps folder so that Windows Apps can smoothly function without any intervention from the user.
What Is the Purpose of the WindowsApps Folder?
WindowsApps folder is the safe house for all Windows apps that you install or come with the factory version of your Windows 10 or 11 OS copy. Here are the use cases of this folder:
Stores UWP Packages
Like the Program Files and Program Files (x86) for usual Windows PC software, WindowsApps is the default file location for all Windows apps or UWP packages. However, the subfolder naming convention is different than the Program Files.
For example, the Windows apps Netflix will have multiple folders with the following naming: app name, version number, CPU architecture (x64), and the Microsoft Store ID. More than one folder exists to differentiate the same app with different CPU architectures.
Works as Windows Apps Sandbox
Conventional Windows software like a data recovery tool or computer troubleshooter has the power to override system values and make visible changes in the Windows OS ecosystem. That’s why Windows features like User Account Control (UAC), user account rights, and Windows Security exists to keep them in check.

However, Windows apps can not make huge changes in the operating system. Microsoft achieved this by keeping these apps sandboxed inside the WindowsApps folder. These apps cannot themselves access computer hardware or data and need permissions in all the steps.
User Convenience
Most Windows apps do not come with executable files like the traditional software. Instead, they are a combination of automatic command prompt scripts and Java programs. Users may find it challenging to run such apps.
Also, users may make irreversible changes to these system files unknowingly if they can access the Windows apps files. Therefore, Microsoft Windows shows you app icons in the Start Menu and hides all the back-end data for safety and convenience.
How to Access WindowsApps Folder
There are multiple ways to access the WindowsApps folder. The steps are identical for both Windows 10 and Windows 11 operating systems.
Using the Task Manager Program
Accessing the WindowsApps folder for a specific app from the Task Manager program is the simplest way. It also takes less effort. However, you must run the target UWP (Universal Windows Platform) or Windows app in the background to access its folder. Here are the quick steps that you can follow on your Windows 11 pr 10 PCs:
Step #1: Run the UWP app or Windows app for which you want to access the WindowsApps folder. In this tutorial, it is the WhatsApp app. You can try this or try others like Netflix, Instagram, Skype, etc.
Step #2: To launch the Task Manager program, you can press this shortcut key: Ctrl+Shift+Esc. Alternatively, you can find the Task Manager folder by searching the Search Bar.

Step #3: Look for the app’s process in the Task Manager by scrolling the list or sorting it according to their names.
Step #4: Click on the drop-down arrow beside the app’s name to expand its processes. If there is no drop-down arrow, move on to the next step.

Step #5: Right-click on the app’s icon and select Open file location from the context menu that follows.
Step #6: Windows Explorer will take you to the sandboxed WindowsApps subfolder for the target app. In this case, the WhatsApp app.

Accessing the WindowsApps folder through the Task Manager gives you viewing permission. For example, you can go through all the files and folders of the UWP app and check their size. This step is good if you want to take a backup of the app’s files and folders.
The process does not let you delete or move files from the WindowsApps folder. To gain write and delete access, you need to follow any of the below-mentioned steps.
Using Windows File Explorer
The most practical and user-friendly way of gaining access into the WindowsApps folder is through the Windows File Explorer program. This process gives you a full read and write access to this folder. Thus, you can make any kind of change that you want.
This process is also reversible, should you need to restrict the access to the WindowsApps folder after making the changes you need. The File Explorer-based method has two phases. In the first phase, you need to unhide the WindowsApps folder.
In the second phase, you need to gain exclusive read and write rights of the folder by changing folder ownership. By default, Microsoft assigned the read and write permission to the TrustedInstaller user account of your Windows 10/11 computer. Without further ado, let’s unhide and take control of the folder of interest:
Step #1: Click on the File Explorer of the Taskbar to access This PC window.
Step #2: On the top ribbon, select View.
Step #3: You will see Options in the View menu. Click on that.
Step #4: Now, click on the Change folder and search options to open the Folder Options window.

Step #5: You will see three tabs in the Folder Options window. Select the one in the middle, the View tab.
Step #6: The View tab has two sections: Folder Views and Advanced Settings.
Step #7: In the Advanced Settings section, select the Show hidden files, folders, and drives option.

Step #8: Now, click the Apply button to save the changes.
Step #9: If you go to the Program Files folder in the Windows 11 installation directory, you should now find the WindowsApps folder in the unhidden state.

The WindowsApps folder is now visible. But, you can not access it yet. You need to manually take ownership of the folder to get read and write access.
For ownership changing purposes, you need a user account with administrative rights. If you are a non-admin user of your computer, you need to log out from that account. Then login again using the administrator account.

Once you are done switching the Windows user account, you can go ahead with the following steps for ownership transfer of the WindowsApps folder:
#1. Right-click on the WindowsApps folder and click on Properties.
#2. While on the Properties screen, click on the Security tab to reveal Advanced options. Click on Advanced.

#3. In the Advanced Security Settings for WindowsApps screen, click on Change.

#4. You will see the Select User or Group screen.
#5. In the Object Name field, enter the name of the user account of your PC that has administrative rights.
#6. You can simply write down the name of the user account in small letters. The system will automatically recognize it. However, you need to type the correct user name.
#7. Now, click on Check Names to populate the full user account address.

#8. Click Ok to apply the changes.
#9. You will now see your user account name in the Advanced Security Settings for WindowsApps window.
#10. Beneath your user account name, you will see a checkmark filed for Replace owner on sub containers and objects. Checkmark that box.

#11. Now click on Apply button and hit Ok to initiate the ownership change process.
#12. Once the process finishes, click Ok on the notification that follows.

#13. Refresh your PC and try to access the WindowsApps folder again from Program Files by double-clicking on it.

#14. You will get full access to the folder with read and write permissions.
You can now move or delete files from the WindowsApps folder if you have taken ownership of the WindowsApps folder using the process mentioned above. However, practice caution when making any changes in the subfolders. Because if you delete vital app files, the respective Windows app may not function anymore.
This step is particularly useful when you need to clean up disk space. If you have stopped using certain Windows apps or have uninstalled them, you can delete their back-end files from the WindowsApps folder to save disk space.
Using Windows Powershell
The Windows File Explorer-based ownership change process for the WIndowsApps folder is somewhat tricky. You need to follow the steps correctly, or you will waste valuable time.
There is an easy and automated process that you can also try by using Windows Powershell. It is a robust configuration and task automation program for Windows. All Windows operating system versions since Windows 7 come with this program.

Therefore, you can apply this process to take ownership of the target folder on both Windows 10 and Windows 11 computers. You also do not need to unhide hidden files, folders, and drives.
In situations where you can not take the risk of unhiding Windows system files, the Powershell-based method is a perfect choice. Here are the steps to execute a Powershell command that assigns the necessary permissions to you to access and change the WindowsApps folder:
Step #1: Click on the magnifying glass of your Windows 11 Search.
Step #2: Type in Powershell and wait for the app to come up.
Step #3: You will see the Windows Powershell app on the right side of the search console.

Step #4: The app will show options like Open, Run as administrator, Open file location, etc.
Step #4: Click on Run as administrator to open the program.

Step #6: Once the program is up and running, execute the following command. You can copy the below command and paste it as is in Powershell and hit Enter.
takeown /f “C:\Program Files\WindowsApps” /rStep #7: The Powershell command takeown restores file or folder ownership to the system administrator. Advanced users utilize this command to facilitate ownership transfer for batch files.
Step #8: After the takeown syntax, you need to use /f parameter to specify the file, folder, or directory name.
Step #9: The closing /r parameter tells Powershell to transfer ownership of all the files and subdirectories to the administrator.

Step #10: Powershell will take some time to transfer the ownership of the WindowsApps folder and its content to your administrator user account.
Step #11: A flashing cursor will show up when the process is complete.
The access you gain by executing the above process is similar to that of the Windows File Explorer-based method. You have just automated the process and eliminated unhiding of system files. Now you can backup, clear some space, or make changes in the Windows apps back-end files.
Final Words
Now that you have an in-depth understanding of the WindowsApps folder, you can make changes in your Windows 10 or 11 OS responsibly. Before deleting any files from this folder, it is necessary that you know the folder inside out so that you do not make any fatal mistake that could damage the entire operating system.
Should you face any Windows 10 issues and need some automatic tools to resolve those problems, you can check out these 7 repair tools to solve Windows 10 problems.
If you’re a long-time Windows user, you’re probably well aware of each file type’s default location. The core files belong to the “Windows” folder, user data to the “Users” folder, programs to the “Program Files,” and so on.
But where does Windows keep the Microsoft Store apps folder? If you’ve been asking yourself the same question, this article will provide the answers you need. We’re going to crack the code when it comes to accessing your Windows App folder on Windows 10.
Most of the time, downloading an app from the Microsoft Store doesn’t require searching for its directory to set everything up. However, you might run into some issues that need troubleshooting. By default, all apps you download from the Microsoft Store will be located in the WindowsApps folder.
The trouble begins when you start looking for this folder. The first thing you should know is that it’s hidden by default. And there’s a valid reason behind this. The WindowsApps folder contains some of the core Windows 10 components.
By hiding it, Windows tries to prevent users from making unwanted changes. Other than your Microsoft Store apps, you’ll find some other core Windows Universal apps in here. Long story short, security-wise, it makes sense to restrict the WindowsApps folder.
For this reason, accessing it takes a bit of time and effort. But don’t worry. We’ve put together a detailed guide to help you reach this folder in the fastest way possible.
The whole procedure will consist of two main parts: making the folder visible and taking ownership of it.
Using Windows File Explorer to Access the WindowsApps Folder
Using the Windows File Explorer is the most straightforward method to access the WindowsApps folder. We’ll start by making the folder visible since we already mentioned that Windows hides it by default:
- In the File Explorer, click on “View” >“Hidden Items.” This will now allow us to move forward and locate the folder.
- Go to the “Program Files” folder and find the WindowsApps folder in the directory list.
- Right-click on it and choose “Properties” from the options menu.
- Move over to the “Security” tab in the newly opened “Properties” window.
- Click on the “Advanced” button in the bottom right-hand corner window.
- When you get to the “Advanced Security Settings for WindowsApps,” click on the “Change” option next to the “Owner” information.
- A new box called “Select User or Group” will pop up. Type your Windows username in the white writing box and click on the “Check Names” button. If you have a Microsoft account, insert your email address instead.
- Click “OK.”
- Now you’ll see your username under the ownership section. Tick the box next to “Replace owner on subcontainers and objects” under the owner’s name.
- Click “OK” to apply the changes.
- You will now be able to open and edit your WindowsApps folder, as well as all its sub-folders and files. Just double-click on the folder to open it.
Troubleshooting Microsoft Store Apps on Windows 10
Maybe you want to uninstall specific apps from the WindowsApps folder. Although possible, we don’t recommend doing this. Yes, you can safely uninstall apps downloaded from the Microsoft Store in the WindowsApps folder.
But this folder will contain some core Windows apps such as yourphone.exe that you shouldn’t remove. Unless you’re absolutely sure about what you’re doing, we recommend troubleshooting your apps from the Microsoft Store.
Alternatively, you can try the solutions Microsoft offers on their website for app troubleshooting:
- Make sure the latest version of Windows is running.
- Make sure your app can run on Windows 10.
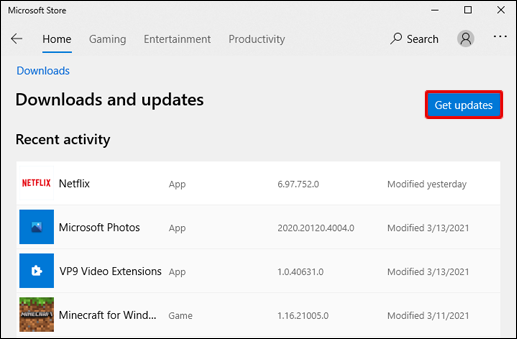
- Check if there is an update available for your Microsoft Store: Click on the Start button and choose the “Microsoft Store” app. Go to “See more > Downloads and updates > Get updates.
- Reset your app.
- Reinstall your app.
- Run Window’s troubleshooter. Click on the Start button and open “Settings.” Head over to Update & Security > Troubleshoot > Windows Store apps > Run the troubleshooter.
Understanding the WindowsApps Folder Structure
There’s a difference in structure between the Program Files folder and the WindowsApps folder. While folders in the Program Files are structured simply by their app names, a Microsoft Store apps folder has a different naming structure. Typically, it follows the pattern of name, version number, architecture, and Microsoft Store publisher ID.
Also, you might notice that some apps have two folders. The only difference between them is that some have a “neutral” while others have a “neutral_split.scale” architecture. Usually, this points to some common data files that stayed the same, regardless of their architecture.
If you’re looking for the core files inside the WindowsApps folder, you’ll find them in the main folder (it will have “x64” in its name).
Feel free to have a look around the WindowsApps folder yourself and gain more insight into how your apps work.
Additional FAQs
Here are some more questions to help you get the most out of this topic.
How to Access AppData Folder?
Just like the WindowsApps folder, your AppData folder might be hidden. To access this folder, you’ll have to enable viewing hidden folders in File Explorer. Just follow the steps below:
1. Open File Explorer.
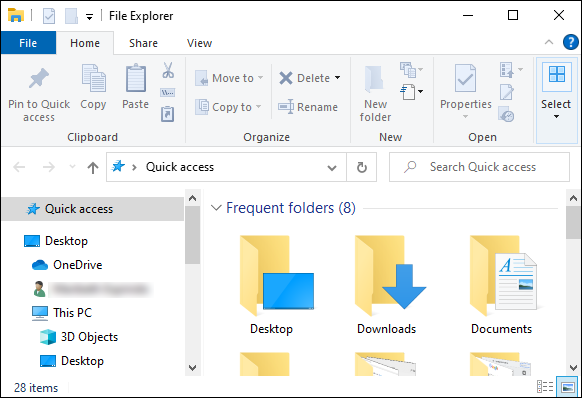
2. In the “View” section, select the “Hidden files” option.
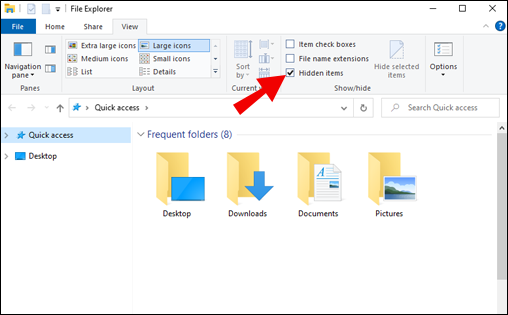
You’ll now be able to find your AppData folder in your system directory. For example, if your username is Mark, you can find the folder under C:\Users\Mark\AppData. You can either paste this address in your File Explorer address bar and replace it with your username or navigate to its location manually.
How Do I Restore My WindowsApps Folder?
In case you can’t see your WindowsApps folder, you’ll have to enable viewing hidden folders. This folder is always there, but it might not always be visible. To restore your folder, follow these steps:
1. Open your File Explorer.

2. From the top menu, select View > Hidden files.

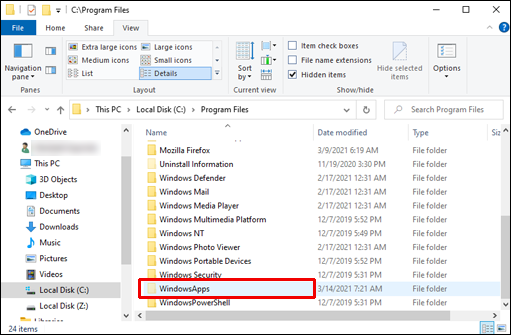
3. Go to the “Program Files” and look for the “WindowsApps” folder.
The folder will now be visible.
Where Are Windows 10 App Files Located?
Windows 10 Apps folder is located under the “C:” directory, in the “Program Files”: C:/Program Files/WindowsApps.

Why Can’t I Access WindowsApps Folder?
If you can’t access your WindowsApps folder, it’s because the folder is hidden. To make the folder visible, here’s what you need to do:
1. Open your File Explorer.

2. From the top menu, select View > Hidden files.

3. Go to the “Program Files” and look for the “WindowsApps” folder. It will now be there.

Follow the steps from the “How to Access the Windows Apps Folder” section (starting from Step 2) if you still don’t have access to your WindowsApps folder.
Navigating to the WindowsApp Folder
As you’ve learned from this article, the WindowsApps folder is sandboxed primarily for your Windows apps’ safety. That’s why gaining access to it and troubleshooting an app from there requires a bit more effort.
To prevent any unwanted actions, we recommend troubleshooting your Microsoft Store apps the recommended way rather than through the WindowsApps folder. Only apply the steps from this guide if you have no other options left.
Have you ever had to access the WindowsApps folder? Share your experiences in the comments section below.
Readers help support Windows Report. We may get a commission if you buy through our links.
Read our disclosure page to find out how can you help Windows Report sustain the editorial team. Read more
The WindowsApps folder is hidden in the C:\Program Files directory on Windows OS. It contains the installation files for apps installed from the Microsoft Store.
However, users encounter issues finding the WindowsApps folder. This article will show you how to access the WindowsApps folder on Windows 11.
How do I find and access the WindowsApps folder?
1. Access the WindowsApps folder via File Explorer
- Press the Windows + E key to open File Explorer.
- Go to the C:\Program Files directory and click the View tab on the File Explorer ribbon.
- Navigate to the Show/hide section, and click on the box in front of the Hidden items to show hidden folders.
- Navigate to the WindowsApps folder, right-click on the folder, and select Properties from the drop-down.
- Click on the Security tab at the top of the newly opened window. Tap on the Advanced button in the bottom right corner of the window.
- Select the Change option on the Advanced Security Setting for WindowsApps.
- Click on the Enter Name to select bar, type in your Windows Username, select the Check Name button, and then click OK.
- Your username will appear next to the Owner. Check the box next to Replace owner sub-containers and object, then click OK to apply the changes.
- Now you will have permission to open and edit the WindowsApps folder.
Using the above-stated steps will require the use of a Microsoft account to be able to change the folder ownership.
You can check our guide on why Windows File Explorer keeps crashing and how to fix it if it occurs on your PC.
2. Access the WindowsApps folder via a PowerShell Command
- Left-click the Start button, type powershell, and click Run as administrator.
- Click Yes on the User Account Control prompt.
- Copy and paste the following lines and press Enter:
takeown /f “C:\Program Files\WindowsApps” /r
The PowerShell command to find and access the WindowsApps folder is direct, advanced, and useful when other methods fail. This will provide Windows apps folder permissions.
However, if you experience issues using PowerShell, read on how to fix PowerShell not opening on your PC.
- Microsoft is slashing 3% of its employees in another round of layoffs
- May 2025 Patch Tuesday finally brings Recall & other AI features to Copilot+ PCs
- Mozilla Firefox 138.0.3 update rolls out with some known bug fixes
- Microsoft just killed these features with Edge 137 beta release
3. Access the WindowsApps folder via Registry
- Download the Take ownership registry file from Revo.
- Unzip the File and open the Add Take Ownership to Context menu registry file.
- On the following page, select Yes to add it to the registry.
- Click OK to close the popup and go to the C:\Program Files directory.
- Right-click on the WindowsApps folder and click on Take Ownership from the drop-down menu.
- You must give Account Control Administrator permission for the Registry file to work.
After trying the above steps, utilizing the Registry Hack may be the last resort. You can also learn how to use the Registry Hack to customize your Windows OS.
You should know that this guide will also help you access the WindowsApps folder on Windows 10 as well because the methods are identical.
Can I move the WindowsApps folder to another drive?
You can move the WindowsApps folder to another drive using File Explorer. Just cut and paste it to the desired drive on the other drive.
Ensure you have permission to move the folder and that you are not moving it to a read-only location.
Remember that if the folder contains any applications or programs, those applications or programs may no longer function once you move the WindowsApps folder to a new drive.
Alternatively, you can read about how to perform a Windows app cleanup to create more space on your device.
Also, you may our guide on ways to get back the missing WindowsApps folder on Windows 11 for more information.
Use the comments section below if you have any questions or other solutions to this problem.
Henderson Jayden Harper
Windows Software Expert
Passionate about technology, Crypto, software, Windows, and everything computer-related, he spends most of his time developing new skills and learning more about the tech world.
He also enjoys gaming, writing, walking his dog, and reading and learning about new cultures. He also enjoys spending private time connecting with nature.

