
Android is a user and developer-friendly OS. However, it is also notorious for sluggish performance and faster battery drain that mar the experience, especially on low and mid-range devices. The good thing is you can tweak your device settings for better performance. If you are comfortable with command-line tools, the ADB commands listed in this article may help you improve the performance of your Android device.
Most Android users who use ADB are familiar with a basic set of commands. However, ADB can perform more advanced tasks like clearing cache, uninstalling bloatware, adjusting system animations, limiting background processes, changing screen refresh rate and resolution, speeding up app launch times, reducing lag, optimizing battery life, etc.
This article will list all ADB commands to tweak advanced settings and enjoy faster load times, smoother multitasking, better battery life, and improved performance. If you don’t know how to set up and use ADB to execute commands, refer to the following tutorials.
- Download and Set Up Android SDK Platform Tools
- Run ADB Commands on Android without Root or PC
1. Adjusting Animation Settings via ADB
Animation settings can significantly impact the responsiveness of your Android device. Standard animation duration may slow down perceived performance. Adjusting these settings makes your phone feel faster and reduces battery consumption.
To adjust animation speeds, navigate through Developer Options on your device. Look for Window Animation Scale, Transition Animation Scale, and Animator Duration Scale. Lowering these values to 0.5x, or 0.25x, or turning them off entirely will boost the speed of your device.
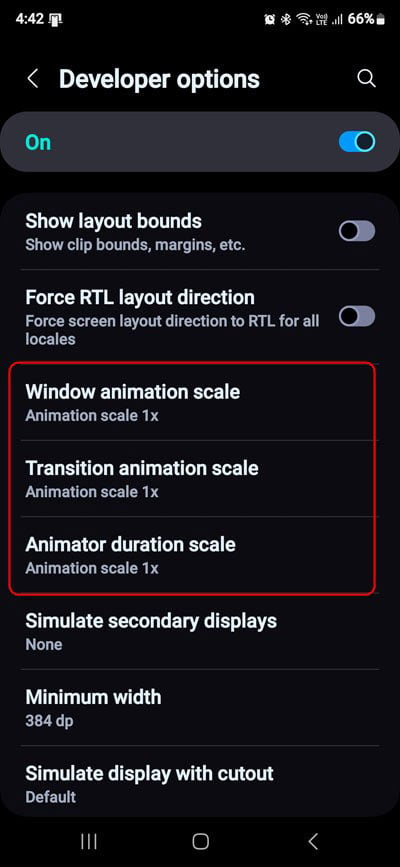
1. Window Animation Scale
Window Animation Scale is a visual effect when opening or closing an app on your Android device. Disabling this animation can make a noticeable difference in your device’s speed. The following command will disable the animation completely.
adb shell settings put global window_animation_scale 0.0
2. Transition Animation Scale
Transition Animation Scale controls the animation when switching between apps on your device. Reducing this will result in a faster transition between apps.
adb shell settings put global transition_animation_scale 0.0
3. Animator Duration Scale
Animator Duration Scale governs how long an animation plays on your screen before transitioning to another state.
adb shell settings put global animator_duration_scale 0.0
2. Speed up App Launch Time
Optimizing the startup process via ADB can speed up app launches. Try the following commands to speed up your device’s app launch time.
adb shell settings put system rakuten_denwa 0
adb shell settings put system send_security_reports 0
adb shell settings put secure send_action_app_error 0
adb shell settings put global activity_starts_logging_enabled 0
3. Disable Game Optimizing Service (Samsung)
When enabled, the Game Optimizing Service stops Samsung devices from aggressively throttling the CPU and GPU while playing games. While it results in higher frame rates in graphic-intensive games, it also slows down the device’s performance. Thankfully, you can disable GOS on Samsung phones using ADB commands.
adb shell settings put secure gamesdk_version 0
adb shell settings put secure game_home_enable 0
adb shell settings put secure game_bixby_block 1
adb shell settings put secure game_auto_temperature_control 0
adb shell pm clear --user 0 com.samsung.android.game.gos
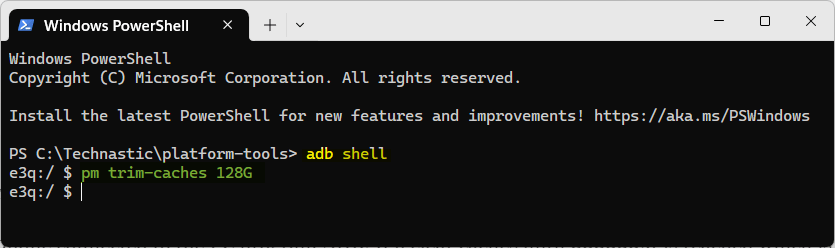
4. Clearing App Cache and Data
Regularly clearing app cache and data ensures your device stays responsive and runs faster. This not only frees up storage space but also helps apps run smoother. The following ADB command takes the desired free space parameter in K/M/G (kilo/mega/gigabytes) and trims caches according to the defined space. So, if you add an insane size in MB or GB, ADB will clear caches until that size is reached. Since the size is never reached, all caches are cleared.
adb shell pm trim-caches 128G
If you want to clear the cache and data for all apps installed on your phone, you should use the following command.
adb shell cmd package list packages|cut -d":" -f2|while read package ;do pm clear $package;done
You can also clear the system cache on Android devices via Recovery Mode.
5. Kill Background Apps and Processes
Background apps and processes significantly impact the performance of Android devices as they stealthily consume system resources and drain the battery. ADB can help you check the apps running in the background and kill them using commands. Fewer processes mean less strain on your processor and RAM.
Executing adb shell ps will give you a list of all running apps and processes with their PIDs. Similarly, you can sort top processes by their memory and CPU consumption
Memory usage: adb shell top -s 6
CPU usage: adb shell top -s 9
Once you have the PID, use the following command to kill a process by PID.
adb shell kill <PID>

6. Adjust the Refresh Rate, Window Blur, and Transparency
Adjusting screen refresh rate, windows blur animation and transparency can significantly impact your Android device’s performance. You can enhance the performance of your device with the following ADB commands.
adb shell settings put system peak_refresh_rate 120.0
adb shell settings put system min_refresh_rate 120.0
adb shell settings put global disable_window_blurs 1
adb shell settings put global accessibility_reduce_transparency 1
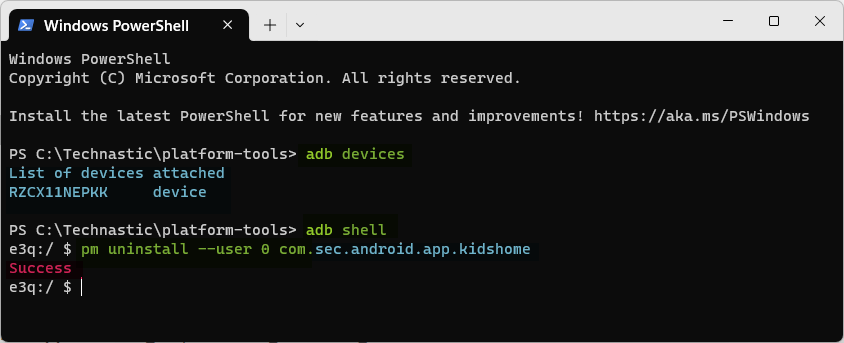
7. Uninstall, Disable, and Freeze Bloatware
Android apps come preloaded with several unwanted apps that clutter the home and app screens, take up storage, and drain resources. Uninstalling bloatware on your Android device will free up RAM and reduce background processes to improve performance. Tools like ADB AppControl and Universal Android debloater can help you remove system apps safely but you can also do that using ADB commands.
Execute this command to uninstall the apps you want to uninstall.
pm uninstall --user 0 <package-name>
The following command will freeze an app running in the background.
adb shell cmd appops set <package-name> RUN_IN_BACKGROUND ignore
To disable a system app, use the following command.
adb shell pm disable-user --user 0 <package-name>
8. Enable Fixed Performance Mode
Fixed-performance mode clocks the CPU and GPU with an upper and lower bound. Enabling the feature disables thermal throttling without root and improves the performance on Android devices.
adb shell cmd power set-fixed-performance-mode-enabled true
Overclocking boosts clock speed, allowing apps to run faster and enhancing gaming experiences. However, it may cause overheating and drain the battery quickly.
9. Disable RAM Plus
Disabling RAM Plus not only improves the performance but also saves battery.
adb shell settings put global zram_enabled 0
adb shell settings put global ram_expand_size_list 0
10. Improve Audio Quality
Modern smartphones provide great audio quality, which can be further enhanced with the help of equalizer apps. However, you can also enjoy better audio experience on Android phones by enabling K2HD and Tube Amp effects via ADB.
adb shell settings put system k2hd_effect 1
adb shell settings put system tube_amp_effect 1
11. Improve Touchscreen Latency and Response Time
A longer touch-and-hold delay means you need to keep your finger on the screen longer before it registers as an input. You can adjust the long-press delay timeout for faster touch response on Android phones and tablets. Try the following commands.
adb shell settings put secure long_press_timeout 250
adb shell settings put secure multi_press_timeout 250
adb shell settings put secure tap_duration_threshold 0.0
adb shell settings put secure touch_blocking_period 0.0
12. Optimize System Performance
Finally, here are some ADB commands to unleash the full potential of the CPU and GPU
adb shell setprop debug.force-opengl 1
adb shell setprop debug.hwc.force_gpu_vsync
adb shell settings put global ram_expand_size 0 default
adb shell settings put system multicore_packet_scheduler 1
If you want your phone’s processor to spike to the peak speed without sacrificing the optimized mode, try the following ADB command.
adb shell settings put global sem_enhanced_cpu_responsiveness 1
13. Enable/Disable Private DNS
Keeping the private DNS feature enabled or disabled on your phone is a matter of personal preference. While the standard DNS isn’t encrypted, private DNS queries are encrypted. It enhances privacy and security while using a network.
You can use the following ADB commands to enable or disable private DNS on your phone.
adb shell settings put global private_dns_mode off
Similarly, you can enable private DNS with the hostname.
adb shell settings put global private_dns_specifier dns.adguard.com
14. Improve Network Performance
Android devices keep scanning for devices and networks in the background by default. Using the following command will reduce stress on your phone’s system resources and battery and thus speed up its performance.
adb shell settings put global wifi_power_save 0
adb shell settings put global enable_cellular_on_boot 1
adb shell settings put global mobile_data_always_on 0
adb shell settings put global tether_offload_disabled 0
adb shell settings put global ble_scan_always_enabled 0
adb shell settings put global network_scoring_ui_enabled 0
adb shell settings put global network_recommendations_enabled 0
15. Power Management Tweaks
Finally, here are some ADB commands to optimize battery on Android devices.
adb shell settings put system intelligent_sleep_mode 0
adb shell settings put secure adaptive_sleep 0
adb shell settings put global app_restriction_enabled true
adb shell settings put global automatic_power_save_mode 0
adb shell settings put global sem_enhanced_cpu_responsiveness 0
adb shell settings put global adaptive_battery_management_enabled 0
These ADB performance commands will help you optimize and improve the performance of your Android device. These ADB tweaks will make your device run faster and smoother, and enhance your overall user experience. Please note that after tweaking your phone for faster performance, you may experience battery drain.
Read Next: 12 Tips to Boost Gaming Performance on Android
Was this Article helpful?
YesNo
Last Updated on January 5, 2023 by Bestusefultips
Do you want to speed up your Android phone? We use Android animation scale features to speed up my phone. In this tutorial, I’ll show you the steps to change the Windows animation scale on Android 13, Android 12, Android 11, and older versions. Three different animation scales are available on Android devices, including the Window animation scale, Transition animation scale, and Animator duration scale. To speed up animation on your Android device, ensure to activate developer options on your Android or Samsung devices. You can disable Window animation scale or set the Android animation scale as 0.5x, 1x, 1.5x, 2x, 5x, and 10x.
What is Window Animation Scale?
Window animation scale means any pop-up menu opens your Android devices when you process any activity.
Read More: How to Get Off my Phone Safe Mode Android
How to Change Android Scale Animation to Speed Up Android Phone
You can make Android faster with developer options on your Android phones. Changing Windows animations on Android is one of the best ways to speed up your Android phone and tablet instantly.
How to Speed up my Phone to Change Animation Duration Scale on Android 13, Android 12/11
Step 1: Go to Settings.
Step 2: Scroll down and tap on System.
Step 3: Scroll down at the end and tap on Developer options.
If you can’t see developer options, check this to enable it on your phone.
Step 4: Scroll down until the drawing section, and you can see three animation scale options, including Windows animation scale (Pop-up menu), Transition animation scale (Settings & Back, home button), and Animator duration scale (open and close apps, Swipe down the notification panel).
Step 5: Tap Windows animation scale and choose the Animation scale .5x to speed up animations on your Android phone.
Now, change each animation scale speed as.5x to
Change Transition Animation Scale Android
Settings > System > Developer options > Transition Animation Scale in Drawing section > Choose Animation scale.5x
Change Animator Duration Scale Android Phone
Settings > System > Developer options > Animator Duration Scale in Drawing section > Choose Animation scale.5x
Android 12 Disable Animations
You can turn off animations on your Android 12 using the below-given settings.
Settings > System > Developer options > Select an Animation scale you want to disable > Choose Animation off
Alternativ Way: Settings > Accessibility > Color and motion > Toggle on Remove animations
Read Also:
- How to Create Animation with Google Photos in Google Pixel
- How to Turn Off Animations on Android
Android 10 and Android 9 (Pie)
Settings > System > Advanced > Developer options > Drawing section > Windows animation scale/Transition animation scale/Animator duration scale
For Android 5.1.2 (Lollipop), 6.0 (Marshmallow), 7.1.2 (Nougat)
Step 1: Open Settings.
Step 2: Under the system section, tap About Device.
Step 3: Tap on Build number 7 times to enable developer options on your Android phone or tablet.
Step 4: Go to Settings.
Step 5: Under the system, tap on Developer options.
By default, turn off Developer options.
You can see the above screen on your Android device when turning on developer options.
Step 6: Tap on OK to enable developer options.
Step 7: Scroll down until you see the Drawing section, and tap on the Window animation scale.
By default, set the Window animation scale, Transition animation scale, and Animator duration scale as “1x”.
Step 8: Choose the Animation off or another Animation scale speed on your Android.
Change Transition Animation Scale on Android
By default transition animation scale is set to 1x. You can change or turn off animation on Android devices.
Settings > System > Developer options > Drawing > Transition animation scale
And that’s all. We hope this clarifies how to change the Windows animation scale on Android devices. Stay and connect with us for the latest updates. If you have any trouble, please tell us in the comment box below.
Related:
- How To Add a Google Account to your Android
- How to Enable USB Debugging Mode Android
- How to Delete an App on Android
- How to Change Bitmoji Style on Android Phone
Android phones are popular for their versatility and user-friendly interface. However, over time, your Android phone may start to slow down, causing frustration and inconvenience. Luckily, there are several methods you can try to boost the performance of your Android phone. In this blog post, we will focus on using the Developer Options, a hidden feature on Android devices, to make your phone faster. We will explore what Developer Options are, why they can help improve your phone’s performance, and the steps you can take to optimize your device.
Video Tutorial:
The Challenge of a Slow Android Phone
Having a slow Android phone can be a frustrating experience, especially when you need to quickly access your apps or perform tasks. There can be several reasons behind the slow performance, such as limited storage, excessive background processes, or outdated software. However, one of the most significant factors is the usage of unnecessary system animations, which can consume a significant amount of system resources. This is where Developer Options can play a vital role in improving the speed and overall performance of your Android phone.
Things You Should Prepare for
Before diving into the methods to utilize Developer Options, there are a few things you should prepare for. First, make sure your Android phone is running on Android 6.0 Marshmallow or a more recent version, as Developer Options are typically available in these versions. Additionally, you may need to enable Developer Options before you can access the settings. This can usually be done by going to the «About phone» section in your device’s Settings, finding the «Build number,» and tapping on it multiple times until Developer Options is enabled.
Method 1: How to Speed Up Your Android Phone Using Force GPU Rendering
Force GPU Rendering is a setting in Developer Options that allows you to force your phone to use the GPU (Graphics Processing Unit) for rendering all the on-screen graphics. This can help reduce the workload on your phone’s CPU (Central Processing Unit), resulting in smoother animations and faster performance. Here are the steps to enable Force GPU Rendering:
1. Open the Settings app on your Android phone.
2. Scroll down and tap on «About phone» or «About device.«
3. Find the «Build number» and tap on it multiple times until you see a message saying that Developer Options have been enabled.
4. Go back to the main Settings screen and scroll down to find «Developer Options.«
5. Tap on «Developer Options» and scroll down to locate «Force GPU Rendering.«
6. Toggle the switch next to «Force GPU Rendering» to enable it.
7. Restart your Android phone for the changes to take effect.
Pros:
1. Smoother animations: Enabling Force GPU Rendering can result in smoother animations and transitions, making your phone feel more responsive.
2. Reduced CPU workload: By offloading the rendering tasks to the GPU, the CPU can focus on other essential tasks, resulting in improved performance.
3. Enhanced gaming experience: Force GPU Rendering can make a noticeable difference in gaming performance, reducing lags and stuttering.
Cons:
1. Battery life impact: Using the GPU more frequently can lead to increased power consumption, which may have a slight impact on your device’s battery life.
| Pros | Cons |
|---|---|
| 1. Smoother animations | 1. Battery life impact |
| 2. Reduced CPU workload | |
| 3. Enhanced gaming experience |
Method 2: How to Improve Android Phone Performance Using Windows Animation Scale
Windows Animation Scale is another useful setting within Developer Options that allows you to adjust the animation speed of your Android device. By decreasing the animation scale values, you can make your phone feel faster and more responsive. Here’s how to do it:
1. Open the Settings app on your Android phone.
2. Scroll down and tap on «About phone» or «About device.«
3. Tap on the «Build number» multiple times until Developer Options are enabled.
4. Go back to the main Settings screen and scroll down to find «Developer Options.«
5. Tap on «Developer Options» and scroll down to locate «Windows Animation Scale.«
6. Tap on «Windows Animation Scale» and choose the desired animation scale, such as 0.5x or 0x for faster animations.
7. Restart your device to apply the changes.
Pros:
1. Faster app switching: Decreasing the animation scale values can make app switching and multitasking feel faster and more efficient.
2. Quicker navigation: With reduced animation speed, navigating through menus and screens becomes quicker, resulting in a smoother user experience.
3. Perceived performance improvement: By speeding up the animations, your Android phone will feel more responsive and snappy.
Cons:
1. Less visually appealing: Lower animation speeds may result in less visually appealing transitions and effects.
| Pros | Cons |
|---|---|
| 1. Faster app switching | 1. Less visually appealing |
| 2. Quicker navigation | |
| 3. Perceived performance improvement |
Method 3: How to Optimize Android Performance Using Background Process Limit
Background Process Limit is a setting in Developer Options that allows you to control the number of background apps and processes running on your Android device. By limiting the number of background processes, you can free up system resources and improve the overall performance and responsiveness of your phone. Follow these steps to adjust the background process limit:
1. Open the Settings app on your Android phone.
2. Scroll down and tap on «About phone» or «About device.«
3. Tap on the «Build number» multiple times until Developer Options are enabled.
4. Go back to the main Settings screen and scroll down to find «Developer Options.«
5. Tap on «Developer Options» and scroll down to locate «Background Process Limit.«
6. Tap on «Background Process Limit» and choose the desired limit, such as 1 or 2 processes.
7. Restart your device for the changes to take effect.
Pros:
1. Improved performance: By limiting background processes, more system resources are available for foreground apps, resulting in faster app launches and smoother overall performance.
2. Reduced battery drain: With fewer background processes running, your device’s battery life can potentially be extended, as fewer resources are being utilized.
Cons:
1. Restricted multitasking: Setting a low background process limit may limit the multitasking capabilities of your Android phone, as background apps may be more frequently closed.
| Pros | Cons |
|---|---|
| 1. Improved performance | 1. Restricted multitasking |
| 2. Reduced battery drain | |
Method 4: How to Enhance Android Phone Speed Using USB Debugging
USB Debugging is a feature in Developer Options that allows your Android phone to communicate with your computer over a USB connection. While the primary purpose of USB Debugging is for app development and debugging, enabling this feature can also help improve your phone’s speed and performance. Here’s how to enable USB Debugging:
1. Open the Settings app on your Android phone.
2. Scroll down and tap on «About phone» or «About device.«
3. Tap on the «Build number» multiple times until Developer Options are enabled.
4. Go back to the main Settings screen and scroll down to find «Developer Options.«
5. Tap on «Developer Options» and scroll down to locate «USB Debugging.«
6. Toggle the switch next to «USB Debugging» to enable it.
7. Accept any prompts or warnings that appear.
8. Connect your Android phone to your computer using a USB cable.
Pros:
1. Faster data transfer: With USB Debugging enabled, you may experience faster data transfer speeds between your Android phone and computer, which can be beneficial when moving files or performing backups.
2. Enhanced system control: USB Debugging allows you to have more control over your Android device, giving you access to advanced system tools for troubleshooting and optimization purposes.
Cons:
1. Potential security risks: Enabling USB Debugging can potentially expose your device to security risks if accessed by unauthorized individuals.
| Pros | Cons |
|---|---|
| 1. Faster data transfer | 1. Potential security risks |
| 2. Enhanced system control | |
Why Can’t I Make My Android Phone Faster?
There can be several reasons why you may not be able to make your Android phone faster, despite trying different methods. Here are a few common reasons and their potential fixes:
1. Insufficient storage: If your phone’s storage is nearing capacity, it can significantly impact performance. To fix this, consider clearing unnecessary files and uninstalling unused apps to free up space.
2. Outdated software: Outdated Android versions or outdated apps can have compatibility issues and may not take full advantage of the latest optimizations. Make sure to regularly update both your system software and apps to ensure optimal performance.
3. Aging hardware: As smartphones age, their hardware components may become outdated or worn, which can affect performance. In such cases, consider upgrading to a newer device with updated hardware specifications.
Additional Tips
Here are a few additional tips to further optimize and improve the performance of your Android phone:
1. Clear app cache: Over time, cached data from various apps can accumulate and affect your device’s performance. Regularly clear app caches by going to Settings > Apps > [App Name] > Storage > Clear Cache.
2. Disable or uninstall bloatware: Bloatware refers to pre-installed apps from manufacturers or carriers that are often unnecessary and consume system resources. Disable or uninstall these apps to free up space and improve performance.
3. Restart your phone regularly: Restarting your Android phone can help clear temporary files, refresh system processes, and improve overall performance. Consider restarting your device at least once a week.
5 FAQs about Making Android Phone Faster
Q1: How long does it take to see noticeable improvements after implementing these methods?
A: The time to see noticeable improvements can vary depending on various factors such as the specific method implemented, the current state of your device, and the number of optimizations performed. However, in most cases, you should be able to notice some improvement in performance immediately or shortly after applying these methods.
Q2: Can I enable all the Developer Options at once?
A: While it is possible to enable multiple Developer Options simultaneously, it is recommended to enable and test each option one at a time to assess the impact on your device’s performance. This way, you can identify which option has the most significant positive effect and customize your settings accordingly.
Q3: Are there any risks involved in using Developer Options?
A: In general, using Developer Options does not pose a significant risk to your Android phone. However, it is essential to exercise caution and avoid making changes to settings you are not familiar with. Additionally, be mindful of the potential impact each setting may have on your device’s battery life or overall stability.
Q4: Will these methods void my phone’s warranty?
A: No, these methods should not void your phone’s warranty as they involve making settings adjustments and optimizations within the Developer Options, which is a built-in feature of Android. However, it is always advisable to check your phone manufacturer’s warranty policy or contact their customer support for any specific concerns.
Q5: Can I revert the changes made in Developer Options?
A: Yes, you can easily revert any changes made in the Developer Options to their default settings. Simply go to the Developer Options menu and toggle off the settings you enabled. Your Android phone will revert to its original configuration.
In Conclusion
By utilizing the hidden Developer Options on your Android phone, you can optimize its performance and make it faster. Whether it’s enabling Force GPU Rendering or adjusting animation scales, these methods can make a noticeable difference in your device’s speed and responsiveness. Additionally, adjusting the background process limit and enabling USB Debugging can further enhance your user experience and give you more control over your Android phone. Remember to exercise caution while making changes within Developer Options and regularly maintain your device by clearing caches and uninstalling unnecessary apps. With a few simple tweaks, you can enjoy a faster and more efficient Android phone experience.
Since the beginnings of time, I have been using a simple tweak across all my Android devices to improve their responsiveness. Surprisingly, I don’t really see it being talked about. I have never met even an enthusiast that also uses it. I’m talking about lowering the Android Animation Scale to speed up transitions across the OS and every app.
Understanding Android Animation Scale
Animation scales determine the duration of UI transitions, like switching between apps or interacting with elements. These animations are an essential part of Material Design, Android’s design system. They are used to communicate the paper like layer metaphor to the user, guiding them while making transitions smoother and less jarring. They also mask delays and loading times, however I found that for many years most devices are faster than the default animation speed conveys. On slower devices, default animations might feel too lengthy, emphasizing lag. Adjusting the scales can thus make both slow and fast devices feel more immediate. Luckily it’s easy to adjust the global animation scale – although it will only affect apps that actually use Androids default UI toolkit – which is most of them.
Modifying Animation Scales
- Activate Developer Options:
- Navigate to Settings > About phone.
- Tap Build number seven times to enable developer mode.
- Change Animation Scales:
- In Settings, go to System > Developer options.
- Under the Drawing or Animation section, locate:
- Window animation scale
- Transition animation scale
- Animator duration scale
- Typically set at 1x, changing these to 0.5x will make animations twice as fast, offering a swifter feel. However, setting them to 0 will disable them entirely.
Key Points to Remember
- Perceived vs. Real Speed: Tweaking animation scales boosts perceived speed, not actual device performance. Sometimes you will still need to wait after the animation, but other times you may actually be able to resume slightly faster, if the animation at 1x was masking a surface that was otherwise ready for interaction
- Disabling Animations: Setting scales to 0 removes animations, but this can harm the user experience. Material design animations convey information; eliminating them might make interactions less intuitive. I found 0.5 to be the sweet spot.
- App Behavior: Some apps with custom animations might not align well with altered scales. If you find that bothering, consider setting only the animator duration scale back to 1.
- You may not be able to go back: Unmodified devices will feel noticably slower and more sluggish.
In essence, adjusting animation scales can improve the user experience on Android devices. Why this is so obscure is beyond me – for me it’s a must-change setting on any Android device.