
Taskbar can be quite convenient for us to launch applications whenever we need. But sometimes we may want to hide it for full-screen play or just for larger screen space. Whether to keep the taskbar always on the top or hide it depends on your needs.
There are a few users reporting that after Windows 10 update, the taskbar always shows up on top of all program windows and they are wondering how to disable that, while other users might be curious about how to keep the taskbar always on top in their Windows 7/8 and even Windows 10. Here you are. This how-to article will show you the ways of both keeping and hiding your taskbar in Windows.
Part 1. How to Make Taskbar Always on Top in Windows 10, 8, 7
The setting of making taskbar always on top in Windows 10 is a little bit different from that in Windows 8 and 7. Choose the one that suits your system version.
1. Uncheck Automatically Hide the Taskbar in Desktop Mode (For Windows 10)
Step 1. Right-click the taskbar on a blank space and select «Taskbar settings». Or you can also open the «Taskbar settings» through: Start menu > Settings > Personalization, and select «Taskbar» in the left menu.
Step 2. Toggle off «Automatically hide the taskbar in desktop mode». By turning off this feature, as long as your computer is in desktop mode, the taskbar will always on top.
Step 3. This is an extra step in which you can choose the location of the taskbar. In the option of «Taskbar location on screen», you are able to determine where the taskbar appears, at the bottom of the whole screen, or the top, or even along one of the sides.

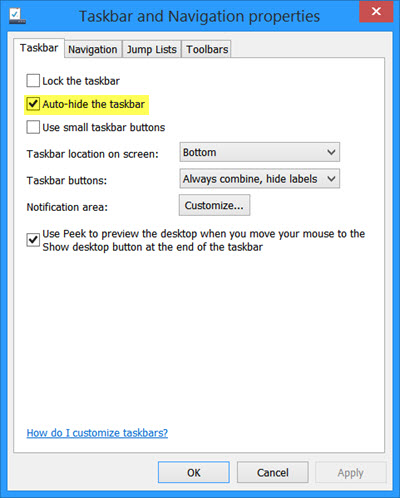
2. Uncheck Auto-hide the Taskbar (For Windows 8/7)
Step 1. In Windows 7, right-click on the blank space of the taskbar and select «Properties». In Windows 8, open Start menu and select «Desktop».
Step 2. Locate «Taskbar» tab, and then uncheck «Auto-hide the taskbar».
Step 3. Click «Apply» at the bottom right of the window and click «OK» to save the settings.
Part 2. How to Disable Taskbar Always on Top in Windows 10, 8, 7
Obviously, the opposite side of turning on is turning off. You can simply try the two ways mentioned in Part 1 to hide your taskbar: In Windows 10, toggle on «Automatically hide the taskbar in desktop mode» in «Taskbar settings»; in Windows 7/8, check «Auto-hide the taskbar» under the «Taskbar» tab either in «Properties» or «Desktop».
If these solutions unfortunately haven’t helped you solve the problem, or if the taskbar still appears on top of all other windows after you’ve turned on the auto-hide, here are other three workarounds to help you disable the taskbar always on top in Windows 10, and Windows 7/8.
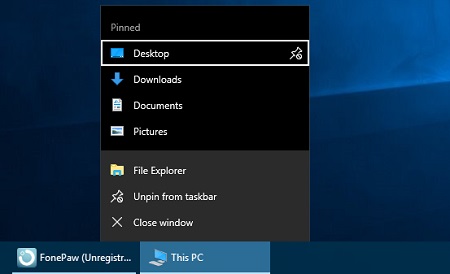
Solution 1. Unpin Applications on Taskbar
Unpin the applications or windows you’ve fixed them on the taskbar. If the problem is fixed after the unpinning, you may pin them back on the taskbar again. This solution is both available in either Windows 10 or Windows 7/8.
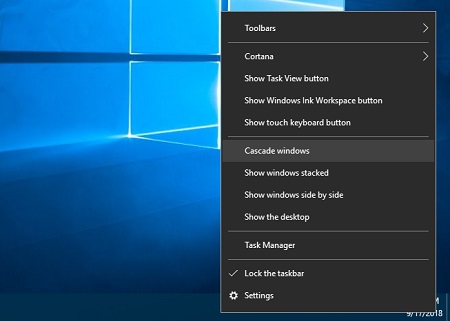
Solution 2. Cascade Windows
If you are working on Windows 10 and the Solution 1 doesn’t help you, you can try this one:
Right-click the taskbar on a blank space.
Click on «Cascade windows» to turn it on.
Solution 3. Reset Explorer.exe
In Windows 7/8, there is also another workaround worth trying: reset the explorer.
- Right click on the blank space of the taskbar and select «Task Manager».
- In the pop-up window, locate «explorer.exe». (If you don’t see that, click on «More information»)
- Right click on «explorer.exe» and select End Processor. Then click File to add a new task of «explorer.exe».

Do you get along well with your taskbar with the workarounds mentioned in this article? If you find this how-to guide is helpful, welcome to share it with your friends and family!
Quick Links
-
The Official Way: Microsoft PowerToys
-
With a Keyboard Shortcut: AutoHotkey
-
Without Installing Anything Extra: Built-in App Options
Summary
- To make a window always on top, install Microsoft PowerToys and press Windows+Ctrl+T. You can customize this keyboard shortcut in PowerToys Settings.
- Consider third-party utilities like AutoHotkey and DeskPins if you want something that works in a slightly different way.
- You can also use built-in options in applications like the Task Manager or VLC player.
Microsoft offers an official tool to keep any window always-on-top of other windows on Windows 10 or Windows 11. We can also recommend some awesome third-party tools for making any window always on top—and many applications have a hidden option for this.
The Official Way: Microsoft PowerToys
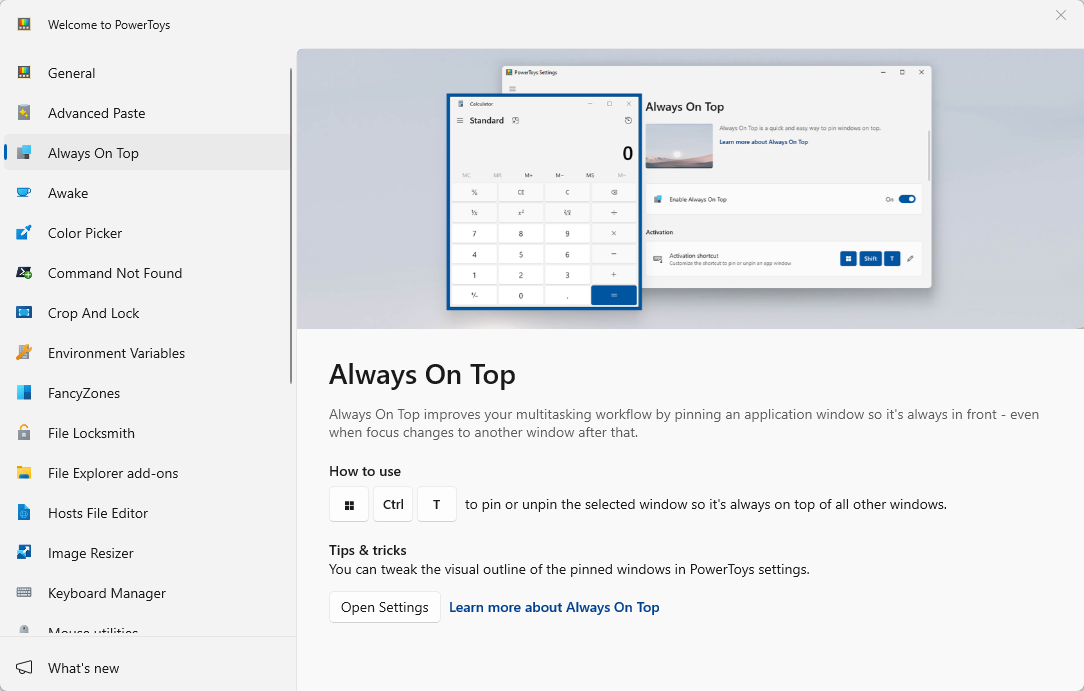
We recommend Microsoft PowerToys for keeping a window always on top. Microsoft PowerToys is a free, open-source package full of powerful Windows utilities developed by Microsoft. The Always-on-Top PowerToy provides an easy, convenient, official way of making any window always on top, and it works on both Windows 10 and Windows 11.
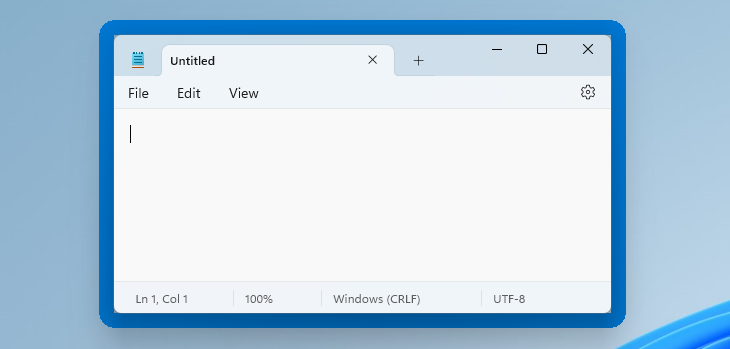
To make a window always on top, install and launch Microsoft PowerToys. Press Windows+Ctrl+T to make the current window always on top. A blue border will appear on the window, and a sound will play. Press Windows+Ctrl+T to undo your change and make Windows treat the window normally.
You can customize this behavior by launching the PowerToys Settings window. To do so, launch «PowerToys» from the Windows Start menu or click the PowerToys icon in your taskbar’s notification area and click the gear-shaped Settings icon.
Select «Always on Top» in the sidebar. If the keyboard shortcut didn’t work, ensure the «Always on Top» PowerToy is enabled at the top here. You can use the options here to change the keyboard shortcut, control whether a colored border appears around the window and customize that border, choose whether the sound plays, and configure windows that will never be made always on top.
We’re big fans of Microsoft PowerToys. The package is full of other useful utilities, and there’s a good chance you’ll find something else useful in it, too.
We recommend the Microsoft PowerToys method as our top choice. You can disable other PowerToys in the PowerToys Settings window if you don’t like the clutter. However, we cover a variety of other simple utilities and methods for making a window always-on-top below.
With a Keyboard Shortcut: AutoHotkey
Using the excellent and useful AutoHotkey program, you can make a simple script that sets your currently active window to be always on top when you press a certain key combination. The resulting script is lightweight and won’t use much resources or add unnecessary clutter to your system. You can even use AutoHotkey to compile the script to its own executable if you don’t want to keep the full AutoHotkey program running—or if you want an easy way to carry the script with you to other PCs.
First, you’ll need download and install AutoHotkey.
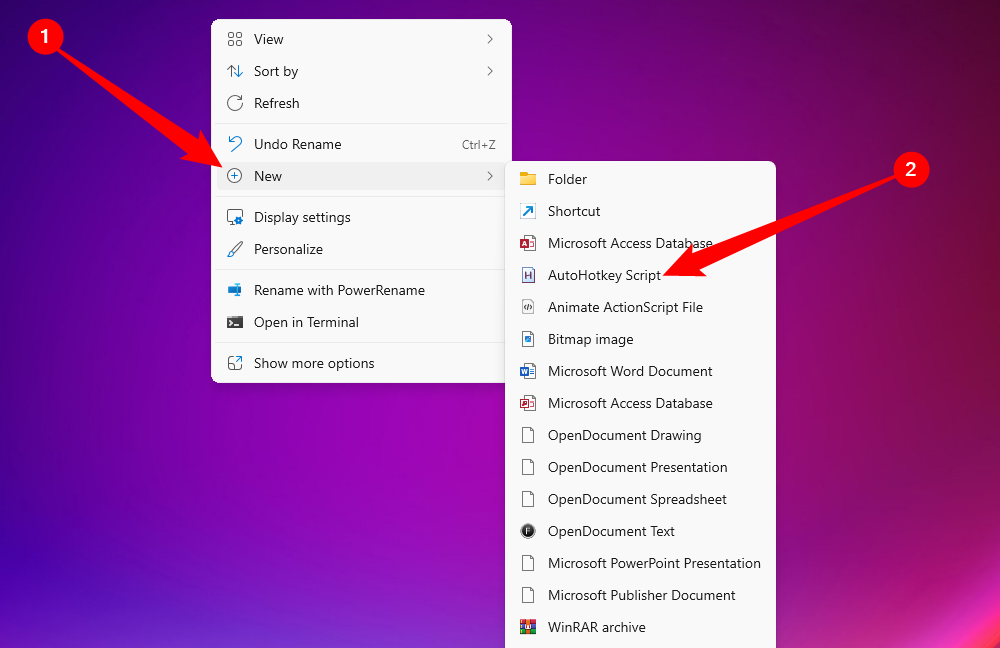
When that’s done, you’ll need to create a new script (if you already use AutoHotkey, feel free to add this to a current script or create a new one). To create a new script, right-click anywhere on your desktop or in a File Explorer window, point to the «New» menu, and then select the «AutoHotkey Script» option.
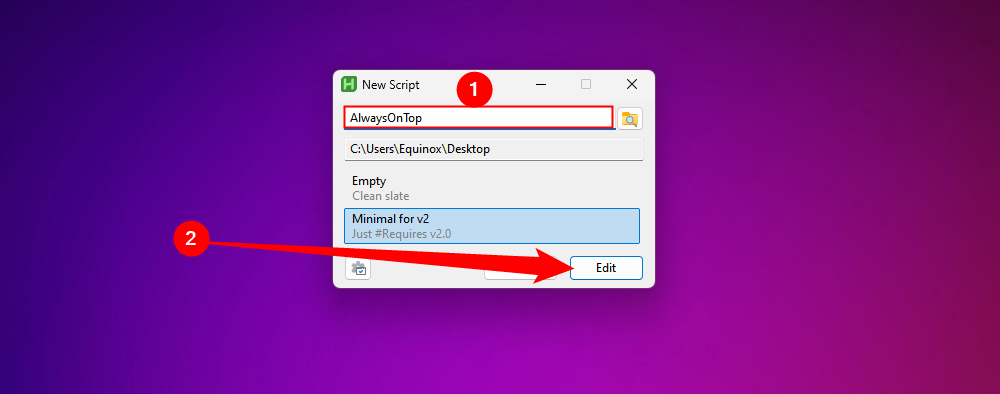
Give the new script file whatever name you want, click then click «Edit.» When prompted, open the script in Notepad.
In the Notepad window, paste the following line of code at the bottom. You can then save and close the script.
        ^space::
{
    WinSetAlwaysOnTop -1, "A"
}
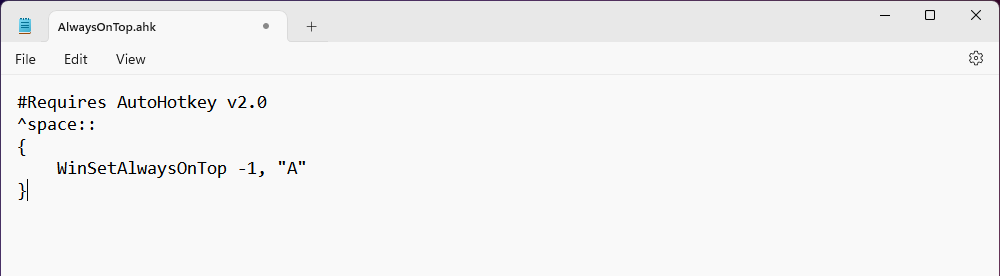
Next, double-click your script to run it. You’ll know it’s running because a green «H» logo appears in your system tray to let you know it’s running as a background process.

You can now press Ctrl+Space to set any currently active window to be always on top. Press Ctrl+Space again set the window to no longer be always on top.
And if you don’t like the Ctrl+Space combination, you can change the ^SPACE part of the script to set a new keyboard shortcut. Consult the Hotkeys documentation on AutoHotkey’s website for help.
Using a Mouse: DeskPins
If you prefer using a mouse over keyboard shortcuts, DeskPins provides a super simple way to make windows always on top by just pinning them.
First, you’ll need to download and install DeskPins. After installation, go ahead and run DeskPins. You’ll see that it adds a pin icon to your system tray.

When you have a window you want to pin to be always on top, click that system tray icon. Your pointer turns into a pin, and you can then click any window to pin it so that it’s always on top. Pinned windows actually have a red pin added to the title bar, so that you can tell easily which windows are pinned and which are not.
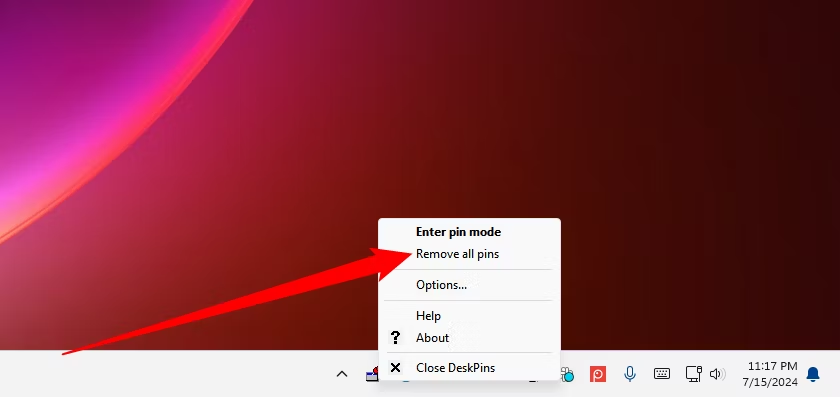
To remove a pin from a window, move your mouse over the pin. Your pointer will show a small «X» on it to let you know you’re about to remove the pin. And if you want to remove pins from all windows you’ve pinned at once, right-click the system tray icon, and then choose the «Remove All Pins» option.
Many apps have built-in options so that you can set their windows to become always on top. You often find these options in media players, system utilities, and other tools that you might want to see all the time. Programs that accept plug-ins may also have an always-on-top plugin you can install.
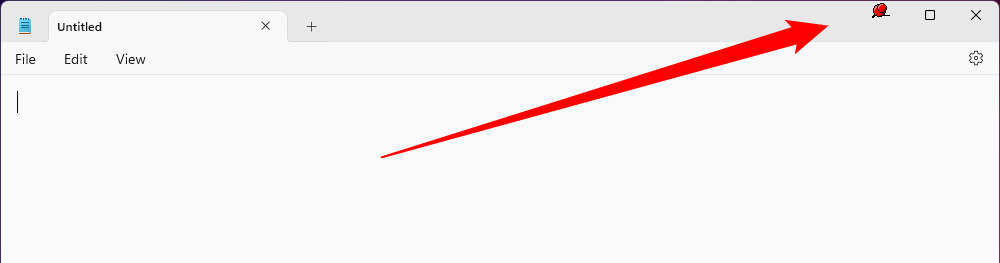
The Windows Task Manager is one built-in application that has this option on Windows 10 and Windows 11, for example. To make the Task Manager always-on-top on Windows 10, click Options > Always on Top in the Task Manager window. (If you don’t see the Options menu at the top of the window, click «More details» at the bottom.)
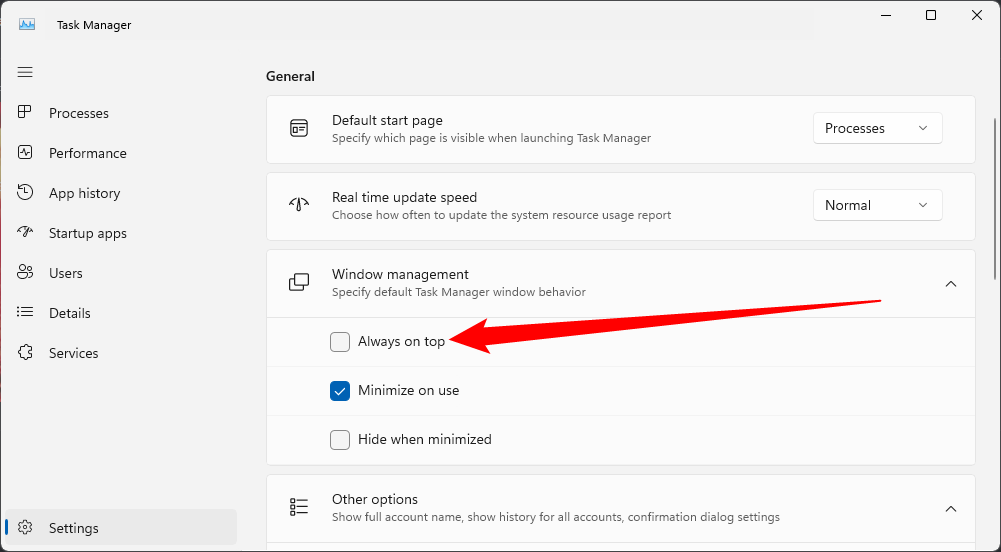
To make the Task Manager always-on-top on Windows 11, open the Task Manager’s menu, select «Settings,» and check «Always on top» under Window management. The Task Manager will remember this setting for the future.
Here’s how to enable the built-in always-on-top option in some other popular programs:
- VLC: Click Video > Always on top.
- Process Explorer: Click Options > Always on Top.
In addition to these apps, some bigger, more fully-featured window and desktop utilities also offer the ability to make windows always on top. DisplayFusion, for example, offers the feature (even in its free version), but also provides tools for managing multiple monitors, controlling the desktop and windows in all kinds of ways, and even tweaking other Windows settings. Actual Window Manager offers the feature, too, and also adds over 50 other desktop management tools. If you already use one of those—or are interested in those other features—then by all means give them a try.
Are you in need of uninstalling Always On Top to fix some problems? Are you looking for an effective solution to completely uninstall it and thoroughly delete all of its files out of your PC? No worry! This page provides detailed instructions on how to completely uninstall Always On Top.
Possible problems when you uninstall Always On Top
* Always On Top is not listed in Programs and Features.
* You do not have sufficient access to uninstall Always On Top.
* A file required for this uninstallation to complete could not be run.
* An error has occurred. Not all of the files were successfully uninstalled.
* Another process that is using the file stops Always On Top being uninstalled.
* Files and folders of Always On Top can be found in the hard disk after the uninstallation.
Always On Top cannot be uninstalled due to many other problems. An incomplete uninstallation of Always On Top may also cause many problems. So, it’s really important to completely uninstall Always On Top and remove all of its files.
How to Uninstall Always On Top Completley?
Method 1: Uninstall Always On Top via Programs and Features.
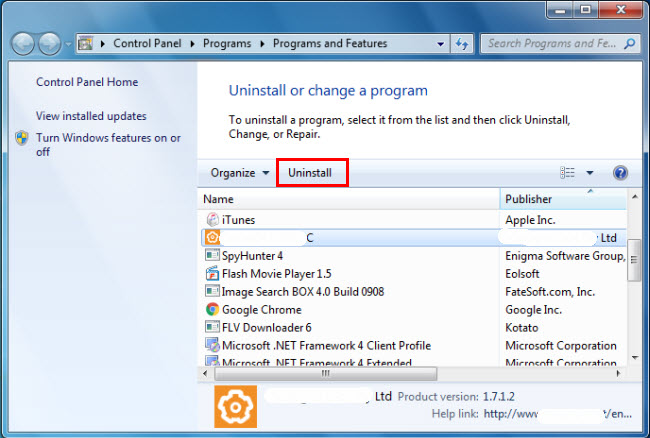
When a new piece of program is installed on your system, that program is added to the list in Programs and Features. When you want to uninstall the program, you can go to the Programs and Features to uninstall it. So when you want to uninstall Always On Top, the first solution is to uninstall it via Programs and Features.
Steps:
a. Open Programs and Features.
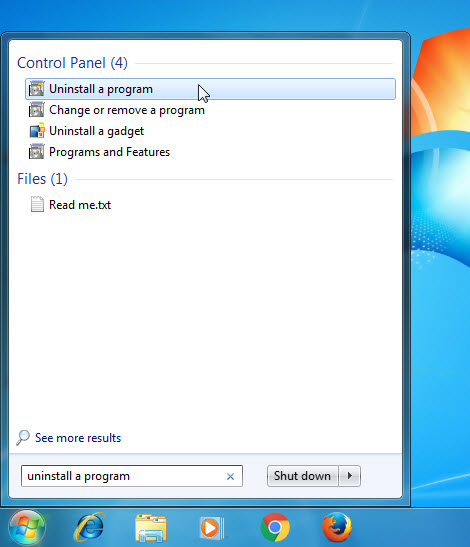
Windows Vista and Windows 7
Click Start, type uninstall a program in the Search programs and files box and then click the result.
Windows 8, Windows 8.1 and Windows 10
Open WinX menu by holding Windows and X keys together, and then click Programs and Features.
b. Look for Always On Top in the list, click on it and then click Uninstall to initiate the uninstallation.
Method 2: Uninstall Always On Top with its uninstaller.exe.
Most of computer programs have an executable file named uninst000.exe or uninstall.exe or something along these lines. You can find this files in the installation folder of Always On Top.
Steps:
a. Go to the installation folder of Always On Top.
b. Find uninstall.exe or unins000.exe.
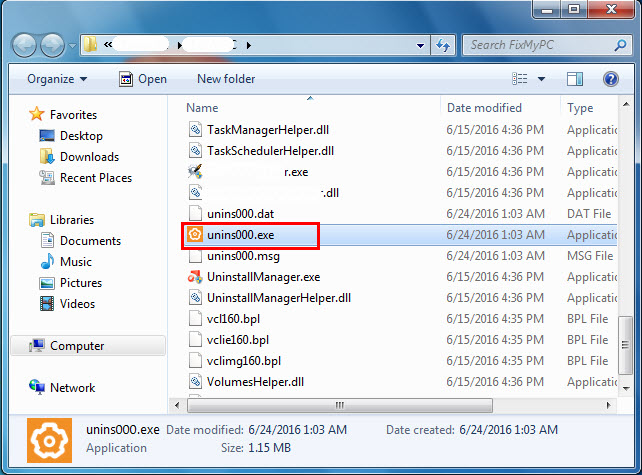
c. Double click on its uninstaller and follow the wizard to uninstall Always On Top.
Method 3: Uninstall Always On Top via System Restore.
System Restore is a utility which comes with Windows operating systems and helps computer users restore the system to a previous state and remove programs interfering with the operation of the computer. If you have created a system restore point prior to installing a program, then you can use System Restore to restore your system and completely eradicate the unwanted programs like Always On Top. You should backup your personal files and data before doing a System Restore.
Steps:
a. Close all files and programs that are open.
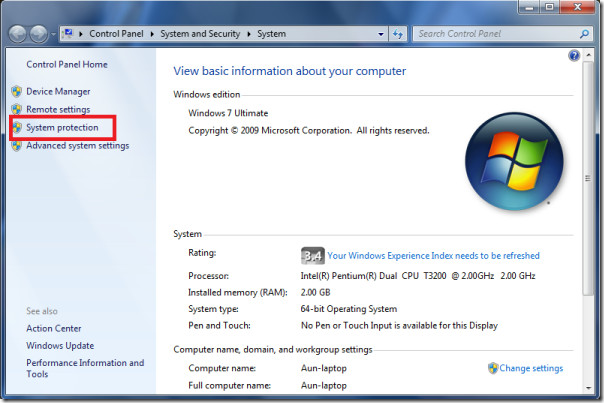
b. On the desktop, right click Computer and select Properties. The system window will display.
c. On the left side of the System window, click System protection. The System Properties window will display.
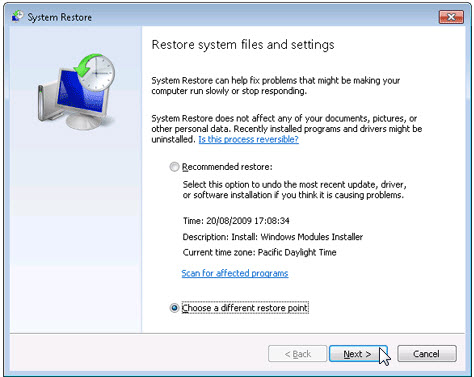
d. Click System Restore and the System Restore window will display.
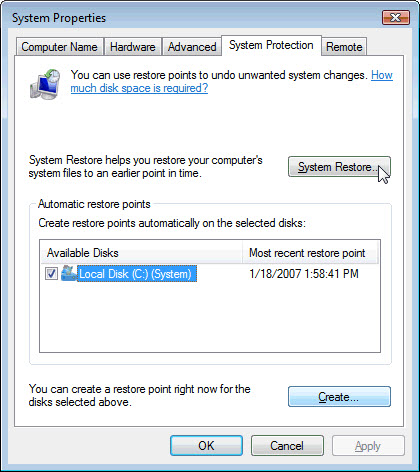
e. Select Choose a different restore point and click Next.
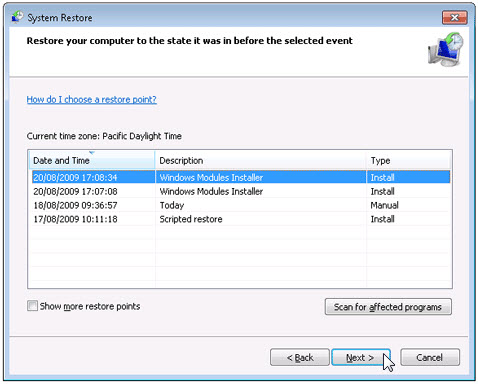
f. Select a date and time from the list and then click Next. You should know that all programs and drivers installed after the selected date and time may not work properly and may need to be re-installed.
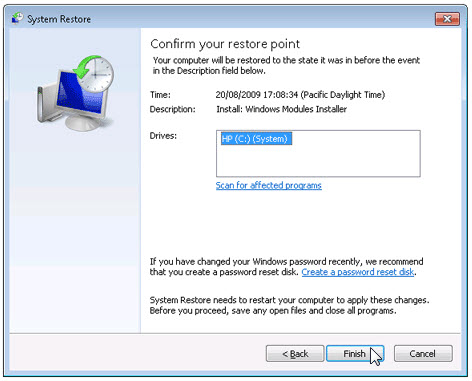
g. Click Finish when the «Confirm your restore point» window appears.
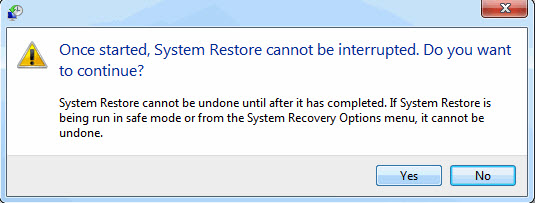
h. Click Yes to confirm again.
Method 4: Uninstall Always On Top with Antivirus.
Nowadays, computer malware appear like common computer applications but they are much more difficult to remove from the computer. Such malware get into the computer with the help of Trojans and spyware. Other computer malware like adware programs or potentially unwanted programs are also very difficult to remove. They usually get installed on your system by bundling with freeware software like video recording, games or PDF convertors. They can easily bypass the detection of the antivirus programs on your system. If you cannot remove Always On Top like other programs, then it’s worth checking whether it’s a malware or not.
Method 5: Reinstall Always On Top to Uninstall.
When the file required to uninstall Always On Top is corrupted or missing, it will not be able to uninstall the program. In such circumstance, reinstalling Always On Top may do the trick. Run the installer either in the original disk or the download file to reinstall the program again. Sometimes, the installer may allow you to repair or uninstall the program as well.
Method 6: Use the Uninstall Command Displayed in the Registry.
When a program is installed on the computer, Windows will save its settings and information in the registry, including the uninstall command to uninstall the program. You can try this method to uninstall Always On Top. Please carefully edit the registry, because any mistake there may make your system crash.
Steps:
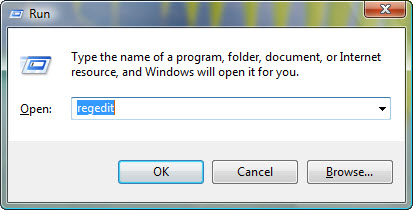
a. Hold Windows and R keys to open the Run command, type in regedit in the box and click OK.
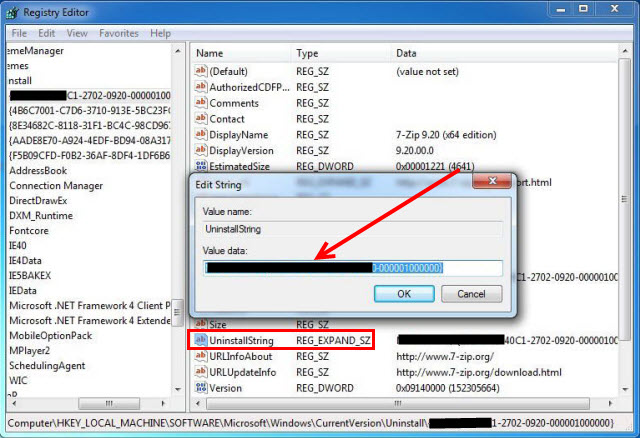
b. Navigate the following registry key and find the one of Always On Top:
HKEY_LOCAL_MACHINE\SOFTWARE\Microsoft\Windows\CurrentVersion\Uninstall
c. Double click on the UninstallString value, and copy its Value Data.
d. Hold Windows and R keys to open the Run command, paste the Value Data in the box and click OK.
e. Follow the wizard to uninstall Always On Top.
Method 7: Uninstall Always On Top with Third-party Uninstaller.
The manual uninstallation of Always On Top requires computer know-how and patience to accomplish. And no one can promise the manual uninstallation will completely uninstall Always On Top and remove all of its files. And an incomplete uninstallation will many useless and invalid items in the registry and affect your computer performance in a bad way. Too many useless files also occupy the free space of your hard disk and slow down your PC speed. So, it’s recommended that you uninstall Always On Top with a trusted third-party uninstaller which can scan your system, identify all files of Always On Top and completely remove them. Download this powerful third-party uninstaller below.
Sometimes you need an open window be on top of all other applications and windows for various reasons. It can be beneficial for monitoring a particular application or watching a movie while working or sticking the audio player on top of all windows. Windows 10 does not offer any way to set a window on top of other windows. You can only arrange windows in cascading tiles which forces all windows to share the same screen space.
Table of Contents
In this article, we’ll discuss three utilities which will enable always on top feature in Windows 10. There are some programs which provide built-in option to make them always on top. We will also discuss those programs in this article. All the tools and utilities discussed in this article are free.
WindowTop

WindowTop is a freeware utility that allows you to pin your any app on the top of another app, so you can easily keep on working and do not need to minimize and maximize each page and app again & again. WindowTop also comes with exclusive features such as “Shrink Window”, an innovative way to minimize windows. And it has a dark/read mode, which you can use at night for reading purposes. This is a simple way to solve your issue and show any app on top of another app’s window.
Download WindowTop
Through Mouse – DeskPins
DeskPins is a freeware utility, you can simply use it with a click of your mouse. It gives you an unlimited number of pins and you can use those pins to put any app on the top of other application windows. Firstly, you have to download DeskPins from below link, and after installing, a pin icon will be available in the system tray.
Open any app window, if you want that specific window to stay on top of all another open window, then grab a pin from the system tray and your mouse will turn into a pin. Click on that particular window to pin it on top. The pinned window will have a red pin icon on its bar so you can easily see which window is pinned.
Download DeskPins
AutoHotkey Script for Always on top keyboard shortcut
Another quick way to set any window on top of all other windows is the keyboard shortcut. Just press the key combination to pin any application or tool “Always On Top”. You have to create a script with AutoHotKey which won’t be heavy for your system, then you can get access to it through shortcut keys to lock any app as a top one. Go with below steps to use Keyboard shortcut.
- Download AutoHotkey from here and run the installer to install it on your system.
- Right click on Desktop. Go to New, and select the option of AutoHotkey Script.

- Open the newly created script in the Notepad to edit it. Copy and Paste the following line into Notepad file.
^SPACE:: Winset, AlwaysOnTop, , A
- Now close the Notepad file, Double click on the script to run it. If it runs successfully, a green logo will appear in the System’s tray and represent that script is running in the background.
- You can now use “Ctrl+Space” key to set any active window to always on top of all other windows.


To unpin any window, again press “Ctrl+Space” key. You can also change key combination according to your needs.
StayOnTop
StayOnTop is a simple and useful application with a single function that puts your required app on top of all application windows. No matter how many windows you have opened, just right-click on it to view all open windows, and select your required window to keep it on Always On Top. You can use this tool to fulfill your need of putting any needed app on Always On Top, that was a missing feature in Windows 10. It can be accessed through the system tray.
Download StayOnTop
TurboTop
TurboTop is a very handy tool, you do not have to assign a pin for any app you want to set always on top, or do not need to press the key combination to pin any app on top. TurboTop sits in your System Tray and lets you set any window to be “Always on Top”.
- Download TurboTop from this link
- A system tray icon will appear after downloading it.
- Right click on its icon to see the list of all active windows. to set any one window on top of all other windows, select it from the list.
- To unpin any pinned window, uncheck it from the list shown in TurboTop system tray icon.
Always On Top
Always On Top is a freeware third-party tool to let you make any application window on top of all other windows. It uses a script that configures the priorities of all active and open windows. You can pin any app on above of all other active windows. This would be helpful for you if you are watching a movie while working, or making notes from any website. Download it from the below link. An icon will be available in your system’s notification area. Open any app you want to stay it open as long as you want. After opening that particular app, press “Ctrl+Space” key to pinning it on top of all other active windows.
Download Always On Top
OnTopReplica
OnTopReplica is a real-time third-party tool, based on DWM thumbnails offers you to open window of our choice on the top of another active window. Create a clone by selecting your specific area or window which you want to stay on top. If your selected area of the window is large, you can resize it with OnTopReplica utility to have more space for other windows. You can set hotkeys to clone the window with OnTopReplica for your ease and convenience. .Net framework 4.0 or 4.5 is required by this utility to run on your system.
Download OnTopReplica from here
WinLister

WinLister is a small but a practical utility that can set any application to top-most mode, and that window will show to you on top of all other windows, or as a pinned window.
This utility also displays the list of opened windows on your system. For each window, some useful information is displayed: the title, the handle of the window, location, size, class name, process number, the name of the program that created the window, and more. In addition, you can easily hide, show, close, or save the windows list to text or HTML file. Both 32-bit and 64-bit systems are supported.
Download WinLister from here
4t Tray Minimizer
4t Tray Minimizer is a lightweight but powerful window manager tool that performs several functions, including to pin your required open window as a top window. It can also minimize the window to tray, roll up/roll down, make transparent, hide/show the system tray.
Download 4t Tray Minimizer
PowerMenu

PowerMenu is a tool that gives you many working features including letting you put a window on top of all other open windows. You can also minimize an app to system’s tray to have more space on the Desktop and can change the transparency of app.
Download PowerMenu
Always On Top is a useful feature which is missed by Microsoft in Windows 10 Operating System, but I hope by going through above ways, you can use Always On Top feature to pin any windows on the top of any other opened windows easily. From my opinion, I like StayOnTop tool because this performs one function only and that is required one.
Все способы:
- Способ 1: Закрытие связанного процесса
- Способ 2: «Командная строка»
- Способ 3: Изменение владельца файла
- Способ 4: Загрузка в «Безопасном режиме»
- Способ 5: Переименование файла
- Способ 6: Функции архивирования
- Способ 7: Сторонние программы
- Вопросы и ответы: 0
Способ 1: Закрытие связанного процесса
Бывает, что при удалении файла появляется предупреждение о том, что удалить его нет возможности, поскольку он используется определенной программой, которая в этот момент запущена в системе.
Если связанный с файлом софт отображается на нижней панели, то его нужно просто закрыть обычным способом. Когда его интерфейс не разворачивается, щелкните по задаче правой кнопкой мыши и выберите пункт «Закрыть окно».
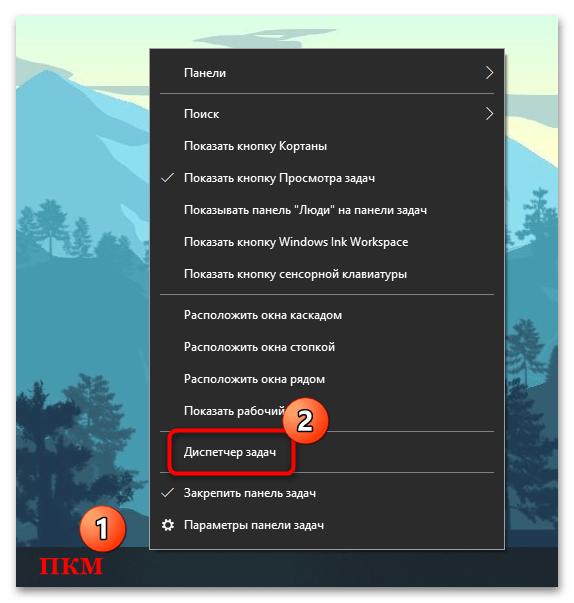
Если же программа нигде не отображается, то выключить ее можно через «Диспетчер задач»:
- Откройте «Диспетчер задач». Проще всего кликнуть правой кнопкой мыши по нижней рабочей панели и запустить приложение через контекстное меню.
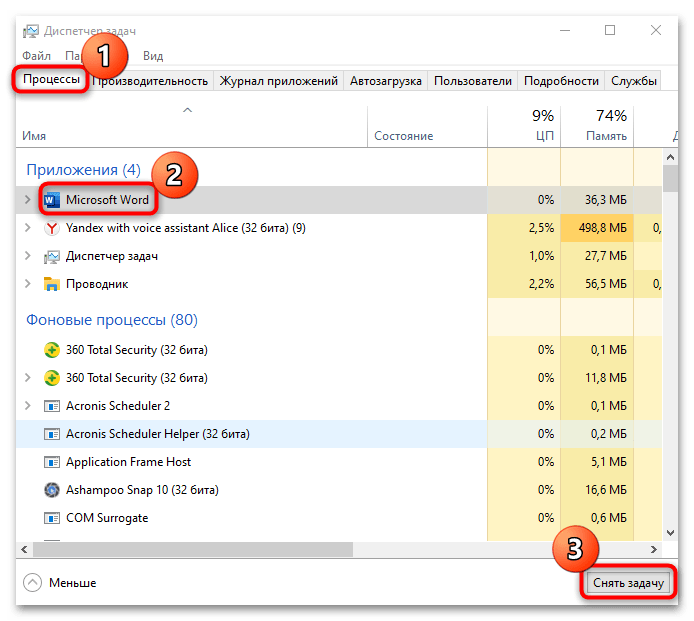
- На вкладке «Процессы» отыщите проблемную программу. Если необходимо, можно упорядочить названия по имени, кликнув по названию столбца вверху. Выделите приложение, затем выберите кнопку «Снять задачу». Для детального поиска процесса можно переключиться на вкладку «Подробности» и поискать там.
После того как программа будет закрыта, должно получиться удалить файл.
Читайте также: Методы принудительного удаления программ в Windows 10
Способ 2: «Командная строка»
Принудительно удалить файл в Windows 10 можно через встроенную консоль, использовав специальную команду и указав путь к нему. Метод может сработать, даже если файл открыт, но из-за сбоев в системе не получается его закрыть.
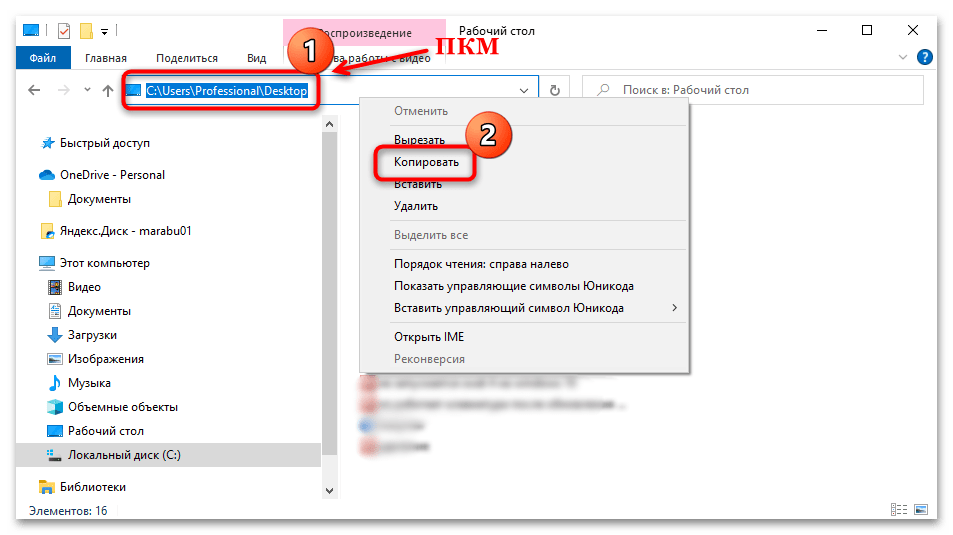
- Через «Проводник» перейдите к расположению файла. Если он находится на рабочем столе или в папке «Загрузки», то указывать нужно путь на диске C через персональную папку (то есть, например,
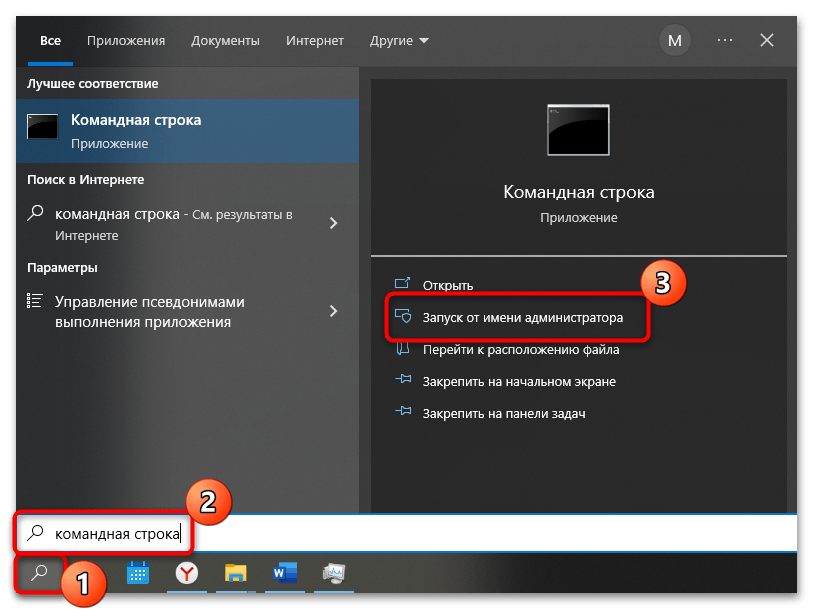
C:\Users\ИМЯ_ПОЛЬЗОВАТЕЛЯ\Downloads). Скопируйте адрес из верхней строки, кликнув по ней правой кнопкой мыши и выбрав пункт «Копировать». - Запустите «Командную строку» с расширенными правами, нажав на «Пуск» и введя в нем название приложения. Среди результатов выберите открытие от имени администратора.
- В консоли введите
del /f /s /q /a, затем поставьте пробел, откройте кавычки и вставьте путь к файлу, поставьте обратный слэш (\) и впишите точное название удаляемого файла с его расширением, после чего закройте кавычки. К примеру, если файл находится на рабочем столе, в нашем примере команда будет выглядеть так:del /f /s /q /a «C:\Users\Professional\Desktop\документ.docx», где «Professional» — имя нашей учетной записи. Нажмите на клавишу «Enter», чтобы подтвердить удаление.
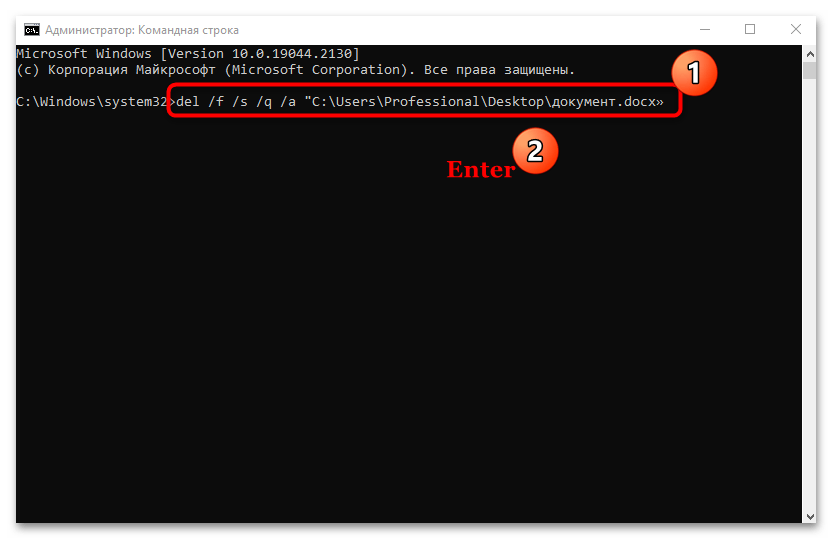
В результате отобразится сообщение, что файл удален, причем при таком подходе он будет стерт без временного помещения в «Корзину».
Способ 3: Изменение владельца файла
В том случае, если во время удаления Windows сообщает, что у пользователя нет прав осуществить процедуру, то здесь проблема заключается во владельце. Обычно это происходит, когда на компьютере используется несколько учетных записей или планируется удалить специфический файл. Чтобы удалить файл, который принадлежит другой учетной записи, потребуется получить право собственности на него. Следует отметить, что это доступно только для администратора Windows 10.
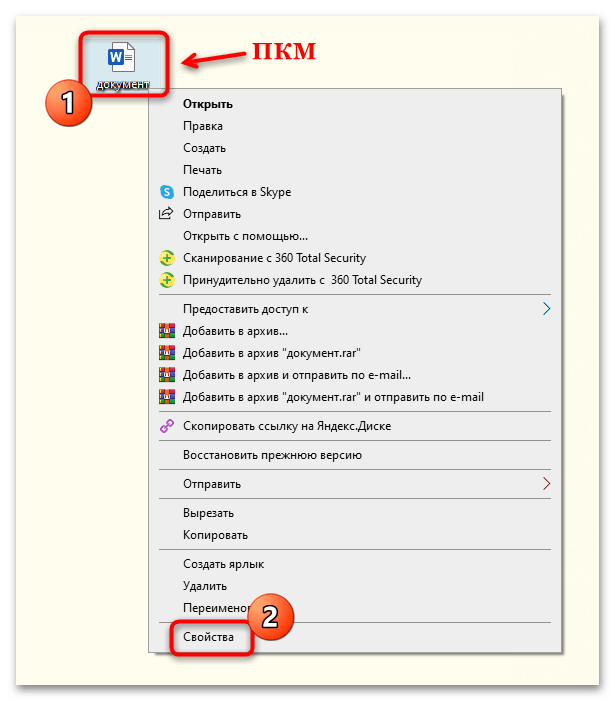
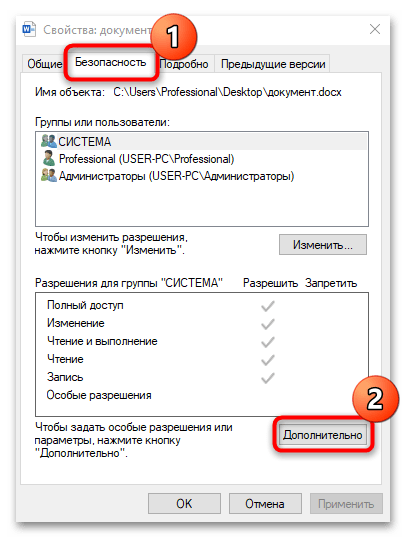
- Щелкните правой кнопкой мыши по названию файла, чтобы вызвать контекстное меню. Перейдите в раздел «Свойства».
- В новом окне нажмите на вкладку «Безопасность», затем на кнопку «Дополнительно».
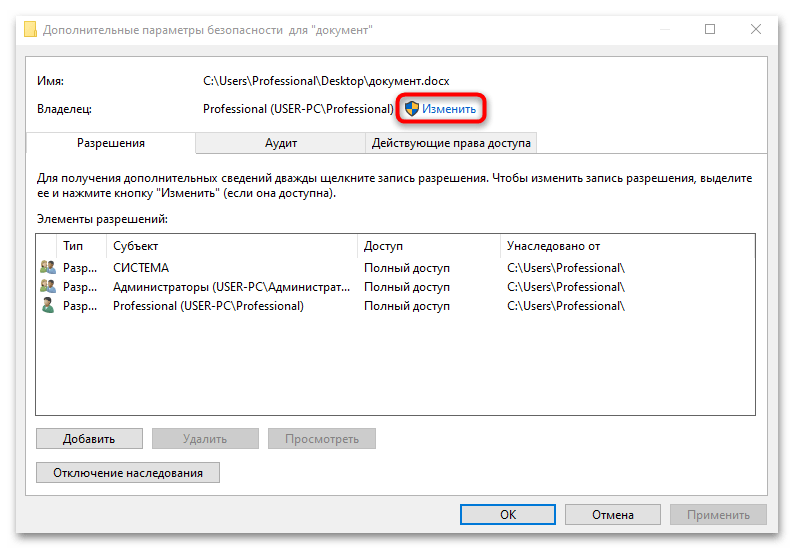
- На строке «Владелец» кликните по ссылке «Изменить».
- Введите имя своей учетной записи в специальное поле и щелкните по кнопке подтверждения.
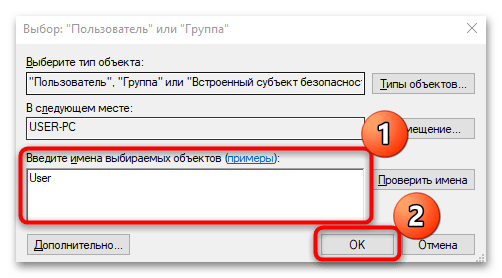
Закройте все окна раздела со свойствами и попробуйте снова удалить файл.
Способ 4: Загрузка в «Безопасном режиме»
Когда сторонние программы мешают удалению файла или это не получается сделать из-за вирусов, которые проникли в систему, может помочь загрузка Windows 10 в «Безопасном режиме»:
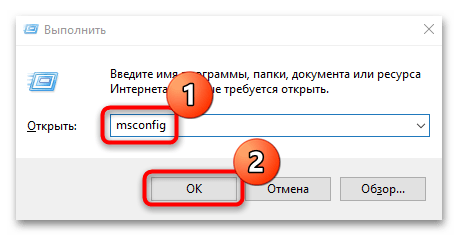
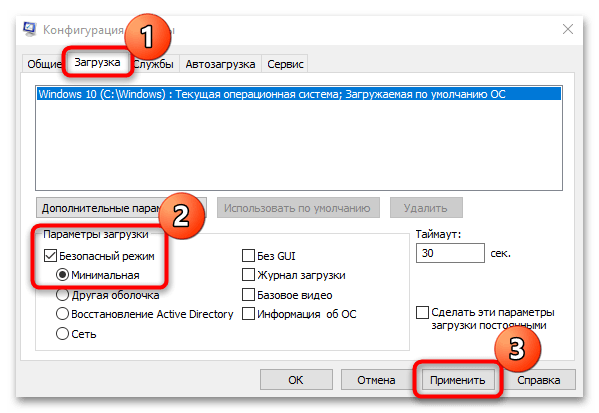
- Откройте средство «Конфигурация системы» с помощью диалогового окна «Выполнить». Одновременно нажмите клавиши «Win + R», затем напишите команду
msconfigи кликните по «ОК». - Перейдите на вкладку «Загрузка». В блоке «Параметры загрузки» отметьте пункт «Безопасный режим» и выберите параметр «Минимальная», при которой система будет запущена лишь только с критически необходимым количеством драйверов, служб и программ. Нажмите на «Применить».
После процедуры останется перезагрузить компьютер, чтобы запустить систему в «Безопасном режиме». Найдите проблемный и файл и повторите попытку его удаления.
Читайте также: Выход из «Безопасного режима» на Windows 10
Способ 5: Переименование файла
Многим помогает старый и проверенный метод, подразумевающий переименование файла. Возможно, проблема появилась из-за того, что в системе произошел сбой или часть проблемного файла записалась на битый сектор жесткого диска, поэтому такой метод может исправить ситуацию.
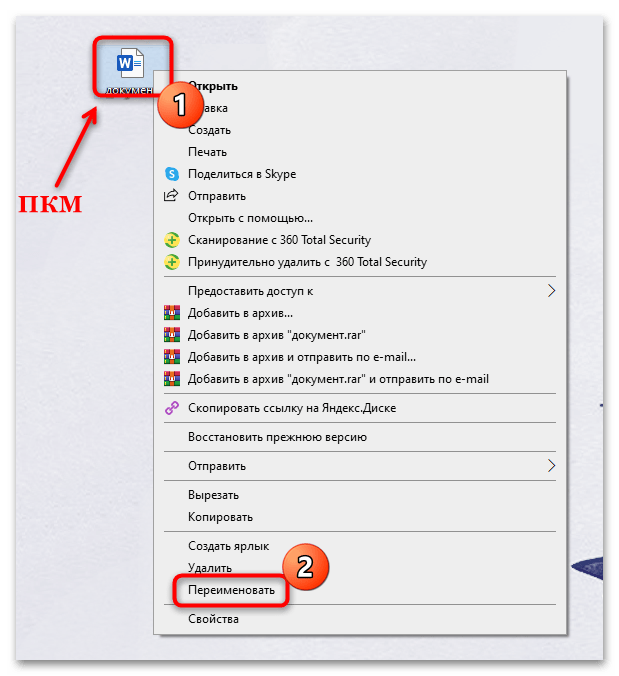
Переименуйте файл, используя функцию контекстного меню. Также можно попробовать изменить его расширение: после точки, отделяющей название от формата, впишите другое расширение, например измените .docx .zip.
Способ 6: Функции архивирования
Некоторые архиваторы позволяют тонко настраивать процедуру архивирования файлов, в том числе удалять оригинал после завершения процедуры. Другими словами, вам понадобится заархивировать проблемные данные, выбрать соответствующую функцию в программе, а потом избавиться от самого архива. В этом может помочь бесплатный софт, например 7-Zip.
Скачать 7-Zip
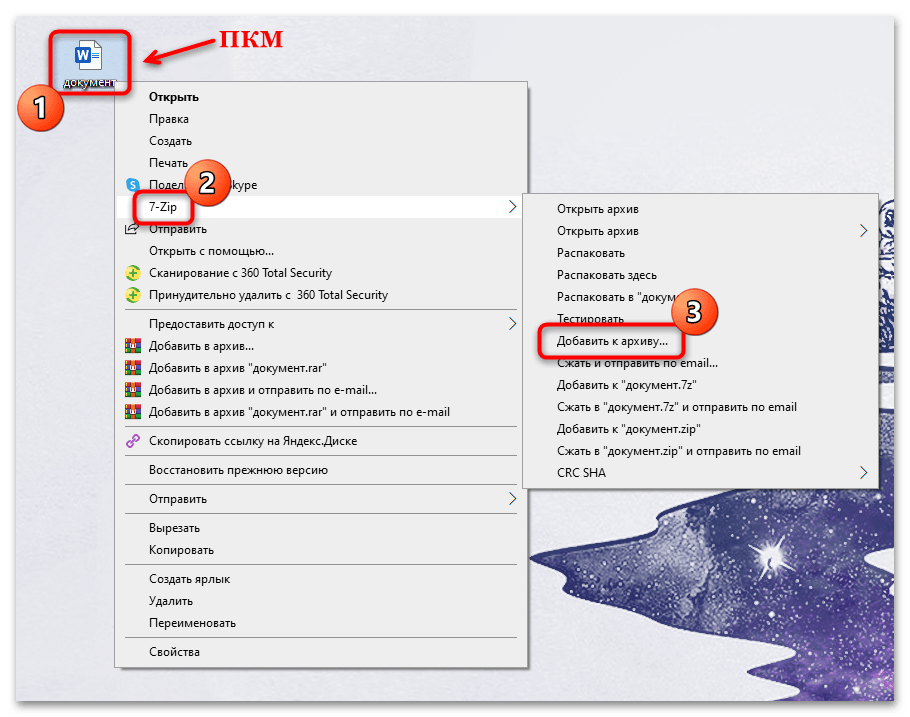
- Установите архиватор. Его функции автоматически интегрируются в контекстное меню. Щелкните по файлу правой кнопкой мыши, наведите курсор на пункт «7-Zip» и из дополнительного списка выберите «Добавить к архиву…».
- В окне с настройками архива найдите блок «Опции» и отметьте пункт «Удалять файлы после сжатия». Нажмите на «ОК».
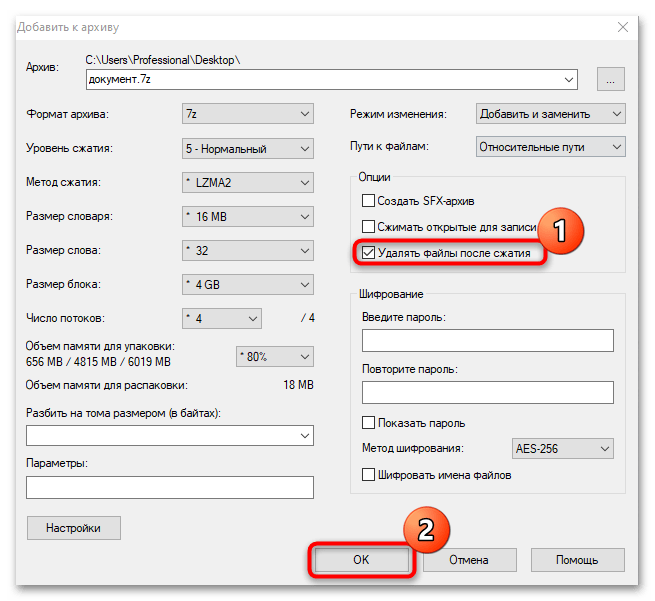
Дождитесь, пока архив будет создан. Изначальный файл должен быть удален автоматически, а вам останется вручную удалить саму сжатую папку.
Способ 7: Сторонние программы
Если ни один рассмотренный выше способ не помог, попробуйте прибегнуть к помощи специализированного софта, который предназначен для удаления неудаляемых обычными методами файлов. Помимо основной функции, многие программы располагают дополнительными возможностями по работе с данными: копирование, смена имени, отображение заблокированных и скрытых файлов. В отдельной статье на нашем сайте разобраны наиболее эффективные и проверенные приложения, а также представлены ссылки на их скачивание.
Подробнее: Программы для удаления файлов, которые не удаляются

Наша группа в TelegramПолезные советы и помощь