
Businesses that need to deploy Windows in a larger environment often require customization before they can go about their operations and processes. This large-scale deployment is carried out by IT professionals and system administrators on many computers using the toolset, known as the Windows Assessment and Deployment Kit, or simply, Windows ADK.
Microsoft Windows ADK is a collection of tools that you can combine to prepare, assess, and launch image-based large-scale Windows deployments. These tools are also used to test the operating system’s quality and performance, as well as the applications running on it.
The Windows Assessment and Deployment Kit was earlier known as the Windows Automated Installation Kit (WAIK).
Windows ADK can be deployed on a broad range of devices, such as desktops, notebooks, Internet of Things (IoT) devices, etc. This toolkit works across platforms that work with devices with and without screens.
Windows ADK was first introduced in Windows Vista and since then has always been available in the latest Windows operating systems. The tools currently available in Windows ADK have varied through the years, but currently, they include the following:
- Windows System Image Manager
- Windows Preinstallation Environment (WinPE)
- Deployment Image Servicing and Management tool (DISM)
The key advantage of using Windows ADK for IT teams is to apply different tools to test software, drivers, and hardware compatibility before finally moving to Windows 11 or 10.
The Application Compatibility Toolkit, for instance, lets developers and IT professionals test how 32 and 64-bit Windows applications work on a new operating system before the final installation. IT admins can also use Windows ADK to automate large-scale deployments of Windows.
Download Windows 10 and 11 ADK Versions
On a high level, Windows ADK has two different formats, which have their own versions. One format is reserved for Windows Insider Preview users. The other format is available publicly and can be downloaded via the Windows ADK page on Microsoft’s website.
The variant available publicly is usually around 2 MB in size and comes in different versions, where each new release of Windows ADK involves new features and product enhancements.
If you want to know about the version history, take a look at the list below:
| Windows ADK Versions | Download Links |
| Windows ADK for Windows 11 22H2 | Download ADK Download WinPE Addon |
| Windows ADK for Windows 11 21H2 | Download ADK Download WinPE Addon |
| Windows ADK for Windows 10 version 22H2 | Download ADK Download WinPE Addon |
| Windows ADK for Windows 10 version 21H2 | Download ADK Download WinPE Addon |
| Windows ADK for Windows 10 version 21H1 | Download ADK Download WinPE Addon |
| Windows ADK for Windows 10 version 20H2 | Download ADK Download WinPC Addon |
| Windows ADK for Windows 10 version 2004 | Download ADK Download WinPE Addon |
| Windows ADK for Windows 10 version 1909 | Download ADK Download WinPE Addon |
| Windows ADK for Windows 10 version 1903 | Download ADK Download WinPE Addon |
| Windows ADK for Windows 10 version 1809 | Download ADK Download WinPE Addon |
| Windows ADK for Windows 10 version 1803 | Download ADK |
| Windows ADK for Windows 10 version 1709 | Download ADK |
| Windows ADK for Windows 10 version 1703 | Download ADK |
| Windows ADK for Windows 10 version 1607 | Download ADK |
| Windows ADK for Windows Insider Preview | Download ADK |
The Windows Preinstallation Environment (WinPE) comes as a separate download from the Assessment and Deployment Kit (ADK), before Windows 10 version 1809. To add Windows PE to your ADK installation, you need to download and install the Windows PE add-on after installing the ADK.
When it comes to features, Windows 10 ADK allows you to select specific features at the time of installation. You can pick and choose the exact features you want to include in the toolkit. The options include:
- Application Compatibility Tools
- Deployment Tools
- Windows Preinstallation Environment (Windows PE)
- Imaging and Configuration Designer (ICD)
- Configuration Designer
- User State Migration Tool (USMT)
- Volume Activation Management Tool (VAMT)
- Windows Performance Toolkit
- Windows Assessment Toolkit
- Microsoft User Experience Virtualization (UE-V)
- Application Virtualization Sequencer (App-V)
- Microsoft Application Virtualization Auto Sequencer (App-V)
- Media experience Analyzer
In general, these features let you perform the following functions:
- Add product branding, applications, along with settings
- Keep Windows up to date with the latest updates, language packs, and drivers
- Look for and identify application compatibility
- Perform user data migration between Windows installations
- Manage bulk activation of Windows
How to Install Windows ADK
Since you can only install one version of Windows ADK at a time, you will need to uninstall any existing ADK installation before installing the new one.

Otherwise, you will need to install the new ADK using the command line for multiple ADK versions working on the same computer.
Follow these steps to install Windows ADK using the traditional method:
-
Download the correct ADK version from above.
-
Run the “adksetup.exe” file to start the installation.
-
Now select “Download the Windows Assessment and Deployment Kit for installation on a separate computer” and click Next.

Install ADK on a separate computer -
Select either Yes or No for Windows Kits Privacy and click Next.
Select privacy preferences -
Click Accept to agree to the licensing terms.
Accept license agreement The download process will now start.
-
Once downloaded, close the wizard.
Close the wizard


After the download process is complete, you can move the downloaded files onto the computer on which you want to install Windows ADK.
If you wish to install it on the current computer, then you must select the first option “Install the Windows Assessment and Deployment Kit on this computer” in Step 3 above and then select the components to install.

Download and Install WinPE Add-On
As discussed earlier in the article, starting with Windows 10 ADK version 1809, WinPE is no longer part of the ADK tool. If you wish to get WinPE, follow these steps to download and install the add-on:
Note: The minimum estimated disk space required is 6.0 GB for the WinPE add-on. Hence, it may take longer for the installation to finish than the ADK. The package includes Windows PE(x86), Windows PE (AMD64), Windows PE (ARM), and Windows PE (ARM64).
-
Begin by downloading the WinPE setup file from the links given above for your respective OS version.
-
Run the downloaded “adkwinpesetup.exe” file.
-
The rest of the process is the same as Windows ADK installation.
Windows ADK Validation
To confirm the Windows ADK installation on a device, follow these steps:
-
Open the Programs and Feature applet by typing in “appwiz.cpl” in the Run Command box.
Open Programs and Features -
Check that Windows ADK and Windows PE have been installed.

Windows ADK has been installed

Conclusion
In order to deploy Windows OS on a large scale, you need a Windows Assessment and Deployment Kit. This article covers the basics of the Windows ADK toolkit, its download links directly from Microsoft, and how to install it.
You can also use this tool and its add-on in conjunction with Windows Deployment Server to level up your automation and operations.
Item Preview
There Is No Preview Available For This Item
This item does not appear to have any files that can be experienced on Archive.org.
Please download files in this item to interact with them on your computer.
Show all files
1,084
Views
1
Favorite
DOWNLOAD OPTIONS
Uploaded by
Windows_RT
on
SIMILAR ITEMS (based on metadata)
Windows 10 ADK Download Guide
Introduction
The Windows Assessment and Deployment Kit (Windows ADK) is an essential tool for IT administrators and developers looking to deploy, customize, and test Windows operating systems. This guide will walk you through downloading and installing the Windows 10 ADK, ensuring a smooth setup for your deployment needs.
**Direct Download Link
What is Windows 10 ADK?
Windows 10 ADK (Assessment and Deployment Kit) includes a suite of tools to help automate and manage large-scale Windows deployments. It features:
- Windows System Image Manager (SIM)
- Deployment Image Servicing and Management (DISM)
- Windows Preinstallation Environment (WinPE)
- User State Migration Tool (USMT)
- Volume Activation Management Tool (VAMT)
These tools help IT professionals customize, automate, and deploy Windows images efficiently.
System Requirements
Before downloading Windows 10 ADK, ensure your system meets these requirements:
- Operating System: Windows 7, 8.1, or 10
- Processor: 1 GHz or faster
- RAM: 2 GB or more
- Disk Space: 2 GB minimum
- Internet Connection: Required for installation
How to Download Windows 10 ADK
Step 1: Get the Installer
To download Windows 10 ADK, click on the
**Direct Download Link
and save the installer to your computer.
Step 2: Run the Installer
- Locate the downloaded file (adksetup.exe) and double-click to launch it.
- Choose «Install the Windows Assessment and Deployment Kit to this computer.»
- Select the components you wish to install (e.g., Deployment Tools, Windows PE).
- Click Next and follow the on-screen instructions.
Step 3: Verify Installation
After installation:
- Open the Start Menu and search for «Deployment and Imaging Tools Environment.»
- Run the tool to confirm proper installation.
- Verify the installation path (usually
C:\Program Files (x86)\Windows Kits\10).
Troubleshooting Tips
- Installation Fails: Run the installer as an administrator.
- Missing Components: Reinstall ADK with required features selected.
- Slow Download: Ensure you have a stable internet connection or try an alternate download source.
Conclusion
Windows 10 ADK is a powerful toolkit for deploying and managing Windows images. By following this guide, you can easily download and install ADK for seamless Windows deployment. Click on the Direct Download Link to get started.
**Direct Download Link
For more updates, check the official Microsoft documentation or follow our GitHub repository for the latest tools and guides.
This post contains a list of all the Windows 10 ADK versions, the ADK release history, and download links. Windows ADK version 10.1.26100.1 (May 2024) is the latest one available for Windows 10 and Windows 11.
The Windows Assessment and Deployment Kit was formerly known as the Windows Automated Installation Kit. The Microsoft Windows Assessment and Deployment Kit (ADK) is a collection of tools that you can combine to prepare, assess, and launch image-based large-scale Windows deployments. These tools are also used to test the operating system’s quality and performance, as well as the applications running on it.
Every new release of Windows ADK for Windows 10 contains new features and enhancements. To keep track of new features and improvements in every Windows 10 ADK release, refer to the What’s new in the ADK tools article.

ADK Installation Modes
Windows ADK can be installed in two modes: online mode and offline mode. The setup files are downloaded and installed from the internet when the ADK installer is run in the online mode. In the offline install mode, you first download the ADK setup files from the internet and then run the installer. To install Windows 10 ADK, refer to the instructions below.
- Install Windows 10 ADK offline
- Install or Update Windows ADK on SCCM Server
Windows ADK is released separately for Windows 11 and Windows Server 2022 operating systems. Take a look at Windows 11 ADK version and downloads guide to learn about all the ADK versions released for Windows 11 OS.
Windows 10 ADK Features
All the Windows 10 ADK versions include the following features: When installing Windows ADK for SCCM or ADK manually for a PC, you have the option to install the following features:
- Application Compatibility Tools
- Deployment Tools
- Windows Preinstallation Environment (Windows PE)
- Imaging and Configuration Designer (ICD)
- Configuration Designer
- User State Migration Tool (USMT)
- Volume Activation Management Tool (VAMT)
- Windows Performance Toolkit
- Windows Assessment Toolkit
- Microsoft User Experience Virtualization (UE-V)
- Application Virtualization Sequencer (App-V)
- Microsoft Application Virtualization Auto Sequencer (App-V)
- Media experience Analyzer
Note: Starting with Windows 10, version 1809, the Windows Preinstallation Environment (PE) is released separately from the ADK. After installing the ADK, you can add Windows PE by downloading the Windows PE Addon and running the installer that comes with it. After you run the installer, the WinPE files will be in the same location as they were in previous ADK installs.

List of Windows 10 ADK Versions and Downloads
All the Windows 10 ADK versions are listed below, along with download links. As and when the new ADK versions for Windows 10 are released, I will update this post.
| Windows ADK for Windows 10 Version | ADK Version | Windows 10 ADK Download Link |
|---|---|---|
| Windows ADK for Windows 10 version 22H2 | A Windows ADK for Windows 10, version 22H2 will not be released. You can use the Windows ADK for Windows 10, version 2004 to deploy Windows 10 22H2. | NA |
| Windows ADK for Windows 10 version 21H2 | A Windows ADK for Windows 10, version 21H1 will not be released. You can use the Windows ADK for Windows 10, version 2004 to deploy Windows 10 21H2. | NA |
| Windows ADK for Windows 10 version 21H1 | A Windows ADK for Windows 10, version 21H1 will not be released. You can use the Windows ADK for Windows 10, version 2004 to deploy Windows 10 21H1. | NA |
| Windows ADK for Windows 10 version 20H2 | A Windows ADK for Windows 10, version 20H2 will not be released. You can use the Windows ADK for Windows 10, version 2004 to deploy Windows 10 20H2. | NA |
| Windows ADK for Windows 10 version 2004 | 10.1.19041.1 | Link |
| Windows ADK for Windows 10 version 1909 | A Windows ADK for Windows 10, version 1909 will not be released. You can use the Windows ADK for Windows 10, version 1903 to deploy Windows 10, version 1909. | NA |
| Windows ADK for Windows 10 version 1903 | 10.1.18362.1 | Link |
| Windows 10 ADK version Insider Preview | Link | |
| Windows ADK for Windows 10 version 1809 | 10.1.17763.1 | Link |
| Windows ADK for Windows 10 version 1803 | 10.1.17134 | Link |
| Windows ADK for Windows 10 version 1709 | 10.1.16299 | Link |
| Windows ADK for Windows 10 version 1703 | 10.1.15063 | Link |
| Windows ADK for Windows 10 version 1607 | 10.1.14393.0 | Link |
| Windows ADK for Windows 10 version 1511 | 10.1.10586.0 | Link |
| Windows ADK for Windows 10 version RTM | 10.0.26624.0 | Link |
| ADK for Windows 10 | 10.0.10240.0 | Link |
| ADK for Windows 8 | 8.100.26629 | Link |
| AIK for Windows 7 | Link |
Still Need Help?
If you need further assistance on the above article or want to discuss other technical issues, check out some of these options.
Привет друзья, в сегодняшней статье мы вместе с Ro8 автоматизируем процесс установки Windows 10 Enterprise Technical Preview с помощью файла ответов, но файл Autounattend.xml не будем интегрировать в дистрибутив Windows 10, а просто подсунем винде на флешке в самом начале инсталляции.
Вы можете спросить: «А что такое файл ответов и за счёт чего происходит автоматизация установки системы?». Друзья, файл ответов — это обычный файл с расширением .xml, но в нём содержится вся необходимая информация о каждом шаге установки Windows на ваш компьютер. С помощью файла ответов инсталляция Windows 10 будет происходить практически без вашего участия: не нужно будет вводить ключ, создавать разделы, принимать лицензионное соглашение, присваивать имя компьютеру, создавать имя пользователя и другое.
В первую очередь скачаем ISO-образ Windows 10 Enterprise, затем займёмся созданием файла ответов в диспетчере установки Windows.
http://www.microsoft.com/en-us/evalcenter/evaluate-windows-enterprise-insider-preview?i=1
Жмём Войти.

Вводим данные учётной записи Майкрософт, если у вас её ещё нет, то создайте её обязательно.

Жмём на Register to continue (Зарегистрируйтесь для продолжения)

Continue (Продолжить)

ISO -образ операционной системы скачивается нам на компьютер.
Создание файла ответов
Создание файла ответов произведем в диспетчере установки Windows, который входит в состав пакета Windows ADK для Windows 10. Переходим по ссылке:
https://msdn.microsoft.com/ru-ru/windows/hardware/dn913721.aspx
и скачиваем Windows ADK для Windows 10

Установочный файл Windows ADK для Windows 10
Запускаем установочный файл и выполняем установку. Далее

Далее

Принимаем лицензионное соглашение

Выбираем Средства развертывания

Установка средств развертывания


На обслуживающем компьютере создана папка Win10 в которую скопировано содержимое установочного образа Windows 10 Enterprise Technical Preview (x64)

Запускаем Диспетчер установки Windows от имени администратора
Откроется главное окно Диспетчера установки

В диспетчере установки начинаем работу с выбора образа Windows

Переходим в папку Win10 в которой находится содержимое установочного образа Windows 10 Enterprise Technical Preview, далее идем в папку Sources и выбираем файл install.wim

Нажимаем Да, для создания файла каталога

Создание файла каталога
После того, как файл каталога будет создан, в окне Образ Windows появятся две папки: Components и Packages. Работать будем с папкой Components

Выбираем Новый файл ответов

Получаем следующее

Открываем папку Components, ищем строку Microsoft-Windows International Core WinPE neutral и добавляем ее в состав прохода Windows PE файла ответов

Заполняем параметры строки Microsoft-Windows International Core WinPE neutral

Заполняем параметры строки SetupUILanguage

В папке Components находим строку Microsoft-Windows-Setup neutral и добавляем ее в проход Windows PE файла ответов

Добавляем новый диск выбрав DiskConfiguration-Вставить новый Disk

Заполняем параметры строки Disk

На жестком диске создадим два раздела (выполняем Вставить новый CreatePartition два раза)

Указываем параметры 1-го раздела: размер 350 мб, тип раздела primary, раздел первый в очереди на создание

Указываем параметры 2-го раздела: 2-й раздел занимает оставшееся пространство жесткого диска, тип primary, раздел находится вторым в очереди на создание

Создаем два новых ModifyPartition (так как раздела тоже два)

Заполняем параметы ModifyPartition 1-го раздела

Заполняем параметры ModifyPartition 2-го раздела

Заполняем параметры строки InstallTo (установку производим на 2-й раздел жесткого диска)

Заполняем параметры строки Userdata

Так как мы с помощью данного файла ответов будем производить установку Windows 10 в редакции Enterprise, указывать ключ не нужно

Добавим строку Microsoft-Windows-IE-InternetExplorer в проход Specialize файла ответов

Заполним параметр Home Page строки Microsoft-Windows-IE-InternetExplorer (указываем домашнюю страницу браузера InternetExplorer)

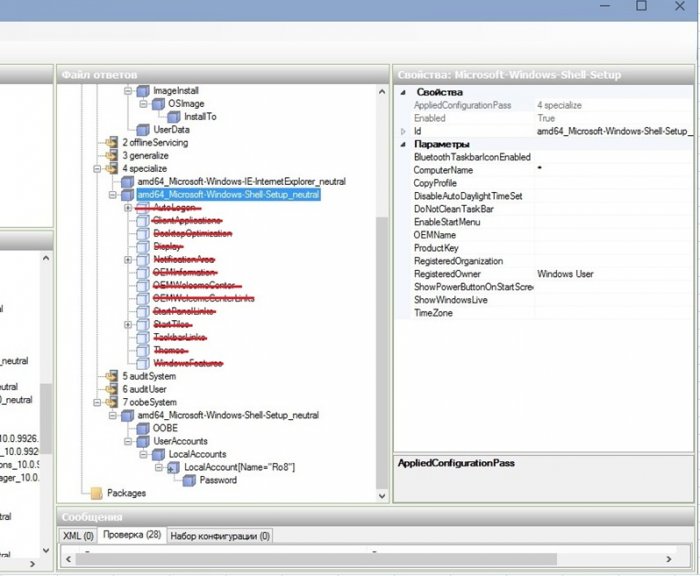
Добавим строку Microsoft-Windows-Shell-Setup из папки Components в проход Specialize файла ответов

Заполним один параметр строки Microsoft-Windows-Shell-Setup: ComputerName (значение этого параметра выставим знак звездочки, что означает что имя компьютера будет сгенерировано автоматически)

Добавим строку Microsoft-Windows-Shell-Setup в проход oobeSystem файла ответов

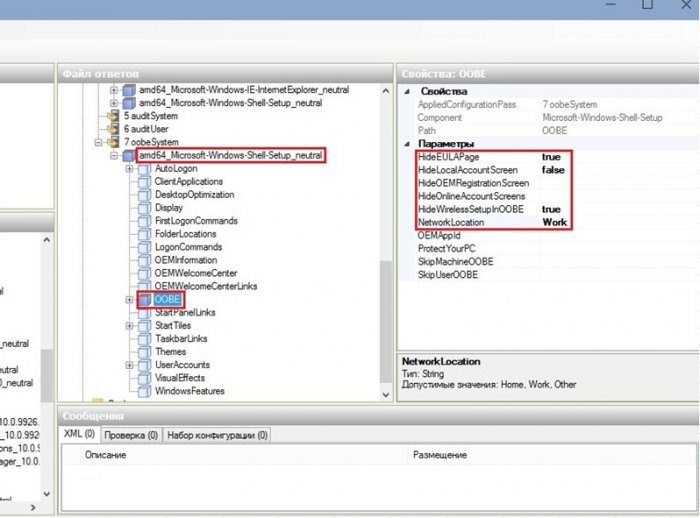
Заполняем параметры строки OOBE
Добавляем нового локального пользователя выбрав UserAccounts-LocalAccounts-Вставить новый LocalAccount

Заполняем параметры LocalAccount (создаем учетную запись пользователя Ro8 входящую в группу администраторы)

Заполняем параметры строки Password

Выделяем строку Microsoft-Windows-Shell-Setup и заполняем в ней один единственный параметр

Производим удаление неиспользуемых строк


После удаления неиспользуемых строк производим проверку файла ответов на наличие ошибок и предупреждений

Ошибок и предупреждений нет

После проверки файла ответов на наличие ошибок и предупреждений выбираем Сохранить файл ответов как….

Сохраняем файл ответов под именем Autounattend

Сохраненный файл ответов

Копируем созданный файл ответов в корень сьемного носителя (например флешки), вставляем флешку в компьютер на который нужно произвести установку windows и загружаем компьютер
с установочного диска Windows (готовый файл ответов можно скачать здесь
https://drive.google.com/file/d/0B5ZtD-mcT8eNam9yTEZUTGIzR3c/view?usp=sharing
Начало установки

Программа установки Windows обнаруживает файл ответов на флешке и установка проходит в соответствии с заданными параметрами.
Установка Windows

Перезагрузка

Подготовка устройств

Использовать стандартные параметры

Завершение настройки параметров
Вводим пароль учетной записи

Система установлена
