
The `route add` command in CMD is used to manually add a route to the local routing table, allowing you to specify the destination network, subnet mask, and gateway for packet routing.
route add <destination> MASK <subnet_mask> <gateway> [metric <metric>] [IF <interface_index>]
Replace `<destination>`, `<subnet_mask>`, `<gateway>`, `<metric>`, and `<interface_index>` with the specific values for your network configuration.
Understanding Networking Basics
What is Networking?
Networking refers to the practice of connecting computers and other devices to share resources and information. At the core of networking are components such as switches, routers, and protocols that work together to facilitate communication. Understanding basic networking concepts is essential as it provides the foundation for effectively managing and troubleshooting network connections.
What are Routes?
A route is a path that network packets follow to reach their destination. Routing enables data to travel across networks, guiding information on the most efficient paths. Configuring routes correctly is crucial for maintaining optimal network performance, minimizing latency, and ensuring reliable connectivity.
Mastering Ip Route Cmd: A Quick Reference Guide
What is the `route` Command?
Introduction to the `route` Command
The `route` command is a tool available in Command Prompt (cmd) used to view and modify the IP routing table on a Windows operating system. The routing table holds essential information about how data packets should be directed through the network. Common use cases for the `route` command include adding, deleting, and modifying routing entries.
Syntax of the `route add` Command
The syntax for the `route add` command is as follows:
route ADD destination MASK subnet_mask gateway metric
This structure allows users to specify various parameters to define how the command should execute, detailing where the route leads and which gateway to utilize.
Trace Rout Cmd: Mastering Your Network Path in Cmd
How to Use the `route add` Command
Basic Command Structure
To effectively use the `route add` command, it’s vital to understand the role of each parameter:
- destination: This is the IP address or hostname of the target route. It represents where the data is intended to go.
- subnet_mask: This defines the range of addresses contained in the destination network. A mask of `255.255.255.0` often indicates a class C subnet, usable for smaller networks.
- gateway: This specifies the next-hop IP address through which packets will travel en route to the destination. It’s crucial that this address be reachable on the local network.
- metric: An optional parameter that specifies the cost of using the route, allowing for priority between multiple routes.
Example of Basic Usage
Here’s an example of adding a basic route using the `route add` command:
route ADD 192.168.1.0 MASK 255.255.255.0 192.168.1.1
Explanation: The command above creates a route for the IP range `192.168.1.0` with a subnet mask of `255.255.255.0`, routing traffic through the gateway `192.168.1.1`. This command is particularly useful for directing packets within a local area network (LAN).
Mastering the Route Cmd Command in Minutes
Advanced Routing Scenarios
Using Metrics
Importance of Metrics
Metrics play a vital role in route selection by indicating the “cost” associated with using a particular route. Lower metrics are preferred over higher ones. For instance, if you have two routes to the same destination, the system will choose the one with the lower metric.
Example Usage of Metrics
route ADD 10.0.0.0 MASK 255.255.255.0 10.0.0.1 METRIC 5
In this example, the command adds a route to the IP range `10.0.0.0` using `10.0.0.1` as the gateway, with a metric of `5`.
Adding Persistent Routes
What are Persistent Routes?
Persistent routes are routes that remain in the routing table even after a reboot. Having persistent routes can be beneficial for ensuring consistent and reliable routing configurations.
Command to Add a Persistent Route
To add a route that persists across reboots, use the `-p` switch:
route -p ADD 192.168.2.0 MASK 255.255.255.0 192.168.2.1
This command ensures that the route to `192.168.2.0` is maintained in the routing table after a system restart.
Mastering Cmd Route Print for Networking Insights
Viewing and Modifying Routes
Viewing the Current Routing Table
To view the routing table entries that are currently configured, the following command can be used:
route PRINT
This command provides a detailed list of all routes, including the destination, mask, gateway, and metric, allowing users to verify current configurations.
Modifying Existing Routes
If you need to change an existing route, use the `route CHANGE` command:
route CHANGE 192.168.1.0 MASK 255.255.255.0 192.168.1.254
This example modifies the route for `192.168.1.0`, directing traffic to a new gateway, `192.168.1.254`.
Deleting a Route
To delete a route from the routing table, you can use the `route DELETE` command:
route DELETE 192.168.1.0
This command effectively removes any route entries associated with `192.168.1.0`, ensuring that data packets will no longer be directed through that path.
Add User Cmd Windows 10: Your Quick Start Guide
Common Errors and Troubleshooting
Common Errors with `route add`
Users may encounter common errors when using the `route add` command, such as:
- Mismatched subnet masks: Ensure that the subnet mask accurately represents the route being added.
- Incorrect gateway address: Verify that the specified gateway is reachable; otherwise, packets will be dropped.
How to Troubleshoot with CMD
To troubleshoot routing issues, utilize cmd tools like `ping` and `tracert`. The `ping` command tests connectivity to a specific IP address, while the `tracert` command displays the route packets take to reach a destination, pinpointing any potential bottlenecks or failures.

Mastering The Startup Cmd: A Quick Guide
Conclusion
The `add route cmd` command is an invaluable tool for effectively managing network configurations. By mastering how to add, modify, and delete routes, users can significantly enhance their network efficiency and reliability. Practice using these commands and explore further resources to deepen your understanding of command prompt functionalities related to networking.
Sometimes you need to manually add, change, or remove a route on a Windows machine. Here is quick guide to help you accomplish these tasks.
First start by opening a CMD prompt by going to start then typing cmd.
These commands should work for Win XP, Win Vista, Win 98, Win NT, Win 2000, Win 2008, Win 2012, Win 7, Win 8, Win 10.
Show the Current Routing Table
C:\>route print
===========================================================================
Interface List
 11...54 ee 75 5b e3 c9 ......Intel(R) Ethernet Connection (3) I218-LM
 13...5c e0 c5 7f e4 c8 ......Intel(R) Dual Band Wireless-AC 7265
===========================================================================

IPv4 Route Table
===========================================================================
Active Routes:
Network Destination        Netmask          Gateway       Interface  Metric
          0.0.0.0          0.0.0.0   192.168.177.1    192.168.177.30     10
        127.0.0.0        255.0.0.0         On-link         127.0.0.1    306
     192.168.60.0    255.255.255.0         On-link      192.168.60.1    276
     192.168.60.1  255.255.255.255         On-link      192.168.60.1    276
   192.168.60.255  255.255.255.255         On-link      192.168.60.1    276
    192.168.177.0    255.255.255.0         On-link     192.168.177.1    276
    192.168.177.1  255.255.255.255         On-link     192.168.177.1    276
  192.168.177.255  255.255.255.255         On-link     192.168.177.1    276
===========================================================================
Persistent Routes:
  None
The default route is represented by A destination/netmask of 0.0.0.0. If there isn’t a route with a more specific destination and netmask, the default route is used.
Use this subnet calculator if you need help subnetting.
Add a Static Route
To add a route to the routing table use the route add command. An example looks like this:
route add 10.0.0.0 mask 255.0.0.0 192.168.177.1You can optionally add a metric 2 to the end if you want to add a specific weight to the route. The routes with the lowest metric will take precedence over higher metrics. By default, static routes have a metric of 6.
You can also optionally add a IF 2 to the end. This will force the route to use interface 2. You can see what interface numbers you have with the route print command.
Active Routes:
Network Destination        Netmask          Gateway       Interface  Metric
         10.0.0.0        255.0.0.0         On-link     172.16.177.30      6
Remove a Static Route
To remove a route you must use the route delete command and the destination.
route delete 10.0.0.0Change a Static Route
If you simply want to update a static route you can use the route change command.
route CHANGE 157.0.0.0 MASK 255.0.0.0 157.55.80.5 METRIC 2 IF 2Troubleshooting
If you get the following error:
The requested operation requires elevation.
To resolve this you will need administrator access to the system. Go to the start menu and when you type cmd right click on the cmd.exe program and click Run As Administrator. This opens a CMD prompt with more privileges.
For any further help you can use the built in help the route command provides. Simply type route and hit enter.
C:\>route

Manipulates network routing tables.

ROUTE [-f] [-p] [-4|-6] command [destination]
                  [MASK netmask]  [gateway] [METRIC metric]  [IF interface]

  -f           Clears the routing tables of all gateway entries.  If this is
               used in conjunction with one of the commands, the tables are
               cleared prior to running the command.

  -p           When used with the ADD command, makes a route persistent across
               boots of the system. By default, routes are not preserved
               when the system is restarted. Ignored for all other commands,
               which always affect the appropriate persistent routes. This
               option is not supported in Windows 95.

  -4           Force using IPv4.

  -6           Force using IPv6.

  command      One of these:
                 PRINT     Prints  a route
                 ADD       Adds    a route
                 DELETE    Deletes a route
                 CHANGE    Modifies an existing route
  destination  Specifies the host.
  MASK         Specifies that the next parameter is the 'netmask' value.
  netmask      Specifies a subnet mask value for this route entry.
               If not specified, it defaults to 255.255.255.255.
  gateway      Specifies gateway.
  interface    the interface number for the specified route.
  METRIC       specifies the metric, ie. cost for the destination.

All symbolic names used for destination are looked up in the network database
file NETWORKS. The symbolic names for gateway are looked up in the host name
database file HOSTS.

If the command is PRINT or DELETE. Destination or gateway can be a wildcard,
(wildcard is specified as a star '*'), or the gateway argument may be omitted.

If Dest contains a * or ?, it is treated as a shell pattern, and only
matching destination routes are printed. The '*' matches any string,
and '?' matches any one char. Examples: 157.*.1, 157.*, 127.*, *224*.

Pattern match is only allowed in PRINT command.
Diagnostic Notes:
    Invalid MASK generates an error, that is when (DEST & MASK) != DEST.
    Example> route ADD 157.0.0.0 MASK 155.0.0.0 157.55.80.1 IF 1
             The route addition failed: The specified mask parameter is invalid.
 (Destination & Mask) != Destination.

Examples:

    > route PRINT
    > route PRINT -4
    > route PRINT -6
    > route PRINT 157*          .... Only prints those matching 157*

    > route ADD 157.0.0.0 MASK 255.0.0.0  157.55.80.1 METRIC 3 IF 2
             destination^      ^mask      ^gateway     metric^    ^
                                                         Interface^
      If IF is not given, it tries to find the best interface for a given
      gateway.
    > route ADD 3ffe::/32 3ffe::1

    > route CHANGE 157.0.0.0 MASK 255.0.0.0 157.55.80.5 METRIC 2 IF 2

      CHANGE is used to modify gateway and/or metric only.

    > route DELETE 157.0.0.0
    > route DELETE 3ffe::/32
Check out this article for more cool Windows CLI commands.
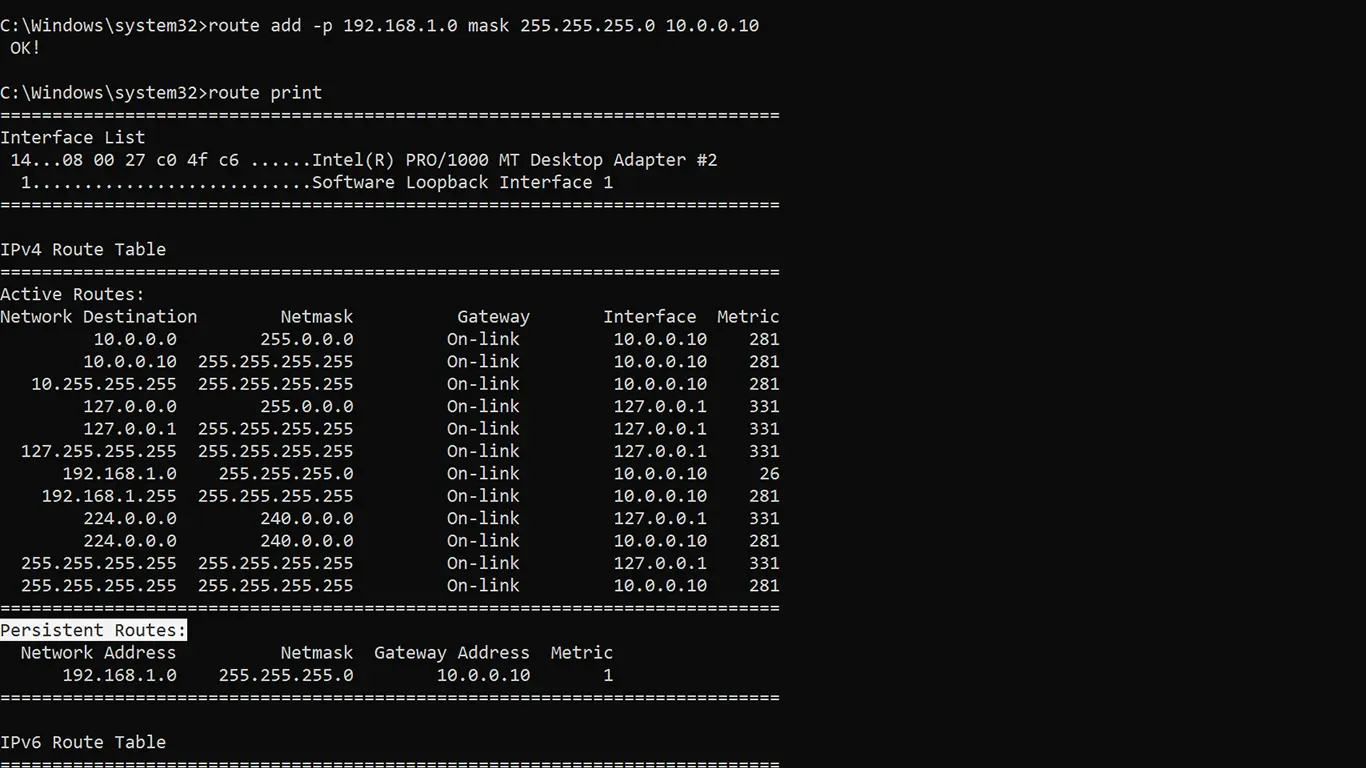
Adding a static route in Microsoft Windows 10 or Server is done by using the route add command.
The following is the general syntax of the route add command we need to follow to add a permanent static route in Windows:
route add -p <destination> mask <subnet-mask> <gateway>For example, the following route command tells the windows to add a new persistent route to the 192.168.1.0/24 network, using 10.0.0.1 as the gateway to reach the network.
route add -p 192.168.1.0 mask 255.255.255.0 10.0.0.1When you want to add a static route to a single host, use the netmask 255.255.255.255.
For example, the following command adds a static route to the destination host 192.168.1.100 with the gateway address 10.0.0.1.
route add -p 192.168.1.100 mask 255.255.255.255 10.0.0.1The most important part of the route add command is the -p option. Without the -p switch, our new route would not be persistent. It will disappear the next time you reboot your Windows PC/Server.
We can print the windows routing table using the route print command. Under the Persistent Routes header, you will see the list of permanent static routes.
Following is another static route example with a metric value:
route add -p 192.168.1.0 mask 255.255.255.0 10.0.0.1 metric 5In case if you have more than one network interface, you could also specify the interface ID using the if command option.
route add -p 192.168.1.0 mask 255.255.255.0 10.0.0.1 if 1When specifying the network interface, you have to provide the interface ID which you can find using the route print command.

Windows hold permanent static routes in the following registry
location: HKEY_LOCAL_MACHINE\SYSTEM\CurrentControlSet\Servi.
ces\Tcpip\Parameters\PersistentRoutes
Static routes are used to define specific paths for network traffic to follow, rather than relying on the default routing behavior determined by the routing table. In some cases, you may need to add persistent static routes to ensure that network traffic between specific subnets or hosts is always directed through a particular gateway.
In this short guide, we will show you how to add persistent static routes in Windows.
Step 1: Open Command Prompt as Administrator
To add a persistent static route, you will need to run the Command Prompt as an administrator. Click the Start button, search for “cmd” or “Command Prompt”, right-click on the Command Prompt result, and select “Run as administrator”.
Step 2: Determine the Interface Index
Before adding the static route, you need to determine the interface index of the network adapter through which the traffic should be routed. In the Command Prompt, run the following command:
netsh interface ipv4 show interface
This command will display a list of network interfaces on your system, along with their interface index numbers. Note the index number of the interface you want to use for the static route.
Step 3: Add the Persistent Static Route
To add the persistent static route, use the route command with the following syntax:
route -p ADD <destination> MASK <subnet_mask> <gateway> METRIC <metric> IF <interface_index>
Replace <destination> with the target network or IP address, <subnet_mask> with the appropriate subnet mask for the destination, <gateway> with the IP address of the gateway through which the traffic should be routed, <metric> with a numerical value representing the route’s priority (lower values have higher priority), and <interface_index> with the interface index you noted in Step 2.
For example, to add a persistent static route for the 192.168.2.0/24 subnet through the gateway 192.168.2.1, with a metric of 1 and an interface index of 3, run:
route -p ADD 192.168.2.0 MASK 255.255.255.0 192.168.2.1 METRIC 1
The -p flag ensures that the route will persist across system reboots.
Step 4: Verify the Static Route
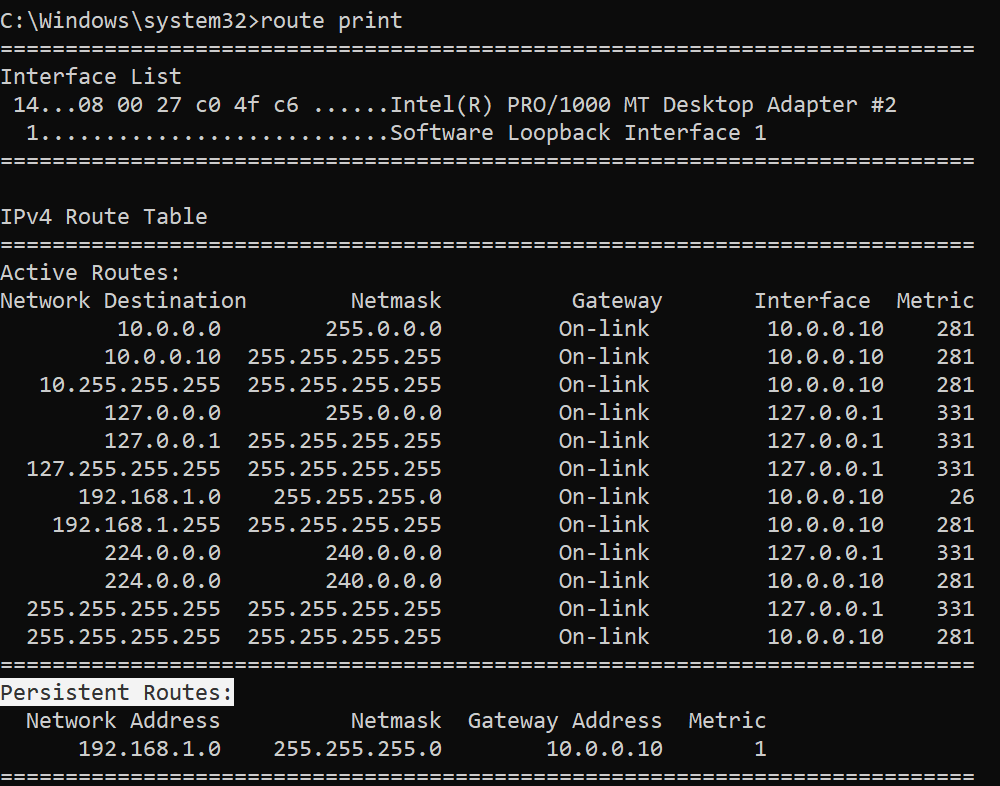
To verify that the static route has been added successfully, run the following command:
route print
This command will display the routing table, including the static route you just added. Check the “Persistent Routes” section to ensure that your new route is listed.
D:\>route print
===========================================================================
Interface List
0x1 ........................... MS TCP Loopback interface
0x2 ...01 56 57 d1 00 08 ...... VMware Virtual Ethernet Adapter for VMnet8
0x3 ...01 56 57 d1 00 01 ...... VMware Virtual Ethernet Adapter for VMnet1
0x4 ...10 22 49 h0 b7 a7 ...... Broadcom NetLink (TM) Fast Ethernet - Packet Sch
eduler Miniport
0x5 ...01 32 5e 3b gb 77 ...... Dell Wireless 1395 WLAN Mini-Card - Packet Sched
uler Miniport
0x10007 ...00 1h e1 de 27 gh ...... Bluetooth LAN Access Server Driver - Packet
Scheduler Miniport
===========================================================================
===========================================================================
Active Routes:
Network Destination        Netmask          Gateway       Interface  Metric
          0.0.0.0          0.0.0.0      192.168.2.1     192.168.2.2       25
        127.0.0.0        255.0.0.0        127.0.0.1       127.0.0.1       1
      192.168.2.0    255.255.255.0      192.168.2.2     192.168.2.2       25
      192.168.2.0    255.255.255.0      192.168.2.1     192.168.2.2       1
      192.168.2.2  255.255.255.255        127.0.0.1       127.0.0.1       25
    192.168.2.255  255.255.255.255      192.168.2.2     192.168.2.2       25
     192.168.26.0    255.255.255.0     192.168.26.1    192.168.26.1       20
     192.168.26.1  255.255.255.255        127.0.0.1       127.0.0.1       20
   192.168.26.255  255.255.255.255     192.168.26.1    192.168.26.1       20
    192.168.201.0    255.255.255.0    192.168.201.1   192.168.201.1       20
    192.168.201.1  255.255.255.255        127.0.0.1       127.0.0.1       20
  192.168.201.255  255.255.255.255    192.168.201.1   192.168.201.1       20
        224.0.0.0        240.0.0.0      192.168.2.2     192.168.2.2       25
        224.0.0.0        240.0.0.0     192.168.26.1    192.168.26.1       20
        224.0.0.0        240.0.0.0    192.168.201.1   192.168.201.1       20
  255.255.255.255  255.255.255.255      192.168.2.2     192.168.2.2       1
  255.255.255.255  255.255.255.255     192.168.26.1    192.168.26.1       1
  255.255.255.255  255.255.255.255    192.168.201.1   192.168.201.1       1
  255.255.255.255  255.255.255.255    192.168.201.1           10007       1
  255.255.255.255  255.255.255.255    192.168.201.1               4       1
Default Gateway:       192.168.2.1
===========================================================================
Persistent Routes:
  Network Address          Netmask  Gateway Address  Metric
      192.168.2.0    255.255.255.0      192.168.2.1       1
Commands and Their Functions:
- netsh interface ipv4 show interface – Shows a list of network interfaces along with their interface index numbers.
- route -p ADD – Adds a persistent static route to the routing table.
- route print – Displays the current routing table, including static routes.
Conclusion
By adding static routes, you can ensure that network traffic between specific subnets or hosts is always directed through a particular gateway, improving the reliability and predictability of your network connections.
Please feel free to leave comments and suggest improvements to this guide. Your feedback is valuable and helps us improve our content for our audience.
В данной статье мы рассмотрим, что такое статический маршрут и зачем его необходимо прописывать. Мы обсудим основы статической маршрутизации, рассмотрим примеры использования утилиты route, а также детально разберем, как прописать маршруты с помощью команды route add в командной строке Windows.
Статическая маршрутизация
Статическая маршрутизация представляет собой один из методов управления путями, по которым сетевой трафик проходит через сеть. Это не динамический процесс, и его необходимо создать вручную, наполнив таблицы маршрутизации фиксированными маршрутами.
В отличие от динамической маршрутизации, которая использует различные алгоритмы и протоколы для определения оптимального пути передачи данных, статическая маршрутизация полагается на заранее определенные маршруты. Это удобно для небольших сетей, где изменения маршрутов не частое явление, и позволяет администратору сети устанавливать явные пути для срабатывания маршрутов.
Статический маршрут
Статический маршрут указывает на определенный маршрут в таблице маршрутизации, который администратор сети задает вручную. Он включает такие параметры, как адрес назначения, маска подсети и адрес шлюза. Данный маршрут фиксируется в таблице маршрутизации и используется до тех пор, пока он не будет удален или изменен.
Основное преимущество статического маршрута в том, что он позволяет сеть оставаться стабильной и предсказуемой. Однако, в случае сбоя, маршруты не будут изменяться автоматически, что может потребовать дополнительных усилий по администрированию сети.
Примеры использования утилиты route
Для управления таблицами маршрутизации в операционной системе Windows используется утилита route. Она позволяет добавлять, изменять и удалять маршруты. Рассмотрим основные команды и их использование.
Команда route print
Команда route print используется для отображения текущей таблицы маршрутизации. Это полезно, когда нужно проверить, какие маршруты уже присутствуют в системе и убедиться, что новый маршрут будет добавлен правильно. Выполните следующую команду для отображения таблицы:
route print
Добавление статического маршрута
Добавление маршрута осуществляется с использованием команды route add. Рассмотрим пример, когда требуется добавить маршрут в сеть 192.168.1.0/24 с использованием шлюза 192.168.1.1:
route add 192.168.1.0 mask 255.255.255.0 192.168.1.1
Сохранение постоянного маршрута
Для того чтобы маршрут сохранился после перезагрузки, необходимо использовать ключ -p, который указывает на постоянность маршрута:
route -p add 192.168.1.0 mask 255.255.255.0 192.168.1.1
Практические примеры
Пример добавления маршрута для доступа к локальной сети при включенном VPN
Рассмотрим пример, когда необходимо прописать маршрут, который позволит получить доступ к локальной сети при включенном VPN-соединении. Это полезно для пользователей, у которых дома более одного компьютера, а в Интернет они выходят через VPN.
Предположим, что у нас есть локальная сеть с адресом 192.168.1.0/24. Локальный IP-адрес первого компьютера (A), на котором присутствует VPN-соединение – 192.168.1.2. Локальный IP-адрес второго компьютера (B) – 192.168.1.3. IP-адрес шлюза (модем) – 192.168.1.1.
Нам нужно настроить маршрут на компьютере A, чтобы он мог видеть компьютер B при включенном VPN-соединении. Для этого выполните следующие шаги:
- Откройте командную строку Windows (
Пуск -> Выполнить -> cmd). - Введите следующую команду:
route -p add 192.168.1.0 mask 255.255.255.0 192.168.1.1
Синтаксис и основные ключи утилиты route
Команда route имеет несколько ключей и опций, которые используются для разных целей. Рассмотрим наиболее важные из них:
-fиспользуется для очистки всех маршрутов из таблицы, это разрушительное действие, поэтому используйте его осторожно.-p(persistent) для сохранения маршрута после перезагрузки системы.addдобавляет новый маршрут.changeизменяет существующий маршрут.deleteудаляет маршрут.printотображает таблицу маршрутизации.
Пример полного синтаксиса команды:
route [-f] [-p] [destination] [mask] [gateway] [metric] [if]destination– адрес целевой сети или хоста.mask– маска подсети.gateway– IP-адрес шлюза.metric– метрика маршрута.if– интерфейс, через который будет осуществляться маршрут.
Работа с командами change и delete
Команда change используется для изменения существующего маршрута. Например, если требуется изменить шлюз для маршрута до сети 192.168.1.0, можно выполнить следующую команду:
route change 192.168.1.0 mask 255.255.255.0 192.168.1.2
Команда delete удаляет существующий маршрут. Расмотрим пример удаления маршрута:
route delete 192.168.1.0
Это удалит маршрут до сети 192.168.1.0 из таблицы маршрутизации.
Работа с метриками и интерфейсами
Метрика – это числовое значение, которое влияет на выбор маршрута. Чем ниже значение метрики, тем предпочтительнее маршрут. Интерфейс указывает, через какой сетевой интерфейс будет выполняться маршрут.
Пример добавления маршрута с указанием метрики:
route add 192.168.1.0 mask 255.255.255.0 192.168.1.1 metric 5
Выбор интерфейса может быть полезен в сложных сетях, где необходимо контролировать, через какой сетевой адаптер будут отправляться пакеты. Рассмотрим пример использования интерфейса:
route add 192.168.1.0 mask 255.255.255.0 192.168.1.1 if 2
В данном примере используется интерфейс с номером 2.
Заключение
Статическая маршрутизация может стать простым и надежным решением для управления трафиком в небольшой сети или в случаях, когда стабильность маршрутов важнее их динамического изменения. Использование команды route add в Windows позволяет легко добавлять и управлять маршрутами, обеспечивая контроль за сетевым трафиком и гарантируя доступность нужных сегментов сети.
Освоив основные команды и принципы работы с утилитой route, вы сможете эффективно управлять маршрутами в операционной системе Windows, обеспечивая предсказуемость и стабильность своей сети. Важно понимать, что настройка всех маршрутов должна проводиться с учетом особенностей вашей сети и требований к доступности ресурсов.