
When it comes to optimizing your workflow on Windows 11, one key feature that can make a significant difference is the ability to add a node to the path. Did you know that by adding a node to the path, you can easily access and run executables from any directory in the command prompt or PowerShell? It’s a small but powerful tweak that can save you valuable time and streamline your development process.
Add Node to Path Windows 11 gives you the flexibility to expand the capabilities of your command line interface. By adding directories to the system path, you can effortlessly navigate between different folders and run applications without having to specify their full paths. This feature has been a part of Windows for quite some time, allowing developers and power users to enhance their efficiency and productivity. With the latest iteration of Windows, Windows 11, the process of adding a node to the path has become even more seamless and user-friendly. Whether you’re a seasoned developer or just starting your coding journey, incorporating this technique can greatly enhance your command line experience.
Adding a Node to the Path on Windows 11 involves a few simple steps. First, open the Control Panel by clicking on the Start menu and selecting «Control Panel.» Next, navigate to the System and Security category and click on «System.» From there, click on «Advanced system settings» and go to the «Advanced» tab. Under the «System Variables» section, locate the «Path» variable and select «Edit.» Finally, add the desired Node path and click «OK» to save the changes. Following these steps, you’ll be able to successfully add a Node to the Path on Windows 11.

How to Add Node to Path in Windows 11
Windows 11 is the latest operating system developed by Microsoft, bringing new features and enhancements to the Windows experience. If you are a developer working with Node.js, you may need to add the Node.js executable path to the system’s PATH environment variable to easily run Node.js commands from any directory in the command prompt. In this article, we will guide you on how to add Node to the PATH in Windows 11, ensuring a seamless workflow for your Node.js development projects.
What is the PATH Environment Variable in Windows?
The PATH environment variable in Windows is a system variable that contains a list of directories where the operating system looks for executable files when you run a command in the command prompt or PowerShell. When you add a directory to the PATH variable, you allow the system to find and execute the programs located in that directory without specifying the full path every time.
By default, the PATH variable in Windows includes directories such as C:\Windows\System32 and C:\Program Files, among others. However, if you want to run a command or executable from a directory that is not on the default PATH, you need to add that directory to the PATH environment variable.
Adding Node.js to the PATH in Windows 11 allows you to access the Node.js command-line tool, npm, and other globally installed packages from any command prompt or PowerShell session, regardless of the current working directory.
Methods to Add Node to Path in Windows 11
Method 1: Using the Node.js Installer
The easiest and recommended way to add Node.js to the PATH in Windows 11 is by using the Node.js installer, which automatically sets up the environment variables during the installation process.
Follow these steps to add Node.js to the PATH using the installer:
- Download the latest Node.js installer from the official website (https://nodejs.org).
- Double-click the downloaded installer to launch it.
- Follow the on-screen instructions to install Node.js.
- Make sure to select the option «Automatically install the necessary tools» during the installation process.
Once the installation is complete, Node.js will be added to the PATH environment variable, and you can now run Node.js commands from any command prompt or PowerShell window.
Method 2: Manually Adding Node.js to the PATH
If you have already installed Node.js without selecting the option to add it to the PATH, or if you want to add a specific version of Node.js to the PATH, you can manually configure the environment variable.
Follow these steps to manually add Node.js to the PATH in Windows 11:
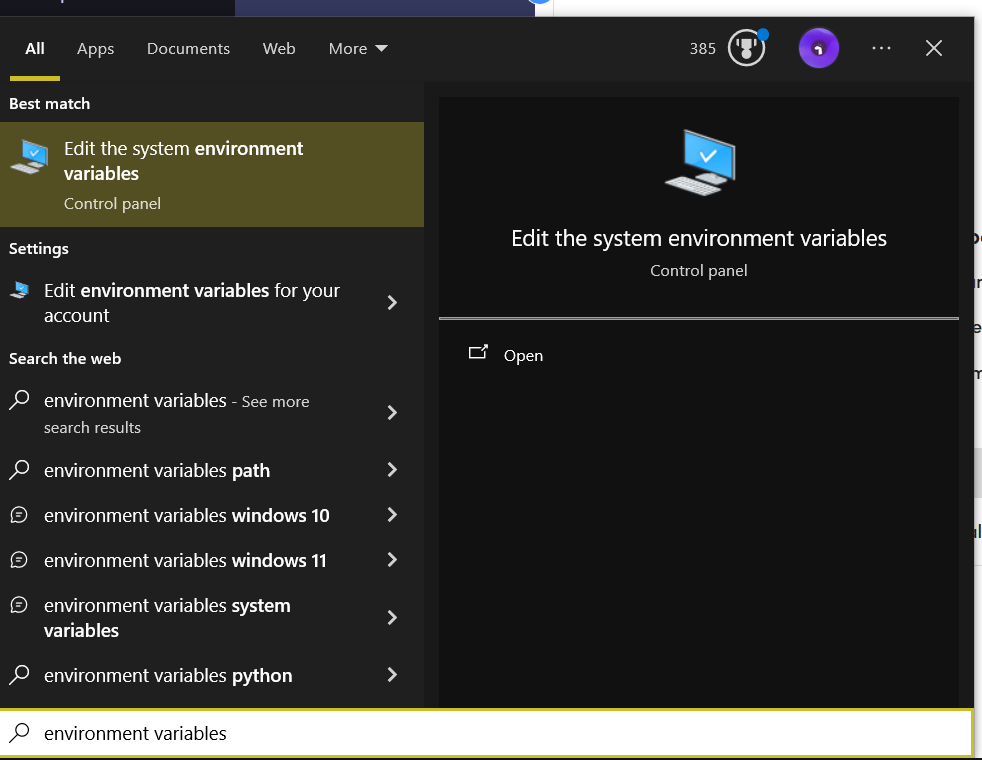
- Open the Start menu and search for «Environment Variables.»
- Click on the «Edit the system environment variables» option that appears.
- In the System Properties dialog, click on the «Environment Variables» button.
- In the Environment Variables dialog, locate the «Path» variable under the «System variables» section and click on the «Edit» button.
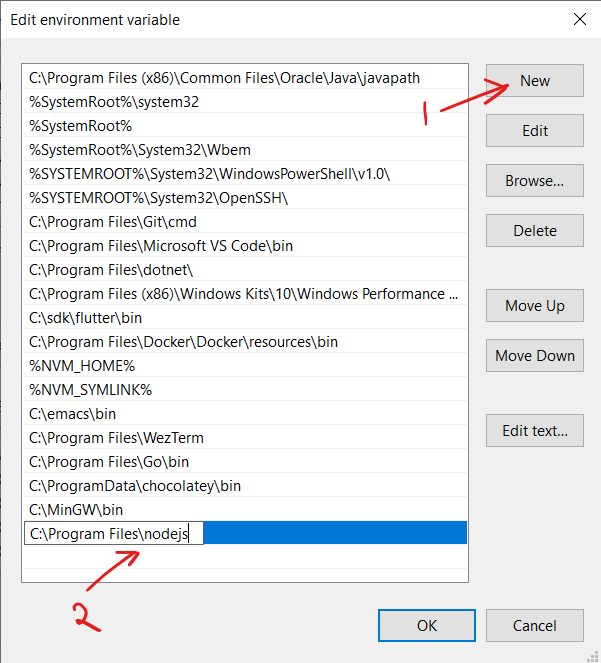
- In the Edit Environment Variable dialog, click on the «New» button to add a new entry.
- Enter the path to the Node.js executable. By default, it is located in the following directory:
C:\Program Files\nodejs. - Click «OK» on all the open dialogs to save the changes.
After adding Node.js to the PATH manually, open a new command prompt or PowerShell window, and you should be able to run Node.js commands without specifying the full path.
Verifying Node.js Installation
Once you have added Node.js to the PATH in Windows 11, you can verify the installation by running a few basic commands.
To check the Node.js version installed, open a command prompt or PowerShell window and type the following command:
node -v
If Node.js is correctly installed and added to the PATH, it will display the installed version number.
You can also check the npm version by running the following command:
npm -v
If npm is installed and configured correctly, it will display the installed version number.
Conclusion
Adding Node.js to the PATH in Windows 11 is essential for seamless development with Node.js projects. Whether you choose to use the Node.js installer or manually configure the PATH variable, you can now run Node.js commands from any directory in the command prompt or PowerShell, enhancing your productivity and workflow.

Adding Node to Path in Windows 11
When working with Node.js on Windows 11, it is essential to add Node to the system’s Path environment variable. This allows you to run Node commands from any directory in the command prompt. Here’s how you can add Node to the Path:
- Open the Start menu and search for «environment variables.»
- Click on «Edit the system environment variables.»
- In the System Properties window, click on the «Environment Variables» button.
- In the «System Variables» section, scroll down and find the «Path» variable.
- Click on «Edit.»
- In the «Edit Environment Variable» window, click on «New.»
- Enter the path to your Node.js installation folder (e.g., «C:\Program Files\nodejs») and click «OK.»
- Close all the windows and open a new command prompt.
- Type «node -v» to verify that Node is added to the Path successfully.
Add Node to Path Windows 11: Key Takeaways
- Adding a node to the path in Windows 11 allows you to run commands and access programs from anywhere in the system.
- You can add a node to the path by modifying the environment variables in Windows 11.
- Open the System Properties window and click on «Environment Variables» to add a node to the path.
- In the Environment Variables window, under the «System variables» section, select the «Path» variable and click «Edit.»
- Add the path of the desired node to the variable value list, separating it with a semicolon.
Frequently Asked Questions
Here are some frequently asked questions about adding Node to Path in Windows 11:
1. How can I add Node to Path in Windows 11?
To add Node to Path in Windows 11, you need to follow these steps:
1. Download and install Node.js on your Windows 11 computer. Make sure to select the appropriate version (32-bit or 64-bit) for your system.
2. Open the System Properties by searching for «System Properties» in the Start menu and selecting the corresponding option.
3. In the System Properties window, click on the «Advanced» tab and then click on the «Environment Variables» button.
4. In the Environment Variables window, locate the «Path» variable under the «System variables» section and click on the «Edit» button.
5. In the Edit Environment Variable window, click on the «New» button and enter the path to the Node.js installation directory. Typically, this will be something like «C:\Program Files\nodejs».
6. Click «OK» to save the changes and close all the windows. Node.js has now been added to the system’s PATH variable.
2. Why is it important to add Node to Path?
Adding Node to Path in Windows 11 is important because it allows you to run Node.js and npm (Node Package Manager) commands from any directory in the command prompt or PowerShell. Without adding Node to Path, you would need to navigate to the Node.js installation directory every time you want to run a Node.js or npm command.
By adding Node to Path, you can easily access Node.js and npm commands from any location on your computer, making your development workflow more efficient and streamlined.
3. Can I add multiple versions of Node to Path in Windows 11?
Yes, you can add multiple versions of Node to Path in Windows 11. Each version of Node.js will have its own installation directory, and you can add the paths to these directories to the system’s PATH variable following the steps mentioned earlier.
By adding multiple versions of Node to Path, you can easily switch between different versions of Node.js and use the desired version for your projects without having to modify the PATH variable every time.
4. Do I need to restart my computer after adding Node to Path in Windows 11?
No, you do not need to restart your computer after adding Node to Path in Windows 11. The changes to the system’s PATH variable take effect immediately, allowing you to use Node.js and npm commands without rebooting your system.
However, if you have any command prompt or PowerShell windows open, you may need to close and reopen them for the changes to take effect in those specific instances.
5. How do I verify if Node is correctly added to Path in Windows 11?
To verify if Node is correctly added to Path in Windows 11, follow these steps:
1. Open the command prompt or PowerShell.
2. Type the command «node -v» (without quotes) and press Enter. This command will display the installed version of Node.js if it is correctly added to the system’s PATH variable.
3. Type the command «npm -v» (without quotes) and press Enter. This command will display the installed version of npm if it is correctly added to the system’s PATH variable.
If both commands return the respective versions, then Node.js and npm are correctly added to Path in Windows 11.
So, to summarize, adding a node to the path in Windows 11 is a straightforward process that can greatly enhance your system’s functionality. By adding a node, you can easily access and run executables from anywhere on your computer without having to navigate through multiple folders. This can save you time and simplify your workflow.
To add a node to the path in Windows 11, you need to access the system’s environment variables and modify the «Path» variable to include the desired node. This can be done through the Control Panel or the Command Prompt. Remember to be cautious when modifying system settings and make sure to enter the correct node path to avoid any errors or issues.

|
| Nodejs, npm, Javascript Logo dark background |
JavaScript is really popular language for building web based frontend application, even before the presences of Nodejs. Now there’s Nodejs, with it not only you can just build front end application, now you can build any kind of application using Javascript with Node Js. With it’s package manager called NPM (node package manager), the biggest collections of libraries in programming world, you will build a robust application using Nodejs with its huge collections of libraries written in Javascript, you can just search whatever dependency you need, pick it, use it whichever for free.
Now if you are a beginner programmer who do not know how to get started doing Javascript programming with package manager. This is without further ado let’s just start on how to install Nodejs into your platform.
1. Install Nodejs
You need to install Nodejs to use NPM, to have Nodejs installed on your Windows computer. You can download Nodejs installer from nodejs.org, click on the installer and just follow the default configuration.
If you are using Linux or MacOS, you don’t need to download zip archive of Nodejs because usually for most Linux distributions already have Nodejs on their repositories. Using Linux especially for Ubuntu, just open a terminal and type in:
sudo apt-get install nodejs
For Mac Os, using brew instead:
brew install node
Just wait for the process to finish.
2. Add npm to path
After the installation process of Nodejs is finished, if you try typing npm on terminal or cmd, you will get an error telling you that npm is not in your path. You need to put npm to your path by following the below instructions.
a. For Windows
— On windows, by default npm will be installed under C:\Program Files\nodejs\
— Press windows button, search for edit system environment, open that program.
— Environment variables > system variables > edit Path > New, and then add C:\Program Files\nodejs\ > OK and Apply
— Then close the cmd and reopen it, now if you type npm, it is not valid command but at least now you have npm on your path. You’ve successfully installed nodejs.
b. Linux/Ubuntu/Mac OS users
To add NPM on your Ubuntu machine, simply by using apt package manager:
sudo apt-get install npm
If you are using Linux but not Ubuntu, I am so sorry because I’ve never used Linux other than Ubuntu, basically just replacing apt-get with yum if you are using Fedora for example.
For Mac OS you don’t have to install, npm is already included with Nodejs.
So that’s how simple it is to install Nodejs for you to begin your Journey developing application using Javascript. If you already have Nodejs and NPM on your terminal, you can do a simple test for example to test Nodejs, just type node and then follow by your Javascript example code:
node
console.log("Hello World!");
In the future you will use NPM as package manager, to add, remove, upgrade your Javascript dependencies. The syntax you need to remember that you will be using it frequently is for example installing and removing dependencies, the syntax is as follows:
npm install the-dependency-name
npm uninstall the-dependency-name
Last Updated :
04 Apr, 2024
Node Package Manager (npm) is a package manager for managing dependencies and packages in Node.js projects. However, users often encounter issues with npm commands not being recognized in Windows 8 and 10 due to path configuration problems.
In this article, we’ll discuss the following approaches to fix the npm path issue.
Table of Content
- NodeJS not being installed
- PATH environment variable not set properly
Error:
Due to some error, it might show an error that it cannot find npm when it is run on the terminal.

Reason for error in NPM:
1. NodeJS not being installed.
2. PATH environment variable not set properly.
Approach 1: NodeJS not being installed
The error can be occour if you haven’t install node in your system.
- Make sure to install NodeJS from here.
- You can follow the step from this article.
After you installed the Node check it in the command prompt.
node -v
npm -vApproach 2: PATH environment variable not set properly
The PATH environment variable tells the command line where executable binaries are located.
To set the PATH for node.js and npm follow these steps:
Step 1: Get the installed location of your NodeJS runtime.
By default it is:
C:\Program Files\nodejs
Step 2: Search for environment variables in the global search.
Step 3: Click Environment Variables

Step 4: On System Variables, select Path and click edit

Step 5: Click New and paste the location of your NodeJS runtime
Step 6: Reload your terminal window and now it should be fixed.
npm --version
To check if it is working properly.

When you try to run npm commands such as npm install, there may be times when the Terminal would respond with npm command not found error as shown below:
$ npm install -g n
zsh: command not found: npm
The command not found error occurs when your computer can’t find the associated program on your computer’s PATH environment variable.
The PATH environment variable is a list of directories specifying where your computer should look for a program to run from the Terminal.
For example, when you execute the npm command from the Terminal, your computer will look through all the folders listed under PATH to find the npm executable file and pass your commands to it.
When the npm executable file is not found, then your computer will respond with the command not found error above.
When you install or update your npm version, the folder where the npm executable file should be automatically added to your computer’s PATH environment variable.
The reason why your npm command can’t be found might be that the PATH environment variable is somehow misconfigured.
To fix this error, you need to add the folder where the npm executable file is located back to the PATH variable.
But to do this, you need to know where your npm executable file is located first.
For Windows users, the npm executable file may be located inside C:\Program Files\nodejs
You can add the location to the Windows PATH environment variable using the Command Prompt as follows:
> SET PATH=C:\Program Files\nodejs;%PATH%
> npm
Or you can set the PATH variable by using Windows graphical UI.
The following steps will help you to fix the error from the Windows interface.
Fixing npm command not found error on Windows OS
First, Go to My Computer or This PC for Windows 10. Right-click on empty space and open the Properties window:
Click Advanced system settings from the left bar of the Properties window:
Now you’re in the System Properties window. Click the Environment Variables... button:
Now you’re in the Environment Variables window. Select the Path variable from either the User Variables or System Variables table and click on the Edit... button:
At the end of the variable values, add C:\Program Files\nodejs as a new entry to your Path variable:
If you installed NodeJS on another location, then you need to change the entry to your custom location. Remember to always enter the absolute path from the drive letter to your NodeJS program folder.
Once done, click OK and open a new Terminal or Command Line window. If you’re calling npm from the VSCode terminal, you need to restart VSCode first before trying again.
The npm command not found error should be fixed and you should be able to check this using the npm --version command:
If you still get the error, then try restarting your computer first. The error should be gone after you restart.
Now you’ve learned how to fix the error on Windows, it’s time to fix the error on macOS or Linux system.
Fix npm command not found error on macOS or Linux
The npm executable file is usually installed under /usr/local/bin/ for macOS and Linux systems, so you need to see if the location is already added to your PATH variable using the echo command as shown below:
$ echo $PATH
:/usr/local/bin:/usr/bin:/bin:/usr/sbin:/sbin
The echo output above is shortened for clarity.
Through searching online, I’ve found that most Linux and macOS systems already have /usr/local/bin/ under their PATH variable.
If you already have the folder under the PATH variable but still facing command not found error, then I’d recommend you do a clean install of NodeJS and npm.
First, you need to uninstall npm using the same method you installed it. If you use a package manager like Homebrew, then use brew uninstall node to remove it.
Then you can install your NodeJS and npm using brew install node command.
After a clean install, you should be able to check the NodeJS and npm versions installed on your computer:
$ node -v
v16.3.0
$ npm -v
7.15.1
Now you should be able to do npm install again. Great job on fixing the error!
If you have installed Node JS or NPM in your system but the node js or npm path is not set to the system environment variable in windows. In this case, When you use node js you will see node or npm is not recognized as an internal or external command error on your command prompt. In this tutorial, we will show you how to set environment variable path in windows for node js or npm.
There are two approaches to add or set node js or npm path to the system environment variable in Windows, which are:
- Approach 1: Add Node Js Path using GUI
- Approach 2: Set Node js Path using Command Line OR Prompt
Approach 1: Add Node Js Path using GUI
Here are the steps on how to set the node js or npm path to the system environment variable in Windows 11:
- Step 1 – Open the Start menu and search for “Environment Variables”.
- Step 2 – Edit Environment Setting
- Step 3 – Edit System Environment Variable Path
- Step 4 – Set Node js or Npm path
- Step 5 – Restart Windows 11/10
Step 1 – Open the Start menu and search for “Environment Variables”.
First of all, visit your system bottom search bar and search Environment Variables; as shown below picture:

Step 2 – Environment Setting
Then Click on the environment variable setting; as shown below picture:

Step 3 – Edit System Environment Variable Path
Edit system environment variable path; as shown below picture:

Step 4 – Set Node js or Npm path
Click the “New” button and add the following paths (or similar paths depending on your installation):
- For Node.js: C:\Program Files\nodejs\node_modules.bin
- For NPM:
C:\Users\<YourUsername>\AppData\Roaming\npm
Make sure to replace <YourUsername> with your actual Windows username.

Click “OK” to close the “Edit environment variable” dialog, “OK” again to close the “Environment Variables” dialog, and one last “OK” to close the “System Properties” dialog.
Step 5 – Restart Windows 11|10
Restart windows 10/11 system.
Approach 2: Set Node js Path using Command Line OR Prompt
Here are steps to set node js or npm path to the system environment variable in windows using command prompt or line:
- Step 1 – Open Command Prompt
- Step 2 – Set Node JS Path to Environment Variable
- Step 3 – Restart Windows 11|10
Step 1 – Open Command Prompt
First of all, visit your system bottom search bar and search cmd and then click on cmd to start your command prompt.
Step 2 – Set Node JS Path to Environment Variable
Once you have started your command prompt. Next run the following command into it to set node js path to system environment in windows:
setx path "%PATH%;C:\Program Files\nodejs"
After running this command, you will see success message into your command prompt.
Step 3 – Restart Windows 11|10
Restart Windows 10/11 system.
Conclusion
Through this tutorial, we have learned how to add node js npm path to system environment variable in windows 11/10.