
Item Preview
There Is No Preview Available For This Item
This item does not appear to have any files that can be experienced on Archive.org.
Please download files in this item to interact with them on your computer.
Show all files
SIMILAR ITEMS (based on metadata)
Windows 95 offered, at long last, a well designed document-oriented desktop shell that worked much like the 1984 Macintosh Finder. It also included a new way of finding installed applications through a «Start» menu, and included the same networking abilities as Windows for Workgroups.
It integrated the ability to run 32-bit applications similar to Windows NT or Windows 3.1 with Win32s. It no longer ran on a separate DOS product. But Windows 95 was not a pure «32-bit» OS: It was still based around the framework of Windows 3.x, 2.x and 1.x. It still ran on top of DOS, but bundled its own special «Windows 95» DOS (AKA MS-DOS 7). It could even still make use of DOS drivers. The 95 architecture was continued with Windows 98.
Most 95 CDs are NOT BOOTABLE. If a download does not include a boot floppy, please see Microsoft Windows Boot Disks
If the listed serials below do not work for a specific release, please see the Serials thread
You may also override the install type (no serial needed) by creating a file name MSBATCH.INF with the lines «[Setup]», and then «ProductType=1», placing that in the Win95 setup folder, and then running setup.
VMWare and VirtualBox are problematic with Windows 95. If you use those, you may need to disable various acceleration features first, and/or install the Windows 95 CPU speed fixes. Windows 95 has many issues on faster machines or VMs, requiring a number of patches in order to operate. Consider emulators like x86Box or PCem instead.
Other Windows Versions:
| 1.0 | 2.x | 3.x | NT 3.x | 95 | NT 4.0 | 98 | 2000 | ME | All |
Screenshots
Release notes
Windows 95 OSR2 («B» version) added support for FAT32. It bundles Internet Explorer 3, Personal Web Server, and MS-DOS «7.1».
OSR2.1 is identical to OSR 2, but includes a seperate USB update installer, that adds the ability to use USB devices. Installing the downloadable USB update brings any OSR 2 system to the level of 2.1.
The OSR 2.x media was ONLY available from OEMs. It was not sold retail.
Installation instructions
Important: Windows 95 CDs are NOT bootable, and require an appropriate Windows 95 Boot Floppy. (A 98FE or 98SE disk will also work fine)
To speed up installation, and to avoid numerous problems, copy the win95 folder to a folder on the hard drive (such as c:\win95) and then run setup from there.
Скачать Windows 95
Только лицензионный продукт
Производитель:Microsoft Corporation
Редакция:Windows 95 OSR 2.1
Размер:Rus — 512 Мб; Eng — 601 Мб; Span — 423 Мб
Язык интерфейса:Русский
Разрядность Системы:x32
Минимальные системные требования:
Процессор:Intel 80386DX или совместимый
ОЗУ:4 Мб
Место на диске:50 Мб
Проверено на вирусы:
Контрольные суммы
- MD5 — 4437A27C8F7D826ECEEA8D9554E19808
- SHA-1 — 548E1AB5B3C5CD417CCBF4AEEEE962ECD14B2D48
Скачать оригинальный дистрибутив Windows 95 в редакции OSR 2.1 на русском языке. Это гибридная 16/32 разрядная графическая операционная система, которая была выпущена 24 августа 1995 шлжа, в России релиз продажи состоялся 10 нояюря 1995 года. Это первая ОС Windows, которая похожа на современную всем привычную операционную систему, т.е в ней присутствует графический рабочий стол, значки, ярлыки, панель задач и меню «Пуск».
65 259
Отзывы магазина
Здесь Вы можете оставить отзыв о нашем магазине. Либо отзыв можете оставить через личный кабинет, в этом случае отзыв появится на сайте от имени «Проверенный покупатель».
При написании отзыва на странице с товаром Ваш Email не публикуется, он нужен только для нашей обратной связи.
Получайте первыми лучшие скидки и свежие новости!
Installing Microsoft Windows 95 in DOSBox-X
Table of Contents
- Installing Microsoft Windows 95 in DOSBox-X
- Overview
- Windows CD-ROM editions this guide applies to
- External links
- DOSBox-X config file
- General installation Notes
- Dynamic vs Normal core
- Turbo mode
- Creating a Harddisk image
-
Installation Method
- Requirements
- Starting the installation
- Copying the contents of the CD-ROM
- Running SETUP.EXE
- Booting Windows 95 after installation
- Steps to take after installation
- Mounting CD or Diskette images
-
Enabling networking
- Enabling NE2000 in your DOSBox-X config file
- Setting up NE2000 networking in Windows 95
-
Emulated video adapter and video mode
- VESA driver
- Emulated sound card
- Enabling General MIDI
-
Enabling printing
- Print to PostScript
- Epson emulation
-
3dfx Voodoo
- Glide pass-through
- Hard Disk Read-ahead optimization
- Host Folder mounts
- Known limitations
- Outstanding issues
Overview
This guide will give a general description of installing Windows 95 in DOSBox-X, in addition to addressing some common issues.
Windows CD-ROM editions this guide applies to
-
Windows 95 (RTM; Original release) — Retail Full
-
Windows 95 (RTM; Original release) — OEM Full
-
Windows 95 OSR1 (aka 95A) — OEM Full
-
Windows 95 OSR2 (aka 95B) — OEM Full
-
Windows 95 OSR2.1 (aka 95B) — OEM Full
-
Windows 95 OSR2.5 (aka 95C) — OEM Full
|
Note |
This guide is meant for the Windows 95 CD-ROM editions. The Windows 95 diskette edition can also be used, but requires a lot of tedious disk swapping and is therefore not recommended. |
|
Note |
Windows 95 Upgrade editions have additional requirements and are not covered by this guide. |
If you don’t know which Windows 9x version to install, we recommend that you install Windows 98SE.
If you want to stick with Windows 95, we recommend to use Windows 95 OSR2 or later.
External links
DOSBox-X config file
You first need to create a DOSBox-X config file.
[sdl]
autolock=true

[dosbox]
title=Windows 95
memsize=64


vmemsize=8
vesa modelist width limit=0
vesa modelist height limit=0

[dos]
# Set 'ver=7.1' if using Win95 OSR2 (95B) or later
ver=7.0
hard drive data rate limit=0
floppy drive data rate limit=0

[cpu]
cputype=pentium_mmx
core=normal

[sblaster]
sbtype=sb16vibra

[fdc, primary]
int13fakev86io=true

[ide, primary]
int13fakeio=true
int13fakev86io=true

[ide, secondary]
int13fakeio=true
int13fakev86io=true
cd-rom insertion delay=4000

[render]
scaler=none

[autoexec]
Copy the above config and save it as win95.conf
|
Note |
If using Windows 95 OSR2 (or later) with FAT32 volumes, be sure to change the DOS version to 7.1 (ver=7.1 or from the DOSBox-X prompt: ver set 7.1) or else you will get errors mounting the FAT32 volume.
|
|
Note |
You can increase the allocated RAM up to the Windows 95 maximum of 480MB by setting memsize=480.Larger values may be possible with tweaks but are not covered here. |
General installation Notes
-
If you get a prompt stating that C:\WINDOWS already exists, ignore it, and continue the installation.
-
During the installation you may be asked if you have a CD-ROM, Network card or sound card that you want it to scan for. If you have NE2000 enabled in your DOSBox-X config file, you may want to check the Network adapter check box. Your DOSBox-X CD-ROM and Sound Card will be detected regardless if you check its box or not.
-
In case you installed Windows 95 OSR2.5 you may have noticed that you did not get IE4 and the Active Desktop features. This is because this is an optional installation. On the CD, simply run \WIN95\IE4SETUP.EXE to install it. While there is no real advantage to either feature, installing it does bring some new and updated libraries such as MSVCRT.DLL and COMCTL32.DLL that some programs need.
Dynamic vs Normal core
The dynamic_x86 core, which should perform much better, has been sufficiently enhanced that it can now be used for most use-cases with Windows 95.
However, for now we still recommend that you do the installation of Windows 95 using core=normal until issue #2215 is resolved.
But after the installation is finished you should be able to change to core=dynamic_x86.
Should you run into problems such as application crashes or a Windows 95 blue-screen that cannot be reproduced with core=normal, please report the problem on the DOSBox-X Git issues page.
One known issue is that opening a DOS window in Windows 95 will cause a crash when not using core=normal.
Turbo mode
Some parts of the installation, but also starting Windows 95 can take a considerable amount of time.
You may be able to speed this up considerably (depending on the host CPU) by using the DOSBox-X Turbo mode, which can be enabled from the drop-down menu bar by selecting «CPU» followed by «Turbo (Fast Forward)».
This turbo mode is not like the old Turbo button on retro PCs, but functions more like a fast-forward, and therefore should not be used when interacting with the guest OS.
By default, the moment you press a key on the keyboard, turbo mode will disengage.
|
Warning |
Using the mouse not disengage turbo mode, and double-clicks will be almost impossible to achieve as long as turbo mode is active. |
You may also want to enable turbo mode by default to allow Windows 95 to startup quicker by merging the following settings into your DOSBox-X config file.
|
Note |
This will cause some audio distortion on Windows 95 startup, if you have the Windows startup sound enabled. |
Creating a Harddisk image
|
Note |
In addition to the below DOSBox-X command line utility, it is possible to create harddisk images from the DOSBox-X menu. Go to the «DOS» menu and select «Create blank disk image…». This option allows for various common harddisk types to be created, for less common types you need to use the command line utility. |
|
Note |
When creating your HDD image with IMGMAKE, instead of specifying a custom size, you can choose a pre-defined template. The pre-defined HDD templates can be seen by running IMGMAKE without arguments.
|
-
Diskette (floppy) images are always created as FAT12.
-
If your reported DOS version is 7.0 or lower, then harddisk images up to 2GB will use FAT16 by default.
-
If your reported DOS version is 7.1 or higher, then harddisk images up to 512MB will use FAT16 by default.
-
Larger size harddisk images will use FAT32 by default (larger than 2GB can only be created as FAT32).
Alternatively, you can use the -fat option to instruct IMGMAKE to create a certain FAT type (assuming that is possible for the harddisk size).
|
Note |
Only Windows 95 OSR2 or later supports FAT32, for older Windows 95 releases you can only use FAT16 up to 2GB. |
First you need to start DOSBox-X from the command-line, using your newly created win95.conf.
This assumes that dosbox-x is in your path and win95.conf is in your current directory.
dosbox-x -conf win95.conf
Then in DOSBox-X you need to create a new harddisk image file with IMGMAKE.
This example uses an 2GB hard disk image with a single FAT16 formatted partition.
This is the maximum size for FAT16 and supported by all Windows 95 releases.
IMGMAKE hdd.img -t hd_2gig -fat 16
Or if you’re using Windows 95 OSR2 or later, you can create a FAT32 volume.
Technically the FAT32 filesystem is capable of supporting partitions up to 2TB, but the generic IDE driver in Windows 95 cannot handle volumes greater than 32GB.
Larger partition sizes may be possible with 3rd party drivers but are not covered here.
In later Windows versions, starting with Windows 2000, Microsoft won’t let you format a volume bigger than 32GB with FAT32 using its built-in formatting tool, this was presumably to push migrations to NTFS and later exFAT.
IMGMAKE hdd.img -t hd_8gig
Or if you want to create a larger disk, you can create a custom type.
This is an example of a 16GB (16*1024=16384 MB) disk, which due to its size, will be formatted as FAT32.
IMGMAKE hdd.img -t hd -size 16384
Installation Method
Other installation methods are possible than the one described below.
This method is however considered to be the quickest one with the least number of steps.
Requirements
-
DOSBox-X 0.83.10 or later, these instructions will NOT work with other DOSBox forks.
-
Windows 95 CD-ROM image (named «Win95.iso» in the example below).
Getting this image file is outside the scope of this guide.
Starting the installation
This assumes you have already started DOSBox-X with the win95.conf config file and created your harddisk image.
First mount the harddisk image you created earlier:
|
Note |
If you get an error saying that «This operation requires DOS version 7.10 or higher», than you’re trying to mount a FAT32 volume, and have not set your reported DOS version in your DOSBox-X config to 7.1. FAT32 volumes are only supported if your installing Windows 95 OSR2 or later. |
You will also need to mount the Windows 95 CD-ROM. There are a few ways of doing so, but this guide assumes you have a ISO image.
If you have a copy of the Windows 95 CD-ROM as an ISO (or a cue/bin pair), you can mount it as follows:
Copying the contents of the CD-ROM
While not strictly necessary, as it is possible to run SETUP.EXE directly from the CD-ROM (if you have the CD-ROM automatically mounted in your [autoexec] section of the config file).
It is recommended to copy the installation files (contents of the WIN95 directory on the CD-ROM) to your HDD image, as it will prevent Windows 95 from asking for the CD-ROM when it needs additional files later.
XCOPY D:\WIN95 C:\WIN95 /I /E
The files in the above example are copied to the C:\WIN95 directory.
|
Note |
You may want to use «C:\WINDOWS\OPTIONS\CABS» instead, as that is the directory that OEM installs normally use. But if you do, be aware that the installer will complain that C:\WINDOWS already exists. When you get the warning below, select «Other directory» and click «Next >» to continue. On the screen afterwards, change the directory to «C:\WINDOWS» and continue the installation. |

Running SETUP.EXE
You can now run SETUP.EXE.
Now run through the installation process.
The actual steps will not be covered in this guide but are pretty self-explanatory and detailed guides on the Windows 95 install process can be found online such as YouTube.
When the installer reboots DOSBox-X, and you’re back at the DOSBox-X Z:\ prompt, type EXIT.
Now edit your win98.conf config file.
At the end of the file, in the [autoexec] section, add the following lines:
IMGMOUNT 0 empty -fs none -t floppy
IMGMOUNT 1 empty -fs none -t floppy -size 512,15,2,80
IMGMOUNT C hdd.img -ide 1m
IMGMOUNT D empty -t iso -ide 2m
BOOT C:
|
Note |
The current DOSBox-X release seems to have a bug where Win95 will only see the first floppy drive. |
Save the config file, and at the command-prompt of your host PC you can type the below command to continue with the next phase of the installation process.
This is also the command you use, after the installation is finished, to start Windows 95 in DOSBox-X.
dosbox-x -conf win95.conf
Booting Windows 95 after installation
After the installation is finished, you can start Windows 95 from the command-prompt of your host PC, with the following command:
dosbox-x -conf win95.conf
You can optionally create a shortcut on your desktop to start Windows 95 directly.
Steps to take after installation
Once Windows 95 is installed, here is some additional software you may want to install or update:
-
Install Microsoft .NET framework version 1.0 and 1.1 (includes Visual C++ 2003 runtime)
-
Install Unofficial Windows 95 OSR2 Service Pack 1.05
-
Install/Update to Microsoft Internet Explorer 5.5SP2 (rarely needed)
-
Install Microsoft WinG API 1.0 (needed by just a few games, and those games typically include it)
-
Install Microsoft DCOM 4.71.1015.0 (DCOM95.EXE)
-
Install/Update to Microsoft DirectX 8.0a
-
Install/Update to Microsoft Windows Media Player 6.4
-
Install Adobe Acrobat Reader 5.05
-
Install/Update to Adobe Flash Player 8.0.24.0
-
Install Adobe PostScript driver 4.2.6
-
Install Apple QuickTime 5.0.5
-
Install the 3dfx Voodoo 3.01.00 reference drivers
Mounting CD or Diskette images
DOSBox-X supports mounting CD and diskette (floppy) images, and making those available to an OS booted in DOSBox-X.
To do so, an empty diskette or CD drive needs to be attached before booting a guest OS such as Windows 95, or diskette or CD images need to be attached (which will automatically cause an appropriate drive type to be emulated).
-
Disks can be changed after booting a guest OS from the drop-down menus under «DOS» → «Change current floppy image…»
-
CDs can be changed after booting a guest OS from the drop-down menus under «DOS» → «Change current CD image…»
For example, to specifying multiple image files with the IMGMOUNT command:
IMGMOUNT A disk1.img disk2.img disk3.img
IMGMOUNT D cd1.iso cd2.iso cd3.iso
You can then swap between disk images with the «DOS» → «Swap floppy drive» or «Swap CD drive» option from the drop-down menus, or using the hot-key.
Enabling networking
To enable networking, you first need to enable NE2000 adapter emulation in your win95.conf config file and select an appropriate back-end for the NE2000 emulation.
Enabling NE2000 in your DOSBox-X config file
There are two different back-ends to the NE2000 adapter emulation.
The default is backend=auto, which implies backend=slirp if SLIRP support is available, otherwise backend=pcap is implied if PCAP support is available.
backend=pcap
The PCAP back-end uses something called «Promiscuous mode».
This has the advantage that DOSBox-X can support various legacy network protocols, such as IPX and NetBIOS Frames (aka NetBEUI) in addition to TCP/IP.
This mode not only allows communication between DOSBox-X instances on the same network, but also with legacy PCs on the same network.
However, for this to work DOSBox-X needs to have very low-level access to your real network adapter.
In some cases, this is not possible, such as:
-
Network Adapter or Driver not supporting Promiscuous mode (most wireless adapters fall into this category).
-
Your Ethernet switch not allowing multiple MAC addresses on a single port or doing any kind of MAC address whitelisting.
-
Sandboxed versions of DOSBox-X (e.g., Flatpak) not allowing the required low-level access.
To enable NE2000 emulation with the pcap back-end, add the following to your win95.conf config file:
[ne2000]
ne2000=true
nicirq=10
backend=pcap

[ethernet, pcap]
realnic=list
The list value for realnic= will need to be replaced by a value representing your actual network adapter.
See Guide: Setting up networking in DOSBox-X for more information.
backend=slirp
Unlike the PCAP back-end, the SLIRP back-end does not require Promiscuous mode.
As such it will work with wireless adapters, and it will work in most sandboxed environments.
But obviously, it has its own limitations.
-
It is not supported in all platforms, such as Windows Visual Studio builds.
-
It only supports the TCP/IP protocol (other protocols must be TCP/IP encapsulated).
-
It is effectively behind a NAT (Network Address Translation) gateway, meaning that you can communicate outbound, but no systems on the LAN can instantiate a new connection to it. Which means that two DOSBox-X instances on the same LAN using
backend=slirpcannot communicate with each other.
To enable NE2000 emulation with the SLIRP back-end, add the following to your win95.conf config file:
[ne2000]
ne2000=true
nicirq=10
backend=slirp
Setting up NE2000 networking in Windows 95
Detection during installation
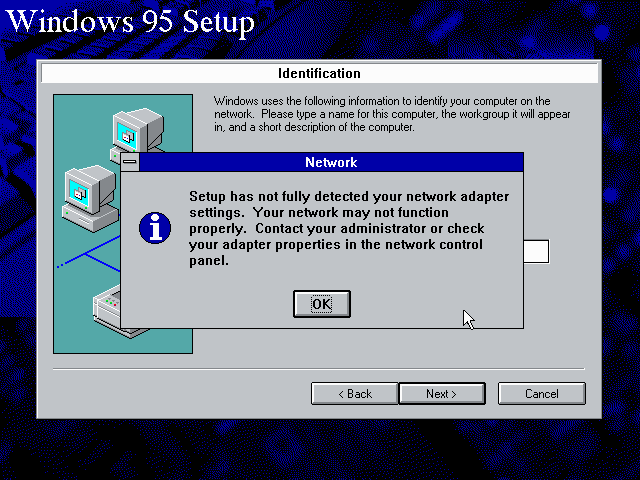
Windows 95 setup wizard will ask if you want to detect additional hardware during installation.
The exact options presented may vary depending on the Windows 95 edition.
You can tick the «Network adapter» checkbox, and it should continue and find the emulated NE2000 adapter.
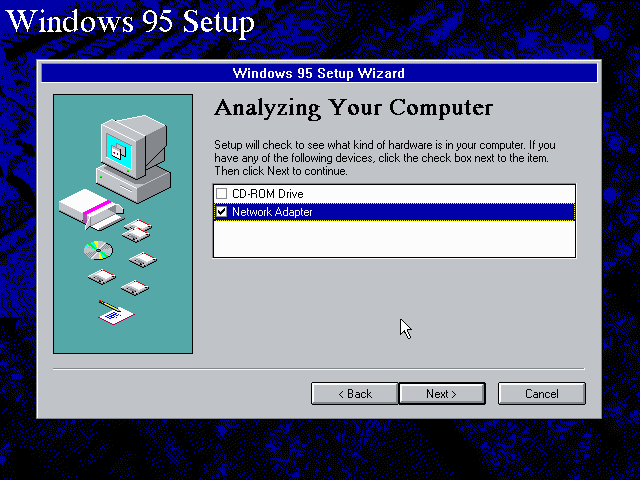
It will however, not give you the possibility to set the resources at this point, and you will need to do so in device manager afterwards.
Once the Windows 95 installation is finished, right-click on «My Computer» on the desktop and select «Properties».
Now in the «System Properties» dialogue, select the «Device Manager» tab.
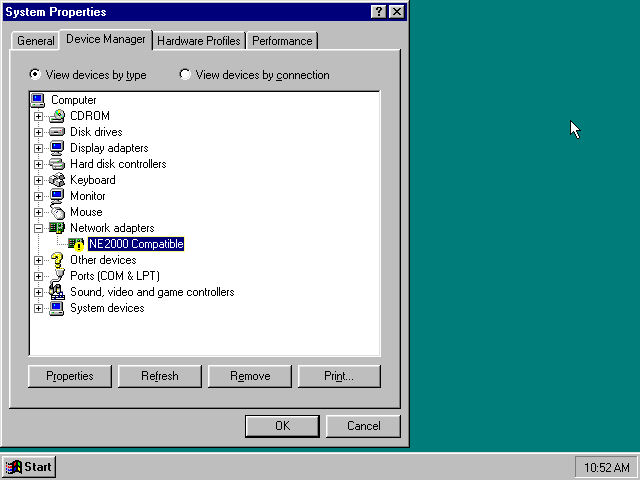
Highlight the «NE2000 Compatible» entry and click on the «Properties» tab and then click the «Set Configuration Manually» button.

Now you need to highlight the «Interrupt Request» entry and click the «Change Setting…» button. You can now change the IRQ to 10 to match the nicirq= value in your DOSBox-X config file.
Next, highlight the «Input/Output Range» entry, and again click the «Change Setting…» button. Now change the value to «0300 — 031F».
Once you’re finished adjusting the resources, click the «OK» button, and Windows 95 will prompt you to shut down to apply the settings, after which you need to restart Windows 95 in DOSBox-X.
|
Note |
By default, Windows 95 only enables Novell’s IPX/SPX protocol. Most Windows 95 applications expect TCP/IP which you will need to manually enable in the Network settings. |
NE2000 Detection after installation
If you enabled NE2000 support in your DOSBox-X config file after Windows 95 installation, go to «Start», «Settings» and «Control Panel» and double-click on «Add New Hardware».
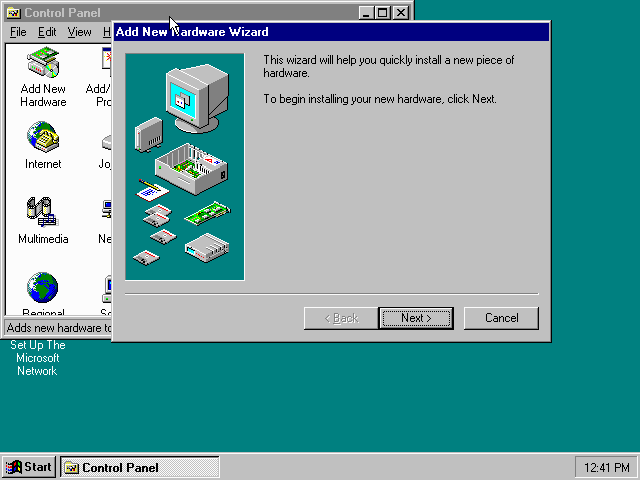
In the «Add New Hardware Wizard» dialogue, click the «Next >» button to continue.

Now select «Yes (Recommended)» and click the «Next >» button to continue.
It will ask for another confirmation.
Again, simply click the «Next >» button.
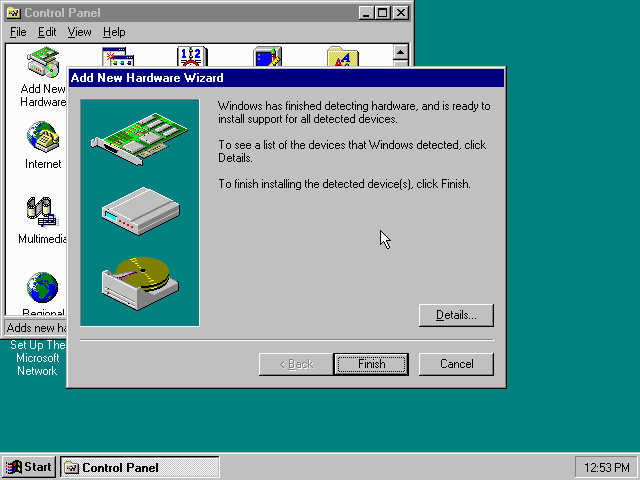
If it detected new hardware, you should get this dialogue.
You can click the «Details…» button to see what it found, after which you can click on «Finish».
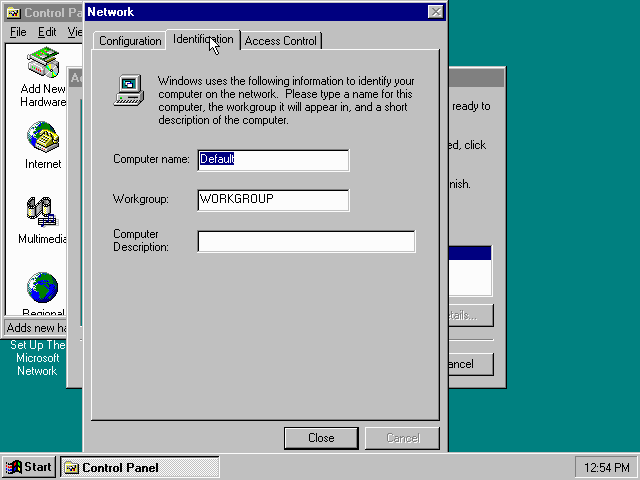
It will now want you to provide some details, click on «OK».
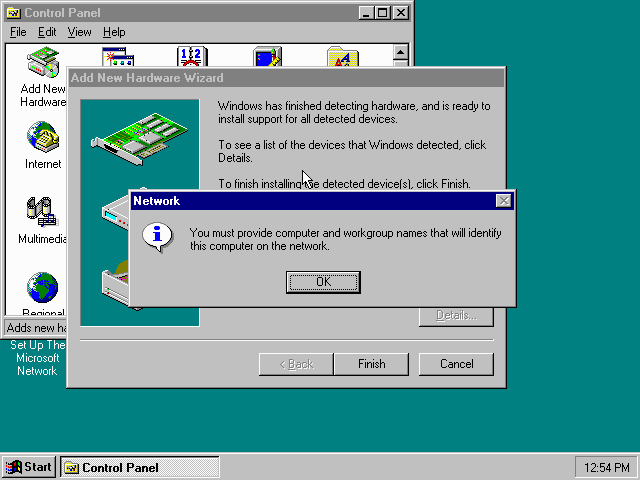
You must at a minimum enter a value in the «Workgroup» field.
If you don’t know what to type, just type «WORKGROUP».
You may also want to provide a more descriptive «Computer Name».
Don’t close the dialogue just yet though, click on the «Configuration» tab instead.
Highlight the «NE2000 Compatible» entry and click the «Properties» button.
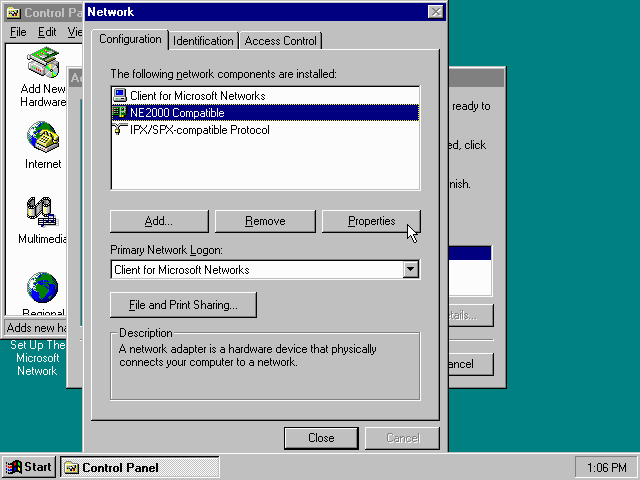
On the «NE2000 Compatible Properties» dialogue, select the «Resources» tab, and adjust the IRQ to 10 to match the nicirq= value in your DOSBox-X config file.
Then click «OK» to finish.

Lastly, while you’re in the Network settings dialogue, you may also want to add the TCP/IP protocol, which is not enabled by default on Windows 95.
On the Configuration tab, click on «Add», then select «Protocol» and click again «Add…»
You will now be presented with the «Select Network Protocol» dialogue.
Select manufacturer: «Microsoft», and for Network Protocols: «TCP/IP», and click the «OK» button.
|
Note |
In the Network settings, you can optionally remove the «IPX/SPX-compatible Protocol» that was automatically installed, as few Windows programs need it. |
|
Note |
By default, TCP/IP will try to get its network configuration over DHCP, which should work in most cases. If you need to manually specify the settings, highlight «TCP/IP», and click the «Properties» button. |
Once you’re finished, Click OK to close the Network settings window, and the TCP/IP driver will be installed, and Windows will prompt you to restart your computer.
Confirm, and Windows 95 will reboot.
After the reboot you should have working TCP/IP networking.
Emulated video adapter and video mode
The default video adapter that DOSBox-X emulates is the S3 Trio64, which is the best emulated video adapter that DOSBox-X offers, with the widest range of resolutions and colour depths.
There is a newer S3 video driver for Win95, version 2.11.03, dated June 12, 1996.
This update adds some additional video modes. But it does not add support for 8MB video RAM, or wide-screen video modes.
The available video modes with the updated S3 Trio64 driver are:
-
4-bit colour (16): 640×480
-
8-bit colour (256): 640×480, 800×600, 1024×768, 1152×864, 1280×1024 and 1600×1200
-
16-bit colour (65536): 640×480, 800×600, 1024×768 and 1280×1024
-
24-bit colour (16.7M): 640×480
-
32-bit colour (16.7M + alpha): 640×480, 800×600 and 1024×768
A few enhancements have been made to the emulated S3 Trio64, compared to a real S3 Trio64:
-
No real S3 Trio64 was ever produced with more than 4MB video memory, under DOSBox-X you can optionally configure 8MB.
-
The real cards never supported wide-screen resolutions, wide-screen VESA modes can optionally be enabled in DOSBox-X.
However, these enhancements cannot be used in Windows 95 with the S3 video driver due to driver limitations.
As such you will be limited to the above video modes with this driver.
|
Note |
If you use an older S3 driver you may experience graphical problems (green tint) in 32-bit colour mode. These problems may not be completely solved by upgrading to the latest driver. The only known solution for now if you used an older driver is to re-install Win95 and use the 2.11.03 driver instead. |
VESA driver
First add the following lines to your DOSBox-X config file in the section:
allow high definition vesa modes=true
allow unusual vesa modes=true
allow low resolution vesa modes=false
Download and extract the latest VBEMP driver package and install the driver from the 032MB directory.
With these settings modes up to 1920×1080 in 32bit colour, or 1920×1440 in 16bit colour are possible.
|
Note |
Using the VBEMP driver does have a negative graphics performance impact, which when measured in WinBench96 Graphics WinMark, can be a reduction of up to 59%. |
Emulated sound card
The emulated sound card used in this guide is the SB16 Vibra, instead of the default SB16.
This is simply because the SB16 Vibra is an ISA PnP card, and therefore automatically detected by Windows.
There is no other real advantage of using the emulated SB16 Vibra over the SB16.
|
Note |
One often heard complaint of the real SB16 Vibra is its CQM synthesis, which was used as a low-cost replacement of the OPL3 chip found on earlier cards. However, DOSBox-X does not really emulate the CQM, instead it uses the same OPL3 emulation as for the regular SB16 model. Therefore, the CQM sound quality issues with the real SB16 Vibra do not apply to DOSBox-X. |
An optional driver update to 4.38.14 is available on the VOGONS Vintage Driver Library (ignore that the download claims it is for Windows 98, the update is for both Windows 95 and 98).
|
Warning |
There have been reports from some users that with sound enabled, that Windows 9x games crash. If you encounter similar issues, try to set sbtype=none and see if the game works.
|
Enabling General MIDI
If you have a working DOSBox-X General MIDI setup, either emulated or real, you can use that in Windows 95.
Go to «Start», «Settings» and open «Control Panel», and then double-click on «Multimedia».
Now on the «MIDI» tab, change the «Single instrument» option to «MPU-401 Compatible», and click OK to close the window.

Enabling printing
Print to PostScript
For the best print quality, you will want to print to a PostScript printer in Windows 95.
First, set up your DOSBox-X config to print to a file as such:
[dosbox]
captures=capture

[parallel]
parallel1=file timeout=2000
You can either use the PostScript driver bundled with Windows 95, or alternatively install the newer Adobe PostScript 4.2.6 driver.
If using the bundled driver, select any PostScript printer such as the «QMS ColorScript 100 Model 30», during printer setup connected to LPT1.
Once the printer is installed, open the printers properties, and on the «Details» tab click on the «Spool Settings…» button.
In the «Spool Settings», you must select «Print directly to the printer» and click OK.
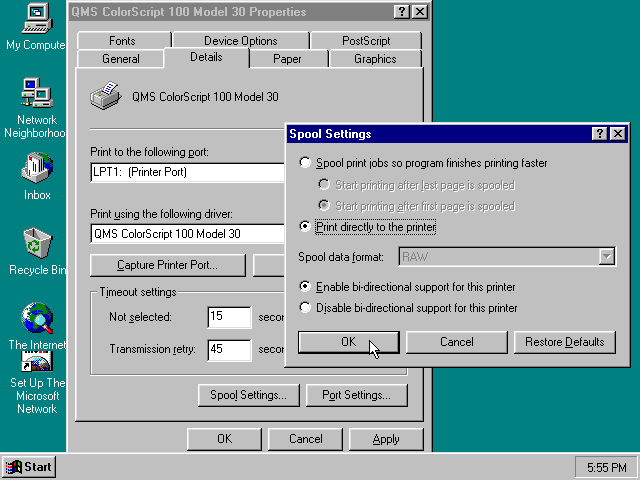
|
Warning |
Failing to change the spool setting, when printing to a file, will result in corrupted PostScript files! |
|
Note |
If two files end up being generated instead of just one for a printjob, you will want to revert the above spool setting. And perhaps try changing the spool setting to «Start printing after last page is spooled». |
When you print, a .prt file in your captures= directory will be created, which despite the extension, is actually a PostScript file.
On Linux and macOS, PostScript files are natively supported and can be viewed and printed.
On a Windows host, it is necessary to install a separate PostScript viewer such as GSview.
Epson emulation
As an alternative, you can use the integrated Epson printer emulation, but the output quality will be significantly less compared to PostScript.
First, set up your DOSBox-X config to emulate an Epson printer as such:
[parallel]
parallel1=printer

[printer]
printer=true
printoutput=ps
multipage=true
timeout=2000
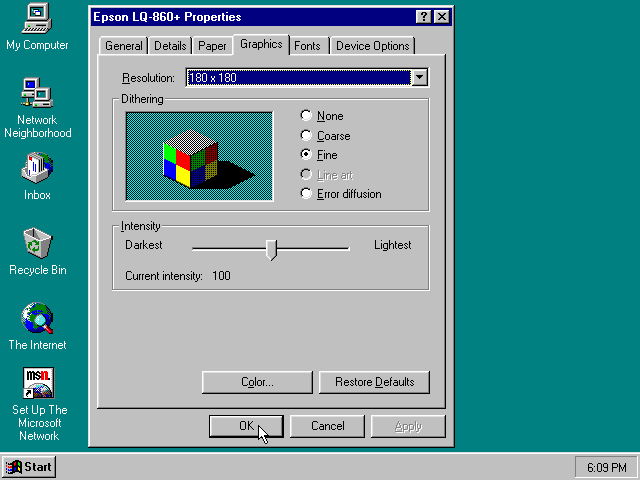
Next in Windows 95, select any Epson dot-matrix printer, such as the «Epson LQ-860+» option during printer setup connected to LPT1
|
Warning |
Make sure that you do not configure the Epson printer driver for a graphics resolution other than 180×180, or the output will be corrupted. |
When you print, a PostScript file with the .ps extension will be created in your current working directory.
The emulated Epson printer settings can be adjusted as documented on the above linked wiki printing guide.
3dfx Voodoo
The emulated 3dfx Voodoo PCI device is enabled by default in DOSBox-X, but Windows 95 lacks drivers for it by default.
As such a «PCI Multimedia Video Device» will show in Device Manager with a yellow exclamation mark.
A driver package is available here (v3.01.00) to enable support.
If for some reason you do not want 3dfx Voodoo emulation, it can be disabled by adding the following lines to your DOSBox-X config:
[voodoo]
voodoo_card=false
Glide pass-through
Glide pass-through is an optional DOSBox-X feature, and not required to use a 3dfx Voodoo game with Windows 95.
It can provide better performance, but can also be rather tricky to get working properly. As such it is not recommended for most users.
If you decide to try this method, first ensure the game works without glide pass-through using the standard 3dfx Voodoo emulation.
There are a few points you need to be aware of.
-
The DOSBox-X and glide-wrapper installed on the host need to be the same architecture.
So, if you’re using a 64bit DOSBox-X, you need to use a matching 64-bit glide-wrapper. -
The Linux SDL2 DOSBox-X does not work with OpenGlide, this is a limitation of OpenGlide (see OpenGlide issue #20).
The work-around is to use the SDL1 DOSBox-X instead.
You need to set the following DOSBox-X config option:
You will also need a specially patched GLIDE2X.DLL file which you can place in either the C:\Windows\System directory of Windows 95, or in the game directory.
But be aware that some games come with their own GLIDE2X.DLL, which typically gets installed in the game directory.
If so, you will have to remove this DLL file for glide pass-through to work.
Hard Disk Read-ahead optimization
In «System Properties», select the «Performance» tab, and click the «File System…» button.
A separate «File System Properties» window will open.
On the «Hard Disk» tab you can specify the Read-ahead optimization.
Based on benchmark results (WinBench 96), it seems that setting this to «None» gives the best performance in combination with DOSBox-X, although the difference is marginal.
This is no doubt because the host system is better at caching then the Windows 98 cache function.
Host Folder mounts
Starting with DOSBox-X 2022.08.0, there is optional support to dynamically convert a host folder mount to an emulated FAT harddisk for use when you need to boot a guest OS, such as Windows 95.
This can be accomplished in one of two ways. Either when you issue the boot command, you add the option -convertfat. e.g. boot c: -convertfat.
Or by setting the following option in your DOSBox-X config file:
[sdl]
convertdrivefat = true
When you now boot from a real image file, it will attempt to convert ALL folder mounts at the time of booting to emulated FAT Harddisks.
|
Note |
You cannot boot from such an emulated FAT harddisk. You will still need some other bootable image file to actually boot a guest OS. |
|
Note |
This conversion is dynamic, effectively creating an emulated FAT harddisk out of a folder mount. This converted FAT harddisk is not automatically stored permanently. You can however, store it as a permanent image file that you can later mount with IMGMOUNT, using the «Drive» > «drive letter» > «Save to disk image» option from the menus.Please see the «Creating harddisk images from folder mounts» section in the Guide: Managing image files in DOSBox-X for more information. |
|
Note |
There is currently no support for creating emulated CD-ROM or Floppy drives out of folder mounts with this method. Any CD-ROM or Floppy folder mounts will also be converted to harddisk folder mounts, and may not actually work for the intended purpose. |
One thing to note, is that there is no way to specify the FAT type to use for the conversion.
The FAT type will be automatically selected based on the aggregate size of files in the folder, plus 250MiB (this can be adjusted with the convert fat free space option in the DOSBox-X config file).
If the total space of files + 250MiB does not exceed 2GiB, it will convert it into a FAT16 disk. Otherwise, it will become a FAT32, which in turn will require a guest OS with FAT32 support.
Alternatively, you can also make the emulated FAT drive read-only by using the -convertfatro option with the boot command. Or by setting convert fat free space=0 option in the DOSBox-X config file.
Known limitations
-
If you intend at any point to use a Floppy or CD during your usage of Windows 95, you must attach either a floppy and/or CD image before starting Windows 95, or an empty floppy or CD-ROM drive.
If a floppy or CD drive is not present when starting Windows 95 the drive is simply missing, and you cannot add it without rebooting the guest OS. -
When mounting a CD-ROM image using
imgmount, before booting Windows 95, you may have to specify the IDE device to attach it to for it to work properly in Windows 95. e.g.imgmount d game_cd.iso -ide 2mto make the CD-ROM drive appear as the master device on the secondary IDE controller.
Outstanding issues
-
Resolve «Drive A is using MS-DOS compatibility mode file system»
Основные возможности OSR2
Установка
Первое знакомство
Инструменты для работы в Internet
Файловая система FAT32
DirectX
OpenGL
Динамическая настройка параметров
экрана
Kernel Toys
PowerToys
Основные компоненты DirectX
Оживление в мир пользователей Windows 95 принесло появление OEM Service Release 2 (OSR2).
экрана
Оживление в мир пользователей Windows 95 принесло появление OEM Service Release 2 (OSR2). С самого начала продукт позиционируется Microsoft как обновленная операционная система Windows 95, предназначенная для установки на компьютеры производителей компьютеров, так называемых OEM (Original Equipment Manufacturers). Поэтому с момента выхода в свет OSR2 устанавливается практически на все OEM-компьютеры.
Первое, что обнаруживается при знакомстве с OSR2, это порядком увеличившийся размер дистрибутива, который теперь занимает ни много ни мало 80 Мбайт. По сравнению с Windows 95, дистрибутив которой занимает примерно 30 Мбайт (плюс-минус несколько мегабайтов в зависимости от типа), OSR2 — настоящий монстр. Однако большая часть данных мегабайтов все равно останутся невостребованными. Отметим, что самый большой размер имеет американская версия OSR2, которая и описывается в этой статье. Панъевропейская и русская версии значительно меньше: приблизительно 50 Мбайт.
Основные возможности OSR2
Самое главное, ради чего (помимо, разумеется, исправления ошибок) многие пользователи ждали выхода OSR2, это новая 32-разрядная файловая система FAT32, с помощью которой пользователю становится доступным дисковое пространство объемом более 2 Гбайт. Максимальный размер диска, поддерживаемый FAT32, — 8 Гбайт. С FAT32 минимальный размер дискового пространства для файла, выделяемого операционной системой, становится равным 4 Кбайт, тогда как ранее эта цифра равнялась 32 Кбайт. Такое нововведение дает возможность намного эффективнее использовать дисковое пространство, особенно в тех случаях, когда пользователь хранит на диске много мелких файлов.
Следующее, что может порадовать пользователя OSR2, — появление дополнительных драйверов для управления и работы с магнитооптическими устройствами, переносной магнитооптикой фирмы Iomega Zip, устройств CD-I и CD-Changers. Пользователи мобильных компьютеров получают дополнительные возможности по управлению батарейным питанием устройств, дисковыми устройствами с выключающимися шпинделями и активизируемыми по звонку модемами, которые выключаются при длительном бездействии. Для тех, кто стремится использовать передовые беспроводные коммуникации, в OEM Service Release 2 предусмотрен драйвер инфракрасного порта Infrared Communication Driver 2.0.
В этой версии Windows 95 Microsoft устранены ошибки, возникавшие при работе некоторых контроллеров жестких дисков (особенно часто это проявлялось при установке Windows 95 на новые системные платы с форм-фактором ATX). Теперь такого рода системные платы, построенные на базе совершенно новых наборов микросхем, работают корректно, в чем автор убедился, установив OSR2 на свой компьютер с системной платой Intel Advanced/ML, имеющий форм-фактор ATX.
Усовершенствования коснулись и модемной связи. OSR2 позволяет использовать голосовые модемы, сочетающие возможности передачи данных и голоса, не разрывая связи. Примерами таких модемов могут служить модемы AT+V и VoiceView малоизвестной в нашей стране компании Radish Communications.
Сетевые возможности OSR2 были расширены по сравнению с Windows 95. В этой области основное нововведение — поддержка клиентов сетевой операционной системы Novell NetWare 4.x и ее службы каталогов Novell Directory Services. Кроме того, реализована поддержка приложений для управления сетями с использованием спецификации Desktop Management Interface 1.1.
Список новинок и усовершенствований можно продолжать еще долго, но мы лучше коснемся их непосредственно по ходу рассказа.
Установка
Обращаем ваше внимание, что на компьютер с уже установленной Windows 95 OSR2 не установится и предупредит пользователя, что не может обновить существующие на компьютере версии Windows. Однако следует помнить, что OSR2 — это полноценная операционная система и разрабатывалась для установки на новые компьютеры. Поэтому перед установкой убедитесь в том, что ваш компьютер не содержит никакой операционной системы компании Microsoft. Допускается только MS-DOS. Сам процесс установки ничем не отличается от типичной установки Windows 95. Единственное, пожалуй, на что можно обратить внимание, — отсутствие некоторых детальных настроек при выборе устанавливаемых компонентов. Так, например, если в Windows 95 вы можете выбрать, какие из дополнительных музыкальных схем вы желаете установить, а какие проигнорировать, то в OSR2 единственное, что можно сделать, это либо установить их все или не устанавливать их вообще.
Первое знакомство
После установки вас, вероятно, постигнет разочарование: никаких значительных видимых изменений вы не обнаружите. Правда, несколько мелких деталей, характерных для OSR2, все же присутствуют. Во-первых, на логотипе системы, появляющемся во время запуска, кроме названия Microsoft Windows 95 добавлено еще одно название — Microsoft Internet Explorer.
После запуска вы действительно обнаружите последний установленным на ваш компьютер.
Так что по крайней мере вы на шаг стали ближе к Internet. Во-вторых, специальное меню управления экраном в правом углу (tray). Используя его, можно динамически переключать разрешение экрана и его свойства. Подробнее мы коснемся этого немного позже. Замечательной особенностью этой пиктограммы является то, что если подержать над ней секунду указатель мыши, появится всплывающая подсказка, уведомляющая вас о текущем разрешении экрана и количестве экранных цветов, а точнее разрядов, используемых видеоадаптером для хранения цветовой информации.
На рабочей области экрана OSR2 добавлена специальная папка Online Services, в которой можно обнаружить несколько пиктограмм для программ установки различных электронных служб Internet: America Online, CompuServe, AT&T WorldNet. Здесь же имеется пиктограмма установки WOW! через службу CompuServe.
Имеется лишь один недостаток: практически ничего из этого списка в нашей стране не используется, за исключением разве что CompuServe, услуги которой изредка можно найти у российских провайдеров.
Маленькое изменение можно обнаружить в стартовом меню: помимо команды выключения и перезагрузки компьютера появилась команда перевода компьютера в режим «засыпания» (Suspend), т. е. включения энергосбережения.
Разумеется, эта команда будет доступна лишь в том случае, если ваши компьютер и монитор обладают возможностями расширенного управления питанием. В Windows 95 эта опция работает лишь для мобильных систем.
OSR2 — новая версия Windows 95, и это легко проверить, вызвав команду Ver, выводящую номер версии. В ответ на это операционная система выведет строку
Windows 95. [Version 4.00.1111]
Правда, если вы заглянете в диалоговую панель System Properties, то обнаружите, что версия системы вовсе не 1111, а 950B.
Можно поставить еще один эксперимент, вызвав стандартный системный отладчик Debug и просмотрев с его помощью дамп загрузочного сектора жесткого диска (в данном случае C:). Ниже показана последовательность команд и результат:
C:WINDOWS>debug
-l 100 2 0 1
-d
1E7B:0100  EB 3C 90 4D 53 57 49 4E-34 2E 31 00 02 20 01 00   .<.MSWIN4.1.. ..
1E7B:0110  02 00 02 00 00 F8 B0 00-3F 00 40 00 3F 00 00 00   ........?.@.?...
1E7B:0120  C1 E6 15 00 80 00 29 53-0E 9B 21 20 20 20 20 20   ......)S..!
1E7B:0130  20 20 20 20 20 20 46 41-54 31 36 20 20 20 FA 33         FAT16   .3
1E7B:0140  C9 8E D1 BC FC 7B 16 07-BD 78 00 C5 76 00 1E 56   .....{...x..v..V
1E7B:0150  16 55 BF 22 05 89 7E 00-89 4E 02 B1 0B FC F3 A4   .U."..~..N......
1E7B:0160  06 1F BD 00 7C C6 45 FE-0F 8B 46 18 88 45 F9 38   ....|.E...F..E.8
1E7B:0170  4E 24 7D 22 8B C1 99 E8-77 01 72 1A 83 EB 3A 66   N$}"....w.r...:f
-q
Как видите, OEM-метка для OSR2 — MSWIN4.1. Она доказывает то, что мы имеем дело с новой операционной системой.
Инструменты для работы в Internet
Как мы уже упомянули, при инсталляции OSR2 происходит еще один важный момент — устанавливается браузер Internet Explorer 3.0 компании Microsoft. С его помощью вы не только сможете путешествовать в глобальной сети Internet, но и просто просматривать файлы в формате HTML. В качестве дополнения к браузеру добавляются еще два полезных приложения: программа отправки и получения электронной почты Microsoft Internet Mail и средство для просмотра новостей Microsoft Internet News. Не менее важна система для ведения групповой работы в сети Internet — программа Microsoft NetMeeting, также автоматически устанавливаемая вместе с OSR2. Среди ее основных функций — полудуплексная и дуплексная аудиосвязь, вызов любого пользователя как в локальной сети, так и в Internet, организация электронных конференций и разделение приложений между всеми их участниками. Вы сможете обмениваться мнениями во время конференции. Если вам требуются средства для организации видео в Internet, то OSR2 предоставляет для этого универсальный проигрыватель видеофайлов Microsoft ActiveMovie, построенный по технологии ActiveX.
Файловая система FAT32
Существенное добавление в OSR2 — это введение поддержки новой 32-разрядной файловой системы FAT32. Она отличается повышенной надежностью и возможностью хранить файлы на дисках емкостью до 8 Гбайт. К сожалению, установка FAT32 требует форматирования жесткого диска, что неудобно. Но с появлением операционной системы Memphis ожидается введение конвертера файловой системы из FAT16 и VFAT в FAT32. Подобное средство имеется в Windows NT, позволяя преобразовывать разделы жесткого диска из FAT в более быструю, прогрессивную и устойчивую файловую систему NTFS.
На нынешнем этапе с FAT32 работать еще непривычно: отсутствуют наборы сервисных утилит, умеющих работать с этой файловой системой. Исключение составляют вторая версия всемирно известных утилит Нортона (Norton Utilites) и собственных системных утилит, поставляемых вместе с OSR2.
Хотелось бы дать рекомендацию тем, кто собирается перейти на OSR2, или тем, кому этот продукт достался вместе с компьютером: пользуйтесь FAT32 тогда, когда размер планируемого под FAT32 раздела вашего жесткого диска превышает 512 Мбайт. Только в этом случае вы добьетесь эффективной работы.
DirectX
Несомненно большим шагом вперед стало включение компанией Microsoft в OSR2 набора драйверов DirectX, предназначенных для использования с различными мультимедиа-приложениями, преимущественно игровыми программами для Windows 95, созданными с помощью инструмента Microsoft Game SDK. Примерами таких игр могут служить Chessmaster 5000 и Final Doom.
Microsoft DirectX состоит из нескольких компонентов (см. врезку «Основные
компоненты DirectX»), работающих напрямую с аппаратурой вашего компьютера, минуя те драйверы и части ядра операционной системы Windows 95, которые обычно задействованы при выполнении программ.
OpenGL
OSR2 — это первая «легкая» операционная система, в которой введена поддержка библиотеки трехмерной графики OpenGL. Начальный ее вариант, IRIS GL, был разработан в недрах компании Silicon Graphics. Спустя некоторое время компания Microsoft включила свою версию этой библиотеки под названием OpenGL в операционную систему Windows NT. И вот наконец эта библиотека стала доступна пользователям «легких» операционных систем.
Основное применение библиотеки OpenGL — создание приложений, использующих трехмерную графику, например инженерное проектирование, имитация процессов, визуализация данных и т. д. С этой точки зрения OpenGL идеальна, так как она платформенно независима и является в настоящий момент индустриальным стандартом трехмерного графического программирования.
Для демонстрации возможностей OpenGL в OSR2 включены программы защиты экрана, созданные на базе этой библиотеки.
Динамическая настройка параметров экрана
Великолепно, что в OSR2 появилось средство динамического изменения разрешения экрана. Теперь, когда вам нужно поменять разрешение и количество цветов в палитре, нет необходимости перезапускать компьютер — система справится с этим «на лету». Подобное динамическое изменение параметров так часто необходимо в повседневной работе, что на линейке задач появилась пиктограмма, с помощью которой можно производить необходимые изменения экрана, и благодаря этому отпадает необходимость в обращении к панели управления. При щелчке на пиктограмме свойств дисплея возникает всплывающее меню, каждый пункт которого представляет собой одну из возможных настроек для дисплея и адаптера.
Правда, эта технология еще не слишком хорошо отработана, поэтому нужно пользоваться ею с осторожностью. Иногда переключение в другой режим может сорваться, и тогда дисплей переходит в состояние засыпания, а компьютер перестает реагировать на какие-либо нажатия клавиш. В результате необходимо перезагрузить компьютер.
Если же система распознает, что выбранный вами видеорежим может работать некорректно без перезагрузки, она предложит сделать выбор: перезагрузить Windows 95 или попробовать сделать переключение динамически.
Следует отметить, что настройка видеокомпонентов компьютера стала удобнее. В том же самом меню, которое показывает пользователю возможные видеорежимы, доступен пункт Adjust Display Properties, вызывающий диалоговую панель свойств дисплея.
В этой панели вместо кнопки смены модели дисплея введена кнопка Advanced Properties, нажав на которую пользователь попадает на диалоговую панель дополнительных свойств. На самом деле это не дополнительные, а что ни на есть главные свойства. Ведь именно здесь можно изменить тип используемого монитора, тип видеоадаптера и даже частоту развертки монитора.
Впервые с динамическим переключением экрана вы могли встретиться, если использовали бесплатный набор системных утилит PowerToys, содержавший утилиту QuickRes, которая также умела динамически управлять разрешением и количеством цветов в палитре экрана. Предполагалось, что набор PowerToys и его собрат Kernel Toys будут интегрированы в OSR2. Но на практике это не подтвердилось. Тем не менее ознакомиться с утилитами PowerToys и Kernel Toys, безусловно, полезно (их можно получить бесплатно с FTP-сервера компании Microsoft по адресу: ftp://ftp.microsoft.com).
Kernel Toys
Convmem. Утилита, точнее виртуальный драйвер CONVMEM.VXD, отслеживает, сколько памяти выделено виртуальными драйверами в нижней области памяти в момент загрузки Windows. Для того чтобы установить CONVMEM.VXD, его следует скопировать в каталог SYSTEM главного каталога Windows 95 и добавить в секцию [386Enh] файла system.ini следующую строку:
device=convmem.vxd
После этого нужно перезагрузить компьютер. Теперь каждый раз, когда система будет загружаться, в том каталоге, где установлена Windows 95, будет создаваться файл CONVMEM.TXT, показывающий сводку распределенной памяти. Здесь имеются пять столбцов:
Address — адрес, в котором была распределена память;
Size — размер выделенного блока памяти;
Align — выравнивание блока памяти;
I — буква «I» означает, что данные в блоке являются экземпляром других данных;
Caller — виртуальный драйвер, запросивший блок памяти.
Эта утилита полезна лишь условно, поскольку представляет интерес только для системных программистов Windows.
Wintop. Эта утилита является расширенной копией аналогичной утилиты top из операционной системы Unix и показывает таблицу процессов. Установка производится просто: щелкните правой кнопкой мыши на файле Wintop.inf и выберите пункт Install. Через несколько секунд программа готова к работе. Запустите Wintop.exe и смотрите на всевозможные процессы, выполняющиеся в недрах Windows 95.
Программа позволяет отслеживать не только сами процессы, но и все их потоки.
Doswinky. Это весьма нужная утилита, если вы используете Windows-клавиатуру. Она запрещает использование клавиши вызова стартового меню. Это особенно полезно, когда вы играете в игры типа Doom, Quake, Duke 3d. Случайно зацепив эту клавишу, вы переключаетесь на стартовое меню, покидая сеанс DOS. Это очень нервирует.
Установка утилиты происходит запуском команды Install из контекстного меню, которое появляется, если щелкнуть правой кнопкой мыши на пиктограмме файла Doswinky.inf.
Tzedit. Это редактор временных поясов, позволяющий редактировать существующие и создавать новые настройки часовых поясов. С его помощью вы можете изменить смещение настройки того или иного временного пояса (от Гринвичского меридиана) и переменить даты и время перехода на летнее и зимнее время. Эта утилита не требует установки и может быть запущена сразу.
Keyremap. Интересная утилита, изменяющая значение некоторых служебных клавиш. При установке добавляет в диалоговую панель настройки параметров клавиатуры еще одну страничку с закладкой Remap.
Doswzcfg. Это утилита настройки режима MS-DOS. Используя ее, вы можете сконфигурировать многие параметры, которые требуются в файлах Autoexec.bat и Config.sys.
Для разных конфигураций можно использовать разные заголовки, быстро переключая их по мере надобности.
PowerToys
QuickRes. Как было замечено ранее, утилита QuickRes предназначается для динамического изменения разрешения экрана и количества цветов в палитре видеоадаптера. Эта утилита применима лишь в Windows 95, а для OSR2 она не нужна, так как в нем уже встроены средства динамического управления параметрами экрана.
TapiTNA. Эта утилита управляет параметрами дозвона и может вызывать системную утилиту дозвона Phone Dialer. Установки для TapiTNA не требуется. После запуска на линейке задач возникает пиктограмма, после щелчка на которой становятся доступны все настройки и команды этой утилиты.
Clock. Это не утилита, а часы. Вы можете выбирать, в каком виде показывать время — стрелками или цифрами. Причем можно сделать так, чтобы заголовок окна часов исчез и на экране остался один круглый циферблат со стрелками. То же касается и цифрового режима показа времени. Можно также настроить часы таким образом, что они будут всегда находиться сверху, не давая другим окнам перекрывать себя.
FlexiCD. Это миниатюрный проигрыватель компакт-дисков. Обладает практически всеми возможностями утилиты CDPlayer, входящей в состав Windows 95 и OSR2, но при запуске отображает свою пиктограмму в системной области на линейке задач. Позволяет запускать диск на прослушивание, останавливать его, открывать лоток дисковода CD, закрывать его, выбирать дорожку для проигрывания, просматривать общий список песен на диске.
Установка утилиты производится после запуска INF-файла Flexicd.inf. Нужно щелкнуть на его пиктограмме правой кнопкой мыши и выбрать из появившегося меню команду Install.
Target. Чрезвычайно полезная утилита, показывающая свойства объекта, на который нацелена ссылка (shortcut). В контекстное меню ссылки встраивается пункт Target, выбрав который вы вызываете контекстное меню для целевого объекта ссылки.
Командой Open Container можно открыть ту папку, в которой располагается ссылаемый объект. Установка этой утилиты производится с помощью команды Install INF-файла.
Content. Добавляет к контекстному меню папок пункт Content, выбрав который можно узнать содержимое папки, не открывая ее.
Устанавливается с помощью команды Install INF-файла.
Cabview. Позволяет открывать CAB-файлы и просматривать их содержимое без распаковки.
Можно даже извлечь отдельные файлы из просматриваемого CAB-файла. Устанавливается с помощью команды Install INF-файла.
Explore. Добавляет к контекстному меню папки два новых пункта: Explore и Explore from here. Вызывая первый, вы получаете на экране окно утилиты Explorer, открытое на выбранной папке. Вторая команда делает то же самое, но показывает папку так, как будто выше нее в файловой иерархии нет ничего. Эта команда активно использует пространства имен Windows 95. Устанавливается с помощью команды Install INF-файла.
Deskmenu. Утилита, запускающая на системной области линейки задач пиктограмму, щелкая на которой, вы получаете в виде меню все папки и ссылки, хранимые на рабочем столе вашего компьютера.
Позволяет обратиться к объектам рабочей области, не закрывая активных окон. Устанавливается с помощью команды Install INF-файла.
Устанавливается с помощью команды Install INF-файла.
FindX. Добавляет к пункту Find стартового меню новые подпункты, значительно расширяющие поисковые возможности.
Устанавливается через вызов команды Install INF-файла.
Doshere. Добавляет к контекстному меню папок новый пункт — Command Prompt Here, выбирая который пользователь получает окно нового сеанса MS-DOS с текущим каталогом, соответствующим выбранной папке. Устанавливается программа с помощью команды Install INF-файла.
TweakUI. Эта утилита размещает в панели управления новую пиктограмму, двойной щелчок на которой приводит к появлению диалоговой панели тонкой настройки различных Windows 95.
Возможных параметров настройки — великое множество. Любой пользователь Windows 95 найдет здесь что-нибудь полезное для себя. Устанавливается с помощью команды Install INF-файла.
XMouse. Придает мыши свойство мыши XMouse из операционной ситемы Unix, а именно: вызывает переключение фокуса ввода к тому окну, на котором находится указатель мыши.
Дополнительно мышь может быть настроена так, что перевод указателя мыши на другое окно автоматически делает его самым верхним.
Основные компоненты DirectX
|
|
регистры, защелки страниц и т. д. При этом функциональность программ, не использующих DirectX, сохраняется. Любая программа, поддерживающая DirectX, может легко управлять видеопамятью и аппаратными особенностями видеоадаптера. |
|
|
любых типов, как аналоговым, так и цифровым. В своей работе DirectInput опирается на стандартный интерфейс программирования Win32, значительно расширяя возможности последнего. Для запоминания данных о джойстике и калибрационных характеристик DirectInput использует регистратор (реестр) Windows 95. |
|
|
транспортных протоколов и без помощи сетевых служб. |
|
|
обеспечивает микширование звука без задержек, аппаратное ускорение и прямой доступ к аппаратуре. |