
- The Windows 8 Mail app lets you add any email account that supports IMAP.
- The reason why your mail app doesn’t work correctly is that the license for a particular app, such as the mail app, may not match the license of the Windows 8 operating system.
- If the email app simply refuses to work, it may be best to try a third-party email app.
Addressing the synchronization hiccup: unraveling the Windows 8 Mail App syncing issue.
Troubleshooting Windows 8 Mail App Issues
If you’re experiencing syncing issues with the Windows 8 Mail app, follow these steps to resolve the problem:
STEP 1: Check your internet connection and make sure it’s stable. A weak or intermittent connection can cause syncing difficulties.
STEP 2: Verify your email account settings. Go to Settings > Accounts > Your email account and ensure that all the information is correct. Make sure your email address, password, and server settings are accurate.
OPTION 1: Update the Mail app. Check for any available updates in the Windows Store. Keeping your app up to date can fix many issues.
OPTION 2: Reset the Mail app. Press the Windows key + I to open the Settings charm, then go to Change PC settings > Update and recovery > Windows Update > Check now. This will reset the app and may resolve the syncing problem.
If these steps don’t fix the issue, you may need to consider using a different email client such as Outlook or Mailbird.
Fixing Mail App Syncing Problems
If you’re experiencing syncing issues with the Mail app on your Windows 8 computer, follow these steps to fix the problem:
STEP 1: Check your internet connection and make sure it’s stable. A weak or unstable connection can cause syncing difficulties.
STEP 2: Restart your computer and try syncing again. This simple step can often resolve syncing issues.
If the problem persists, try the following:
1. Open the Mail app and go to the Settings menu.
2. Select your email account and click on “Sync options.”
3. Toggle the sync options off and on again. This can refresh the connection and fix the syncing problem.
If these steps don’t work, you may need to consider using a different email client, such as Outlook or Mailbird, which are known for their reliable syncing capabilities.
Resolving Access Issues on Windows 8 Mail App
To resolve access issues on the Windows 8 Mail App, follow these steps:
1. Check your internet connection and make sure it is stable.
2. Verify that your account settings are correct. Go to the Mail App settings, select your account, and ensure that the email address and password are entered correctly.
3. Update your Windows operating system to the latest version. Open the Settings app, go to Update & Security, and click on Windows Update to check for available updates.
4. Restart your PC to refresh the Mail App and resolve any temporary glitches.
5. If the issue persists, try removing and re-adding your email account. Open the Mail App settings, select your account, and click on Remove Account. Then, add the account again by clicking on Add Account.
6. If you are using an email service other than Outlook or Exchange ActiveSync, such as Gmail, make sure that the correct server settings are entered. Consult your email service provider’s website for the correct settings.
7. If you are still experiencing issues, consider using a different email client such as Microsoft Outlook or Windows Live Mail, which may provide better compatibility and syncing capabilities.
Note: For more advanced troubleshooting, you may need to consult Microsoft support or refer to their official documentation.
python

import subprocess
def repair_windows8_mail_app():

    # Close the Windows 8 mail app if it is currently running

    subprocess.call(["taskkill", "/IM", "Windows8Mail.exe", "/F"])
# Clear the app's local cache and temporary files
subprocess.call(["del", "/F", "/Q", "%LocalAppData%\\Packages\\microsoft.windowscommunicationsapps_*\\LocalState\\Indexed\\LiveComm\\*"])
# Reset the app's settings to default values
subprocess.call(["powershell", "-Command", "Get-AppxPackage *windowscommunicationsapps* | Reset-AppxPackage"])
# Restart the Windows 8 mail app
subprocess.call(["start", "Windows8Mail:"], shell=True)
# Call the repair function

repair_windows8_mail_app()
Please note that this code is a basic example and may not address the specific issue you are facing. Additionally, it assumes that you have Python and the necessary permissions to execute the commands. It is always recommended to seek official documentation or assistance from Microsoft support for a more accurate solution to your Windows 8 mail app problem.
Troubleshooting Blocked Access to Windows 8 Mail App
If you’re experiencing issues with accessing the Windows 8 Mail app or your emails are not syncing properly, follow these steps to resolve the problem:
1. Check your internet connection: Ensure that you have a stable internet connection to sync your emails.
2. Verify your account settings: Go to the Mail app settings and make sure your account credentials are correct.
3. Update the Mail app: Check for any available updates for the Mail app in the Microsoft Store.
4. Disable antivirus or firewall: Temporarily disable any antivirus or firewall software that might be blocking the Mail app’s access to the internet.
5. Reset the Mail app: Open the Windows Settings app, go to Apps > Apps & features, find the Mail app, and click on it. Then select Advanced options and click the Reset button.
6. Contact support: If the issue persists, reach out to our support team for further assistance.
By following these steps, you should be able to resolve the blocked access and syncing issues with the Windows 8 Mail app.
Mark Ginter
Mark Ginter is a tech blogger with a passion for all things gadgets and gizmos. A self-proclaimed «geek», Mark has been blogging about technology for over 15 years. His blog, techquack.com, covers a wide range of topics including new product releases, industry news, and tips and tricks for getting the most out of your devices. If you’re looking for someone who can keep you up-to-date with all the latest tech news and developments, then be sure to follow him over at Microsoft.
Windows 8 features a pretty slick Mail app. If you thought it only supported Microsoft accounts, such as Hotmail, Windows Live, or Outlook, you were wrong. The Windows 8 Mail app lets you add any email account that supports IMAP.
As it always is in life, the theory is beautiful, but in practice we run into all sorts of petty issues. That was me when I tried to set up the Windows 8 Mail app. This article is based on my experiences. It will help you set up the Mail app in two super simple steps, which should be very easy, unless you run into issues like me. And so I added troubleshooting tips to help you avoid some common pitfalls.
Set Up Windows 8 Mail App
When you log into Windows 8 with a local account and open Mail for the first time, you will be asked to log in with your Microsoft account.

If you are logged into Windows 8 with your Microsoft account already, you should see the respective email account, given your Microsoft account is based on a Hotmail, Outlook, or Windows Live email address. Otherwise, you will see three blank columns and a note to Add your email accounts. Since I used my Gmail address to create a Microsoft account, that is what I saw.

That is perfectly normal! Go ahead and click an account you wish to add. If Mail comes up completely blank, click [Windows] + [I] to bring up the app’s Settings, go to Accounts, select Add an account, and choose an option from the list. Enter your email address and password and try your luck.
The trouble starts, when you don’t actually succeed in adding any accounts.
Problem: Cannot Add Any Email Account
Do you see one of these error messages:
- Unable to connect. Ensure that the information you’ve entered is correct.
- That email address or password didn’t work. Double-check them and try again.
First, make sure your login details are correct. Windows won’t let you see your password as you enter it, but you can click and hold the eye symbol on the far right of the password field to briefly review your password.

Second, while your password might be correct, it won’t work if you enabled two-factor authentication, e.g. Gmail’s two step verification. In that case you need specific password to log in. Log into your email account via its web interface or use a mobile app you might have to obtain this a temporary application-specific password.
Third, check your Internet connection! When I first tried to add an account, the Adding your account wheel would spin forever before one of those errors popped up. I tried every trick in the book, and out of pure desperation I even refreshed Windows 8. To no avail. When I finally connected to the Internet using a LAN cable, it suddenly worked.
Don’t laugh! I was actually connected to the Internet via WiFi the whole time. I can only suspect that Windows was downloading updates in the background and hence connecting to the email account eventually timed out. Later, adding accounts via WiFi worked perfectly fine.
Summary Of Possible Solutions:
- Double-check your login details are correct.
- Are you using two step verification? Get an application-specific password!
- Connect to Internet via LAN cable.
Problem: Cannot Add A Gmail Account
So you tried all of the above and you’re still stuck. If you’re trying to add a Gmail account, your mistake might be that you’re trying to Include your Google contacts and calendars.
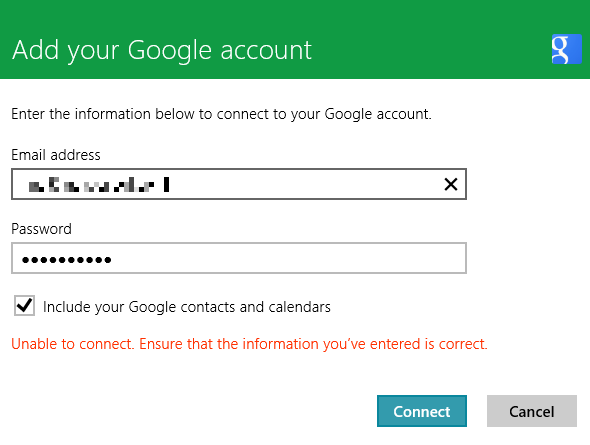
Unfortunately, Google no longer supports new Exchange ActiveSync connections. The only way to sync your Google calendar and contacts to Windows 8 is through workarounds described in the previous link. To add your Google email account to the Mail app, you must un-check the respective option.
Solution:
- Un-check box next to option Include your Google contacts and calendars.
Problem: Cannot Add Other Account
Like most email clients, the Mail app tries to auto-fill most of the information required to add an email account. If you have an exotic account, however, for example from your work or university, Mail might fail. The error message will read like this:
- We sill can’t find settings for [your email address]. Providing this additional info may help. If you don’t know this information, search online or check with your provider.
For once, Mail has some helpful advice. The solution is in the error message above.
Conclusion
Many small pitfalls are to be avoided when setting up applications that depend on so many different parameters. Automatically completing server details, synchronizing data via the Cloud, logging in with additional security features, and meanwhile collaborating competitors change their settings and stop supporting features. The only thing that remains reliable is a Google search combined with trial & error as a means of troubleshooting. And maybe you’re better off trying an alternative Windows 8 email app.
If you’re one of the millions of people who rely on your Internet provider for an email address, you’re in for a shock when you upgrade to Windows 8. Brace yourself; there’s a very good chance that your ISP-provided email address (jan@comcast.net, or mike@verizon.net, for example), won’t work with Windows 8’s Mail app.
Windows 8 supports an up-and-coming email protocol called IMAP, but many Internet service providers — such as Time Warner, Comcast and Fairpoint — only offer email access through a Web browser or through an older email protocol called POP. Unlike the email applications in earlier generations of Windows, the new Mail app doesn’t include POP mail support.
You could still check your email on the Web, or hop into Desktop mode and set up a classic-style email client like Thunderbird (assuming you aren’t running a limited Windows RT tablet), but neither of those options sink their claws into Windows 8 with the same intensity as the native Mail app. The Windows 8 Mail app integrates with the operating system’s People list and pops up system-wide notifications when you receive new messages; the alternatives don’t. There aren’t any Windows 8 Mail apps available in the Windows Store, either.
Don’t panic, though; all is not lost. Thanks to the Mail app’s support for webmail services like Outlook.com and Gmail, it’s possible to work around the crippling lack of POP functionality. It’ll take jumping through a hoop or two, and there is one big “gotcha!” involved, but you should be receiving your ISP-provided POP messages in minutes.
Here’s how to read your POP mail in Windows 8, with a helping hand from Gmail. Fear not; we’ll guide you through every step of the way.
Configure your Gmail account to work with your POP account
1. Create a Gmail account. If you don’t have a Gmail account already, head over to mail.google.com and whip one up. I recommend giving your account a decent-sounding handle — maybe your name? – instead of something silly. You’ll see why at the end. Make sure you’re signed into the account to continue.

2. Enter Gmail’s email account options. Click on the gear icon in the upper right-hand corner, then select “Settings.” In the Setting page, select the “Accounts and Import” tab along the top, then click the “Add a POP3 mail account you own” link in the “Check mail from other accounts (using POP3)” section. A new Window opens.

3. Configure Gmail to read your incoming POP mail. Enter your POP email account address on the first screen, then click Next and enter your incoming POP settings as specified by your Internet provider. (Don’t know this info? Search for “<your provider’s name> POP email settings”, sans quotes.) If you already had an active Gmail account, you might want to check the box that labels messages coming from the new POP account. Click Next, then confirm that you want to be able to send messages from the account as well.

4. Configure Gmail to send outgoing POP mail. Confirm your outgoing email settings, then continue. On the next screen, leave the “Send through Gmail” option. Then, tell Gmail to send a verification message to your email address. Either click the link in the message, or copy and paste the verification code into the last box. Now you’re good to go.
Configure the Windows 8 Mail app to read your Gmail account

5. Add a new account to the Mail app. Open up the Windows 8 Mail app, bring up the Charm Bar, then select “Settings.” In the Settings Menu, click on “Accounts,” then select “Google” from the list.
6. Add your Google Account. Enter your Gmail account name and password. Optionally checking the box will import your Google Calendar and Contacts. Voilà! Your Gmail account appears in the Mail app, complete with incoming messages from your POP account. Now, Windows 8 will send you a notification when you receive a new email.
Now for the bad news…
The above all sounds good and well, but here’s the rub: when you send an outgoing email, it will use your Gmail email address, not your POP provider’s email address — even if you’re replying to a message sent to your POP account. There’s no way around it; we tried mucking around in Gmail’s Web-based settings, the Mail app’s outgoing server settings, and everything else we could think of — all to no avail. Now you see why I suggested selecting a halfway professional-sounding Gmail account name.
That shouldn’t matter too much, though. You’ll still be receiving the messages sent to your POP account, and your contacts should still be able to receive your messages just fine despite the new Gmail handle. If tricky spam filters start snagging your outgoing messages, just sign into your POP account’s Web-based interface and send out a message telling your friends to look for messages from your new Gmail account. If your POP account doesn’t have a Web interface, sign into the Gmail website and send the message that way; you’ll find your POP email account listed as an option in the “From” line when you compose a new message.
Elegant? Not at all. But Windows 8 hides a lot of little flaws and awkward annoyances underneath its beautiful, multicolored surface, and hey — at least this fix works. Happy emailing!
За без малого три года со времени написания руководства по оживлению почтового клиента Windows Mail в рамках операционной системы Windows 7 выяснилось, что тема по-прежнему весьма востребована, а народ так и не полюбил Windows Live Mail. (UPD: настолько востребована, что пришлось писать сиквел с дополнениями и поправками: Разбор полетов, или Активизация Windows Mail в Windows 7 — три года спустя.) Также с тех пор успела выйти Windows 8 и даже обновиться до 8.1. Я сам продолжаю использовать Семерку, не видя для себя пока вразумительных причин перехода на 8. Мои клиенты, которым я за этот период восстановил WinMail, также продолжают сидеть на 7. Однако, учитывая, что уже длительный срок OEM-компьютеры поставляются с Восьмеркой на борту, и система показывает себя с хорошей стороны, то рано или поздно вопросом, вынесенным в заголовок данной статьи, пришлось бы озаботиться. К тому же вопросом этим начали интересоваться читатели в комментариях к упомянутой статье. Один из них нашел в сети вариант решения, который я протестировал, исправил, дополнил и предоставляю теперь на суд общественности.
Результат был проверен на Windows 8 и 8.1, 32 и 64 бит. Последовательность действий для разных разрядностей одна и та же, а вот файлы, которыми предстоит заменить неактивные в Восьмерке — разные. Если сомневаетесь в битности вашей системы — кликните: Где посмотреть, 32-х или 64-битная Windows 8.
Если у вас 32-битная операционка — скачайте следующий архив:
Владельцы 64-битной ОС скачивают другой:
1. Разлочиваем папку, содержащую файлы WinMail. Для этого:
а) Запускаем Add_Take_Ownership.reg, активируя тем самым Take Ownership сервис. (Архив также содержит Remove_Take_Ownership.reg, его деактивирующий.)
б) Открываем папку Program Files в проводнике. Для этого нажимаем сочетание клавиш Win+R и в строку ввода Open появившегося окна Run вводим или копируем строку %ProgramFiles%, после чего жмем OK. Находим в ней папку Windows Mail.
Как и на Семерке, вне зависимости от разрядности ОС работаем с фолдером Program Files (а не Program Files (x86) для 64-битной, в котором также имеется папка Windows Mail).
в) Кликаем правой кнопкой мыши на папке Windows Mail. В открывшемся меню выбираем Take Ownership.
2. Копируем содержимое папки Windows Mail из скачанного архива в папку почтовика. После того, как мы получили на нее права, система позволяет заменить существующее содержимое папки на новое.
3. Запускаем командный файл unhide.cmd с правами администратора (правый клик — Run as Administrator). Это удалит атрибуты «скрытый» (hidden) и «системный» (system) c экзешника WinMail.exe.
4. В отличие от Семерки, в Windows 8 и 8.1 отсутствует необходимая для функциональности Windows Mail библиотека msidcrl30.dll. Каждый архив содержит соответствующую своей разрядности версию этой библиотеки. Скопируйте файл в папку System32 системной директории. Открыть ее можно также через Win+R и строку ввода Open диалога Run, где набиваем %SystemRoot%\system32 и жмем OK.
Таким образом, многострадальный Windows Mail обрел новую жизнь в очередной версии Windows. Интересно, когда Майкрософт определится с ним окончательно в ту или иную сторону?
В результате установки некоторых системных обновлений, а особенно сервис паков, Windows Mail может вернуться в нерабочее состояние. В таком случае просто повторите процедуру. Аккаунты, письма и настройки при этом слететь не должны.
UPD: Те, кто использует русский интерфейс, должны заменить также содержимое подпапки ru-RU в папке Windows Mail — два файла локализации — на такие же, но из Windows 7. Разрядность операционной системы, естественно, роли не играет. Следующий архив содержит эти файлы:
UPD 2: Для Windows 10 после Fall Creators Update (v.1709): Внедрение Windows Mail в Windows 10 версии 1709.
UPD 3: Windows 10 после v.1709 — вернули теперь и MAPI!!: Внедрение Windows Mail в Windows 10 версии 1709. MAPI восстановлен!.