
Building a new Windows 8.1 partition partition is a means of protecting data from infection by automatically setting up a designated area on your hard disk(s) where you will automatically store important data related to the partition feature.
In this article, we share four ways to remove watermark from Windows 8 / Windows 10 operating system. These methods are enabled from the built-in resources of each version
Method 1: Remove Activate Windows Watermark using Regedit
To remove activate Windows watermark using Regedit, follow the following;
- Click Start and type in Regedit and hit enter
(you will be prompted by UAC, click Yes)
- Now, browse to HKEY_CURRENT_USER > Control Panel > Desktop
- In the Desktop folder, scroll down to find PaintDesktopVersion and double click on it to open
- Make sure Hexadecimal is selected and change the Value to “0″. Then, Click OK to save changes

- You close the registry editor and restart your computer. When you log back on to the desktop the watermark should now be removed


Method 2: Remove Activate Windows Watermark using Windows PowerShell
This method will temporarily activate Windows for 90 days (3 months), which means you won’t be seeing activate Windows watermark for 90 days. However, after 90 days, you have to redo this method to continue the essence. Here’s how;
- Click Start, and type in PowerShell, right-click and select run as administrator.
(you will be prompted by UAC, click Yes)
- In the PowerShell window, type the below command and hit enterslmgr /renew

- Now restart your machine and you will be good for the next 90 days.


ALSO READ: No Sounds On Windows 10? Here Are Some Easy Fixes
Method 3: Disable Activate Windows Watermark using A Script
We have discussed many ways to activate Windows to remove activate Windows watermark. Here’s another way to activate Windows, this time by running a script. Here’s how to;
- Open notepad on your computer
- Copy and paste the below text into the notepad@echo offtitle Activate Windows 7 / 8 / 8.1 / 10 for FREE!&cls&echo =====================================&echo #Copyright: MSGuides.com&echo =====================================&echo.&echo #Supported products:&echo – Windows 7 Professional&echo – Windows 7 Professional N&echo – Windows 7 Professional E&echo – Windows 7 Enterprise&echo – Windows 7 Enterprise N&echo – Windows 7 Enterprise E&echo – Windows 8 Core&echo – Windows 8 Core Single Language&echo – Windows 8 Professional&echo – Windows 8 Professional N&echo – Windows 8 Professional WMC&echo – Windows 8 Enterprise&echo – Windows 8 Enterprise N&echo – Windows 8.1 Core&echo – Windows 8.1 Core N&echo – Windows 8.1 Core Single Language&echo – Windows 8.1 Professional&echo – Windows 8.1 Professional N&echo – Windows 8.1 Professional WMC&echo – Windows 8.1 Enterprise&echo – Windows 8.1 Enterprise N&echo – Windows 10 Home&echo – Windows 10 Home N&echo – Windows 10 Home Single Language&echo – Windows 10 Home Country Specific&echo – Windows 10 Professional&echo – Windows 10 Professional N&echo – Windows 10 Education N&echo – Windows 10 Education N&echo – Windows 10 Enterprise&echo – Windows 10 Enterprise N&echo – Windows 10 Enterprise LTSB&echo – Windows 10 Enterprise LTSB N&echo.&echo.&echo ====================================&echo Activating your Windows… & cscript //nologo c:\windows\system32\slmgr.vbs /ipk FJ82H-XT6CR-J8D7P-XQJJ2-GPDD4 >nul&cscript //nologo c:\windows\system32\slmgr.vbs /ipk MRPKT-YTG23-K7D7T-X2JMM-QY7MG >nul&cscript //nologo c:\windows\system32\slmgr.vbs /ipk W82YF-2Q76Y-63HXB-FGJG9-GF7QX >nul&cscript //nologo c:\windows\system32\slmgr.vbs /ipk 33PXH-7Y6KF-2VJC9-XBBR8-HVTHH >nul&cscript //nologo c:\windows\system32\slmgr.vbs /ipk YDRBP-3D83W-TY26F-D46B2-XCKRJ >nul&cscript //nologo c:\windows\system32\slmgr.vbs /ipk C29WB-22CC8-VJ326-GHFJW-H9DH4 >nul&cscript //nologo c:\windows\system32\slmgr.vbs /ipk BN3D2-R7TKB-3YPBD-8DRP2-27GG4 >nul&cscript //nologo c:\windows\system32\slmgr.vbs /ipk 2WN2H-YGCQR-KFX6K-CD6TF-84YXQ >nul&cscript //nologo c:\windows\system32\slmgr.vbs /ipk NG4HW-VH26C-733KW-K6F98-J8CK4 >nul&cscript //nologo c:\windows\system32\slmgr.vbs /ipk XCVCF-2NXM9-723PB-MHCB7-2RYQQ >nul&cscript //nologo c:\windows\system32\slmgr.vbs /ipk GNBB8-YVD74-QJHX6-27H4K-8QHDG >nul&cscript //nologo c:\windows\system32\slmgr.vbs /ipk 32JNW-9KQ84-P47T8-D8GGY-CWCK7 >nul&cscript //nologo c:\windows\system32\slmgr.vbs /ipk JMNMF-RHW7P-DMY6X-RF3DR-X2BQT >nul&cscript //nologo c:\windows\system32\slmgr.vbs /ipk M9Q9P-WNJJT-6PXPY-DWX8H-6XWKK >nul&cscript //nologo c:\windows\system32\slmgr.vbs /ipk 7B9N3-D94CG-YTVHR-QBPX3-RJP64 >nul&cscript //nologo c:\windows\system32\slmgr.vbs /ipk BB6NG-PQ82V-VRDPW-8XVD2-V8P66 >nul&cscript //nologo c:\windows\system32\slmgr.vbs /ipk GCRJD-8NW9H-F2CDX-CCM8D-9D6T9 >nul&cscript //nologo c:\windows\system32\slmgr.vbs /ipk HMCNV-VVBFX-7HMBH-CTY9B-B4FXY >nul&cscript //nologo c:\windows\system32\slmgr.vbs /ipk 789NJ-TQK6T-6XTH8-J39CJ-J8D3P >nul&cscript //nologo c:\windows\system32\slmgr.vbs /ipk TX9XD-98N7V-6WMQ6-BX7FG-H8Q99 >nul&cscript //nologo c:\windows\system32\slmgr.vbs /ipk 3KHY7-WNT83-DGQKR-F7HPR-844BM >nul&cscript //nologo c:\windows\system32\slmgr.vbs /ipk 7HNRX-D7KGG-3K4RQ-4WPJ4-YTDFH >nul&cscript //nologo c:\windows\system32\slmgr.vbs /ipk PVMJN-6DFY6-9CCP6-7BKTT-D3WVR >nul&cscript //nologo c:\windows\system32\slmgr.vbs /ipk W269N-WFGWX-YVC9B-4J6C9-T83GX >nul&cscript //nologo c:\windows\system32\slmgr.vbs /ipk MH37W-N47XK-V7XM9-C7227-GCQG9 >nulecho ————————————&echo.&echo.&set i=1:serverif %i%==1 set KMS_Sev=kms7.MSGuides.comif %i%==2 set KMS_Sev=kms8.MSGuides.comif %i%==3 set KMS_Sev=kms9.MSGuides.comif %i%==4 goto notsupportedcscript //nologo c:\windows\system32\slmgr.vbs /skms %KMS_Sev% >nulcscript //nologo c:\windows\system32\slmgr.vbs /ato | find /i “successfully” && (echo.& echo ====================================== & echo. & choice /n /c YN /m “Would you like to visit my blog [Y,N]?” & if errorlevel 2 exit) || (echo The connection to the server failed! Trying to connect to another one… & echo Please wait… & echo. & echo. & set /a i+=1 & goto server)explorer “https://productkey.net”&goto halt:notsupportedecho ======================================&echo.&echo Sorry! Your version is not supported.:haltpause >nul
- In notepad, go to File and click Save as and name the file windows10.cmd (it is crucial that the file name ends with .cmd) and save the file to your desktop.
- Right-click on the windows10.cmd file (we just created) and click run as administrator.
- Restart your machine to activate Windows.


Method 4: Disable Activate Windows Watermark by using Ease of Access
We can remove activate Windows watermark by also using the Windows 10 Ease of Access option. Don’t get twisted, here’s how to;
- Click on Start menu, and search for Control Panel then click on the app
- Go to Ease of Access Centre
- On the next screen, click on Make the computer easier to see
- Now, scroll down to the bottom of this screen to tick the box Remove background images (where available)
- Click OK and Restart your machine
- The activate Windows watermark should be gone.
ALSO READ: Windows Update Stuck? Here’s How To Fix It
Method 5: Get Rid of Activate Windows Watermark by disabling Windows 10 Tips
Another way to get rid of activate Windows watermark specifically on Windows 10 is by disabling Windows 10 tips. Here’s how to do it;
- Go to Start and click Settings (The button that looks like a gear)
- Go to System and click Notifications & Actions
- Scroll down and turn off Show me the Windows welcome experience after updates and Get tips, tricks and suggestions as you use windows
- That’s it! you will be good.
Method 6: Get Rid of Activate Windows Watermark using CMD
Sometimes, enabling test mode on your Windows causes the activate Windows watermark to appear. If your test mode is enabled, you can disable easily using CMD. This is how;
- Click Start and type in CMD, right-click and select run as administrator
(you will be prompted by UAC, click Yes)
- In the cmd window enter the below command and hit enterbcdedit -set TESTSIGNING OFF
- If everything is good, then you should see “The operation completed successfully” prompt
- Restart your machine. You’re good.


ALSO READ: 7 Common Windows 10 Errors And How to Fix Them [2020]
Method 7: Remove Activate Windows Watermark using Third-Party Tools
If nothing worked, this is probably the last method you can try to get rid of Activate Windows watermark. These free third-party tools remove activate Windows watermark by deceiving Windows to believe it has been activated. So, we won’t recommend this method, but it’s our duty to inform you. Here’s how;
1. Universal Watermark Disabler (Winaero)
This software will remove activate Windows watermark from your machine with a click of a button. Before you proceed make sure all the applications are closed on your machine and save all work. Here’s we go;
- Download Universal Watermark Disabler from this page.
- Unzip the file and double click on uwd.exe and install it.
- The application will run then automatically log you off.
- Log back into your machine.
- The watermark should now be removed.
2. KMSAuto
This is a good alternative to counterfeit Windows product keys. It can be used to activate not only Windows but also other Microsoft products, such as Office.
- Download KMSAuto and install it.
- Open the program, click on Activation Windows.
- Once it’s done, your machine will restart.
- That’s it! when you log in back, Windows will be activated and the activate Windows watermark will be long gone.
How To Remove Activate Windows Watermark Permanently
There are several ways to remove Activate Windows watermark. We will show you all the possible ways to remove Activate Windows watermark without using a product key.
1. Get rid of Activate Windows Watermark using Regedit
To remove the watermark using regedit, do the following:
1. Click Start and type in Regedit and hit Enter. Select “Yes” if prompted by UAC (User Account Control) box.
2. Now, navigate to HKEY_CURRENT_USER > Control Panel > Desktop.
3. Scroll down and find the PaintDesktopVersion and double click it to open.
4. Once opened, make sure that the Hexadecimal option is selected. Then, change the Value data to 0 and click OK to save changes.
5. Now, close the Registry Editor and restart your Windows PC/Laptop.
When you log in to your desktop again, the Activate Windows watermark should be removed.
2. Disable Activate Windows Watermark via Windows PowerShell
Using this method will activate the Windows on temporary basis (90 days/3 months). You might need to use this command again after 90 days to continue removing the Activate Windows watermark. Here’s how you can remove the watermark using PowerShell:
1. Click Start and type in PowerShell. On the right pane, select “Run as Administrator” option. Choose “Yes” if prompted by UAC.
2. Once PowerShell opens, type this command and hit Enter.
slmgr /renew
3. Close PowerShell and restart your Windows PC/Laptop.
Once restarted, you will get rid of the Activate Windows watermark for the next 90 days. If you see the watermark again, run this command again and you will be good to go.
3. Disable Activate Windows Watermark using CMD (Command Prompt)
It is a rare case but activating Test mode can often cause the Activate Windows watermark to appear. If you disable the Test Mode, you can hide the Activate Windows watermark. To turn this off, follow these steps:
1. Click Start and type in CMD. On the right pane, click on the “Run as Administrator” option. Select “Yes” if prompted by UAC.
2. Once Command Prompt opens up, type this command and hit Enter.
bcdedit -set TESTSIGNING OFF
3. If everything goes good, you’ll see “Operation completed successfully” as a result. Restart your Windows PC/Laptop.
Once you restart your PC, you’ll see that you got rid of the Activate Windows watermark.
4. Remove Activate Windows Watermark with a Script
Although there are many ways to remove the Activate Windows watermark, one of those methods is using a script. Running this script might get rid of the Activate Windows watermark.
1. Click Start > search for Notepad and hit Enter.
2. Once opened, copy and paste the below text to the Notepad.
@echo offtitle Activate Windows 7 / 8 / 8.1 / 10 for FREE!&cls&echo =====================================&echo #Copyright: MSGuides.com&echo =====================================&echo.&echo #Supported products:&echo – Windows 7 Professional&echo – Windows 7 Professional N&echo – Windows 7 Professional E&echo – Windows 7 Enterprise&echo – Windows 7 Enterprise N&echo – Windows 7 Enterprise E&echo – Windows 8 Core&echo – Windows 8 Core Single Language&echo – Windows 8 Professional&echo – Windows 8 Professional N&echo – Windows 8 Professional WMC&echo – Windows 8 Enterprise&echo – Windows 8 Enterprise N&echo – Windows 8.1 Core&echo – Windows 8.1 Core N&echo – Windows 8.1 Core Single Language&echo – Windows 8.1 Professional&echo – Windows 8.1 Professional N&echo – Windows 8.1 Professional WMC&echo – Windows 8.1 Enterprise&echo – Windows 8.1 Enterprise N&echo – Windows 10 Home&echo – Windows 10 Home N&echo – Windows 10 Home Single Language&echo – Windows 10 Home Country Specific&echo – Windows 10 Professional&echo – Windows 10 Professional N&echo – Windows 10 Education N&echo – Windows 10 Education N&echo – Windows 10 Enterprise&echo – Windows 10 Enterprise N&echo – Windows 10 Enterprise LTSB&echo – Windows 10 Enterprise LTSB N&echo.&echo.&echo ====================================&echo Activating your Windows… & cscript //nologo c:\windows\system32\slmgr.vbs /ipk FJ82H-XT6CR-J8D7P-XQJJ2-GPDD4 >nul&cscript //nologo c:\windows\system32\slmgr.vbs /ipk MRPKT-YTG23-K7D7T-X2JMM-QY7MG >nul&cscript //nologo c:\windows\system32\slmgr.vbs /ipk W82YF-2Q76Y-63HXB-FGJG9-GF7QX >nul&cscript //nologo c:\windows\system32\slmgr.vbs /ipk 33PXH-7Y6KF-2VJC9-XBBR8-HVTHH >nul&cscript //nologo c:\windows\system32\slmgr.vbs /ipk YDRBP-3D83W-TY26F-D46B2-XCKRJ >nul&cscript //nologo c:\windows\system32\slmgr.vbs /ipk C29WB-22CC8-VJ326-GHFJW-H9DH4 >nul&cscript //nologo c:\windows\system32\slmgr.vbs /ipk BN3D2-R7TKB-3YPBD-8DRP2-27GG4 >nul&cscript //nologo c:\windows\system32\slmgr.vbs /ipk 2WN2H-YGCQR-KFX6K-CD6TF-84YXQ >nul&cscript //nologo c:\windows\system32\slmgr.vbs /ipk NG4HW-VH26C-733KW-K6F98-J8CK4 >nul&cscript //nologo c:\windows\system32\slmgr.vbs /ipk XCVCF-2NXM9-723PB-MHCB7-2RYQQ >nul&cscript //nologo c:\windows\system32\slmgr.vbs /ipk GNBB8-YVD74-QJHX6-27H4K-8QHDG >nul&cscript //nologo c:\windows\system32\slmgr.vbs /ipk 32JNW-9KQ84-P47T8-D8GGY-CWCK7 >nul&cscript //nologo c:\windows\system32\slmgr.vbs /ipk JMNMF-RHW7P-DMY6X-RF3DR-X2BQT >nul&cscript //nologo c:\windows\system32\slmgr.vbs /ipk M9Q9P-WNJJT-6PXPY-DWX8H-6XWKK >nul&cscript //nologo c:\windows\system32\slmgr.vbs /ipk 7B9N3-D94CG-YTVHR-QBPX3-RJP64 >nul&cscript //nologo c:\windows\system32\slmgr.vbs /ipk BB6NG-PQ82V-VRDPW-8XVD2-V8P66 >nul&cscript //nologo c:\windows\system32\slmgr.vbs /ipk GCRJD-8NW9H-F2CDX-CCM8D-9D6T9 >nul&cscript //nologo c:\windows\system32\slmgr.vbs /ipk HMCNV-VVBFX-7HMBH-CTY9B-B4FXY >nul&cscript //nologo c:\windows\system32\slmgr.vbs /ipk 789NJ-TQK6T-6XTH8-J39CJ-J8D3P >nul&cscript //nologo c:\windows\system32\slmgr.vbs /ipk TX9XD-98N7V-6WMQ6-BX7FG-H8Q99 >nul&cscript //nologo c:\windows\system32\slmgr.vbs /ipk 3KHY7-WNT83-DGQKR-F7HPR-844BM >nul&cscript //nologo c:\windows\system32\slmgr.vbs /ipk 7HNRX-D7KGG-3K4RQ-4WPJ4-YTDFH >nul&cscript //nologo c:\windows\system32\slmgr.vbs /ipk PVMJN-6DFY6-9CCP6-7BKTT-D3WVR >nul&cscript //nologo c:\windows\system32\slmgr.vbs /ipk W269N-WFGWX-YVC9B-4J6C9-T83GX >nul&cscript //nologo c:\windows\system32\slmgr.vbs /ipk MH37W-N47XK-V7XM9-C7227-GCQG9 >nulecho ————————————&echo.&echo.&set i=1:serverif %i%==1 set KMS_Sev=kms7.MSGuides.comif %i%==2 set KMS_Sev=kms8.MSGuides.comif %i%==3 set KMS_Sev=kms9.MSGuides.comif %i%==4 goto notsupportedcscript //nologo c:\windows\system32\slmgr.vbs /skms %KMS_Sev% >nulcscript //nologo c:\windows\system32\slmgr.vbs /ato | find /i “successfully” && (echo.& echo ====================================== & echo. & choice /n /c YN /m “Would you like to visit my blog [Y,N]?” & if errorlevel 2 exit) || (echo The connection to the server failed! Trying to connect to another one… & echo Please wait… & echo. & echo. & set /a i+=1 & goto server)explorer “https://productkey.net”&goto halt:notsupportedecho ======================================&echo.&echo Sorry! Your version is not supported.:haltpause >nul
3. After pasting this text, go to File > Save As and give the file name as windows.cmd only. Choose “All files” from the Save as type dropdown menu.
4. Save the file on Desktop for easier access, and click Save.
5. Now close the notepad, and go to the Desktop. Right-click on the “windows.cmd” file and select “Run as administrator.” Choose “Yes” if prompted by UAC.
6. Once the script runs, restart your computer.
After restarting your PC/Laptop, the Activate Windows watermark will be gone.
5. Remove Activate Windows Watermark via Ease of Access
You can also remove the Activate Windows watermark using Ease of Access option, which is built in Windows. Before you go haywire, here’s how to do that.
1. Click Start and search for Ease of Access Display Settings.
2. Scroll down and toggle off “Show desktop background image” option.
3. Restart your PC/Laptop.
Once restarted, your background should be gone along with the Activate Windows watermark as well.
6. Remove Activate Windows Watermark using a BAT (Batch) File
There’s another notepad tweak that will let you remove the Activate Windows watermark, and that is done by creating a Batch (.BAT) file.
1. Click Start and type in Notepad and hit Enter.
2. Once opened, copy and paste the below command in the Notepad.
@echo off
taskkill /F /IM explorer.exe
explorer.exe
exit
3. After pasting this text, go to File > Save As and give the file name as remove.bat only. Choose “All files” from the Save as type dropdown menu.
4. Save the file on Desktop for easier access, and click Save.
5. Now close the notepad, and go to the Desktop. Right-click on the “remove.bat” file and select “Run as administrator.” Choose “Yes” if prompted by UAC.
6. Once the command window opens up and closes off, restart your computer.
After restarting your PC/Laptop, the Activate Windows watermark will be hidden now.
7. Get rid of Activate Windows Watermark by Disabling WIndows 10 Tips
An easy way to disable the Activate Windows watermark permanently, is through disabling Windows 10 Tips. To disable them, follow the process below.
1. Go to Start and click on the Settings (⚙) icon.
2. Click on Settings, and then click on Notifications & actions from the left pane.
3. Now scroll down and find the option that says “Get tips, tricks, and suggestions as you use Windows” and toggle it OFF.
4. Once done, restart your PC/Laptop.
This shall get rid of the Activate Windows Watermark.
8. Hide Activate Windows Watermark using a Free Third-Party Tool
If none of the above tips worked, your last resort should be a third-party tool to remove the “Activate Windows” watermark. There are many tools available out there. These tools trick Windows to think it’s activated. We don’t recommend using this method, but this should be your last option if nothing works.
1. Download the Universal Watermark Disabler tool using the download link given below.Download Universal Watermark Disabler
2. Unzip the file and make sure that all the applications are closed.
3. Double click on uwd.exe file. Click “yes” if prmopted by UAC. A window will popup on your screen.
4. Click on the “Install” button.
If necessary, restart your machine and you will be good to go. The Activate Windows watermark should be gone by now.
Conclusion
No matter how hard Microsoft tries, there is no escaping the watermarking on their new Windows 8.x platform. And if you’re a tech geek you want to keep those Windows 8 watermarks as quiet as possible, because the more people watch the pirated version of Windows, the less chance there is that Microsoft will create a decent operating system.
Многие пользователи знают о встроенной утилите Windows 7, 8 и Windows 10 — Очистка диска (cleanmgr), позволяющей удалить разного рода временные файлы системы, а также некоторые системные файлы, которые не требуются для штатной работы ОС. Преимущества этой утилиты по сравнению с самыми разными программами для очистки компьютера — в том, что при ее использовании любой, даже начинающий пользователь, скорее всего, ничего не повредит в системе.
Однако, мало кто знает о возможности запуска этой утилиты в расширенном режиме, позволяющем очистить компьютер от еще большего количества различных файлов и компонентов системы. Именно о таком варианте использования утилиты очистки диска и пойдет речь в статье.
Некоторые материалы, которые могут быть полезны в данном контексте:
- Как очистить диск от ненужных файлов
- Как очистить папку WinSxS в Windows 7, Windows 10 и 8
- Как удалить временные файлы Windows
- Как очистить папку DriverStore/FileRepository (обычно очень большую)
Запуск утилиты очистки диска с дополнительными опциями
Стандартный способ запуска утилиты очистки диска Windows — нажать клавиши Win+R на клавиатуре и ввести cleanmgr, затем — нажать Ок или Enter. Также ее можно запустить в разделе Панели управления «Администрирование».
В зависимости от количества разделов на диске, появится либо выбор одного из них, либо сразу откроется список временных файлов и других элементов, которые можно очистить. По нажатию кнопки «Очистить системные файлы», можно будет также удалить некоторые дополнительные вещи с диска.
Однако, с помощью расширенного режима, можно выполнить еще более «глубокую очистку» и задействовать анализ и удаление еще большего количество не совсем нужных файлов с компьютера или ноутбука.
Процесс запуска очистки диска Windows с возможностью использования дополнительных опций начинается с запуска командной строки от имени администратора. Сделать это в Windows 10 и 8 можно через меню правого клика по кнопке «Пуск», а в Windows 7 — просто выбрав командную строку в списке программ, кликнув по ней правой кнопкой мыши и выбрав пункт «Запуск от имени администратора». (Подробнее: Как запустить командную строку).
После запуска командной строки, введите следующую команду:
%systemroot%\system32\cmd.exe /c cleanmgr /sageset:65535 & cleanmgr /sagerun:65535
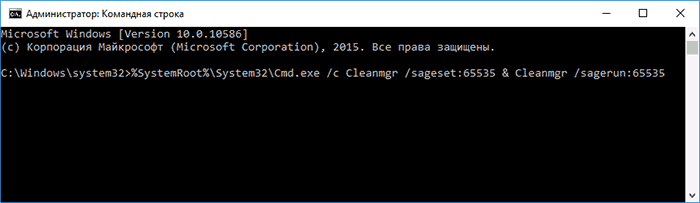
И нажмите Enter (после этого, пока не завершите действия по очистке, не закрывайте командную строку). Откроется окно очистки диска Windows с большим, чем обычно количеством пунктов для удаления ненужных файлов с HDD или SSD.
Список будет включать в себя следующие пункты (те, что появляются в данном случае, но отсутствуют в обычном режиме, выделены курсивом):
- Temporary Setup Files
- Старые файлы программы Chkdsk
- Файлы журнала установки
- Очистка обновлений Windows
- Защитник Windows
- Файлы журнала обновления Windows
- Загруженные файлы программ
- Временные файлы Интернета
- Файлы дампа памяти для системных ошибок
- Файлы мини-дампа для системных ошибок
- Файлы, оставшиеся после обновления Windows
- Пользовательские архивы отчетов об ошибках
- Пользовательские очереди отчетов об ошибках
- Системные архивы отчетов об ошибках
- Системные очереди отчетов об ошибках
- Временные файлы отчетов об ошибках
- Файлы установки Windows ESD
- BranchCache
- Предыдущие установки Windows (см. как удалить папку Windows.old)
- Корзина
- RetailDemo Offline Content
- Файлы резервной копии пакета обновления
- Временные файлы
- Временные файлы установки Windows
- Эскизы
- История файлов пользователя
Однако, к сожалению, в данном режиме не отображается, какое количество места на диске занимает каждый из пунктов. Также при таком запуске из пунктов очистки исчезают «Пакеты драйверов устройств» и «Файлы оптимизации доставки».
Так или иначе, думаю, такая возможность в утилите Cleanmgr может оказаться полезной и интересной.
На компьютерах/ноутбуках известных производителей с предустановленной Windows обычно присутствует скрытый раздел восстановления от производителя оборудования с пометкой OEM. Этот раздел обычно содержит эталонный образ Windows от производителя, к которому можно откатиться при сбросе системы до заводских настроек, а также ряд системных и диагностических утилит производителя. Размер такого OEM раздела восстановления может достигать нескольких десятков ГБ. Опытные пользователи Windows могут удалить этот раздел, чтобы освободить дополнительное место диске.
Содержание:
- Безопасное удаление OEM раздела в Windows с помощью Diskpart
- Удалить букву у OEM раздела восстановления в Windows
Безопасное удаление OEM раздела в Windows с помощью Diskpart
Откройте консоль управления дисками Disk Management (
diskmgmt.msc
). В нашем примере на диске есть раздел восстановления размером 15 Гб с меткой тома Recovery и типом Healty OEM Partition (в русской версии Windows он может называться “Раздел изготовителя оборудования ОЕМ”). Щелкните правой кнопкой в диспетчере дисков по этому OEM разделу. Обратите внимание, что в меню раздела отсутствуют все опции (в том числе кнопка удаления раздела)
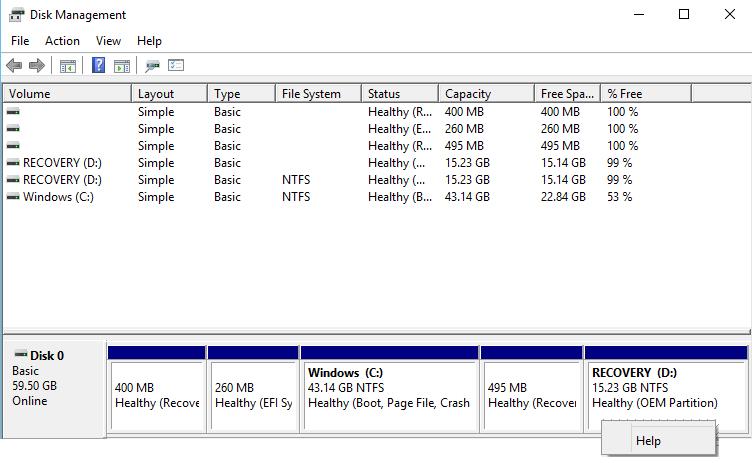
В нашем примере на диске есть дополнительный раздел recovery со средой WinRE (Windows Recovery Environment). Образ winre.wim на этом разделе позволяет загрузить Windows в режиме восстановления.
Вы можете проверить, на каком разделе находится образ среды восстановления Windows. Выполните команду:
reagentc /info

В нашем примере это раздел 4 на диске 0 (\\?\GLOBALROOT\device\harddisk0\partition4\Recovery\WindowsRE).
Выведите список номеров разделов на системном диске с помощью встроенного PowerShell модуля управления дисками:
Get-Disk | Where-Object IsSystem -eq $True|Get-Partition
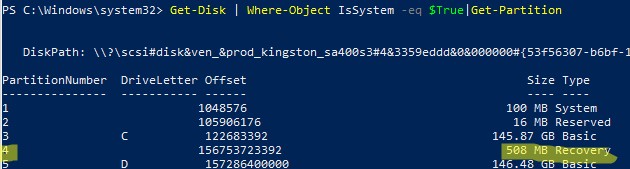
В этом примере образ восстановления находится на отдельном разделе Recovery размером 500 Мб, поэтому переносить его не нужно.
Если образ winre.wim находится на OEM разделе, рекомендуется перенести среду WinRE на системный раздел.
Теперь выведите конфигурацию загрузчика Windows с помощью команды:
bcdedit
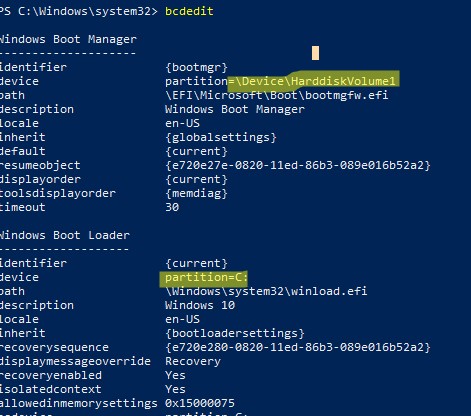
Убедитесь, что в конфигурации Windows Boot Manager и Windows Boot Loader отсутствуют на ссылки на ваш OEM раздел.
Microsoft целенаправленно ограничило функционал графической оснастки Disk Management по работе с системными, защищенными, скрытыми, и OEM разделами восстановления. Для управления такими разделами нужно использовать сторонние утилиты, либо встроенную утилиту diskpart. В этом примере мы покажем, как с помощью diskpart удалить раздел восстановления производителя на диске.
Важно! При удалении OEM/EISA разделов восстановления, вы не сможете выполнить откат операционной системы к начальному («заводскому») состоянию (но это не помешает вам выполнить чистую установку Windows, если нужно). Некоторые производители оборудования выпускают официальные инструкции с описанием переноса или удаления OEM разделов (я встречал такую инструкцию для Lenovo ThinkPad, подразумевающую перенастройку BIOS/ UEFI). На компьютерах с UEFI системах нельзя удалять раздел EFI System Partition (ESP), содержащий загрузчик Windows (способ восстановления удаленных EFI разделов).
Запустите командную строку с правами администратора и выполните команду
diskpart
Выведите список дисков в системе:
DISKPART> list disk
Disk ###  Status         Size     Free     Dyn  Gpt
--------  -------------  -------  -------  ---  ---
Disk 0 Online 59 GB 5120 KB
Совет. Если вы не видите нужного диска, выполните повторное сканирование командой rescan.
Выберите диск, на котором находится OEM раздел:
DISKPART> select disk 1
Disk 1 is now the selected disk.
Совет. Укажите ваш номер диска. Как правило, на компьютере с одним HDD/SSD нужно выбирать диск с индексом 0.
Выведите список разделов на выбранном диске:
DISKPART> list partition
Partition ###  Type              Size     Offset
-------------  ----------------  -------  -------
Partition 1    Recovery          400 MB  1024 KB
Partition 2    System (EFI)      260 MB   401 MB
Partition 3    Reserved          128 MB   661 MB
Partition 4    Primary            43 GB   789 MB
Partition 5    Recovery          495 MB    43 GB
Partition 6    Primary            15 GB    44 GB
Теперь выберите раздел, который вы хотите удалить;
DISKPART> select partition 6
Partition 6 is now the selected partition.
Совет. Здесь нужно указать номер раздела, который вы планируете удалить. Нужно быть внимательным с выбором раздела, чтобы случайно не удалить раздел с данными или системный раздел.
Попробуйте удалить данный раздел:
DISKPART> delete partition
Появится ошибка:
Virtual Disk Service error:
Cannot delete a protected partition without the force protection parameter set.
Diskpart не может удалить защищенный раздел. Выведите подробную информацию о выбранном разделе и его атрибуты:
DISKPART> detail partition
Partition 6
Type : 27
Hidden: Yes
Active: Yes
Как вы видите, задан тип раздела 27. Например, у обычного раздела Windows NT NTFS со стандартной таблицей разделов MBR используется тип – 07 (у скрытого раздела код – 17).
Можно попытаться изменить тип раздела так:
DISKPART>setid id=07
Однако проще всего сразу удалить раздел с помощью специального флага override, позволяющий удалить раздел диска любого типа:
DISKPART> delete partition override
DiskPart successfully deleted the selected partition.
exit
.
Совет. Не удастся удалить системный, загрузочный раздел и любой раздел, который содержит активный файл подкачки или аварийный дамп памяти.
Теперь можно закрыть сессию diskpart командой
Таким образом, можно удалить любой OEM раздел. После удаления раздела, вы можете расширить другие разделы в Windows за счет высвободившегося места.
Удалить букву у OEM раздела восстановления в Windows
При выполнении апгрейда билда Windows 10 на диске может появится отдельный дополнительный OEM раздел или раздел восстановления (Исправен, раздел изготовителя ОЕМ) с назначенной буквой диска. На новое OEM разделе обычно находятся. На новом OEM разделе только папки Recovery и System Volume Information.
Однако на этом разделе свободного места мало, менее 8%. В результате чего Windows 10 начинает постоянно отображать уведомления Storage Sense о том, что данный диск заполнен и его нужно очистить.
Выполните команду
reagentc /info
Если на этом разделе находится образ среды WinRE, удалять его не рекомендуется. Если раздел большой, вы можете перенести с него образ WinRE и удалить его. Если размер маленький, можно просто удалить букву диска у раздела.
Это можно сделать с помощью команды diskpart:
diskpart
list volume
select volume <номер раздела>
remove letter=<буква диска>
exit
Но еще проще удалить точку монтирования диска командой:
mountvol E: /D
Таким образом вы скроете этот раздел восстановления от пользователя.
Или вы можете перенести образ WinRE на системный диск C:
reagentc /disable
reagentc /setreimage /path C:\Windows\System32\Recovery
reagentc /enable
После этого образ перенесётся обратно в папку C:\Recovery, и скрытый раздел можно удалять.
Windows 8 or 8.1 which serves as a patch to the previous Windows 7 comes with the fast startup feature and a more advanced traditional start menu but you might be at risk if your Windows 8 isn’t activated.
You might be prone to the installation of unauthorized apps, and other malware threats above all you won’t be able to configure your windows to suit your view, whichever way; you need to make an upgrade to your Windows 8/8.1 in order to make maximum use of your hardware.
So, If you installed Windows 8 and 8.1 on your PC and the activation code is giving errors or isn’t working after several trials, then here’s a way to permanently activate Windows 10 using CMD and KMS command prompts for free.
This also works if your activation code has expired and you would like to re-activate your Windows without necessarily installing a new Windows 8/8.1 disk or purchasing a new activation code.
If you’re also new to the Windows 8 family or want to download and install it online, you can visit the Windows official page to learn how to do so. Our discussion for today will be on how to activate it.
So, feel free to return to this page when you’re done installing Windows 8/8.1 on your computer.
Requirements:
- PC/Computer with unactivated Windows 8 or Windows 8.1
- Active internet connection while parsing the CMD command {Authomatic Method}
- License keys for Windows Version {Manual Method}
- Patience
Method 1: Manual Method
HOW TO PERMANENTLY ACTIVATE WINDOWS 8/8.1 USING KMS CLIENT KEY
- Click on the Start button, search for “CMD” and run as an administrator
- Next, use the “slmgr /ipk yourlicensekey” command and press enter to install a license key
(yourlicensekey in the above code is the activation key that corresponds to your Windows edition).

Below is a list of Windows 8/8.1 license keys;
W8 Core: BN3D2-R7TKB-3YPBD-8DRP2-27GG4
W8 Core Single Language: 2WN2H-YGCQR-KFX6K-CD6TF-84YXQ
W8 Professional: NG4HW-VH26C-733KW-K6F98-J8CK4
W8 Professional N: XCVCF-2NXM9-723PB-MHCB7-2RYQQ
W8 Professional WMC: GNBB8-YVD74-QJHX6-27H4K-8QHDG
W8 Enterprise: 32JNW-9KQ84-P47T8-D8GGY-CWCK7
W8 Enterprise N: JMNMF-RHW7P-DMY6X-RF3DR-X2BQT
W8.1 Core: M9Q9P-WNJJT-6PXPY-DWX8H-6XWKK
W8.1 Core N: 7B9N3-D94CG-YTVHR-QBPX3-RJP64
W8.1 Core Single Language: BB6NG-PQ82V-VRDPW-8XVD2-V8P66
W8.1 Professional: GCRJD-8NW9H-F2CDX-CCM8D-9D6T9
W8.1 Professional N: HMCNV-VVBFX-7HMBH-CTY9B-B4FXY
W8.1 Professional WMC: 789NJ-TQK6T-6XTH8-J39CJ-J8D3P
W8.1 Enterprise: MHF9N-XY6XB-WVXMC-BTDCT-MKKG7
W8.1 Enterprise N: TT4HM-HN7YT-62K67-RGRQJ-JFFXW

> Now, Click on “Enter” to run the command
> The next thing to do is to set the KMS machine address;
- Use “slmgr /skms s8.uk.to” or “slmgr /skms s8.now.im” to connect to my KMS server
- Finally, activate your windows by running the “slmgr /ato” in CMD
If you see the error 0x80070005, it means the server is busy. Please try the command “ato” again until you succeed.
Now recheck your activation status
Method 2: Automatic Method
HOW TO PERMANENTLY ACTIVATE WINDOWS 8/8.1 USING CMD
This can be done using a batch file that you will upload below and run as administrator, meanwhile, remember to have your data connection on during the process.
- Copy the Windows 8/8.1 activation code from below and paste it into a new text document
- Then save as a lukastech activate.cmd
- Locate the file on your PC and right-click,
- Click on “Run as Administrator“
- Select “YES” on any pop-up
- Wait for some minutes and it’s DONE.
@echo off
title Activate Windows 8 / Windows 8.1 ALL versions for FREE!&cls&echo ============================================================================&echo #Project: Activating Microsoft software products for FREE without software&echo ============================================================================&echo.&echo #Supported products:&echo - Windows 8 Core&echo - Windows 8 Core Single Language&echo - Windows 8 Professional&echo - Windows 8 Professional N&echo - Windows 8 Professional WMC&echo - Windows 8 Enterprise&echo - Windows 8 Enterprise N&echo - Windows 8.1 Core&echo - Windows 8.1 Core N&echo - Windows 8.1 Core Single Language&echo - Windows 8.1 Professional&echo - Windows 8.1 Professional N&echo - Windows 8.1 Professional WMC&echo - Windows 8.1 Enterprise&echo - Windows 8.1 Enterprise N&echo.&echo.&echo ============================================================================&echo Activating your Windows...&cscript //nologo slmgr.vbs /ckms >nul&cscript //nologo slmgr.vbs /upk >nul&cscript //nologo slmgr.vbs /cpky >nul&set i=1&wmic os | findstr /I "enterprise" >nul
if %errorlevel% EQU 0 (cscript //nologo slmgr.vbs /ipk MHF9N-XY6XB-WVXMC-BTDCT-MKKG7 >nul&cscript //nologo slmgr.vbs /ipk TT4HM-HN7YT-62K67-RGRQJ-JFFXW >nul&cscript //nologo slmgr.vbs /ipk 32JNW-9KQ84-P47T8-D8GGY-CWCK7 >nul&cscript //nologo slmgr.vbs /ipk JMNMF-RHW7P-DMY6X-RF3DR-X2BQT >nul&goto server) else (cscript //nologo slmgr.vbs /ipk GCRJD-8NW9H-F2CDX-CCM8D-9D6T9 >nul&cscript //nologo slmgr.vbs /ipk HMCNV-VVBFX-7HMBH-CTY9B-B4FXY >nul&cscript //nologo slmgr.vbs /ipk NG4HW-VH26C-733KW-K6F98-J8CK4 >nul&cscript //nologo slmgr.vbs /ipk XCVCF-2NXM9-723PB-MHCB7-2RYQQ >nul&cscript //nologo slmgr.vbs /ipk BN3D2-R7TKB-3YPBD-8DRP2-27GG4 >nul&cscript //nologo slmgr.vbs /ipk 2WN2H-YGCQR-KFX6K-CD6TF-84YXQ >nul&cscript //nologo slmgr.vbs /ipk GNBB8-YVD74-QJHX6-27H4K-8QHDG >nul&cscript //nologo slmgr.vbs /ipk M9Q9P-WNJJT-6PXPY-DWX8H-6XWKK >nul&cscript //nologo slmgr.vbs /ipk 7B9N3-D94CG-YTVHR-QBPX3-RJP64 >nul&cscript //nologo slmgr.vbs /ipk BB6NG-PQ82V-VRDPW-8XVD2-V8P66 >nul&cscript //nologo slmgr.vbs /ipk 789NJ-TQK6T-6XTH8-J39CJ-J8D3P >nul)
:server
if %i%==1 set KMS=kms7.MSGuides.com
if %i%==2 set KMS=kms8.MSGuides.com
if %i%==3 set KMS=kms9.MSGuides.com
if %i%==4 goto notsupported
cscript //nologo slmgr.vbs /skms %KMS%:1688 >nul&echo ============================================================================&echo.&echo.
cscript //nologo slmgr.vbs /ato | find /i "successfully" && (echo.&echo ============================================================================&echo.&echo #My official blog: MSGuides.com&echo.&echo #How it works: bit.ly/kms-server&echo.&echo #Please feel free to contact me at [email protected] if you have any questions or concerns.&echo.&echo #Please consider supporting this project: donate.msguides.com&echo #Your support is helping me keep my servers running everyday!&echo.&echo ============================================================================&choice /n /c YN /m "Would you like to visit my blog [Y,N]?" & if errorlevel 2 exit) || (echo The connection to my KMS server failed! Trying to connect to another one... & echo Please wait... & echo. & echo. & set /a i+=1 & goto server)
explorer "https://www.notatraderr.com"&goto halt
:notsupported
echo ============================================================================&echo.&echo Sorry! Your version is not supported.
:halt
pause >nul


Now recheck the activation status.
METHOD 3: OFFLINE METHOD/OFFLINE ACTIVATOR
HOW TO ACTIVATE WINDOWS 8/8.1 WITHOUT INTERNET VIA KMSPico
I’m happy to announce that I’ve found a way you can activate your Windows 8 or 8.1 without using the command prompt or a Kms client key.
This approach is the best if you ask me because you don’t have to start trying multiple activation keys or hoping for the cmd prompt to work. It automatically activates your Windows permanently once you run the software on your PC.
Here’s the best part, it also activates any Microsoft Office packages installed on your PC plus it is an offline activation process. However, for copyright reasons, I won’t advise you to use this tool for commercial and long-term purposes.
The name of the tool/software is the KMSPico 8.1 activator tool. Without wasting much time, let’s get started.
- Download the KSMPico Windows 8.1 activator tool
- Now, turn off real-time protection by opening Settings > Virus and Threat Protection > Manage Settings > Turn off real-time protection. You must do this, or else the antivirus will see the program as a threat and delete it.
- Next, go to your downloads, unzip the file, and run the program as an administrator.
- Once inside the app, Click on the “Activate” button and wait for some seconds.
- This should activate your Windows alongside other Microsoft packages. However, you can confirm this by typing the below prompt into your CMD.
- Open your CMD from the search icon > run as administrator > and type this “slmgr /xpr” then ENTER.

That’s all about activating your Windows 8/8.1 without an activation code or software.
If the above tool doesn’t work then you should reach out to us on WhatsApp since we’ve got an alternative app that should do the job.
Kindly share and drop comments below.
DOWNLOAD OUR MOBILE APP FOR QUICK UPDATES.
Victor is Just a passionate tech enthusiast who invests his time in Blogging and web designing. Writer. Web 3.
Ключ от Windows 8 не подходит к Windows 8.1. Это особенно актуально для ноутбуков где стоит OEM редакция, а ключ зашит.
Magnet ссылка на torrent-файлы дистрибутивов:
magnet:?xt=urn:btih:761A0030DF81352A16E4D8808B6619DD6309FA8E
Нам нужен файл MICROSOFT.WINDOWS.8.1.SINGLE.LANGUAGE.RTM.X64.RUSSIAN.DVD-WZT.torrent
Чтобы установить Windows 8.1 из образа нужно:
- Сохранить текущий OEM ключ. Получить этот ключ поможет предназначенная для этого утилита Windows 8 Product Key Viewer.
После запуска программы, поставьте галочку MSDM. Это гарантирует что утилита прочитает зашитый код из BIOS, а не другой ключ, который мог быть использован во время установки. - Установить Windows 8.1 при помощи одного из этих generic ключей для установки:
- Core Single Language (версия для одного языка):
Y9NXP-XT8MV-PT9TG-97CT3-9D6TC
- Core: 334NH-RXG76-64THK-C7CKG-D3VPT
- Pro: XHQ8N-C3MCJ-RQXB6-WCHYG-C9WKB
- Core Single Language (версия для одного языка):
- После установки активировать Windows при помощи ключа полученного на этапе 1.