
You are here:
Home » Windows 8.1 » How To Recover Windows 8/8.1 Product Key From BIOS
Have you purchased a new Windows 8 or Windows 8.1 PC and want to reinstall the operating system now? Do you want to legally download Windows 8 or Windows 8.1 ISO from Microsoft but can’t find the product key on your PC?
Those of you have purchased a PC pre-installed with Windows 8 or later version of Windows probably have noticed that OEMs have stopped pasting “Proof of license. Certificate of Authenticity” sticker at the back of the PC which usually includes Windows product key. OEMs are now embedding the product key into the BIOS/UEFI instead and isn’t easily visible.
Even though this is a good way to combat piracy, and in most cases, Windows 8/8.1 setup automatically reads the product key while reinstalling the operating system, PC users who need the product key to download Windows ISO from Microsoft to reinstall the OS or for other reasons need to recover the product key from the firmware first.
Luckily, there are a couple of free tools out there to help you recover Windows product key from the BIOS/UEFI.
Windows 8 Product Key Viewer is a little tool developed to recover Windows 8/8.1 product key from BIOS/UEFI as well as hard drive. In short, you can use this tool to retrieve Windows product key on a PC preinstalled with Windows 8/8.1, and also, if you have installed Windows 8/8.1 on a newly assembled computer.
Method 1:
View Windows 8/8.1 product key saved in BIOS/UEFI
Step 1: Head over to this page and download Windows 8 Product Key Viewer.
Step 2: Run the program and check the option labelled MSDM key to view your genuine program key.
And if Windows 8/8.1 wasn’t bundled with your PC and you manually installed it later, you can view the product key by unchecking MSDM Key box. That’s it!
Method 2:
If Windows 8/8.1 was preinstalled on your PC, you can try out a free script named Get_Win8Key as well. It reads the product key from the device firmware and is easy to use as well.
Step 1: Visit this page and download the script. Extract the zip file package to get the script file.
Step 2: Double-click on the file to execute it and view the license key.
Method 3:
And if you want to recover the product key from Windows Registry, try out ProduKey from NirSoft. Just like Windows 8 Product Key Viewer, Nirsoft’s ProduKey is a portable tool designed to recover Windows product key.
How to recover Windows 7/8 product key from unbootable PC and how to backup data from unbootable hard drive guides might also interest you.
Have you ever wondered how to access BIOS in Windows 8.1? Well, here’s a surprising fact — accessing BIOS in Windows 8.1 is not as straightforward as it used to be. Unlike previous versions of Windows, where you could easily access BIOS by pressing a specific key during startup, Windows 8.1 introduced a new fast startup feature that made accessing BIOS a bit more complicated.
To access BIOS in Windows 8.1, you need to first navigate to the Advanced Startup options. This can be done by going to the Settings menu, clicking on «Change PC settings,» selecting «Update and recovery,» and then clicking on «Recovery.» From there, you can find the Advanced Startup section and click on the «Restart now» button. This will restart your computer and bring up the Advanced Startup menu, where you can access the BIOS settings.
To access the BIOS in Windows 8.1, follow these steps:
- Start your computer and continuously press the «F2» or «Delete» key until the BIOS setup utility appears.
- Once in the BIOS, navigate through the options using the arrow keys on your keyboard.
- Make any necessary changes to hardware settings or boot options.
- Press the «F10» key to save your settings and exit the BIOS.

Understanding the Importance of Accessing BIOS in Windows 8.1
Accessing the BIOS (Basic Input/Output System) in Windows 8.1 is a crucial step in customizing and optimizing your computer’s hardware and software settings. The BIOS is responsible for initializing your computer’s hardware components and booting up the operating system. By accessing the BIOS, you gain control over various system settings, such as boot priority, CPU overclocking, hardware configurations, and more.
Even though modern versions of Windows, including Windows 8.1, handle most system configurations automatically, accessing the BIOS can still be beneficial, especially in scenarios where you need to troubleshoot hardware issues, update firmware, or enable/disable specific features. In this article, we will explore the various methods to access the BIOS in Windows 8.1, allowing you to make the most out of your computer’s capabilities.
It’s important to note that accessing the BIOS requires a basic understanding of computer hardware and the potential risks involved in making incorrect changes. Therefore, it is recommended to proceed with caution and only make changes if you are familiar with the settings and their potential impact on your system.
Now, let’s dive into the different methods you can use to access the BIOS in Windows 8.1.
Method 1: Using the Advanced Startup Options
One of the easiest ways to access the BIOS in Windows 8.1 is through the Advanced Startup Options. Follow the steps below to access the BIOS using this method:
- Press the Windows key + X on your keyboard to open the Power User Menu.
- Click on «Settings» and select «Update & Security.»
- In the Update & Security menu, click on the «Recovery» tab located on the left-hand side.
- Under the Advanced Startup section, click on the «Restart now» button.
- Your computer will now restart and display the Advanced Startup Options menu.
- In the Advanced Startup Options menu, click on «Troubleshoot.»
- Next, click on «Advanced options.»
- Finally, click on «UEFI Firmware Settings.»
- Your computer will now restart again, taking you directly to the BIOS.
It’s important to note that not all computers will have the UEFI Firmware Settings option in the Advanced Startup Options menu. If you don’t see the option, you can try the other methods mentioned below.
Once you’re in the BIOS, you can navigate through the various settings using the arrow keys on your keyboard. To make changes, refer to your computer’s user manual or the manufacturer’s website for specific instructions.
Method 2: Using the Windows Settings
If the Advanced Startup Options method didn’t work for you, you can try accessing the BIOS through the Windows Settings. Follow the steps below:
- Press the Windows key + I on your keyboard to open the Windows Settings.
- Click on «Update & Security.»
- In the Update & Security menu, click on «Recovery» located on the left-hand side.
- Under the Advanced Startup section, click on the «Restart now» button.
- Your computer will now restart and display the Advanced Startup Options menu.
- Click on «Troubleshoot.»
- Next, click on «Advanced options.»
- Finally, click on «UEFI Firmware Settings.»
- Your computer will now restart again, taking you directly to the BIOS.
If the UEFI Firmware Settings option is not available in the Advanced Startup Options menu using this method, you can try the alternative methods mentioned later in this article.
Method 3: Using the Shift Key
If neither the Advanced Startup Options nor the Windows Settings method worked for you, you can try using the Shift key to access the BIOS. Follow the steps below:
- Click on the «Start» menu and select the «Power» icon.
- Hold down the Shift key on your keyboard.
- While holding the Shift key, click on «Restart.»
- Your computer will now restart and display the Advanced Startup Options menu.
- Click on «Troubleshoot.»
- Next, click on «Advanced options.»
- Finally, click on «UEFI Firmware Settings.»
- Your computer will now restart again, taking you directly to the BIOS.
If the Shift key method didn’t work, you can move on to the next method.
Method 4: Through the BIOS Key
If none of the previous methods worked, you can try accessing the BIOS by pressing a specific key during the computer’s startup. The BIOS key varies depending on the manufacturer of your computer. Common BIOS keys include:
| Manufacturer | BIOS Key |
| Acer | F2 or Delete |
| ASUS | Delete or F2 |
| Dell | F2 or F12 |
| HP | Escape or F10 |
| Lenovo | F1 or F2 |
| Toshiba | F12 or Esc |
Please refer to your computer’s user manual or the manufacturer’s website to find the specific BIOS key for your device. Once you know the key, follow these steps:
- Restart your computer.
- While the computer is booting up, press and hold the BIOS key repeatedly.
- This will take you directly to the BIOS settings.
If all else fails, you can contact your computer’s manufacturer for further assistance in accessing the BIOS.
Exploring Additional BIOS Features in Windows 8.1
Accessing the BIOS not only allows you to change basic settings but also grants you access to additional features that can enhance your computer’s performance and functionality. Here are some common BIOS features you may come across when accessing the BIOS in Windows 8.1:
Quick Boot
Quick Boot, also known as Fast Boot or Fast Startup, is a BIOS feature that reduces the computer’s boot time by skipping certain tests and processes. Enabling Quick Boot can significantly reduce the time it takes for your computer to start up, especially if you have a solid-state drive (SSD) installed.
To enable Quick Boot, enter the BIOS settings and look for a Quick Boot option or a similar setting under the Boot tab or section. Enable or disable the option based on your preference and save the changes before exiting the BIOS.
Overclocking
Overclocking is the process of increasing the clock speed of your computer’s CPU (Central Processing Unit) to achieve higher performance. However, overclocking carries certain risks and should only be done if you are familiar with the process and the potential consequences it may have on your computer’s stability and longevity.
If your computer supports overclocking, you can find options related to it in the BIOS settings. Look for a section like «Advanced CPU Settings» or «Overclocking» and follow the instructions provided by your computer’s manufacturer to adjust the CPU clock speed.
Hardware Monitoring
The BIOS also offers hardware monitoring features that allow you to check the temperature, voltage, and fan speed of your computer’s components. Monitoring these parameters can help you identify potential hardware issues or simply keep track of your system’s performance.
To access the hardware monitoring features, navigate to the appropriate section in the BIOS settings. Look for options like «Hardware Monitor,» «PC Health Status,» or similar. Here, you can view real-time data and set temperature or fan speed thresholds to trigger system warnings or automatic actions.
Secure Boot
Secure Boot is a BIOS feature that prevents unauthorized operating systems and bootloaders from loading during the computer’s startup process. It adds an extra layer of security to your system by verifying the integrity and authenticity of the operating system before allowing it to boot.
Secure Boot is typically enabled by default on most computers. However, if you need to disable it for compatibility reasons or to install a different operating system, you can do so in the BIOS settings. Look for a section like «Secure Boot» or «Security» and adjust the settings accordingly.
Conclusion
Accessing the BIOS in Windows 8.1 is crucial for customizing your computer’s settings and getting the most out of your hardware and software. By following the methods outlined in this article, you can easily access the BIOS and explore the various features and options available to you.

Accessing BIOS in Windows 8.1
In order to access the BIOS (Basic Input/Output System) in Windows 8.1, you can follow these steps:
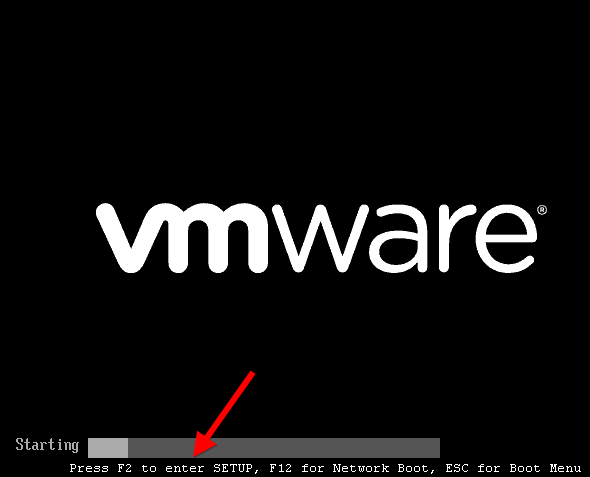
1. Start your computer and wait for the manufacturer’s logo to appear on the screen. This logo usually appears during the boot process.
2. Press the designated key to access the BIOS. The key may vary depending on the manufacturer of your computer, but commonly used keys include F2, F10, and Delete. The key is typically displayed on the manufacturer’s logo screen or in the computer’s user manual.
3. Once you press the correct key, you will enter the BIOS setup utility. Here, you can navigate through different tabs and options using the arrow keys on your keyboard.
4. Make any necessary changes or adjustments in the BIOS settings. However, be cautious as making incorrect changes can lead to system instability or other issues.
5. After making your desired changes, save the settings and exit the BIOS. This will restart your computer and apply the changes you made.
Key Takeaways — How to Access Bios in Windows 8.1
- To access the BIOS in Windows 8.1, restart your computer and press the designated key during startup.
- Common keys to access the BIOS include F2, Del, or Esc depending on the manufacturer.
- If you miss the timing to press the key, restart your computer and try again.
- Once in the BIOS, you can change settings related to hardware, boot sequence, and security.
- Be cautious when making changes in BIOS, as incorrect settings can cause system instability or failure.
Frequently Asked Questions
Here are some commonly asked questions about how to access BIOS in Windows 8.1:
1. Can I access the BIOS on a Windows 8.1 computer?
Yes, you can access the BIOS on a Windows 8.1 computer. The BIOS (Basic Input/Output System) is a firmware that is embedded in your computer’s motherboard. It is responsible for initializing and testing system hardware components, and it allows you to make changes to the hardware settings.
To access the BIOS on a Windows 8.1 computer, you can use the following steps:
1. Start your computer and wait for the manufacturer’s logo to appear.
2. Press the specific key or key combination mentioned in your computer’s manual or on the manufacturer’s website to enter the BIOS setup. Common keys to access the BIOS include F2, F10, Del, or Esc.
3. Once you enter the BIOS setup, you can navigate through the different settings using the arrow keys on your keyboard. Make any necessary changes and save your settings before exiting.
Keep in mind that the steps to access the BIOS may vary depending on the computer manufacturer and model.
2. Why would I need to access the BIOS in Windows 8.1?
There are several reasons why you might need to access the BIOS in Windows 8.1:
1. Changing hardware settings: The BIOS allows you to configure settings such as boot order, enabling or disabling devices, and adjusting memory timings. Accessing the BIOS gives you control over these settings.
2. Troubleshooting: If you are experiencing issues with your computer’s hardware, accessing the BIOS can help you diagnose and troubleshoot the problem. You can check if all hardware components are recognized and functioning properly.
3. Updating BIOS firmware: Occasionally, computer manufacturers release updates for the BIOS firmware. These updates may include bug fixes, performance improvements, and compatibility enhancements. Accessing the BIOS allows you to update the firmware to the latest version.
Overall, accessing the BIOS gives you more control and flexibility over your computer’s hardware.
3. Can I access the BIOS in Windows 8.1 from within the operating system?
No, you cannot access the BIOS from within the Windows 8.1 operating system. The BIOS is independent of the operating system and is accessible before the operating system loads. You need to access the BIOS during the computer’s startup process.
However, Windows 8.1 does provide an option to access some basic system information and settings through the «PC settings» menu in the operating system. This includes options to restart your computer into the BIOS.
4. What should I do if I am unable to access the BIOS on my Windows 8.1 computer?
If you are unable to access the BIOS on your Windows 8.1 computer, you can try the following troubleshooting steps:
1. Ensure you are pressing the correct key or key combination to enter the BIOS. Check your computer’s manual or the manufacturer’s website for the specific key.
2. Make sure you are pressing the key at the right time. Some computers display a message like «Press [key] to enter BIOS» during startup. You may need to press the key multiple times or at a specific moment during the startup process.
3. Disconnect any external devices, such as USB drives or external keyboards, that might interfere with the startup process.
If you are still unable to access the BIOS, it is recommended to contact the computer manufacturer or seek assistance from a professional.
5. Are there any risks involved in accessing the BIOS in Windows 8.1?
Accessing the BIOS in Windows 8.1 generally does not pose significant risks if you are only making changes to hardware settings. However, it
How to Get into BIOS (UEFI) Settings In Windows 8.1
In conclusion, accessing the BIOS in Windows 8.1 is a straightforward process that allows you to modify important system settings. By following a few simple steps, you can easily access the BIOS and make changes to your computer’s hardware configuration.
To access the BIOS in Windows 8.1, you need to restart your computer and press a specific key during the boot process. This key is usually displayed on your computer screen or mentioned in the user manual. Once you access the BIOS, you can navigate through the different menus using the arrow keys and make necessary changes to settings such as boot order, system clock, and hardware configuration. However, it’s important to exercise caution and only modify settings if you have a clear understanding of the consequences.
В этой инструкции — 3 способа зайти в БИОС при использовании Windows 8 или 8.1. По факту, это один способ, который можно использовать разными способами. К сожалению, у меня не было возможности проверить все описанное на обычном BIOS (впрочем, в нем должны работать старые клавиши — Del для десктопа и F2 для ноутбука), а только на компьютере с новой материнской платой и UEFI, однако большинство пользователей последних версий системы интересует именно эта конфигурация.
На компьютере или ноутбуке с Windows 8 у вас может возникнуть проблема со входом в настройки BIOS, так как с новыми материнскими платами, а также технологиями быстрой загрузки, реализованными в самой ОС, вы можете просто не увидеть никаких надписей «Нажмите F2 или Del» или не успеть нажать эти кнопки. Разработчики учли этот момент и решение есть.
Вход в BIOS с помощью особых вариантов загрузки Windows 8.1
Для того, чтобы зайти в BIOS UEFI на новых компьютерах с ОС Windows 8, вы можете использовать особые варианты загрузки системы. Кстати, они же пригодятся и для того, чтобы загрузиться с флешки или диска, даже без входа в BIOS.

Первый способ запуска особых вариантов загрузки — открыть панель справа, выбрать «Параметры», затем — «Изменение параметров компьютера» — «Обновление и восстановление». В нем откройте пункт «Восстановление» и в пункте «Особые варианты загрузки» нажмите «Перезагрузить сейчас».

После перезагрузки вы увидите меню как на картинке выше. В нем вы можете выбрать пункт «Использовать устройство», если вам нужно загрузиться с USB накопителя или диска и зайти в БИОС нужно было только для этого. Если же все-таки обязательно требуется вход для изменения настроек компьютера, нажмите пункт «Диагностика».

На следующем экране выберите пункт «Дополнительные параметры».


И вот мы там, где нужно — нажмите по пункту «Параметры встроенного ПО UEFI», затем подтвердите перезагрузку для изменения настроек БИОС и после перезагрузки вы увидите интерфейс BIOS UEFI вашего компьютера, не нажимая никаких дополнительных клавиш.

Еще способы зайти в БИОС
Вот еще два способа попасть в это же меню загрузки Windows 8 для входа в БИОС, которые могут также оказаться полезными, в частности первый вариант может сработать, если у вас не загружается рабочий стол и начальный экран системы.
С помощью командной строки
Вы можете ввести в командную строку
shutdown.exe /r /o
И компьютер перезагрузится, показав вам различные опции загрузки, в том числе для входа в биос и смены загрузочного накопителя. Кстати, при желании, вы можете сделать и ярлык для такой загрузки.

Shift + Перезагрузка
Еще один способ — нажать по кнопке выключения компьютера в боковой панели или на начальном экране (начиная с Windows 8.1 Update 1) и затем, удерживая клавишу Shift нажать «Перезагрузка». Это также вызовет появление особых вариантов загрузки системы.
Дополнительная информация
Некоторые производители ноутбуков, а также материнских плат для настольных компьютеров предусматривают вариант входа в BIOS в том числе и с включенными опциями быстрой загрузки (что применимо для Windows 8), вне зависимости от установленной операционной системы. Такую информацию можно попробовать найти в инструкции к конкретному устройству или в Интернете. Обычно, это удерживание какой-либо клавиши при включении.
Windows 8 is may be a few years old now, but it’s still commonly used. And one change that you might not be aware of on newer Windows machines is a different method for accessing a computer’s BIOS. No longer do you press a certain key during the boot process to reveal the BIOS—instead, an option to access the BIOS is located in Windows 8’s boot options menu.
How Accessing BIOS Changed in Windows 8
Traditionally, computers displayed a message like «Press F2 to enter setup» at the beginning of the boot process. Pressing this key entered the computer’s BIOS.
However, machines that come with Windows 8 preinstalled use a modern update to BIOS called UEFI.
On some machines, especially those with solid state hard drives, the boot process can be so fast that you might not have time to see the message about entering BIOS. In these cases, you can opt to enter the BIOS from Windows itself.
Microsoft’s blog post about this [Broken URL Removed] on the Building Windows 8 blog describes how this new system came to be. With the increased boot speed, some systems had a less than a 200-millisecond window of opportunity to press a key. Even the best key-tappers at Microsoft could only press a key once every 250ms.
That meant to access the BIOS, frantic tapping, luck, and several computer reboots were all necessary.
The new system does away with this problem. It also brings some much-needed consistency to Windows 8 computers—they’ll all have a consistent way of accessing the BIOS.
Windows 8 Hardware vs. Old Computers With Windows 8
Note that this new method only applies if you purchased a new computer with Windows 8 preinstalled. If, on the other hand, you’ve installed Windows 8 on an existing computer that uses the legacy BIOS system, you’ll access the BIOS in the same way as always by pressing the key that appears during your boot process.
This key is often F2 or Delete, but it can also be other keys.
The exact key depends on your computer—if you don’t see the appropriate key displayed on your screen during the boot-up process, consult your computer’s manual.
How to Enter Windows 8 BIOS
In order to access the BIOS on Windows 8, you need to restart your computer into the boot options menu. There are several ways to do this.
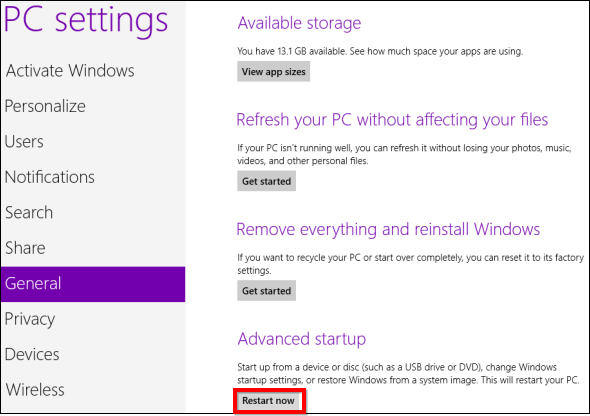
The easiest one to find is in the PC Settings application. Press Windows key + C to reveal the Charms bar, click Settings, and select Change PC settings to access it.
In the PC Settings application, select the General category and click the Restart now button under Advanced startup. Your computer will restart and you’ll enter the Windows 8’s boot options menu. From here you can access the UEFI BIOS and change other settings.
You can also hold Shift while clicking Restart in the Shut Down menu to restart your computer into the boot options menu. This is a quick way to restart into the boot options menu, as you can access the Shut Down button from the Charms anywhere on your system.
Those who prefer to use the Windows command line to access the BIOS in Windows 8 can do so. There’s a shutdown command that’s one of the essential Windows command prompts you should know.
Here’s the command you need to use:
Shutdown.exe /r /o
Accessing UEFI BIOS
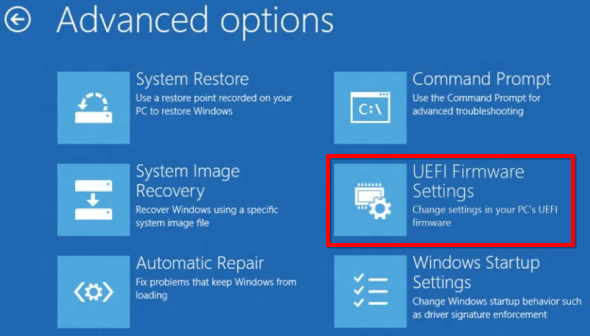
Once you’ve restarted and accessed the boot options menu, you can enter UEFI BIOS. To do this, click the Troubleshoot tile.
This will reveal an Advanced Options screen with a variety of tools. The UEFI Firmware Settings tile will take you to your computer’s BIOS.
If you don’t see the UEFI Firmware Settings tile here, your computer doesn’t use UEFI. That means you’ll need to access the BIOS in the traditional way, by pressing a specific key during the boot-up process. See the earlier section above for more information.
If there’s an error booting Windows, you won’t be locked out of the BIOS. The boot options screen will appear when you start your computer. From here, you can repair Windows or enter your BIOS.
Once you’ve entered the BIOS, you can perform the tasks you want. These could include tasks such as changing the boot device order, setting fan curves, overclocking your processor, or performing troubleshooting by detecting what hardware is being picked up by your system.
How to Access the BIOS on Windows 10

If you have updated your operating system recently, you might wonder how to access BIOS from Windows 10. Once again, if you have installed Windows 10 onto older hardware, then you’ll access BIOS by pressing a designated key during the boot process. This is the same as older hardware running Windows 8.
However, if you bought a computer with Windows 10 preinstalled, you’ll need a different method to access BIOS. To do this, start by going to Windows settings. You can access this by pressing Windows key + I.
From the settings menu, choose Update & Security, then choose Recovery from the menu on the left. You’ll see a list of options on the right, including a title saying Advanced startup. Beneath this header is a button saying Restart now.
When you hit this button, your computer will restart. During the startup, you’ll see the boot options menu. Like the Windows 8 instructions, go to Troubleshooting and then to UEFI Firmware Settings, then click Restart. This will restart your computer once again, and it will boot into UEFI BIOS.
UEFI Vs. BIOS
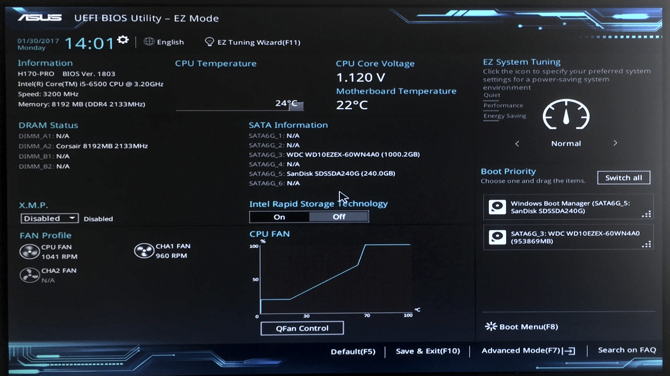
UEFI is rather different from traditional BIOS, even though they perform similar functions. BIOS tends to be in a limited color scheme and does not support the use of a mouse, so you need to navigate using your keyboard. The functions are somewhat limited too, with the ability to perform tasks like changing the boot device order or changing the system time and date.
UEFI is a more up to date version of BIOS. It is in full color, and you can navigate using a keyboard and mouse. It’s more like Windows, so it’s not so intimidating to new users. You can also do a lot more with UEFI. For example, you can set fan curves to adjust how fast the fans in your system spin at given temperatures. Or you can overclock your processor, using automatic overclocking wizards which set everything up for you based on your cooling solution.
Technically UEFI is a replacement for BIOS. But in practice, people use the terms interchangeably.
It’s Important to Secure Your BIOS
This shows you how to access BIOS from Windows 8, in case you need to make any changes to your system.
While you’re working on BIOS, it’s a good idea to set a password to keep your system more secure. If you have any problems with this process, then see our article on how to reset the BIOS password.
Spend some time on its screen and understand how the BIOS works and how it can help you optimize your computer.
Windows OS is the most commonly used OS on PCs. Windows OS for PCs is like Android OS for smartphones. It is the simplest OS for PC, and you can do all the basic and advanced things independently of your user experience. Accessing BIOS (Basic Input Output System) in Windows PC looks like a complex thing unless you know how to do it. It is one of the simplest things that you can do on your PC. Follow the steps below to learn how to access the BIOS settings in Windows.
In new model computers, you can access UEFI instead of BIOS settings. UEFI (Unified Extensible Firmware Interface) is similar to BIOS settings but with some advanced settings. In older computers, BIOS is the primary setup tool. However, in new computers, you can still access BIOS if your computer is capable of it.
Contents
- How to Access BIOS Windows 10?
- Ways to Access BIOS on Windows 8 and 8.1
- How to enter BIOS mode on Windows 7
- List of BIOS keys for various brands and models
- BIOS keys for Dell PCs
- BIOS keys for Aces PCs
- BIOS keys for HP PCs
- BIOS keys for ASUS PCs
- BIOS keys for Sony PCs
- BIOS keys for MSI PCs
- BIOS keys for Toshiba PCs
- What is the correct time or moment to click the BIOS key
- How to Access BIOS on Windows 7?
- Our Opinion
In newer computers with Windows 10 OS, you can get the UEFI settings. BIOS settings are outdated in Windows 10. In some computers with Windows 8 and 8.1, you can’t access BIOS settings. Follow the below steps to access UEFI Windows 10.
(1) Open the Settings toolbar on your PC by using shortcut keys(Win + I) or clicking the app.
(2) Click Update & Security on the Settings menu.
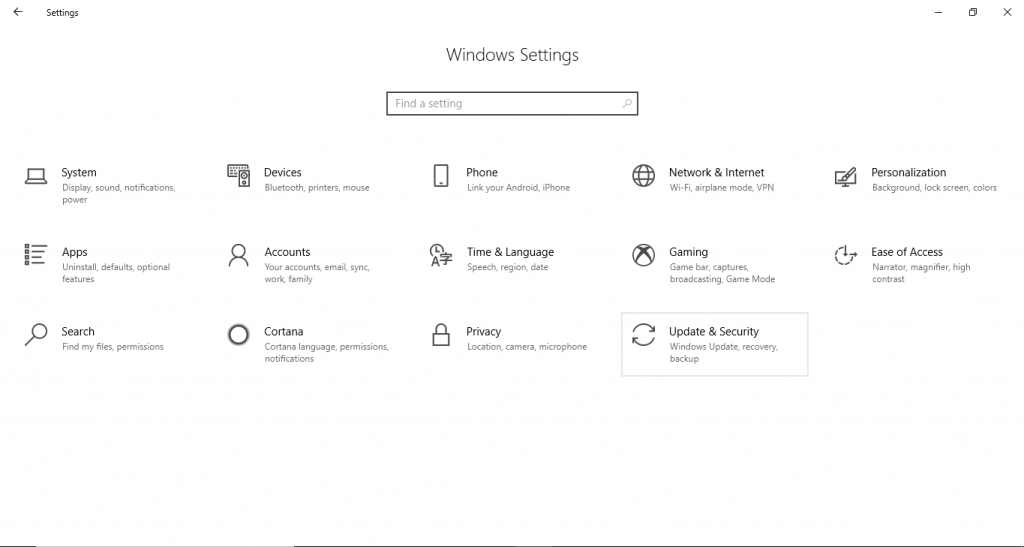
(3) Choose Recovery on the left side of the screen.
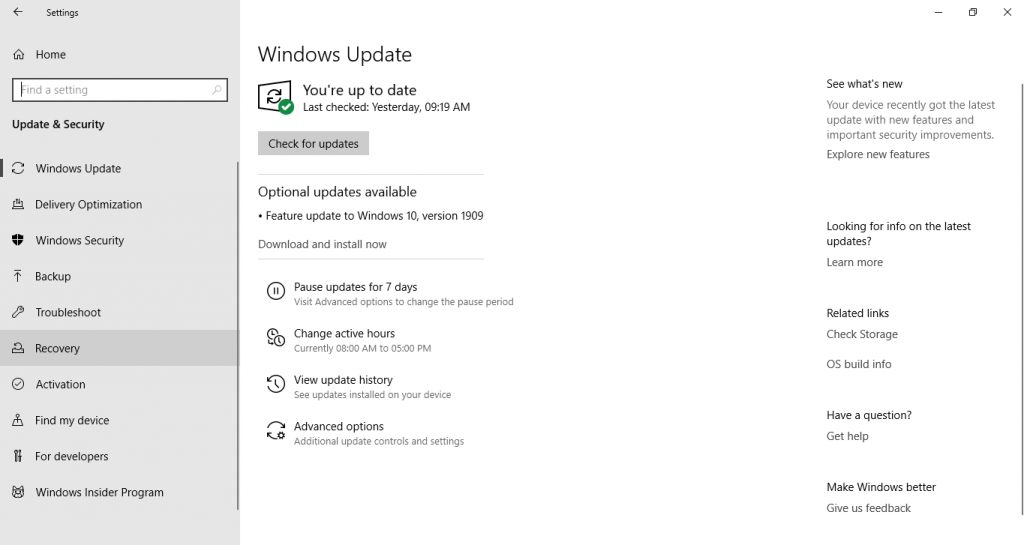
(4) Under Advanced Startup, click Restart now. Your PC will start to restart.
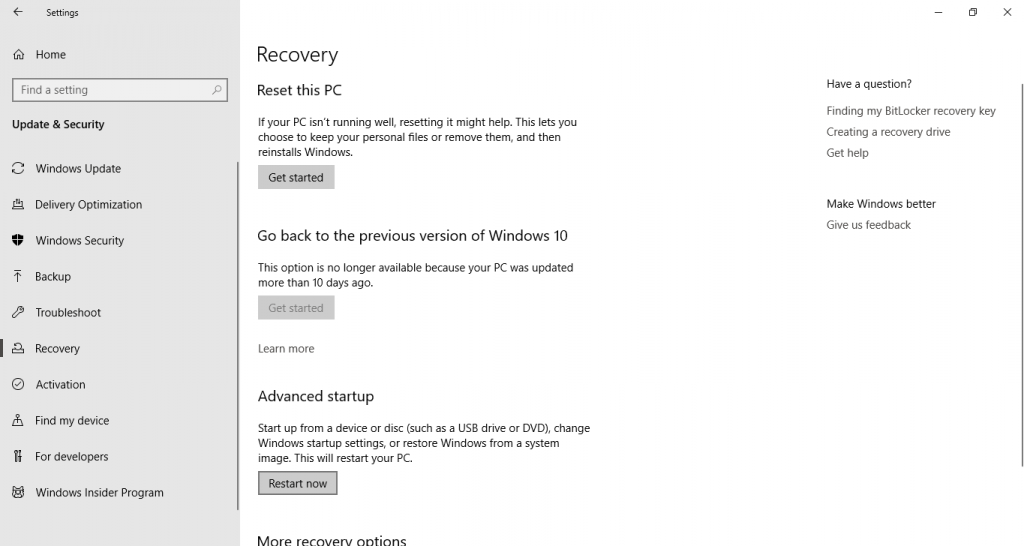
(5) When you restart your PC using Advanced Startup, it will ask you to choose the boot options to turn on. When a screen is displayed, click Troubleshoot.
(6) Under Troubleshoot, click Advanced options and choose UEFI Firmware Settings.
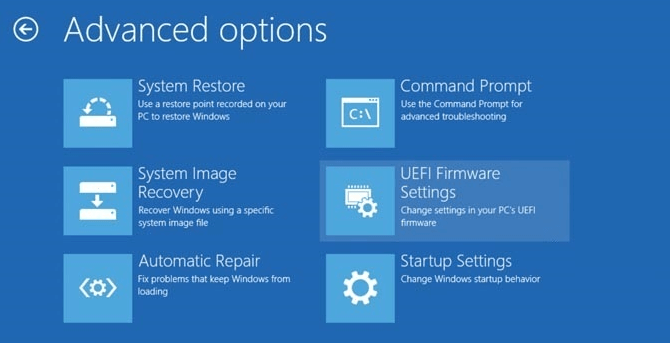
(7) Now, click Restart. It will redirect you to the UEFI settings. Do the necessary changes and leave the UEFI settings.
Ways to Access BIOS on Windows 8 and 8.1
In Windows 8 and 8.1, you can get the BIOS in three ways.
Way 1: In both Windows 10 and 8, you need to restart your PC under Advanced Startup. In Windows 10, the Restart now button is available on the Recovery tab whereas, in Windows 8 and 8.1, it is available on the General tab under the PC settings.
Way 2: You can simply click the Restart button. When restarting, press and hold the Shift key until you get the boot menu. This may or may not work in all the PCs. If this method fails, use the above method or the below-mentioned way.
Way 3: You can get access to BIOS by using Command Prompt as well. Open the Command Prompt, type the below command, and click the Enter key.
shutdown.exe /r /o
Executing this command will directly get into the boot menu.
How to enter BIOS mode on Windows 7
In Windows 7, you can access the old fashioned BIOS settings. For that, you need to know the correct BIOS key. The BIOS key may or may not vary according to the brand and models of PC. If you want to know, what is the correct BIOS key for your PC, check the below list.
List of BIOS keys for various brands and models
F1, F2, F10, Delete, Esc are the common keys for BIOS Setup. Sometimes, combinations of keys may work. Ctrl + Alt + Esc or Ctrl + Alt + Delete are the common keys that can be used to access the BIOS setup.
BIOS keys for Dell PCs
- For new models, try F2. If it fails, try F1, Delete, F12, or F3
- For older models, try Ctrl + Alt + Enter, Delete + Esc, Delete + Fn, or Fn + F1
BIOS keys for Aces PCs
- For new models, try F2, Delete, or F10
- For older models, try F1 or Ctrl + Alt + Esc
BIOS keys for HP PCs
- The common keys are F10 and Esc.
- If it fails, try F1, F2, F6, F10, F11. F12.
BIOS keys for ASUS PCs
- F2 is the most common key
- If not, try Delete, Insert, or F10 keys
BIOS keys for Sony PCs
- F1, F2, F3 are the common keys
- If your PC has the ASSIST key, try that key
BIOS keys for MSI PCs
- Delete key or F2 key is the correct one.
BIOS keys for Toshiba PCs
- F2 is mostly the correct key
- If it fails, try F1 and Esc keys
- In Toshiba Equium, F12 is the key
What is the correct time or moment to click the BIOS key
Now you know what is the correct key to enter the BIOS settings. If you don’t know the correct time, press the BIOS key for the whole time during the restart until you get the BIOS menu.
In most of the computers, it will ask you to click the BIOS Setup key, like the image shown below.
If it didn’t ask, the correct time would be the time after the Windows logo appears. Press the correct BIOS key after the Windows logo is shown.
How to Access BIOS on Windows 7?
Now that you have known the correct BIOS key, head to access the BIOS Windows 7.
(1) Restart your PC in your desired way. There is no Advanced startup like you do in Windows 10.
(2) When restarting, after the Windows logo appears, press the correct BIOS key.
(3) Make the necessary changes and leave the BIOS settings.
Our Opinion
The above are the methods that can be used to access the BIOS settings in various Windows OS. If you are using older Windows versions (Windows 7 or below), update your OS to the newer versions to get the more customized BIOS settings. There are plenty of options available on the BIOS menu and you can look into it by accessing the BIOS.
If you have any queries, let us know in the comment section below. We will reply ASAP.
Was this article helpful?
YesNo