
Уровень сложностиСредний
Время на прочтение11 мин
Количество просмотров8.4K
Если что-то существует, на этом можно запустить Bad Apple
Правило 86
За последние лет 15, Bad Apple запустили множестве вещей — на самодельном RISC-V процессоре, на осциллографе, на яблоках. Попробуем запустить Bad Apple на значках рабочего стола с помощью вызовов API Windows и нескольких других.
Требования
Visual Studio 2022
Нужная нагрузка для Visual Studio:
.NET Core
Подойдет SDK версии 7+:
winget install Microsoft.DotNet.SDK.7ffmpeg
winget install --id=Gyan.FFmpeg -eОпционально: yt-dlp
Нужно только для скачивания видео с YouTube, можно и по другому
winget install yt-dlp-
Windows 10 с пустым рабочим столом
На чем будем отображать
Цвета значков
Рендерить видео будем в 2 цветах — черных и белых. Есть два варианта, как поменять значок файла:
-
Если файл — изображение, то поменять изображение, оно будет отображаться в миниатюрном варианте
-
Изменить расширение файла так, чтобы Windows выбрала нужный нам значок.
Первый вариант требует каждый раз переписывать содержимое файла, это очень дорогая операция. Воспользуемся вторым вариантом.
Придумаем 2 расширения файлов, для каждых из которых Windows будет отображать свой значок. Например: .baclrw — белый цвет, и .baclrb — черный. Теперь необходимо зарегистрировать в реестре иконки для этих расширений.
Создадим 2 иконки в формате .ico в папкеC:\badappleresources с черным и белым сплошным заполнением. Создадим и запустим файл badapple.reg с таким содержимым:
Windows Registry Editor Version 5.00

[HKEY_CLASSES_ROOT\.baclrb]
[HKEY_CLASSES_ROOT\.baclrb\DefaultIcon]
@="C:\\badappleresources\\badapple_black.ico"

[HKEY_CLASSES_ROOT\.baclrw]
[HKEY_CLASSES_ROOT\.baclrw\DefaultIcon]
@="C:\\badappleresources\\badapple_white.ico"
В результате, Windows начнет правильно отображать файлы с нашими расширениями:
Размеры значков
Все значки рабочего стола отображаются с внешним отступом. Необходимо подобрать такой размер значка, при котором заполнение значка было бы максимальным.
Рабочий стол в Windows NT — это практически такое-же окно проводника как и любая папка. Значит, с ним можно работать как и с любой другой папкой — извлекать информацию о расположении значков, их параметрах и т.д.
Для того, чтобы с помощью Win32 изменить размер значков рабочего стола нужно выполнить несколько COM вызовов:
-
Получить IFolderView2 — интерфейс папки, которая отображается в окне рабочего стола.
-
Вызвать метод IFolderView2::GetViewModeAndIconSize , чтобы получить текущий режим отображения и размер значка
-
Вызвать метод IFolderView2::SetViewModeAndIconSize для задания нового размера значка
CoInitialize(NULL); // Запускаем COM
CComPtr<IFolderView2> spView;
FindDesktopFolderView(IID_PPV_ARGS(&spView)); //Получим IFolderView2 окна рабочего стола
const auto desiredSize = 67;
FOLDERVIEWMODE viewMode;
int iconSize;
spView->GetViewModeAndIconSize(&viewMode, &iconSize);
spView->SetViewModeAndIconSize(viewMode, desiredSize);
Код функции FindDesktopFolderView
void FindDesktopFolderView(REFIID riid, void** ppv)
{
    CComPtr<IShellWindows> spShellWindows;
    // Создаем экземпляр IShellWindows
    spShellWindows.CoCreateInstance(CLSID_ShellWindows);

    CComVariant vtLoc(CSIDL_DESKTOP);
    CComVariant vtEmpty;
    long lhwnd;
    CComPtr<IDispatch> spdisp;
    // Находим окно по его идентификатору SW (SW_DESKTOP в случае рабочего стола)
    spShellWindows->FindWindowSW(
        &vtLoc, &vtEmpty,
        SWC_DESKTOP, &lhwnd, SWFO_NEEDDISPATCH, &spdisp);

    CComPtr<IShellBrowser> spBrowser;
    CComQIPtr<IServiceProvider>(spdisp)->
        QueryService(SID_STopLevelBrowser,
            IID_PPV_ARGS(&spBrowser));

    CComPtr<IShellView> spView;
    // Находим активный IShellView в выбранном окне
    spBrowser->QueryActiveShellView(&spView);
    // Находим выбранный объект (в нашем случае IFolderView2) в IShellView
    spView->QueryInterface(riid, ppv);
}
Регулируя значение desiredSize ищем такой размер значка, при котором отступы по краям иконки будут минимальными. Такое значение — 67.
")
Данный код будет изменять размер значков на 67 каждый раз при запуске программы.
Разрешение «виртуального экрана»
Теперь необходимо узнать, сколько значков помещается на рабочий стол по горизонтали и вертикали. Можно посчитать вручную (неинтересный вариант), можно посчитать автоматически после корректировки размера иконок (вариант поинтереснее):
RECT desktop;
// Получаем HANDLE окна рабочего стола
HWND hDesktop = GetDesktopWindow();
// Получаем прямоугольник окна рабочего стола
GetWindowRect(hDesktop, &desktop);

POINT spacing;
//Получаем ширину значка вместе с отступами
spView->GetSpacing(&spacing);
auto xCount = desktop.right / spacing.x;
auto yCount = desktop.bottom / spacing.y;
IFolderView2::GetSpacing возвращает размеры иконки с учетом отступов (что нам и нужно). Делим сторону экрана на сторону значка и получаем количество значков на сторону, на моем мониторе 2560×1440 пикселей это 34×11 значков. Запоминаем эти числа, они пригодятся позже.
Что будем отображать
Подготовка видео
Подготовим нужные файлы. Скачаем оригинальное видео:
yt-dlp "https://www.youtube.com/watch?v=FtutLA63Cp8" -o "badapple.mp4"Необходимо понизить разрешение видео до 34×11, и частоту до 10 кадров в секунду:
ffmpeg -i badapple.mp4 -s 34x12 -c:a copy -filter:v fps=10 downscaled-33x12.mp4Обратите внимание на указанное разрешение — 34 на 12. К сожалению, ffmpeg требует четного количества пикселей по вертикали, придется игнорировать последнюю строку.
Преобразование видео в пиксели
Можно считать покадрово все видео и сохранить значение пикселей в бинарный файл. Однако, в этом моменте можно сделать небольшую по коду но существенную по производительности оптимизацию.
Сделаем так, чтобы приложение рендерило только измененные пиксели. Для этого, предыдущий кадр будем хранить в буфере и записывать в бинарный файл данные только изменившихся пикселей. Для этого напишем приложение на C#, для чтения видео будем использовать пакет GleamTech.VideoUltimate.
Код конвертера видео в бинарный формат
using System.Runtime.CompilerServices;
using GleamTech.Drawing;
using GleamTech.VideoUltimate;

// Ширина входного видео
const int WIDTH = 34;
// Высота входного видео (с учетом игнорируемой последней строки)
const int HEIGHT = 11;

// Значение байта для БЕЛОГО пикселя
const byte BYTE_ONE = 255;
// Значение байта для ЧЕРНОГО пикселя
const byte BYTE_ZERO = 0;
// Значение байта для команды "ПОКРАСИТЬ ПИКСЕЛЬ"
const byte BYTE_FRAME_PIXEL = 0;
// Значение байта для команды "Сделать скриншот"
const byte BYTE_FRAME_SCREENSHOT = 1;

// Ссылка на выходной файл
var outputPath = Path.Combine(Environment.GetFolderPath(Environment.SpecialFolder.Desktop), "framedata.bapl");
// Поток выходного файла
using var outputStream = File.Open(outputPath, FileMode.Create, FileAccess.ReadWrite);
// Входной файл
using var videoReader = new VideoFrameReader(File.OpenRead("downscaled-33x12.mp4"));

// Буфер предыдущего кадра
var buffer = new Span<bool>(new bool[WIDTH * HEIGHT]);

//Считываем кадры, пока они доступны
for (var i = 0; videoReader.Read(); i++)
{
    Console.WriteLine(i);
    //Получаем кадр и преобразуем его к Bitmap из .NET
    using var frame = videoReader.GetFrame();
    using var bitmap = frame.ToSystemDrawingBitmap();
    for (byte x = 0; x < WIDTH; x++)
    {
        for (byte y = 0; y < HEIGHT; y++)
        {
            //Индекс пикселя в буфере
            var bufferValue = WIDTH * y + x;
            //Получим значение пикселя (канал значения не имеет, видео черно-белое)
            var color = bitmap.GetPixel(x, y).R > 128;
            if (buffer[bufferValue] != color)
            {
                // Записываем байт команды изменения пикселя
                outputStream.WriteByte(BYTE_FRAME_PIXEL);
                // Записываем данные измененного пикселя
                outputStream.WriteByte(x);
                outputStream.WriteByte(y);
                outputStream.WriteByte(color ? BYTE_ONE : BYTE_ZERO);
                buffer[bufferValue] = color;
            }
        }
    }
    //Записываем байт команды скриншота
    outputStream.WriteByte(BYTE_FRAME_SCREENSHOT);
}
Конвертер покадрово просматривает видео и сравнивает пиксели с буфером предыдущего кадра. Если значение цвета отличается, то в выходной файл записывается команда отрисовки пикселя:
-
Байт
BYTE_FRAME_PIXEL(0) -
Координата
Xпикселя -
Координата
Yпикселя -
Значение
BYTE_ONEилиBYTE_ZERO— белый или черный цвет пикселя.
Перед завершением обработки кадра, в выходной файл записывается байт BYTE_FRAME_SCREENSHOT(1) — отрисовщик будет делать скриншот рабочего стола, когда встретит этот байт.
Еще одно небольшое улучшение (на самом деле нет)
Можно сэкономить примерно 25% бинарного файла, если не передавать четвертый байт команды отрисовки «виртуального пикселя» — отрисовщик может хранить последнее состояние каждой иконки и менять его на противоположное. Однако, это приведет к потере FPS при отрисовке видео — будут тратиться дополнительные ресурсы на вычисление нового состояния иконки
В результате работы конвертера на рабочем столе появляется файл framedata.bapl, который содержит порядок отрисовки пикселей и выполнения снимка экрана рабочего стола.
Как будем отображать
Заполним рабочий стол файлами с иконками черного цвета. Для этого, получим путь к рабочему столу текущего пользователя с помощью SHGetSpecialFolderPathA:
// desktopPath будет указывать на строку wstring - путь к рабочему столу текущего пользователя
  char desktop_path[MAX_PATH + 1];
  SHGetSpecialFolderPathA(HWND_DESKTOP, desktop_path, CSIDL_DESKTOP, FALSE);

  const auto totalScreenCapacity = desktopResolution.x * desktopResolution.y;
  auto desktopPath = std::string(desktop_path);
  auto desktopPathW = std::wstring(desktopPath.begin(), desktopPath.end());
Далее, заполним 2 вектора — полные пути к файлам белых цветов и черных цветов.
for (auto y = 0; y < desktopResolution.y; y++)
    {
        for (auto x = 0; x < desktopResolution.x; x++)
        {
            blacks[y * desktopResolution.x + x] = desktopPathW + line_separator + std::to_wstring(x) + L"_" + std::to_wstring(y) + black_extension;
            whites[y * desktopResolution.x + x] = desktopPathW + line_separator + std::to_wstring(x) + L"_" + std::to_wstring(y) + white_extension;
        }
    }
По итогу, в blacks и whites будут лежать строки вида C:\Users\[User]\Desktop\[x]_[y].baclr['w'|'b'] .
Иконку файла будем менять переименованием.
Переименование файла
Для переименования файла в Win32 API предусмотрена функция MoveFile. Мы могли бы изменить иконку с индексом i с белого на черный цвет так:
MoveFile(whites[i], blacks[i]);Однако у такого подхода есть существенный недостаток — при каждом таком переименовании будет создаваться и удаляться новый дескриптор файла, а создание дескриптора — это очень дорогая операция.
Мы можем использовать немного другой подход — создать файл при помощи функции CreateFile, сохранить полученный дескриптор в вектор и использовать его для будущего переименования без закрытия файла.
 for (int i = 0; i < totalScreenCapacity; i++) {
    // Создаем файлы с черной иконкой с доступом на чтение, запись и удаление
    handles[i] = CreateFile(blacks[i].c_str(), GENERIC_READ | GENERIC_WRITE | DELETE, 0, NULL, CREATE_ALWAYS, 0, NULL);
}
Осталось непосредственно переименовать файл, зная его HANDLE, для этого есть SetFileInformationByHandle. Напишем функцию:
void RenameFileByHandle(HANDLE handle, std::wstring newName) {
    auto newNameStr = newName.c_str();
    // Создадим структуру с информацией о длине файла
    union
    {
        FILE_RENAME_INFO file_rename_info;
        BYTE buffer[offsetof(FILE_RENAME_INFO, FileName[MAX_PATH])];
    };

    file_rename_info.ReplaceIfExists = TRUE;
    file_rename_info.RootDirectory = nullptr;
    //Заполним информацию о длине названия файла
    file_rename_info.FileNameLength = (ULONG)wcslen(newNameStr) * sizeof(WCHAR);
    // Запишем нули в название файла (для нормальной работы SetFileInformationByHandle название файла должно кончаться на \0)
    memset(file_rename_info.FileName, 0, MAX_PATH);
    // Скопируем нужное название файла в память
    memcpy_s(file_rename_info.FileName, MAX_PATH * sizeof(WCHAR), newNameStr, file_rename_info.FileNameLength);

    // Переименуем файл
    SetFileInformationByHandle(handle, FileRenameInfo, &buffer, sizeof buffer);
}
Делаем скриншоты экрана
Будем использовать GDI+, напишем функцию SaveScreenshotToFile.
Код SaveScreenshotToFile
void SaveScreenshotToFile(const std::wstring& filename)
{
    // Получим контекст устройства экрана
    HDC hScreenDC = CreateDC(L"DISPLAY", NULL, NULL, NULL);

    // Получим размер экрана
    int ScreenWidth = GetDeviceCaps(hScreenDC, HORZRES);
    int ScreenHeight = GetDeviceCaps(hScreenDC, VERTRES);

    // Создадим изображение
    HDC hMemoryDC = CreateCompatibleDC(hScreenDC);
    HBITMAP hBitmap = CreateCompatibleBitmap(hScreenDC, ScreenWidth, ScreenHeight);
    HBITMAP hOldBitmap = (HBITMAP)SelectObject(hMemoryDC, hBitmap);

    // Скопируем скриншот из контекста экрана в контекст памяти (изображения)
    BitBlt(hMemoryDC, 0, 0, ScreenWidth, ScreenHeight, hScreenDC, 0, 0, SRCCOPY);
    hBitmap = (HBITMAP)SelectObject(hMemoryDC, hOldBitmap);

    // Сохраним изображение в файл
    BITMAPFILEHEADER bmfHeader;
    BITMAPINFOHEADER bi;

    bi.biSize = sizeof(BITMAPINFOHEADER);
    bi.biWidth = ScreenWidth;
    bi.biHeight = ScreenHeight;
    bi.biPlanes = 1;
    bi.biBitCount = 32;
    bi.biCompression = BI_RGB;
    bi.biSizeImage = 0;
    bi.biXPelsPerMeter = 0;
    bi.biYPelsPerMeter = 0;
    bi.biClrUsed = 0;
    bi.biClrImportant = 0;

    DWORD dwBmpSize = ((ScreenWidth * bi.biBitCount + 31) / 32) * 4 * ScreenHeight;

    HANDLE hDIB = GlobalAlloc(GHND, dwBmpSize);
    char* lpbitmap = (char*)GlobalLock(hDIB);

    // Скопируем биты изображения в буффер
    GetDIBits(hMemoryDC, hBitmap, 0, (UINT)ScreenHeight, lpbitmap, (BITMAPINFO*)&bi, DIB_RGB_COLORS);

    // Создадим файл с будущим скриншотом
    HANDLE hFile = CreateFile(filename.c_str(), GENERIC_WRITE, 0, NULL, CREATE_ALWAYS, FILE_ATTRIBUTE_NORMAL, NULL);

    // Размер в байтах заголовка изображения
    DWORD dwSizeofDIB = dwBmpSize + sizeof(BITMAPFILEHEADER) + sizeof(BITMAPINFOHEADER);

    // Сдвиг данных пикселей
    bmfHeader.bfOffBits = (DWORD)sizeof(BITMAPFILEHEADER) + (DWORD)sizeof(BITMAPINFOHEADER);

    //Размер файла
    bmfHeader.bfSize = dwSizeofDIB;

    //0x4d42 = 'BM' в кодировке ASCII, обязательное значение
    bmfHeader.bfType = 0x4D42; //BM

    DWORD dwBytesWritten = 0;
    WriteFile(hFile, (LPSTR)&bmfHeader, sizeof(BITMAPFILEHEADER), &dwBytesWritten, NULL);
    WriteFile(hFile, (LPSTR)&bi, sizeof(BITMAPINFOHEADER), &dwBytesWritten, NULL);
    WriteFile(hFile, (LPSTR)lpbitmap, dwBmpSize, &dwBytesWritten, NULL);

    //Очищаем данные контекстов
    GlobalUnlock(hDIB);
    GlobalFree(hDIB);

    //Закрываем файлы
    CloseHandle(hFile);

    //Очищаем мусор после себя
    DeleteObject(hBitmap);
    DeleteDC(hMemoryDC);
    DeleteDC(hScreenDC);
}
Перед снимком экрана необходимо обновить содержимое окна и дождаться пока обновление произойдет. Для этого воспользуемся SendMessage и напишем небольшую функцию:
void TakeScreenshot(int index){
    // Путь i-того скриншота
    auto path = screenshot_path + L"shot_" + std::to_wstring(index) + L".png";
    // Отправляем сообщение для обновления
    SendMessage(HWND_BROADCAST, WM_SETTINGCHANGE, 0, 0);
    // Ждем DEFAULT_SLEEP_TIME миллисекунд
    std::this_thread::sleep_for(DEFAULT_SLEEP_TIME);
    // Делаем скриншот
    SaveScreenshotToFile(path);
}
Команда SendMessage предназначена для отправки сообщения в выбранное окно (0 аргумент), мы используем HWND_BROADCAST, поэтому адресатами будут все окна. В нашем случае сообщением является WM_SETTINGCHANGE — изменение настроек окна. Это сообщение заставляет окна отрисовать заново себя и свои дочерние окна.
Почти финал — собираем все воедино
Функция main отрисовщика будет выглядеть примерно так:
int main()
{
    // Получаем параметры рабочего стола
    auto desktopResolution = GetDesktopParams();
    const auto totalScreenCapacity = desktopResolution.x * desktopResolution.y;

    // Создаем файлы и заполняем векторы с названиями файлов и дескрипторами
    std::vector<HANDLE> handles(totalScreenCapacity);
    std::vector<std::wstring> blacks(totalScreenCapacity);
    std::vector<std::wstring> whites(totalScreenCapacity);
    FillDesktop(desktopResolution, handles, blacks, whites);

    // Считываем содержимое файла framedata.bapl
    auto bytes = ReadAllBytes(pixel_source_path);
    auto i = 0;
    auto frame = 0;

    // Отрисовываем созданные файлы
    SendMessage(HWND_BROADCAST, WM_SETTINGCHANGE, 0, 0);

    while (i < bytes.size()) {
        i++;
        //Считываем очередной байт
        char value = bytes[i];
        // Если это команда для снимка экрана - делаем скриншот
        if (value == BYTE_FRAME_SCREENSHOT) {
            TakeScreenshot(frame);
            frame++;
        }
        else {
            // Получаем координаты и цвет пикселя
            auto x = bytes[i + 1];
            auto y = bytes[i + 2];
            auto color = bytes[i + 3];
            i += 3;

            // Переименовываем соответствующий файл
            auto position = y * desktopResolution.x + x;
            RenameFileByHandle(handles[position], color == BYTE_ONE ? whites[position] : blacks[position]);
        }
    }
    // Делаем финальный скриншот
    TakeScreenshot(frame);
    return 0;
}
Отрисовщик считывает файл framedata.bapl байт за байтом, переименовывает соответствующий файл или делает скриншот в нужный момент. На выходе получаем множество файлов формата .bmp — скриншоты окна для каждого из кадров видео Bad Apple.
Сборка снимков экрана обратно в видео
Осталось еще немного, скоро дойдем до видео)
Используем ffmpeg:
ffmpeg -framerate 10 -i "scan_%d.bmp" output.mp4Осталось добавить звук в вашем любимом видеоредакторе.
Финал
Итоги
В рамках статьи мы смогли запустить Bad Apple на значках рабочего стола. В ходе работы мы использовали множество функций API Windows, научились обращаться к некоторым COM интерфейсам, делать скриншоты с помощью GDI+ и компоновать их в видео при помощи ffmpeg.
Ссылка на репозиторий проекта
Bad Apple but it’s a Windows virus
A high-performance (I’ve never seen anything like this run in realtime before)
rendition of Bad Apple, using Windows windows as the video surface.
It’s not actually a virus, but it is reminiscent of the viruses of old that
were more of a nuisance than anything.
Video demonstration:

Why is it so performant?
DeferWindowPos— even the most naive of projects can go from 1fps to 15fps
by using this wonderful batched API instead ofSetWindowPos.WS_EX_TOOLWINDOWto remove the taskbar entrySWP_NOREDRAWwhen moving/resizing windows- Optimised code that only shows/hides/moves windows that need
showing/hiding/moving - Rust is blazing fast, don’t you know?
Could it be faster?
I suspect that choosing which windows to move/resize, such that each is resized
as little as possible, can increase performance — currently, the windows are just
used from largest to smallest, which can result in some location jitter as they
fit into different indexes.
Future work
All of these I have done already in small tests, but they’re both difficult to
make performant (copy dialogs are particularly slow), and difficult to arrange
into a pleasing display.
- Spawning
MessageBoxAwindows and taking their handle (thus avoiding the need
to replicate the layout ofMessageBoxAfor each version of Windows you run
on) - Spawning Vista file copy dialogs using
IProgressDialog - Arranging windows in rolling sine waves, circles, etc
All of these I have not tried yet, but would be great additions:
- Water physics using hundreds of scroll bars
- Basic hard-body physics between windows
- Error noises synced with the audio (could just pre-render…)
- Notification bubbles
- Windows in the taskbar to show text (if the user has large taskbar buttons
enabled) - A large variety of error messages to delight the user with
Building and such
Should be fine to just cargo build --release.
Look at bad apple.py for the pre-processing to take an input video and turn it
into boxes.bin, a space-optimized representation of the window bounds for each
frame. The script is jank, don’t come complaining.
Check the PRs for some forks that improve the python script to be easier to run.
Why’s the repo archived?
I simply don’t have the bandwidth to respond to questions and merge PRs for this little
project I threw out into the world. Feel free to fork it and make it do cool things!
How can Uninstall Bad Apples Completely from Computer
Bad Apples removal has been a tough problem on your PC? Do you need an effective way to uninstall Bad Apples quickly with simple steps? Don’t worry, you will be able to solve the problem via the following removing instructions of the program.
Get Bloatware Uninstaller Now
Bad Apples may be great in providing its specific function for the users, but it also can turn out to be a problem when the program get some running issues or you don’t want to keep it on your computer any more. In this case, removing Bad Apples will be the common and also effective means to resolve the problem, and the real difficulty just come out when people try to uninstall Bad Apples from their PCs.
What usually make people to remove Bad Apples
- Bad Apples is not compatible with other installed applications
- Program gets a corrupted issue unexpectedly
- Bad Apples is not as good as the user expected, and need to be erased from the computer
- Bad Apples should be uninstalled first and reinstalled on the PC
- The application is regarded by the user and some websites as a suspect malware
Most common problems of removing the software
- Bad Apples program is not available on the Windows uninstall panel
- Bad Apples can’t be removed from the Windows and always receive a notification
- Nothing happen when click on the uninstall button on Windows
- Bad Apples or the related process still keep running on the computer after removing it
- Some files and traces of the program still can be found
- Removing process running for a long time and does not come to the end
If must be a headache if encountering such a problem on the computer, and there are still many other problems people might come across when perform the program removal on their own computers. Therefore, you should know the right way about how to uninstall Bad Apples from PC, or the way to fix/avoid the removing issue on the computer. Here are just several options that can support you to remove the application well.
How can uninstall Bad Apples well on PC? Check these guides
Option 1: Use the product’s uninstall tool
There are many applications in nowadays provides an uninstall process on the program’s installation folder, or the publisher gets an uninstaller which is specifically used to remove its own products. To remove Bad Apples in this way, please refer to the following uninstall instructions:
- 1. Right-click on Bad Apples icon on the desktop, and select «Open file location»
- 2. Scroll down the list of files and find the uninstall process, usually named «uninst000», «Uninstall», or «Uninstaller»
- 3. Double click on the uninstall process to start the removal
- 4. Follow the uninstall wizard to finish the removal, and restart your computer
- 5. Open the directory of the installation folder again, and make sure everything has been cleared well
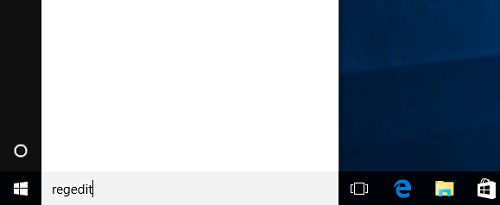
- 6. Click on the Windows button on the bottom-left-corner, and enter «regedit» on the search box
-
- 7. Click to open «regedit» or Registry Editor on the search result
-
- 8. Unfold the registry group inside, and find out those registry keys or entries which contains the program’s name
- 9. Back up these files, and then remove them from your computer system

Note: once problems occur after deleting the registry, please restore the back-up registry to Registry Editor.
When using the publisher’s uninstaller, you should download and install the uninstall application additionally, and choose to uninstall Bad Apples from its interface. Similar to the above removal, you should restart your computer after finish the uninstall process, and clear its remnants again which are still staying on the PC.
Things you need to know about Registry Editor
Registry Editor is a place that stores many important registry keys and entries which closely related to the system operation and program’s performance on the computer, removing a wrong file inside usually cause serious problem for the system, so you should be very careful when you have to manually delete some registries inside.
Get Bloatware Uninstaller Now
Option 2:Remove it with Windows uninstall feature
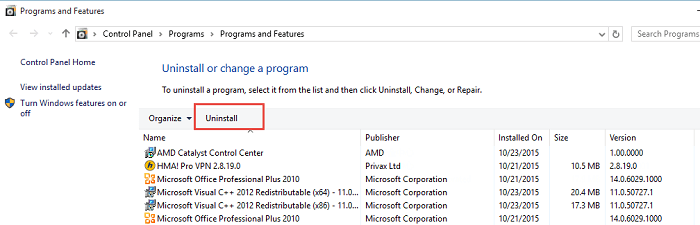
Windows system provide an uninstall feature in Control Panel that support the user to remove unwanted program on the PC, to access this applet in different operating system, you can follow these instructions:
- 1. Open the uninstall panel on Windows system
- 2. Select Bad Apples on the programs list, click on Remove/Uninstall button
-
- 3. Confirm the program removal, and complete the removing steps with guides
- 4. When finish, reboot the computer
- 5. The same to the removing steps in Option 1, you should clear the leftovers in the installation folder as well as Registry Editor
Option 3:Uninstall Bad Apples with Bloatware Uninstaller
If you want to totally avoid the risky manual removal of registry, and handle Bad Apples uninstall more easily and quickly, taking a professional uninstall tool will be a great help for you, because it can count all of the files (including registry keys and temporary files) and provide a complete and automatic removal, thus, many risky and annoying manual steps could be skipped can you can totally remove Bad Apples on the PC more quickly.
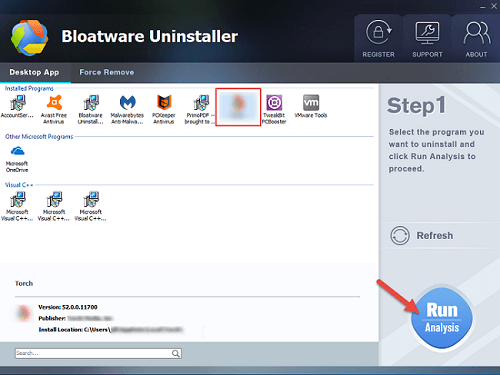
Bloatware Uninstaller is an advanced uninstall utility that can give a good example about how uninstall Bad Apples well:
- 1. Install and launch the uninstaller on PC
- 2. Find and select Bad Apples from the programs list, and click on Scan button
-
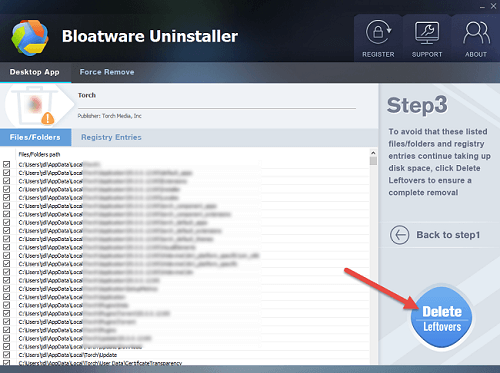
- 3. When all of files being detected, click on the uninstall or remove button
-
- 4. Follow the uninstall wizard to remove all of components from the computer
-
- 5. Exit the uninstaller when finish, and reboot the computer system

Get Bloatware Uninstaller Now
This is a very effective way to uninstall Bad Apples and other applications, while the manual removal usually resulted in an unsuccessful removal, and the most important point is it is much easier for the common user to take and get rid of the program they want. So it is currently the best way we found and would like to recommend you to remove unneeded programs with a good app uninstaller.
Item Preview
There Is No Preview Available For This Item
This item does not appear to have any files that can be experienced on Archive.org.
Please download files in this item to interact with them on your computer.
Show all files
59
Views
1
Favorite
DOWNLOAD OPTIONS
Uploaded by
Megasxlr
on