
UpdatePack7R2: The Ultimate Update & Integration Suite for Windows 7 SP1 and Server 2008 R2 SP1
UpdatePack7R2 is a versatile update solution that automatically installs the latest updates—including critical security patches, recommended fixes, and the newest Internet Explorer versions—on Windows 7 SP1 and Windows Server 2008 R2 SP1.
Whether you’re updating a live system or integrating updates into a distribution image (WIM file), UpdatePack7R2 streamlines the process and enhances system stability and security.
Keep your systems secure and up-to-date with a single, powerful tool that integrates all critical, recommended, and security updates – including Internet Explorer 11 – for every edition, bit depth, and language of Windows 7 and Server 2008 R2.
Key Features
- Universal Compatibility:
Works on any edition, any bit depth, and any language version of Windows 7 and Server 2008 R2. - Comprehensive Update Coverage:
Integrates all critical, recommended, and security updates, including updates for all versions of Internet Explorer. - Flexible Installation Modes:
- Automatic Reboot:
/rebootautomatically restarts the computer if necessary. - Silent Installations:
/Sfor a completely silent mode or/silentfor a passive installation that displays progress. - IE11 Integration:
/IE11installs and localizes Internet Explorer 11. - Custom Temporary Directory:
/Temp=to set a custom working directory. - Skip Free Space Check:
/NoSpacebypasses the free space check (not recommended). - USB Driver Control:
/NoUSBprevents the integration of USB 3.0/3.1 drivers. - NVMe Support:
/NVMeadds NVMe support for both the system and recovery environments. - Meltdown & Specter Protection:
/FixOnenables protection and/FixOffdisables it (enabled by default for Server 2008 R2).
- Automatic Reboot:
- Update Integration Options — Easily integrate updates into your system image using:
/WimFile=to specify the absolute path to your WIM file./Index=to select a specific image index (or use*for all indexes)./Optimizeand/Optimize=esdto reduce the size of the image after integration.
- Additional Functionalities:
- Automatic SP1 Installation: Place the SP1 installer files in the same directory.
- Pre/Post Update Scripts: If available, scripts like
UpdatePack7R2Start.cmd,UpdatePack7R2Finish.cmd, andUpdatePack7R2Wim.cmdrun automatically. - IE11 Tweaks: Drop an
ie11.regfile in the folder to apply custom tweaks post-installation. - Add-On Integration: Support for SmartFix, DirectX, .NET Framework, and Visual C++ add-ons.
System Requirements
- Hard Drive: Minimum of 10 GB free space.
- RAM: Preferably at least 1 GB free.
Usage Examples
- Automated Update with IE11 and Reboot:
UpdatePack7R2.exe /ie11 /silent /reboot - Silent Update Without Changing IE Version or Rebooting:
UpdatePack7R2.exe /S - Integrate Updates into a WIM Image for a Specific Index:
UpdatePack7R2.exe /ie11 /WimFile=C:\install.wim /Index=1 - Integrate Updates into All Indexes:
UpdatePack7R2.exe /ie11 /WimFile=C:\install.wim /Index=*
UpdatePack7R2 is a must-have tool for IT professionals looking to maintain secure, fully updated Windows 7 and Server 2008 R2 systems. With its flexible command-line options, seamless integration into distribution images, and support for additional add-ons, this update pack not only simplifies the update process but also ensures that your systems run efficiently and safely.
UpdatePack7R2 — Changelog
Download UpdatePack7R2:
Size: 1.01 MB
Download
UpdatePack7R2 for updating Windows 7 SP1 and Server 2008 R2 SP1
The set allows you to update the working system, as well as integrate updates into the distribution. It can be installed on any edition of Windows 7 and Server 2008 R2, any bit depth and any language. Updates are included for all versions of Internet Explorer, all critical, recommended, and security updates. See details in the list of updates.
Download (size 730 MB) Magnet
UpdatePatch-19.8.22 fixes a boot problem on UEFI
A digital signature is used to verify integrity.
Update List and Change History
Detailed integration instructions from Nordek
Update7 Integrator from boss911 | UP_Integrator from sov44
Changes in version 19.8.15
Added KB4474419-v2-x86-x64 (replace KB4474419-x86-x64)
Added KB4512506-x86-x64 with telemetry disabled and processor checks (replaces KB2563227-x86-x64, KB2732487-v2-x86-x64, KB2763523-x86-x64, KB2813347-x86-x64 and KB4507449-x86-x64)
Using
The system must have at least 10 GB of free space on the hard drive and preferably at least 1 GB of free RAM.
For a flexible set installation, you can use the following keys and their combinations:
- Key / Reboot to automatically reboot if necessary.
- / S switch for a completely silent installation without windows or messages. Register matters.
- Key / Silent for passive installation — progress is visible, but the installation is fully automatic.
- The / IE11 switch to install Internet Explorer 11 and localize it.
- The / Temp = switch allows you to specify a temporary working directory. It does not have to be empty, but it must exist.
- The / NoSpace switch allows you to skip checking the free space on the system partition, it is not recommended to use it.
- The / NoUSB switch cancels the integration of USB 3.0 and 3.1 drivers into the system distribution package through the Win7USB3 project.
- Key / NVMe integrates NVMe support for the system and recovery environment.
- The / FixOn switch enables protection from Meltdown and Specter, and / FixOff turns it off. Without keys, protection is disabled for Win7, and enabled for Win2008R2.
Examples:
- You need to automatically install all updates, IE11 and restart the computer: UpdatePack7R2.exe / ie11 / silent / reboot
- It is necessary to covertly install all updates to existing products, do not change the IE version, do not restart the computer: UpdatePack7R2.exe / S
The following keys are for integrating updates into the distribution:
- The / WimFile = switch specifies the location of the wim file, you must specify an absolute path.
- The key / Index = indicates the index of the system in the wim-file; for each index, it is necessary to perform integration again.
- The key / Index = * allows you to perform sequential integration of updates into all indexes of the wim-file.
- The / Optimize switch allows optimizing the size of the wim file after integrating updates.
- The / Optimize = esd switch converts the wim file to esd after integrating updates.
Notes:
- Before specifying the index, it is useful to run the command: Dism / Get-WimInfo /WimFile:C:\install.wim (replace the path with your own).
Examples:
- It is necessary to integrate IE11 and all updates into 1 index: UpdatePack7R2.exe / ie11 /WimFile=C:\install.wim / Index = 1
- It is necessary to integrate IE11 and all updates into all indexes: UpdatePack7R2.exe / ie11 /WimFile=C:\install.wim / Index = *
- It is only necessary to integrate updates to existing products, do not change the IE version: UpdatePack7R2.exe /WimFile=C:\install.wim / Index = 1
Additional functionality
- Automatic installation of SP1 is possible if it is not installed in the system. To do this, place the files Windows6.1-KB976932-X86.exe and Windows6.1-KB976932-X64.exe in the same directory as the set.
- If there is UpdatePack7R2Start.cmd next to the set, it will be executed before installing updates, UpdatePack7R2Finish.cmd after installation, UpdatePack7R2Wim.cmd after integration of updates. By default, console windows will be displayed. To hide them, the first line in the cmd-file must begin with «: hide» (without quotes). A set of updates tracks the exit code from cmd files, in case a reboot is necessary. This code is 3010 (exit 3010 command).
- If you want to apply your tweaks after installing Internet Explorer 11 on a working system, place the ie11.reg file in the folder with the set and it will be imported automatically.
- Some keys can be replaced by renaming the set file itself. So to install IE11, you can add the word «ie11» to any place in the set file name, «-» for automatic reboots, and «++» for passive installation.
- The integration of add-ons is supported: SmartFix , DirectX , .NET Framework , Visual C ++ . Add-on files must be located in the same folder as UpdatePack7R2.
Examples:
- You need to automatically install the kit on a working system with IE11 and restart the computer: rename UpdatePack7R2.exe to UpdatePack7R2 — ie11 ++. Exe
- This will be exactly the same as using the following keys: UpdatePack7R2.exe / ie11 / silent / reboot
Notes
- The size of the distribution package (wim-file) will be increased by the size of installed updates.
- Integrated updates can be removed even after installing the system.
- It is recommended to unload the resident antivirus monitor from memory for the duration of the set.
- A detailed update installation log is located in the % WinDir% \ UpdatePack7.log file.
- Installation on a working system will be carried out in several stages with reboots.
Привет друзья! Не секрет, что операционная система Windows 7 ещё пользуется большой популярностью и многие пользователи, чьи компьютеры совместимы с семёркой, держат Win 7 в качестве второй или даже основной операционной системы на компьютере. Зная о неугасающей популярности старенькой системы, Майкрософт ещё летом выпустила для неё очень удобный накопительный пакет обновлений «Rollup Update» (или обновление KB3125574), получивший неофициальное название — Service Pack 2, так как содержит в себе все важнейшие обновления с 2011 года. Данный накопительный пакет очень удобен, ведь всем известно, что сразу после установки на компьютер, Windows 7 начинает скачивать массу обновлений и устанавливать их с целой чередой перезагрузок, что очень неудобно для пользователя. Другое дело сразу после установки системы накатить накопительный пакет «Rollup Update» со всеми обновлениями и спокойно работать. В одной из наших предыдущих статей мы разобрали, как установить «Rollup Update» на Windows 7, но вот интересно, а возможно ли интегрировать в дистрибутив OS этот накопительный пакет, чтобы после установки все обновления были уже установлены в операционную систему. Об этом мы и поговорим в сегодняшней статье.
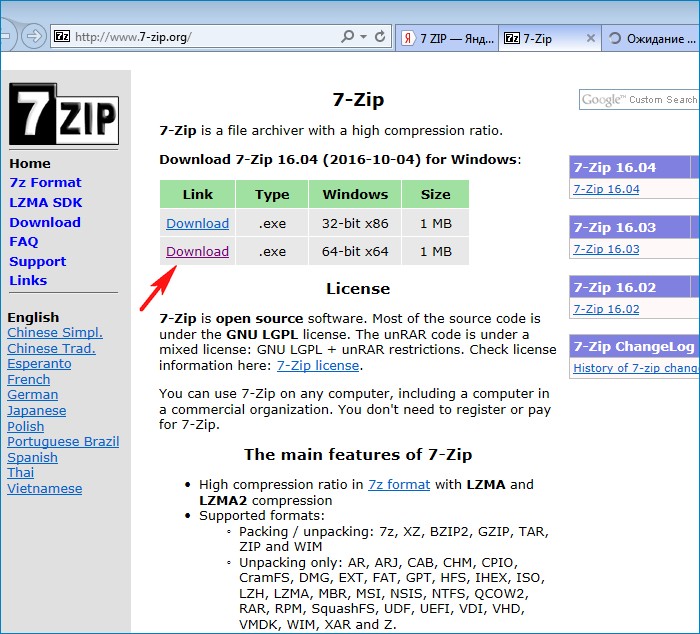
Во-первых скачаем программу 7-Zip по ссылке и установим её (если вы работаете в Windows 8.1, 10, то 7-Zip вам не нужна, так как эти системы прекрасно работают с ISO-образами).
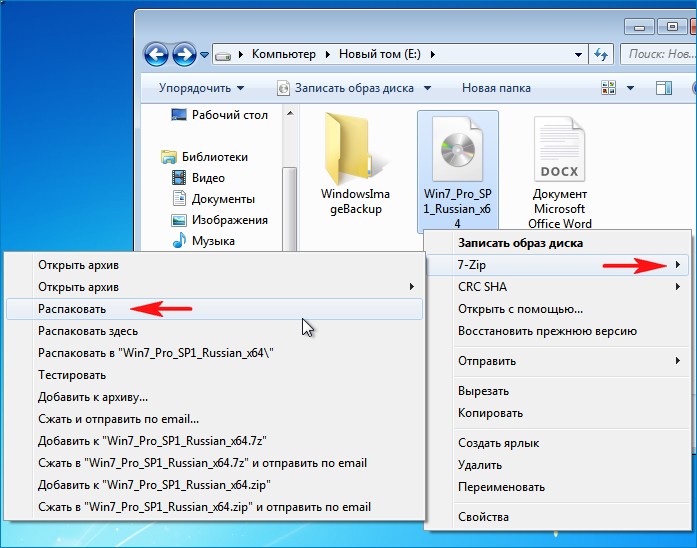
Затем скачаем ISO-образ Windows 7 на официальном сайте Майкрософт. Щелкаем на ISO-образе правой мышью и выбираем «7-Zip»—>«Распаковать»
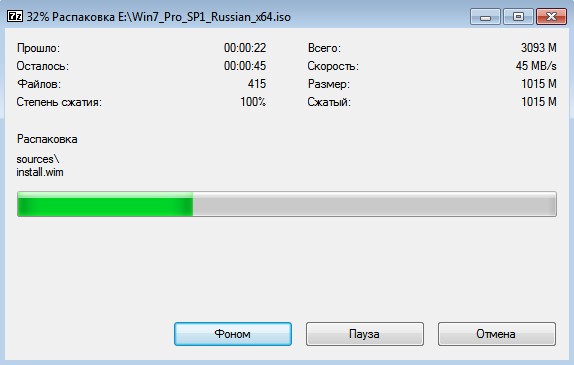
Снимаем галочку и распаковываем файлы Windows 7 на раздел (E:) с созданную нами папку «1»

Распаковка файлов.
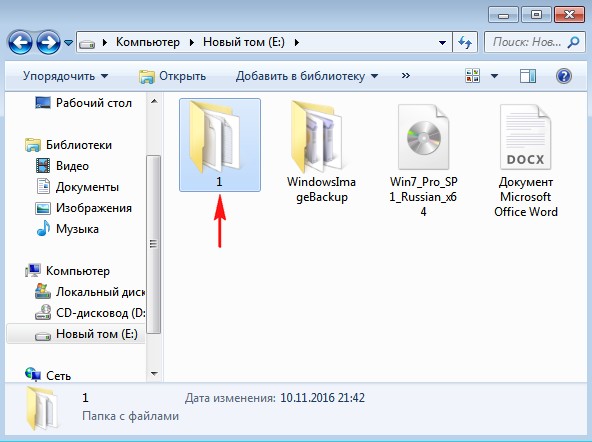
Файлы Windows 7 распакованы на раздел (E:) в папку «1».
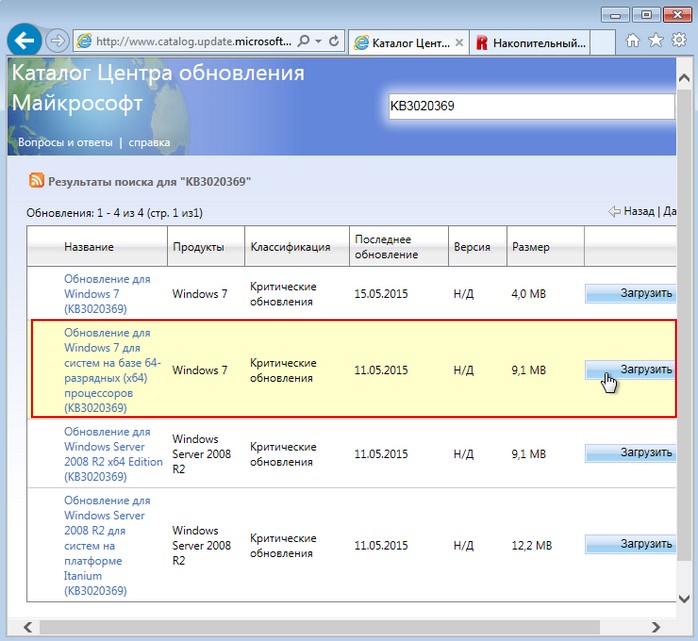
Скачиваем (обязательно в браузере Internet Explorer) три пакета обновлений KB3020369 по ссылке:
http://www.catalog.update.microsoft.com/Search.aspx?q=KB3020369
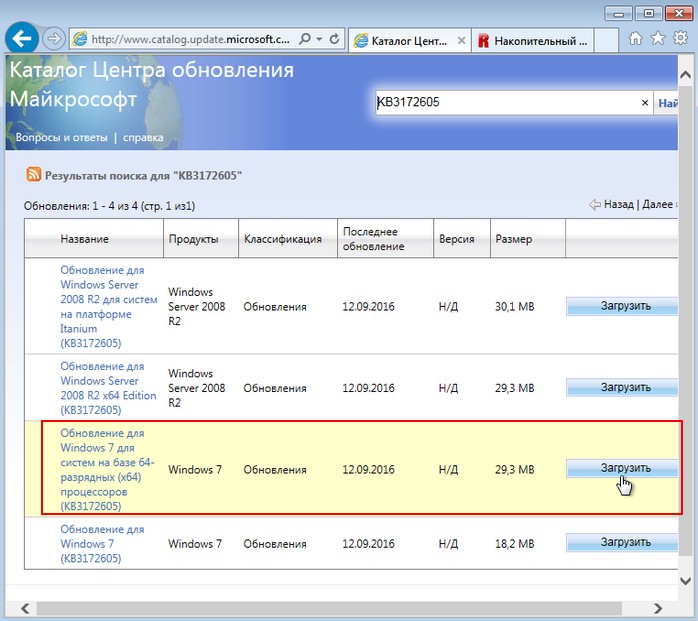
KB3172605 по ссылке:
http://www.catalog.update.microsoft.com/Search.aspx?q=KB3172605
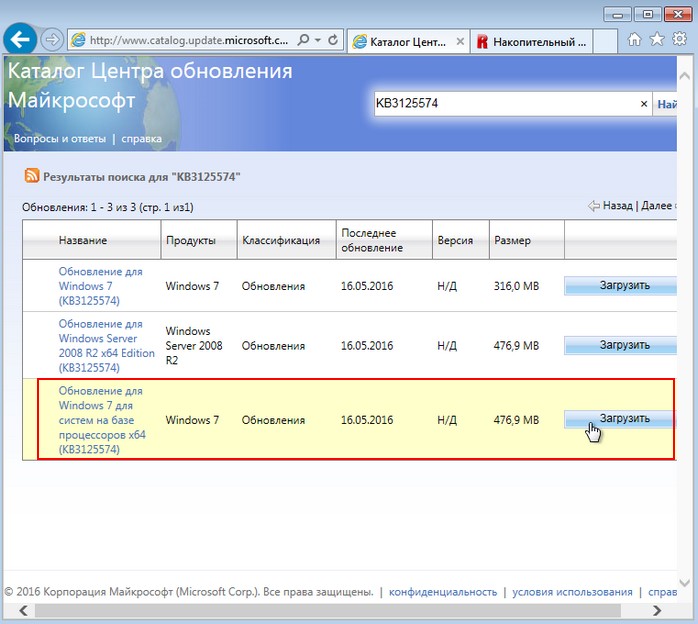
и накопительный пакет обновлений «Rollup Update» KB3125574:
http://www.catalog.update.microsoft.com/Search.aspx?q=KB3125574
Все три пакета обновлений скачаны на раздел жёсткого диска (E:)
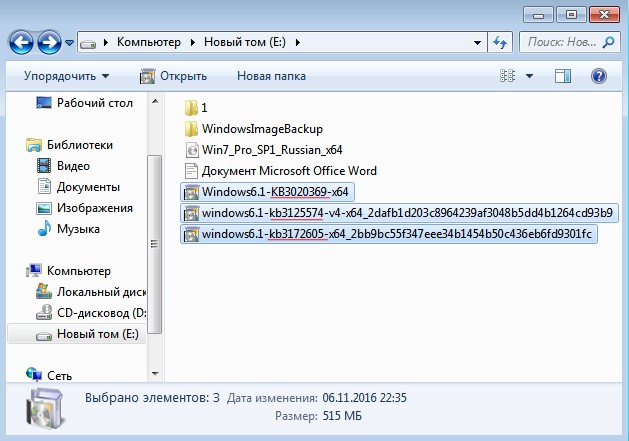
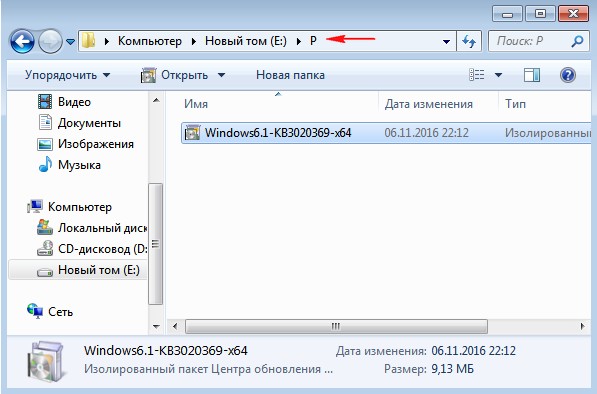
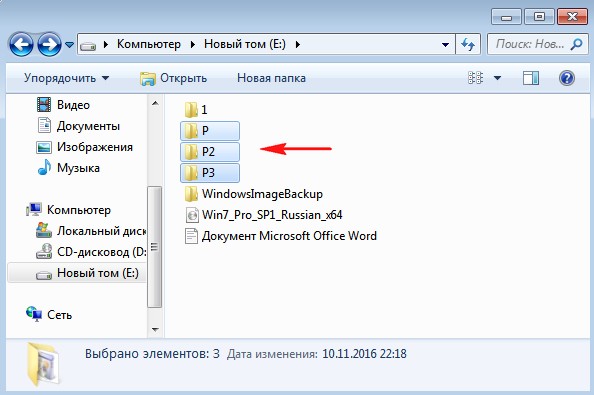
Создаём на разделе (E:) папку с названием «P» (русских букв быть не должно) и копируем в неё пакет обновлений «KB3020369».
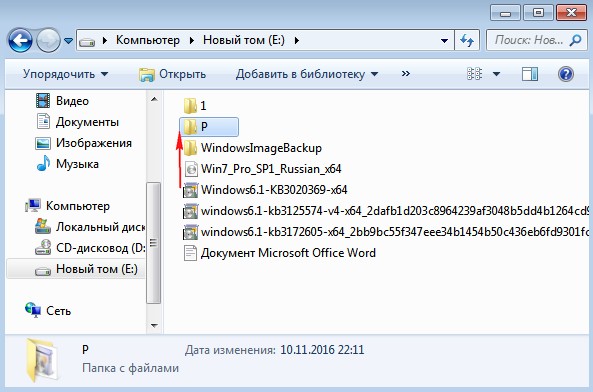
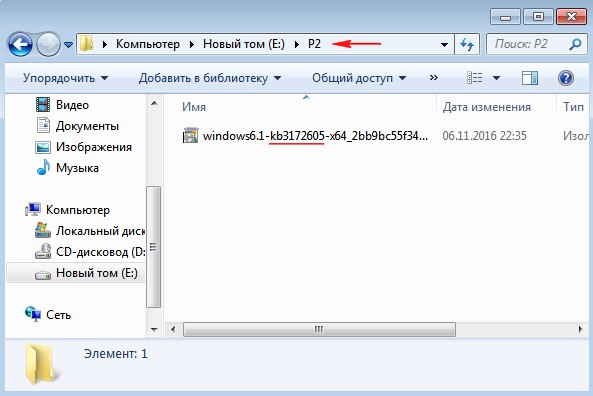
Создаём на разделе (E:) папку с названием «P2» и копируем в неё пакет обновлений «KB3172605»
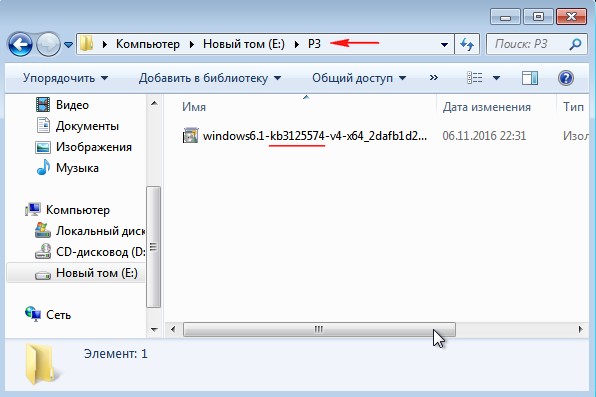
Создаём на разделе (E:) папку с названием «P3» и копируем в неё пакет обновлений «KB3125574»
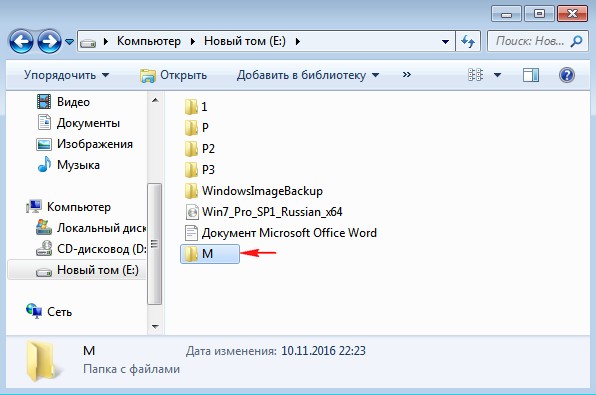
Создаём на разделе (E:) папку с названием «M», в данную папку мы смонтируем Windows 7 64-бит и затем интегрируем в неё обновления.
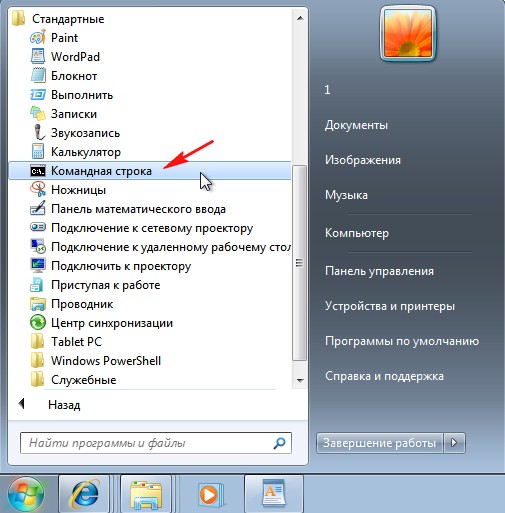
Запускаем командную строку от имени администратора
ISO-образ Windows 7 64-бит мы разархивировали с вами в начале статьи в папку «1».
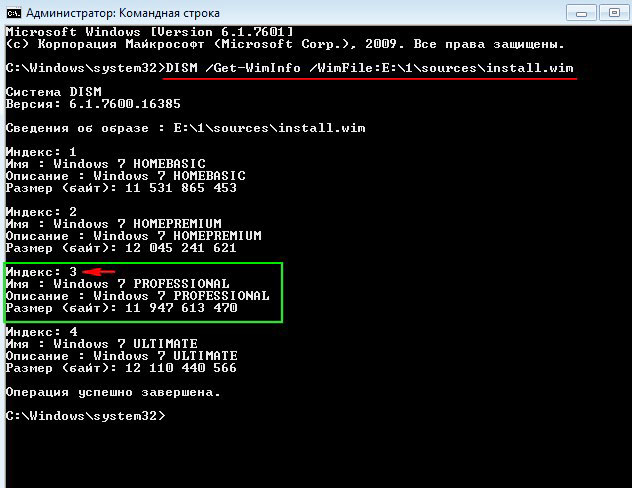
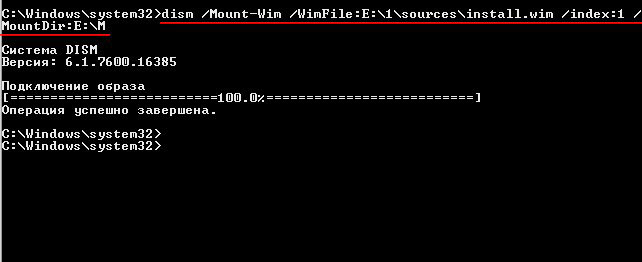
Следующей командой узнаём индекс всех релизов, находящихся в ISO-образе Windows 7.
Dism /Get-WimInfo /WimFile:E:\1\sources\install.wim
мне нужна Windows 7 Профессиональная и её индекс 3.
Следующей командой монтируем (распаковываем архив Windows 7), находящийся в папке 1, в подпапке «source» файл-образ install.wim — в папку «M» на диске (E:)
dism /Mount-Wim /WimFile:E:\1\sources\install.wim /index:3 /MountDir:E:\M
Интегрируем из папки «P» пакет обновлений «KB3020369» в смонтированный в папку M: образ Windows 7.
dism /image:E:\M /add-package /packagepath:E:\P
Интегрируем из папки «P2» пакет обновлений «KB3172605» в смонтированный в папку M: образ Windows 7.
dism /image:E:\M /add-package /packagepath:E:\P2
Интегрируем из папки «P3» пакет обновлений «KB3125574» в смонтированный в папку M: образ Windows 7.
dism /image:E:\M /add-package /packagepath:E:\P3
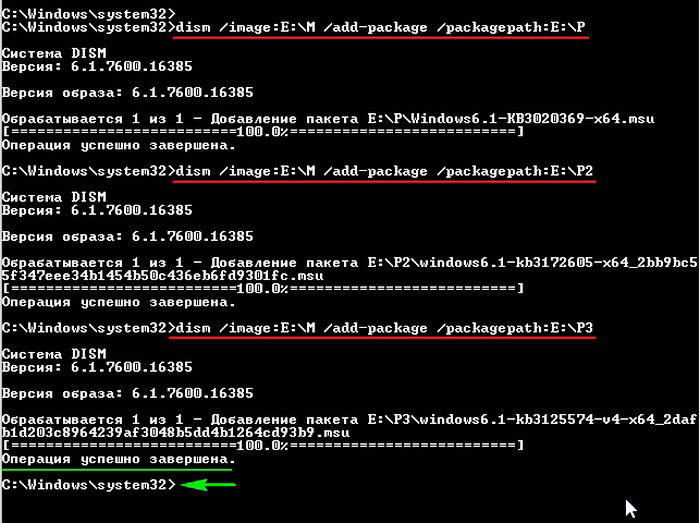
Дождитесь сообщения:
Операция успешно завершена
C:\windows\system32>
Следующей командой отключаем (размонтируем) образ Windows 7 из папки «M».
dism /unmount-wim /mountdir:E:\M /commit

Теперь нам осталось только запаковать Windows 7 с интегрированными обновлениями в ISO-образ
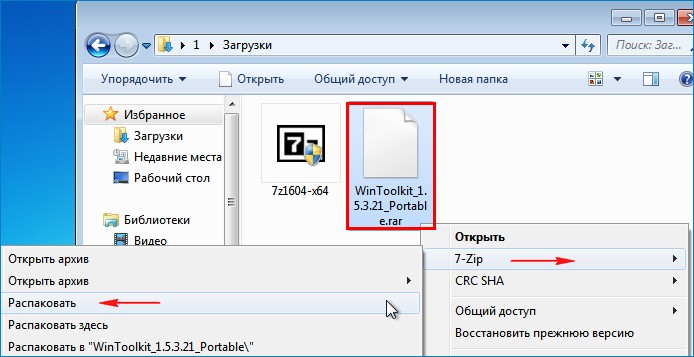
Скачиваем программу по ссылке WinToolkit 1.5
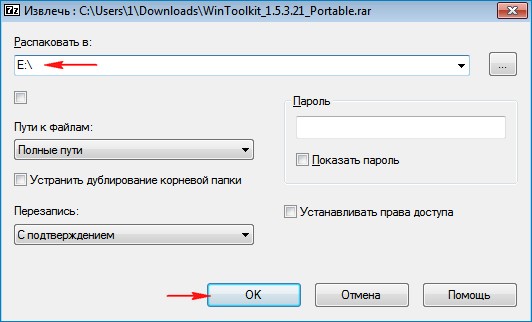
Щелкаем на скачанном архиве с программой WinToolkit 1.5 правой мышью и выбираем «7-Zip»—>«Распаковать»
Я распакую программу на раздел (E:).
Запускаю программу WinToolkit 1.5.

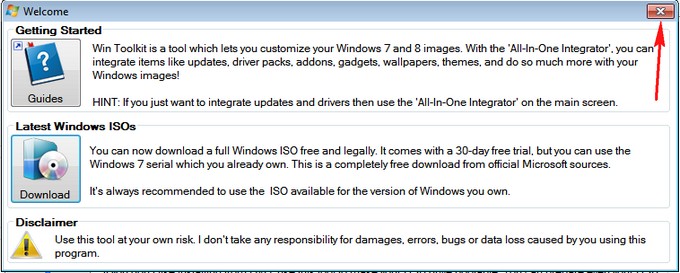
Закрываем окно с рекламой.
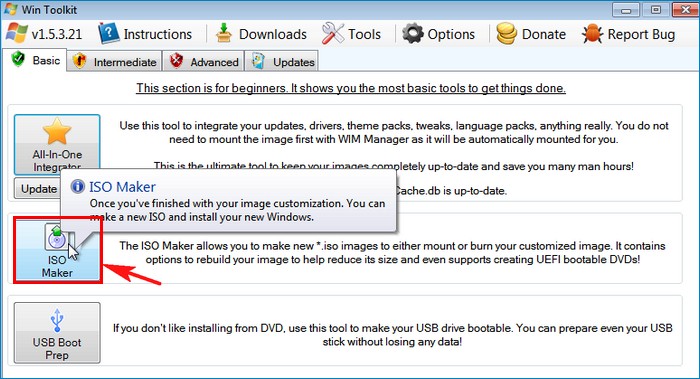
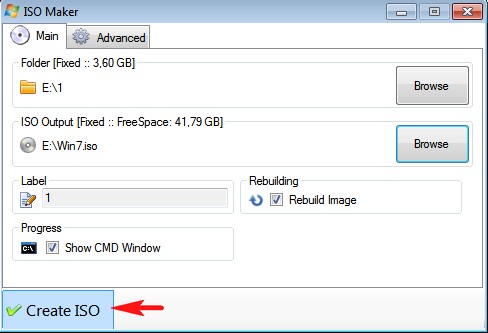
Жмём на кнопку ISO Maker для создания образа, содержащего все редакции Windows 7
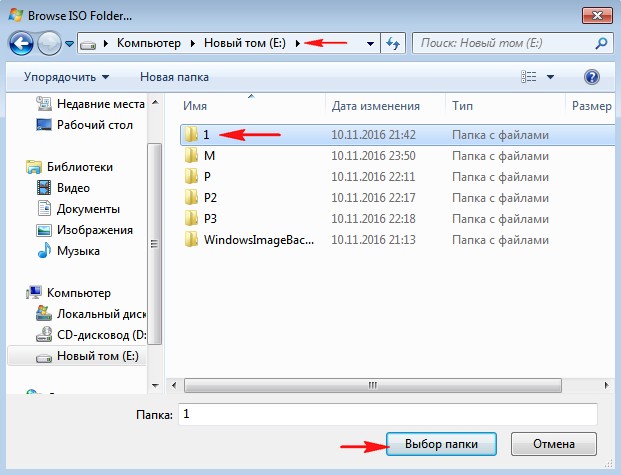
Жмём на верхнюю кнопку «Browse»

В открывшемся проводнике находим на диске (E:) папку «1» с файлами Windows 7, выделяем её левой мышью и жмём кнопку «Выбор папки»
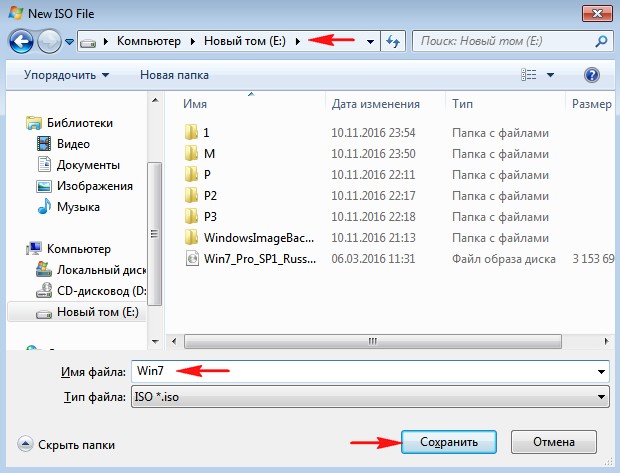
Жмём на нижнюю кнопку «Browse»
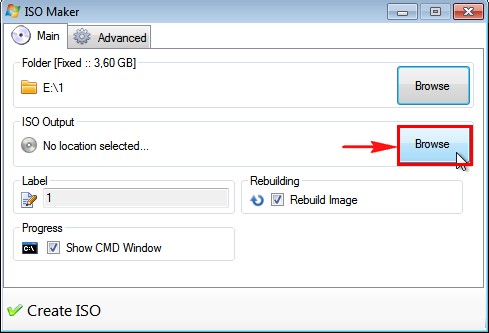
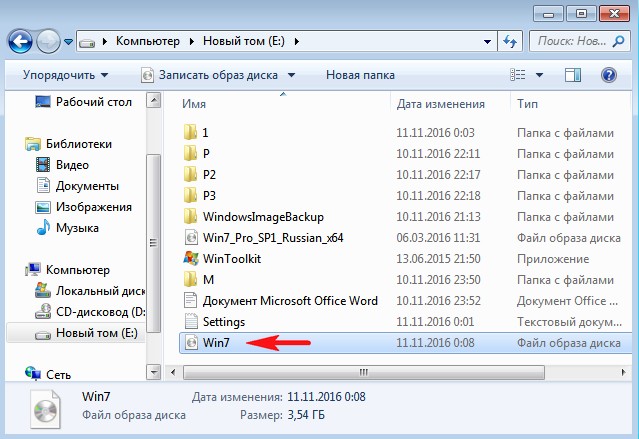
В открывшемся проводнике выбираем место сохранения будущего ISO-образа Windows 7 (раздел E:) и даём ему название «Win7», затем жмём «Сохранить»
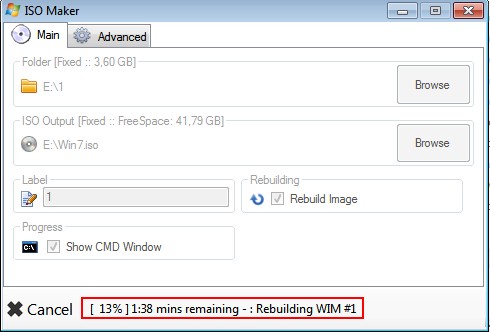
Жму на кнопку «Create ISO»
и начинается процесс создания ISO образа Windows 7
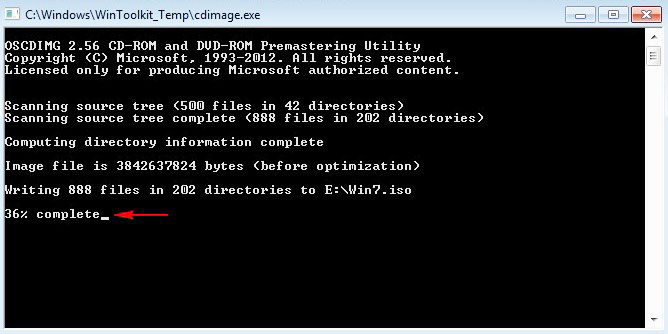
ISO-образ Windows 7 64-бит с интегрированными обновлениями готов!
«ОК»
и находится на диске (E:).
Устанавливаем Windows 7 с интегрированными обновлениями «Rollup Update» на другой компьютер
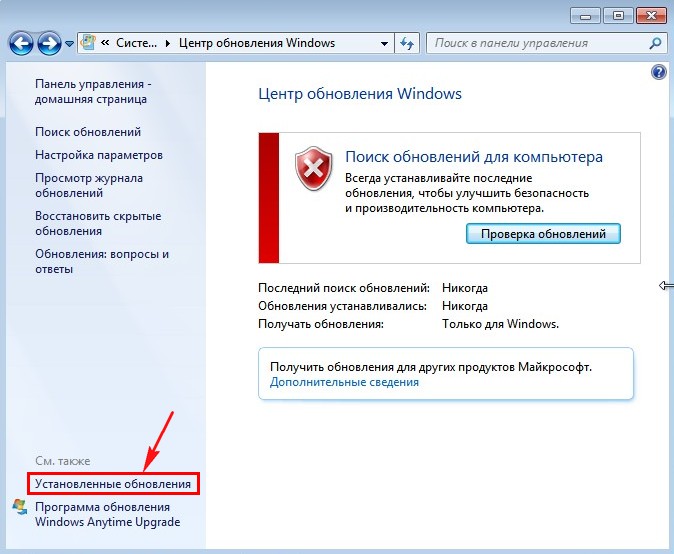
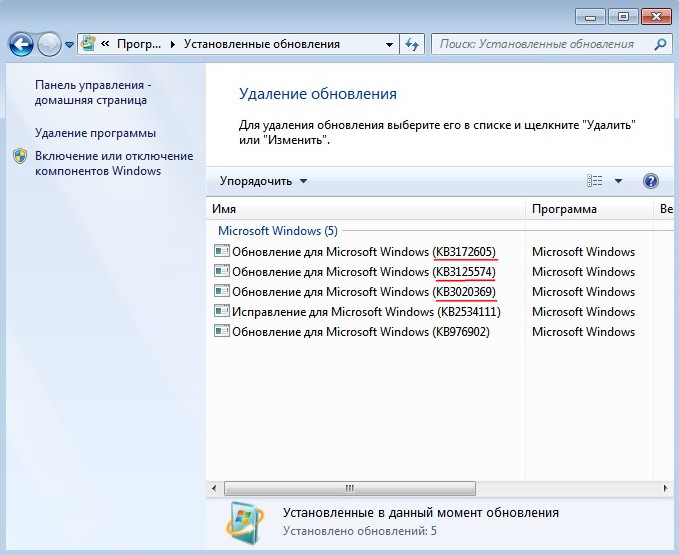
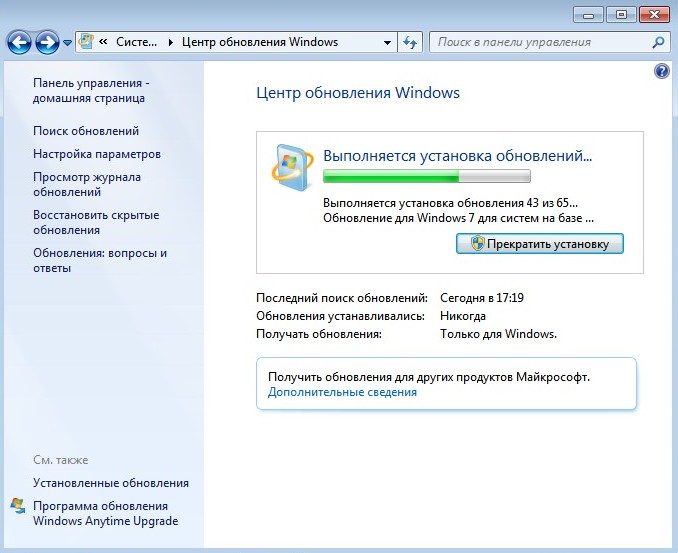
После успешной установки идём в «Центр обновления Windows» и смотрим установленные обновления.
Видим наши интегрированные обновления установились вместе с операционной системой.
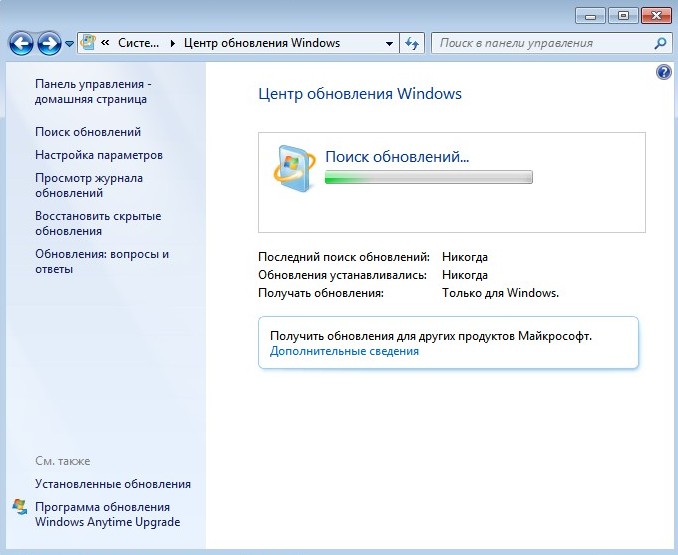
Возвращаемся в предыдущее окно и жмём на кнопку «Проверка обновлений»
Windows 7 начинает поиск обновлений.
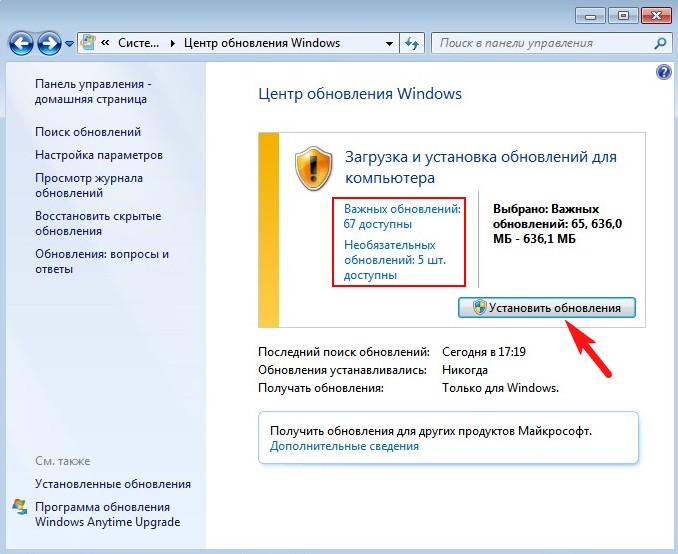
И обновления находятся. Жмём на кнопку «Установить обновления»
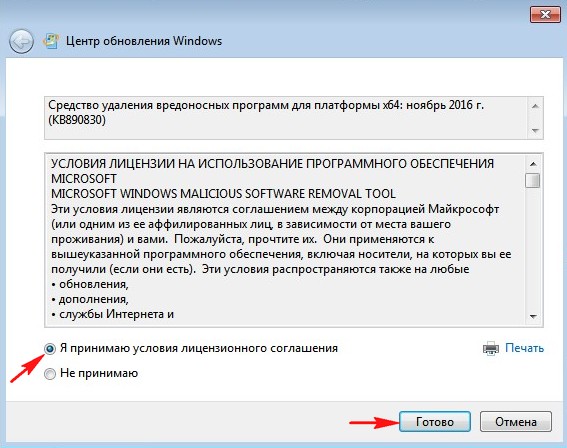
Принимаем условия лицензионного соглашения и жмём «Готово»
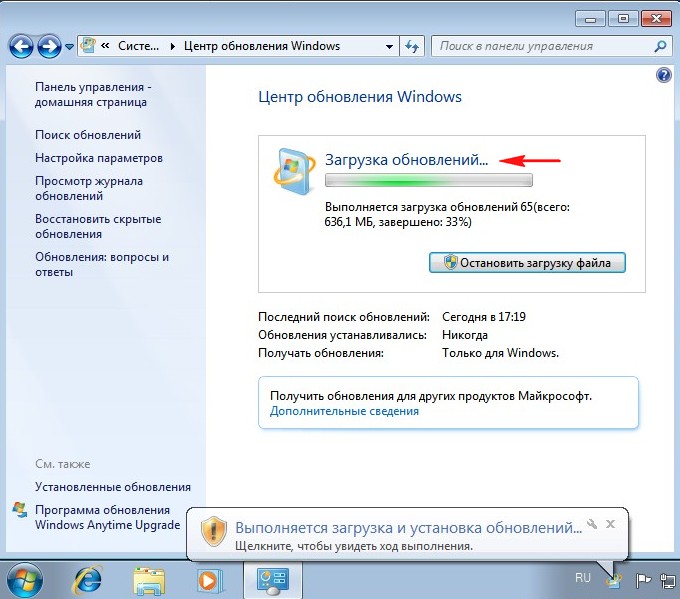
Начинается загрузка обновлений.
Выполняется установка обновлений.
После установки обновлений система просит перезагрузку.
Начинается Настройка обновлений.

После перезагрузки идём «Центр обновления Windows и видим, что все обновления установлены»

Смотрим Журнал обновлений.

Статья по этой теме:
Как создать дистрибутив Windows 7 с интегрированными обновлениями операционной системы при помощи виртуального диска VHD
Download UpdatePack7R2 23 for Windows 7, Server — The set allows you to update the working system, as well as integrate updates into the distribution for Windows 7 and Server 2008 R2
UpdatePack7R2 is the set allows you to update the operating system, and also to integrate updates into the distribution. Can be installed on any revision of Windows 7 and Server 2008 R2, any bit depth and any language. Includes updates for all versions of Internet Explorer, all critical, recommended and security updates.
How to use UpdatePack7R2:
The system must have at least 10 GB of free space on the hard drive and preferably at least 1 GB of free RAM.
For a flexible set installation, you can use the following keys and their combinations:
- Key / Reboot to automatically reboot if necessary.
- / S switch for a completely silent installation without windows or messages. Register matters.
- Key / Silent for passive installation — progress is visible, but the installation is fully automatic.
- The / IE11 switch to install Internet Explorer 11 and localize it.
- The / Temp = switch allows you to specify a temporary working directory. It does not have to be empty, but it must exist.
- The / NoSpace switch allows you to skip checking the free space on the system partition, it is not recommended to use it.
- The / NoUSB switch cancels the integration of USB 3.0 and 3.1 drivers into the system distribution package through the Win7USB3 project.
- Key / NVMe integrates NVMe support for the system and recovery environment.
- The / FixOn switch enables protection from Meltdown and Specter, and / FixOff turns it off. Without keys, protection is disabled for Win7, and enabled for Win2008R2.
Examples:
- You need to automatically install all updates, IE11 and restart the computer: UpdatePack7R2.exe / ie11 / silent / reboot
- It is necessary to covertly install all updates to existing products, do not change the IE version, do not restart the computer: UpdatePack7R2.exe / S
The following keys are for integrating updates into the distribution:
- The / WimFile = switch specifies the location of the wim file, you must specify an absolute path.
- The key / Index = indicates the index of the system in the wim-file; for each index, it is necessary to perform integration again.
- The key / Index = * allows you to perform sequential integration of updates into all indexes of the wim-file.
- The / Optimize switch allows optimizing the size of the wim file after integrating updates.
- The / Optimize = esd switch converts the wim file to esd after integrating updates.
Notes:
- Before specifying the index, it is useful to run the command: Dism / Get-WimInfo /WimFile:C:\install.wim (replace the path with your own).
Examples:
- It is necessary to integrate IE11 and all updates into 1 index: UpdatePack7R2.exe / ie11 /WimFile=C:\install.wim / Index = 1
- It is necessary to integrate IE11 and all updates into all indexes: UpdatePack7R2.exe / ie11 /WimFile=C:\install.wim / Index = *
- It is only necessary to integrate updates to existing products, do not change the IE version: UpdatePack7R2.exe /WimFile=C:\install.wim / Index = 1
Скачиваем пакет с последними обновлениями:
Наборы — UpdatePack7R2 версия 22.3.11 от simplix.
https://disk.yandex.ru/d/vocYa5mVhZh6HQ
Автор: simplix.
Дата: сентябрь 2022
UpdatePack7R2 для обновления Windows 7 SP1 и Server 2008 R2 SP1
Набор позволяет обновлять рабочую систему, а также интегрировать обновления в дистрибутив. Может быть установлен на любую редакцию Windows 7 и Server 2008 R2, любого языка и архитектуры. Включены обновления для Internet Explorer 11, все критические, рекомендуемые и обновления безопасности. Смотрите
установщик
размер: 811 MB
последние обновления можно взять например здесь
Для интеграции вам понадобится образ установочного дистрибутива windows 7.
И последнии обновления, которые вы скачали по ссылкам выше на этой странице.
Извлекаем файл:
«install.wim»
из папки:
«sources»
образа установочного диска windows 7.
например с помощью программы UltraISO
Из имени файла убираем знаки после дефиса.
В корне диска «C» создаём папку «W7» и помещаем в неё два файла, о которых я писал выше:
- «install.wim»,
- пакет обновлений «UpdatePack7R2.exe».
У имени файла удалены символы после дефиса для удобства. (там показано от какого числа, месяца и года эти обновления).
Теперь открыв командную строку комбинацией «win + R» вставляем в поле редактора строку:
C:\W7\UpdatePack7R2.exe /WimFile=C:\W7\install.wim /Index=*
А если нужно интегрировать обновлённый браузер, то:
C:\W7\UpdatePack7R2.exe /ie11 /WimFile=C:\W7\install.wim /Index=*
е сли не нужны обновления для всех редакций(обычно диск расчитан на установку одной редакции), то вместо звёздочки в конце строки, нужно ставить цыфру:
Для x64 битных систем:
- HOMEBASIC — цыфра 1
- HOMEPREMIUM — цыфра 2
- PROFESSIONAL — цыфра 3
- Ultimate — цыфра 4
Для windows 7 x86:
- STARTER — цыфра 1
- HOMEBASIC — цыфра 2
- HOMEPREMIUM — цыфра 3
- PROFESSIONAL — цыфра 4
- Ultimate — цыфра 5
Всё, ждём окончания интеграции.
Вернуться к общему содержанию