
In this professional guide, I will explain how to install Windows 7 OS in a virtual machine using Oracle VM VirtualBox on Windows 11 & 10. First, I will show you how to create a new virtual machine for this operating system. I will also configure the performance settings of the virtual PC.
In addition, I will cover how to optimize the VM settings for a smooth user experience. As a result, you will be able to get the most out of Windows 7 in a virtualized environment.
How to Set Up Windows 7 Ultimate 64-bit on Windows 10/11 using Oracle VM VirtualBox 7
Following the Windows Vista system, Microsoft unveiled Windows 7 on October 22, 2009, catering to personal computers, tablets, media devices, and laptops, focusing on enhancing performance and security.
Windows 7 has Starter, Home Basic, Home Premium, Professional, Enterprise, and Ultimate editions.
This Windows version was developed to deliver an enhanced user experience and improved convenience in the interaction between users and computers. Windows 7 supports processors with fewer cores and 32-bit and 64-bit architectures.
Shortly after releasing this operating system, Microsoft promptly issued the Service Pack 1 (SP1) update package to address system vulnerabilities, bugs, and performance issues.
Windows 7 is Microsoft’s most widely used and favorite operating system today. Today, most companies and individuals still use this version of Windows.
This operating system is almost the smoothest, but Microsoft finished support for the Windows 7 operating system on January 19, 2015. On the other hand, Extended Support ended entirely on January 14, 2020.
For this explanation, we strongly advise against installing an outdated operating system on your host computer. Instead, we recommend utilizing virtualization software like VMware or VirtualBox to run and experience more aged systems, such as Windows 7, on a virtual machine. This approach ensures a separate and isolated environment for compatibility and security purposes.
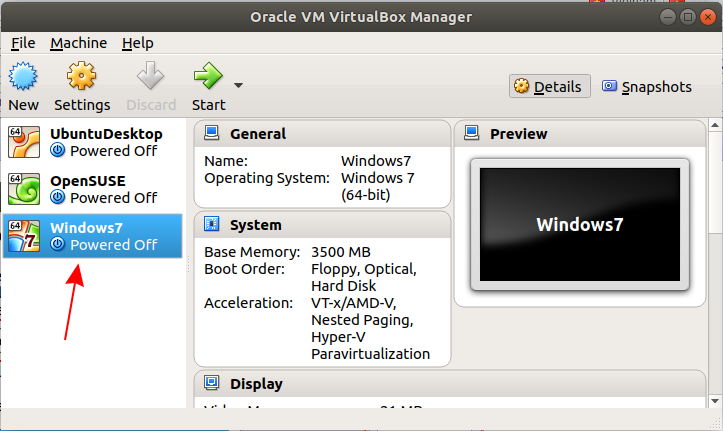
How to Create and Configure a New Virtual Machine for Windows 7 OS
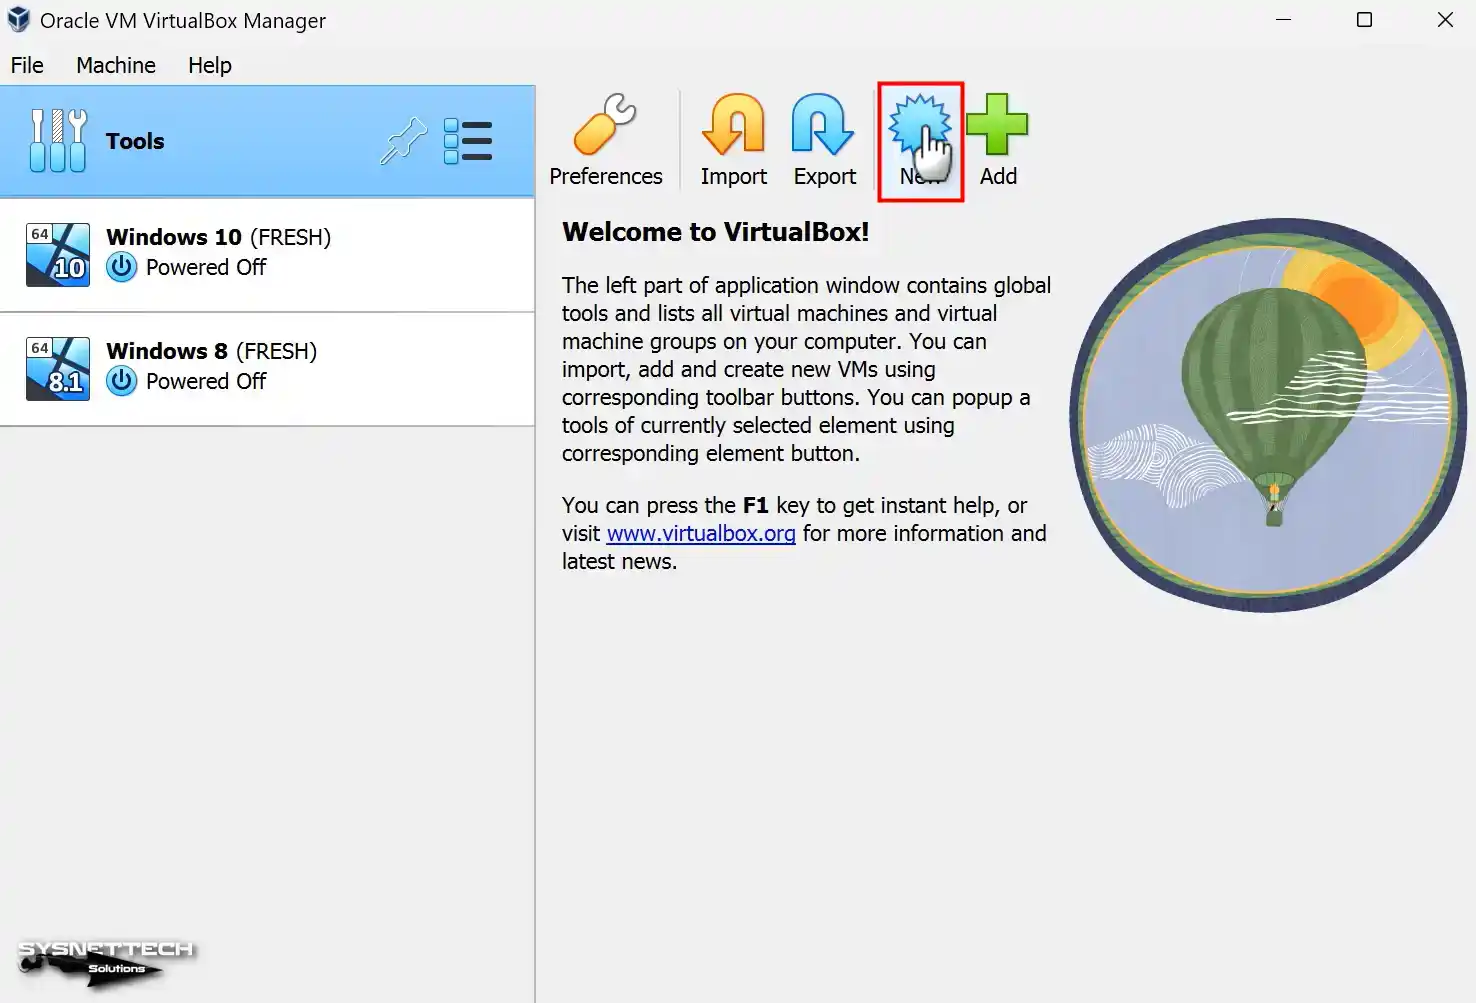
First, you need to correctly create a virtual computer and configure the device’s performance settings. Once you have successfully established the Oracle software on your host computer, click its shortcut to launch the program. From there, carefully follow the steps below to create a new virtual machine.
Step 1
After running the virtualization software on your Windows 11 or Windows 10 system, click Machine / New on the program’s main page or click New with the big icon as in the image below.
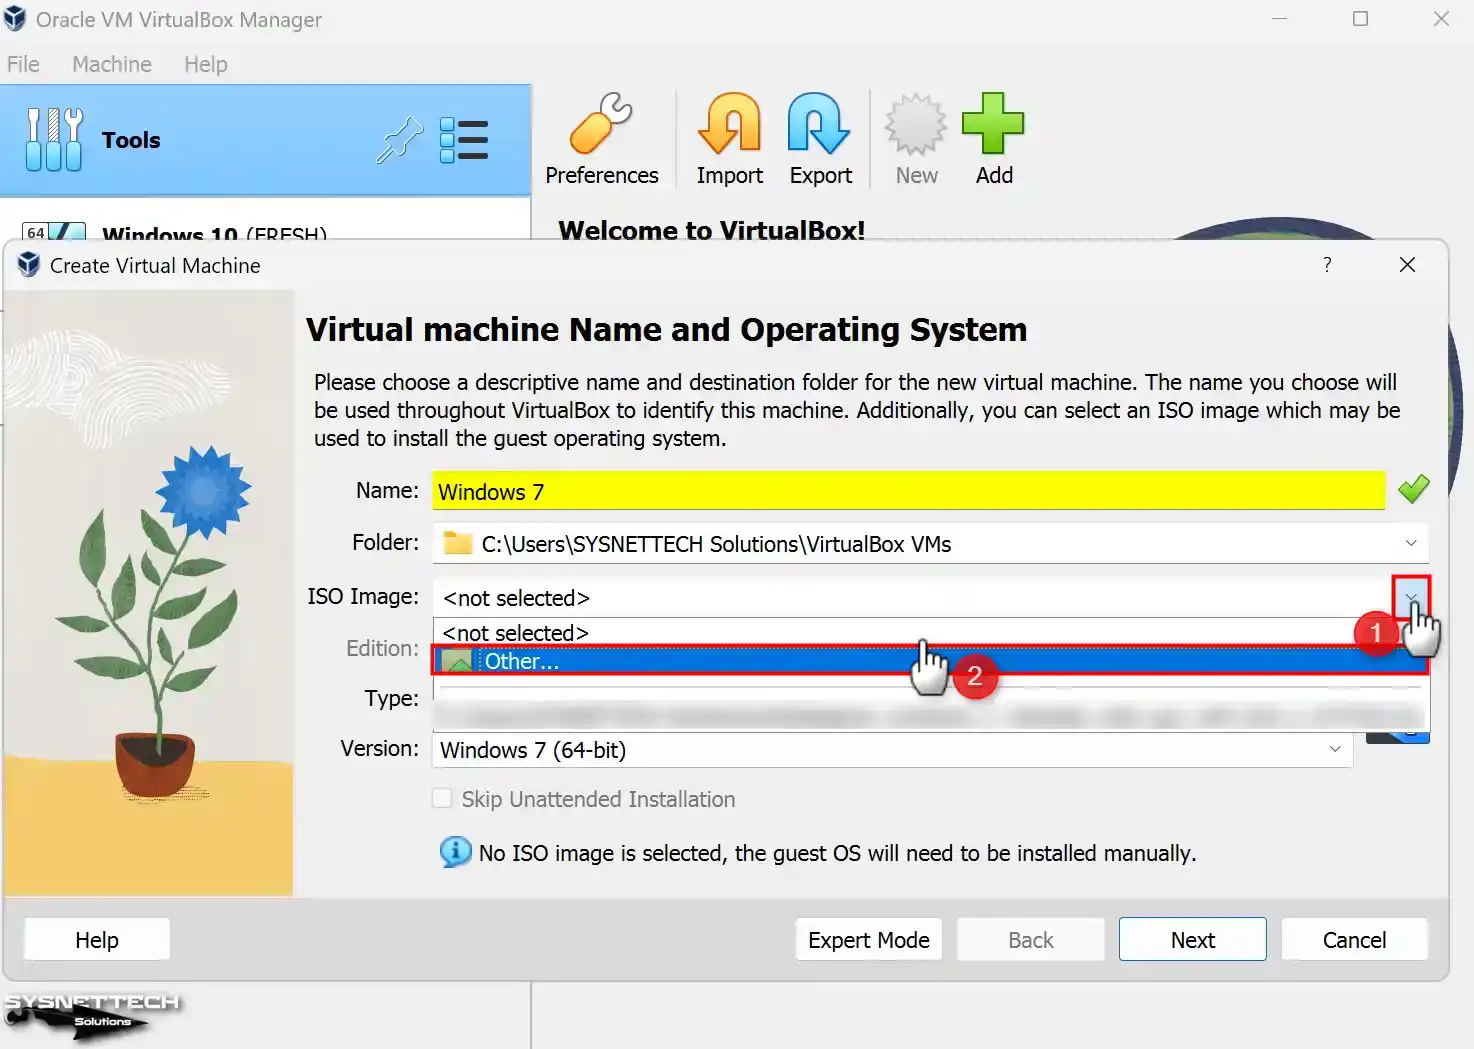
Step 2
When you type the name of the operating system you will install on your Virtual PC in the Name area, VirtualBox will automatically set the Type and Version values. For example, suppose you type Windows 7 in the operating system name. In that case, the version is set to 64-bit automatically. If you intend to install a 32-bit version, you must manually configure the system’s architecture.
To add a Windows 7 ISO file to the virtual machine, expand the drop-down menu in the ISO Image section and click “Other”.
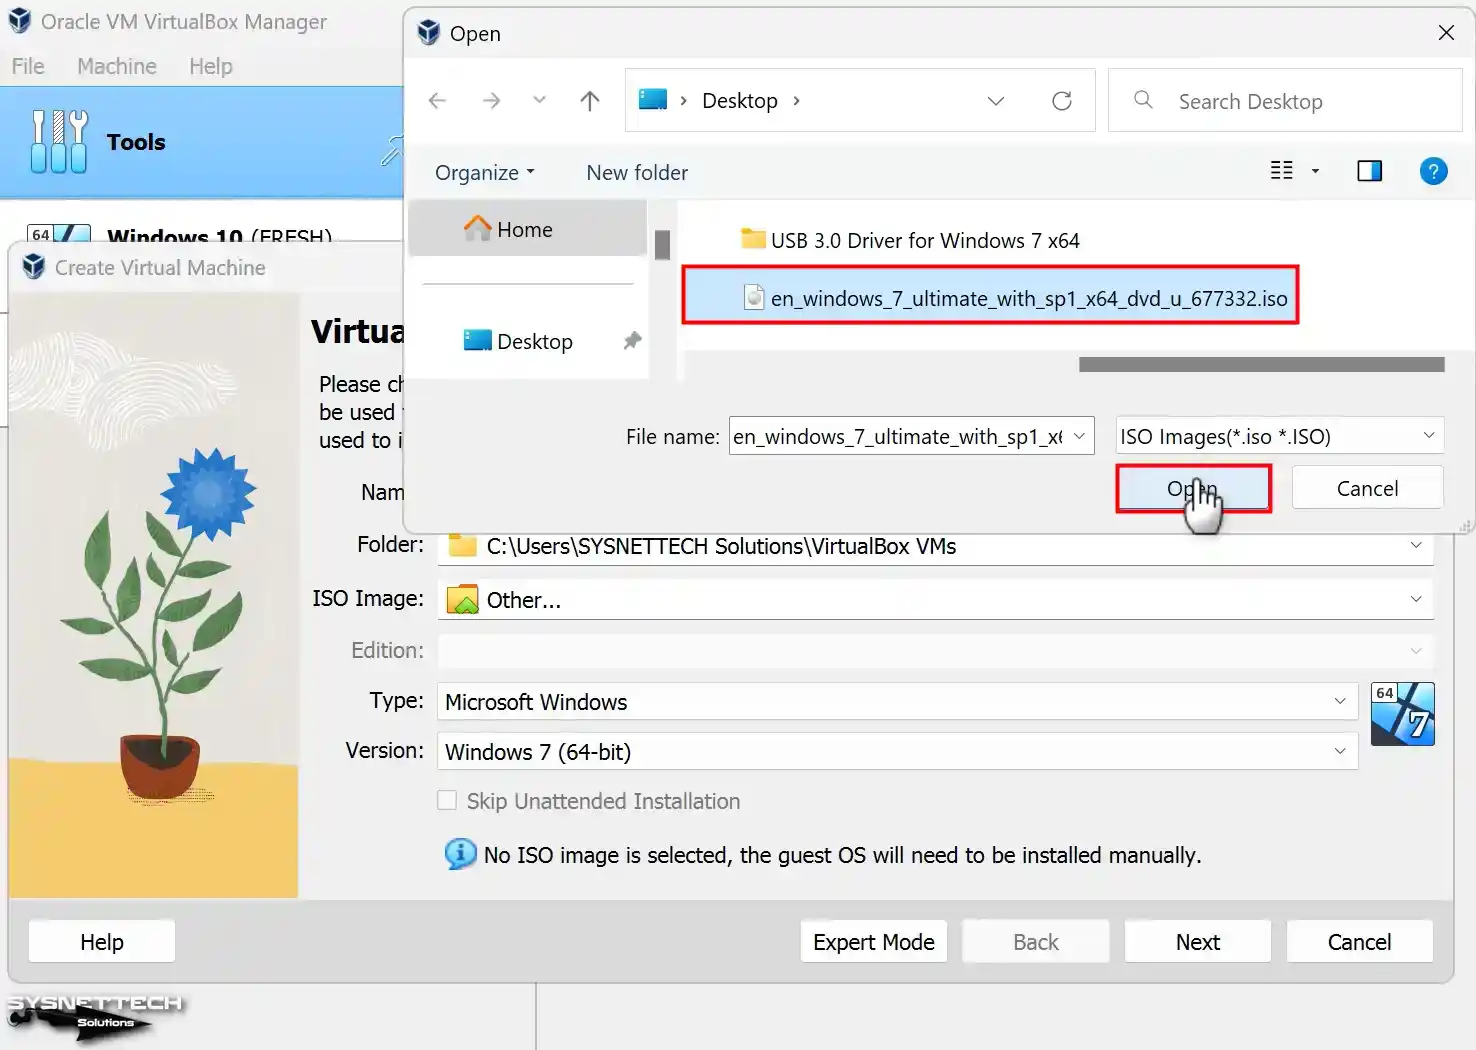
Step 3
Choose the Windows 7 image file you downloaded to your computer from the newly opened window. Once chosen, click the “Open” button to use the file.
Step 4
In VirtualBox’s 7.x versions, you can now use the unattended installation feature to prepare a guest machine with preconfigured settings. However, since preparing a VM using the manual method is more stable, select the “Skip Unattended Installation” option and click “Next”.

Step 5
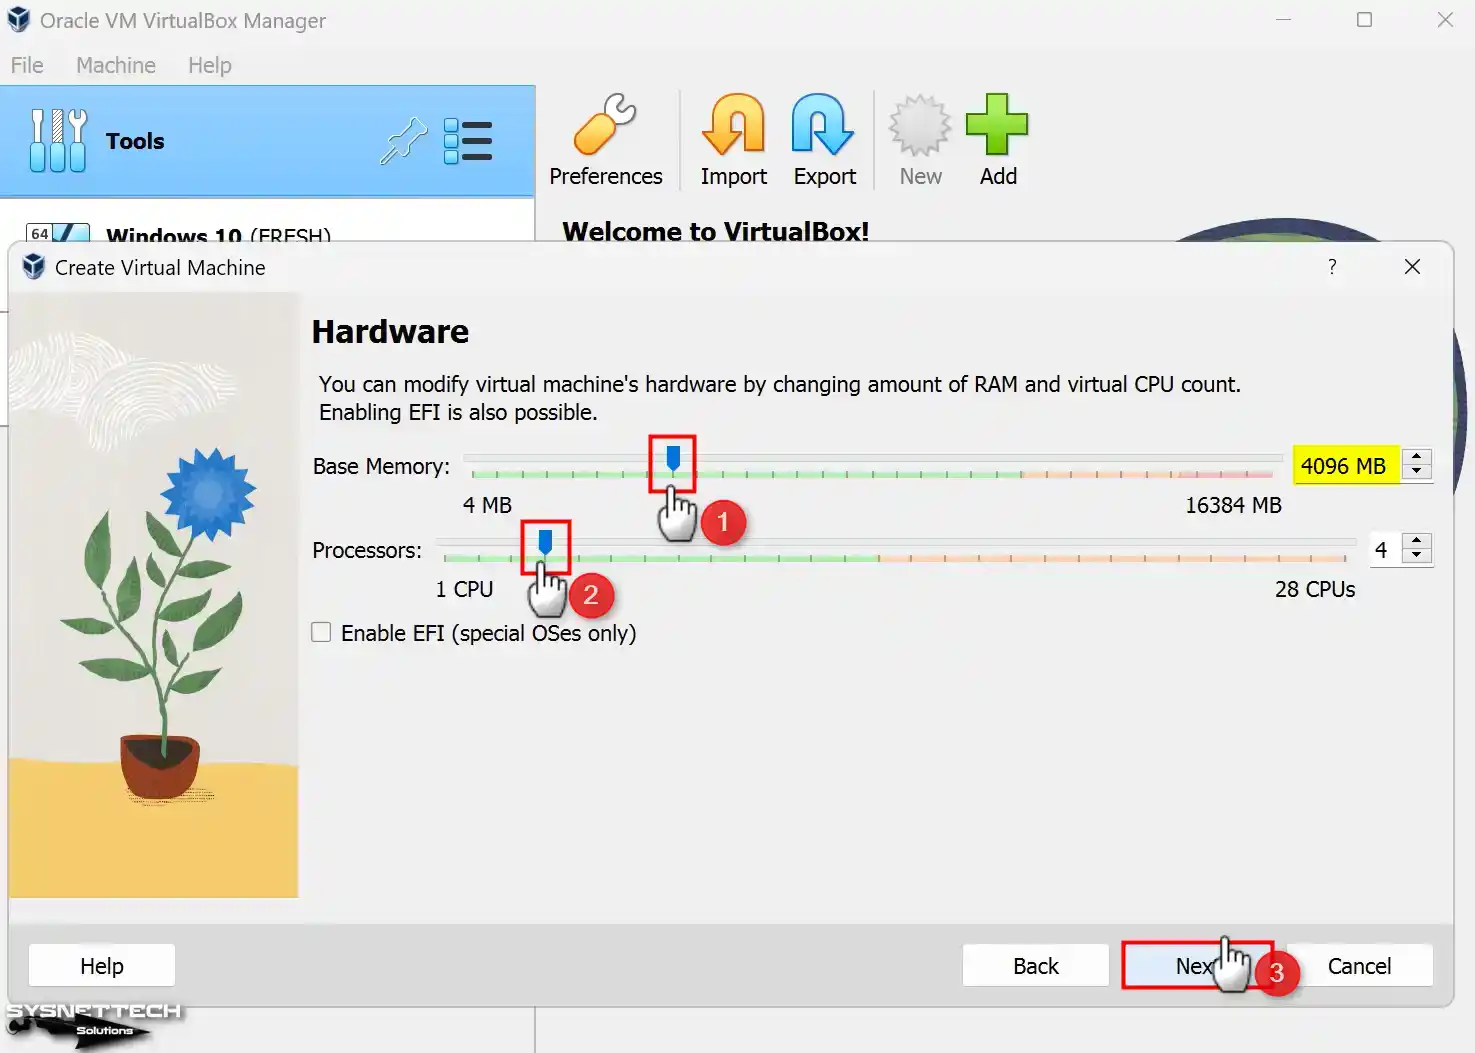
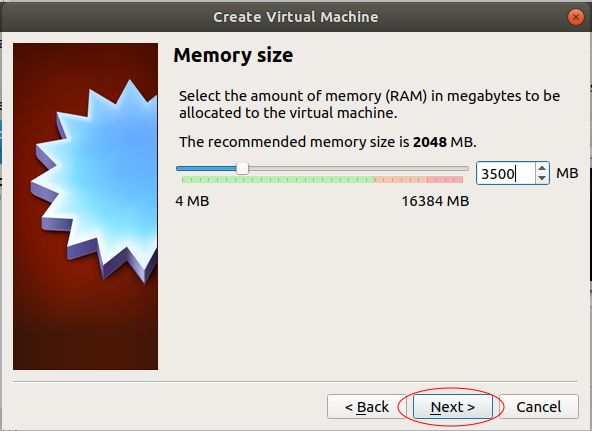
For the Memory Size setting, set a suitable value for the Windows 7 VM depending on the RAM capacity of your host computer. Suppose your host computer has a total of 8 GB of RAM. In that case, it is recommended to allocate 4 GB of memory to the virtual machine, which is sufficient for smooth operation.
Step 6
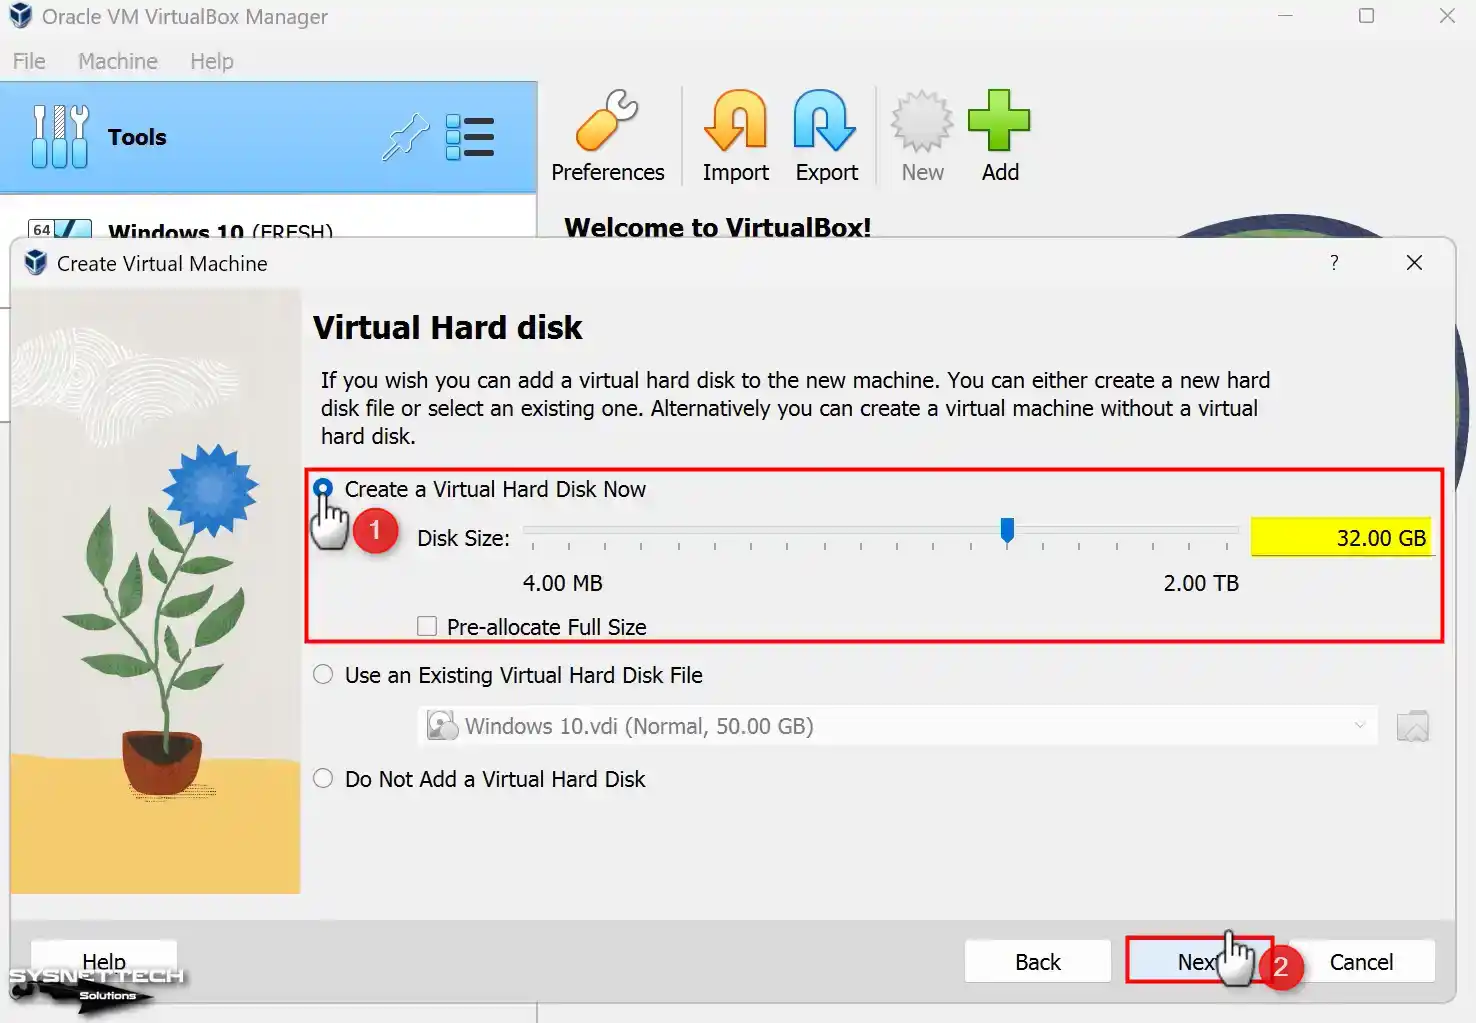
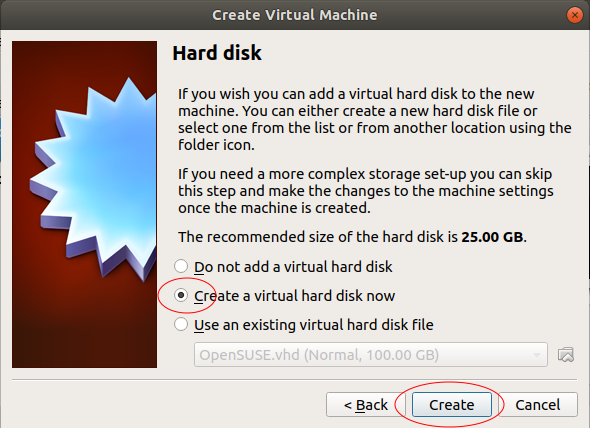
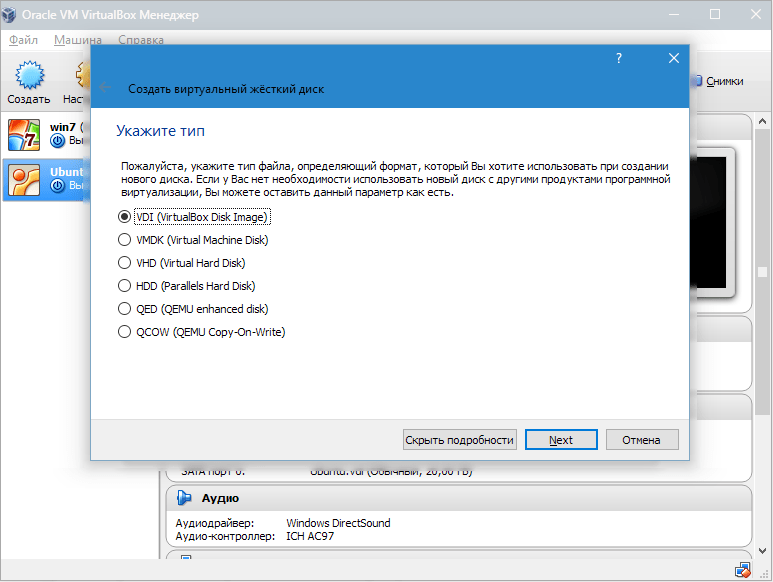
Since installing Windows 7 from scratch, you must now select Create a virtual hard disk in the Hard Disk Configuration window. Suppose you have a VM previously installed with Oracle virtualization software. For that topic, you need to add the virtual HDD of that system using an existing virtual hard disk file option.
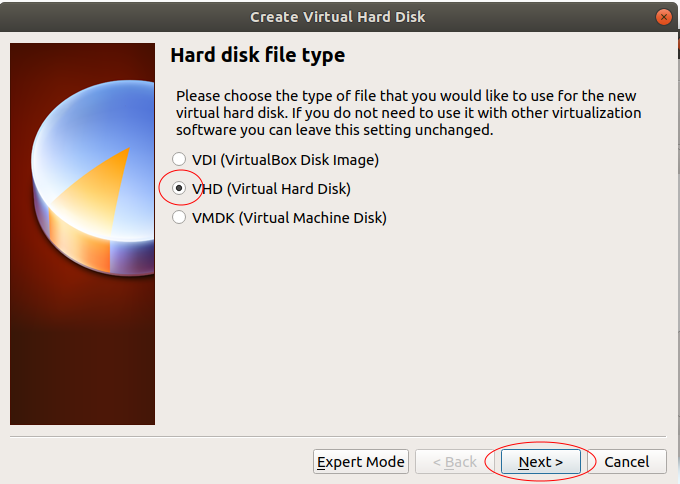
In the 6.x versions of VirtualBox, select VDI (VirtualBox Disk Image) developed by Oracle for the virtual disk type and continue. VHD is used for Microsoft’s proprietary virtualization software. VMDK is a virtual disk file commonly used by VMware Workstation.
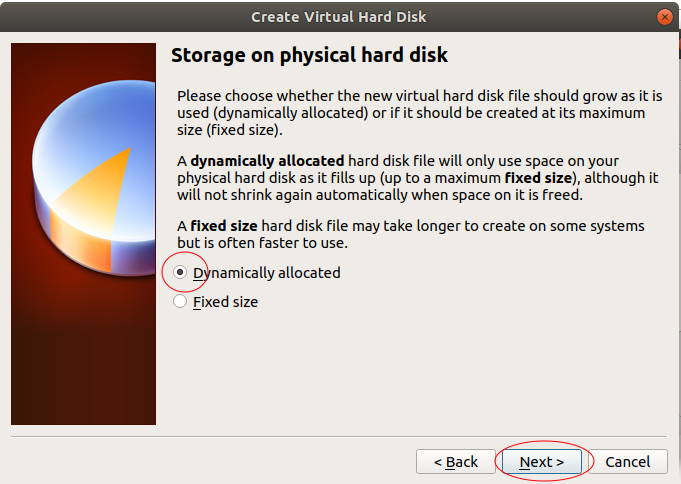
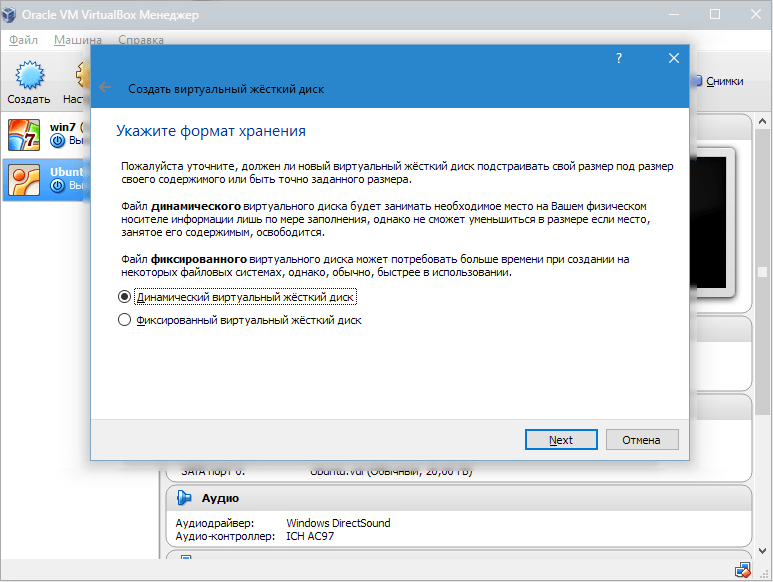
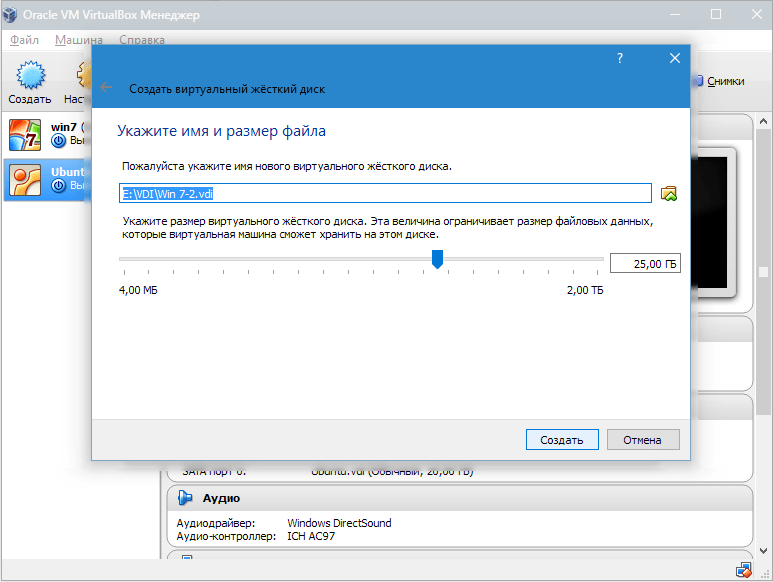
Also, you must select in this window how the virtual disk file will be stored on your physical HDD. Suppose you want to fill the capacity of your host disk sparingly. In that case, you should choose the Dynamically Allocated option. If you have an older PC, it is recommended to allocate disk space on your host’s disk equal to the capacity of the virtual disk using the Fixed Size option.
Step 7
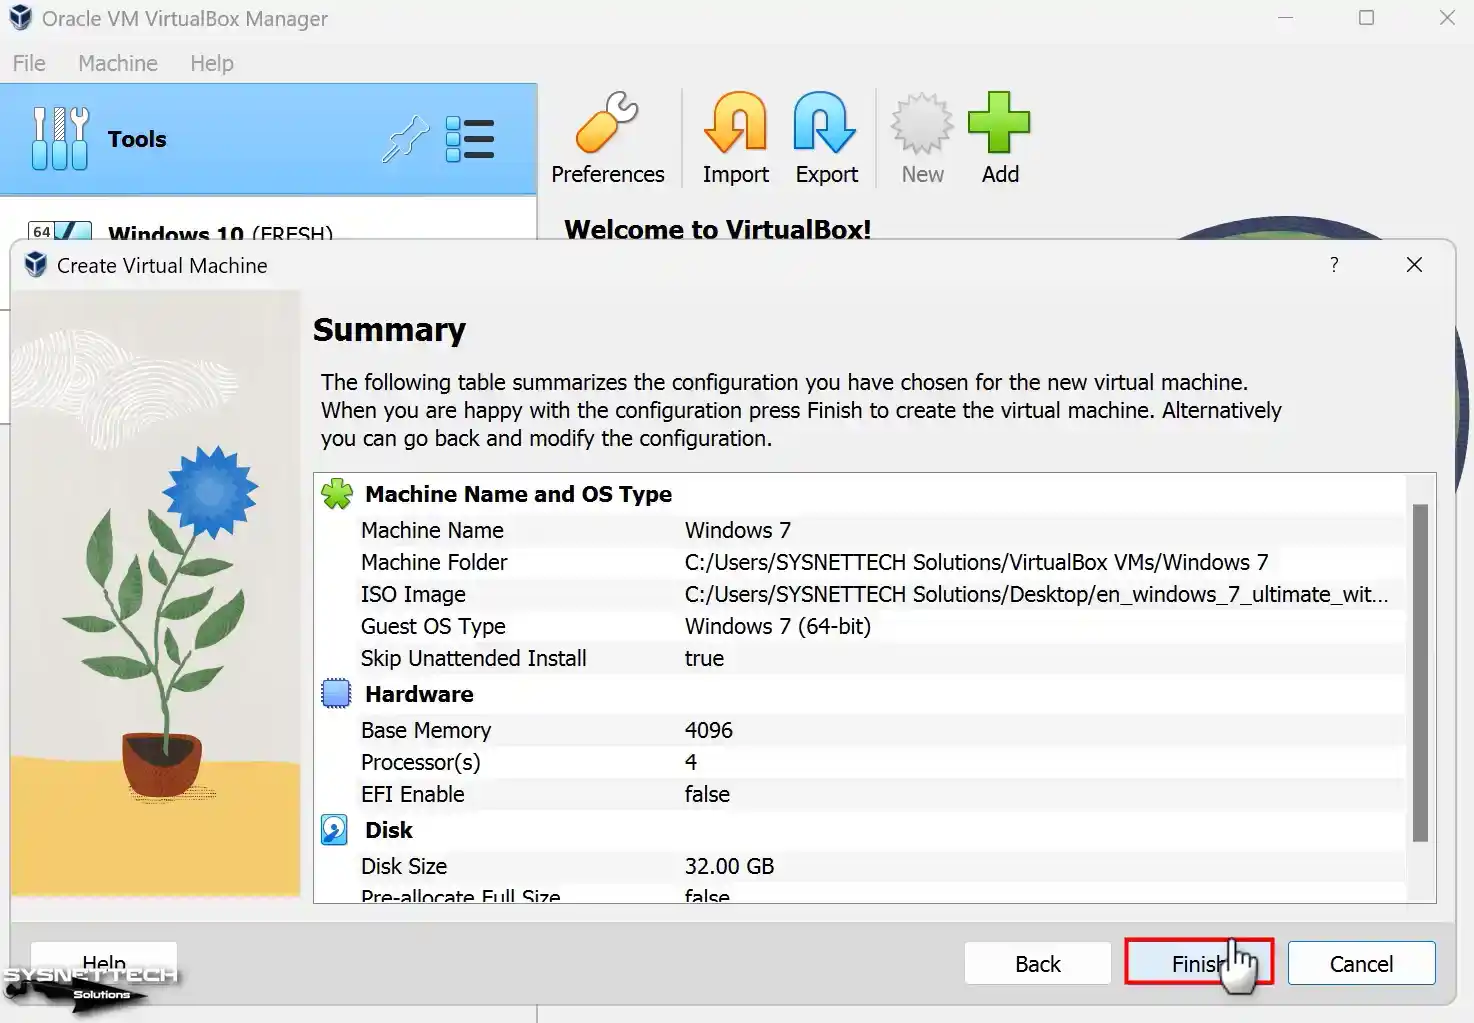
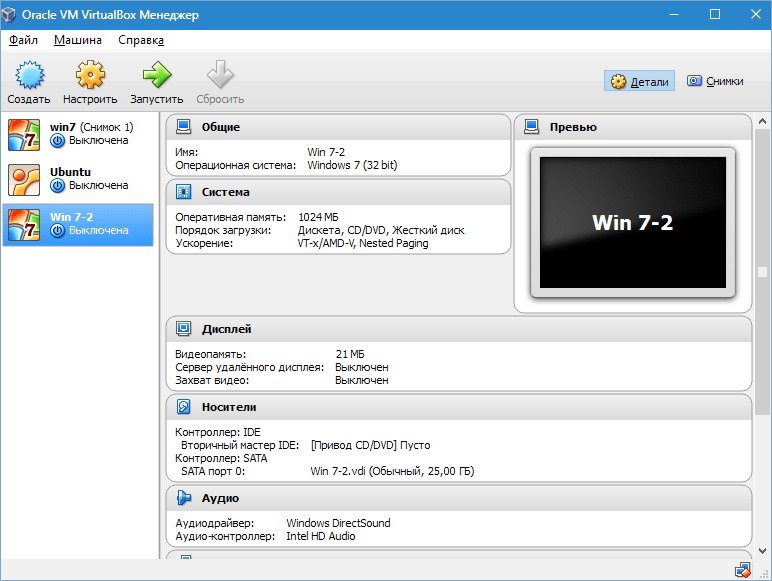
Review the hardware settings of the Windows 7 guest machine you have prepared and close the wizard.
Step 8
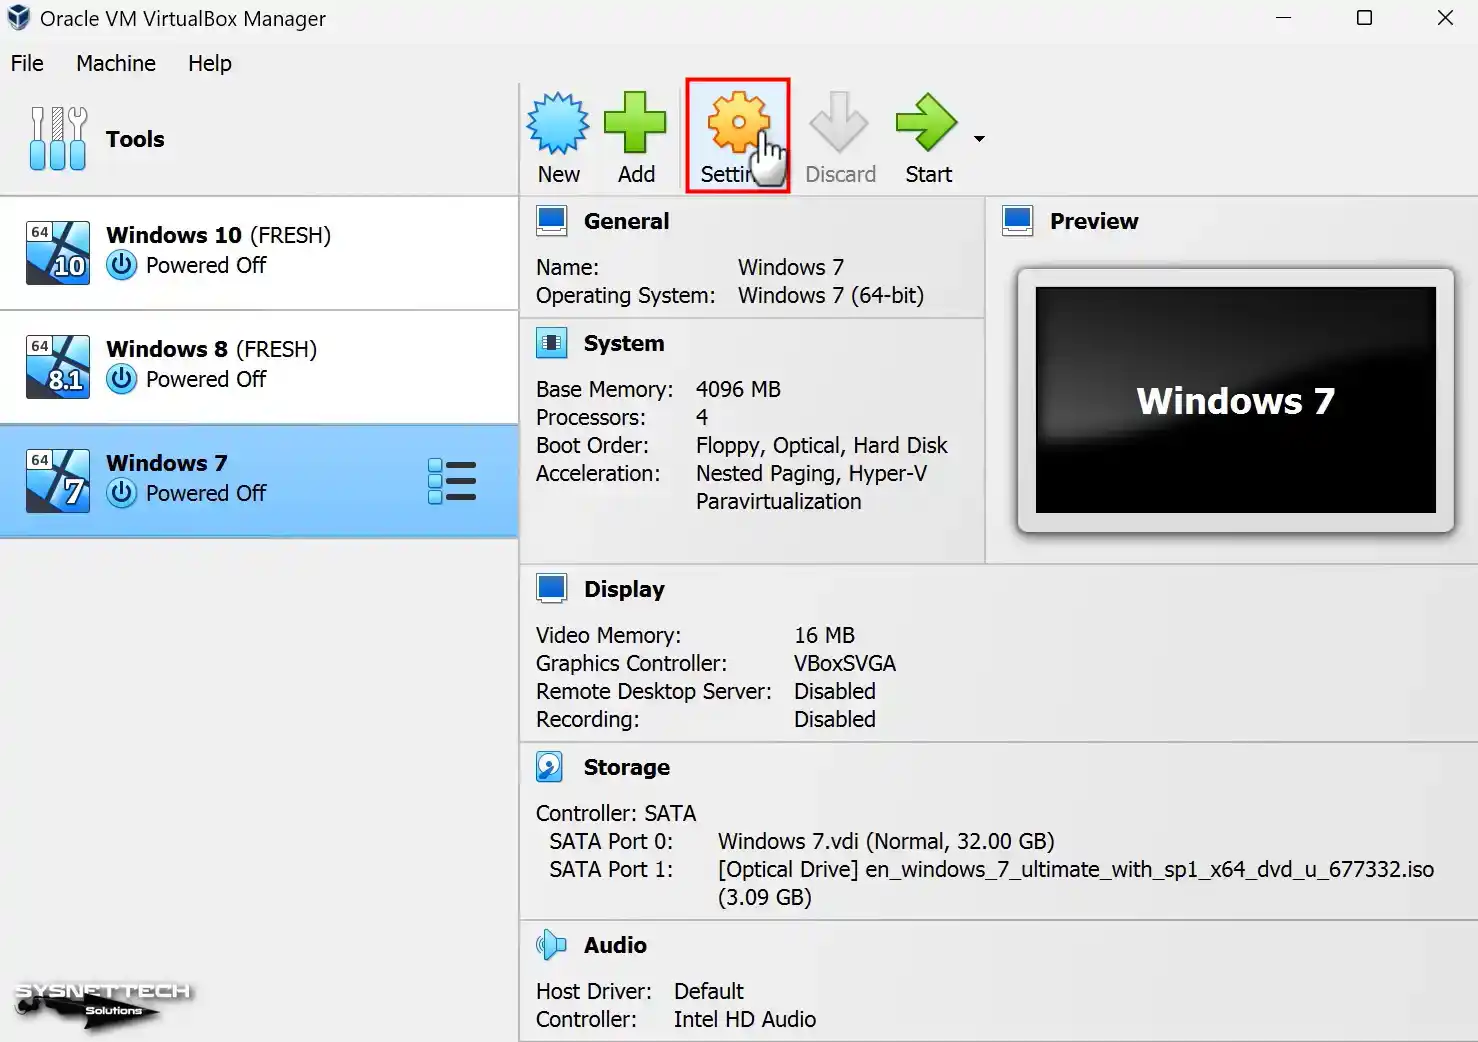
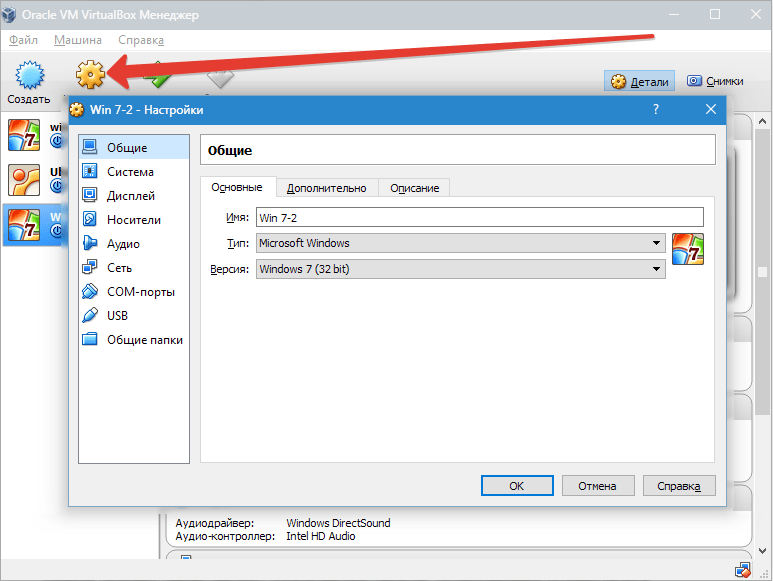
Click Settings to configure the settings of the virtual computer you created more professionally.
Step 9
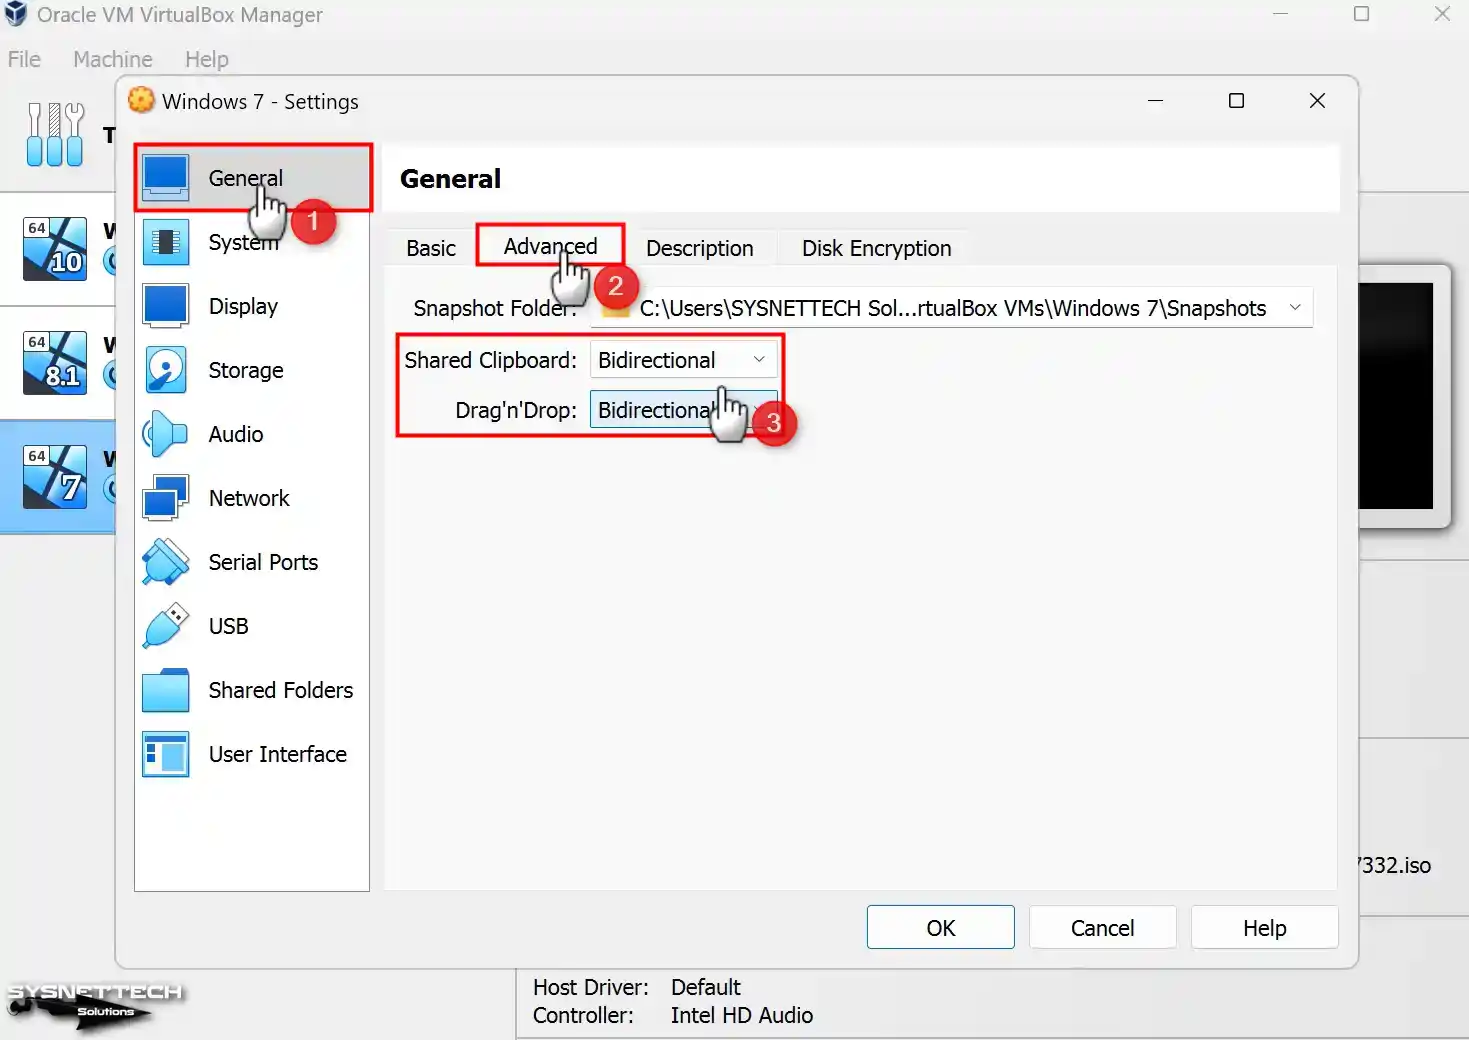
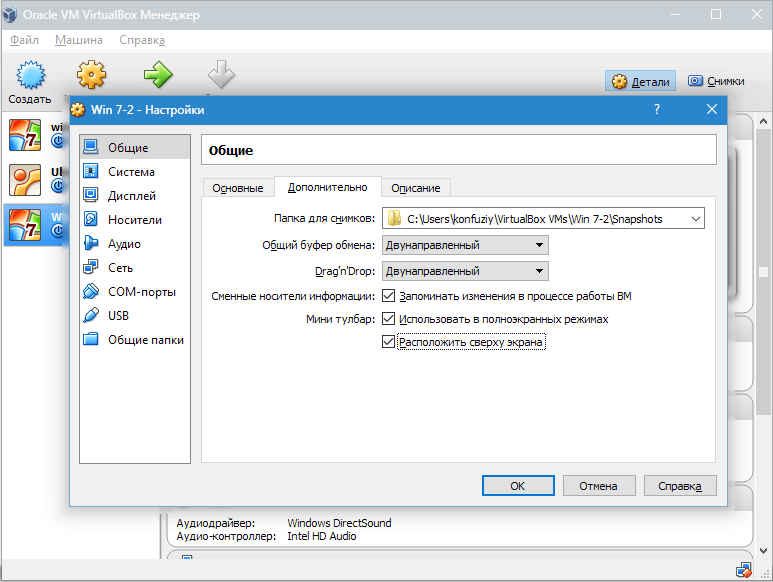
In Windows 7 VM settings, you need to make some settings for file and text transfer. First, go to the General tab. Then, open the Advanced tab.
Here, you have the options of Shared Clipboard and Drag and Drop. For this Windows 7 VM, set the options to Bidirectional. This way, you can copy files and text between the host and the VM. Also, file transfer will be possible using drag and drop.
Step 10
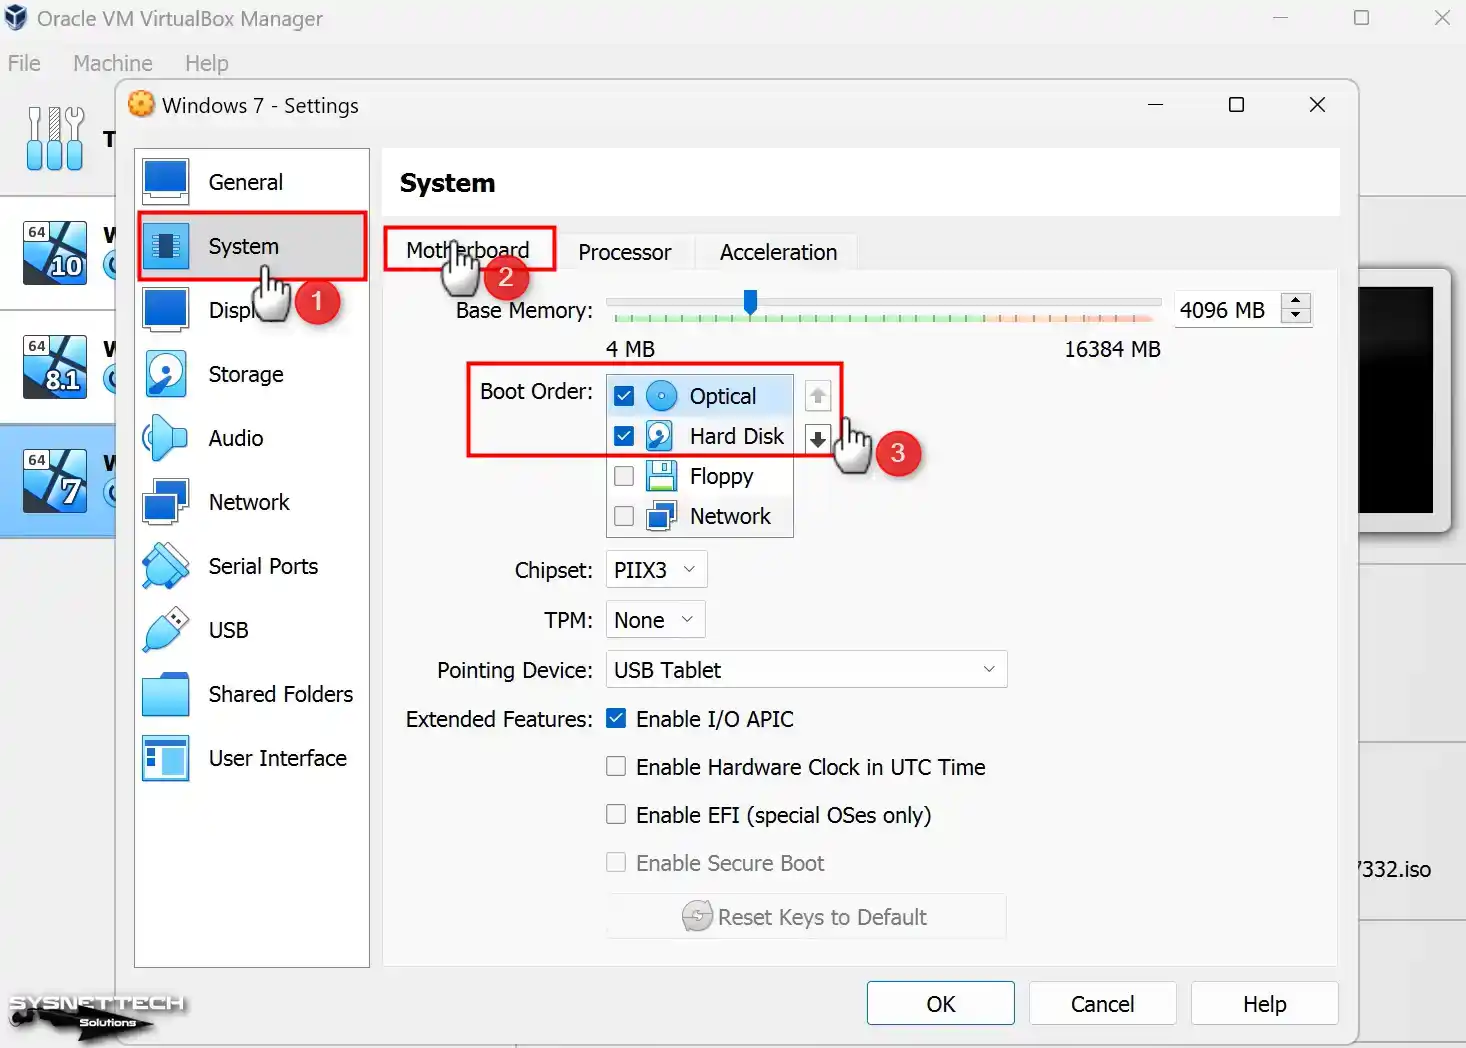
There are some steps required to install Windows or Linux operating systems on a physical computer. First, you need to change the boot order in the BIOS settings.
You also need to insert the operating system’s installation media into the optical drive. Finally, you need to start the computer with the installation media. By following these actions, you can successfully install your operating system.
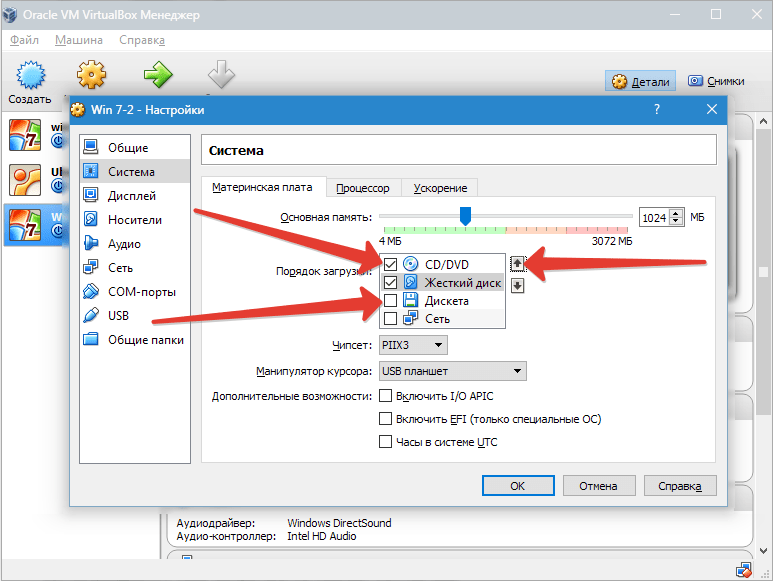
The boot order must be changed when installing a system on virtual machines. You need to set the Boot Order settings of the System / Motherboard hardware in the Windows 7 virtual computer settings. Since Floppy is legacy hardware, turn off the device and configure the first boot order as Optical.
Step 11
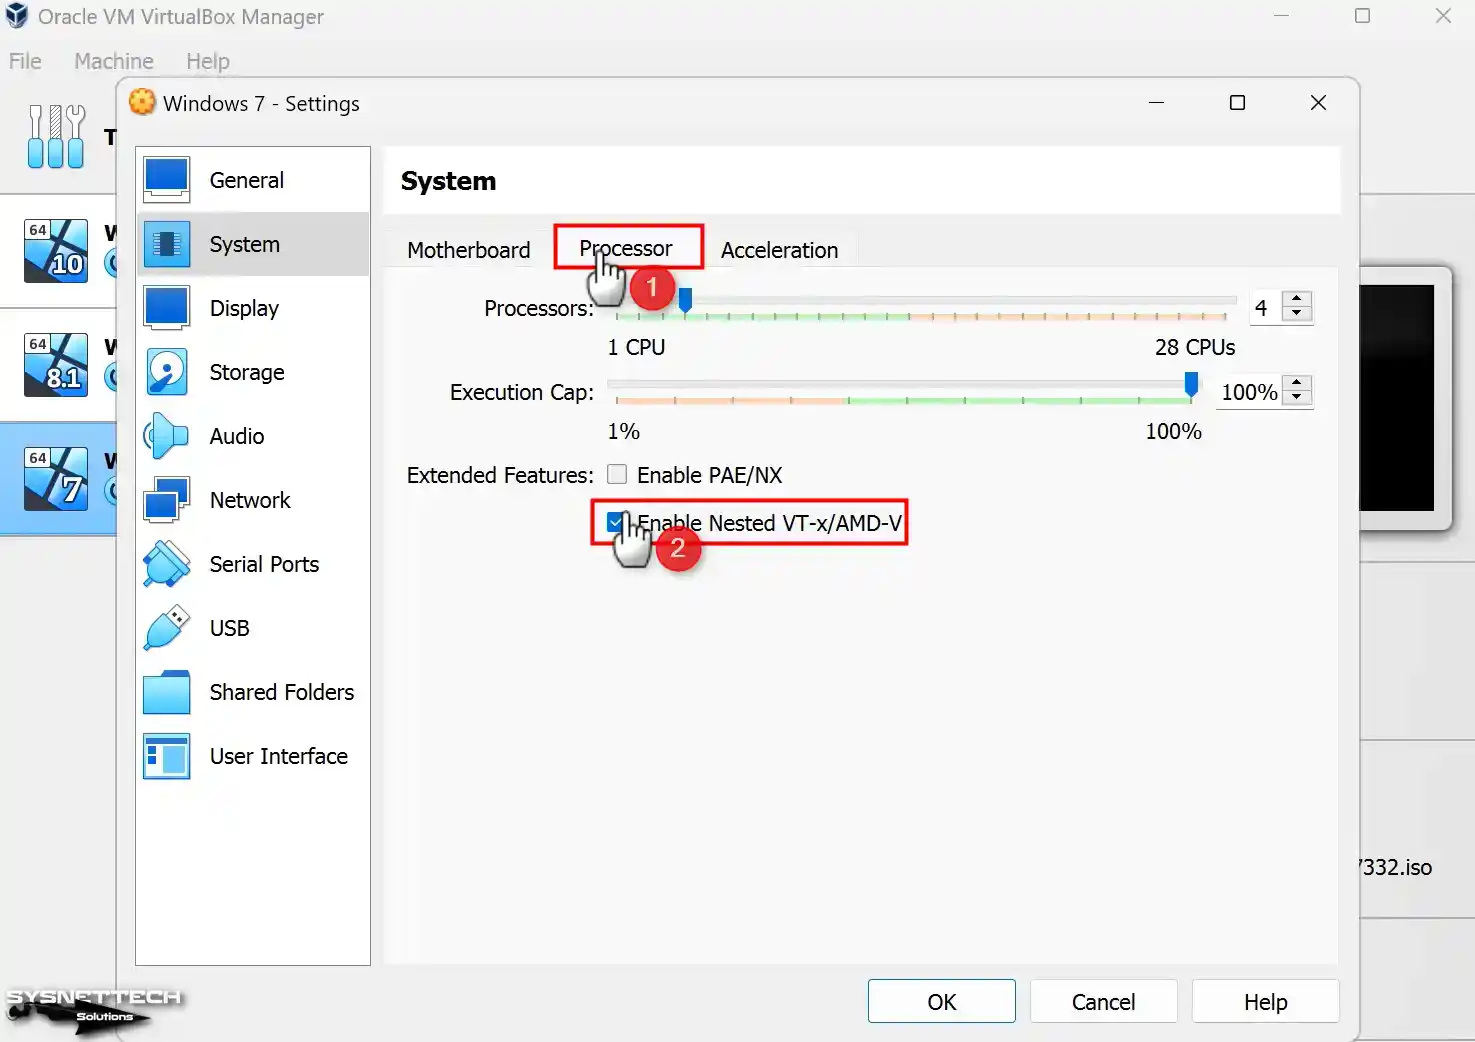
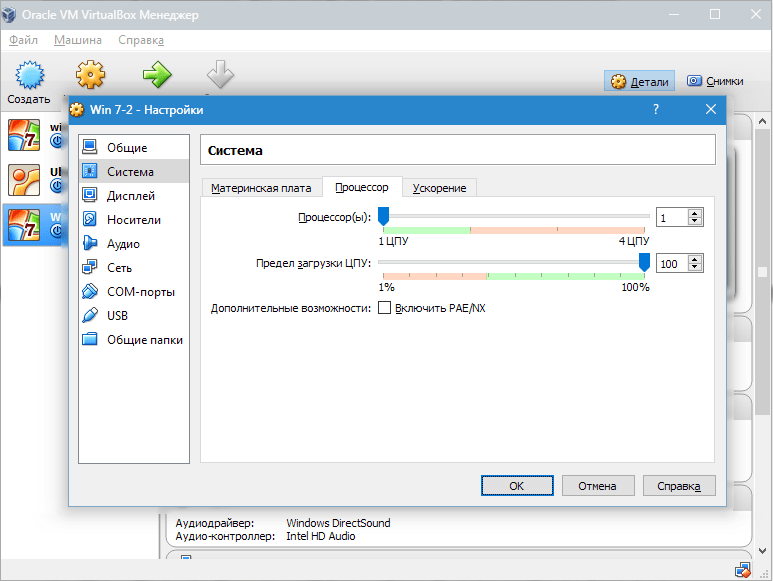
You have the flexibility to add multiple virtual CPUs to the virtual appliance based on the performance capabilities of your host CPU. Specifically for Windows 7, you can configure the Processor to allocate four virtual CPUs.
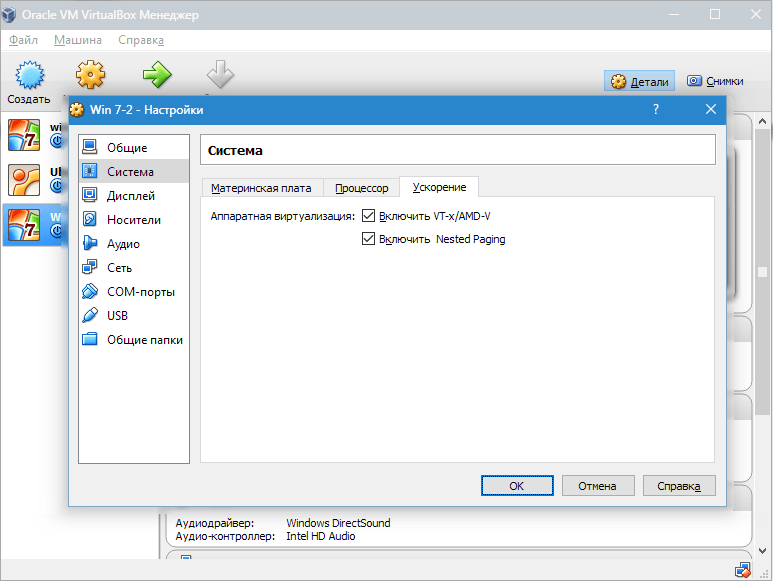
Also, you can enable Nested VT-x/AMD-V if you want to operate a VM inside a VM using virtualization software such as VirtualBox on your guest operating system.
Step 12
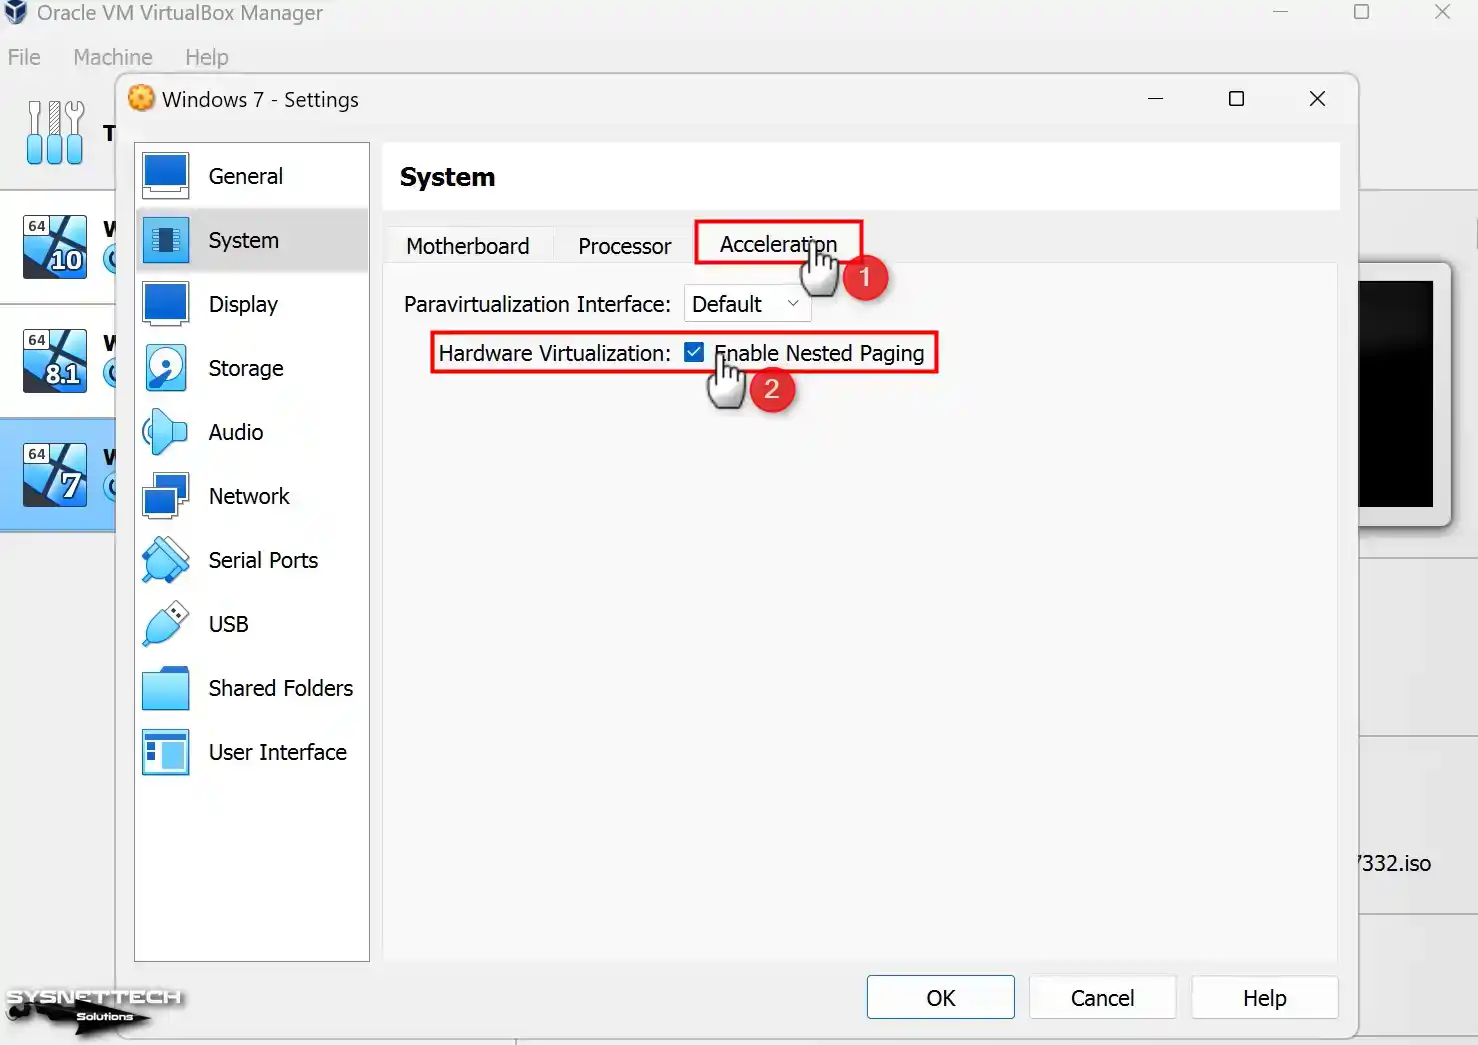
Enable Nested Paging so the guest machine can better access your host’s RAM hardware and improve memory management.
Step 13
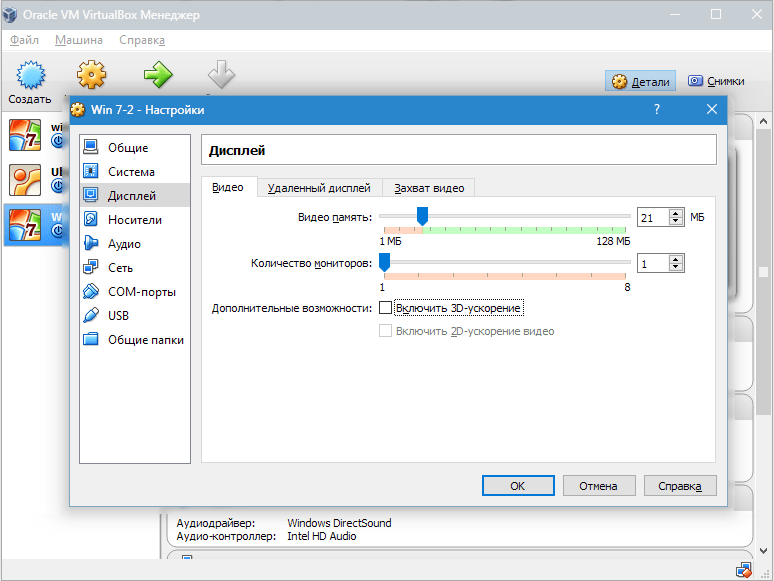
Activate the 3D Acceleration option and configure the Video Memory value to 256 MB to improve virtual computer image quality and adequately run applications or games containing 3D graphics.

Step 14
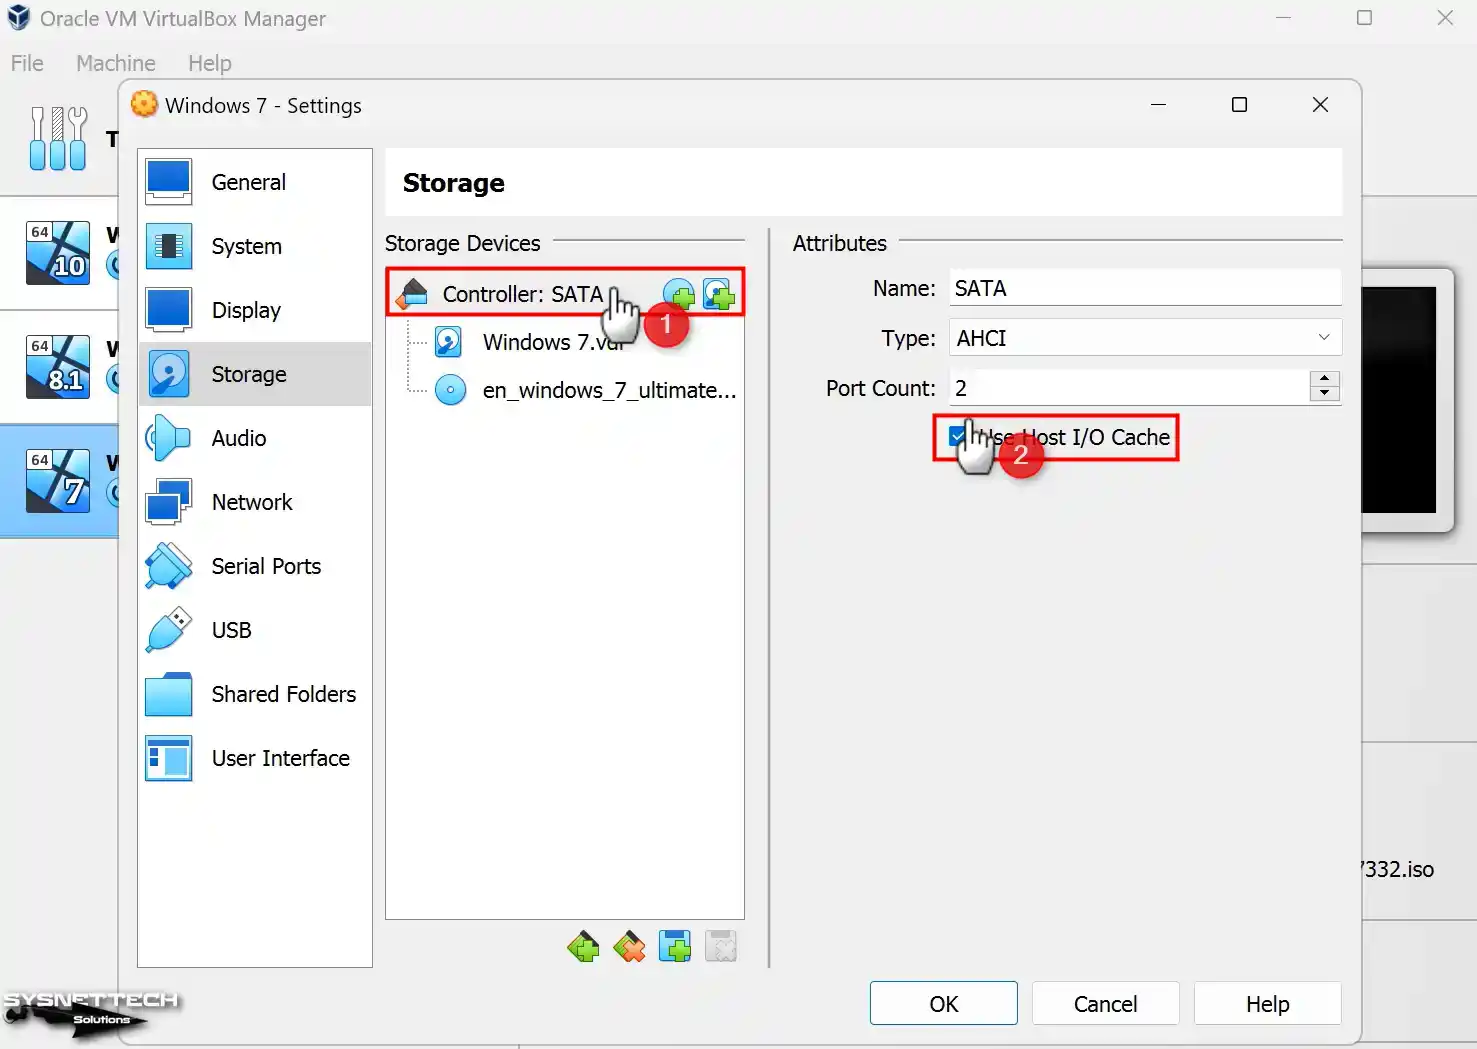
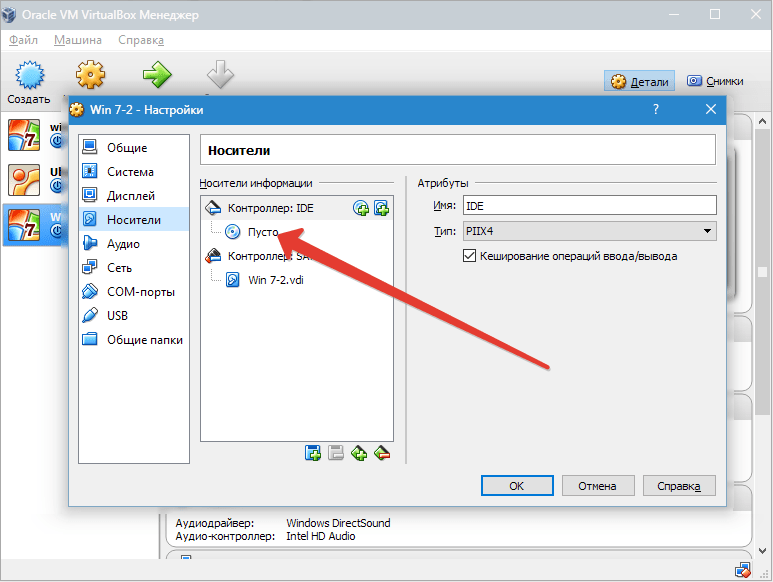
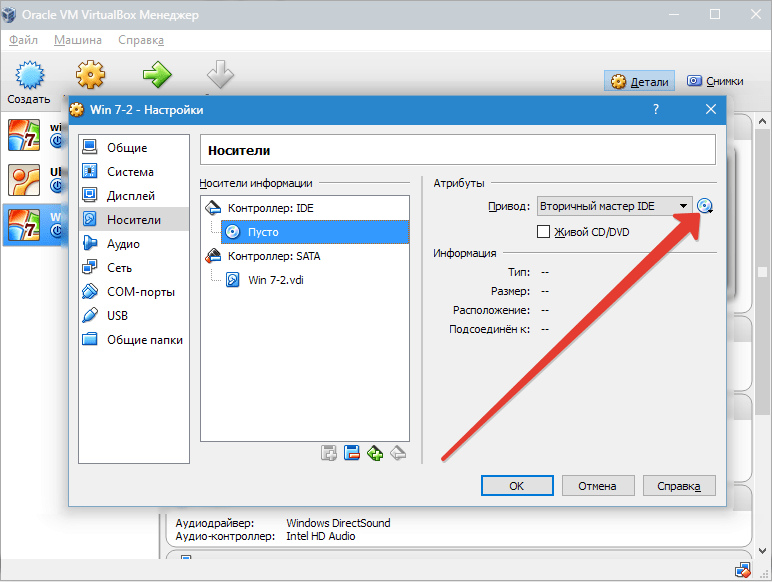
For the performance of the virtual computer, enable the Host I/O Cache feature on the SATA controller in the Storage settings.
Step 15
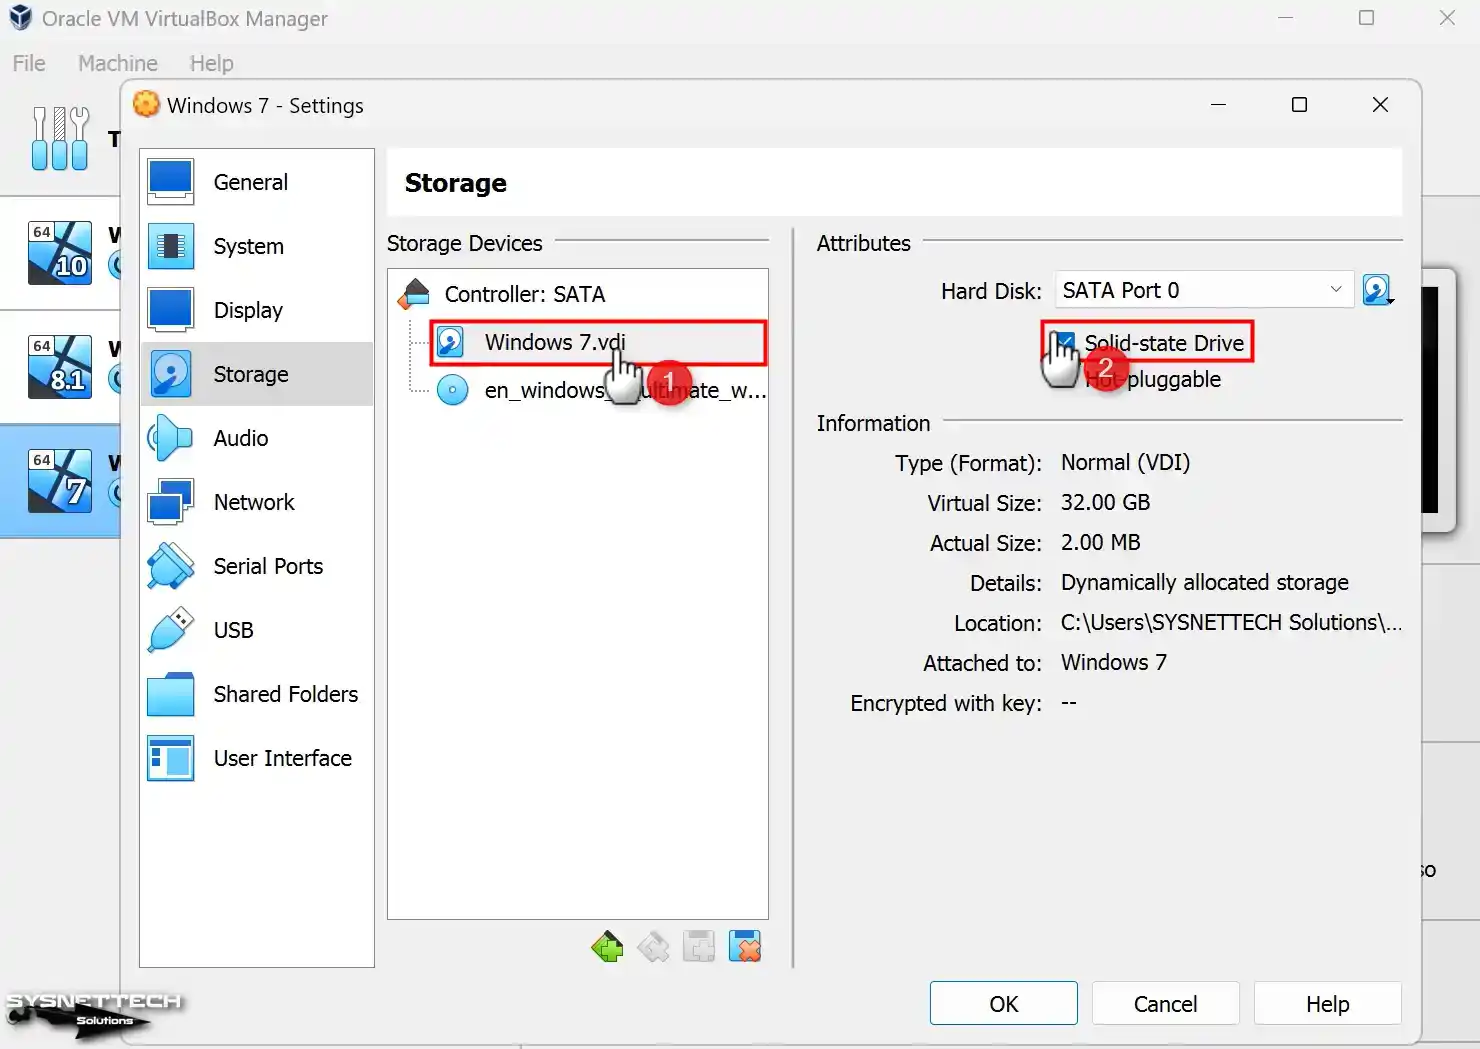
Configure Windows7.vdi virtual disk file as a Solid-State Drive (SSD) disk type.
Step 16
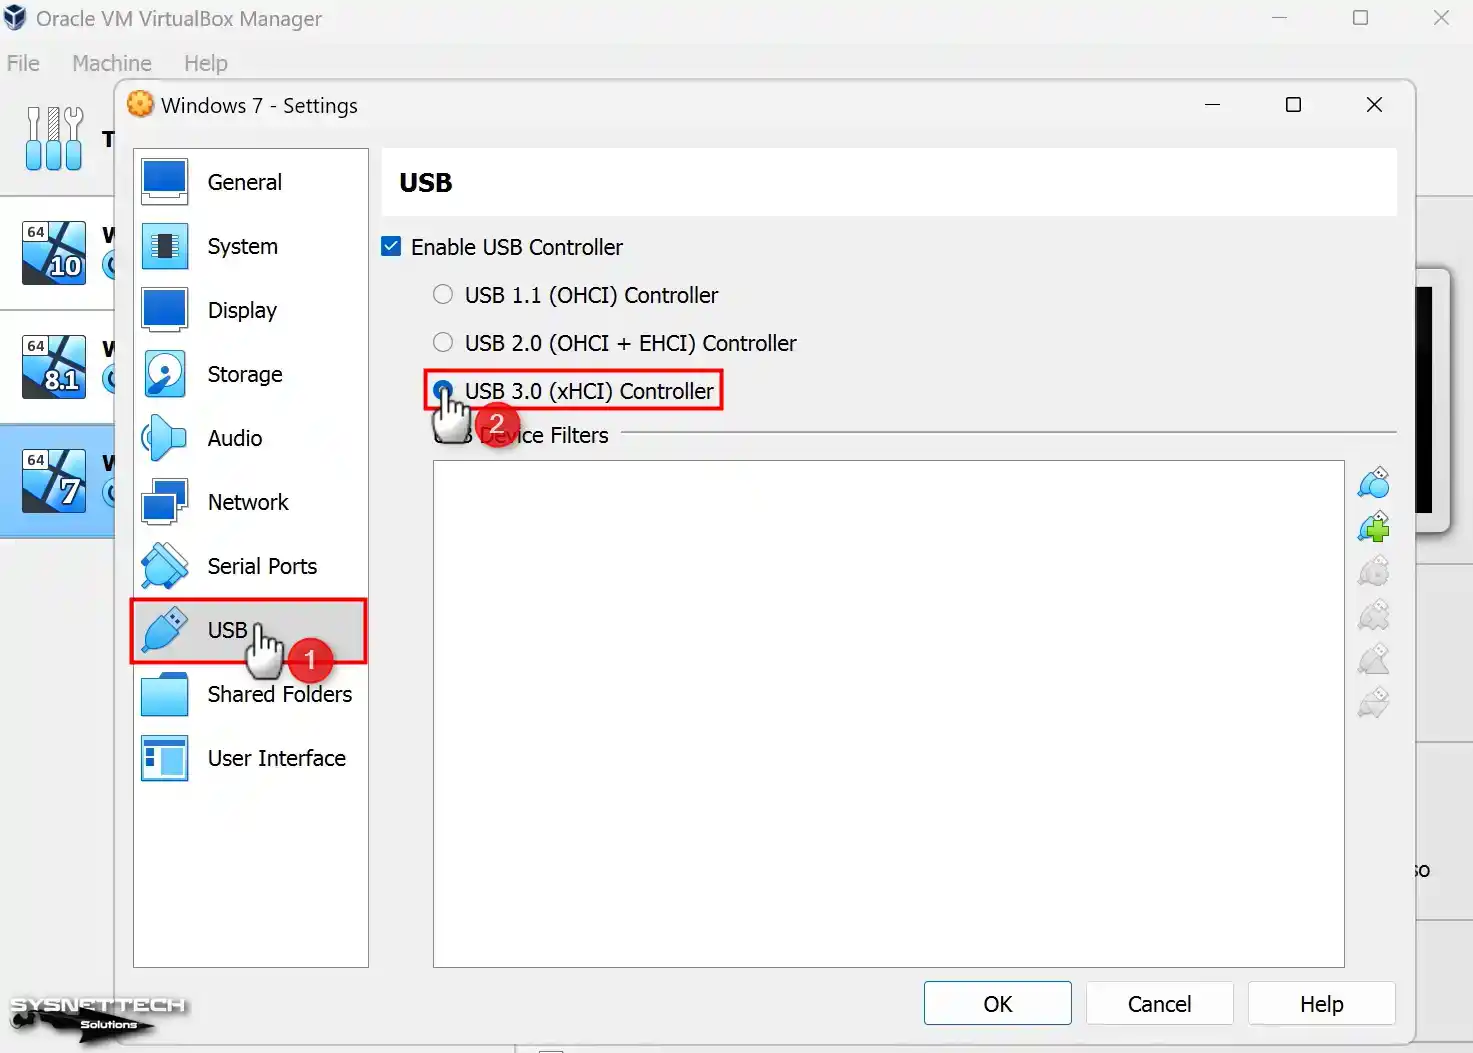
In your virtual computer, make sure that the 3.0 (xHCI) controller is enabled in the USB appliance settings so that you can transfer files faster using a USB 3.x supported storage or flash memory.
Step 17
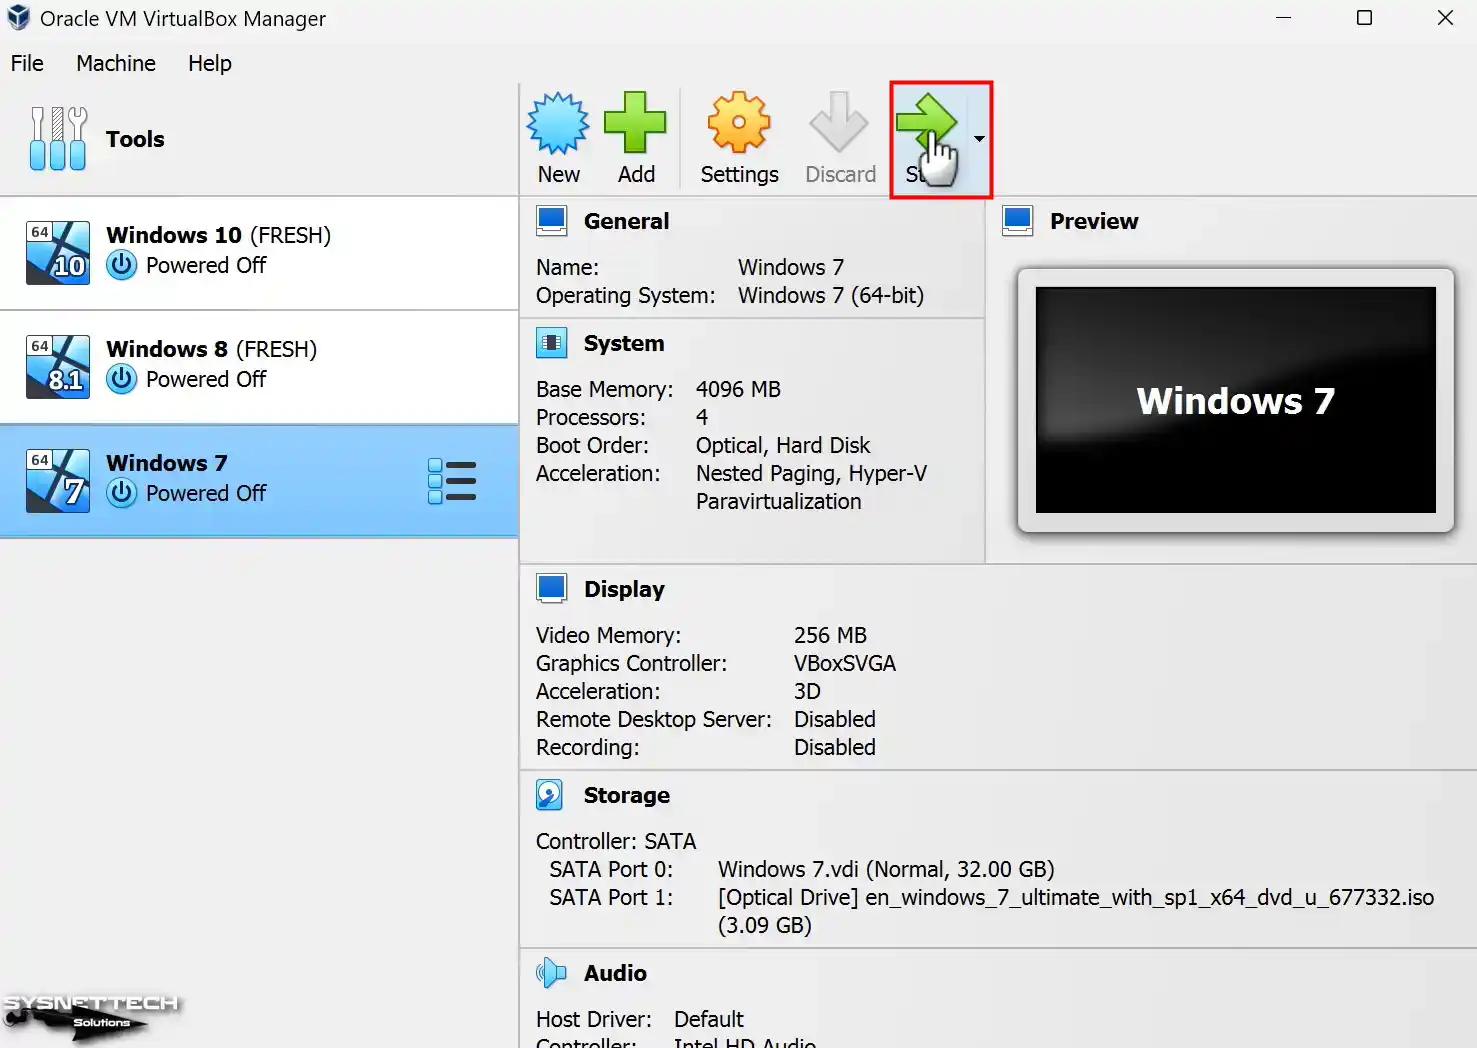
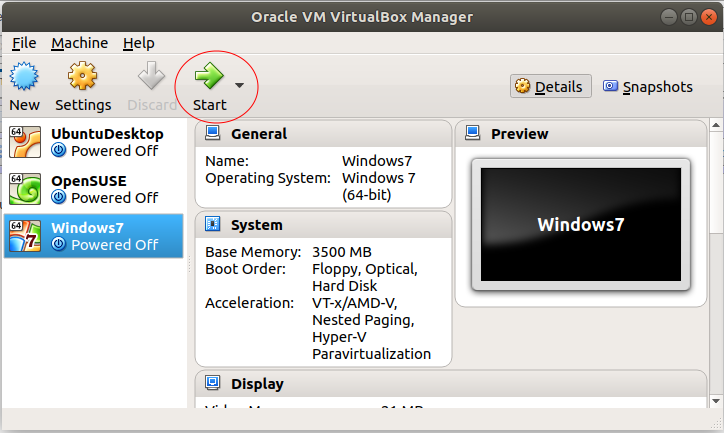
Click the Start button to begin your Windows 7 virtual PC.
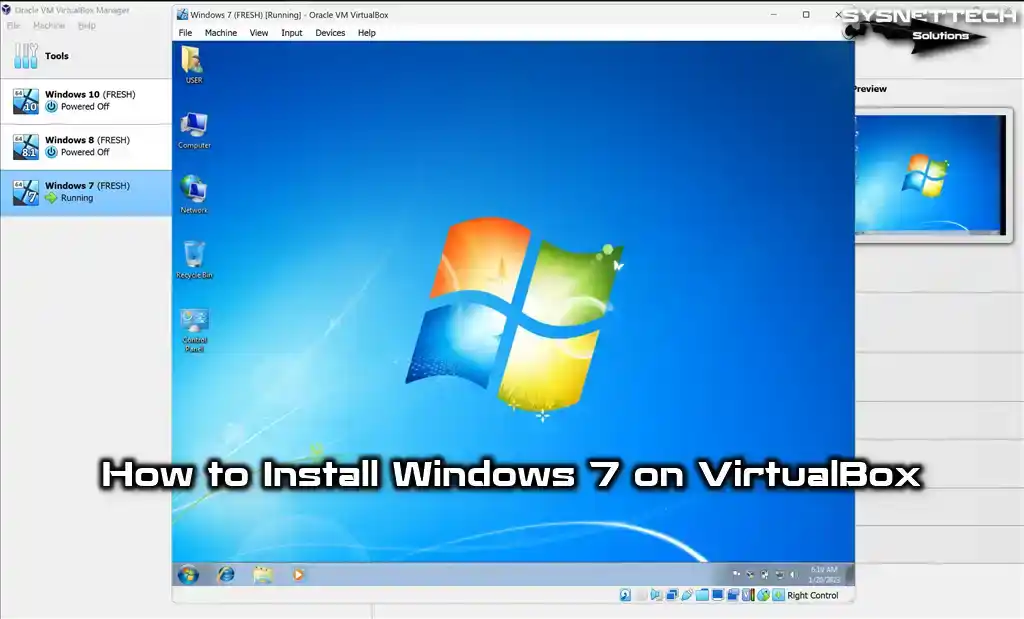
How to Install Windows 7 on VirtualBox
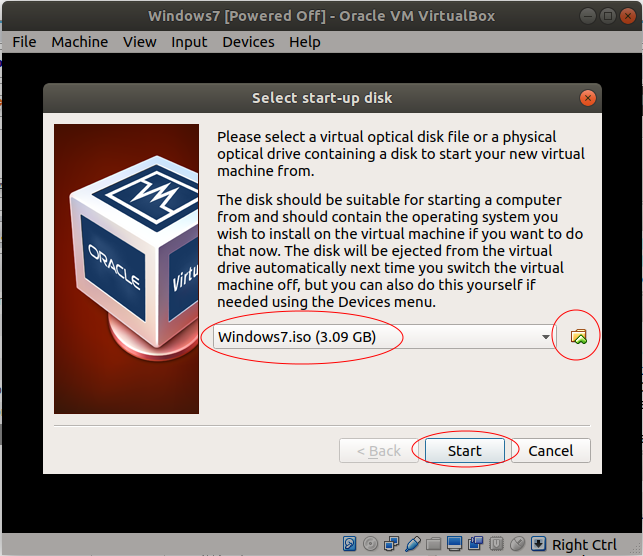
Once you have prepared your virtual computer and selected the boot media, you can install Windows 7 using VirtualBox. After launching your virtual machine, you must follow the same installation stages as installing the operating system on a physical computer.
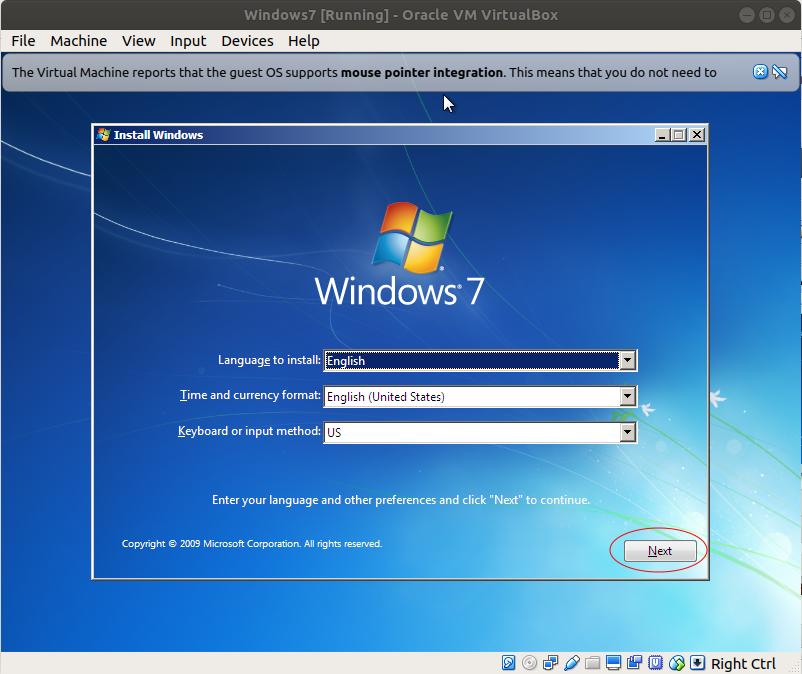
Step 1
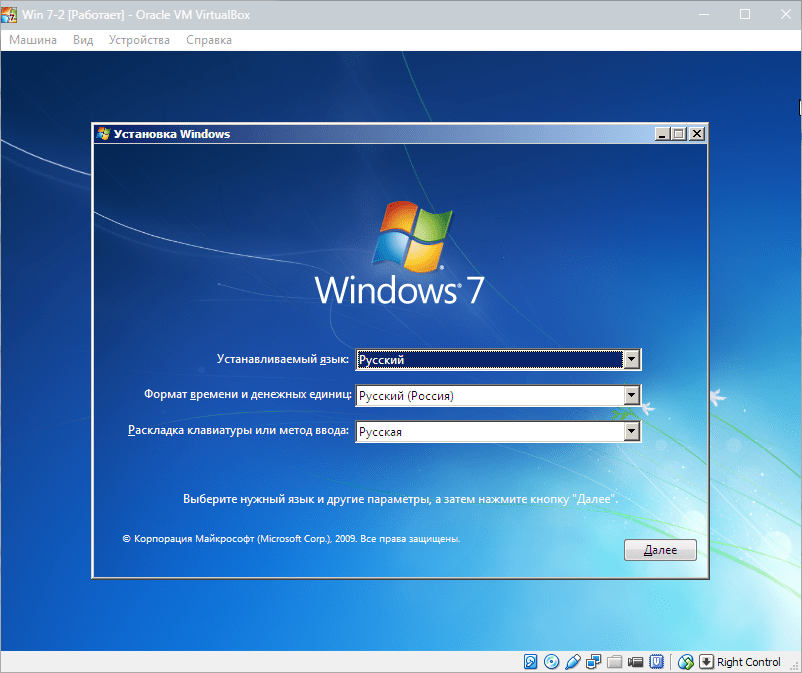
When the Windows 7 setup screen opens, select the display language, time settings, and keyboard layout you want to use for your OS and click the Next button.

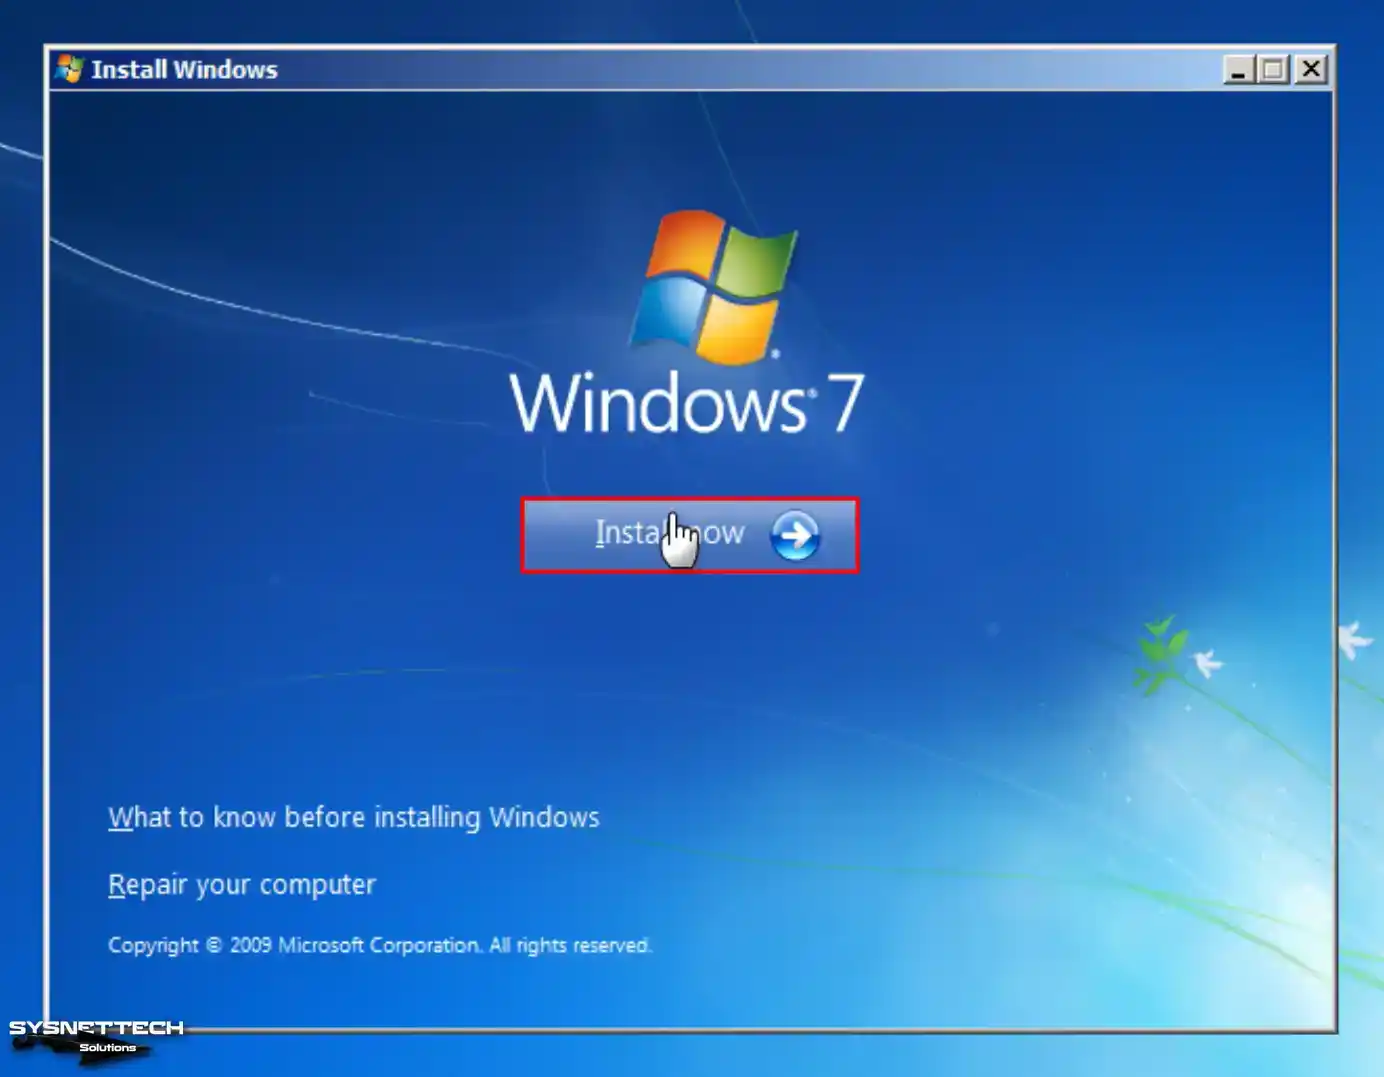
Step 2
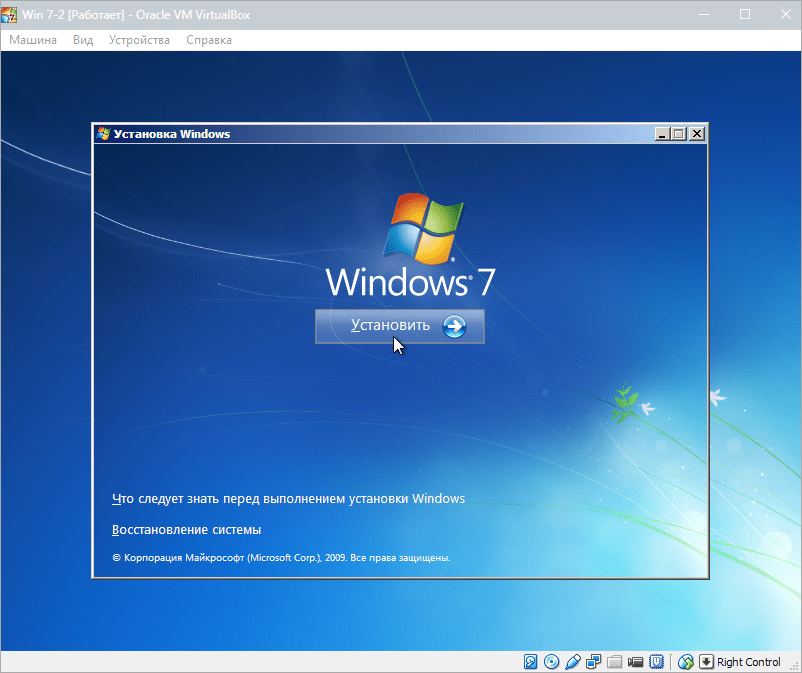
After making the necessary basic settings, click the Install Now button and continue.
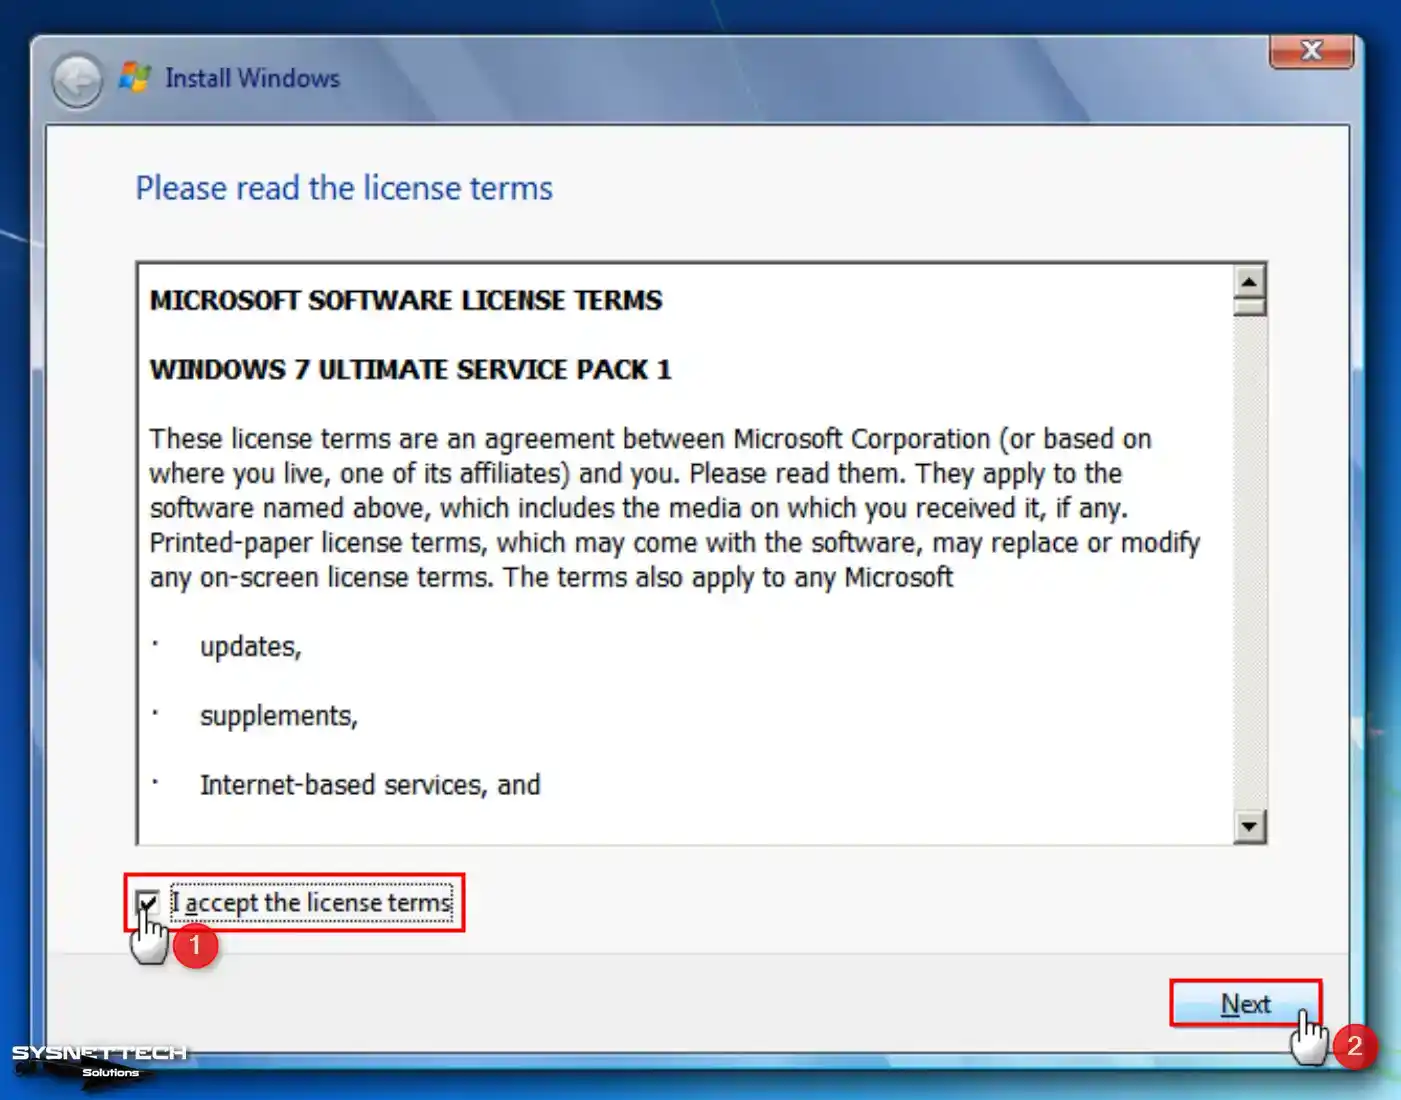
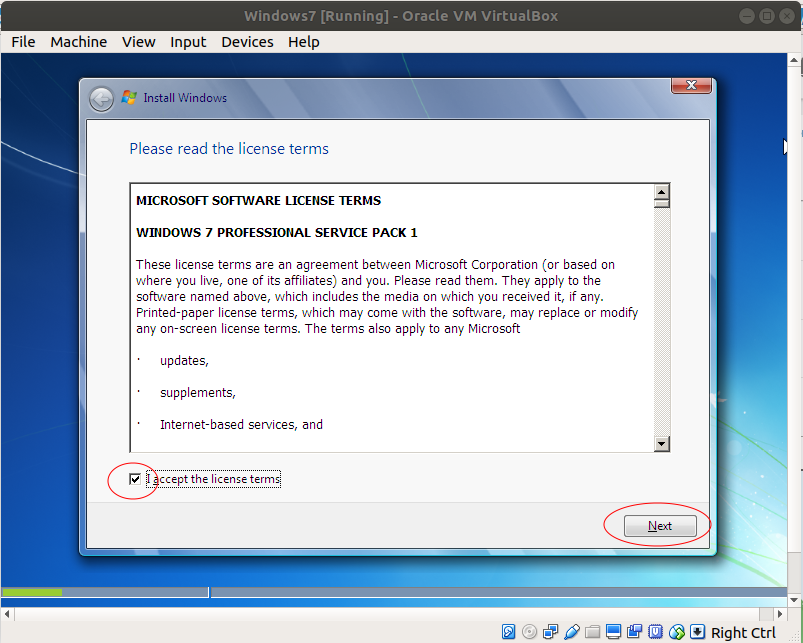
Step 3
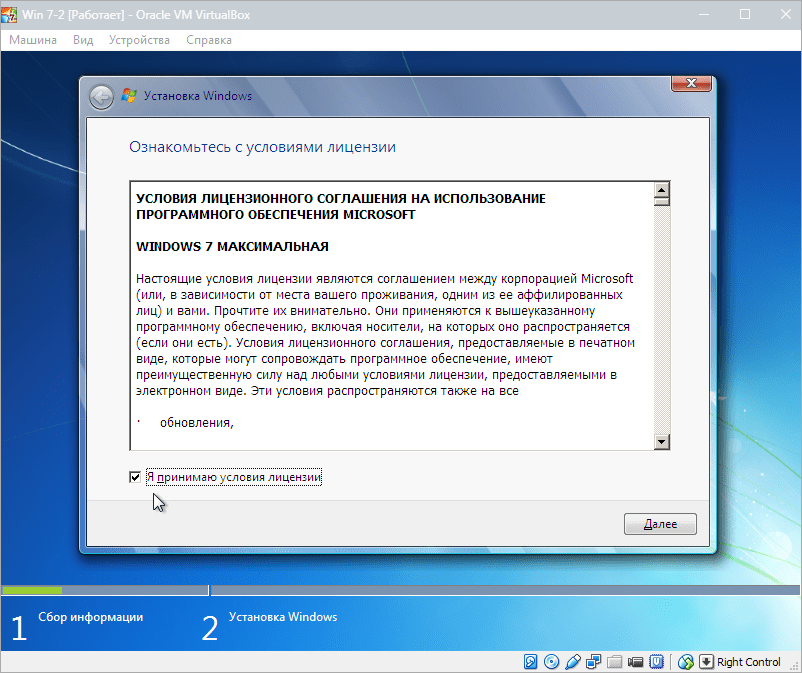
Kindly provide your consent by agreeing to the license agreement for the Windows 7 Ultimate Service Pack 1 (SP1) platform and continue by clicking the “Next” button.
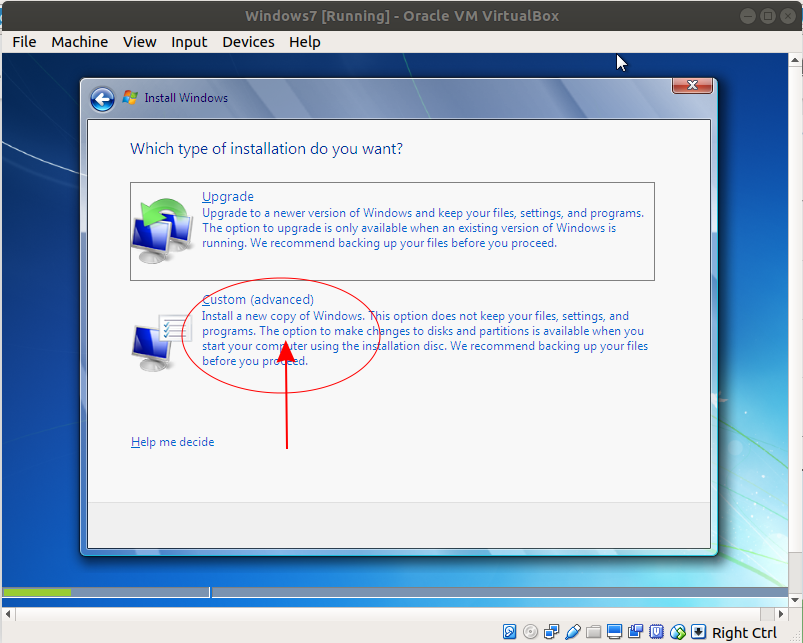
Step 4
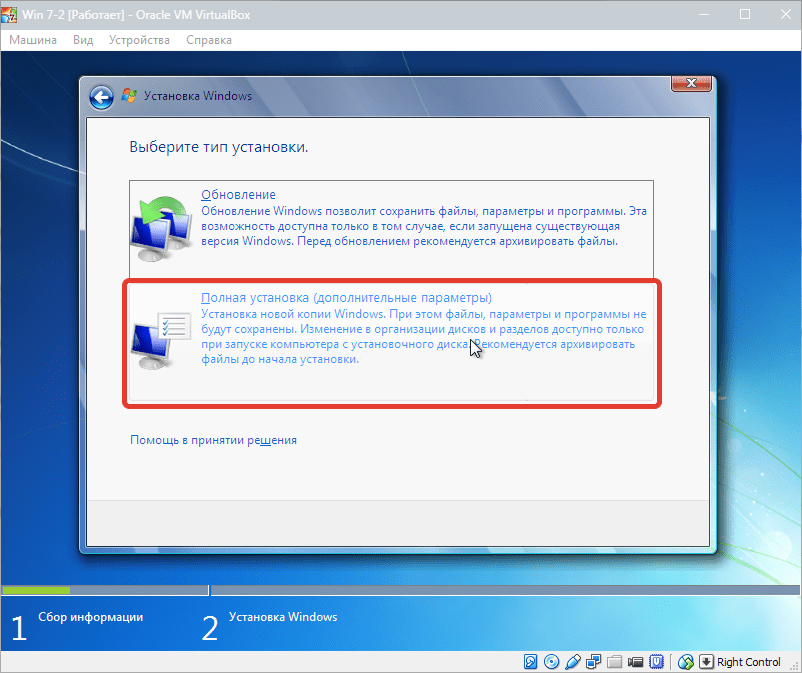
Click on the Custom option at this step, as you will perform a clean system installation.

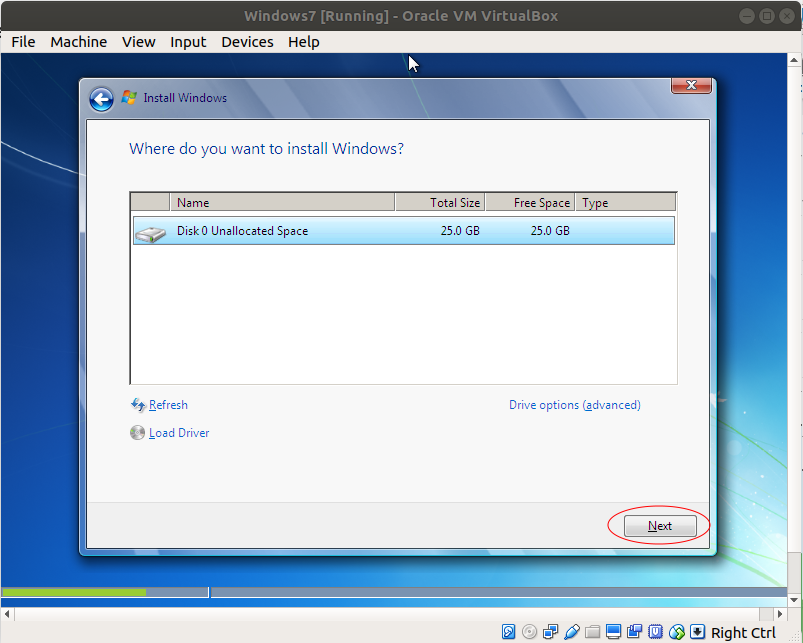
Step 5
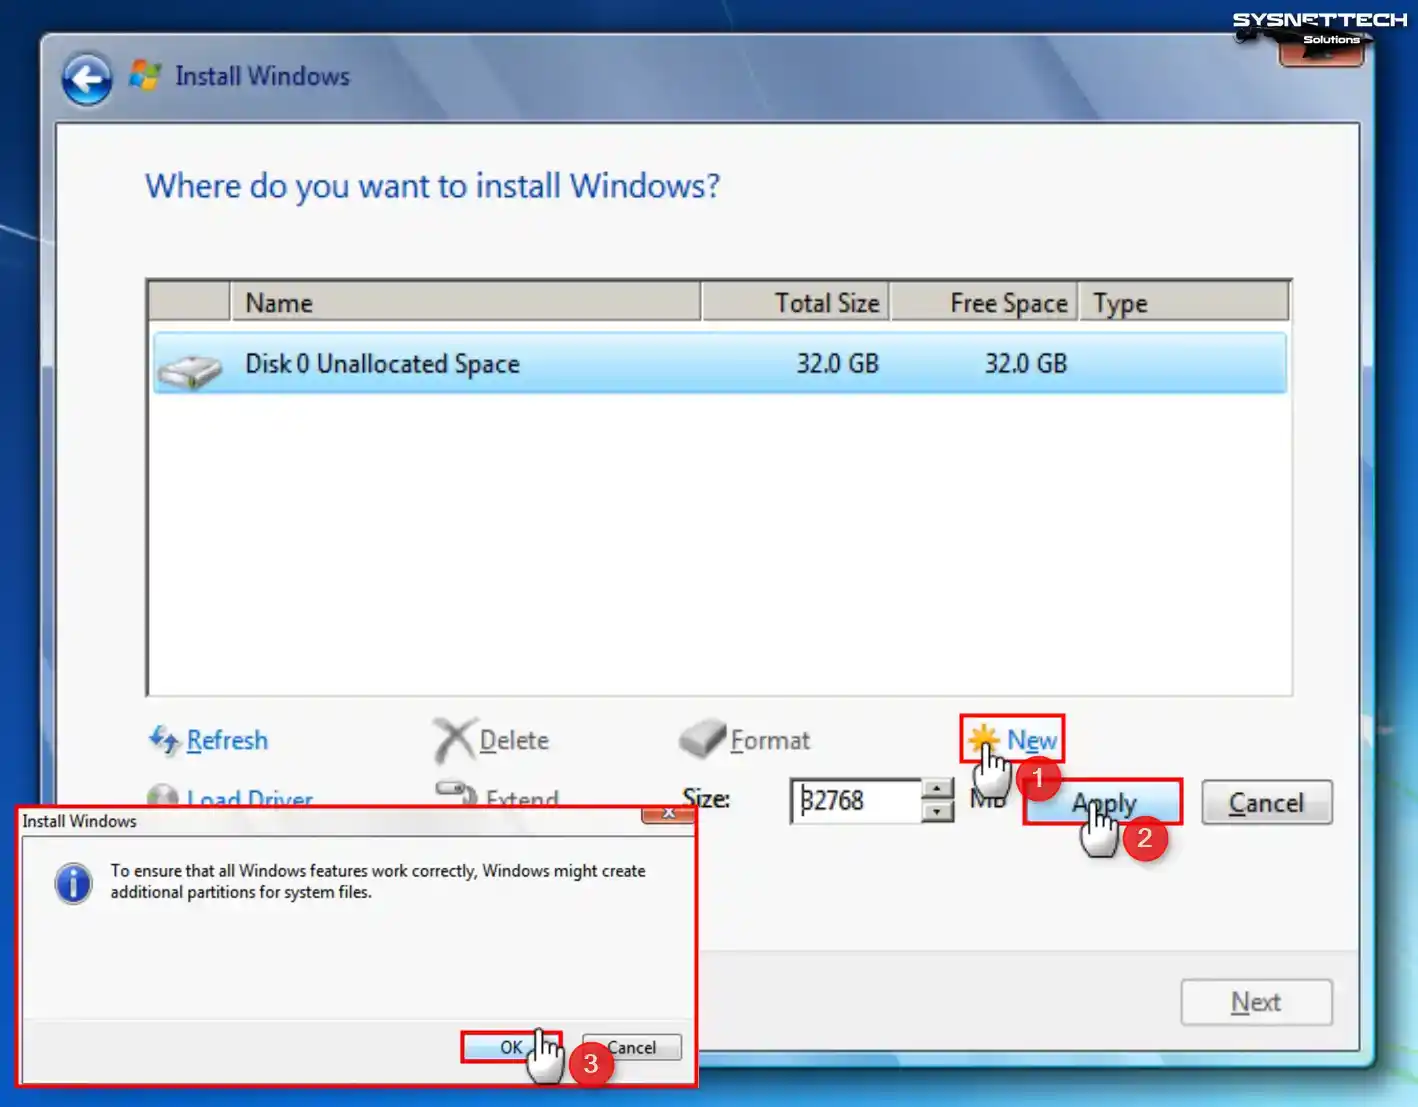
Click Drive Options in the disk configuration window of the Windows setup wizard.
To establish a fresh partition on the virtual disk, choose the disk, select “New,” and then click the “Apply” button to validate the automatic disk space allocation. Also, when you receive an information message that additional fields will be created so that Windows can work correctly, click OK and continue.
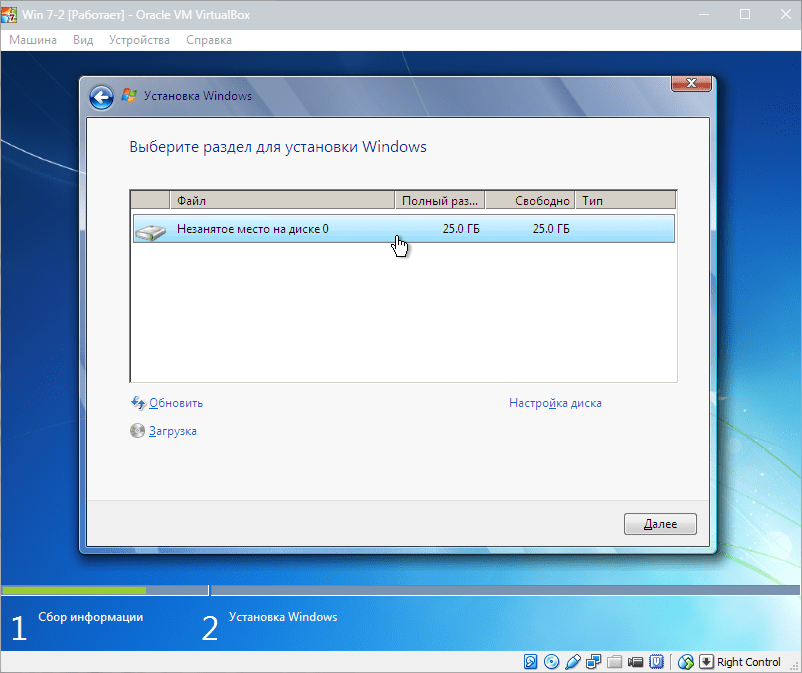
Step 6
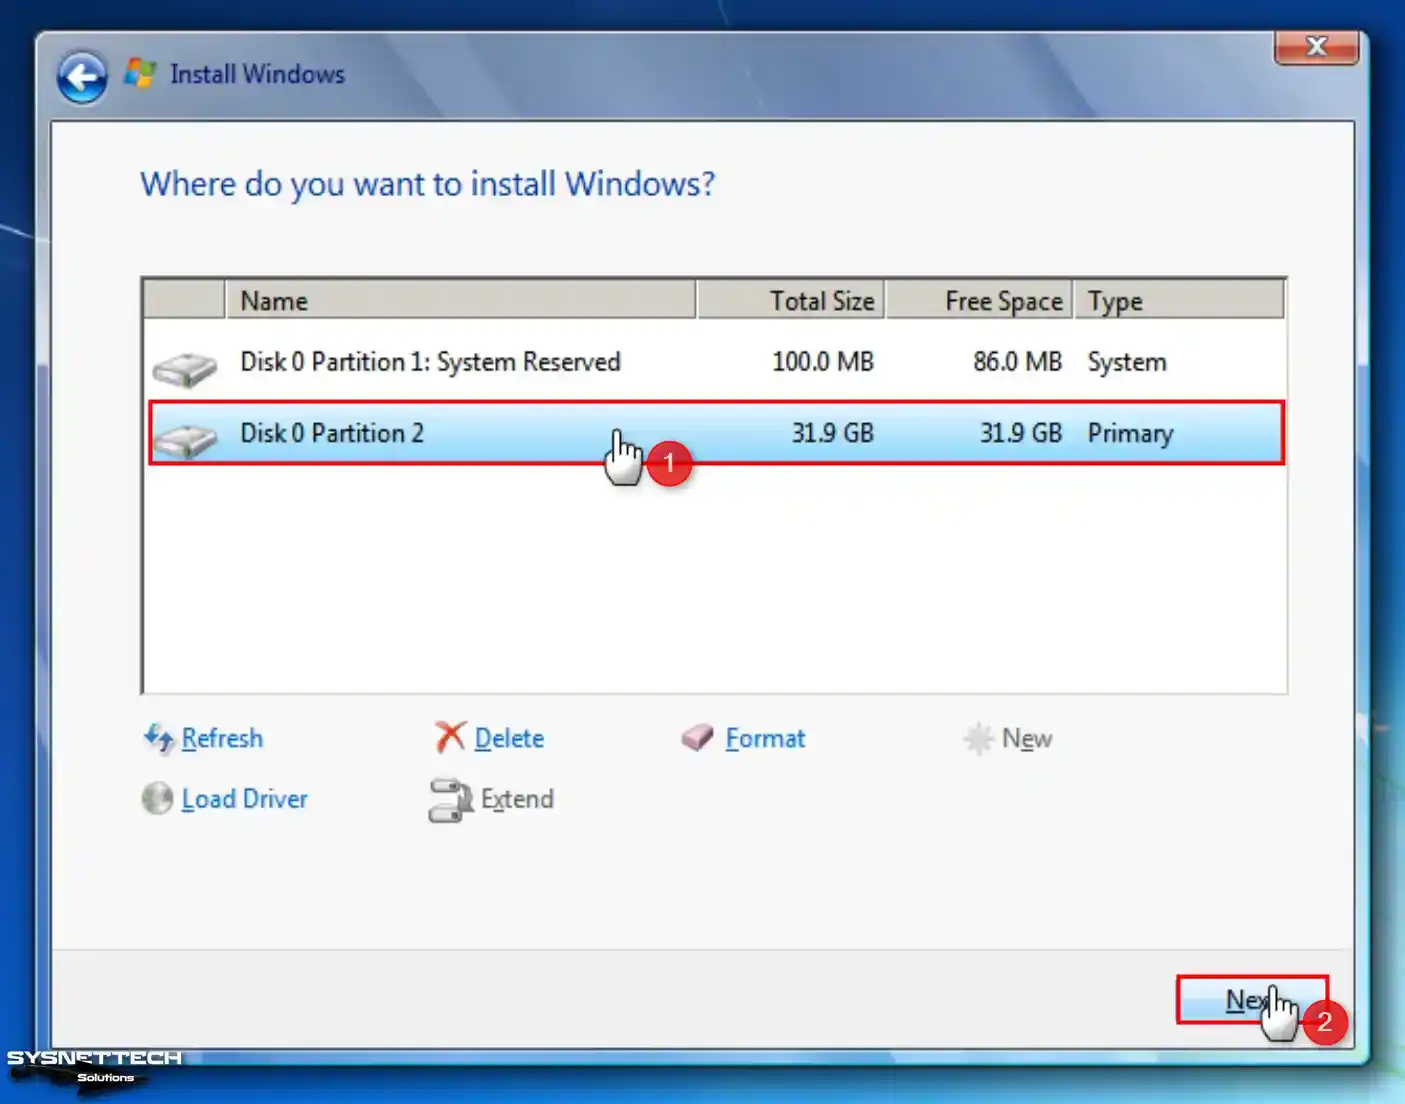
Select the partition you created (Disk 0 Partition 2) and click Next.
Step 7
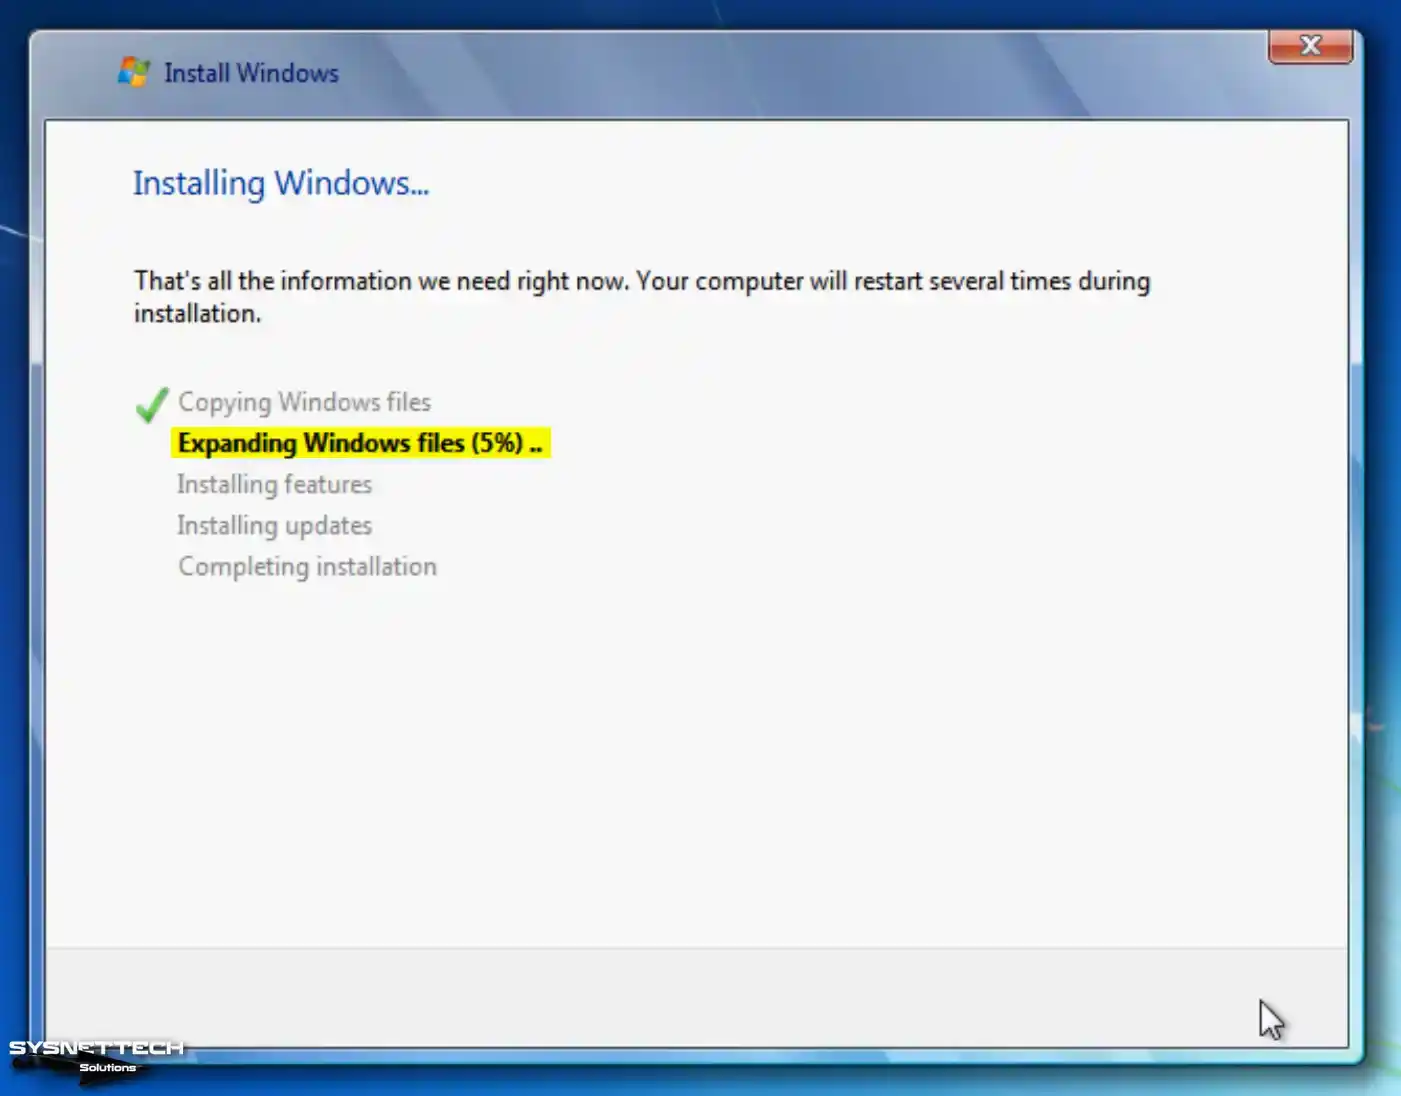
Wait while the setup wizard expands the Windows files for installation.
Step 8
After the installation files are copied to the disk, wait to restart your virtual computer within the specified time, or directly click the Restart Now button.

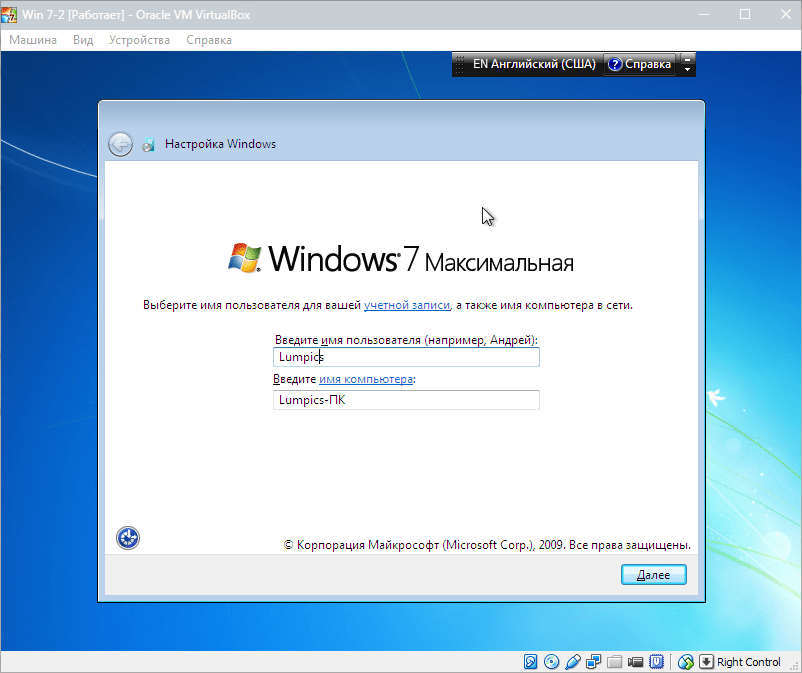
Step 9
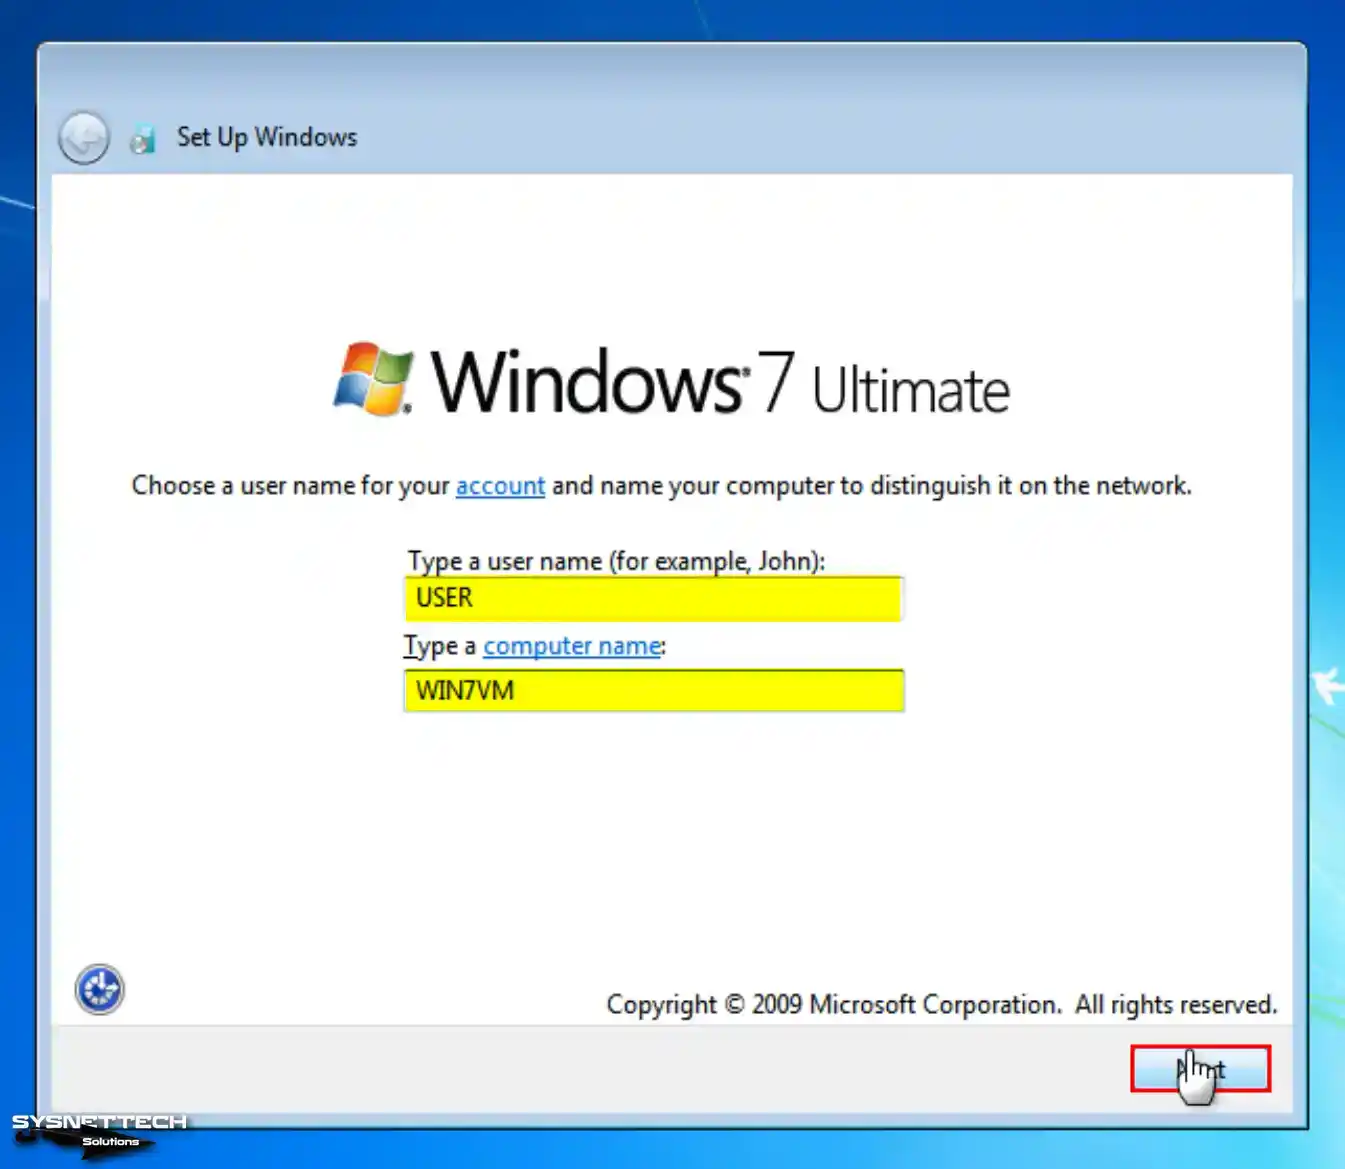
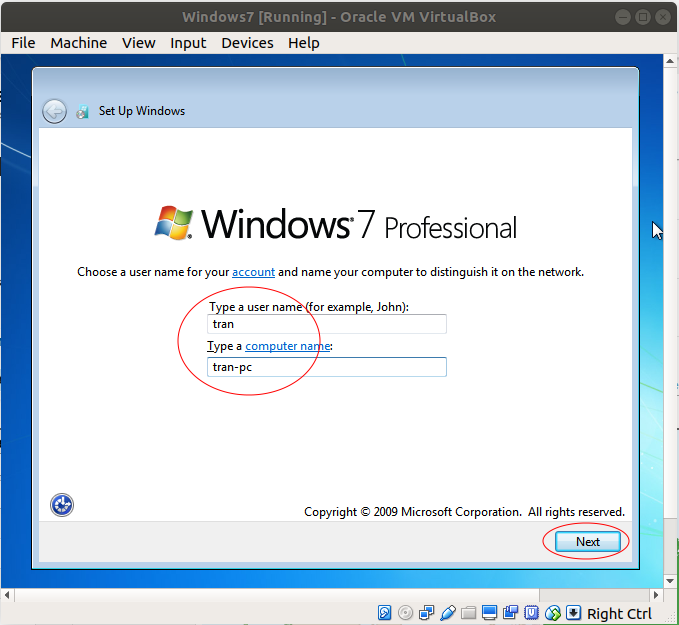
After your system restarts, type a new name for your user account and the computer’s name, and then click Next.
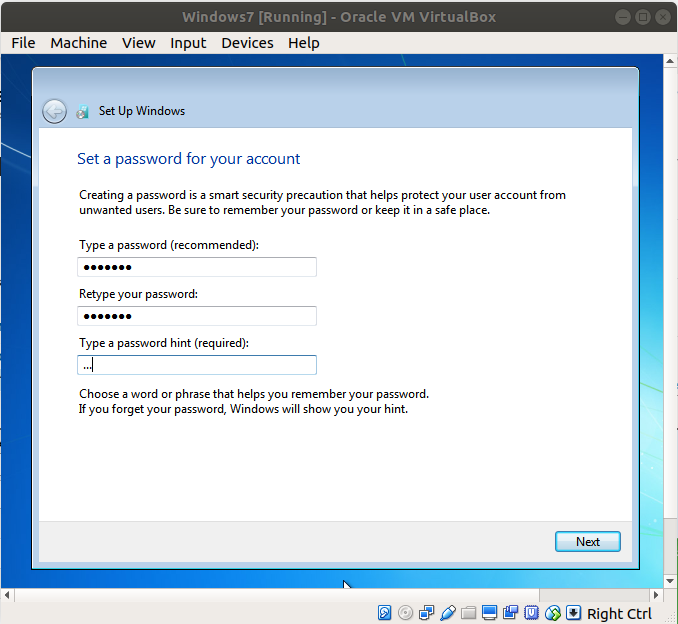
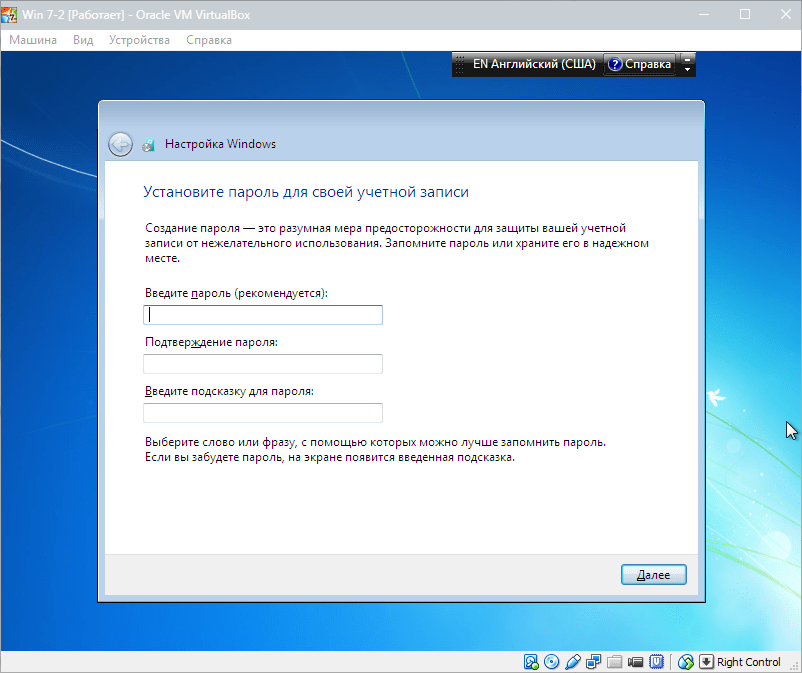
Step 10
To configure a password for your virtual system, kindly complete the necessary fields depicted in the image provided and proceed accordingly. If you would rather not create a password, kindly click the “Next” button.

Step 11
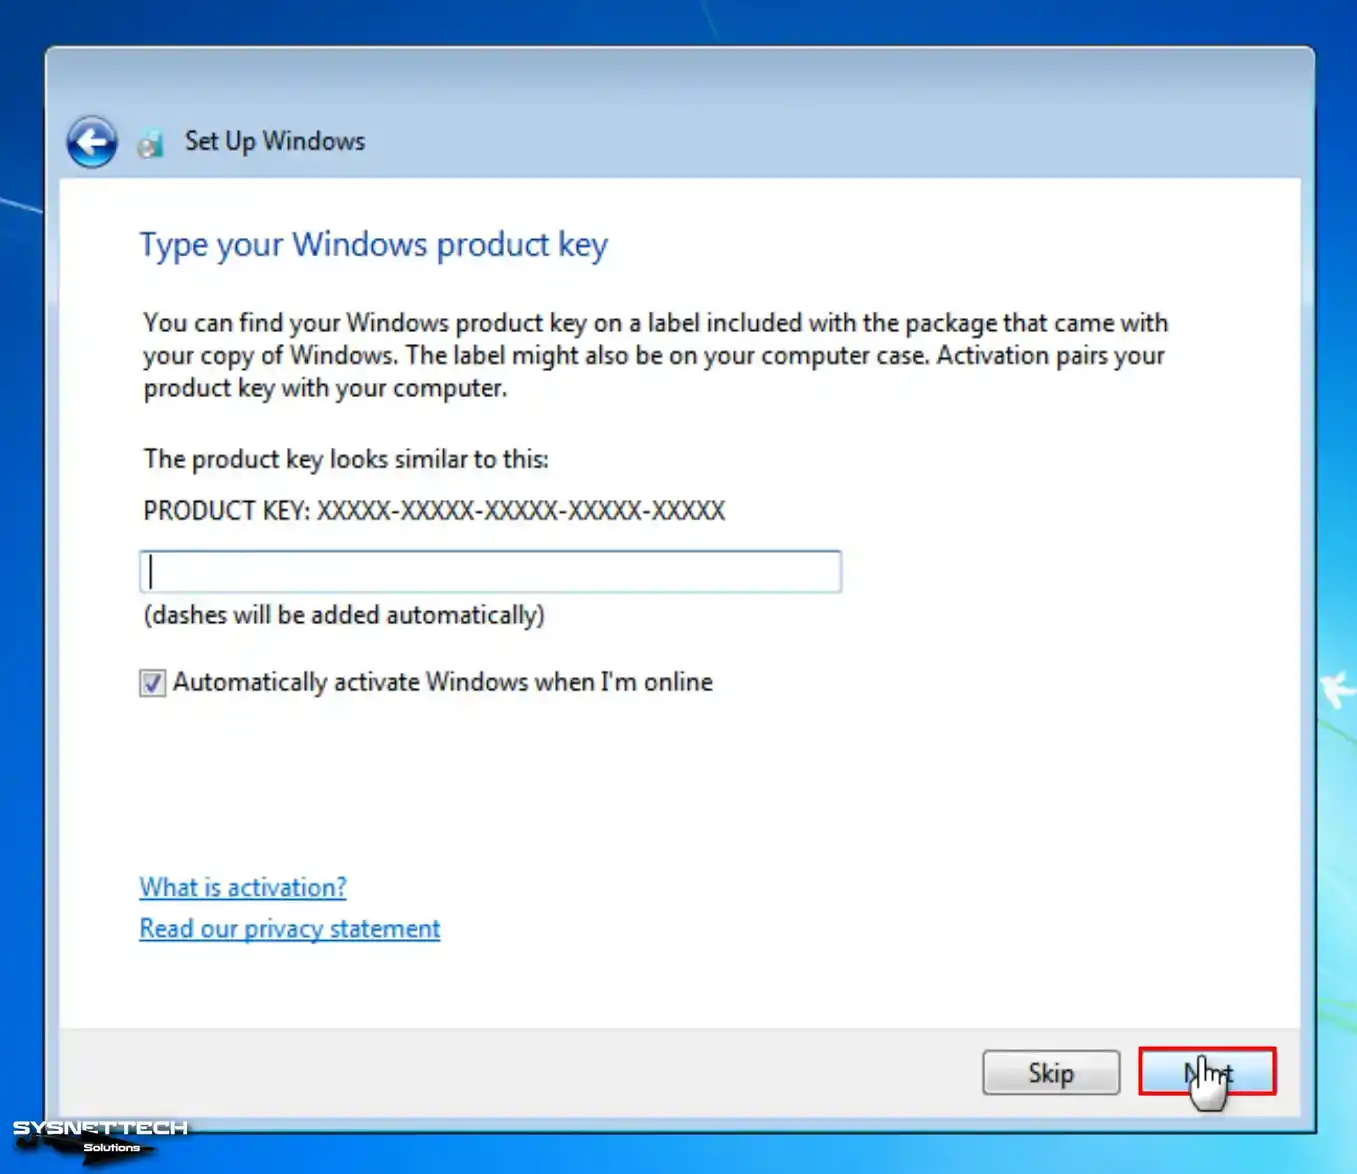
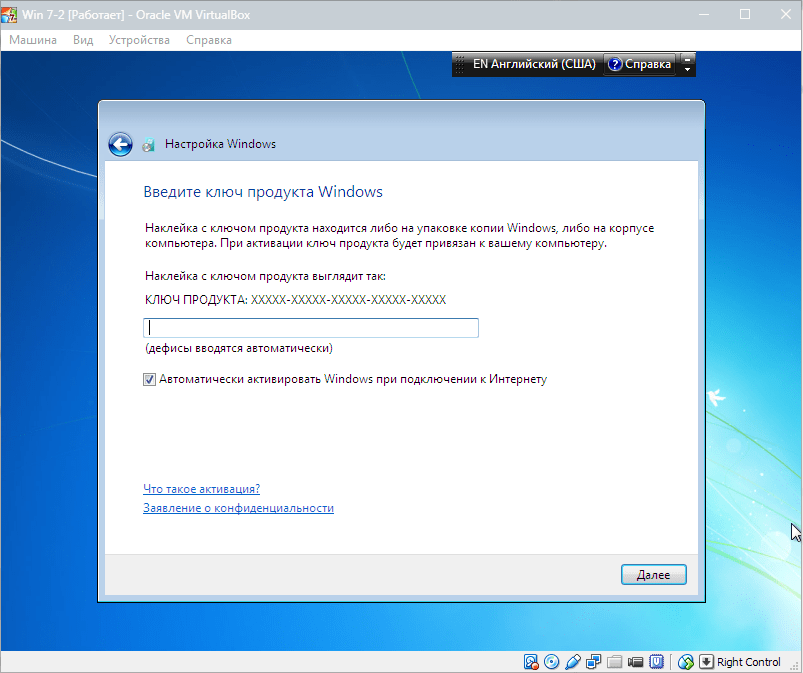
To use a licensed operating system on your guest machine, type your product key and click Next. Suppose you select Automatically Activate Windows When I’m Online after typing your product key. In this scenario, your system will be activated automatically when you access the Internet.
If you do not hold a Windows 7 product key, you can continue by clicking Skip or Next.
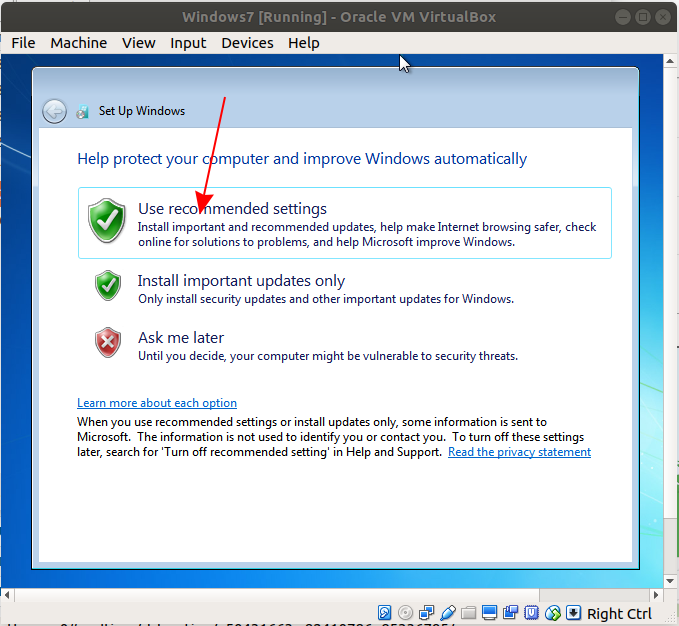
Step 12
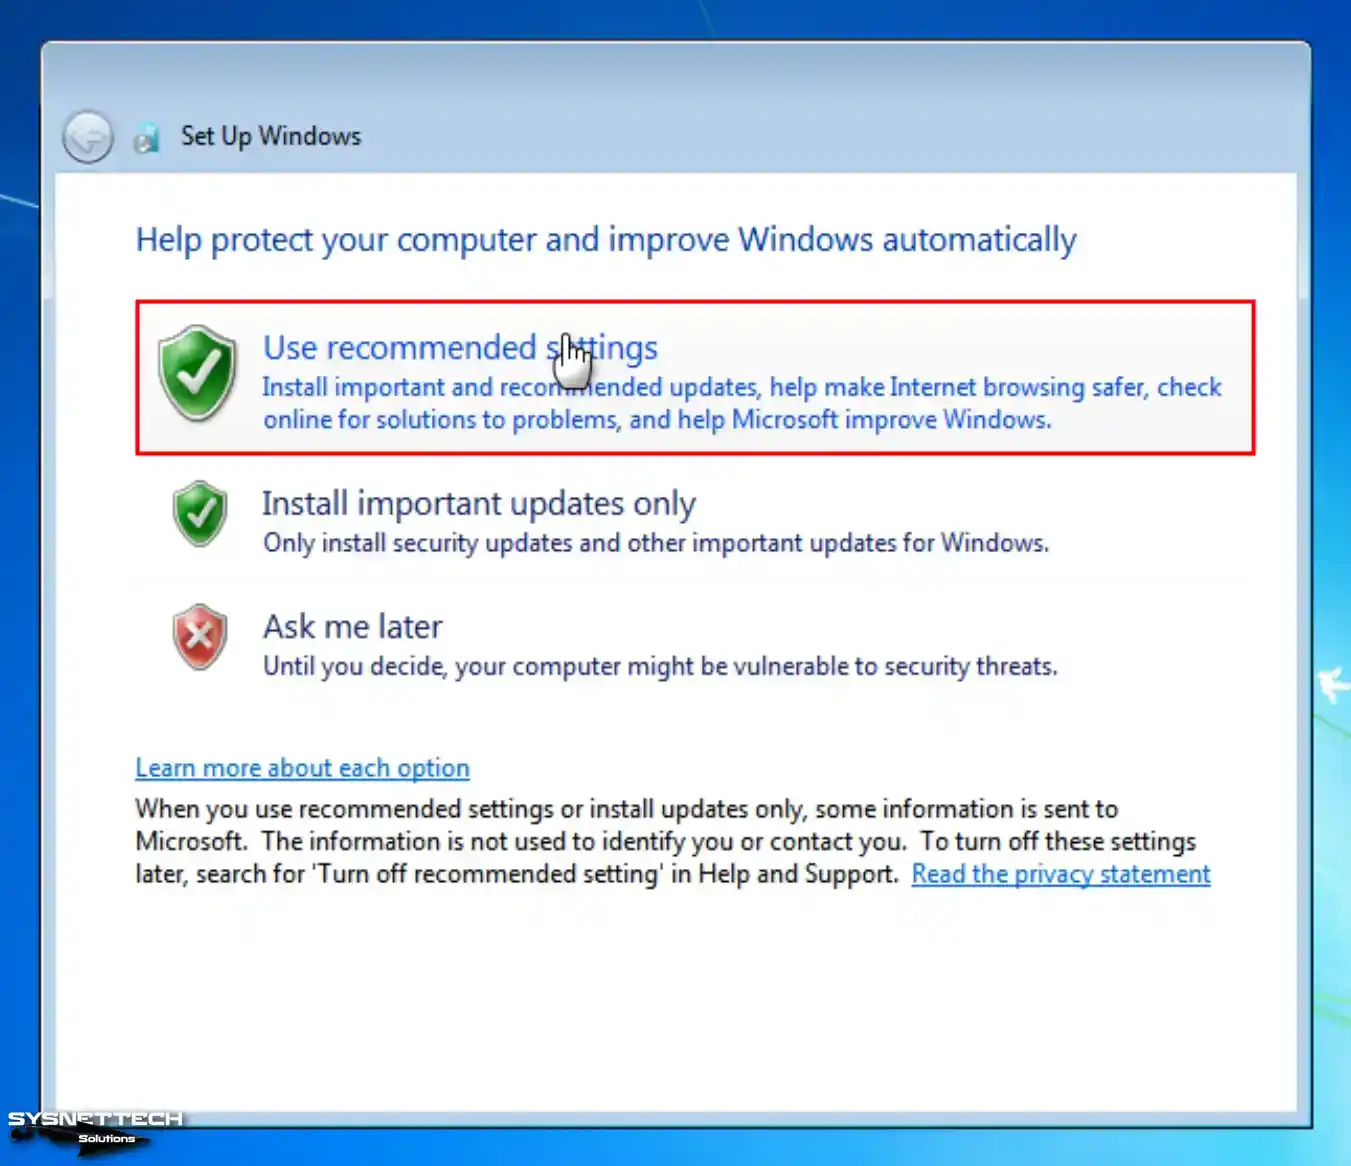
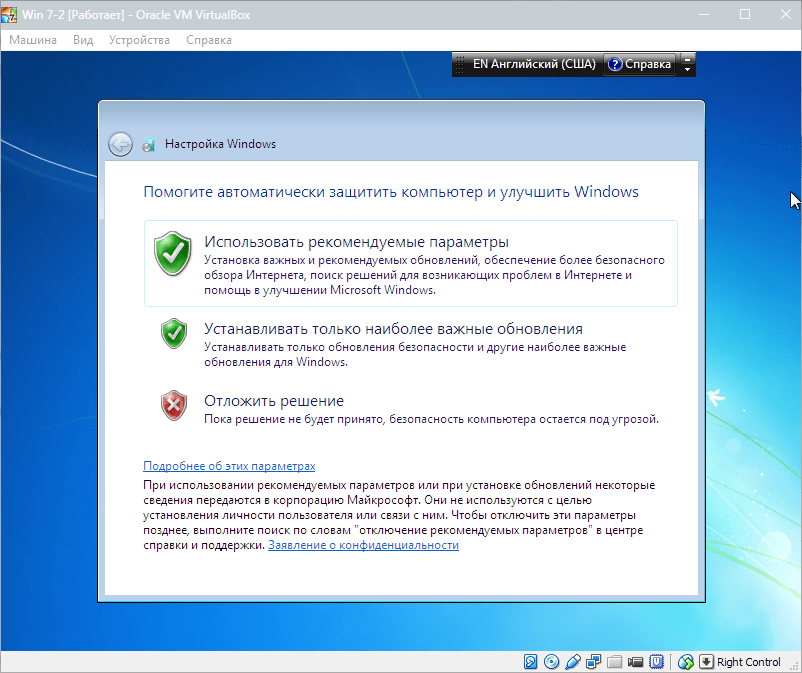
Click Use Recommended Settings for Windows firewall and system updates.
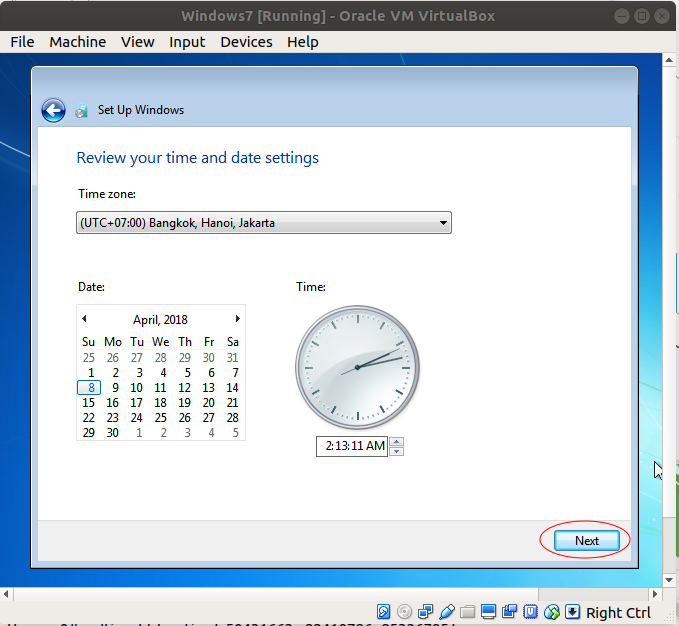
Step 13
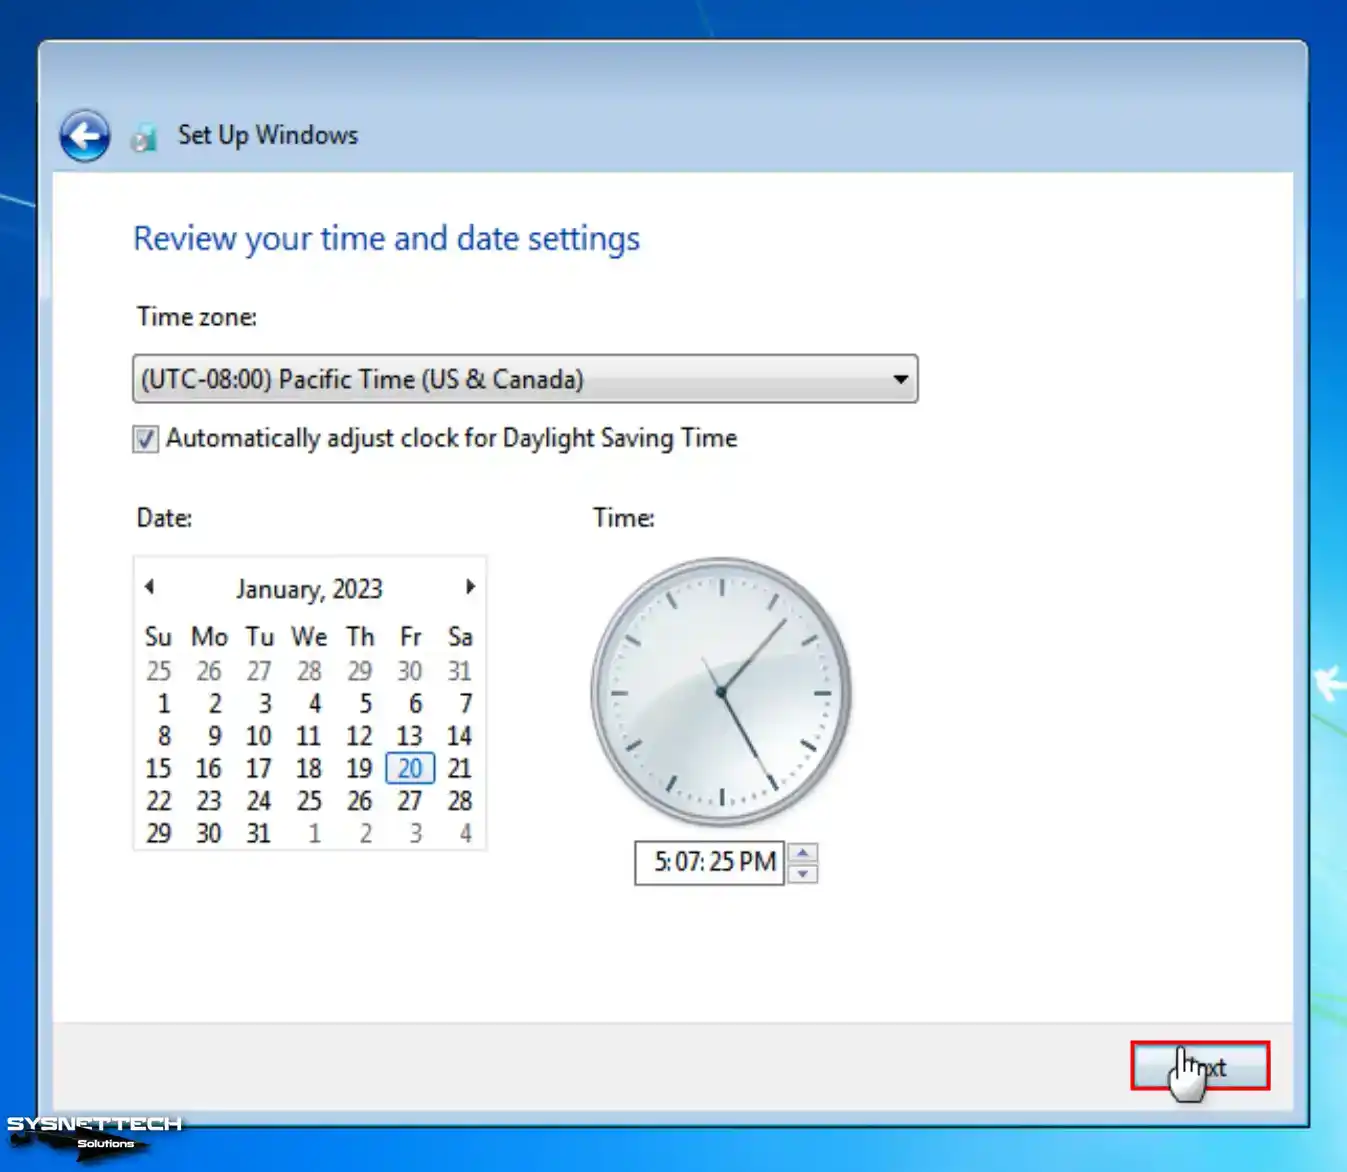
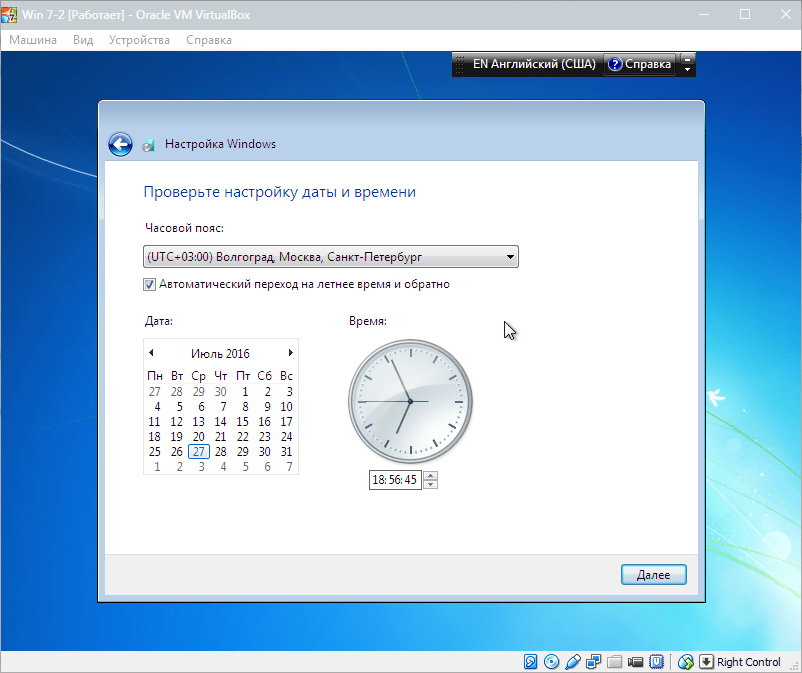
Choose your time zone according to your country and make your date settings.
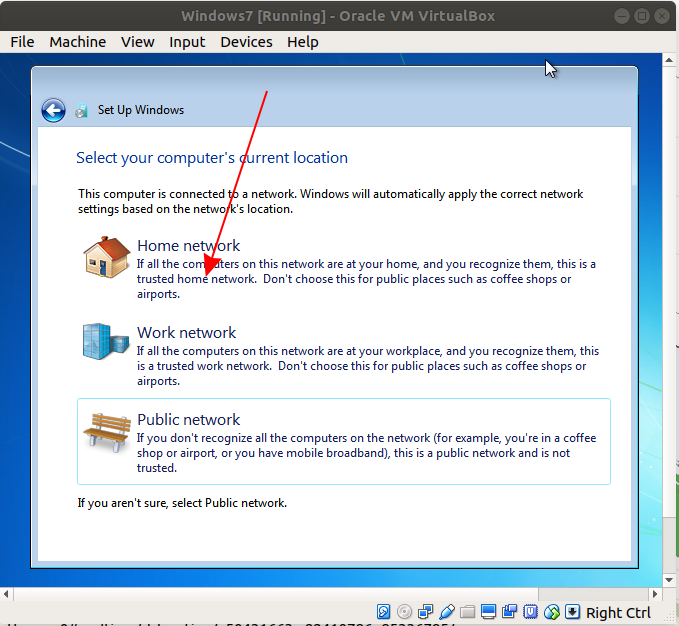
Step 14
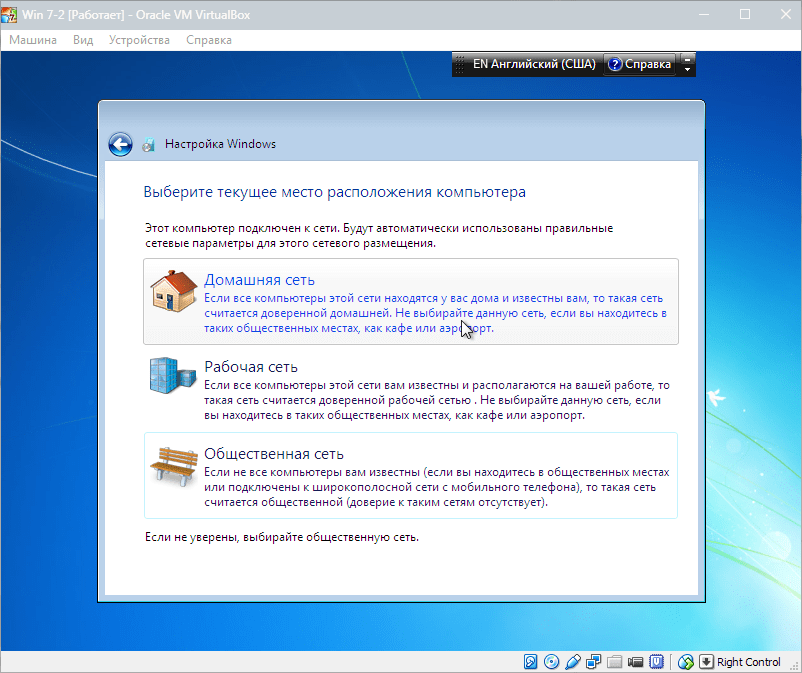
Select the current location of your virtual computer for network and sharing settings.

Step 15
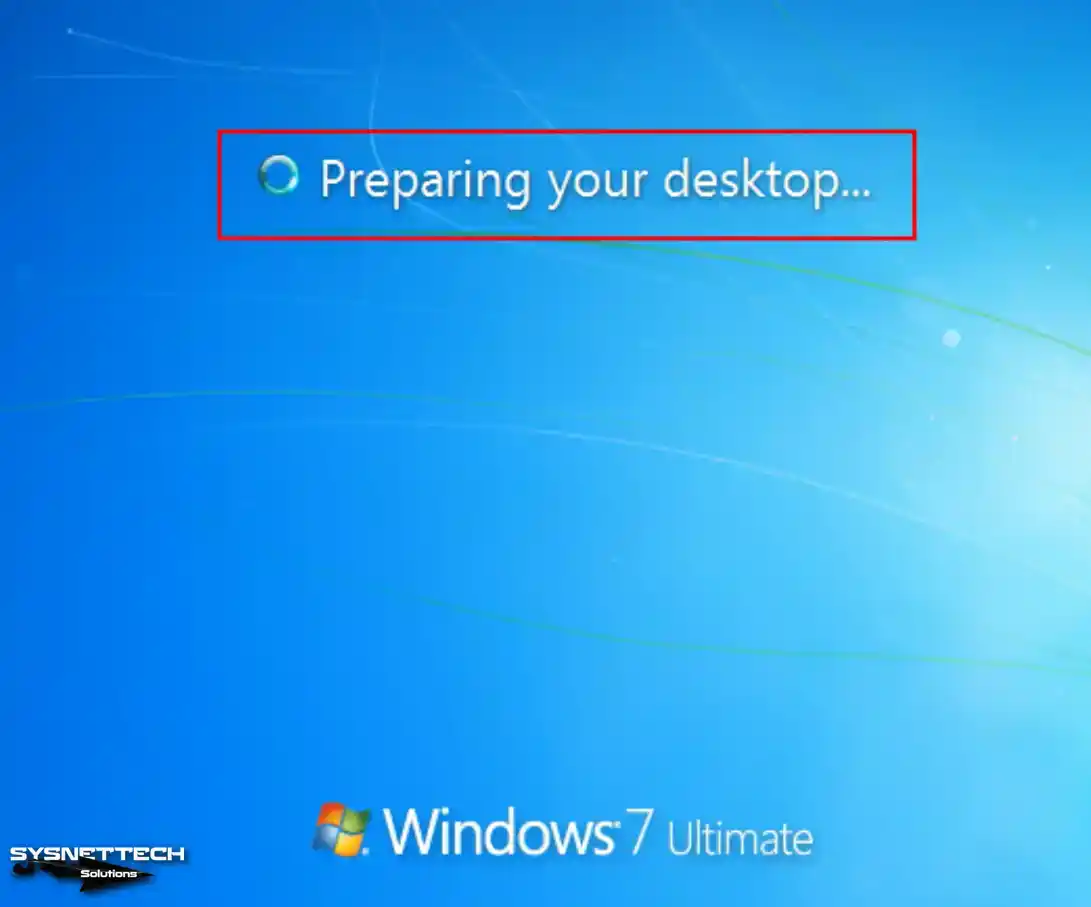
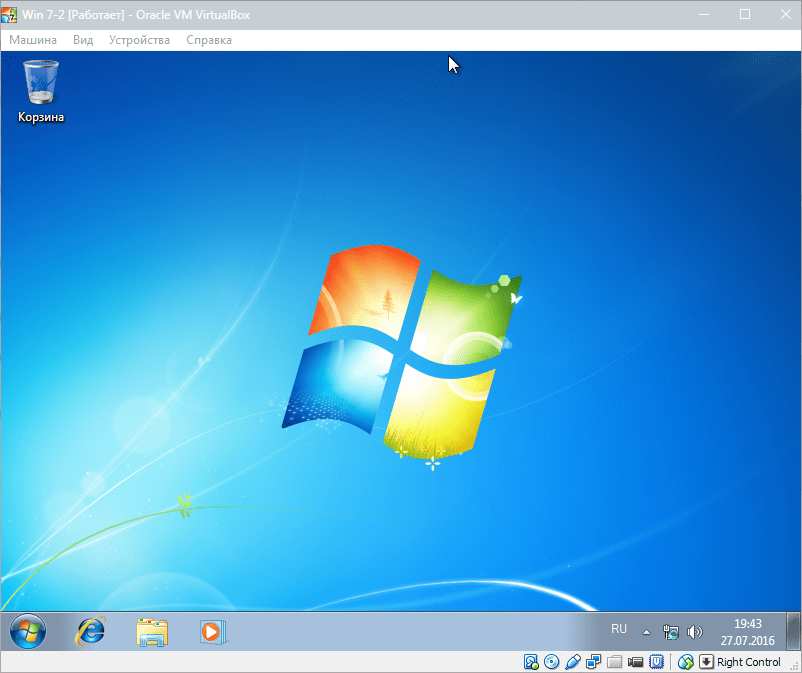
Wait while the Windows 7 desktop layout is being prepared.
Step 16
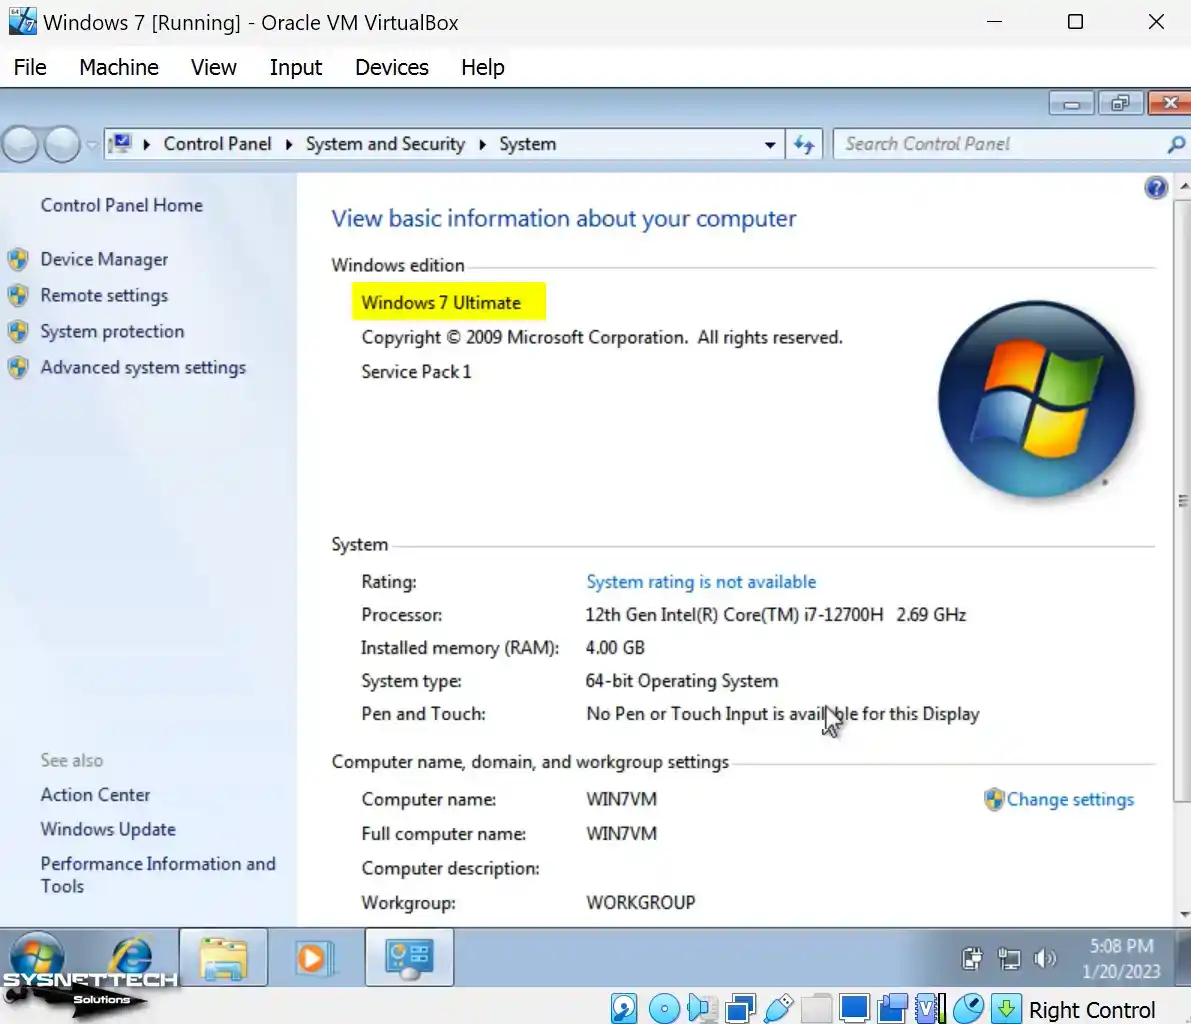
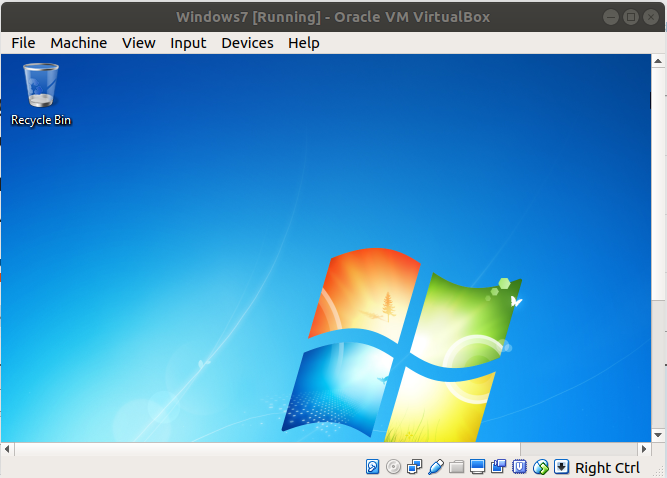
To examine the system properties of Windows 7, you can right-click on My Computer and subsequently select Properties.
How to Install Guest Additions in Windows 7 VM
After installing Windows 7 on the virtual computer, you must install Guest Additions to configure the screen resolution as full screen, use it in scale mode, and copy files to the host.
Step 1
Before installing Guest Additions on Windows 7, open Device Manager on your virtual machine and check for drivers that have not been installed or drivers that need to be installed correctly.
When you examine the image below, you can see that the driver for the Base System Device and Standard VGA Graphics Adapter devices is not installed.

Step 2
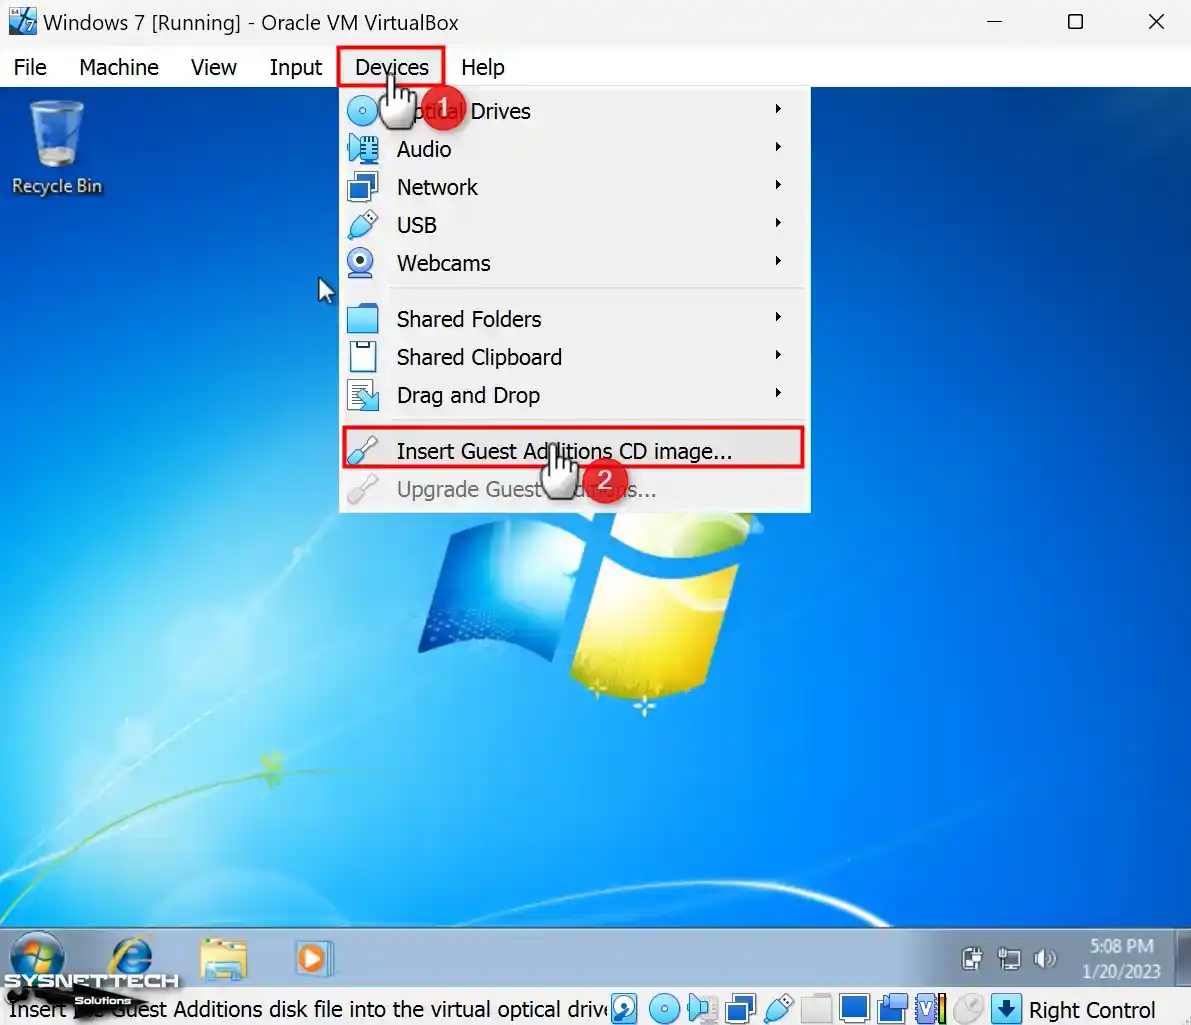
Click Devices / Insert Guest Additions CD Image in the Oracle VM VirtualBox tool menu.
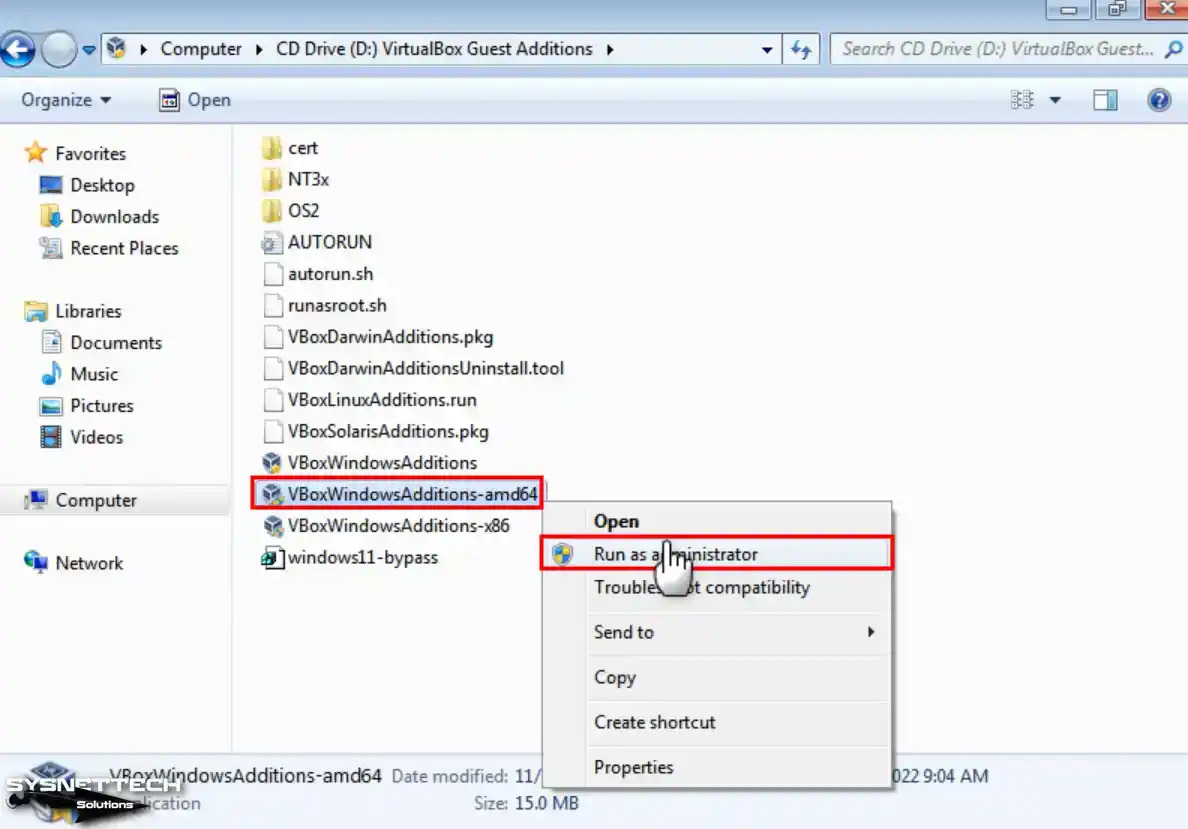
Step 3
If the guest additions image file doesn’t show up on the guest machine, open My Computer. Look inside the image file and find the VBoxWindowsAdditions-amd64 file. Run it as an administrator, and then click “Yes” in the User Account Control window.
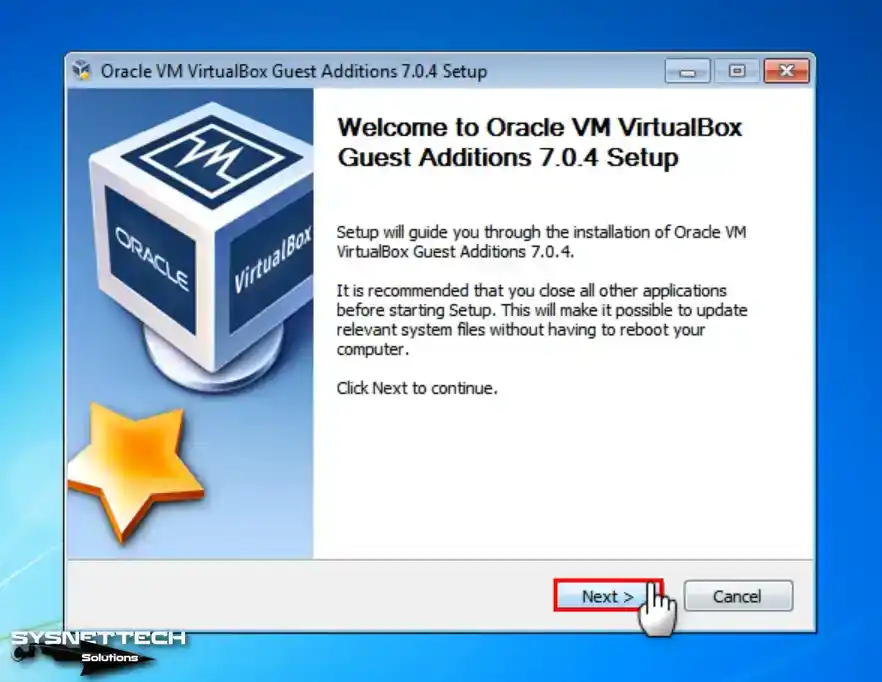
Step 4
When the Guest Additions setup wizard opens, click Next directly.
Step 5
Leave the installation location of guest additions as the default in your virtual system.

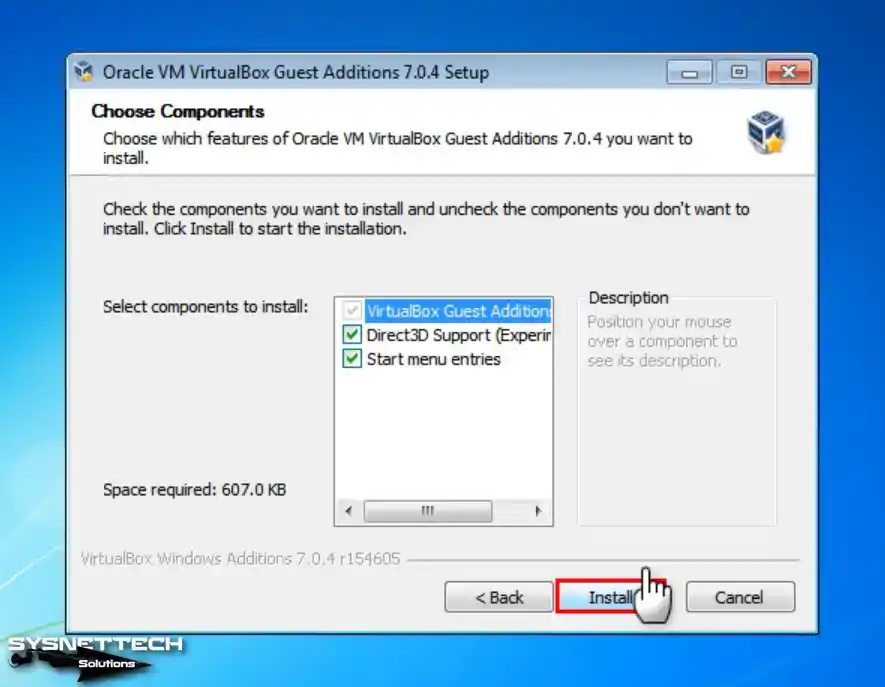
Step 6
Check that the Direct3D feature is enabled in the Choose Components window and click the Install button.
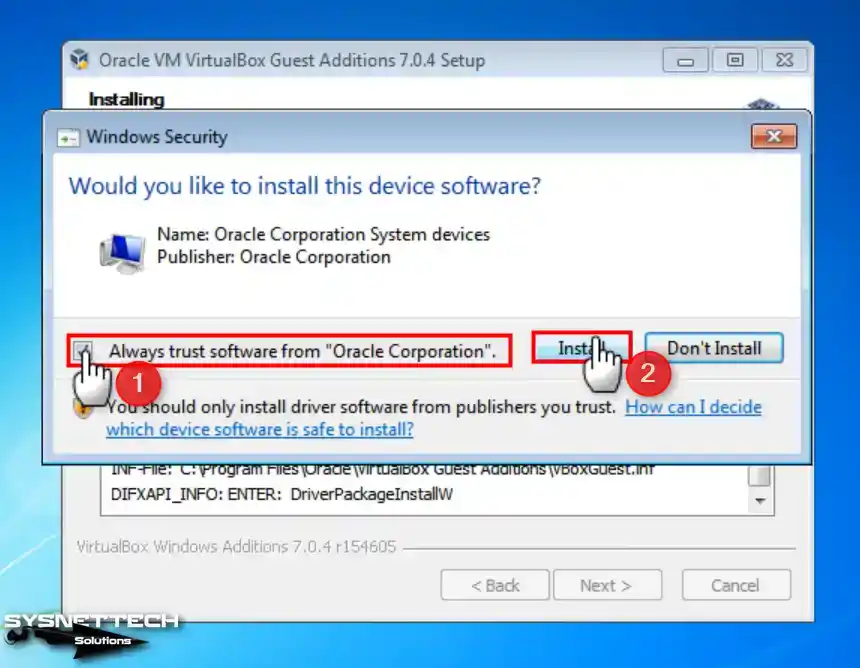
Step 7
Check the option to always trust the software from Oracle and click the Install button again.
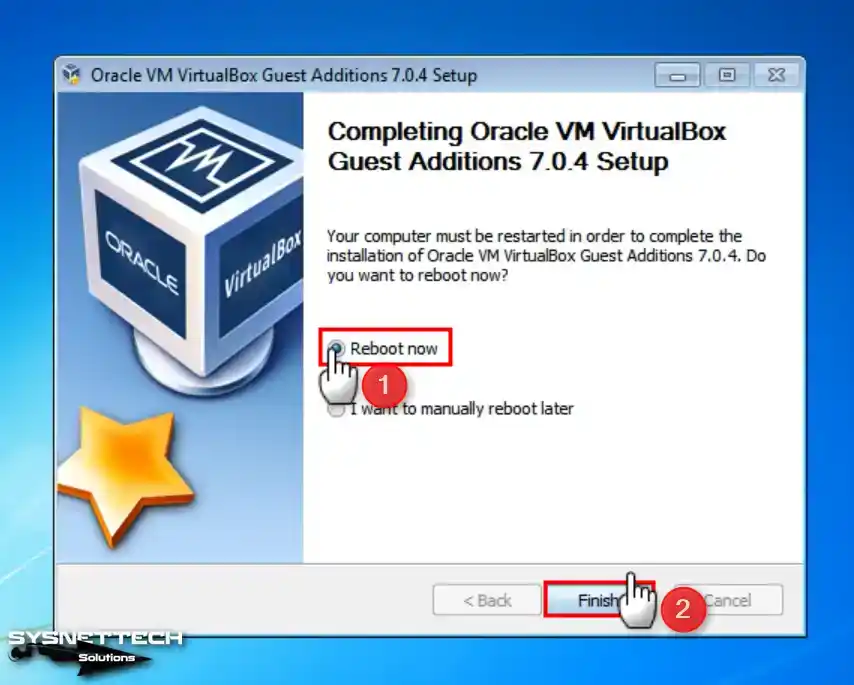
Step 8
Once the guest plugins are installed on the guest machine, please restart your system to confirm that the changes take effect.
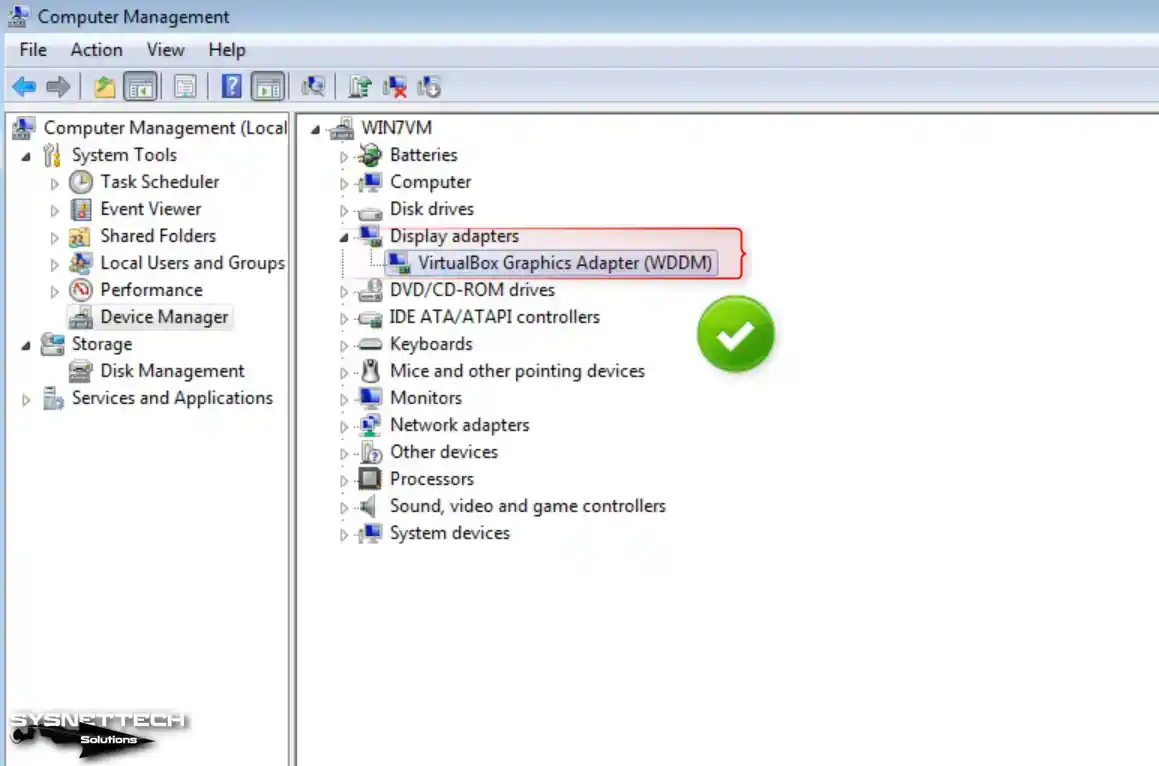
Step 9
Once your guest machine is turned on, open the Device Manager again. Check that the graphics adapter and other device drivers are installed correctly.
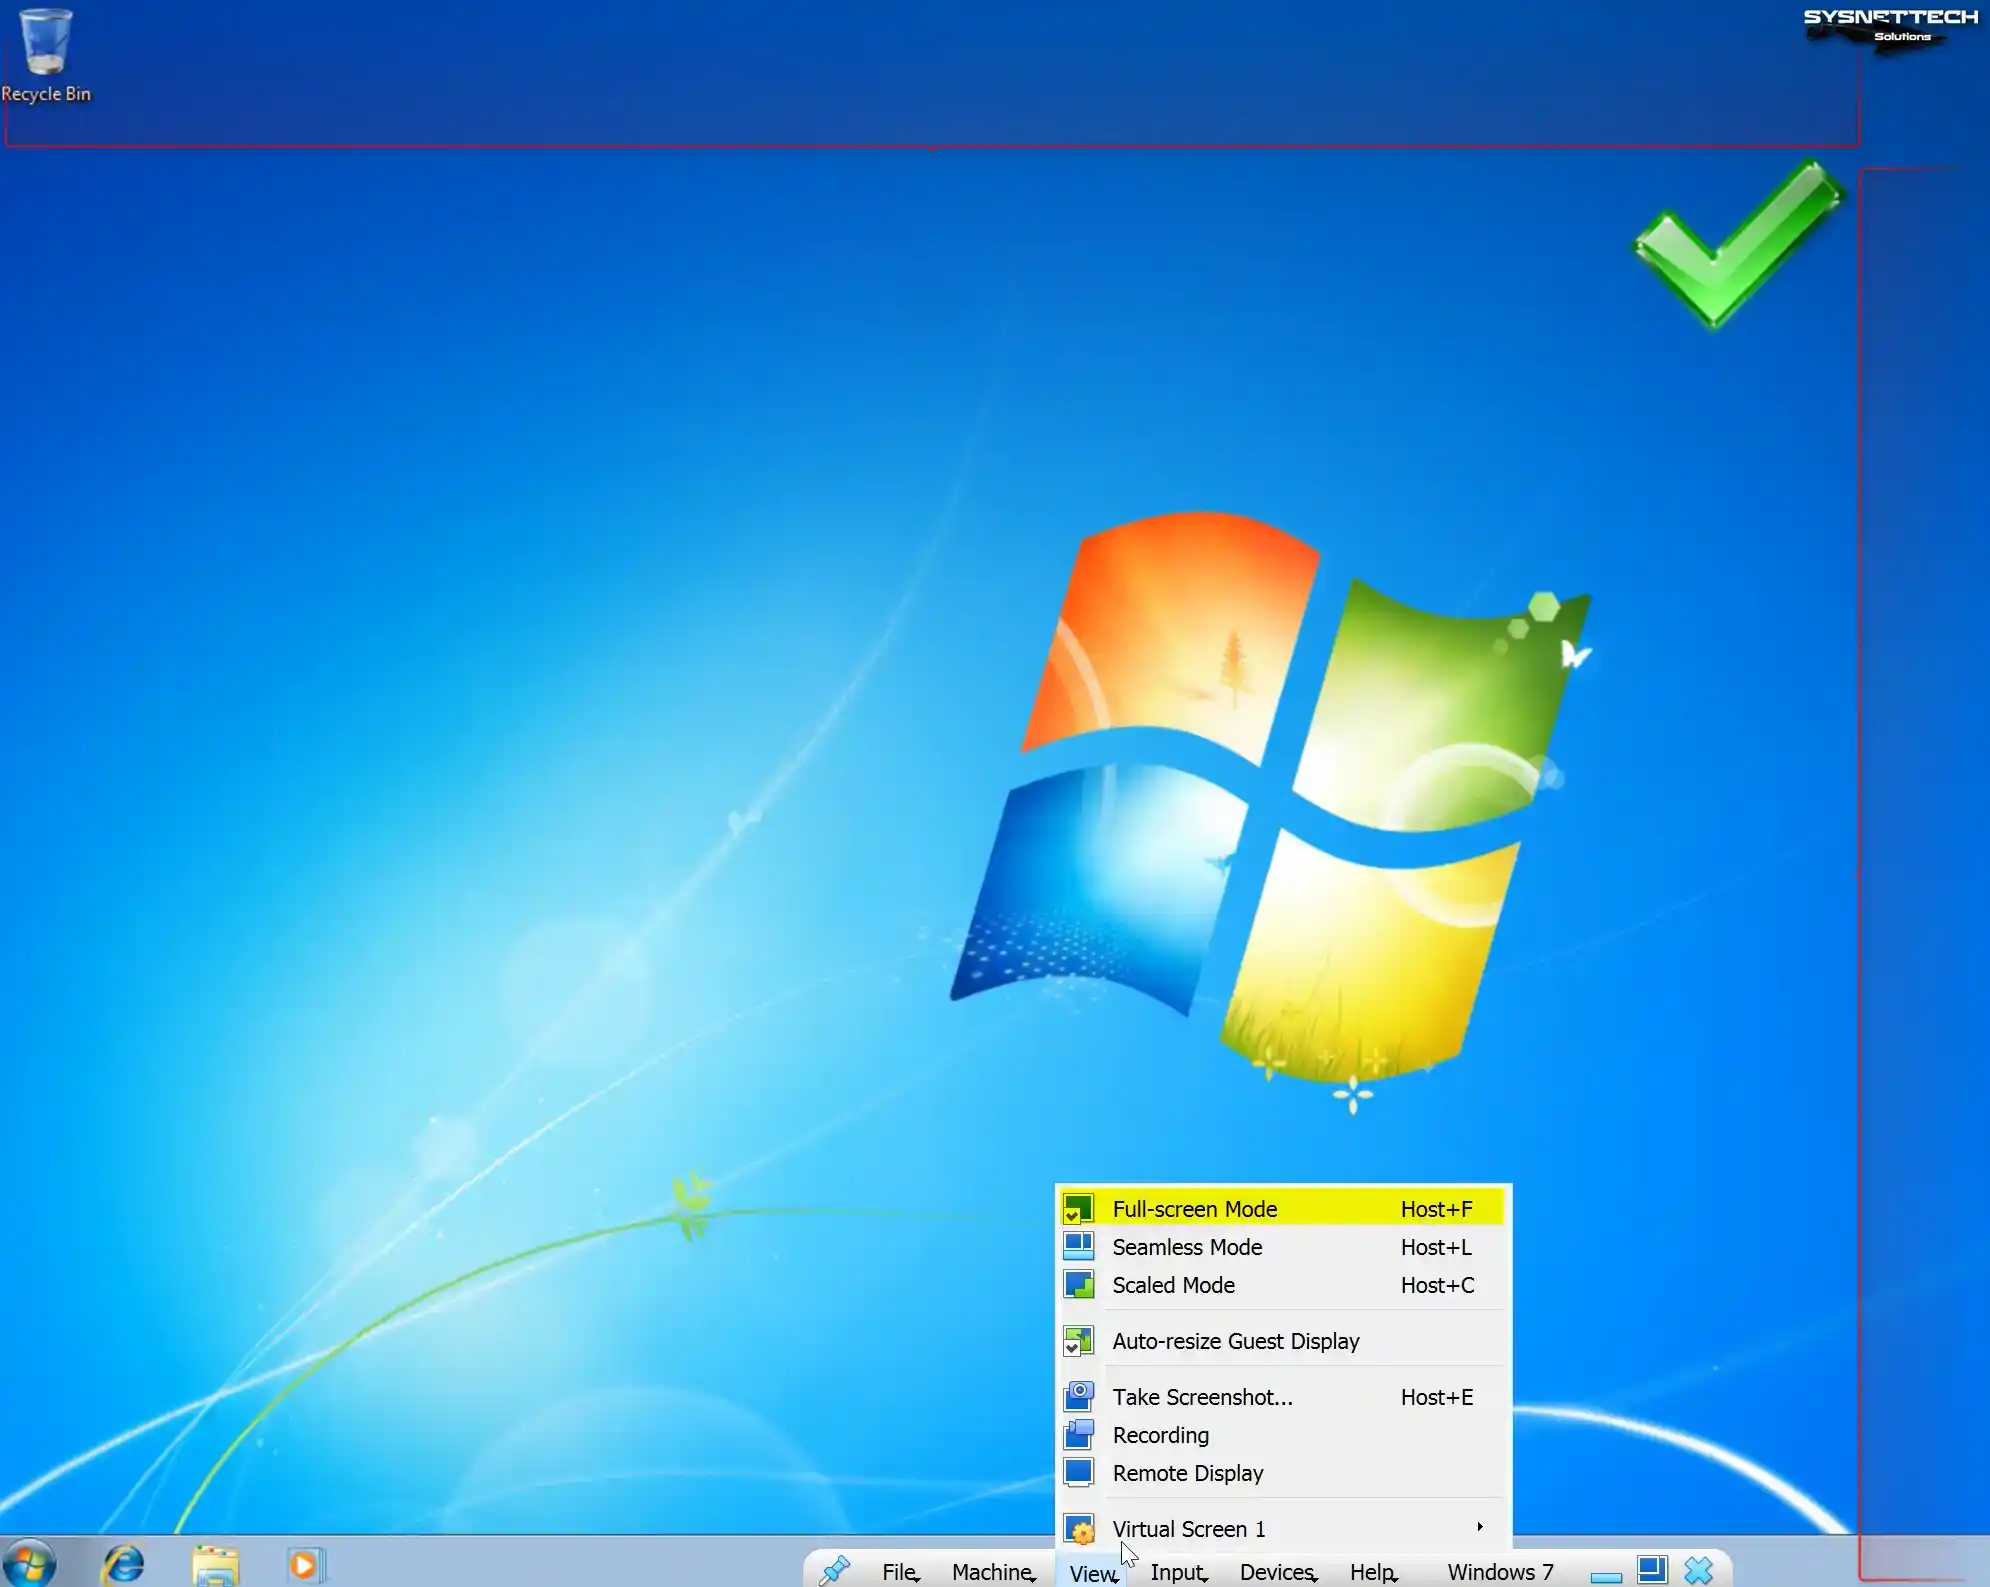
Step 10
To adjust your Windows 7 VM to the host screen size, go to the View menu. Then, click Full-Screen Mode. If you have a 2K or 4K display, use the settings in your virtualization software to increase the text size. Be sure to set the screen scale settings to a higher value.
Step 11
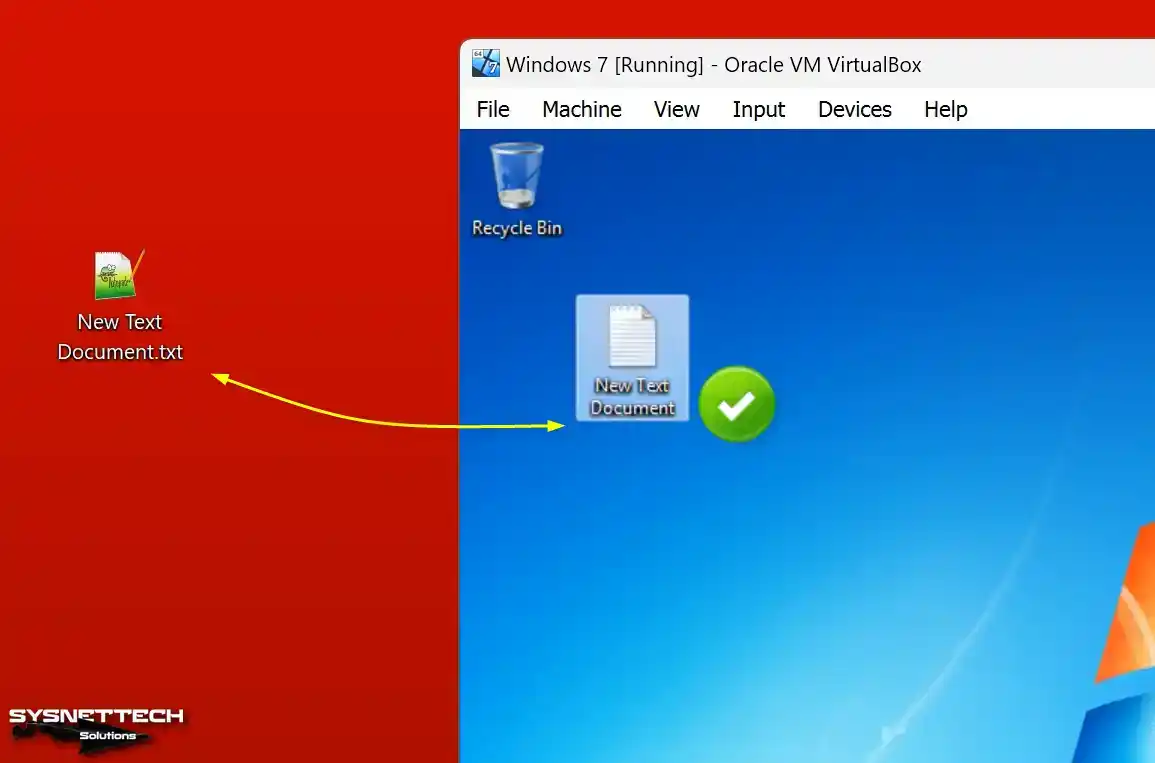
Create a new text document on your host computer. Then drag and drop it onto your virtual PC desktop. Upon examining the image, you can see that the file transfer was successful.
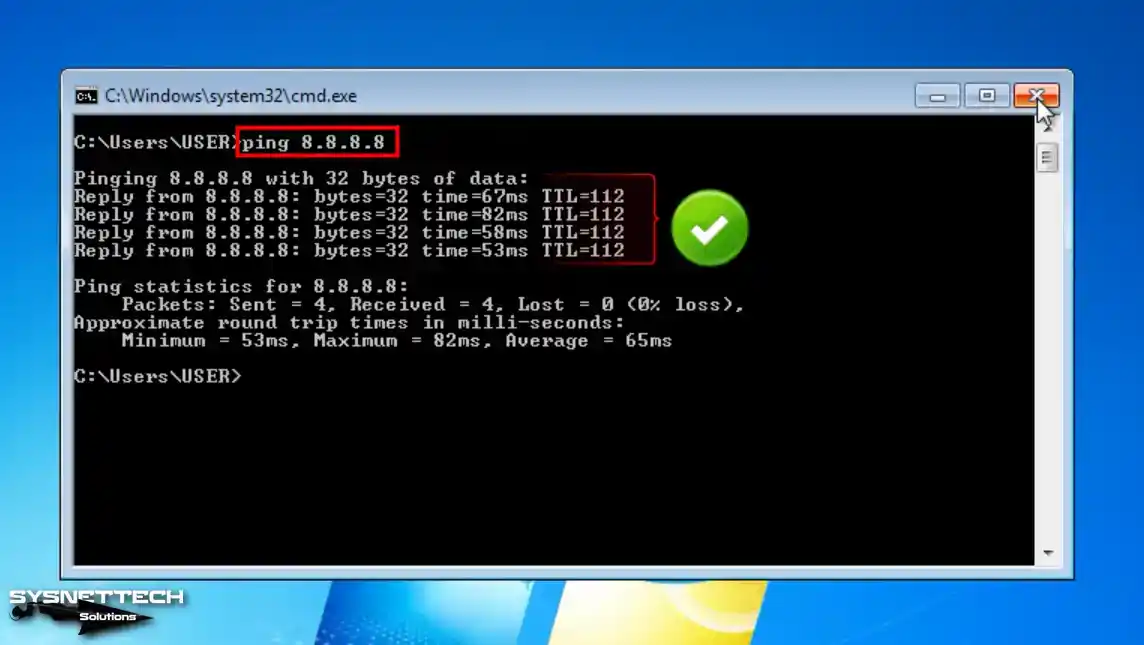
How to Test Internet Connection
You can see that the network settings are configured when you want to access the Internet through the virtual machine. This is because the VirtualBox network services are running correctly in your host’s background.
Step 1
Open the CMD command prompt on your guest machine, ping 8.8.8.8, and check that it can access Google servers.
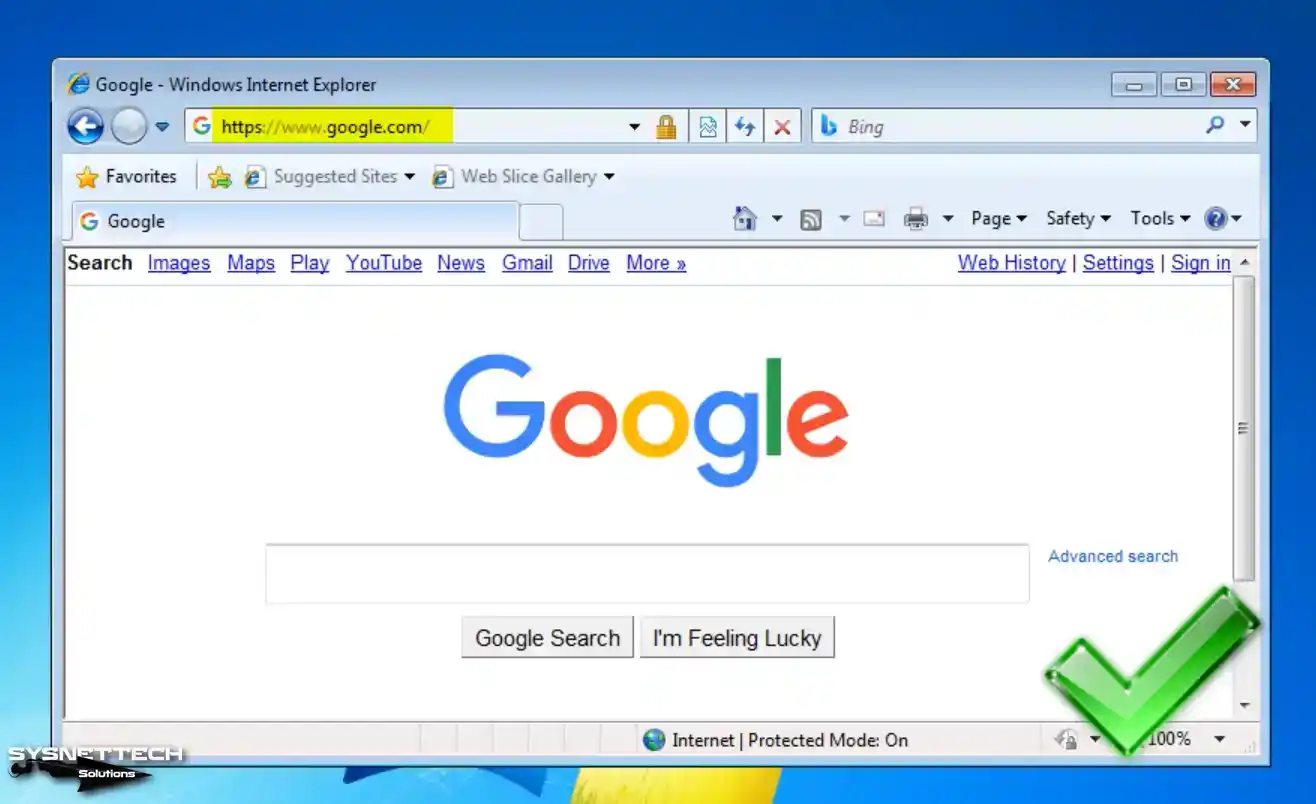
Step 2
Once the ping is successfully executed, a connection with the Google search engine will be established using Internet Explorer. Verify that your Internet settings are accurately configured.
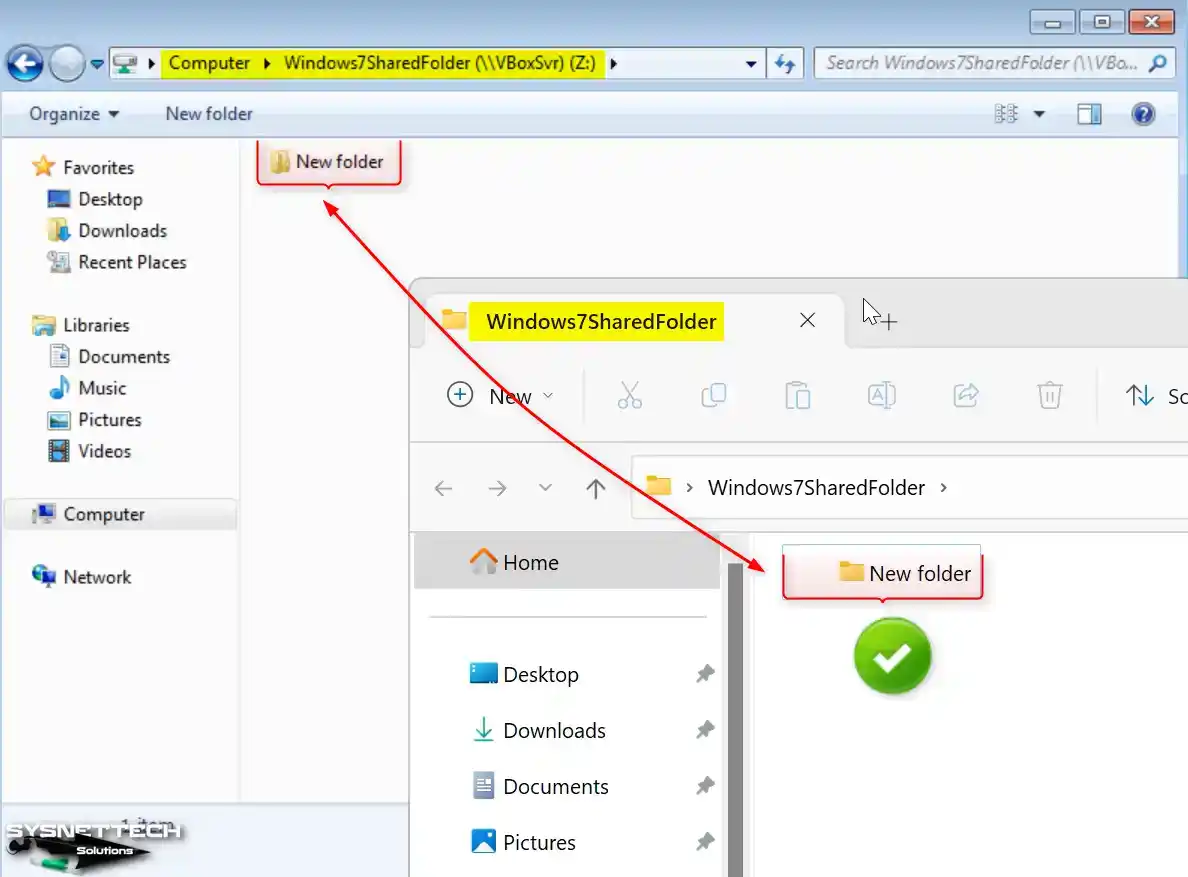
How to Configure a Shared Folder
Although the drag-and-drop file transfer between the host and the virtual PC is working, sometimes copying files to the virtual machine may take time. It is valuable to create a Shared Folder to avoid such problems.
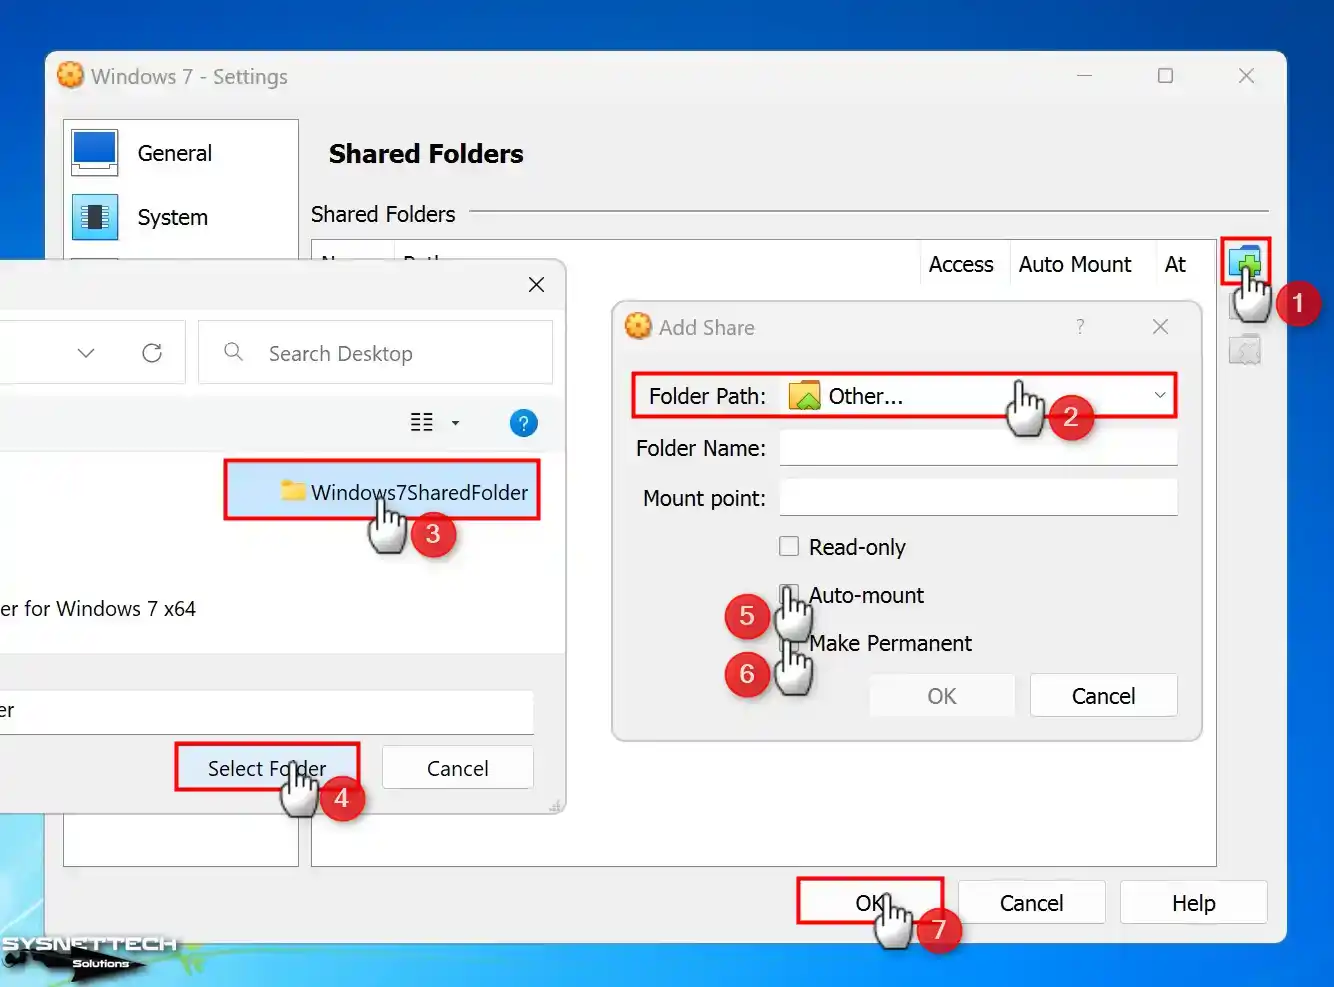
Step 1
Click Devices / Shared Folders / Shared Folders Settings on the Win7 guest machine.

Step 2
When Shared Folders opens its settings, click the green + button and open the sharing settings. In the Add Share window, select a common folder between your host and your VM for the Folder Path.
Enable Auto-Mount and make it Permanent to map the shared folder as a network drive and on My Computer. After rechecking the location of the public folder, click OK.
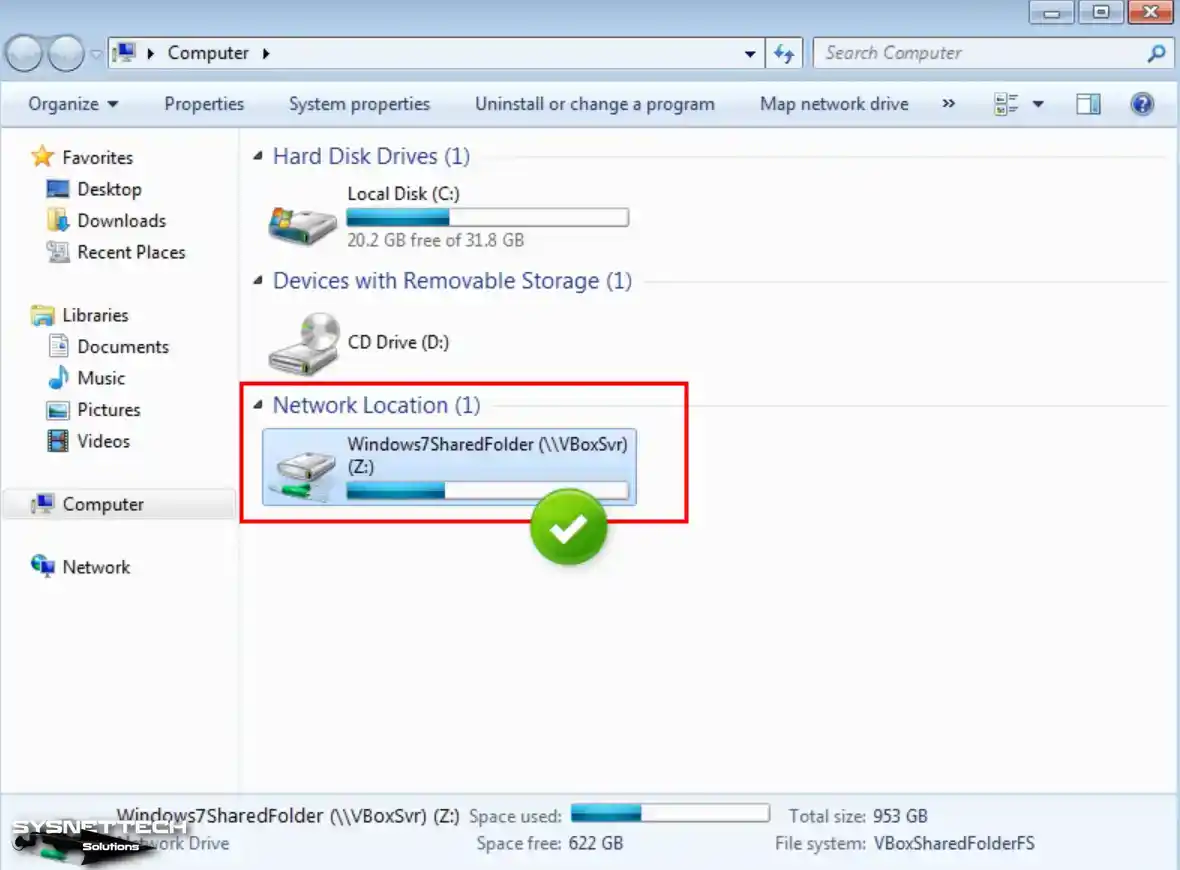
Step 3
Verify that you can access the shared folder via the My Computer shortcut on the virtual machine.
Also, check that the VBOXSVR device is available on the network. If VBOXSVR is not visible, you can access the Shared Folder after enabling the network and sharing settings.
Step 4
It will instantly be synchronized when you create a file or folder from your host system and a guest machine in the shared folder.
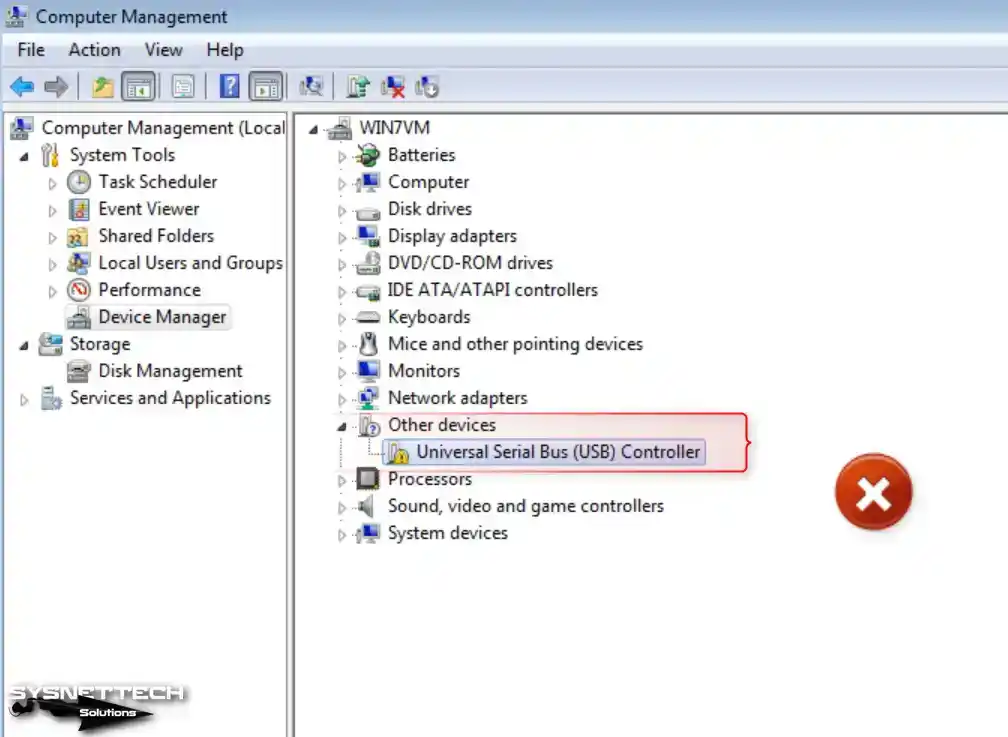
How to Install USB Driver and Use Flash Memory in VM
To use USB devices such as Flash Memory on a Windows 7 guest machine, you must enable USB 3.0 in the VM’s settings.
Step 1
Upon launching your virtual machine, you will notice that the Universal Serial Bus (USB) Controller device driver is not automatically installed in the Device Manager. Download the USB 3.0 driver package for Windows 7 64-bit from the table below the article to your host and copy the installation files to the VM.
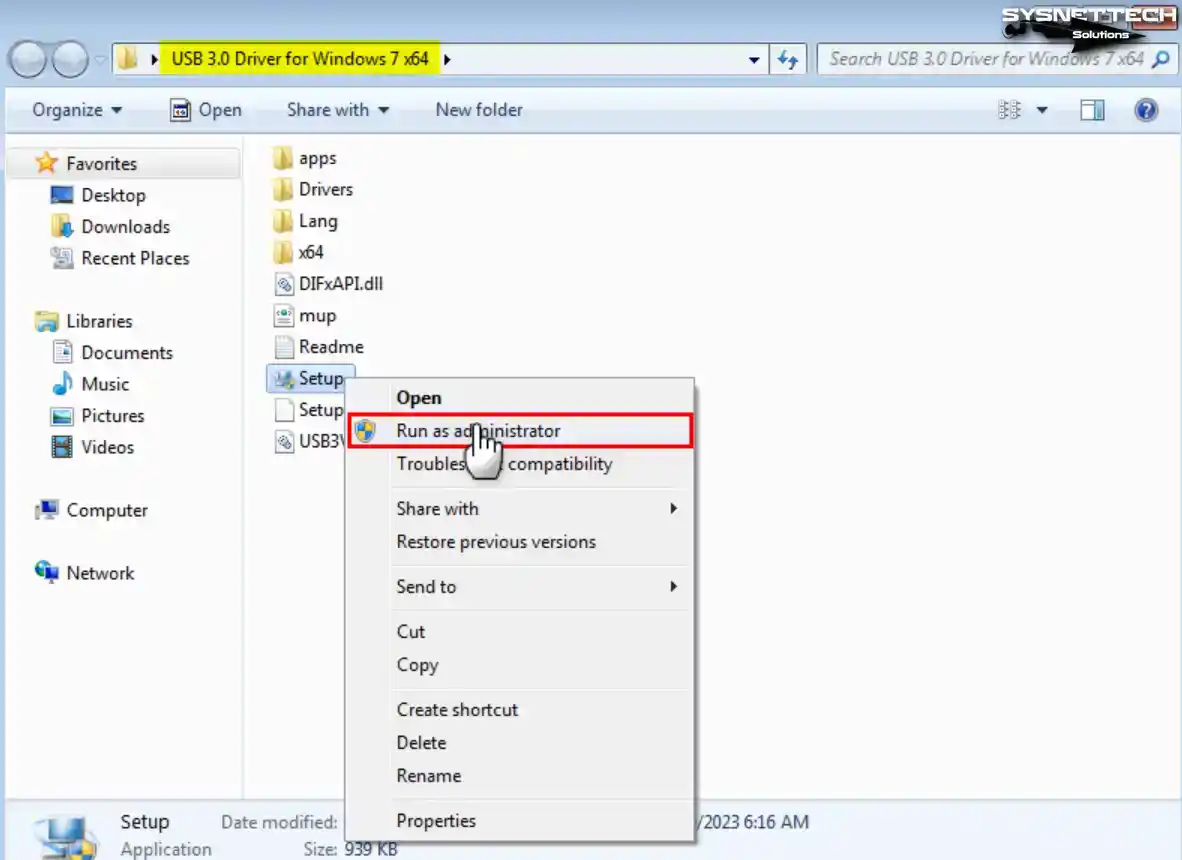
Step 2
Open the USB 3.0 Driver folder and run the Setup file as an administrator.
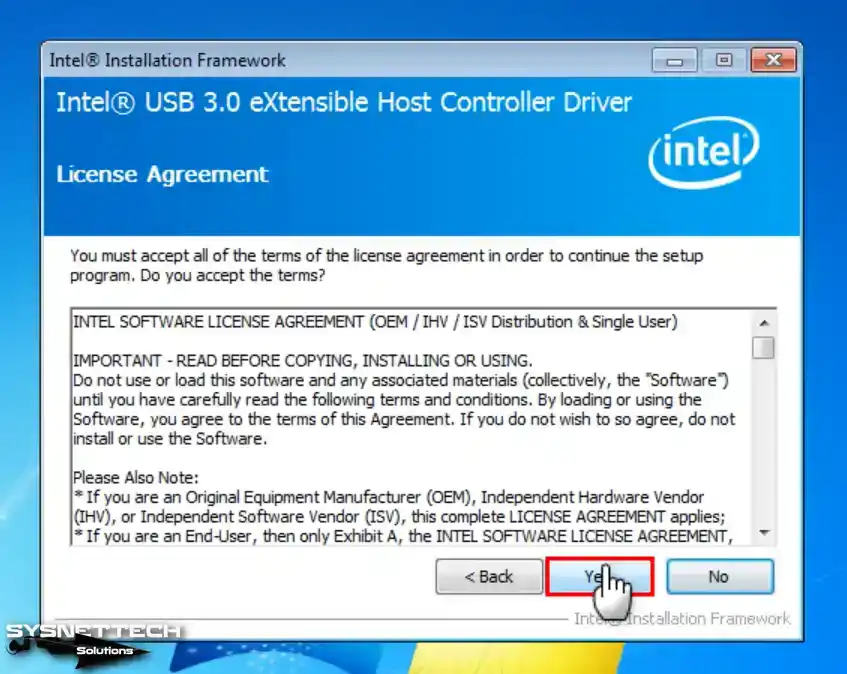
Step 3
After checking the drivers to be installed on your system in the Intel USB 3.0 eXtensible Host Controller Driver window, click Next.

Step 4
Click ‘Yes’ to accept the USB 3.0 driver license agreement and continue.
Step 5
Click Next in the information window, informing you not to run the USB driver from a USB storage device.

Step 6
When installing USB 3.0 drivers on Windows 7, the Device Manager configures the devices automatically.
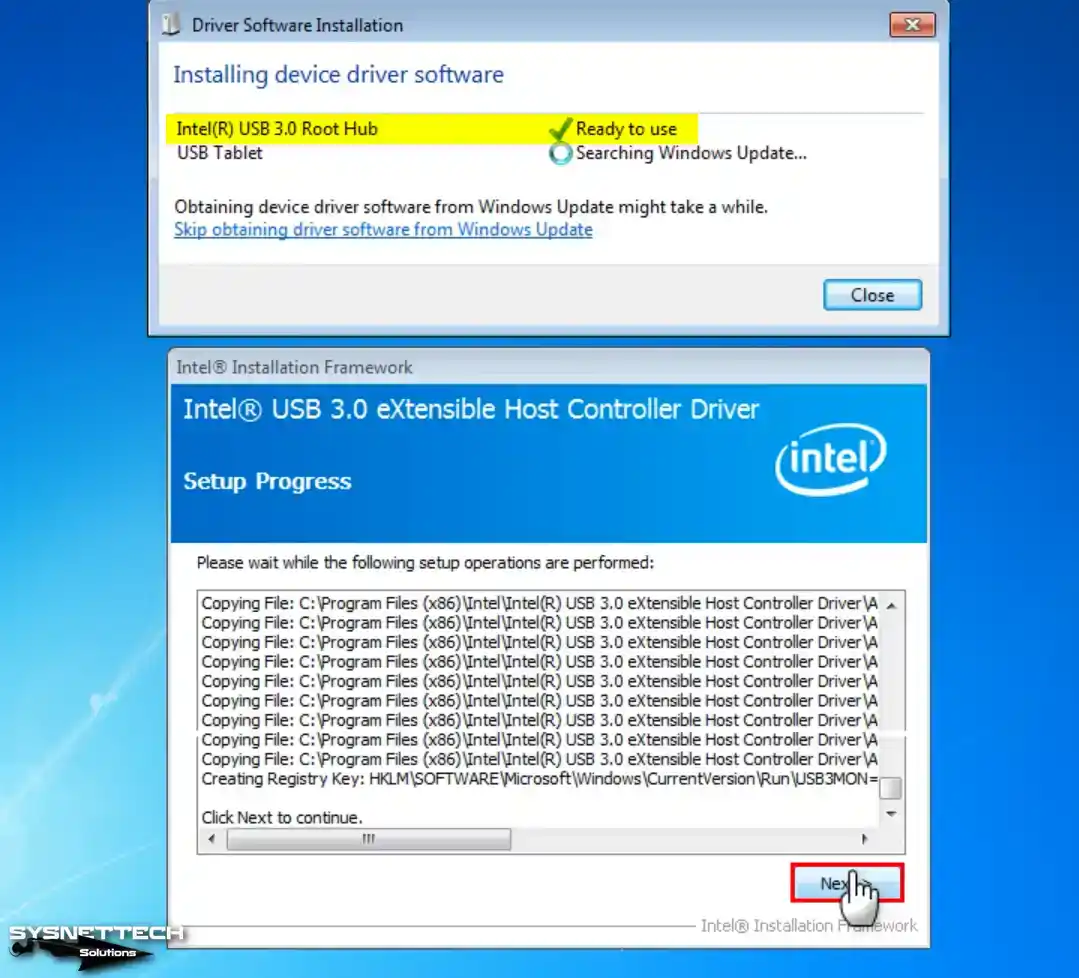
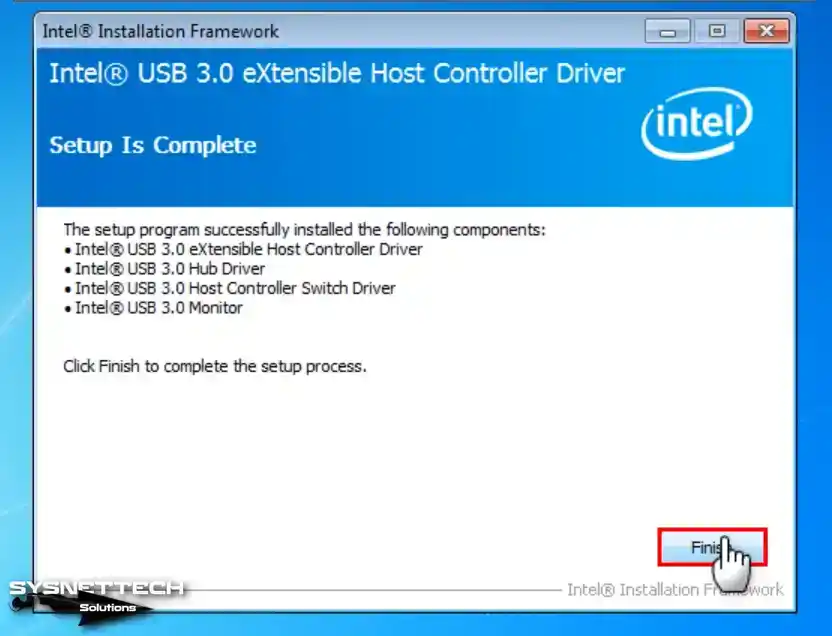
Step 7
Click the Finish button when the USB setup wizard is complete.
Step 8
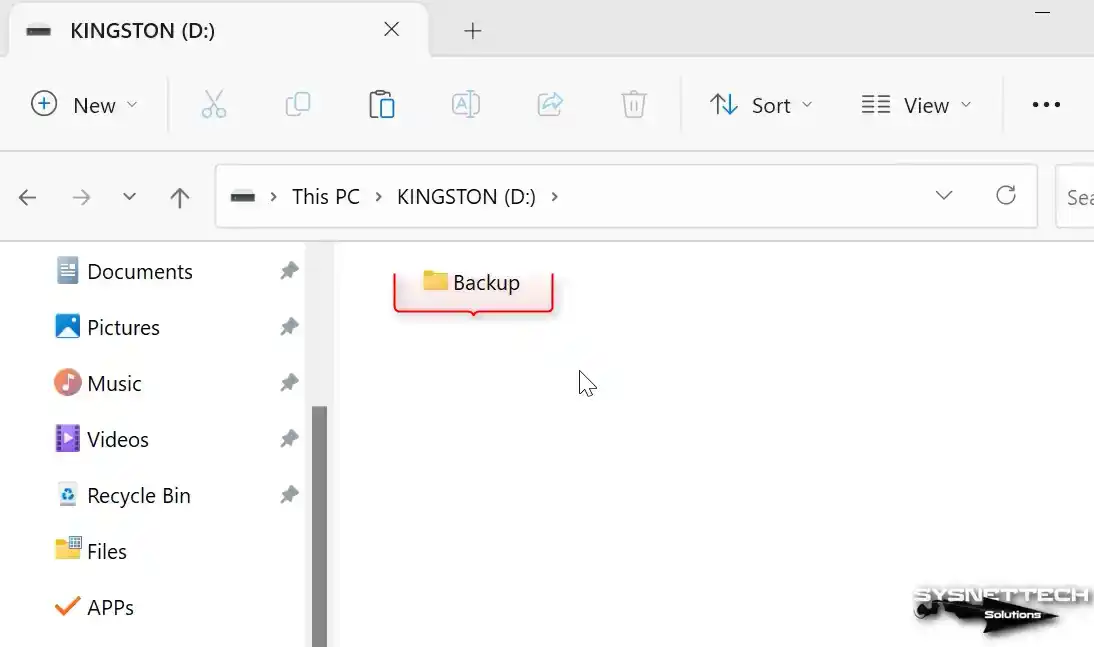
Connect a USB 3.0/3.1 compatible flash drive to any port on your host PC and create a folder named ‘Backup’ as an illustrative example.
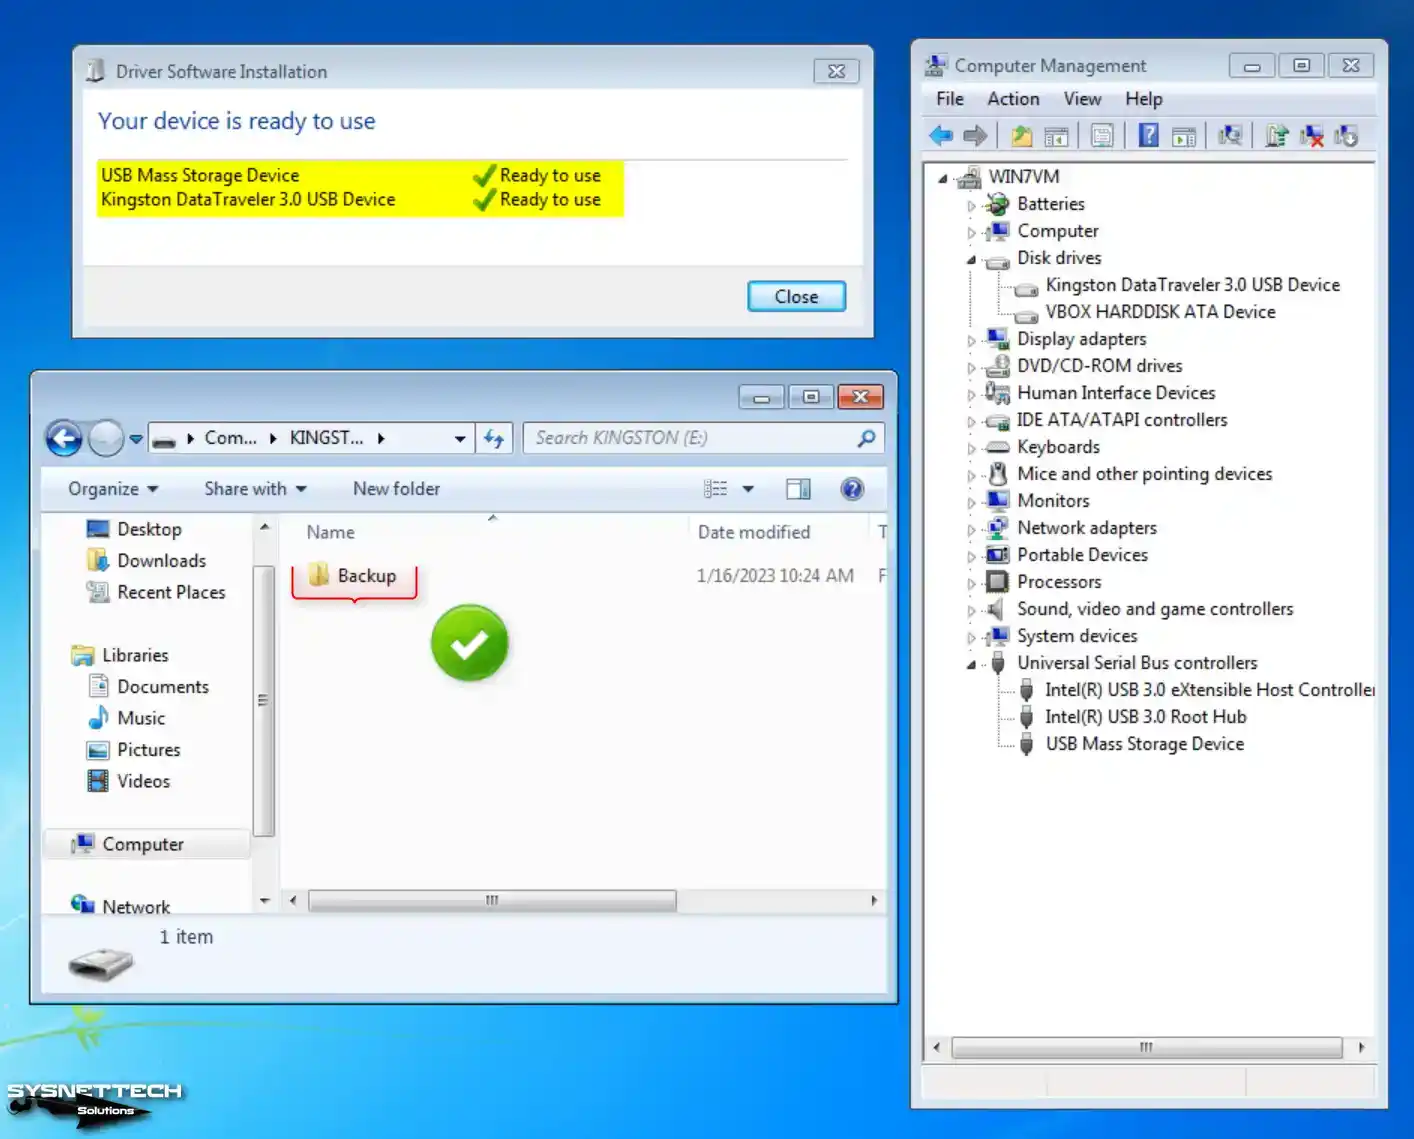
Step 9
Click Devices / USB / Kingston DataTraveler 3.0 (Name of Your USB Device) on the Windows 7 guest machine.
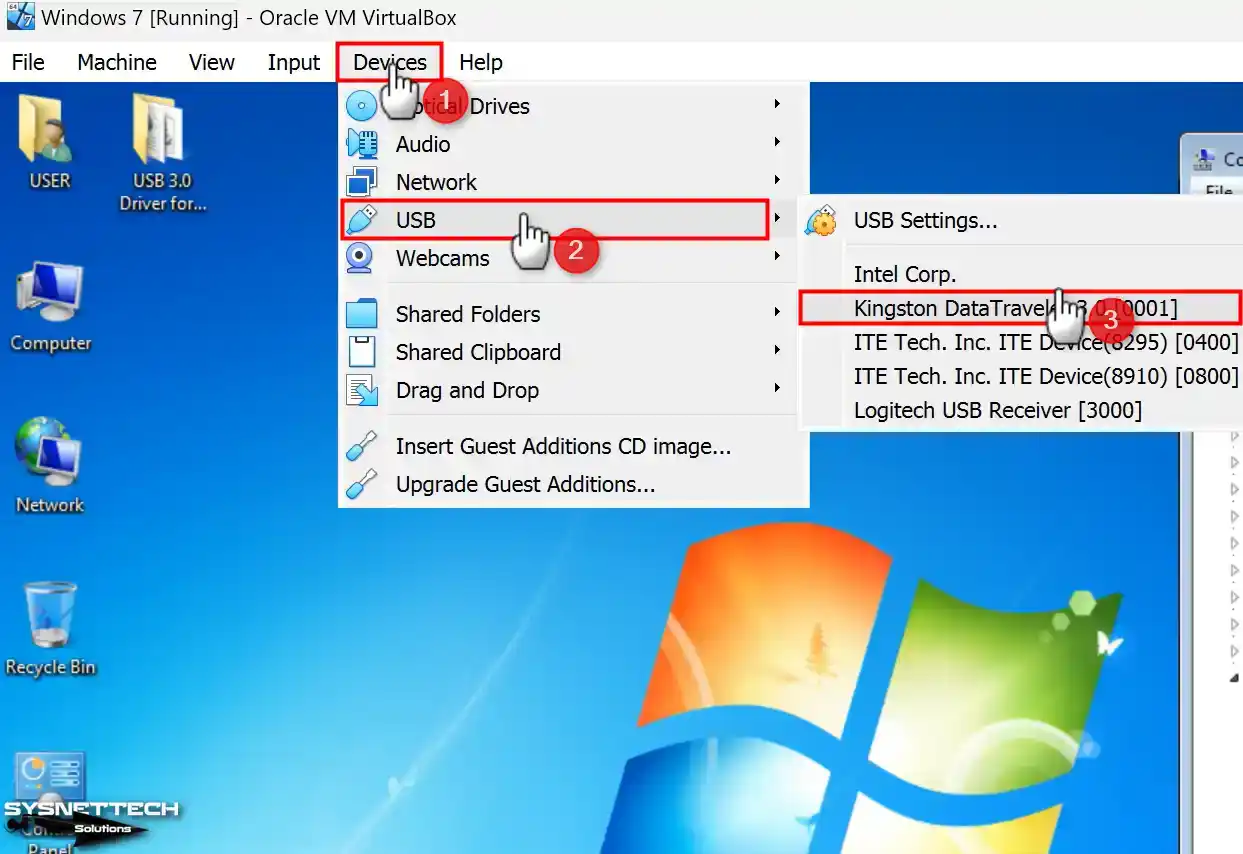
Step 10
Your USB 3.0 memory inserted in your host machine will be automatically identified by your virtual computer.
- Intel(R) USB 3.0 eXtensible Host Controller
- Intel(R) USB 3.0 Root Hub
- USB Mass Storage Device
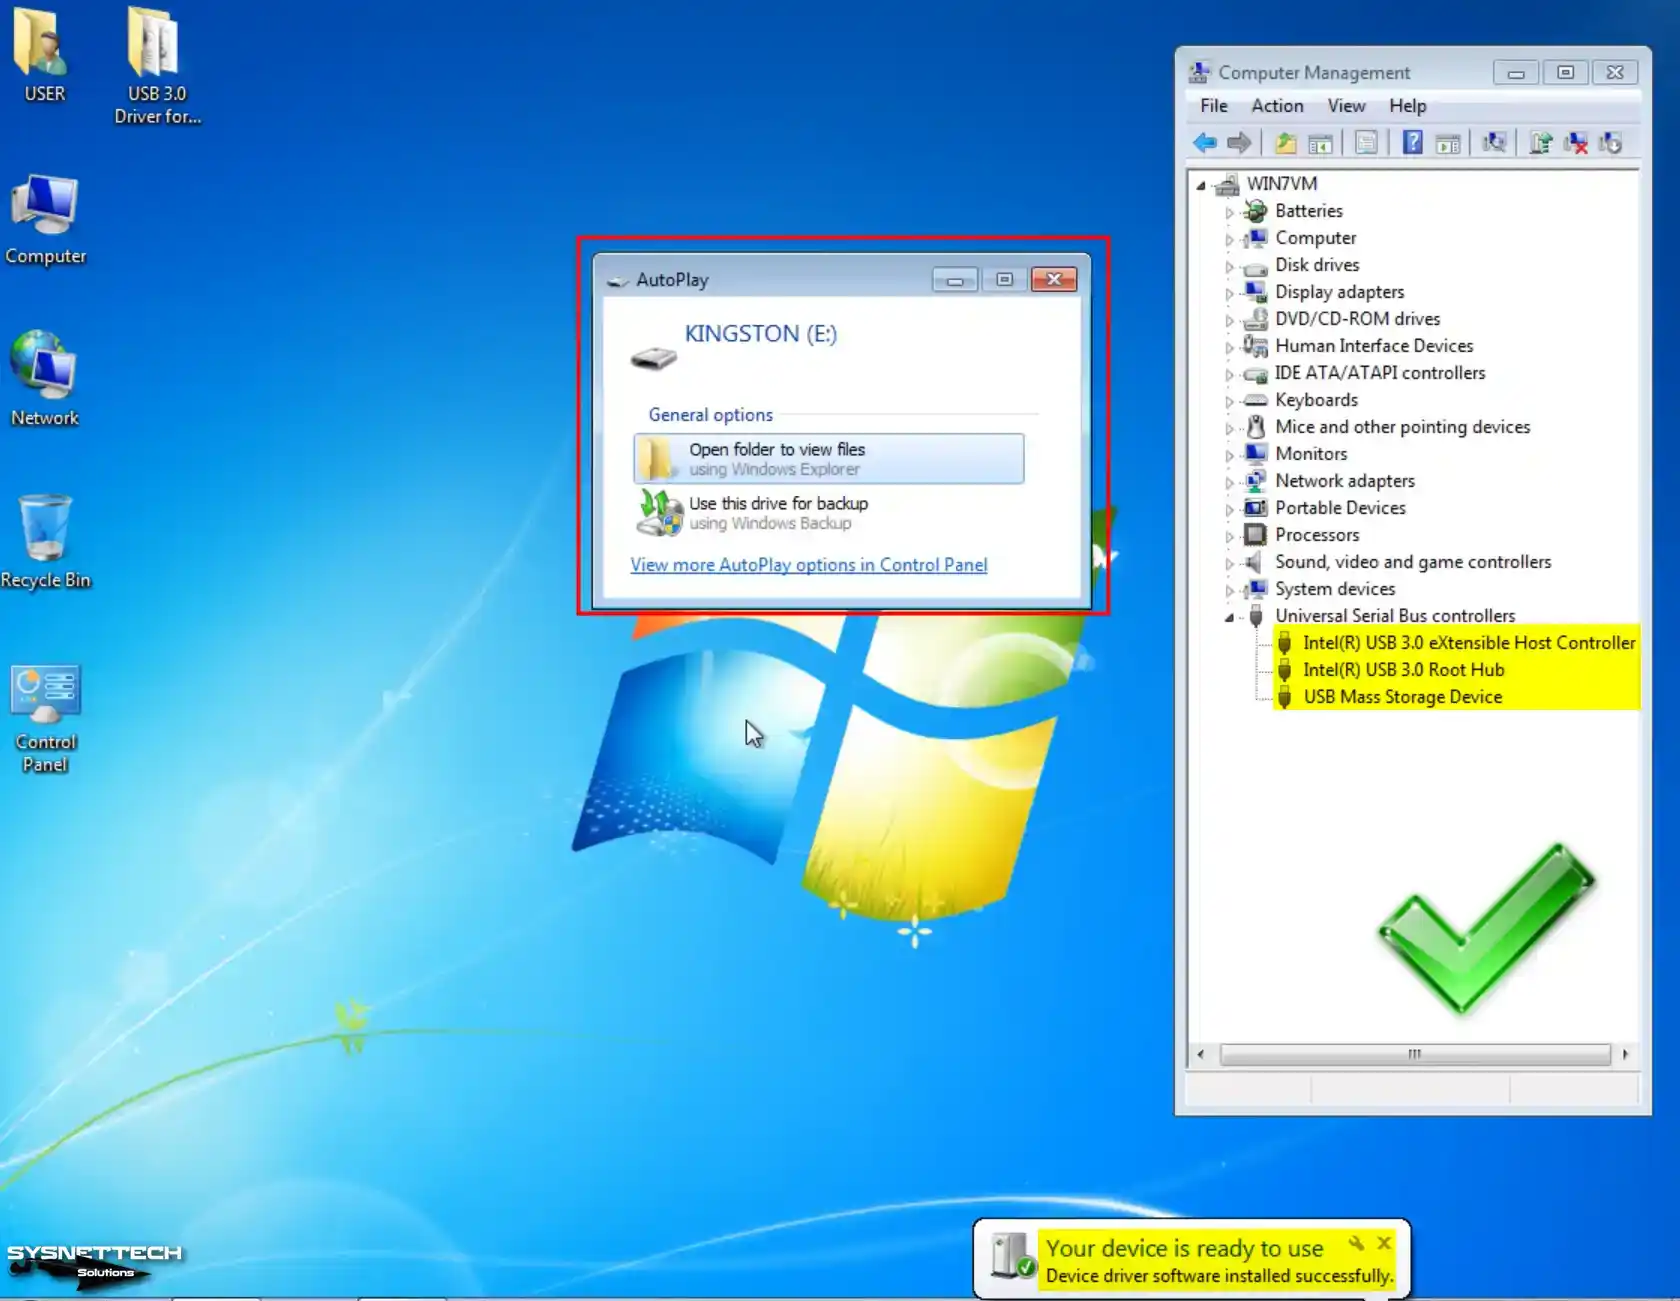
Step 11
Upon navigating to My Computer on your guest machine, you will see that your USB 3.0 or 3.1 flash memory is successfully mounted within the virtual system.
Video
Installing Old Versions
Windows 7 ISO ve USB 3.0 Driver
| File | Links |
|---|---|
| The USB 3.0 Driver for Windows 7 x64 | Download |
| Windows 7 Ultimate SP1 EN 64-Bit | Download |
Conclusion
In summary, you can install Windows 7 OS on even your newest PC without any problems with Oracle VM VirtualBox. Although current devices no longer support Windows 7 on physical machines, we can use virtualization software. Tools like VirtualBox allow us to run old operating systems safely and efficiently.
By following all the steps I mentioned in this article, you can create a Windows 7 virtual machine. You can also do compatibility tests and experience using your old software. Plus, system security is critical when experimenting with old operating systems. Therefore, you can run your virtual system independently of your host.
If you want to try older operating systems, check out our guide to installing Windows XP in VirtualBox. In this guide, I explain everything you need to set up an XP virtual machine. This way, you can run the old operating system safely on your current platform.
Item Preview

VirtualBox_Windows 7 Ultimate_14_08_2022_18_18_25.png
VirtualBox_Windows 7 Ultimate_14_08_2022_18_19_45.png
VirtualBox_Windows 7 Ultimate_14_08_2022_18_19_57.png
VirtualBox_Windows 7 Ultimate_14_08_2022_18_21_47.png
VirtualBox_Windows 7 Ultimate_14_08_2022_18_26_01.png
Windows 7 Accessories.png
Windows 7 DVD Maker.png
Windows 7 Desktop.png
Windows 7 Games.png
Windows 7 Google.png
Windows 7 Internet Explorer 8.png
Windows 7 Media Center.png
Windows 7 Media Player.png
Windows 7 More Games.png
Windows 7 Startup.png
51,179
Views
15
Favorites
7
Reviews
DOWNLOAD OPTIONS
Uploaded by
SunnyD Studios
on
SIMILAR ITEMS (based on metadata)
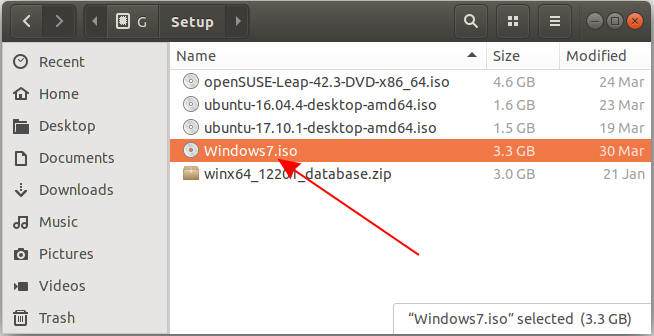
1. Download Windows 7 Iso
First of all, you need to download a Windows 7 Installer with Iso, and Bootable formats. If you have a copyright CD Key, you can download directly from a website of Microsoft:
- https://www.microsoft.com/en-us/software-download/windows7
If you have no copyright CD Key, let’s seek a site to be able to download a Windows7 Iso installer, for instance, the following website:
OK, I have a Windows 7 installer with Iso format here:
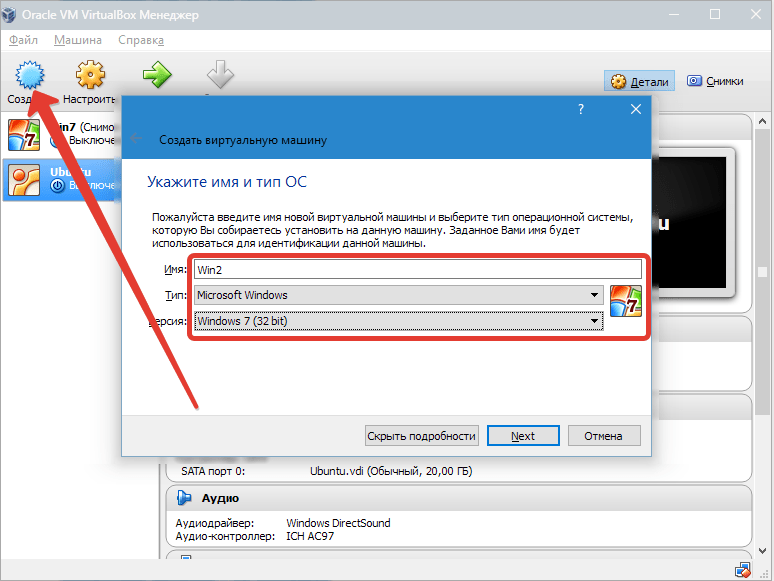
2. Declare Windows 7 virtual machine
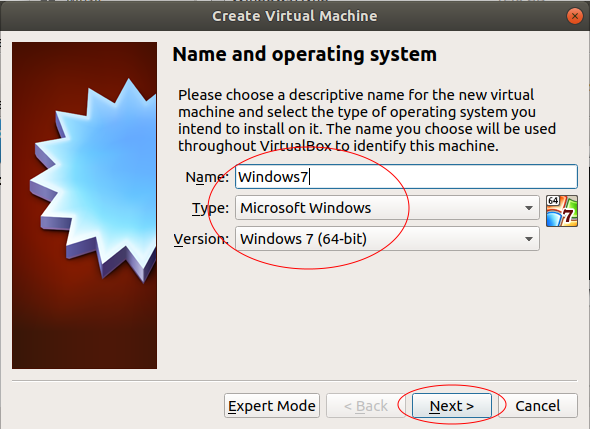
First, you need to open the VirtualBox, select New to create a new virtual machine.

Enter the name of virtual machine, herein called «Windows7» by me
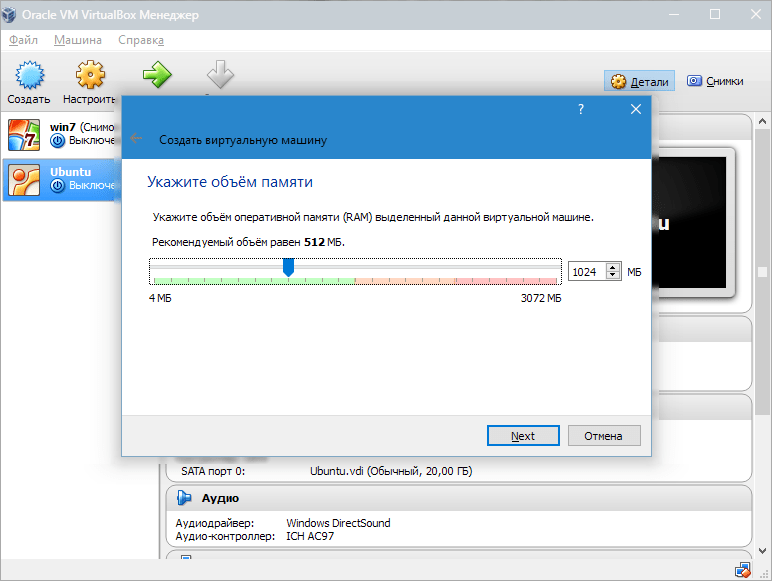
Choose the number of RAMs to be provided to the virtual machine.
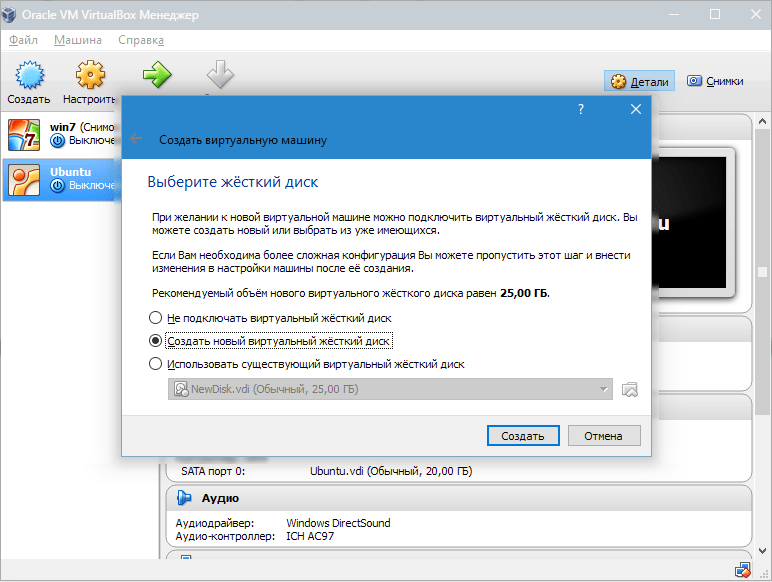
Next, create a virtual hard disk for your virtual machine.
Select the position where your virtual disk file will be created and designate the size of your virtual disk.

A Windows 7 virtual machine is created and you can see it on the VirtualBox Manager window. It is noted that your virtual machine just created is not installed operating system, therefore, you need to install an operating system for it.
3. Install operating system
In the above step, you have just declared a virtual machine on the VirtualBox. Now, you need to install an operating system for it.
Press «Start»:
The VirtualBox will ask you where the ISO file downloaded by you in the previous step is.
OK, at this time, the operating system starts being installed. If you are familiar with the installation of windows operating system, this is very simple.

Enter password and hint. Your hinted information helps you remember the password if you forget it in the future.
Select time and time zone:
OK Hệ điều hành đã cài đặt xong!
4. Install additional tools
In the above step, you have installed a virtual machine successfully. In fact, you need copy & paste the files between the virtual machine and your computer, therefore, you need to install additional software.
Поскольку мы все любим поэксперементировать, покопаться в настройках системы, запустить что-нибудь собственного изготовления, то необходимо задуматься о безопасном месте для экспериментов. Таким местом будет для нас являться виртуальная машина VirtualBox с установленной Windows 7.
При запуске виртуальной машины VirtualBox (далее VB) пользователь видит окно с полностью русскоязычным интерфейсом.
Напомним, что при установке приложения ярлык автоматически размещается на десктопе. Если вы впервые создаете виртуальную машину, в этой статье вы найдете подробные инструкции, которые смогут на этом этапе оказаться полезными.
- Итак, в новом окне нажимаем «Создать», после чего можно выбрать название ОС и другие атрибуты. Выбирать можно из всех доступных ОС.
- Переходим к следующему шагу, нажав «Next». Теперь нужно указать, какой объем ОЗУ надлежит выделить для ВМ. Для нормального ее функционирования достаточно 512 Мб, однако можно выбрать и больше.
- После этого создаем виртуальный жесткий диск. Если вы ранее создавали диски, то можно использовать их. Однако в этой же статье мы остановимся на том, как они создаются.
- Отмечаем пункт «Создать новый жесткий диск» и переходим к дальнейшим этапам.
- Далее мы указываем тип диска. Он может быть либо динамически расширяющимся, либо с фиксированным размером.
- В новом окне нужно указать, где должен находиться новый образ диска и какого он объема. Если создается загрузочный диск, содержащий ОС Windows 7, то вполне хватит объема 25 Гб (эта цифра установлена по умолчанию).

Что касается размещения, то наилучшим решением будет разместить диск за пределами системного раздела. Несоблюдение этого условия может привести к перегрузке загрузочного диска.
- Если все устраивает, нажимаем «Создать».
Когда диск будет создан, в новом окне отобразятся параметры создаваемой ВМ.
Теперь нужно настроить аппаратную часть виртуалки.
В разделе «Общие» 1-я вкладка отображает ключевые сведения о созданной машине.
- Откроем вкладку «Дополнительно». Здесь мы увидим опцию «Папка для снимков». Указанную папку рекомендуется поместить за пределами системного раздела, поскольку снимки отличаются большим объемом.
- «Общий буфер обмена» подразумевает работу буфера обмена при взаимодействии вашей главной ОС и ВМ. Буфер может работать в 4-х режимах. В первом режиме обмен производится только из гостевой операционной системы в основную, во втором – в обратном порядке; третий вариант допускает оба направления, а четвертый отключает обмен данными. Выбираем двунаправленный вариант как наиболее удобный.
- Далее активируем опцию запоминания изменений в процессе работы сменных носителей информации. Это нужная функция, поскольку она позволит системе запоминать состояние CD и DVD-приводов.
- «Мини тулбар» представляет собой малую панель, позволяющую осуществлять управление ВМ. Эту консоль рекомендуем активировать в полноэкранном режиме, поскольку ее целиком повторяет главное меню рабочего окна ВМ. Наилучшее для нее место — верхняя часть окна, поскольку так не существует риска случайно нажать на одну из ее кнопок.
- Переходим к разделу «Система». Первая вкладка предлагает произвести определенные настройки, которые мы рассмотрим ниже.
- При необходимости следует скорректировать объем оперативной памяти ВМ. Вместе с тем, только после ее запуска станет до конца понятно, верно ли выбран объем.
При выборе следует отталкиваться от того, какой размер физической памяти установлен на компьютере. Если он равен 4 Гб, то для ВМ рекомендуется выделить 1 Гб – она будет функционировать без «тормозов».
- Определим очередность загрузки. Проигрыватель флоппи-дисков (дискет) не нужен, отключаем его. 1-м в списке следует назначить CD/DVD-привод для того, чтобы иметь возможность устанавливать ОС с диска. Отметим, что это может быть как физический диск, так и виртуальный образ.
- Прочие настройки приведены в справочном разделе. Они тесно связаны с конфигурацией железа вашего компьютера. Если установить настройки, не согласующиеся с ней, запуск ВМ не сможет состояться.
На закладке «Процессор» пользователь указывает, сколько ядер имеется на виртуальной «материнке». Эта опция будет доступна, если поддерживается аппаратная виртуализация AMD-V или VT-х.
Что касается опций аппаратной виртуализации AMD-V или VT-х, то перед их активацией необходимо узнать, поддерживаются ли эти функции процессором и входят ли они изначально в BIOS – часто бывает, что они отключены.
- Теперь рассмотрим раздел «Дисплей». На закладке «Видео» указывается объем памяти виртуальной видеокарты. Также здесь доступна активация двухмерного и трехмерного ускорения. Первое из них желательно включить, а второй параметр не является обязательным.
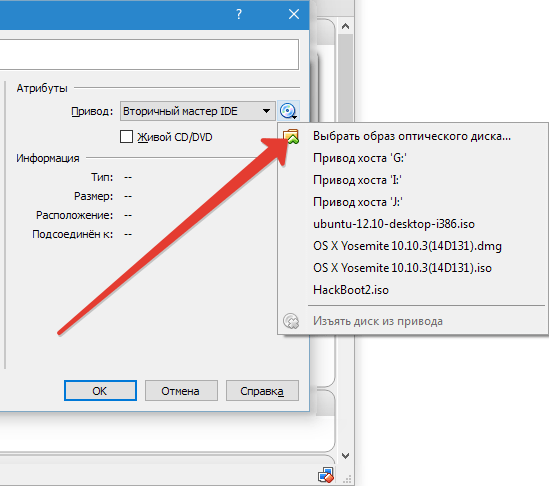
- В разделе «Носители» отображается все диски новой виртуалки. Также здесь можно увидеть виртуальный привод с надписью «Пусто». В него мы смонтируем образ установочного диска Windows 7.
- Настраивается виртуальный привод следующим образом: кликаем по значку, расположенному справа. Открывается меню, в котором мы жмем «Выбрать образ оптического диска». Далее следует добавить образ загрузочного диска операционной системы.
- Вопросы, касающиеся сети, здесь мы освещать не станем. Отметим, что сетевой адаптер изначально активен, что является предпосылкой для выхода ВМ в Internet.
- На разделе СОМ подробно останавливаться нет смысла, поскольку к такого рода портам сегодня уже ничего не подсоединяется.
- В разделе USB отмечаем обе доступных опции.
- Зайдем в «Общие папки» и выберем те каталоги, к которым ВМ планируется предоставить доступ.
Как создать и настроить общие папки
Весь процесс настройки на этом завершен. Теперь можно приступать к инсталляции ОС.
- Выбираем созданную машину в списке и жмем «Запустить». Сама установка Windows 7 на VirtualBox очень похожа на обычную установку Windows.
- После загрузки установочных файлов откроется окно с выбором языка.
- Далее нажимаем «Установить».
- Принимаем условия лицензии.
- Затем выбираем «Полная установка».
- В следующем окне нужно выбрать раздел диска для установки операционной системы. Раздел у нас единственный, поэтому выбираем его.
- Далее следует процесс установки Windows 7.
- Во время установки машина несколько раз автоматически перезагрузится. После всех перезагрузок вводим желаемое имя пользователя и компьютера.
- Далее программа установки предложит придумать пароль для Вашей учетной записи.
- Здесь вводим ключ продукта, если есть. Если нет, то просто жмем «Далее».
- Далее следует окно Центра обновлений. Для виртуальной машины лучше выбрать третий пункт.
- Выставляем часовой пояс и дату.
- Затем выбираем, к какой сети отнести нашу новую виртуальную машину. Нажимаем «Домашняя».
- После этих действий виртуалка автоматически перезагрузится и мы попадем на рабочий стол свежеустановленной Windows 7.

Таким образом, мы установили Windows 7 на виртуальную машину VirtualBox. Далее ее необходимо будет активировать, но это тема для другой статьи…
Наша группа в TelegramПолезные советы и помощь
9 января 2016 г. в 12:00 · Артём Золотаревский

В статье приведена подробная пошаговая инструкция по установке Windows 7 на VirtualBox. В чем преимущество виртуального окружения? Это изолированная среда. Запустив в ней вирус, вашей основной системе ничего не грозит.
Подготовка
В этом разделе мы подготовим все необходимые компоненты. Нам надо:
1. Скачать виртуальную машину
Чтобы скачать виртуальную машину нам надо сначала выбрать ее. К наиболее популярным относиться VMWare, Virtual PC 2007 от Microsoft и VirtualBox от Sun. Мне больше всего понравились две машины, первая и последняя. Но мы будем рассматривать именно VirtualBox. Скачать свежую версию нужно с их официального сайта — http://www.virtualbox.org/wiki/Downloads. Послего этого установка производится стандартным образом.
2. Скачать образ виртуальной ОС
Мы будем устанавливать Windows 7. Найти нужную версию можно по ключевым словам: “Образ операционной системы Windows 7”. Вот ссылка на используемый в статье образ — https://yadi.sk/d/NviXZl9gmksdf. Для установки данной ОС необходимо минимум 7 ГБ свободного дискового пространства.
Создание виртуальной машины
После установки VirtualBox на рабочем столе должен был появиться вот такой значок.
Мы нажимаем по нему и тем самым запускаем программу. Если вы удачно ее установили, тогда у вас должно открыться окно, которое показано ниже.

В этой программе можно создавать много виртуальных OC. А установить можно даже андроид или люникс.
Чтобы создать виртуальную систему нам надо нажать на кнопку «Создать». Откроется окно, в котором нужно указать, какую именно систему Вы хотите создать.

Заполняете параметры, в нашем случае выбираем любое имя, Тип: Microsoft Windows, а версия: Windows 7 и жмем далее.
В следующем окне введите размер оперативной памяти, меньше 512 не рекомендуеться, в принципе, их хватит для знакомства с системой. Щелкаем Далее.
В новом окне нужно выбрать загрузочный виртуальный жесткий диск. Поскольку мы их еще не создали, выбираем пункт «Создать новый виртуальный жесткий диск» и нажимаем кнопу Создать.
В новом окне надо выбрать тип файла, определяющий формат, который Вы хотите использовать при создании нового жесткого диска. Тут мы ничего не трогаем и жмем Далее.

Откроется окно мастера в котором надо выбрать тип хранения данных жесткого диска новой системы. Есть два варианта:
- Динамический
- Фиксированный
Динамический означает, что у вас изначально он будет занимать мало места и будет расширяться постепенно, а фиксированный сразу заберет весь выделенный под него объем. Я вам советую выбрать динамический. И так, мы выбираем динамический и жмем далее.
Здесь мы должны выбрать размер диска. По умолчанию рекомендуется 25 гигабайт, но можно и уменьшить, я поставил 20 гигабайт.
Мы нажимаем готово и нас вернуло в первоначальное окно. Так мы создали виртуальную машину, в которую нам предстоит еще загрузить образ диска.
После установки виртуальной машины у нас заработали еще две кнопки: настроить и запустить. Мы нажимаем настроить и у нас открывается окно настроек вашей виртуальной машины.

В этом окне, как вы заметили, у нас есть левое меню. Мы выбираем «Дисплей» и ставим флажок на «Включить 3d ускорение».
Дальше мы переходим во вкладку «Носители». В этом окне, в разделе носители информации, выбираем диск, на котором написано «Пусто». У нас во втором разделе «Атрибуты» появляется значок диска. Нам надо на него нажать. У нас появляется небольшая менюшка, в которой мы выбираем: «Выбрать образ оптического диска».

Теперь надо найти образ Windows, который вы возможно уже скачали по ссылке, которую я вам дал в начале статьи, или нашли в интернете. Если вы еще не скачали, то вот вам ссылка — https://yadi.sk/d/NviXZl9gmksdf.

После того, как мы нашли образ диска и нажали открыть, во вкладке «Носители информации», где было написано «Пусто», теперь появилось название файла образа Windows. В окне настроек мы нажимаем «ОК», чтобы сохранить наши изменения.
Мы проделали важную работу, но самое важное осталось впереди. Нам предстоит произвести непосредственно установку систему. Установка таким образом помогает новичкам научиться установливать Windows на реальный компьютер, ведь в виртуальной машине происходит все тоже самое, что и на физическом устройстве.
И так, чтобы начать процесс установки Windows нам надо выбрать нашу виртуальную машину, если имеются другие, и нажать кнопку «Запустить». Что мы сейчас и делаем.
Установка Windows 7
Мы нажали «Запустить» и у нас открылось еще одно окошко. Это окно самой виртуальной машины, в которой сейчас происходит стандартная установка Windows.

Для специалиста, который уже устанавливал Windows, будет легко разобрать что дальше надо делать.
Мы подождали секунд десять и у нас появилось установочное окно Windows. В левом меню мы выбираем пункт «Установка Windows > Установка Windows 7″.

У нас пошло начало установки.
В следующем окне мы снова выбираем нашу операционную систему. Также, если вы использовали мою сборку операционной системы, то у вас выбор будет не богатый. Выбираем то, что есть, и жмем «Далее».

Дальше мы выбираем раздел для установки Windows. Сейчас мы выбираем как раз диск, который мы создавали, и нажимаем Далее.
У нас идет процесс установки Windows. А точнее копирование файлов. Это долгий процесс. Копирование может идти примерно полчаса, но может закончиться и через 5 минут. У кого как.
В процессе установки ваш виртуальный Windows будет несколько раз перезагружен и, когда у вас скопируются все системные файлы, то произойдет очередная перезагрузка и в конечном итоге появится этот экран:
Здесь вы должны указать имя вашего виртуального компьютера и новой учетной записи пользователя.
Нажимаете «Далее» и в следующем окне указываем пароль для этой учетной записи, но это необязательный пункт. Нажимаем «Далее» и идем дальше.
В следующем окне нас ждет сюрприз. Нас просят вести ключ продукта, но у нас его нет. Что же делать?!? Мы просто жмем «Пропустить» и идем дальше.
Идет завершение установки. Ваша виртуальная Windows почти готова.

Мы чуть подождали и все, Windows готова. Виртуальная машина перезагрузиться и все что нам остается сделать, это просто вести пароль от учетной записи.

Все, мы ввели пароль, еще немножко подождали и, воуля, ваша виртуальная Windows готова!
Вы можете экспериментировать, изменять что хотите, вашей основной операционной системе ничего не будет. Только не забываем сохранять виртуальную машину (делать снапшоты), ведь вы можете что-нибудь испортить, а устанавливать лишний раз Windows, я думаю, мало кому захочется!

С уважением,
Артем Золотаревский
9 января 2016 года