
Любая современная версия операционной системы от компании Microsoft поставляется в нескольких редакциях. Как правило, это Стартовая, Домашняя, Для бизнеса и Корпоративная. Отличаются они функционалом, доступными возможностями и другими аспектами. Зачастую пользователи выбирают какую-то определенную редакцию, а после при необходимости переходят на более высокую.
Например, вы можете купить Windows 7 Professional, а после приобрести лицензионный ключ для Полного издания и без переустановки ОС перейти на нее. Вы сохраните все установленные программы и настройки, но при этом получите дополнительный функционал. А можно ли сделать наоборот – понизить версию системы (даунгрейд)?
_06.jpg)
Возможно ли понижение редакции ОС?
Разработчиками операционной системы изначально предусмотрена возможность повышения редакции. Для этого можно воспользоваться установочным диском с ОС или встроенной службой Windows. Это распространенная практика. Однако изменить версию системы в обратную сторону, к сожалению, нельзя. Речь идет об официальных способах. В таких случаях техническая поддержка Microsoft рекомендует провести установку с нуля. Если у вас на ПК нет каких-либо очень важных данных и программ, или вы все сохранили на отдельный носитель и можете быстро восстановить, то чистая инсталляция для вас будет самым простым и доступным способом.
Нестандартное снижение версии Windows
Если же говорить о неофициальных способах, как изменить редакцию, то есть один вариант. Вам потребуются: диск с нужной версией ОС и ключ ее активации. При этом важно соблюсти одно из следующих условий:
- на диске установлен пакет SP1;
- ни на диске, ни в текущей ОС нет пакета SP1.
Если одно из условий соблюдено, то можно работать. Вам потребуется выполнить следующие действия, чтобы понизить Windows 7 Ultimate до Professional:
- запустите редактор реестра;
- перейдите в раздел «HKEY_LOCAL_MACHINE\SOFTWARE\Microsoft\Windows NT\CurrentVersion»;
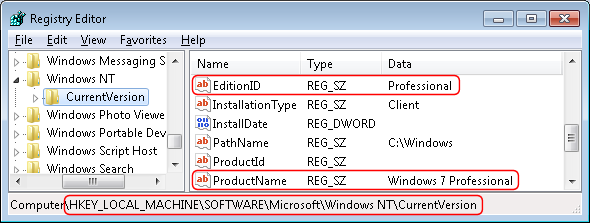
- поменяйте значение пункта «EditionID», в него необходимо вписать нужную вам редакцию ОС, в нашем случае – Professional;
- сохраните изменения;
- запустите установку системы с установочного диска;
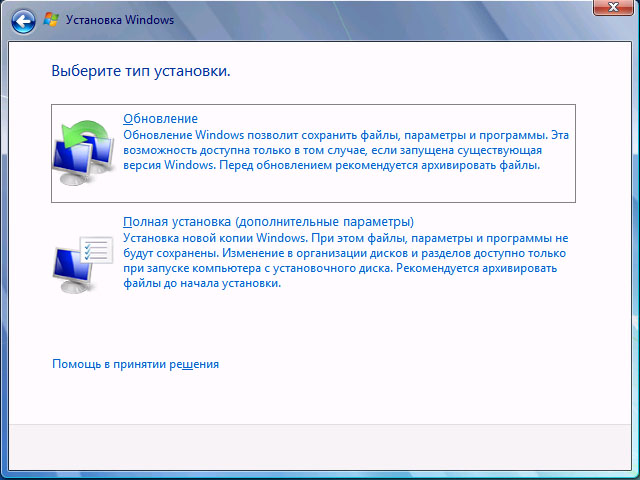
- выберите в меню пункт «Обновление»;
- дождитесь завершения операции и перезапуска ПК.
Если все прошло верно, то вы получите необходимую версию ОС. Вот так можно провести downgrade Windows 7 Ultimate to Professional.
Зачем нужно понижать редакцию ОС?
Обычно пользователи принимают решение повысить версию системы, чтобы получить доступ к новым функциям, сохранив настройки ОС. Зачем же нужно совершать даунгрейд?
- Покупка собранного ПК или ноутбука, на котором стояла одна из последних редакций ОС. Пользователь имеет лицензионный ключ нужной версии системы и хочет снизить.
- Переход с Ultimate пиратской ОС на официальную домашнюю или Professional. Это актуально для офисов.
- Высокие требования к ПК. Более старшие редакции могут требовать больше ресурсов от компьютера, что приводит к снижению производительности. Снижение версии может решить эту проблему.
Update: The latest Windows 11 is here, but if you are still using Windows 7 and want to change the version in the year 2021 or later, keep reading the below steps. Some users mentioned that the modifying registry trick does not work anymore. Hence, I’m including a downgrade tool that may do the job. Anyhow, I’m not able to verify both steps now since Windows 7 is out of support and it is not recommended to use anymore.
Original Post:
I installed/downgraded Windows 7 Ultimate to the Professional version without formatting or reinstalling OS on one of the computers. Even though both are the same Windows 7 family, it is not easy to switch the versions especially backwards. The following method is to fake the Windows OS and trick that we have the Professional version installed, then do an upgrade. The Ultimate version is the higher version of Windows 7 and it can’t be downgraded to lower versions officially without formatting and doing a fresh installation. Anyhow, I found a trick to downgrade Windows 7 ultimate to Professional easily without the new installation.
We are going to two 2 steps.
- Change registry key and tell Windows that we have the Professional version (Take extra precaution while modifying the registry. Better take a backup of the registry before doing any changes).
- Insert the actual Windows 7 Professional CD and start the upgrade.
Before starting the installation, do change two keys in Registry. In my case, I had to change the key to ‘ Windows 7 Professional ’. Make sure you are typing the exact OS version which is written on your installation DVD.

After you changed the registry key, insert the Windows 7 Professional CD/DVD and start the upgrade. It is required to enable the option to check the Windows update while doing the installation. So, the process will check the Windows update catalogue online and do the upgrade related to Windows 7 Professional. If the current state of Windows 7 is the latest build and update, then this method may fail because it will not find any updates from the Microsoft catalogue website.
Make sure you have enough space in ‘System Partition’ (usually C drive). Allocate enough time since this will copy your personal data first, downgrade the OS and then copy back your data. If the computer data is so critical, I advise taking a backup of your important data.
I suggest cleaning up (move to a different location) your personal data (such as Desktop, My Documents..etc) before starting the downgrade to save time.
Additional Method
- Download Windows 7 Downgrader tool (Google it and find the correct file).
- Open the tool with administrative privilege.
- Select the OS version you need. You need to have the installation DVD or ISO file of the Windows 7 Professional (or Home)
- This tool simply changes the registry keys which we modified manually earlier. Because other steps are identical.
- Now insert the DVD or mount the ISO file and start the installation (upgrade) process that is a downgrade in this example.
I hope one of the above methods would be helpful for this downgrade process. It is highly recommended to upgrade your computer to the latest Windows 10 or Windows 11 except you have some genuine and legacy reasons to have outdated Windows OS.
If any of the above solutions did not fix the Windows PC issues, we recommend downloading the below PC repair tool to identify and solve any PC Issues.
Dinesh is the founder of Sysprobs and written more than 400 articles. Enthusiast in Microsoft and cloud technologies with more than 15 years of IT experience.
Введение
В ходе работы часто приходиться сталкиваться с установленной ОС Windows 7 не той редакции, что была приобретена лицензия или поставлялась с изделием. Такое встречается при разных обстоятельствах. Со слов пользователей, которые описывают, как такое могло произойти, встречаются самые разные варианты. Кто то обратился для установки (переустановке) к друзьям, кто то к соседям, а кто-то к сыну маминой подруге, и самый распространённый вариант просто в не качественный сервис.
Как же такое могла произойти? Получается что, легко! При установке (переустановке), по самым разным причинам, выбирается исходник с дистрибутивом не той редакции. Например, была приобретена лицензия на Windows 7 Professional, а «добрый мастер» взял и установил Windows 7 Ultimate. И кто то скажет что же тут страшного, а то, что КЛЮЧИ этих редакций не совместимы друг с другом! И получается не активированная ОС!
И вот пользователь получает свое устройство обратно, начинает работать, и в течение месяца (30 дней) не знает что, что то не так с его системой, когда проходит срок, отведенный на активацию ОС, система при запуске начинает выдавать сообщение, что ваша версия Windows не активирована! Рабочий стол становиться черным, а в правом нижнем углу появляется мозолящая глаза надпись, что ваша версия ОС не активирована! И возможно вы стали жертвой пиратства!
Кто-то скажет, что ничего страшного, но обычно, пользователей пугают подобного рода сообщения! Даже при условии, что никакого вреда работе они не приносят, не считаю черного рабочего стола, конечно.
Но что же делать, активировать систему! У вас установлена Windows 7 Ultimate, а лицензия на Windows 7 Professional / Home Premium / Home Basic. А значит активировать вашу систему имеющимся у вас ключом не получиться. И встает вопрос, что же делать, самый простой видимый путь, это очередная переустановка ОС, но за 30 дней у пользователя накопилось внушительное кол-во установленных программ в системе, файлов, фотографий и т.п., и большинству не хотелось бы все переустанавливать и перенастраивать под себя.
Процесс
Есть вариант решение сложивший ситуации еще одним методом (а может и не одним), это произвести «понижение» (downgarde) версии (редакции) установленной ОС Windows 7.
Для того что бы произвести «понижение», в реестре системы необходимо изменить два значения (ключа) в ветке:
HKEY_LOCAL_MACHINE\SOFTWARE\Microsoft\Windows NT\CurrentVersion
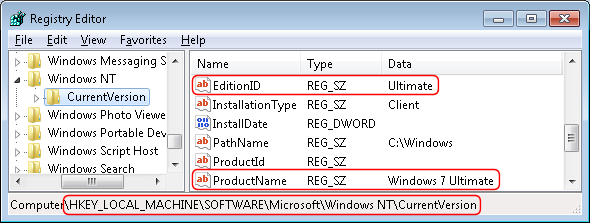
Значение (ключ): EditionID — REG_SZ — Ultimate
Значение Ultimate (в нашем случае) меняем на требуемое:
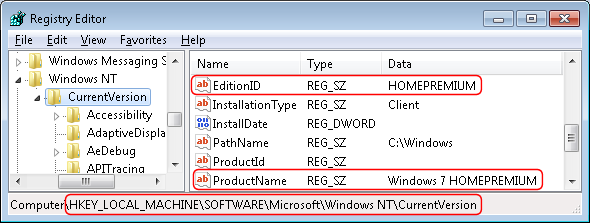
Professional / HomePremium / HomeBasic
Значение (ключ): ProductName — REG_SZ — Windows 7 Ultimate
Значение Windows 7 Ultimate (в нашем случае) меняем на требуемое:
Windows 7 Professional / Windows 7 HomePremium / Windows 7 HomeBasic
После того как все изменения в реестре будут сделаны, необходимо запустить Обновление (Upgrade) ОС с диска, именно Обновление, а не новую установку!
При обновление выбираем требующеюся нам версию (редакцию), после чего переходим к проверки совместимости… проверка может занять значительное время, после чего начнётся обновление.
Внимание!
При обновление (понижении) версии ОС, необходимо выбирать ту же разрядность что и у установленной ОС. Например если у вас установлена Windows 7 Ultimate x32, то обновить (понизить) редакцию можно будет только на Professional x32 / Home Premium x32 / Home Basic x32 и т.д. Тоже самое относиться и к x64 версиям.
Понизить редакцию x32 на x64 (x64 на x32) НЕЛЬЗЯ!
Длительность обновления, напрямую зависит от кол-ва установленных в ОС программ и находящихся на диске данных. По опыту можно сказать, что стоит рассчитывать на минимум 2 — 3 часа, в отдельных случаях процесс может занять еще больше времени!
Все что вы делает, вы делаете на свой страх и риск!
При не обдуманных и/или неверных действиях, вы можете потерять все свои данные!
Windows 7 Ultimate is a feature-rich edition of the Windows operating system, offering advanced functionalities. However, there may be instances where downgrading from Windows 7 Ultimate to Professional becomes necessary. This tutorial will guide you through the process of downgrading your operating system from Windows 7 Ultimate to Professional without the need for a CD.
Step 1: Open the Start menu by clicking on the Windows icon in the bottom-left corner of your screen.
Step 2: In the search box, type «Control Panel» and click on the Control Panel app that appears in the search results.
Step 3: In the Control Panel window, select «System and Security» followed by «System.«
Step 4: Within the System window, click on «Advanced system settings» on the left-hand side.
Step 5: A new window called «System Properties» will open. Navigate to the «Advanced» tab.
Step 6: In the «Advanced» tab, under the «Startup and Recovery» section, click on the «Settings» button.
Step 7: In the Startup and Recovery window, under the «Default operating system» section, select «Windows 7 Professional» from the drop-down menu.
Once you have completed these steps, your Windows 7 Ultimate operating system will be downgraded to Windows 7 Professional.
| Pros | Cons |
|---|---|
| 1. Simplifies the user interface and reduces system resources required compared to Windows 7 Ultimate. | 1. May not have access to some advanced features that are exclusive to Windows 7 Ultimate. |
| 2. Potentially resolves compatibility issues with certain applications or hardware drivers that are only supported in Windows 7 Professional. | 2. It may require reinstalling certain applications after the downgrade. |
| 3. Downgrading to Windows 7 Professional may offer cost-saving benefits if you do not require the additional features provided by Windows 7 Ultimate. | 3. It is recommended to backup important files and data before proceeding with the downgrade process. |
Please note that downgrading your operating system should be done with caution, and it is advisable to create a backup of your important files and data before proceeding. Additionally, ensure that you have a valid license for Windows 7 Professional before downgrading your operating system.
By following the steps outlined in this tutorial, you can easily downgrade your Windows 7 Ultimate operating system to Windows 7 Professional without the need for a CD. This process can help you optimize your system according to your specific needs and requirements.
Video Tutorial: How to download Windows 7 without CD or USB?
To downgrade from Windows 7 Ultimate to Windows 7 Professional, you can follow the steps below:
1. Create a backup: Before performing any system changes or downgrades, it is crucial to back up all your important files and data to prevent any potential data loss during the process.
2. Obtain a Windows 7 Professional installation media: You will need a valid copy of the Windows 7 Professional installation media. This could be in the form of a DVD or an ISO file. Make sure you have a genuine product key for Windows 7 Professional.
3. Backup your Windows 7 Ultimate product key: You may need the Windows 7 Ultimate product key to reactivate your installation in the future. It is advisable to note down or save the product key in a safe place.
4. Clean installation: Downgrading Windows versions usually involves performing a clean installation of the desired version. Insert the Windows 7 Professional installation media into your computer and restart it. Make sure the boot settings are configured to boot from the installation media. Follow the on-screen prompts to initiate the installation process.
5. Format the drive: During the installation process, you will come across a step where you can choose where to install Windows. Here, you’ll want to select the partition or drive where Windows 7 Ultimate is installed and format it. This will erase all the data on that drive, so ensure you have backed up all your important files beforehand.
6. Complete the installation: After formatting the drive, continue with the installation process by following the on-screen instructions. You will be prompted to enter the Windows 7 Professional product key during the setup. Enter the product key and proceed with the installation.
7. Install necessary drivers and software: Once the installation is complete, you’ll need to install the necessary device drivers for your hardware components. Visit the manufacturer’s website for each component and download the appropriate drivers for Windows 7 Professional. Additionally, reinstall any software applications you were using prior to the downgrade.
8. Reactivation: After the installation and setup are complete, you’ll need to activate your Windows 7 Professional installation using the product key. Follow the on-screen instructions to activate your copy of Windows.
Remember that downgrading to a different Windows version may result in the loss of certain features or functionalities that were available in the higher version. It’s essential to perform proper research and ensure the downgrade will meet your specific requirements before proceeding.
Disclaimer: The steps provided in this response are for informational purposes only. Always consult official documentation or seek professional assistance if you are uncertain about the process of downgrading your operating system.
Can you downgrade from Windows 7 Ultimate to home?
Yes, it is possible to downgrade from Windows 7 Ultimate to Windows 7 Home. However, it’s important to note that downgrading an operating system involves reinstalling or performing a clean installation of the desired version. Here’s a step-by-step process to downgrade from Windows 7 Ultimate to Windows 7 Home:
1. Backup your important files: Before proceeding with any major system changes, it’s crucial to back up all your important files, documents, and media to ensure you don’t lose any data during the downgrade process.
2. Obtain a Windows 7 Home installation media: You will need a Windows 7 Home installation DVD or an ISO file to reinstall the operating system. This media should match the architecture of your current Windows 7 Ultimate installation (32-bit or 64-bit).
3. Create a bootable USB or DVD: If you have an ISO file, you can create a bootable USB or DVD using software tools like Rufus or Windows USB/DVD Download Tool. If you have a physical installation disc, skip this step.
4. Insert the bootable media: Insert the bootable USB or DVD into your computer and restart it.
5. Boot from the media: During the startup process, access the boot menu or BIOS settings of your computer by pressing the designated key (usually F2, F12, or Esc). Choose the bootable media as the primary boot device.
6. Install Windows 7 Home: Follow the on-screen prompts to initiate the Windows 7 Home installation. Choose the appropriate installation type (custom/clean installation) and select the partition where you want to install Windows 7 Home.
7. Format the partition (optional): If you want a completely clean installation, you can format the existing partition during the installation process. However, make sure you have backed up all your important files as this step will remove all data on that partition.
8. Complete the installation: Once the installation process is complete, follow the on-screen instructions to finalize the setup. You will be prompted to enter your Windows 7 Home product key during this step.
9. Install necessary drivers and software: After the installation, make sure to install all the required drivers and necessary software programs to ensure proper functionality.
10. Restore your files: Once everything is set up, you can restore your backed-up files to the newly installed Windows 7 Home system.
Remember to consult official documentation or seek technical assistance if you encounter any issues during the process.
How do I uninstall Windows 7 Ultimate from my computer?
To uninstall Windows 7 Ultimate from your computer, please follow these steps:
Step 1: Backup Your Data
Before proceeding with the uninstallation, it is crucial to back up any important files or data you have on your computer. This ensures that you don’t lose any valuable information during the process.
Step 2: Check Compatibility
Make sure your computer meets the minimum system requirements for the operating system you intend to install after removing Windows 7 Ultimate. This way, you can ensure smooth functioning of the new operating system.
Step 3: Create a Recovery Drive
Creating a recovery drive or system image is highly recommended. This allows you to restore your computer to its previous state if something goes wrong during the uninstallation process. You can use tools like Windows 7 Backup and Restore or third-party software to create a backup.
Step 4: Obtain Installation Media
You will need a bootable installation media for the operating system you want to install after removing Windows 7 Ultimate. This can be a USB flash drive or a DVD with the installation files. Make sure you have this before proceeding.
Step 5: Boot from Installation Media
Insert the bootable installation media into your computer and restart it. Change the boot order in the BIOS settings to prioritize the installation media. This will allow your computer to boot from the USB or DVD containing the new operating system.
Step 6: Format or Delete Windows 7 Partition
During the installation process, you will be prompted to select a partition for the new operating system. Choose the partition where Windows 7 Ultimate is installed and format it. Formatting the partition erases all data on it, so make sure you’ve backed up everything.
Step 7: Install the New Operating System
Follow the on-screen instructions provided by the installation media to install the new operating system on the freshly formatted partition.
Step 8: Restore Data
Once the new operating system is installed, you can restore your backed-up data using the recovery drive or system image you created earlier.
Remember, this process permanently removes Windows 7 Ultimate from your computer. Ensure you have the necessary files and a compatible operating system ready before proceeding.
How do I change my Windows 7 Ultimate to Windows 10?
To upgrade your Windows 7 Ultimate to Windows 10, you can follow these steps:
1. Check system requirements: Before you begin, ensure that your computer meets the minimum system requirements for Windows 10. This includes having a compatible processor, sufficient RAM, and available storage space.
2. Backup your data: It’s always advisable to back up your important files and data before performing any major operating system upgrade. This ensures that you have a copy of your data in case any issues arise during the process.
3. Obtain a valid Windows 10 license: To upgrade legally, you will need a valid Windows 10 license. You can either purchase a license directly from Microsoft’s website or consider upgrading through an eligible Windows 7 Ultimate license if there are any available promotions or offers.
4. Download the Windows 10 installation media: Visit the official Microsoft website and download the Windows 10 installation media. This can be done by using the Media Creation Tool provided by Microsoft. Make sure you download the appropriate version of Windows 10 (e.g., 64-bit or 32-bit) based on your computer’s specifications.
5. Create a bootable USB drive or DVD: Follow the instructions provided by Microsoft’s Media Creation Tool to create a bootable USB drive or DVD using the Windows 10 installation media you downloaded in the previous step.
6. Install Windows 10: Insert the bootable USB drive or DVD into your computer and restart it. Ensure that your computer is set to boot from the USB drive or DVD in the BIOS settings. Follow the on-screen instructions to begin the installation process.
7. Activate Windows 10: During the installation process, you will be prompted to enter your Windows 10 license key. Enter the key and continue with the installation. Once the installation is complete, Windows 10 should be activated automatically. If not, you can manually activate it using the activation settings.
8. Restore your data: After successfully upgrading to Windows 10, you can restore your previously backed-up data to your computer. Simply copy the files back to their respective locations or use a backup restoration tool if available.
Remember to consult official Microsoft resources or seek professional assistance if you encounter any issues or have specific questions during the upgrade process.
How do I factory reset my Windows 7 Ultimate without a disk?
To factory reset your Windows 7 Ultimate without a disk, follow these steps:
1. Back up your important data: Before proceeding with a factory reset, it is crucial to back up all your important files and data. This ensures you don’t lose any essential information during the process. You can copy your files to an external hard drive, USB drive, or cloud storage service.
2. Access the Advanced Boot Options: Start by restarting your computer. As it boots up, continuously press the F8 key until you see the Advanced Boot Options menu. If this doesn’t work, you may need to search for your specific computer’s instructions to access this menu.
3. Choose «Repair Your Computer«: From the Advanced Boot Options menu, use the arrow keys to highlight and select the «Repair Your Computer» option. Press Enter to proceed.
4. Select the operating system: On the System Recovery Options screen, choose the operating system that you want to reset. In this case, select Windows 7.
5. Choose «Next» on the System Recovery Options screen: Once you’ve selected the operating system, click on «Next» to proceed.
6. Select «Command Prompt«: On the next screen, choose «Command Prompt» from the list of available recovery tools.
7. Enter the command to reset Windows 7 Ultimate: In the Command Prompt window, type the following command and hit Enter: «format c: /fs:ntfs«. This command will format your C drive (where Windows is installed) and use the NTFS file system.
8. Confirm the factory reset: A warning message will appear, indicating that all data on the C drive will be permanently deleted. Make sure you have backed up all necessary data, then type «Y» to confirm and start the factory reset process. Press Enter to proceed.
9. Complete the factory reset: Wait for the formatting process to complete. Once done, your computer will be restored to its original factory settings. You can then set it up as if for the first time, following the on-screen instructions.
Please note that a factory reset will erase all your personal files, applications, and settings. It’s important to back up everything you need before proceeding. Additionally, the steps provided here are based on a generic Windows 7 installation. Some computer models or manufacturers might have specific instructions or recovery tools, so it’s recommended to consult your device’s manual or support resources for more accurate instructions.
null
Нередко возникает необходимость изменения издания ОС Windows. При этом, конечно же, нет никакого желания, а, иногда, и возможности, настраивать систему «с нуля». Обновить ОС без потери приложений и настроек можно. О том как жто сделать и написано в этой статье
Если Вы хотите повысить издание, то проблем нет — используйте Windows Anytime Upgrade (WAU). Данный элемент доступен из панели управления, либо Вы можете найти его с помощью поиска. Запустив даное проиложение Вы получите подробную инструкцию. В этом случае Вам понадобится лишь ключ продукта.
Другое дело, если нужно понизить издание ОС. Такая необходимость может быть обусловлена корпоративной политикой или решением перейти на лицензионное ПО. В таком случае Вам понадобится установочный диск с необходимым изданием и ключ продукта, подходящий к данному изданию.
Штатными средствами типа WAU понизить редакцию не получится, но есть обходной путь.
Чтобы не понижать редакцию предлагаю изменить изданию установленной системы на ту, которую Вы хотиту установить.
-
Для начала предлагаю создать точку восстановления:
Пуск->Компьютер->(кликаем правой кнопкой мыши, в контекстном меню выбираем пункт)Свойства->(в списке слева)Защита системы(если ОС запросит учетные данные администратора введите соответствующие учётные данные)->(в появившемся окне в правом нижнем углу клавиша)Создать. Выбрать место сохранения точки восстановления, дожаться завершения.
- Убедиться, что на системном диске имеется достаточное для обновления количество свободного места (обычно около 18 Gb).
- Запустить редактор реестра. (Нажимаем)Win+R->(вводим)regedit.
- В появившемся окне с помощью проводника справа переходим в седующую ветвь:
-
Изменяем значение параметра EditionID: (кликаем правой клавишей манипулятора на параметр)Изменить…->(вводим необходимое значение). Внимание, допустимы лишь следующие значения в данном параметре: 1.Enterprise
2.Ultimate
3.Professional
4.HomePremium
5.HomeBasic
6.Starter В данном списке издания Windows преведены от старшего к младшему. -
Перезагружает ПК.
-
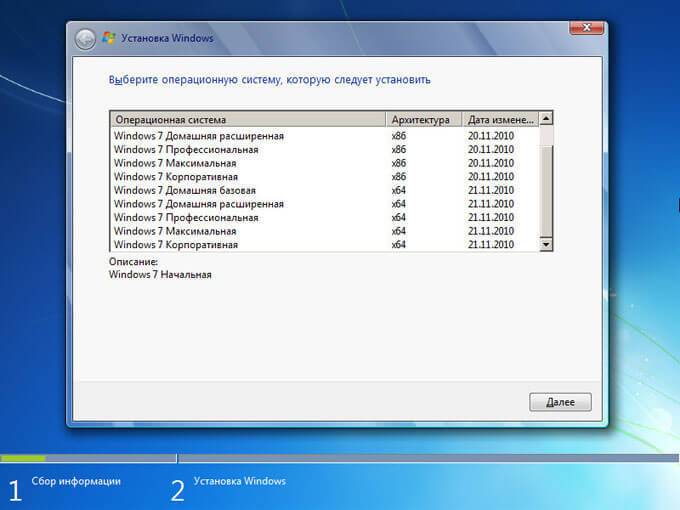
Затускаем установочный диск.
-
В пункте, где предлагается «Обновление» или «Полная установка» выбираем первый пункт (обновление).
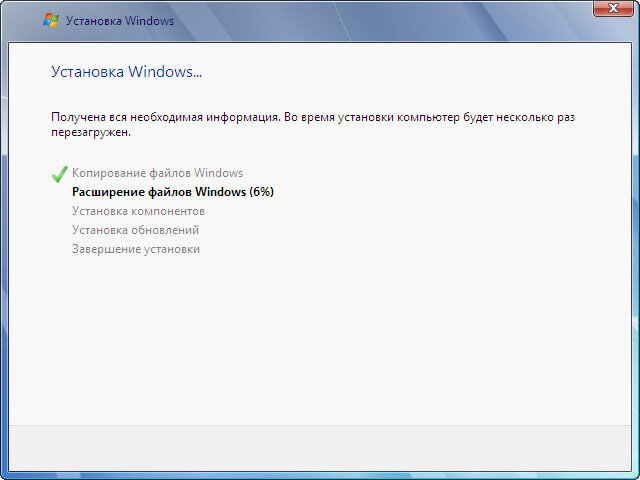
Ожидаем окончание установки, выставляем необходимые настройки.
Издание системы изменено, все настройки и приложения остались нетронутыми.
Если, вдруг, что-то пошло не так всегда можно восстановить систему из созданой в первом пункте точки восстановления.
С увжением, Дробышев Владимир.