
Do you wish to turn off or disable WiFi on your Windows 7 PC but are confused about how exactly to do that? Here in this article, we tell you about various methods that you can use to do so. Disabling Wi-Fi in the newer Windows versions, such as Windows 10, is quite simple. However, when it comes to Windows 7, it might get a bit tricky. To turn off WiFi in Windows 7 requires more than clicking a dedicated button to switch Wi-Fi on or off. You will get to know all about it in the sections below.
Table of Contents
Why Turn Off WiFi in Windows 7 Operating System?
Well, there are several reasons one may need to disable WiFi on a Windows 7 PC. At times, you may need to cut off the wireless internet connection from your PC because your work requires you to do so. You may also want to turn off the wireless connection on your PC because you are letting someone else use your PC and not want that person to access the internet. Whatever the reason be, here, you will find a suitable method according to your requirement to disable Wi-Fi.
Methods to Disable WiFi in Windows 7
There are several ways through which WiFi can be disabled on a Windows 7 computer. You can either use the dedicated switch to turn off your PC’s wireless connection or go with other methods that require you to access Windows Control Panel and more. Let us take a look.
#1 – Disable WiFi by using the Wireless Hotkey
Every PC comes with a dedicated hotkey to enable or disable its wireless connectivity. This hotkey could be found either on the keyboard or somewhere else on a laptop. The wireless connectivity hotkey usually has an airplane icon or an icon that looks something like, as shown in the screenshot below.
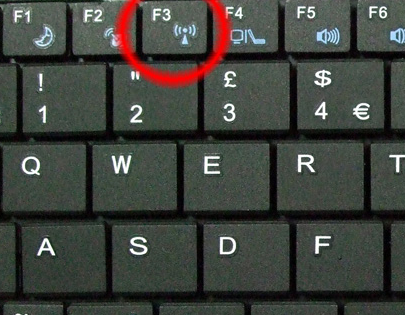
If the key with an airplane icon is present on the keyboard, it will be located on one of the function keys available at the keyboard’s top row. You may also find the wireless toggle switch located somewhere else on the PC. Just look for the icon shown in the screenshot above or a key with an airplane icon.
If the WiFi on your PC is enabled, press the button to turn it off. If the key is on one of the function keys, you will need to press the hotkey along with the Fn key.
You can use the same key to turn the wireless connection on or off. Press the key whenever required to disable or enable a WiFi connection on your PC.
#2 -Turn Off WiFi by Disabling the WiFi Adapter
You can also turn the wireless connection off on your PC by disabling the WiFi Adapter if you want. You can do so by accessing the Network and Sharing Center. Here are the steps to follow:
Step 1: Open Control Panel on your PC. For this, press the Win + R buttons. As the Run window opens, type the control panel and press the Enter key.
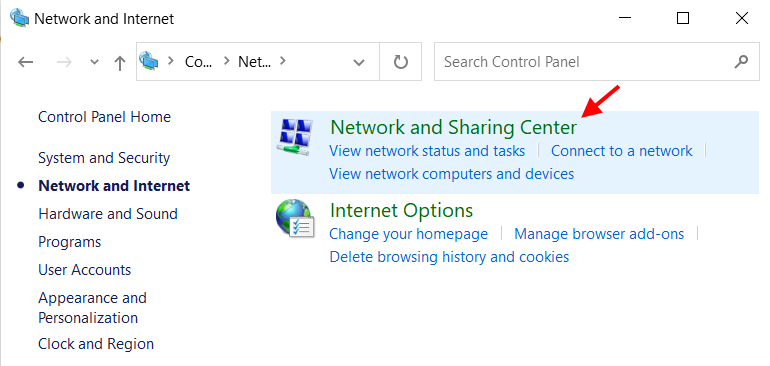
Step 2: In the Control Panel window, click on the Network and Internet option.

Step 3: As the Network and Internet window opens, click on the Network and Sharing Center option.
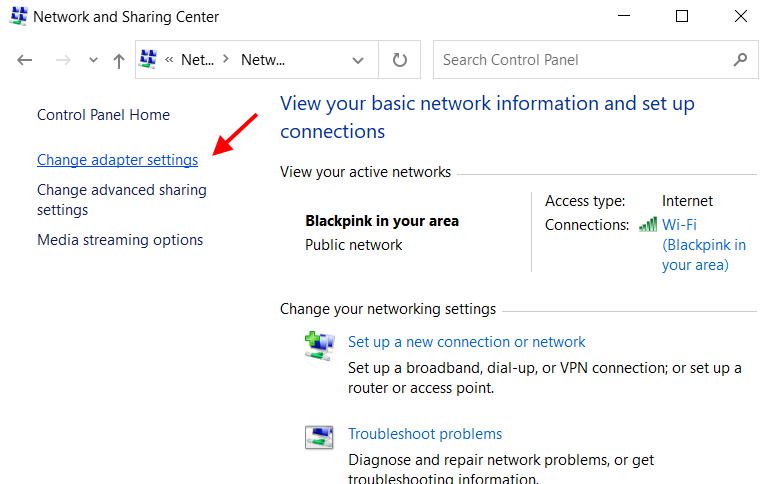
Step 4: On the Network and Sharing Center screen, go to the panel on the left and look for the option that says Change adapter settings. Click on Change adapter settings to open the Network Connections window.
Step 5: When the Network Connections window opens up, locate the Wi-Fi adapter available from the list of networking adapters. When found, make a right-click on it. A context menu will open. Click on the Disable option.
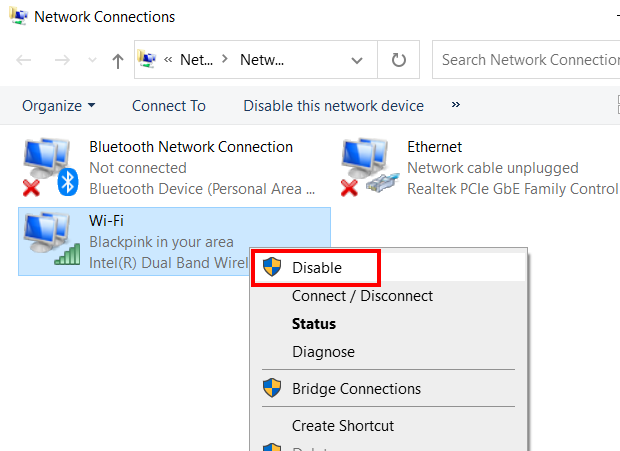
This will disable the Wi-Fi connection on your computer. Now, you will not be able to access any WiFi network on your PC.
To enable Wi-Fi back again, go to the same Network Connections window. Make a right-click on the Wi-Fi adapter. From the context menu, click on the Enable option.
#3 – Disconnect from the Wireless Network
If you want to enable or disable WiFi temporarily in Windows 7 operating system, you can always go ahead and do it by following this simple method.
Go to the Windows Taskbar at the bottom of the screen. On the left corner of the taskbar, you will find the WiFi icon. Click on it to open the internet connection menu. Click on the WiFi network you are connected to, then select the Disconnect option.
Now, if your PC has connected to another WiFi network in the past, it may try to connect to it automatically. If that is the case, you will need to disconnect from the other Wi-Fi network as well.
This method quickly lets you turn off WiFi on your Windows 7 PC. You can use it if disabling Wi-Fi was a quick one-time requirement.
#4 – Disable Wireless Device Driver
Another way to disable the wireless network on your computer is by disabling the Wireless Device Driver in Windows 7. How to do this?
You can do it through the Device Manager window.
Step 1: Press the Win + X keys on your keyboard simultaneously. A menu will open. Here, click on the Device manager option.
Step 2: In the Device Manager window, click on the Network adapters option. The list of network drivers will expand. Here, make a right-click on the wireless network device driver. In the context menu that opens, select the Disable device option.
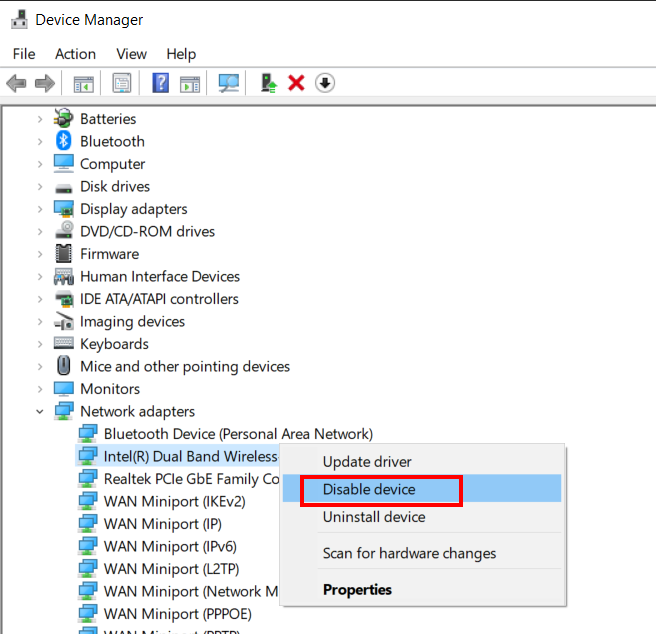
This will disable the Wi-Fi network driver on your PC, disconnecting you from the wireless network.
When you want to re-enable the wireless network driver, go to the Device Manager again and enable the driver using the same steps.
Closing Words
In this article, you learned about various methods to help you enable to disable wireless network on Windows 7 PC. We hope that you found all the methods helpful.
When it comes to managing your computer’s connectivity, knowing how to disable WiFi on Windows 7 is a skill that can enhance your experience by providing you control over your network connections. Whether you’re troubleshooting network issues, aiming to conserve battery power on a laptop, or simply seeking better performance by switching to an Ethernet connection, disabling WiFi can be essential. In this comprehensive guide, we will walk you through various methods to disable WiFi on Windows 7, ensuring you have all the knowledge you need to manage your connectivity effectively.
Before diving into the steps, let’s explore why you might want to disable WiFi. Understanding your reasons can help you decide the right method for your needs:
- Troubleshooting: If you’re experiencing connectivity problems, turning off WiFi can help isolate the issue.
- Power Conservation: Disabling WiFi on laptops can save battery life.
- Network Management: If you’re using a wired connection, turning off WiFi can enhance overall performance.
With these goals in mind, let’s go through some straightforward methods for disabling WiFi on Windows 7.
Method 1: Using the Network and Sharing Center
One of the most traditional ways to disable WiFi is through the Network and Sharing Center. This method is user-friendly and allows you to see your active network connections.
Step-by-Step Instructions
- Open the Control Panel:
- Click on the Start menu located at the bottom left of your screen.
-
Select Control Panel from the menu.
-
Navigate to Network and Internet:
- In the Control Panel, locate and click on Network and Internet.
-
Then, click on Network and Sharing Center.
-
Change Adapter Settings:
- On the left pane of the Network and Sharing Center, click on Change adapter settings.
-
You will see a list of your network connections.
-
Disable the WiFi Adapter:
- Right-click on your Wireless Network Connection (usually named “Wi-Fi” or “Wireless Network Connection”).
-
From the context menu, select Disable.
-
Confirm the Action:
- A prompt may appear, confirming your choice. Click Yes if prompted.
Your WiFi is now disabled! To re-enable it, simply follow the same steps and select Enable instead.
Method 2: Using the Command Prompt
For tech-savvy users or those who enjoy utilizing keyboard shortcuts, the Command Prompt offers a powerful alternative to manage your network connections.
Step-by-Step Instructions
- Open Command Prompt as Administrator:
- Click on the Start menu, type cmd in the search bar.
-
Right-click on cmd.exe and select Run as administrator.
-
Check Your Current Connections:
- Type the command:
netsh wlan show interfacesand press Enter. -
This will display the details of your current WiFi connections.
-
Disable the WiFi Adapter:
- To disable the WiFi, type in the command:
netsh interface set interface "Wireless Network Connection" disable. - Ensure to replace “Wireless Network Connection” with the exact name of your WiFi connection if it differs.
-
Press Enter.
-
Check the Status:
-
To ensure the WiFi has been disabled, you can run the first command again:
netsh wlan show interfaces. It should show that the state is disconnected. -
Re-enable the WiFi Adapter:
- If you wish to re-enable your WiFi, use the command:
netsh interface set interface "Wireless Network Connection" enable.
Using the Command Prompt can be efficient and faster, especially if you need to toggle your connections frequently.
Method 3: Using the Physical WiFi Switch
Many laptops come equipped with a physical switch or a function key that allows you to disable WiFi quickly. This hardware solution is often the easiest and most accessible method for laptop users.
Identifying the Physical Switch or Function Key
- Physical Switch:
-
Look at the sides of your laptop for a physical switch that has a WiFi symbol. This should easily toggle the WiFi on and off.
-
Function Key:
- Check the F1-F12 keys on your keyboard; one of them may have a WiFi symbol (often represented by a signal icon).
- You typically need to hold down the Fn key and press the corresponding function key to disable WiFi.
Notes on Function Keys
Make sure to consult your laptop’s user manual for specific instructions regarding the function key combinations, as they can vary between manufacturers.
Method 4: Using the System Tray
Another easy way to disable WiFi on Windows 7 is through the system tray, where you can quickly manage your network connections.
Step-by-Step Instructions
- Locate the Network Icon:
-
In the system tray (the lower-right corner of your screen), find the Network icon. It usually resembles a computer screen or a set of signal bars.
-
Open the Network Connections:
-
Click on the Network icon and select Open Network and Sharing Center from the pop-up menu.
-
Access Adapter Settings:
-
Click on Change adapter settings on the left menu.
-
Disable WiFi:
- As previously described, right-click on your Wireless Network Connection and select Disable.
Using the system tray could be a more direct method for users who are familiar with desktop navigation.
Method 5: Using Device Manager
The Device Manager allows you to manage all hardware connected to your computer, including network adapters.
Step-by-Step Instructions
- Open Device Manager:
- Right-click on Computer on your desktop or in the Start menu.
-
Select Manage, then click on Device Manager from the left pane.
-
Locate Network Adapters:
-
In Device Manager, scroll down and expand the Network adapters section.
-
Disable the Wireless Adapter:
- Right-click on your wireless adapter (it may contain “wireless” or “wifi” in its name) and select Disable.
-
Confirm any prompts that appear.
-
Re-enabling the Wireless Adapter:
- To turn WiFi back on, return to Device Manager, right-click the same adapter, and select Enable.
Using Device Manager offers you deeper insights into the drivers and various settings associated with your network connection.
Conclusion
In this article, we have expertly covered various methods on how to disable WiFi on Windows 7. Each method provides unique advantages, so you can choose the approach that best fits your style and needs. Whether using a simple mouse click, a functional keyboard shortcut, or a command line, you now have the tools to manage your connectivity effectively.
Disabling WiFi can be a valuable tool for troubleshooting and enhancing performance, especially in a world where reliable internet access is crucial. Remember, if you ever need to enable your WiFi connection again, simply reverse the methods mentioned above, and you’ll be back online in no time.
By mastering these skills, you can enjoy a seamless computing experience tailored to your preferences. If you’re facing issues after disabling WiFi, do not hesitate to explore your network settings to troubleshoot further or seek additional resources. Happy connecting!
What are the steps to disable WiFi on Windows 7?
The process of disabling WiFi on Windows 7 can be done in several simple steps. First, go to the taskbar and locate the wireless network icon, which appears as a set of radio waves. Right-click this icon to open the context menu, then select “Disable” to turn off the wireless network adapter.
Alternatively, you can disable WiFi by going to the Control Panel. Click on “Network and Sharing Center” and then choose “Change adapter settings.” Here, you’ll find your wireless network connection listed. Right-click on it and select “Disable” to turn off the WiFi functionality.
Why would I want to disable WiFi on my Windows 7 computer?
Disabling WiFi on your Windows 7 computer can be beneficial for various reasons. For instance, if you want to use a wired Ethernet connection for faster and more stable internet access, turning off WiFi can help avoid conflicts between the two types of connections.
Another reason to disable WiFi is to conserve battery life on laptops. By turning off the wireless adapter when it’s not in use, you can save power and extend the usage time between charges. Additionally, it can enhance security, as preventing unauthorized wireless access protects your computer from potential threats.
Can I re-enable WiFi after disabling it?
Yes, you can easily re-enable WiFi on your Windows 7 computer after it has been disabled. To do this, go back to the taskbar and right-click the wireless network icon. Select “Enable” from the context menu, and your WiFi adapter will be turned back on.
If you disabled WiFi through the Control Panel, you can re-enable it by revisiting “Network and Sharing Center” and then “Change adapter settings.” Here, right-click on your wireless network connection and select “Enable” to restore your connection to wireless networks.
Will disabling WiFi affect my Ethernet connection?
No, disabling WiFi will not affect your Ethernet connection. When you turn off WiFi on your Windows 7 computer, it disables only the wireless network adapter, while the wired network interface remains active. This means you will continue to have internet access through your Ethernet connection without any issues.
You can switch between your network connections without any conflicts. If you prefer a wired connection for faster internet speeds, you may find it beneficial to disable WiFi temporarily while using Ethernet.
What should I do if my WiFi won’t disable despite following the steps?
If you are having trouble disabling WiFi on your Windows 7 computer, there could be a few underlying issues. First, ensure that you have administrative privileges, as restricted accounts may not be able to make changes to network settings. If you’re using a limited account, switch to an admin profile and try again.
Another possibility is that your wireless adapter drivers may not be functioning correctly or are outdated. You can update your drivers by going to the Device Manager, locating your network adapters, and checking for updates. Restarting your computer can also sometimes resolve connectivity issues.
Does disabling WiFi delete my saved networks?
No, disabling WiFi does not delete your saved networks or their credentials. When you disable your wireless adapter, it simply turns off the adapter’s functionality, meaning you won’t be able to connect to any networks. Your saved networks and passwords remain intact for when you choose to re-enable WiFi later.
When you enable WiFi again, your computer will automatically recognize saved networks, giving you quick access without the need to re-enter passwords or configurations. This feature allows for a seamless transition between using wired and wireless networks.
Is there a keyboard shortcut to disable WiFi on Windows 7?
Windows 7 does not come with a dedicated keyboard shortcut solely for disabling WiFi; however, many laptops have a function key that can toggle the wireless adapter on or off. This is typically indicated by a wireless icon on one of the F keys. You can press the “Fn” key along with the appropriate function key to quickly disable or enable WiFi.
If your laptop does not have a specialized key, consider creating a custom shortcut by using tools like Windows shortcuts or third-party applications that can manage network settings more efficiently. These can help streamline the process of toggling your WiFi connection.
Can I disable WiFi using Command Prompt?
Yes, you can disable WiFi on your Windows 7 computer using the Command Prompt if you’re comfortable with command-line interfaces. To do this, open the Command Prompt by typing “cmd” in the Start menu search and running it as an administrator. Once the Command Prompt is open, you can enter the command “netsh interface set interface name=”Wi-Fi” admin=disable.”
To enable the WiFi again using Command Prompt, you can simply change “disable” to “enable” in the command. This method provides an alternative way to manage your network settings without navigating through the graphical user interface, making it a useful technique for advanced users.
In today’s digital age, Wi-Fi has become an essential aspect of our daily lives. We rely on it to stay connected to the internet, check our emails, scroll through social media, and even complete our work tasks. However, there are times when we need to turn off our Wi-Fi connection, whether it’s to conserve battery life, troubleshoot connectivity issues, or simply to take a break from the digital world. If you’re a Windows 7 user, you may be wondering how to turn off Wi-Fi on your device. Fear not, dear reader, for we’ve got you covered.
Why Turn Off Wi-Fi on Windows 7?
Before we dive into the nitty-gritty of turning off Wi-Fi on Windows 7, let’s explore some reasons why you might want to do so:
Power Saving: Wi-Fi connectivity can drain your laptop or desktop’s battery life. By turning it off, you can conserve power and extend the battery life of your device.
Troubleshooting: If you’re experiencing connectivity issues or slow internet speeds, turning off Wi-Fi can help you identify the problem and resolve it more efficiently.
Security: Turning off Wi-Fi can help prevent unauthorized access to your device or network, reducing the risk of cyber threats and data breaches.
Reducing Distractions: In today’s world, distractions are everywhere. Turning off Wi-Fi can help you focus on your work or other activities without the temptation of social media or email notifications.
Methods to Turn Off Wi-Fi on Windows 7
Now that we’ve discussed the reasons why you might want to turn off Wi-Fi on Windows 7, let’s explore the various methods to do so:
Method 1: Turn Off Wi-Fi Using the Network and Sharing Center
This is perhaps the most straightforward method to turn off Wi-Fi on Windows 7. Here’s how to do it:
- Click on the Network and Sharing Center icon in the system tray (usually located at the bottom right corner of the screen).
- Click on “Change adapter settings” on the left side of the window.
- Right-click on the Wi-Fi adapter and select “Disable.”
Alternatively, you can also click on “Turn wireless off” at the top of the window.
Method 2: Turn Off Wi-Fi Using the Device Manager
This method involves using the Device Manager to disable the Wi-Fi adapter. Here’s how:
- Press the Windows key + X and select “Device Manager.”
- Expand the “Network Adapters” section.
- Right-click on the Wi-Fi adapter and select “Disable.”
Method 3: Turn Off Wi-Fi Using the Command Prompt
This method requires a bit more technical know-how, but it’s still relatively simple. Here’s how to do it:
- Press the Windows key + R to open the Run dialog box.
- Type “cmd” and press Enter to open the Command Prompt.
- Type “netsh wlan set interface adminState=Disable” and press Enter.
This command will disable the Wi-Fi adapter.
Turning Off Wi-Fi on a Laptop vs. Desktop
While the methods mentioned above apply to both laptops and desktops, there is a notable difference between the two:
Laptops: Laptops often have a dedicated Wi-Fi switch or button that allows you to toggle Wi-Fi on and off. This switch is usually located on the laptop’s keyboard or near the power button. You can use this switch to quickly turn off Wi-Fi on your laptop.
Desktops: Desktops, on the other hand, usually don’t have a dedicated Wi-Fi switch. You’ll need to use one of the methods mentioned above to turn off Wi-Fi on your desktop.
Common Issues When Turning Off Wi-Fi on Windows 7
While turning off Wi-Fi on Windows 7 is a relatively straightforward process, you may encounter some issues. Here are some common ones:
Issue 1: Wi-Fi Adapter Not Found
If you’re unable to find the Wi-Fi adapter in the Network and Sharing Center or Device Manager, try restarting your device or updating your Wi-Fi drivers.
Issue 2: Wi-Fi Won’t Turn Off
If you’re unable to turn off Wi-Fi using any of the methods mentioned above, try restarting your device or disabling any third-party Wi-Fi software.
Conclusion
Turning off Wi-Fi on Windows 7 is a simple process that can help you conserve power, troubleshoot connectivity issues, and reduce distractions. By following the methods outlined in this article, you should be able to turn off Wi-Fi on your Windows 7 device with ease. Remember to use the method that works best for you, whether it’s through the Network and Sharing Center, Device Manager, or Command Prompt. Happy disconnecting!
How do I turn off Wi-Fi on Windows 7 if I don’t see the Wi-Fi toggle option?
If you don’t see the Wi-Fi toggle option in the Network and Sharing Center, it’s likely because your laptop or device has a physical Wi-Fi button or switch. This button is usually located on the keyboard or on the side of the laptop. Pressing this button will toggle Wi-Fi on and off. Alternatively, you can also use the function keys on your laptop to enable or disable Wi-Fi. The exact key combination may vary depending on your laptop model, but it’s usually something like Fn + F2 or Fn + F5.
If you’re still having trouble finding the Wi-Fi toggle option, you can try using the Device Manager to disable the Wi-Fi adapter. To do this, press the Windows key + X and select Device Manager. In the Device Manager, expand the Network Adapters section and right-click on the Wi-Fi adapter. Select Disable to turn off Wi-Fi. Note that this method will disable Wi-Fi entirely, so you won’t be able to re-enable it from the Network and Sharing Center.
Can I turn off Wi-Fi on Windows 7 using the command prompt?
Yes, you can use the command prompt to turn off Wi-Fi on Windows 7. To do this, you’ll need to use the netsh command. Open the command prompt as an administrator by right-clicking on the Command Prompt icon in the Start menu and selecting Run as administrator. Then, type the following command: netsh wlan set interface adminstate=disable. This will disable Wi-Fi on your device.
Note that this method will disable Wi-Fi entirely, so you won’t be able to re-enable it from the Network and Sharing Center. To re-enable Wi-Fi, you can use the following command: netsh wlan set interface adminstate=enable. This method can be useful if you need to script Wi-Fi toggle functionality or if you prefer using the command prompt over the graphical interface.
Will turning off Wi-Fi on Windows 7 disable Bluetooth as well?
Turning off Wi-Fi on Windows 7 will not automatically disable Bluetooth. Wi-Fi and Bluetooth are separate wireless technologies, and disabling one does not affect the other. However, if your device has a wireless switch or button that controls both Wi-Fi and Bluetooth, pressing this button may disable both technologies at the same time.
To disable Bluetooth separately, you can go to the Device Manager, expand the Bluetooth section, and right-click on the Bluetooth adapter. Select Disable to turn off Bluetooth. Alternatively, you can also use the Bluetooth settings in the Control Panel to disable Bluetooth.
Can I schedule Wi-Fi to turn off automatically on Windows 7?
Yes, you can schedule Wi-Fi to turn off automatically on Windows 7 using the Task Scheduler. The Task Scheduler is a built-in utility that allows you to automate tasks and scripts on your device. To schedule Wi-Fi to turn off, you’ll need to create a new task that runs a batch script to disable Wi-Fi.
To create a new task, open the Task Scheduler and create a new task. Set the trigger to the time and date you want Wi-Fi to turn off, and set the action to run a batch script. In the batch script, use the netsh command to disable Wi-Fi. You can also use third-party software to schedule Wi-Fi toggle functionality.
Will turning off Wi-Fi on Windows 7 affect my Ethernet connection?
Turning off Wi-Fi on Windows 7 will not affect your Ethernet connection. Wi-Fi and Ethernet are separate network interfaces, and disabling one does not affect the other. Your Ethernet connection will continue to work as usual, and you can still access the internet and local network resources over Ethernet.
However, if you’re using a laptop with a wireless-only network card, disabling Wi-Fi may also disable network connectivity entirely. In this case, you may need to use an Ethernet adapter or docking station to connect to the network using an Ethernet cable.
Can I turn off Wi-Fi on Windows 7 using a shortcut key?
There is no built-in shortcut key to turn off Wi-Fi on Windows 7. However, you can create a custom shortcut key using the Windows Key + X menu. To do this, right-click on the Network icon in the system tray and select Open Network and Sharing Center. Then, click on the Change adapter settings link and right-click on the Wi-Fi adapter. Select Create shortcut to create a shortcut to the Wi-Fi adapter.
You can then right-click on the shortcut and select Properties, and assign a shortcut key to toggle Wi-Fi on and off. For example, you can assign the Ctrl + Shift + W keys to toggle Wi-Fi. This method requires some setup, but it provides a convenient way to toggle Wi-Fi using a shortcut key.
Will turning off Wi-Fi on Windows 7 affect my VPN connection?
Turning off Wi-Fi on Windows 7 will likely disconnect your VPN connection if you’re using a Wi-Fi connection to establish the VPN tunnel. This is because the VPN software relies on the Wi-Fi connection to establish a secure tunnel to the VPN server. If you disable Wi-Fi, the VPN software will no longer be able to establish a connection.
However, if you’re using an Ethernet connection to establish the VPN tunnel, turning off Wi-Fi will not affect your VPN connection. Your VPN connection will continue to work as usual, and you can still access VPN resources over the Ethernet connection.
Windows 7 is the latest Microsoft Operating System for users. Windows 7 comes in 32-bit or 64-bit editions. Because of memory limitations in
32-bit OSes, the maximum amount of available RAM is 3GB. This used to be more than enough for Windows XP, but progress demands higher requirements and with the
minimum around 2GB now, 3GB will soon be insufficient.
With a 64-bit OS, the maximum amount of memory in Windows 7 Professional or Windows 7 Enterprise is 196GB, which is almost 50 times bigger!!!
But, not all software makers have upgraded their programs to 64-bit versions. And since each new OS includes more gadgets and tools, one of the tools
that Microsoft included for laptops is the Windows Mobility Center. This utility allows you to control many things at once, like screen brightness,
sound, screen rotation, external displays, wireless and sometimes more (depends on hardware detected by Windows 7).
Most laptops in the Math Department are Acer Travelemates and they usually have Intel Wireless Network cards. When available, the Intel Wireless
Connection Utility is recommended for controlling the wireless network card as it is a very good program. See this
this page for instructions for use in Windows XP. But your laptop has Windows 7, here are some instructions for controlling the Wireless.
| To turn on/off the Wireless in Windows 7 using the hardware switch | |
| On most the the Acer Laptops there is a hardware switch located on the front of the laptop which has a little picture of a satellite dish next to a slider switch. Other laptop manufacturers use either a slider switch or a simple on/off switch or sometimes there is a keyboard switch that usually requires using the Function (Fn) key and another key like F5. The other key usually has a small icon to indicate wireless. There is usually a light next to the switch which is off, blinking or on. If it is blinking, then it is turned on, but not connected to any network. With the slider switch, sliding it toggles the wireless card on or off. If you use the hardware switch to turn on the wireless and it doesn’t come on, then it’s probably the software switch which is turned off. Continue below. |
|
| To turn on/off the Wireless in Windows 7 using the software switch | |
| 1. Look in the lower right corner of the desktop for the Windows 7 power icon. Looks like a battery with an AC plug. | |
| 2. Right-click on the power icon and a popup menu should appear. Choose the Windows Mobility Center and click on it. | |
| 3. You should see something similar to the one pictured here, although it may vary with different hardware.
Notice in the upper right corner |

|
| 4. Now look again in the lower right corner of the desktop, only look for the network icon. Looks like a monitor with a weird antenna on the left. | |
| 5. Left-click on the Network icon and a popup menu should appear showing what network, if any, you are connected to at the top and below that, a list of available wireless networks. |
|
| 6. When I click on the UHWireless network, the is a warning about information being visible to others, which is due to the UHWireless network not being encrypted. There is also a checkbox to connect automatically when in wireless range and a Connect button. Click on the Connect If the network you are connecting to has security |

|
| 7. Once connected, if this is the first time, you should get a window like the example to the right asking you to choose the location for the network. Home and Work network are trusted location and are basically the same thing. The Public network is not trusted and security is tighter and some network programs might not work correctly. For the UHWireless, I suggest choosing the Work network. |

|
| 8. You should see that you are connected and the location is set to whatever you chose, which for UHWireless is Work. Click the close button. |

|
| 9. The Windows Netowrk icon should change and look like wireless signal bars. | |
| 10. If the Windows Mobility Center window is still up, it should show you are connected and the button for the Wireless should have changed to «Turn wireless off». You can close this window now. |

|
Well, that should be all you need to be able to control the wireless under Windows 7.
Back to Top
Last revised: February 11, 2015 13:58
37121
Привет! В большинстве случаев, у пользователей возникает куча вопросов которые касаются включения беспроводной сети на ноутбуке, или компьютере с Wi-Fi адаптером. Но сегодня я решил подготовить небольшую инструкцию, в которой расскажу и покажу как отключить Wi-Fi на ноутбуке с установленной Windows 7. Впрочем, не важно какая операционная система у вас установлена, сам процесс отключения беспроводной сети там практически ничем не отличается.
Если вы зашли сюда случайно, и у вас проблема с включением Wi-Fi в Windows 7 и подключением к беспроводной сети, то смотрите эту статью: как подключить ноутбук (компьютер) к интернету по Wi-Fi? Проблемы с подключением к Wi-Fi. Ну а если вы хотите полностью выключить Wi-Fi в Windows 7, то смотрите инструкцию ниже.
Забыл еще написать, что способов есть несколько. Но зачем усложнять себе жизнь. Я покажу самый простой и быстрый способ, которым вы сможете отключить, и так же быстро при необходимости включить беспроводное подключение на своем ноутбуке.
Отключаем Wi-Fi в Windows 7
На панели уведомлений нажмите правой кнопкой мыши на значок «Wi-Fi». Выберите пункт «Центр управления сетями и общим доступом». В новом окне перейдите в «Изменение параметров адаптера».

Дальше просто правой кнопкой мыши нажимаем на «Беспроводное сетевое соединение», и выбираем «Отключить».

Беспроводное соединение будет полностью отключено.

Как включить Wi-Fi обратно?
Все очень просто. Заходим в «Изменение параметров адаптера», нажимаем на наше беспроводное подключение правой кнопкой мыши, и выбираем «Включить».

Беспроводное подключение заработает, и ноутбук подключится к сети.
Как создать ярлык для быстрого отключения Wi-Fi?
Если вам нужно очень часто отключать Wi-Fi на ноутбуке, то можно вывести отдельный ярлык на рабочий стол.
Достаточно нажать правой кнопкой мыши на подключение, и выбрать «Создать ярлык». Система предложит поместить ярлык на рабочий стол. Нажмите «Да».

Теперь достаточно на рабочем столе нажать на созданный ярлык, и выбрать «Отключить».

Вот собственно и все. Думаю, эти небольшие советы вам пригодились.
На самом деле, штука полезная. Например, если вы подключили интернет к ноутбуку по сетевому кабелю, то Wi-Fi лучше полностью отключить. Случаев может быть много, так что пользуйтесь!