
Все способы:
- Проверяем веб-камеру на ноутбуке с Windows 7
- Способ 1: Skype
- Способ 2: Онлайн-сервисы
- Способ 3: Программы для записи видео с веб-камеры
- Вопросы и ответы: 1
Большинство ноутбуков оборудованы встроенной веб-камерой. Она должна сразу исправно работать после установки драйверов. Но лучше предварительно убедиться в этом самостоятельно, с помощью нескольких простых способов. В этой статье мы рассмотрим несколько вариантов проверки камеры на ноутбуке с Windows 7.
Проверяем веб-камеру на ноутбуке с Windows 7
Изначально камера не требует никаких настроек, но их необходимо совершать перед работой в определенных программах. Как раз из-за неправильной настройки и проблемам с драйверами возникают различные неполадки с веб-камерой.
Неполадки обнаруживаются чаще всего во время тестирования устройства, поэтому давайте перейдем к рассмотрению способов проверки веб-камеры.
Способ 1: Skype
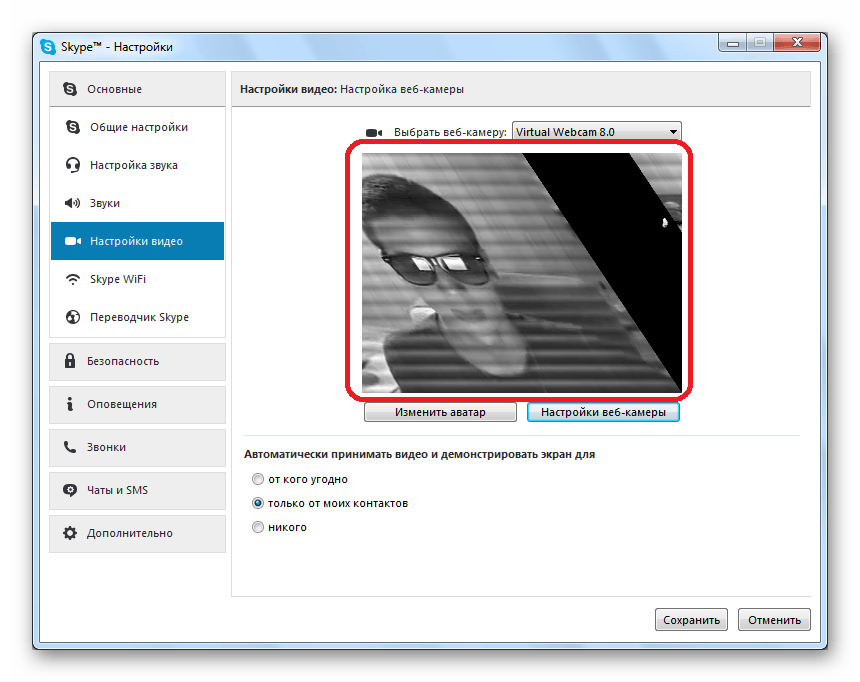
Большинство пользователей для видеосвязи используют популярную программу Skype. Она позволяет проверить камеру перед совершением звонков. Провести тестирование достаточно просто, нужно только перейти в «Настройки видео», выбрать активное устройство и оценить качество картинки.
Подробнее: Проверка камеры в программе Skype
Если результат проверки по каким-либо причинам вас не устраивает, необходимо провести настройку или исправить возникшие неполадки. Выполняются эти действия, не выходя из окна тестирования.
Подробнее: Настройка камеры в программе Skype
Способ 2: Онлайн-сервисы
Существуют специальные сайты с простыми приложениями, которые предназначены для тестирования веб-камеры. Вам не нужно выполнять сложные действия, часто достаточно нажать только одну кнопку, чтобы началась проверка. На просторах интернета находится множество подобных сервисов, просто выберите один из списка и проведите тестирование устройства.

Подробнее: Проверяем веб-камеру онлайн
Поскольку проверка осуществляется через приложения, то корректно они будут работать только в том случае, если у вас на компьютере установлен Adobe Flash Player. Не забудьте его скачать или обновить перед началом тестирования.
Читайте также:
Как установить Adobe Flash Player на компьютер
Как обновить Adobe Flash Player
Способ 3: Программы для записи видео с веб-камеры
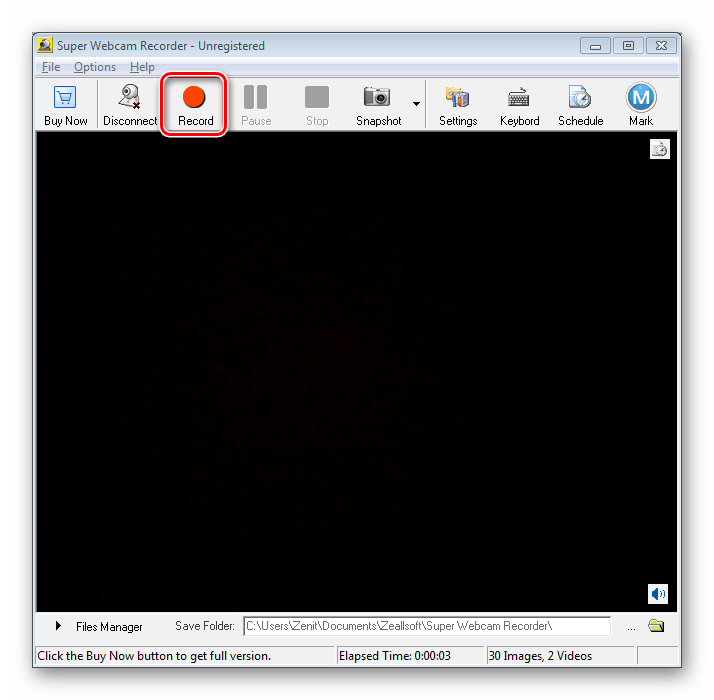
Если вы собираетесь записывать видео или фотографироваться с камеры, то лучше всего сразу же осуществить тестирование в необходимой программе. В качестве примера мы подробно рассмотрим процесс проверки в Super Webcam Recorder.
- Запустите программу и нажмите кнопку «Record», чтобы начать запись видео.
- Вы можете поставить запись на паузу, остановить ее или сделать снимок.
- Все записи, снимки будут сохранены в файловом менеджере, отсюда доступен их просмотр и удаление.


В этой статье мы рассмотрели четыре способа проверки камеры на ноутбуке с Windows 7. Более рационально будет сразу тестировать устройство в той программе или сервисе, который вы планируете использовать в дальнейшем. В случае отсутствия картинки рекомендуем еще раз проверить все драйвера и настройки.
Наша группа в TelegramПолезные советы и помощь
Testing a webcam on Windows 7 can be a straightforward process if you follow the right steps. Whether you are preparing for a video conference, recording a video, or simply ensuring that your webcam is functioning correctly, this guide will walk you through the necessary steps to test your webcam on a Windows 7 system.
Step-by-Step Guide to Testing Your Webcam on Windows 7

1. Check Webcam Connection
Before diving into software solutions, ensure that your webcam is properly connected to your computer. If you are using an external webcam, make sure it is securely plugged into a USB port. For built-in webcams, ensure that your laptop’s hardware is functioning correctly.
2. Install Webcam Drivers
Webcam drivers are essential for the proper functioning of your device. If your webcam is not working, it might be due to missing or outdated drivers. Here’s how to check and update your drivers:
— Open Device Manager: Click on the Start menu, type «Device Manager» in the search box, and press Enter.
— Locate Your Webcam: In the Device Manager window, look for «Imaging Devices» and expand the list. Your webcam should be listed there.
— Update Drivers: Right-click on your webcam and select «Update Driver Software.» Follow the on-screen instructions to search for and install the latest drivers.
3. Use the Windows Camera App
Windows 7 does not come with a built-in camera app like Windows 10, but you can use third-party software or the pre-installed applications that came with your webcam. Here’s how to use some common options:
— Third-Party Software: Many webcams come with their own software. Install the software from the CD that came with your webcam or download it from the manufacturer’s website.
— Skype: If you have Skype installed, you can use it to test your webcam. Open Skype, go to Tools > Options > Video Settings. You should see a live feed from your webcam if it is working correctly.
4. Online Webcam Test Tools
There are several online tools available that can help you test your webcam. These tools are easy to use and do not require any installation. Here’s how to use them:
— Visit a Webcam Test Website: Open your web browser and go to a webcam test website such as webcamtests.com or testmycam.net.
— Allow Access: The website will ask for permission to access your webcam. Click «Allow» to proceed.
— Check the Feed: If your webcam is working, you should see a live feed on the screen. These tools often provide additional information about your webcam, such as resolution and frame rate.
5. Troubleshooting Common Issues
If your webcam is not working, here are some common issues and their solutions:
— Webcam Not Detected: Ensure that your webcam is properly connected and that the drivers are installed. Try plugging the webcam into a different USB port.
— Black Screen: This could be due to a software conflict. Close any other applications that might be using the webcam and try again.
— Poor Image Quality: Adjust the lighting in your room and clean the webcam lens. You can also check the settings in the webcam software to adjust the resolution and other parameters.
6. Using Built-in Diagnostics
Some laptops come with built-in diagnostic tools that can help you test your webcam. Here’s how to access them:
— Dell: For Dell laptops, you can use the Dell Webcam Central software. Open the software and follow the on-screen instructions to test your webcam.
— HP: HP laptops often come with HP MediaSmart Webcam software. Open the software and use the test feature to check your webcam.
7. Testing with Other Applications
You can also test your webcam with other applications that use video input. Here are a few examples:
— Zoom: Open Zoom, go to Settings > Video. You should see a live feed from your webcam.
— Google Meet: Open Google Meet in your web browser, start a new meeting, and check if your webcam feed is visible.
Testing your webcam on Windows 7 involves a few straightforward steps, from checking the connection and updating drivers to using third-party software and online tools. By following this guide, you can ensure that your webcam is functioning correctly and be prepared for any video calls or recordings you need to make. If you encounter any issues, the troubleshooting tips provided should help you resolve them quickly.
Remember, keeping your drivers up to date and ensuring that your webcam is clean and properly connected are key to maintaining good webcam performance. Whether you are using your webcam for professional meetings, online classes, or personal use, these steps will help you get the most out of your device.
In today’s digital age, webcams have become an essential component of our online interactions. Whether you’re attending a video conference, chatting with friends, or recording a tutorial, a functioning webcam is crucial. However, like any other hardware device, webcams can malfunction or encounter issues. That’s why it’s essential to know how to test your webcam on Windows 7 to ensure it’s working correctly. In this comprehensive guide, we’ll walk you through the process of testing your webcam, troubleshooting common issues, and providing tips for improved webcam performance.
Checking the Webcam Hardware
Before we dive into the testing process, let’s start with the basics. Ensure that your webcam is properly connected to your computer. If you’re using an external webcam, plug it into a USB port and make sure it’s securely connected. If you’re using a laptop with a built-in webcam, you don’t need to worry about this step.
Next, check your webcam’s physical condition. Make sure the lens is clean and free from any obstacles. A dirty or obstructed lens can significantly impact your webcam’s performance. Gently wipe the lens with a soft cloth to remove any dirt or debris.
Device Manager: The First Stop in Webcam Troubleshooting
Now that we’ve checked the physical aspects of our webcam, let’s move on to the software side of things. The first place to start is the Device Manager.
- Click on the Start button and type “Device Manager” in the search bar.
- Click on the Device Manager icon to open it.
- In the Device Manager window, expand the “Imaging devices” or “Cameras” section.
Look for your webcam’s name or model number in the list. If you don’t see it, it’s possible that the webcam drivers are not installed or are corrupted. We’ll cover driver installation and updating later in this article.
Using the Windows 7 Camera App
The Windows 7 Camera app is a built-in utility that allows you to test your webcam and take photos or videos. Here’s how to access it:
Launching the Camera App
- Click on the Start button and type “Camera” in the search bar.
- Click on the Camera icon to open the app.
Testing Your Webcam with the Camera App
Once the Camera app is open, you should see a live feed from your webcam. If you don’t see a feed, it’s possible that your webcam is not detected or is malfunctioning.
- Check the webcam settings by clicking on the “Options” button at the bottom of the window.
- Ensure that the correct webcam is selected from the dropdown menu.
- Adjust the brightness, contrast, and other settings to optimize your webcam’s performance.
If you’re still not seeing a live feed, try restarting the Camera app or your computer.
Troubleshooting Common Webcam Issues on Windows 7
While testing your webcam, you may encounter some common issues. Don’t worry; we’ve got you covered.
Webcam Not Detected or Recognized
If your webcam is not detected or recognized by Windows 7, try the following:
- Disconnect and reconnect the webcam to ensure it’s properly connected.
- Try using a different USB port or a USB hub to rule out any port issues.
- Restart your computer and try again.
Webcam Drivers: Installation and Updating
Outdated or corrupted webcam drivers can cause issues with your webcam’s performance. Here’s how to update your webcam drivers:
- Go to the Device Manager (as described earlier) and find your webcam’s entry under “Imaging devices” or “Cameras.”
- Right-click on the webcam entry and select “Update driver software.”
- Click on “Search automatically for updated driver software” to allow Windows 7 to search for and install the latest drivers.
Alternatively, you can visit your webcam manufacturer’s website to download and install the latest drivers.
Webcam Permissions and Settings
Sometimes, webcam issues can be resolved by adjusting the permissions and settings. Here’s how:
- Go to the Start menu and type “Privacy” in the search bar.
- Click on “Privacy options” to open the Privacy window.
- Scroll down to the ” Webcam” section and ensure that the “Allow apps to use my webcam” checkbox is selected.
- You can also choose which apps are allowed to access your webcam.
Additional Tips for Improved Webcam Performance
To get the best out of your webcam, follow these additional tips:
- Update your operating system and software regularly to ensure you have the latest security patches and features.
- Use good lighting to improve the video quality. Natural light is always the best, but if you’re recording in a dark room, invest in a good quality external light source.
- Invest in a high-quality webcam that’s compatible with Windows 7. A good webcam can make a significant difference in video quality.
- Use a headset or external microphone for better audio quality. Built-in laptop microphones can pick up background noise and compromise audio quality.
| Webcam Model | Windows 7 Compatibility |
|---|---|
| Logitech C920 | Yes |
| Razer Kiyo | Yes |
By following this comprehensive guide, you should be able to test your webcam on Windows 7 and troubleshoot any common issues that may arise. Remember to stay updated with the latest drivers and software, and don’t hesitate to reach out to your webcam manufacturer’s support team if you need further assistance. Happy recording!
Why do I need to test my webcam on Windows 7?
To ensure that your webcam is working properly, it’s essential to test it. This is especially important if you plan to use your webcam for video conferencing, online meetings, or live streaming. Testing your webcam will help you identify any issues with the device, drivers, or software, allowing you to troubleshoot and resolve problems before they become a bigger issue.
By testing your webcam, you can also verify that it’s properly connected to your computer, the drivers are up-to-date, and the software is configured correctly. This will give you peace of mind knowing that your webcam is functioning correctly and ready for use whenever you need it.
What do I need to test my webcam on Windows 7?
To test your webcam on Windows 7, you’ll need a few basic things. First, you’ll need a webcam that’s compatible with Windows 7. Make sure it’s properly connected to your computer, either through a USB port or wirelessly. You’ll also need to ensure that your webcam drivers are up-to-date and installed correctly. Additionally, you’ll need a webcam testing software or tool, such as the built-in Windows Camera app or a third-party program.
If you’re using a built-in webcam, you may not need to install any additional software or drivers. However, if you’re using an external webcam, you may need to install the manufacturer’s software and drivers to get it working properly. It’s also a good idea to have a decent internet connection and a quiet, well-lit space to test your webcam.
How do I access the Windows Camera app on Windows 7?
The Windows Camera app is a built-in tool in Windows 7 that allows you to test your webcam. To access the Windows Camera app, click on the Start menu and type “Camera” in the search bar. Click on the “Camera” icon to open the app. Alternatively, you can also find the Camera app in the Control Panel.
Once you open the Camera app, you’ll see a preview of your webcam feed. You can then use the app to take photos, record videos, and adjust settings such as brightness, contrast, and more. The Camera app is a convenient and easy way to test your webcam and ensure it’s working correctly.
What are some common issues I might encounter when testing my webcam?
When testing your webcam, you might encounter some common issues. One of the most common problems is a black screen or no video feed. This could be due to a faulty webcam, incorrect driver installation, or software configuration issues. You might also experience issues with audio, such as no sound or poor sound quality.
Other common issues include poor video quality, flickering lights, or distortion. These problems could be due to a range of factors, including hardware issues, outdated drivers, or incorrect software settings. By identifying and resolving these issues, you can ensure that your webcam is working correctly and providing high-quality video and audio.
How do I troubleshoot webcam issues on Windows 7?
To troubleshoot webcam issues on Windows 7, start by ensuring that your webcam is properly connected to your computer and that the drivers are up-to-date. You can check for driver updates in the Device Manager or through the manufacturer’s website. If you’re using a built-in webcam, try restarting your computer or disabling and re-enabling the webcam in the Device Manager.
If the issue persists, try using a different webcam testing software or tool to rule out any software-related problems. You can also try adjusting the webcam settings, such as brightness, contrast, and resolution, to see if it improves the video quality. If none of these steps resolve the issue, you may need to contact the manufacturer or a technical support professional for further assistance.
Can I use a third-party software to test my webcam?
Yes, you can use a third-party software to test your webcam on Windows 7. There are many free and paid webcam testing software available online, such as ManyCam, OBS Studio, or YouCam. These software often offer more advanced features and settings than the built-in Windows Camera app, allowing you to customize your webcam experience.
Third-party software can also provide additional features, such as video editing, special effects, or screen sharing. Some software may also offer more detailed diagnostic tools to help you troubleshoot webcam issues. However, be cautious when downloading and installing third-party software, as some may contain malware or viruses.
What are some tips for getting the best video quality from my webcam?
To get the best video quality from your webcam, make sure you’re using good lighting. Natural light is ideal, but if you’re recording in a low-light environment, use soft, indirect light sources. Avoid harsh lighting, as it can create unflattering shadows and highlights.
Additionally, ensure that your webcam is at a comfortable distance and angle from your face. Experiment with different positions to find the most flattering angle. Also, consider investing in a high-quality external webcam, as these often provide better video quality than built-in webcams. Finally, make sure your webcam drivers are up-to-date and that you’re using the latest software and firmware.
Testing a webcam on Windows 7 is essential for ensuring that your camera is working properly and ready to be used for video calls, conferences, or any other applications that require a webcam. By performing a webcam test, you can verify the functionality of your camera and make any necessary adjustments to optimize its performance. This blog post will provide you with a comprehensive guide on how to test a webcam on Windows 7, including different methods and troubleshooting tips.
Video Tutorial:
What’s Needed
Before you can start testing your webcam on Windows 7, there are a few things you will need:
1. A computer running Windows 7 operating system.
2. A built-in or external webcam connected to your computer.
3. Internet access to download and install webcam testing software (optional).
What Requires Your Focus?
To successfully test your webcam on Windows 7, there are a few key areas that require your attention:
1. Camera drivers: Ensure that the necessary drivers for your webcam are installed and up to date. This will enable your computer to recognize and communicate with the camera effectively.
2. Privacy settings: Check your privacy settings to make sure that the webcam is allowed to be accessed by the specific applications or websites you intend to use.
3. Lighting and positioning: Consider the lighting conditions and positioning of the camera to ensure optimal image quality during video calls or recordings.
4. Testing software: If you opt to use third-party webcam testing software, make sure to research and choose a reliable and reputable program that is compatible with Windows 7.
Different Methods to Test a Webcam on Windows 7
In this section, we will outline four different methods to test a webcam on Windows 7. Depending on your preferences and specific requirements, you can choose the method that suits you best.
Method 1: Testing via Device Manager
1. Connect your webcam to the computer if it is not already connected.
2. Open the Start menu and type «Device Manager» in the search bar.
3. Click on «Device Manager» in the search results to open the Device Manager window.
4. Expand the «Imaging devices» or «Cameras» section to display your webcam.
5. Right-click on your webcam and select «Properties» from the context menu.
6. In the Properties window, navigate to the «Driver» tab.
7. Click on the «Driver Details» button to view driver information.
8. Review the details to ensure that the webcam driver is installed and functioning correctly.
Pros:
– Convenient method accessed through the built-in Device Manager.
– Provides essential driver information.
Cons:
– Limited functionality and testing capabilities.
– May not diagnose all potential webcam issues.
Method 2: Testing via Windows Camera App
1. Connect your webcam to the computer if it is not already connected.
2. Open the Start menu and search for «Camera» or locate the Camera app in the app list.
3. Click on the «Camera» app to open it.
4. The Camera app will automatically detect and display the live video feed from your webcam.
5. Check the video for any abnormalities, ensuring that the image quality and audio are satisfactory.
Pros:
– Pre-installed app that offers a simple and user-friendly interface.
– Allows you to view the live video feed from your webcam.
Cons:
– Limited testing features and options.
– May not offer advanced settings or configuration options.
Method 3: Testing via Online Webcam Test Websites
1. Open your preferred web browser.
2. Search for «online webcam test» or similar keywords.
3. Choose a reliable and reputable online webcam test website.
4. Access the website and follow the on-screen instructions to initiate the webcam test.
5. The website will access your webcam and display the live video feed.
6. Follow the instructions to perform various tests, such as checking image quality, color accuracy, and audio output.
Pros:
– No software installation required.
– Offers additional testing options and features.
Cons:
– Requires an internet connection.
– Depends on the reliability and security of the selected website.
Method 4: Testing via Third-party Webcam Testing Software
1. Search for third-party webcam testing software compatible with Windows 7.
2. Choose a reputable and reliable webcam testing software and download it from the official website.
3. Install the software by following the on-screen instructions.
4. Open the webcam testing software.
5. The software will automatically detect and display the live video feed from your webcam.
6. Use the software’s testing features and options to evaluate image quality, adjust settings, and troubleshoot any issues.
Pros:
– Provides comprehensive testing features and options.
– Enables advanced settings and configuration adjustments.
Cons:
– Requires downloading and installing additional software.
– May have a learning curve for first-time users.
Why Can’t I Test My Webcam?
There can be several reasons why you may encounter difficulties in testing your webcam on Windows 7. Some common issues include:
1. Outdated drivers: If your webcam drivers are outdated or incompatible with Windows 7, it may prevent proper functioning or testing.
Fix: Visit the manufacturer’s website or use a driver update software to download and install the latest drivers for your webcam.
2. Privacy settings: Windows 7 includes privacy settings that can block access to your webcam for certain applications or websites.
Fix: Check the privacy settings and ensure that the webcam is allowed to be accessed by the desired applications or websites.
3. Software conflicts: Other software or applications on your computer may be conflicting with the webcam testing process, preventing successful testing.
Fix: Close unnecessary applications or perform a clean boot to troubleshoot software conflicts.
4. Hardware issues: It’s possible that there may be a hardware problem with your webcam, such as a loose connection or a faulty camera.
Fix: Check the physical connections and try connecting the webcam to a different USB port. If the issue persists, consider contacting the manufacturer for further assistance.
Implications and Recommendations
1. Keep drivers up to date: Regularly update your webcam drivers to ensure optimal performance and compatibility with Windows 7.
2. Lighting and positioning: Pay attention to the lighting conditions and positioning of your webcam to achieve the best image quality during video calls or recordings.
3. Use reputable software: When installing third-party webcam testing software, ensure that you download it from a reputable source to avoid potential security risks.
5 FAQs about Testing a Webcam on Windows 7
Q1: Why is my webcam not showing up in Device Manager?
A: There could be several reasons for your webcam not showing up in Device Manager. Try the following troubleshooting steps:
– Ensure that your webcam is properly connected to your computer.
– Install the necessary drivers for your webcam.
– Restart your computer and check if the webcam appears in Device Manager.
If the issue persists, consider contacting the manufacturer for further assistance.
Q2: How can I improve the video quality of my webcam?
A: To improve the video quality of your webcam, try the following:
– Adjust the lighting conditions for optimal visibility.
– Position the camera at eye level for a more natural perspective.
– Clean the lens of your webcam to ensure clarity.
– Update your webcam drivers for potential performance improvements.
Q3: Can I test my webcam on Windows 7 without using any software?
A: Yes, you can test your webcam on Windows 7 using built-in features like Device Manager or the Windows Camera app. These options allow for basic testing without the need for additional software.
Q4: How can I troubleshoot audio issues with my webcam?
A: If you are experiencing audio issues with your webcam, try the following troubleshooting steps:
– Ensure that the webcam’s microphone is not muted or disabled in the audio settings.
– Update your audio drivers to the latest version.
– Check the volume settings on your computer and make sure they are not muted or set too low.
– Connect an external microphone to your computer and test if audio works through that source.
Q5: Why does my webcam freeze during video calls?
A: Webcam freezing during video calls can be caused by various factors, including:
– Insufficient processing power or memory on your computer.
– A poor internet connection.
– Outdated webcam drivers.
– Software conflicts.
To address this issue, try the following:
– Close unnecessary applications running in the background.
– Restart your computer and ensure that no other processes are consuming excessive resources.
– Update your webcam drivers and ensure that your internet connection is stable.
Final Words
Testing a webcam on Windows 7 is crucial to ensure it is functioning properly for various applications and activities. By following the methods outlined in this article and troubleshooting common issues, you can quickly and efficiently test your webcam, address any problems, and enjoy a seamless video chatting experience. Remember to keep your drivers up to date, optimize lighting and positioning, and choose reputable software for testing purposes. Happy webcam testing!
В современном мире высоких технологий, особенно после пандемии, веб-камера и видеозвонки стали буквально неотъемлемой частью жизни большинства людей. При этом многие даже не подозревают, как с этой камерой взаимодействовать, как проверить её работоспособность и как отключить, дабы сохранить конфиденциальность. Самое время всё это объяснить и наглядно показать.
Проверяем веб-камеру штатными инструментами Windows
Пожалуй, проще и быстрее всего проверить веб-камеру встроенными инструментами Windows 10 или 11. Для этого разработчики из компании Microsoft реализовали весьма простой, но многофункциональный софт, способный не только отображать саму камеру компьютера, но и предоставлять доступ к гибкому набору настроек.
Как проверить веб-камеру встроенным инструментом Windows:
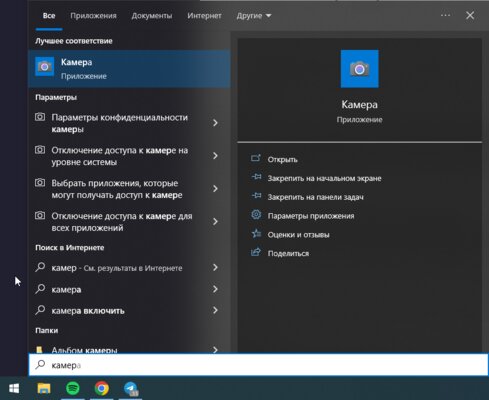
- Откройте «Пуск» и начините писать «Камера»;

- запустите фирменное приложение и, если веб-камера работает, вы сразу увидите картинку, а если камера не работает, вы увидите чёрный экран и ошибку, которая поможет найти проблему.


Как проверить веб-камеру через веб-сервисы
Если предыдущий метод по какой-то причине вам не подходит, можно воспользоваться специализированными сайтами, которые создали для того, чтобы пользователи могли быстро проверить работоспособность своей веб-камеры.
- Ru.WebcamTests.Com — сервис не только проверяет камеру, но и показывает все её характеристики (разрешение, частота кадров и так далее), плюс на сайте есть встроенный рейтинг камер.
- WebcamMicTest.com — предельно простой ресурс, проверяющий веб-камеру и позволяющий сделать тестовую запись, чтобы оценить качество конечного контента.
- Webcam-test.com — сайт позволяет не только посмотреть на работоспособность камеры, но и отображает разрешение и частоту кадров.
Как проверить веб-камеру через Zoom, Discord или Telegram
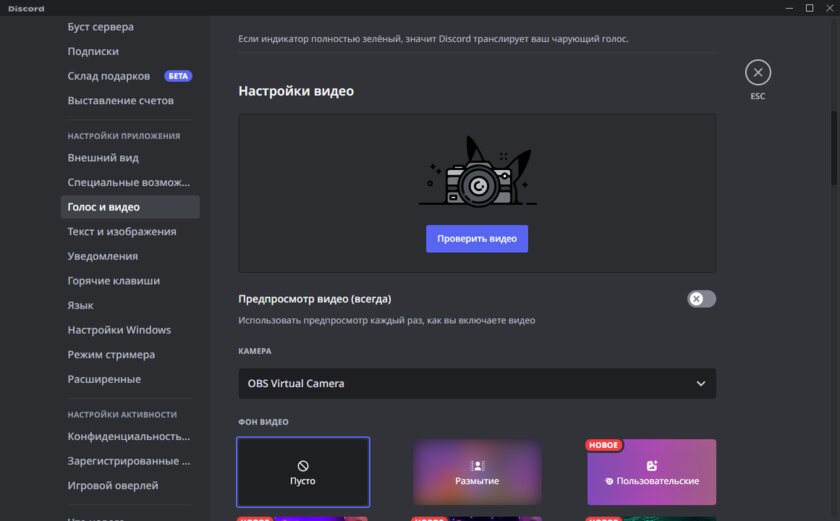
Естественно, можно проверить работу веб-камеры и в «полевых» условиях — в сценариях, для которых обычно этот гаджет и покупается. Например, можно просто позвонить товарищу в Telegram, Discord или посредством любого другого приложения с видеосвязью, подключить в настройках устройство и посмотреть, отображается ли картинка. Благо приложений с поддержкой видеозвонков сейчас очень много.
Как системно отключить веб-камеру в Windows 10 и Windows 11
В определённых ситуациях, например, с целью обеспечения максимальной конфиденциальности, пользователям хочется веб-камеру отключить. Безусловно, можно просто вытянуть кабель из компьютера, но если у вас ноутбук или моноблок, то такой хитростью уже не воспользуешься. К счастью, в Microsoft этот момент тоже продумали и отключить камеру можно системными инструментами.
Как отключить веб-камеру в Windows 11
- Откройте «Пуск» и меню «Параметры».
- Перейдите в раздел «Bluetooth и устройства» и откройте «Камеры».
- Нажмите на кнопку «Отключить».
К сожалению, в Windows 10 аналогичной функции не предусмотрено, но есть и второй, универсальный вариант, который работает и на Windows 10, и на Windows 11
- Откройте «Пуск» и перейдите в раздел «Диспетчер устройств».
- В списке устройств выберите пункт «Камеры», после чего найдите свою модель и в выпадающем списке выберите пункт «Отключить устройство».
Оба способа позволяют системно отключить камеру в компьютере.