
Windows 11 users could be facing an error that prevents Valorant from launching. This is because the tactical shooter requires its launch client and anti-cheat system to function alongside. Furthermore, the developers mandate specific system requirements for the game to run seamlessly on a machine.
Riot Games launched Valorant in 2020 after a successful beta testing phase. At the time of writing, the competitive shooter is only available to play on a system running Windows 10 or 11. The game is expected to receive a smartphone port soon, although the developers haven’t hinted at a date yet.
If Valorant refuses to work on your Windows 11 PC, you must pinpoint the exact cause and mitigate the error. Specific workarounds can also help fix the issue.

Possible reasons why Valorant isn’t working on your Windows 11 PC

Windows 11 is the latest software version from Microsoft. Upon its launch in 2021, PC users had to ensure that their system followed specific requirements, including TPM 2.0 and Secure Boot, before they could download the new distro.
Valorant on Windows 11 requires TPM 2.0 and UEFI Secure Boot, the official security standards recommended by Microsoft to verify bootloaders. If these BIOS settings are disabled on your system, the game will not launch. Riot Vanguard blocks the executable to force the error.
Other reasons behind the «Valorant not working on Windows 11» issue could be outdated graphics drivers, problems with system compatibility, corrupted game files, third-party anti-virus programs, a server breakdown or bug, and a few more.
Possible fixes for the Valorant «not working on Windows 11» issue
1) Check if Secure Boot and TPM 2.0 is enabled
You can check for TPM 2.0’s situation in your system’s UEFI (BIOS) settings. To get to the advanced UEFI settings, open Windows Settings, select Update & security > Recovery, and hit Restart now under Advanced startup. Click on Troubleshoot > Advanced options > UEFI Firmware settings and select Restart.
You will now be able to access the BIOS settings for your system. Here, you’ll be able to enable or disable TPM 2.0.
To check for Secure Boot, open the Start menu, look for System Information and open it. Now, select System Summary on the left pane. Check if BIOS mode is set to UEFI and Secure Boot State is set to On. If not, you’ll have to go to the BIOS settings on your system to fix it.
2) Update graphics drivers and OS
Not updating your system for a long time may result in outdated graphics drivers, leading to Valorant refusing to launch on your Windows 11 PC. Check the card manufacturer’s website to download a pending update. You can also use the Device Manager app to trigger the update for your system’s graphics card.
If you don’t want to update the driver manually, you can install the official third-party app available from your graphic card manufacturer (Nvidia, AMD) to set automatic driver updates.
Make sure to keep the operating system updated to avoid any compatibility issues. Riot Games, for example, has stopped supporting older Windows 10 versions.
3) Use the compatibility mode and run the game as an administrator
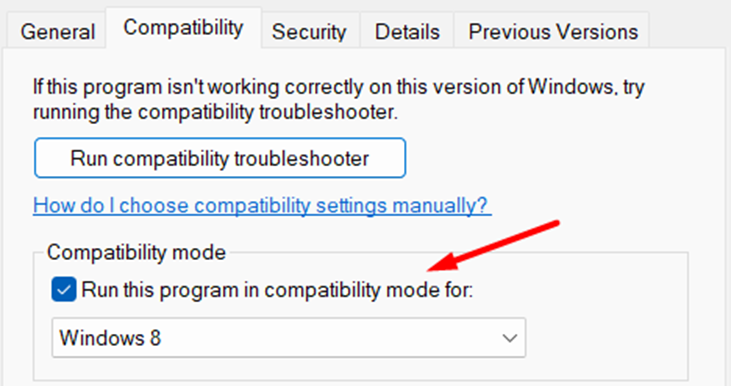
Right-click on Valorant’s executable file and click Show more options > Properties. When the Properties window opens, select the Compatibility tab. Now, check the box beside the Run this program in compatibility mode for option and select an older Windows version.
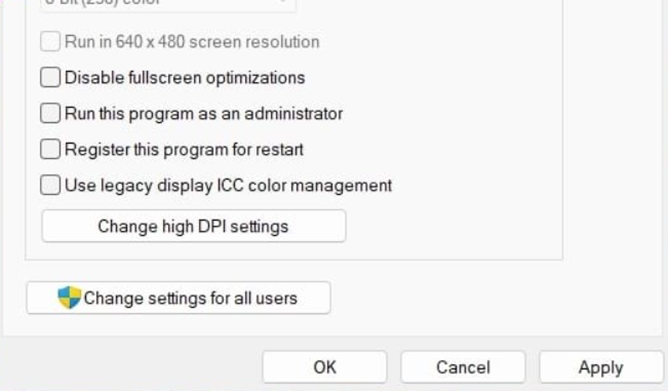
Under Settings, check the box beside Run this program as an administrator. Click on Apply > OK. Check if the issue persists after this workaround.
4) Repair game files
To repair Valorant, open the Riot Client and click on the profile icon on the top-right side. Select Settings and then Valorant. Now, click on the Repair button to initiate repair. Once the process completes, restart the game.
5) The game’s servers could be out of service
Being a large-scale multiplayer game, Valorant depends on several network servers, prone to bugs or bottlenecks due to the amount of traffic. You will not be able to play the tactical shooter during a server outage.
Riot Games also conducts scheduled pre-patch maintenance, during which the game remains unavailable. In case of a bug, the developers may address it by disabling in-game elements or taking down servers entirely.
If your search for fixes leads to a server outage or maintenance, wait for the developers to address the situation before trying to launch the game.
Although a nuisance, a clean re-installation may help fix the issues entirely. However, try this step only if none of the above fits your situation.
To clean and re-install the game, uninstall the Riot Client and the Riot Vanguard from the list of programs. Next, restart your system to flush residual files, and only then, download the game from the official website again.
-
Clickbait / Misleading
-
Factually Incorrect
-
Hateful or Abusive
-
Baseless Opinion
-
Too Many Ads
-
Other
Submit
Was this article helpful?
Thank You for feedback
About the author
Sharmila is an esports writer at Sportskeeda. After completing her bachelor’s degree in engineering, Sharmila followed her passion for writing and video games. She loves indulging in first-person shooter games, especially Valorant, as well as boxing and volunteering for animal care.
Know More
Edited by Srijan Sen
Все способы:
- Способ 1: Запуск игры от имени администратора
- Способ 2: Завершение фоновых процессов Riot
- Способ 3: Установка обновлений для VALORANT
- Способ 4: Обновление драйвера видеокарты
- Способ 5: Установка системных обновлений
- Способ 6: Управление игровым режимом Windows
- Способ 7: Переустановка VALORANT
- Вопросы и ответы: 0
Способ 1: Запуск игры от имени администратора
Начнем с самого простого варианта решения проблемы с запуском VALORANT в Windows 11, который не требует от пользователя выполнения слишком многих действий. Суть данного метода заключается в запуске игры от имени администратора, что позволит исправить неполадки с доступом к определенным системным файлам при старте клиента и самой игры, что может стать причиной появления рассматриваемой проблемы. Вам понадобится щелкнуть по исполняемому файлу VALORANT правой кнопкой мыши и выбрать из контекстного меню пункт «Запуск от имени администратора».

Если этот метод оказался действенным и теперь никаких проблем с игрой нет, стоит настроить постоянный запуск от имени администратора, чтобы не повторять одно и то же действие каждый раз. Это подразумевает изменение следующей настройки:
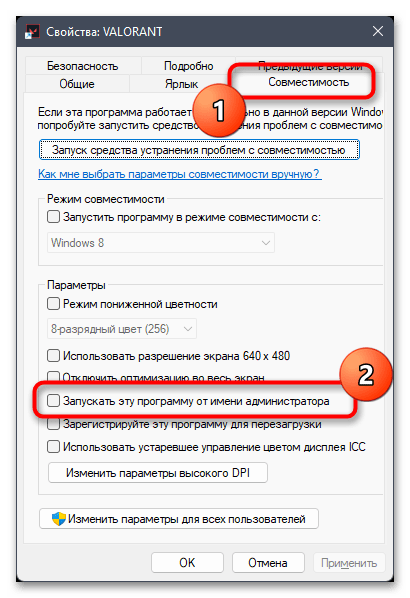
- Снова щелкните по VALORANT правой кнопкой мыши, но на этот раз выберите «Свойства».
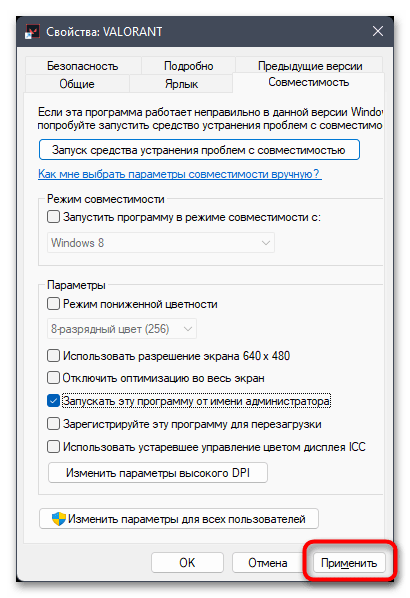
- Перейдите на вкладку «Совместимость» и отметьте галочкой пункт «Запускать эту программу от имени администратора».
- Перед выходом обязательно примените изменения, затем переходите к игре в данный многопользовательский шутер.

Способ 2: Завершение фоновых процессов Riot
Иногда игровой клиент Riot, который и используется для запуска VALORANT, создает фоновые процессы, отвечающие за установку обновлений или выполнение других действий в операционной системе. Если они не завершены, могут возникнуть проблемы с открытием игр, поэтому мы рекомендуем проверить данные задачи и самостоятельно очистить их, если это понадобится.
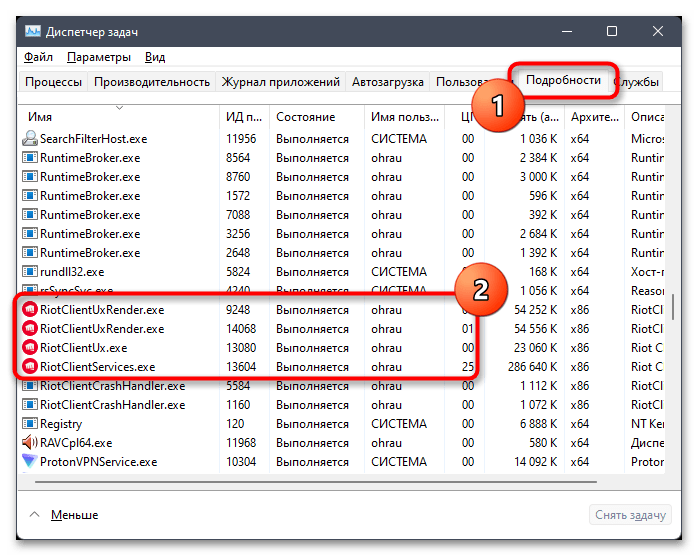
- Щелкните по кнопке «Пуск» правой кнопкой мыши и из контекстного меню выберите пункт «Диспетчер задач».
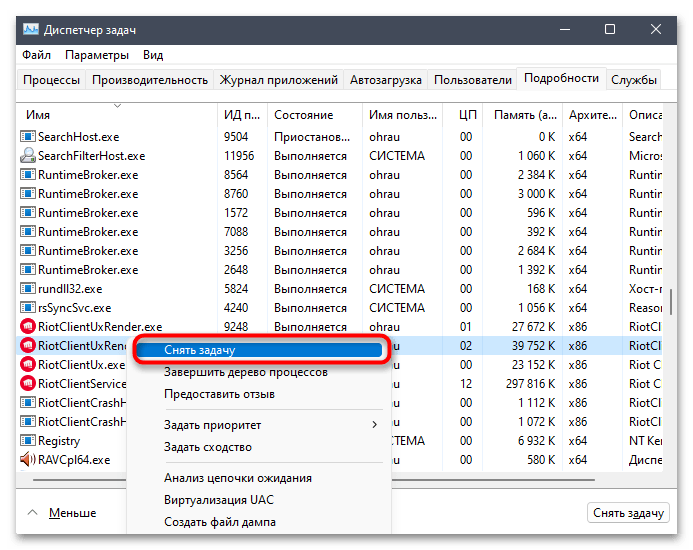
- Перейдите на вкладку «Подробности» и найдите процессы, в названиях которых фигурирует «Riot» или «VALORANT».
- Если такие есть, щелкните по каждому из них правой кнопкой мыши и выберите «Снять задачу». После того как все процессы будут завершены, запускайте VALORANT повторно и проверяйте, удалось ли решить проблему.
Способ 3: Установка обновлений для VALORANT
Существует вероятность того, что VALORANT не запускается из-за отсутствия обновлений. Если по каким-то причинам их установка не запускается автоматически, придется выполнить инсталляцию вручную. Для этого используется официальный клиент Riot, который вместе с игрой установился на ваш компьютер.
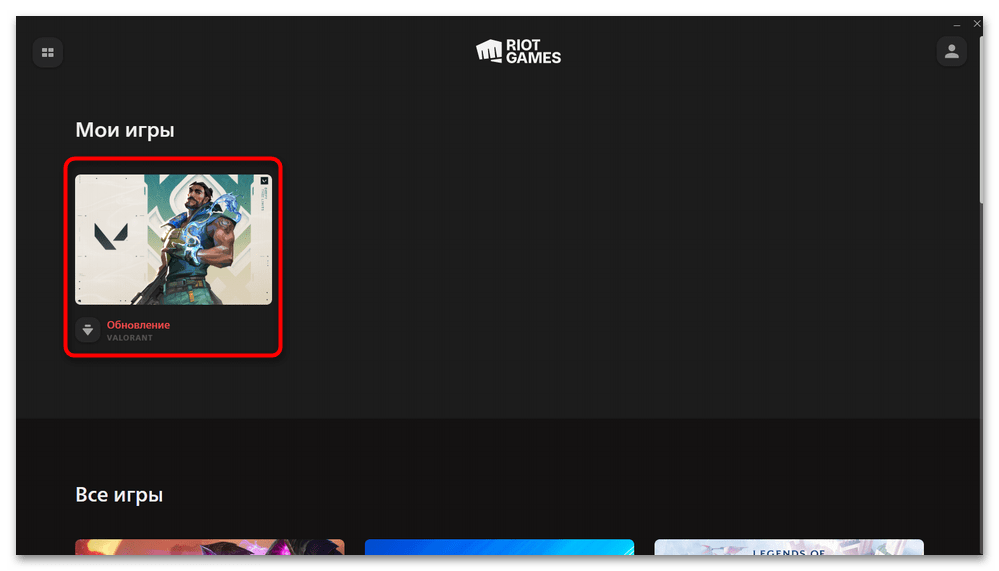
- Отыщите клиент Riot на рабочем столе или через поиск в меню «Пуск», затем запустите его.
- Если вы еще не выполнили вход в профиль, сделайте это, введя учетные данные или используя кнопки подключения связанных аккаунтов.
- В списке «Мои игры» найдите «VALORANT» и кликните левой кнопкой мыши по плитке с данной игрой.
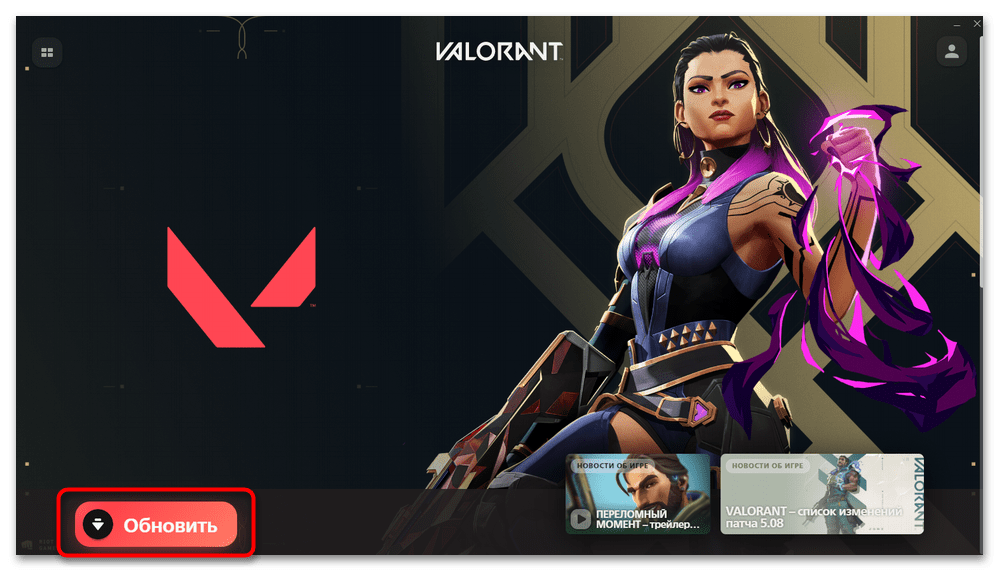
- Нажмите кнопку «Обновить», чтобы запустить скачивание и установку апдейтов.
- Ожидайте окончания этого процесса, после чего используйте кнопку «Играть» для повторного запуска шутера.


Способ 4: Обновление драйвера видеокарты
Для комфортной игры в VALORANT пользователю нужен актуальный драйвер видеокарты. Если обновления для данного устройства отсутствуют, могут возникать не только лаги внутри самого приложения, но и проблемы с его запуском. Мы рекомендуем осуществить проверку апдейтов вручную или автоматически, запустив официальные либо сторонние средства. Обо всех доступных вариантах поиска обновлений драйверов видеокарты в Windows 11 читайте в другой статье на нашем сайте по следующей ссылке.
Подробнее: Обновление драйвера видеокарты на Windows 11

Способ 5: Установка системных обновлений
Рассмотрим еще один метод, который связан с обновлениями, однако на этот раз затронем тему системных апдейтов. Вы наверняка знаете, что Windows 11 вышла не так давно и последнее время активно обновляется. Разработчики постоянно добавляют что-то новое и исправляют известные ошибки. Возможно, как раз из-за существующей ошибки в текущей сборке у вас и не получается запустить Валорант, поэтому нужно запустить поиск обновлений и установить их в случае обнаружения.
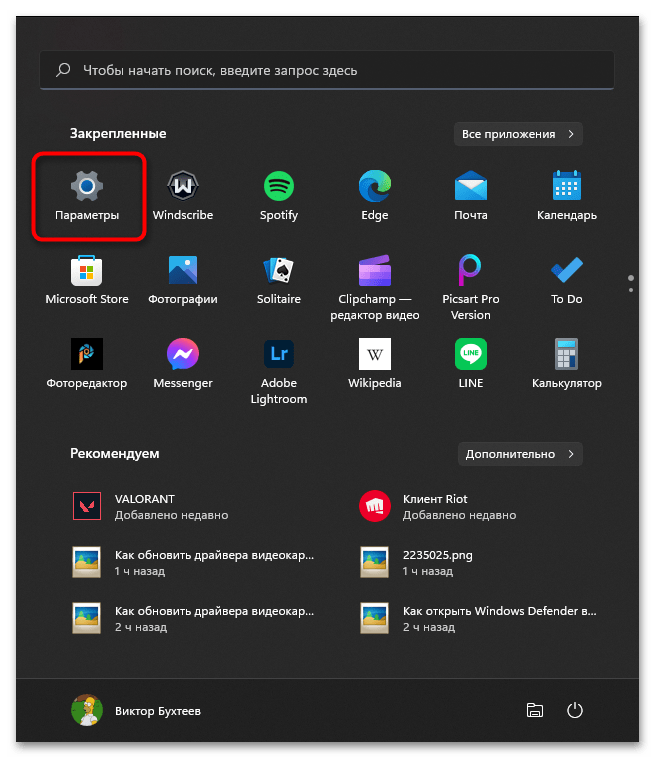
- Откройте меню «Пуск» и перейдите в «Параметры», щелкнув по соответствующему значку в списке закрепленных.
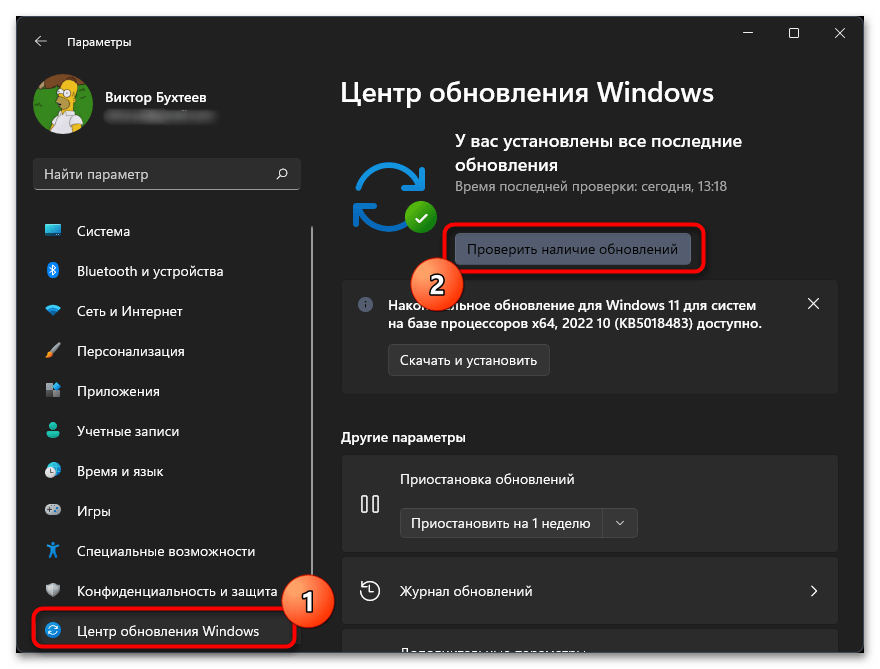
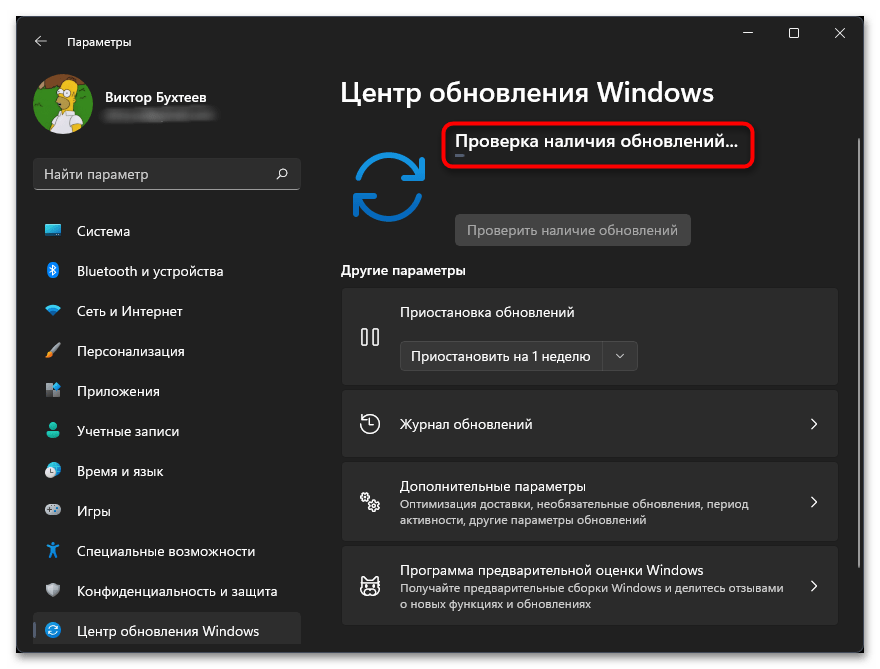
- На панели слева выберите раздел «Центр обновления Windows» и нажмите кнопку «Проверить наличие обновлений».
- Ожидайте окончания проверки, следя за ее состоянием в этом же окне.
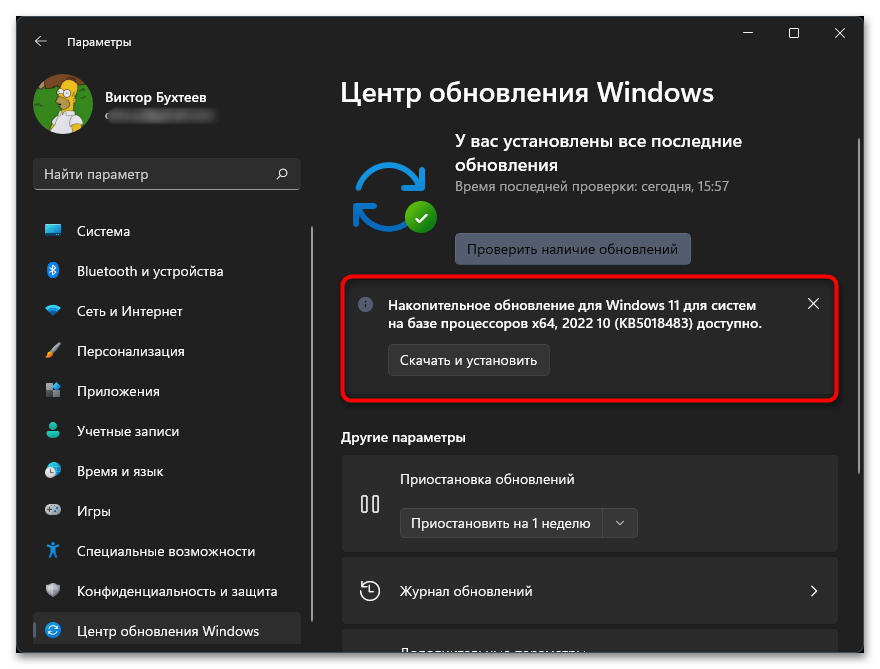
- Если какие-то апдейты будут найдены, запустите их скачивание и установку. По завершении обязательно перезагрузите ПК, чтобы изменения вступили в силу.
Способ 6: Управление игровым режимом Windows
В Windows 11 есть игровой режим, который отвечает за оптимизацию компьютера для запуска игр. Его действие может напрямую сказываться на работе приложений, включая VALORANT. Мы бы рекомендовали активировать данный режим, а также проверить его дополнительные настройки для конкретной игры.
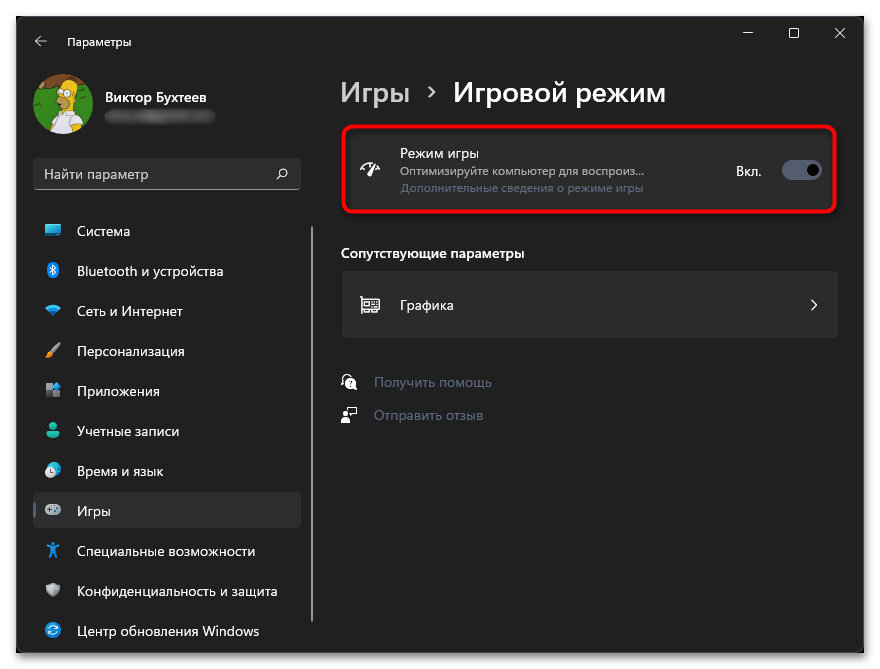
- В приложении «Параметры» на панели слева выберите раздел «Игры» и перейдите к категории «Игровой режим».
- Найдите переключатель «Режим игры» и установите его в состояние «Вкл.».
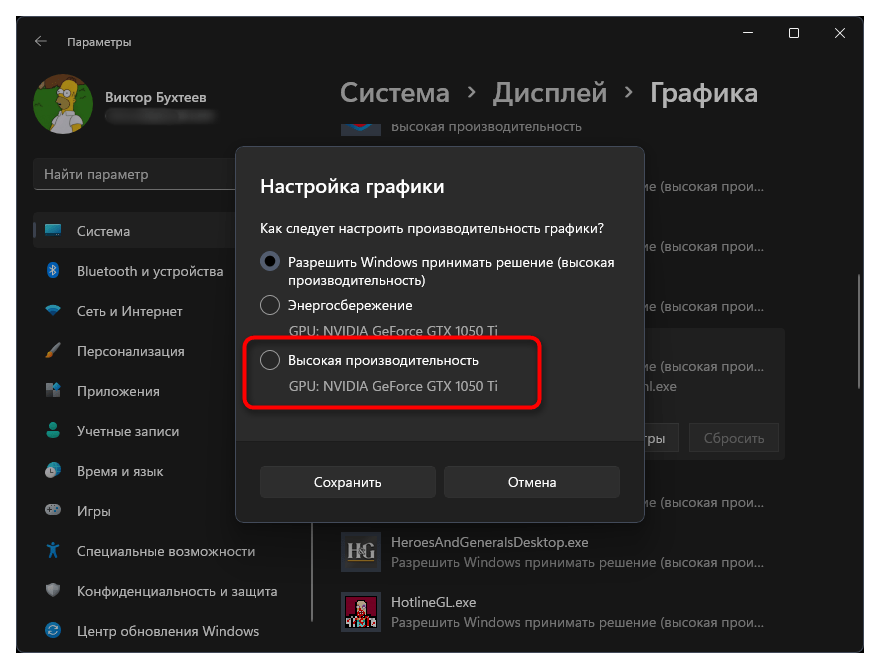
- Дополнительно перейдите к сопутствующему параметру с названием «Графика».
- В списке приложений отыщите «VALORANT» и кликните по нему левой кнопкой мыши.
- Установите настройку графики в состояние «Высокая производительность» и сохраните изменения, после чего приступайте к запуску игры.


Способ 7: Переустановка VALORANT
Клиент Riot для запуска игр от данного производителя появился совсем недавно. Пока в нем нет большого количества разных функций, при помощи которых можно было бы настраивать или исправлять приложения. Поэтому единственным методом восстановить утерянные или поврежденные файлы, из-за которых VALORANT и не может запуститься, является полная переустановка игры.
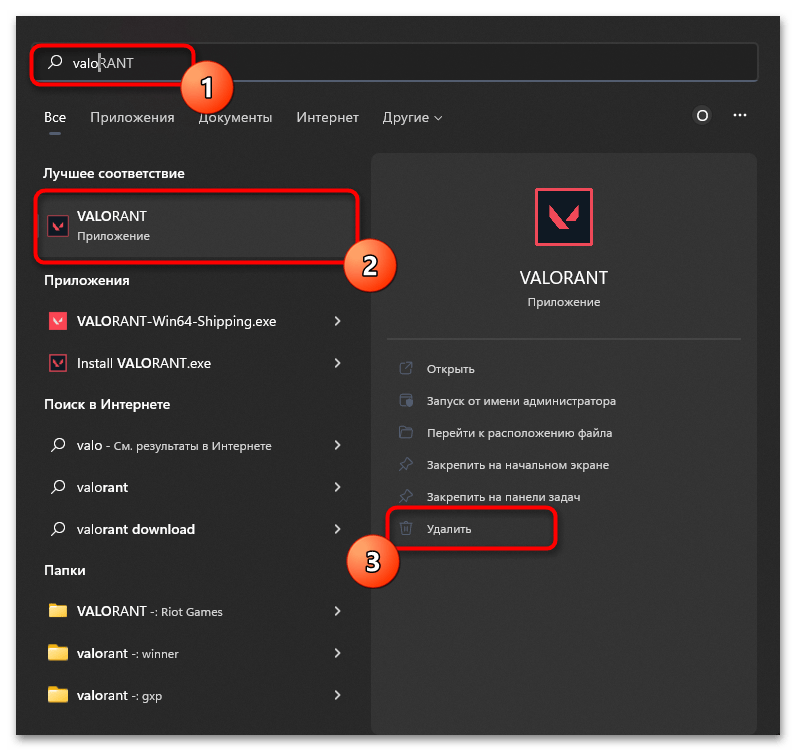
- Для начала откройте меню «Пуск» и через поиск отыщите рассматриваемую игру. На панели с действиями справа выберите кнопку «Удалить» и следуйте отобразившимся на экране инструкциям, чтобы завершить деинсталляцию.
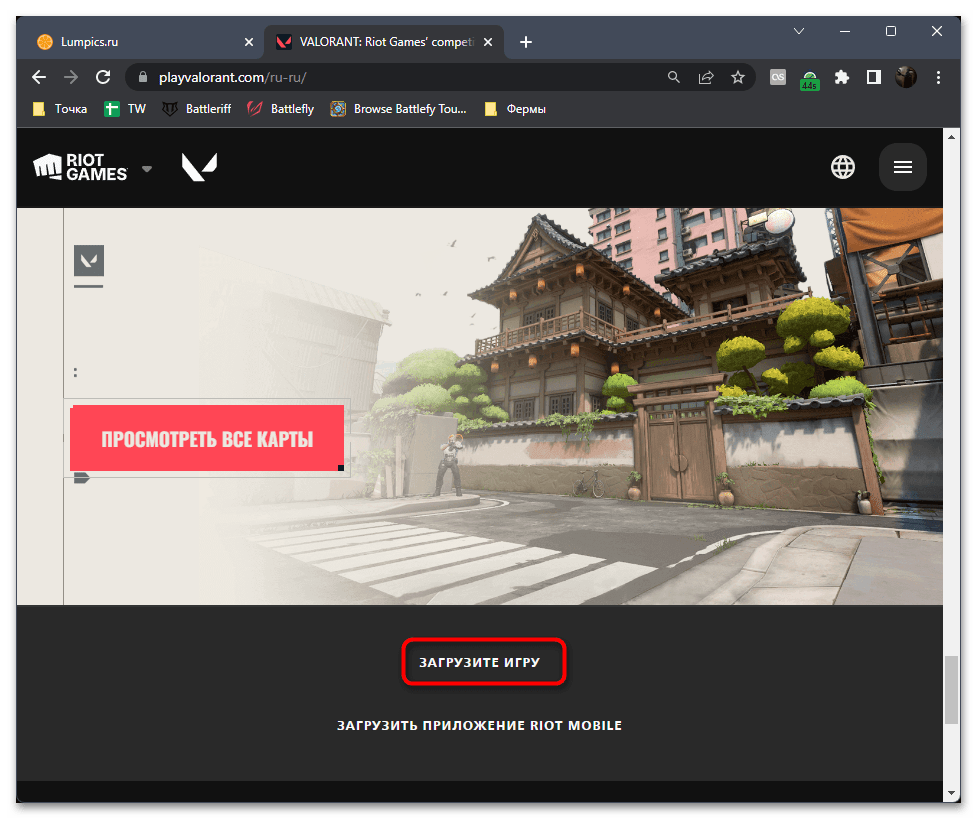
- Откройте официальный сайт Riot Games и перейдите к скачиванию VALORANT.
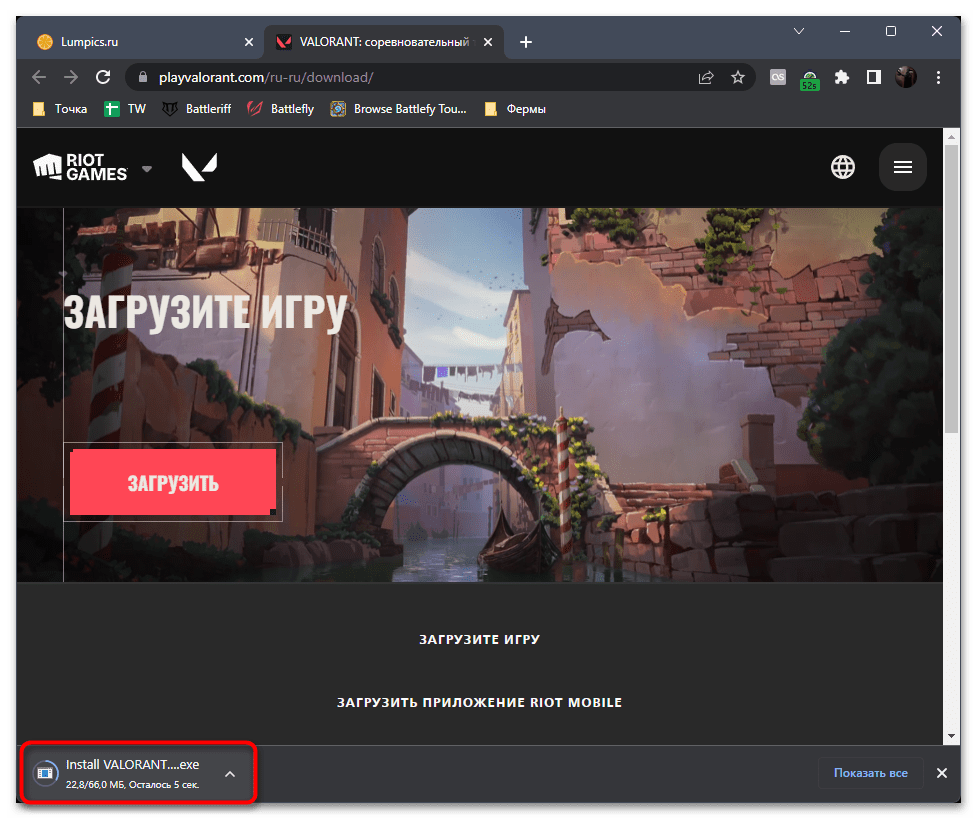
- Нажмите кнопку «Загрузить», чтобы запустить процесс получения исполняемого файла.
- Ожидайте окончания скачивания и запустите EXE-объект, чтобы начать повторную установку. Выберите место для игры на компьютере и следуйте остальным инструкциям. По завершении запустите клиент и через него откройте Валорант. На этот раз все должно пройти успешно.

Наша группа в TelegramПолезные советы и помощь
Все способы:
- Шаг 1: Проверка функций
- Статус Secure Boot
- Статус TPM-модуля
- Шаг 2: Активация функций
- Включение Secure Boot
- Включение TPM
- Шаг 3: Настройка технологии шифрования ОС
- Вопросы и ответы: 5
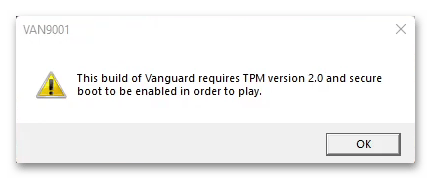
Обратите внимание! Окно с ошибкой «VAN 9001» обычно появляется на компьютерах с ОС Windows 11 и сообщает о том, что безопасная загрузка и доверенный платформенный модуль, необходимые для запуска Valorant, отключены. Мы разделим инструкцию по решению этой проблемы на несколько шагов, но если какой-нибудь из них вы уже выполнили, пропустите его.
Шаг 1: Проверка функций
TPM-модуль и Secure Boot должны быть на всех компьютерах с Windows 11, где запускается Valorant. И даже несмотря на то, что эти требования можно обойти прямо во время установки системы, технологию безопасности «Vanguard», видимо, не обманешь, а значит, в первую очередь нужно убедиться, что компьютер поддерживает эти функции, а заодно проверить их текущий статус.
Статус Secure Boot
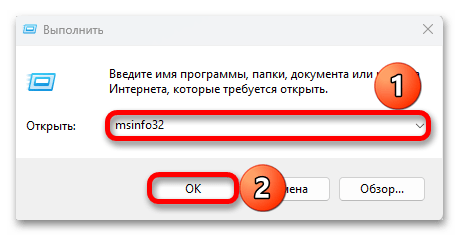
- Нажимаем «Windows+R», вводим команду
msinfo32и жмем «Enter». - В открывшемся окне находим позицию «Состояние безопасной загрузки» и смотрим статус справа от нее. У нас функция активна, но если у вас она выключена, переходите к следующему шагу.
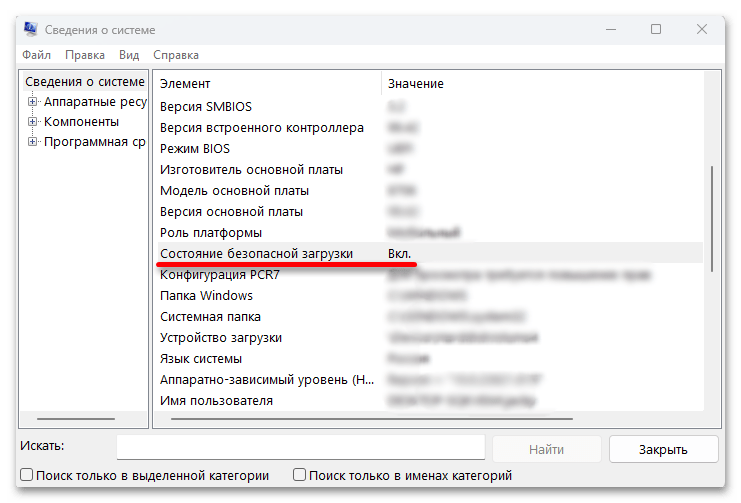
Статус TPM-модуля
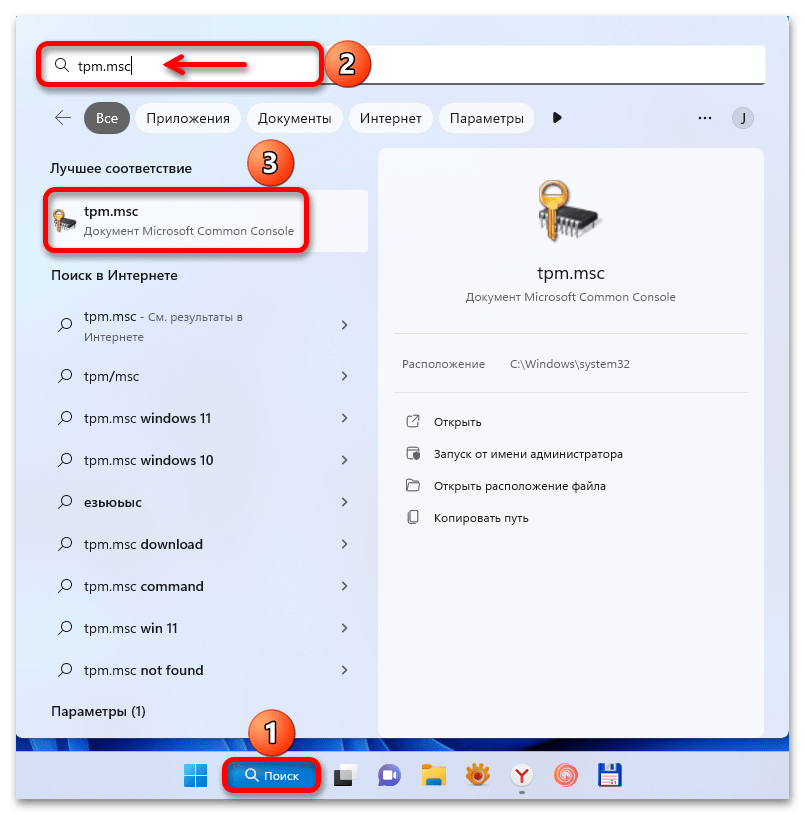
- В поиске Виндовс 11 вводим
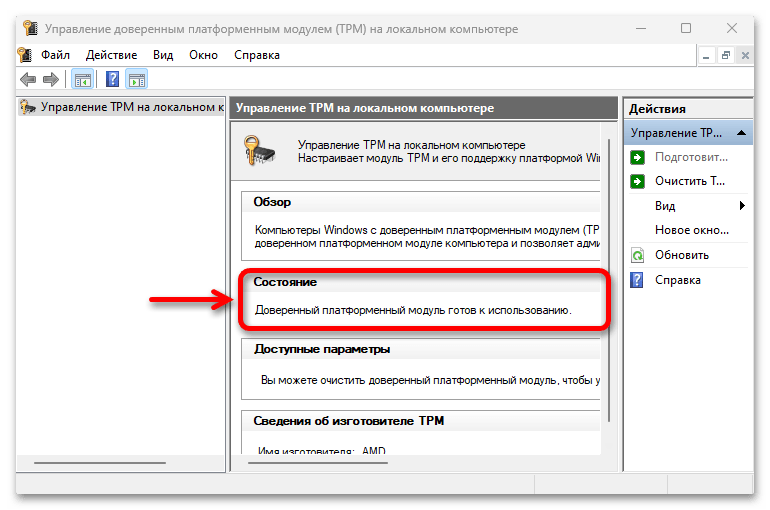
tpm.mscи открываем консоль. - Проверяем состояние доверенного модуля. Скриншот ниже показывает ситуацию, когда он включен. Если TPM 2.0 не обнаружен, значит, он не поддерживается или его нужно включить в BIOS.
Шаг 2: Активация функций
Включение технологий будем рассматривать на примере ноутбука HP, но и в моделях других брендов нужно будет действовать похожим образом.
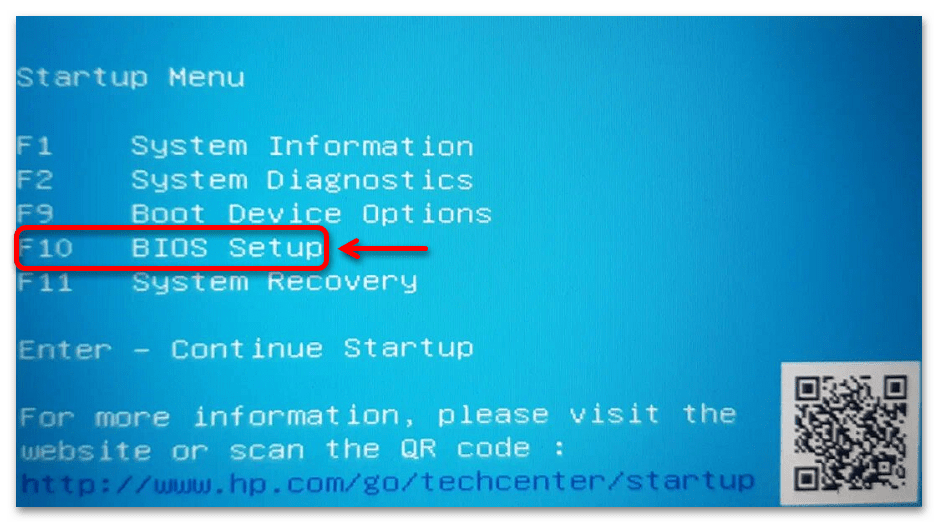
В обоих случаях необходимо войти в BIOS. На нашем устройстве это делается через загрузочное меню. Перезагружаем систему, несколько раз жмем клавишу «Esc», а затем «F10».
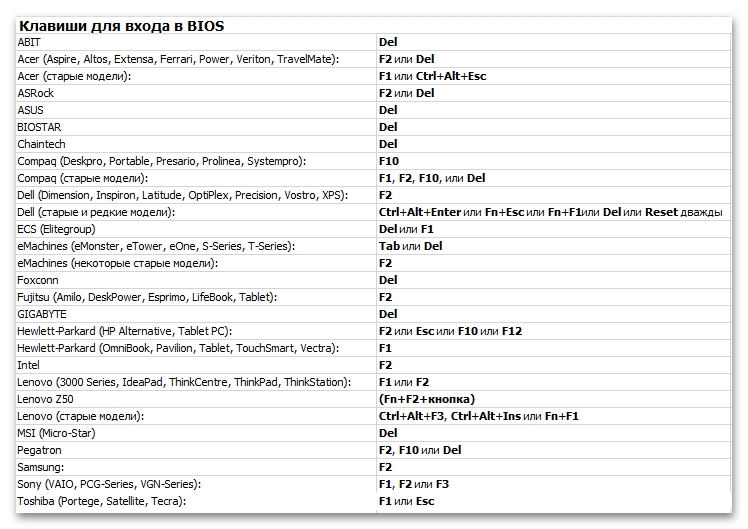
На других ноутбуках и персональных компьютерах процедура будет немного отличаться. Получить подробную информацию можно на сайте производителя или в наших специальных статьях на эту тему.
Подробнее:
Как попасть в BIOS на компьютере
Как попасть в BIOS на ноутбуке
Включение Secure Boot
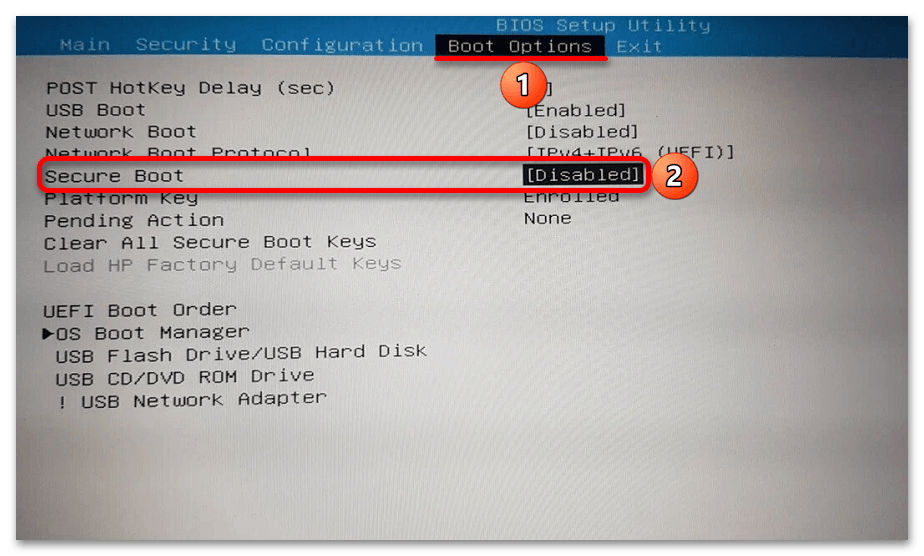
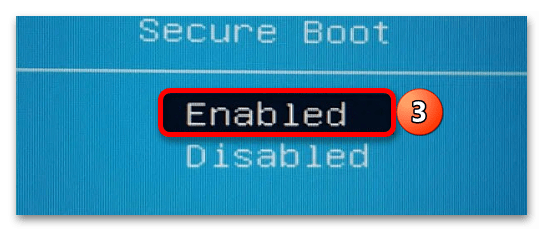
- Учитывая, что Secure Boot защищает устройство от запуска несанкционированных образов, следует в первую очередь искать разделы «Boot Option», «Security» и т.д. Если стоит значение «Disabled», как на скриншоте ниже, вызываем меню функции

и включаем ее.
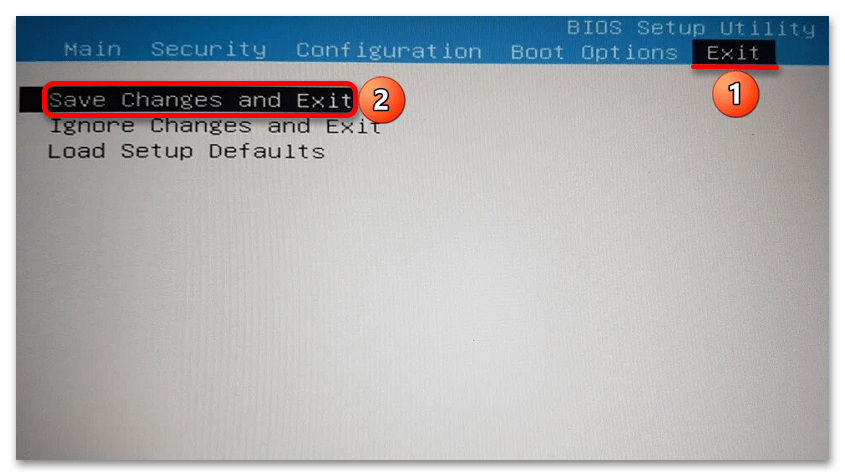
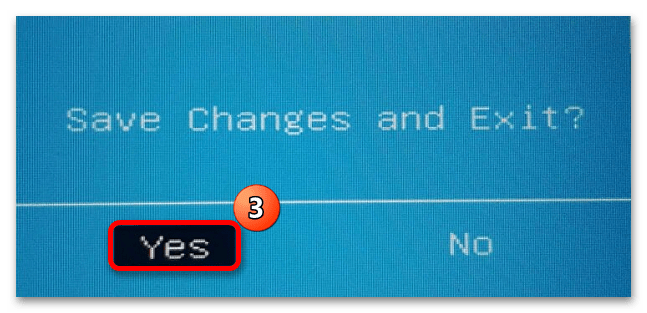
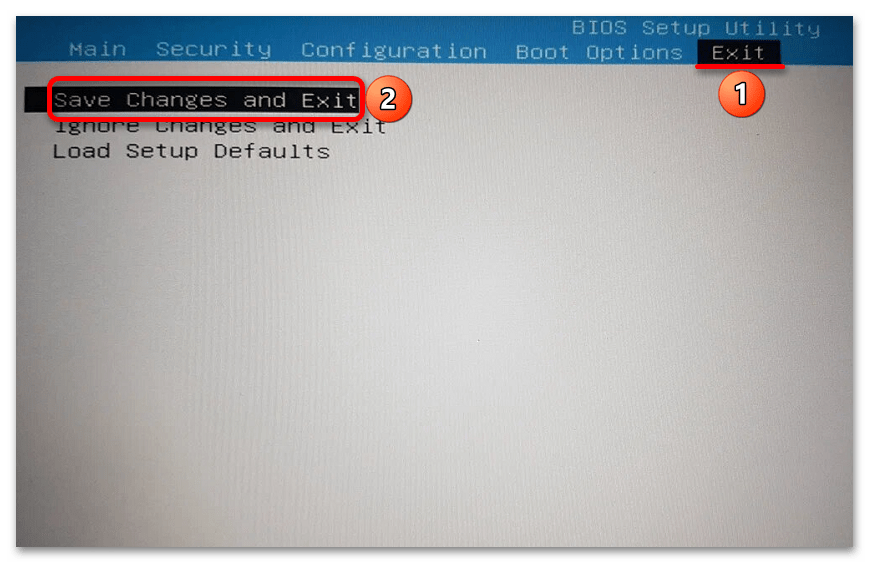
- Теперь переходим во вкладку «Exit», которая должна быть во всех BIOS/UEFI, жмем «Save Changes and Exit»

и подтверждаем перезагрузку в штатном режиме.
Если вы до сих пор не нашли, как включить безопасную загрузку, вам может пригодиться наша статья с инструкциями по ее отключению на ноутбуках разных производителей и материнской плате Gigabyte.
Подробнее: Как отключить Secure Boot в BIOS
Включение TPM
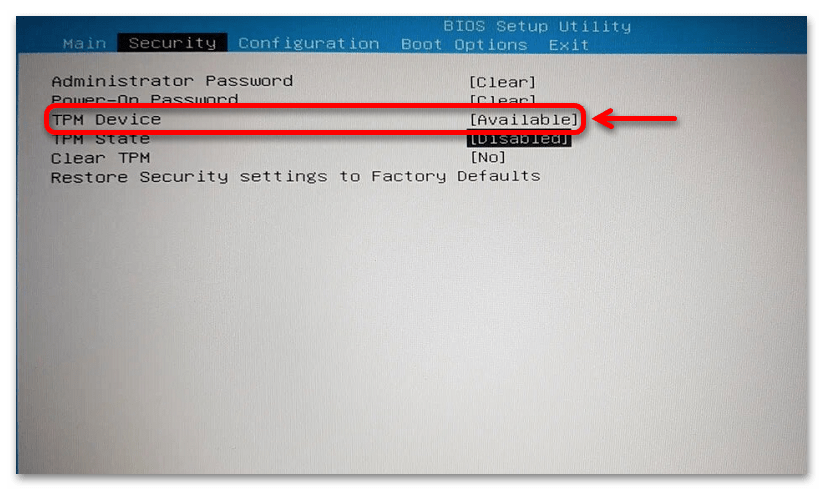
- Trusted Platform Module – еще одно средство обеспечения безопасности компьютера, поэтому также ищем раздел «Security» или что-то похожее. Если обнаружите пункт «TPM Device» со значением «Hidden», значит, опция управления доверенным модулем скрыта. В этом случае выбираем эту запись, нажимаем «Enter» и устанавливаем значение «Available».
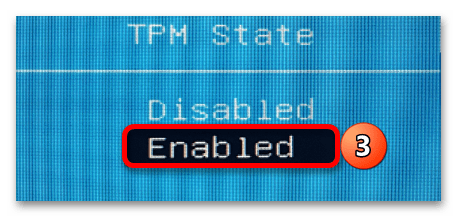
- В любом случае ищем пункт «TPM State», «Security Chip», «fTPM», «Trusted Platform Module» и похожие,

а затем убеждаемся, что установлено значение «Enabled».
- После этого сохраняем изменения и перезагружаем ПК.

Если вы самостоятельно не нашли, как включить TPM 2.0, подробные инструкции, а также информация о поддержке модуля должны быть на официальном сайте производителя вашего ноутбука или материнской платы.
Шаг 3: Настройка технологии шифрования ОС
Обычно после первых двух шагов все начинает работать, но бывают случаи, когда даже при включенном в BIOS TPM-модуле Windows, а, следовательно, и Vangard не могут его определить. Этот способ подходит только для системы версии «PRO» и выше, так как функция шифрования «Битлокер» и «Редактор локальной групповой политики», где будем менять ее параметры, домашнее издание не поддерживает.
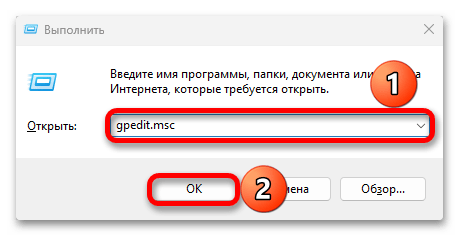
- Снова вызываем оснастку «Выполнить» («Windows+R») вводим
gpedit.mscи нажимаем «OK».
Читайте также: Запуск «Редактора локальной групповой политики» в Windows 11
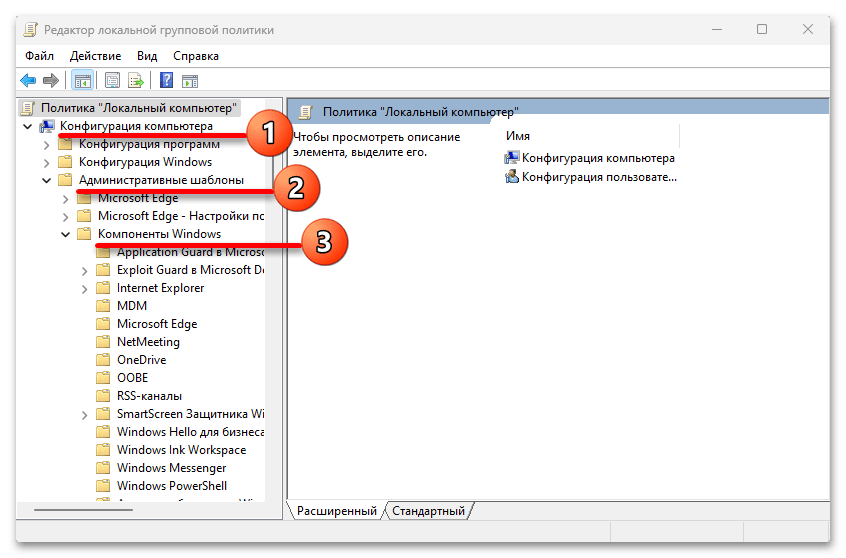
- Переходим в раздел с компонентами Windows так, как показано на скриншоте ниже:
Конфигурация компьютера/Административные шаблоны/Компоненты Windows
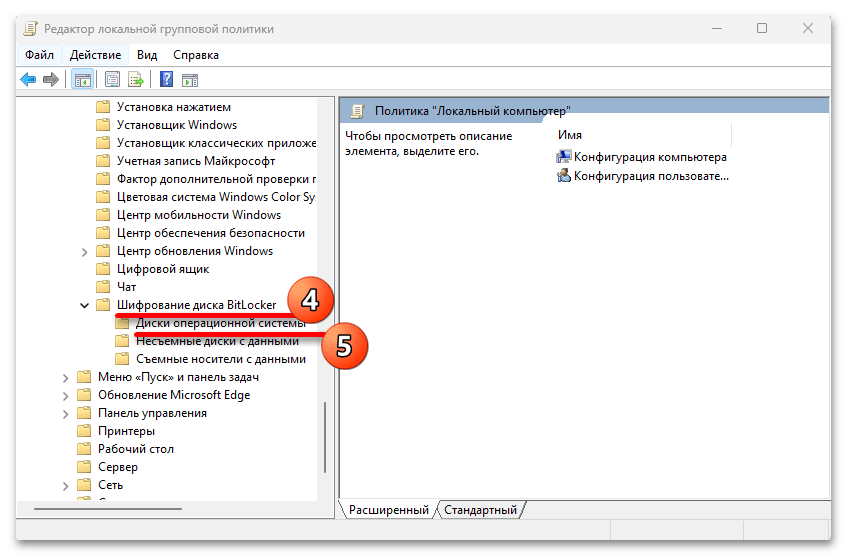
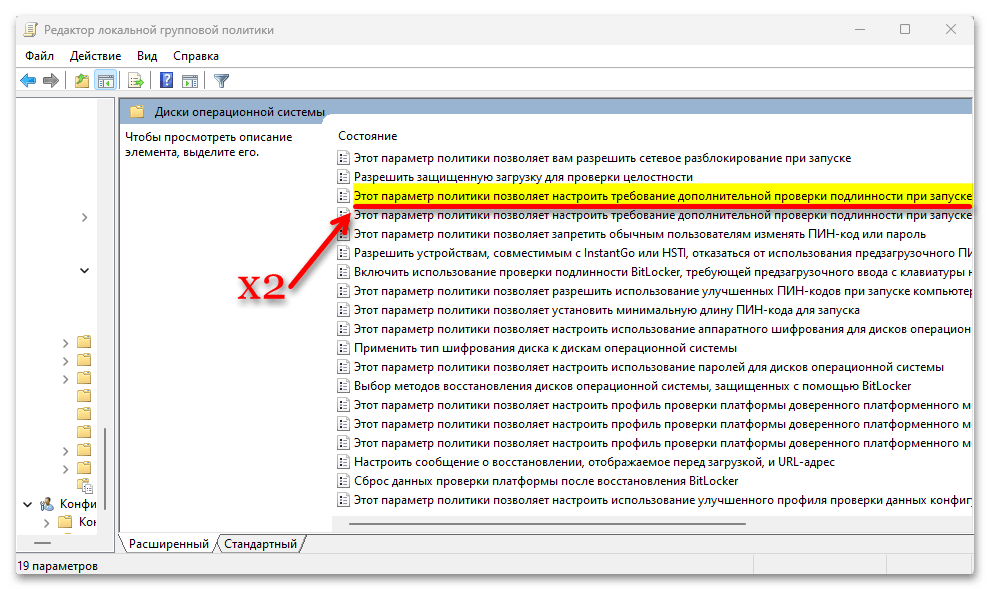
находим папку «Шифрование диска Битлокер» и кликаем «Диски операционной системы».
- Здесь нас интересует параметр для настройки требования дополнительной проверки подлинности при загрузке. Находим его и открываем двойным кликом.
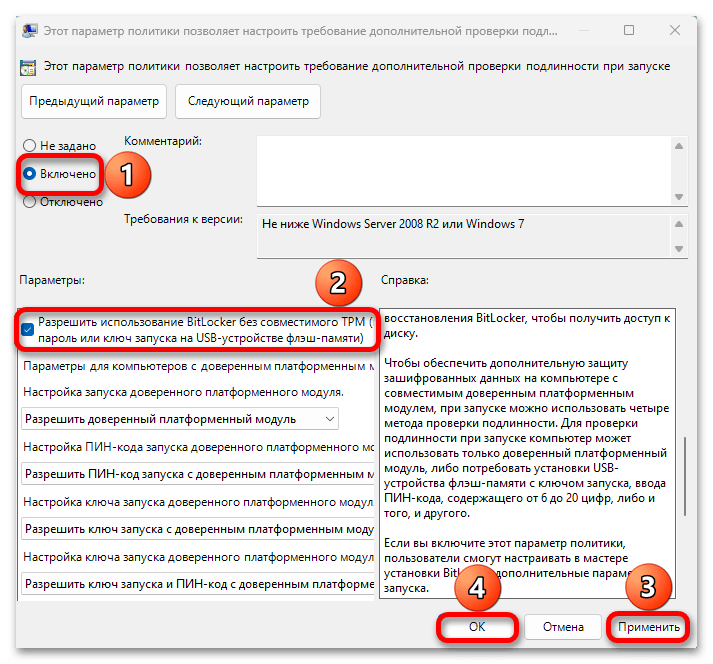
- Включаем опцию, затем в ее параметрах ниже разрешаем использовать Битлокер без совместимого TPM-модуля, принимаем новые настройки, закрываем окно, сам «Редактор» и перезагружаем ОС.
Наша группа в TelegramПолезные советы и помощь
Masterpieces of multiplayer like Valorant not opening on Windows 11 are quite unfortunate. But we have 4 easy ways to fix this issue.
Valorant has been one of the most popular multiplayer games for the past couple of years because it’s free to play and pretty well optimized for gaming hardware. The game runs pretty smoothly, and you can easily transfer Valorant files to a different drive without losing any of the progress. However, after the revolution of Windows 11, many players on Reddit have complained about Valorant not opening on Windows 11 issue. Fortunately, there is a fix for it.
If you are experiencing Valorant not opening on Windows 11, you must first check the driver’s updates for GPU. Then try running Valorant as Administrator or with the compatibility mode for Windows 8, which will let the game run on the new operating system.
To explain things more clearly, we have written a comprehensive guide to fix the Valorant not opening on Windows 11 issue by following 4 step-by-step methods. Now, let’s jump right into it.
Fix #1: Update GPU Drivers
If you have a more high-end GPU, you can always check the website of AMD or Nvidia to find the right GPU drivers. However, if you are running Windows 11 and looking for the most compatible GPU drivers (recommended for Intel), here is what you need to do.
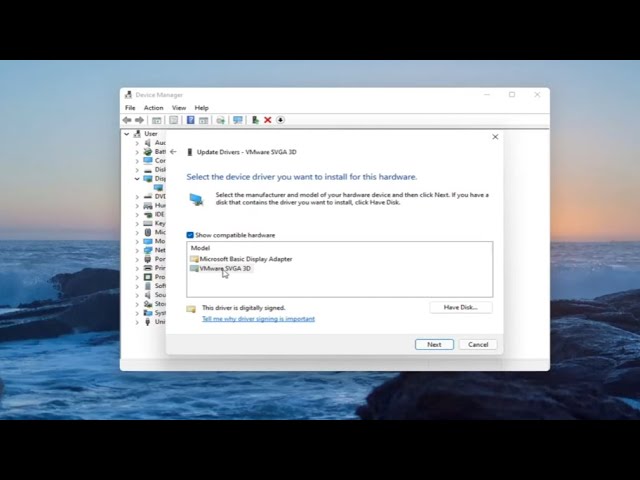
- Press ‘Win + X’ and click on Device Manager.
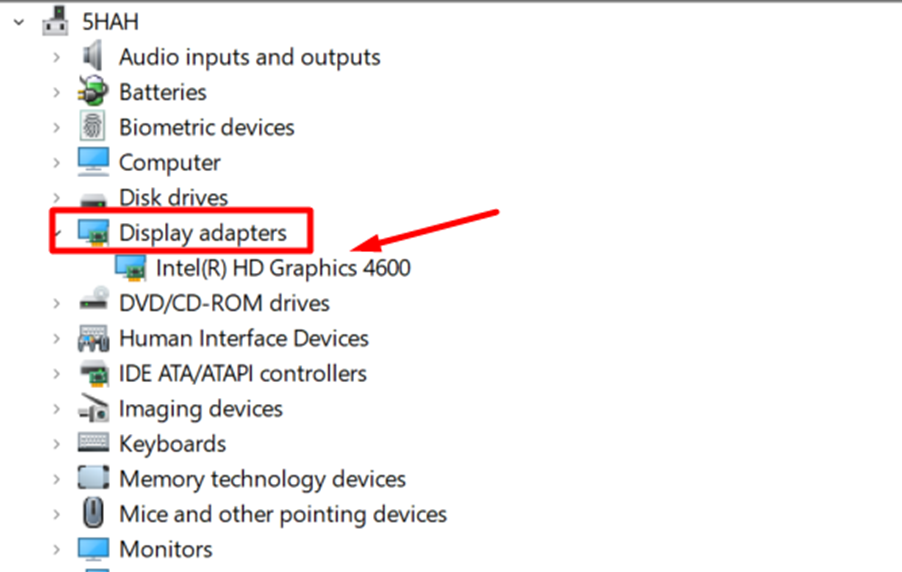
- Click on Display Adapters to expand the GPU attachments with your PC.
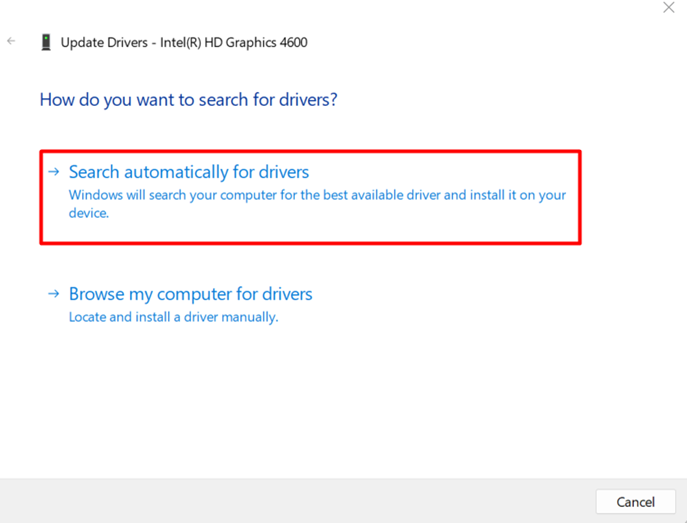
- Right-click on your GPU name and select ‘Update Drivers.’

- Select ‘Search automatically for drivers’ and wait until Windows finds and installs the right drivers for your GPU.

- After the installation, restart your PC to bring the changes into effect.
Fix #2: Run Valorant as Administrator
- Press ‘Win +E’ to open File Explorer and paste C:\RiotGames\VALORANT\live\ShooterGame\Binaries\Win64
- Right-click on ‘VALORANT-Win64-Shipping’ and select ‘Properties.’

- Select ‘Run this program as an administrator’ and click ‘Apply’ and ‘OK’ to save the changes.
- Run the Valorant game and click ‘Yes’ to run the game without the Valorant not opening on the Windows 11 issue.
If you have saved Valorant game files to a different path, you can apply these methods by clicking the Valorant game file from the desktop.
Fix #3: Run in Compatibility Mode
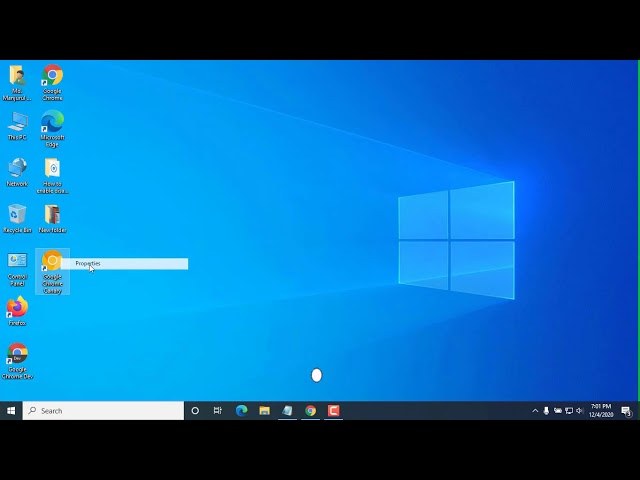
- Right-click on the Valorant.exe file and select properties.
- Go to the ‘Compatibility’ tab and check the box ‘Run this program in compatibility mode.’

- Select ‘Windows 8’ from the drop-down menu and click ‘Apply’ and ‘OK’ to apply the changes.
Fix #4: Change Environment Variables
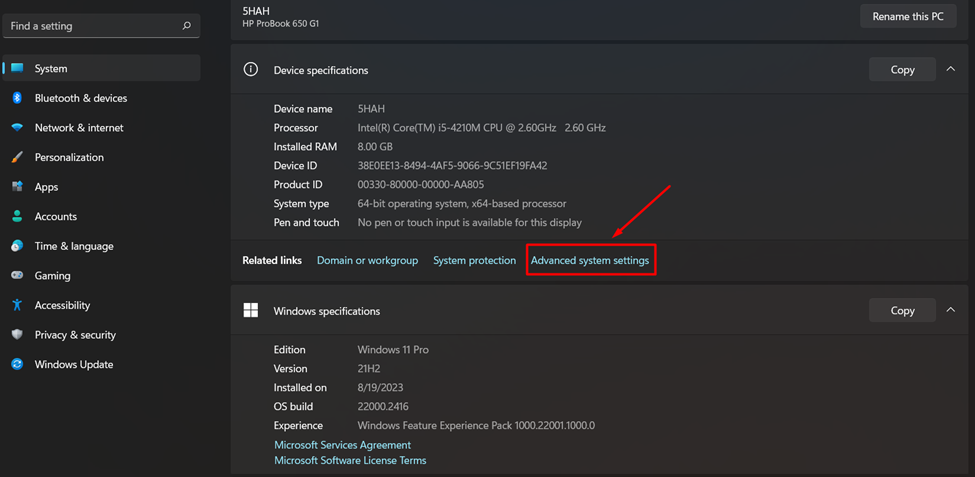
- Press ‘Win + I’ to open Settings and go to System > About.
- Select ‘Advanced system settings’ from the bottom right corner of the screen.

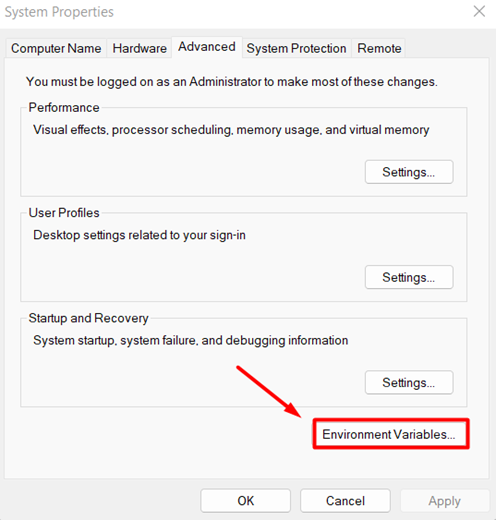
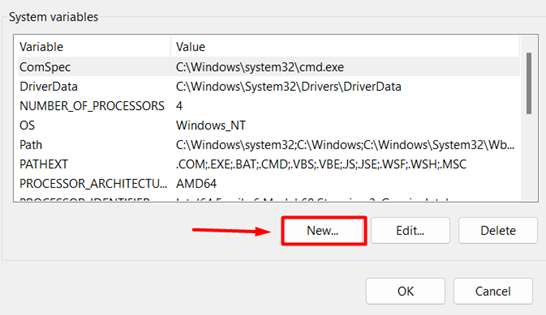
- Click on ‘Environment Variables.’

- Click on ‘New’ to add new variables.

- Type OPENSSL_ia32cap in the Variable name field and ~0x200000200000000 as the Variable Value. Then click ‘OK’ to save the changes.
Final Words
If you are experiencing Valorant not opening on Windows 11 issue, then you should also check for the minimum requirements of Valorant. If the game was already running fine on a previous version of Windows but is causing issues on the newer Windows 11, you could always apply the fixes mentioned in this article that are tried and tested by the gamers.
Hi there! I’m a passionate content creator and gamer. Being devoted to making a difference through my publications, I chose to blog for a career to share my knowledge and expertise in gaming technology. Compiling my tech knowledge and gaming experience, I am here to bring you the latest updates and news from the gaming world. Follow me on Twitter .
For the past few months, some Windows users have been able to download Windows 11 and participate in beta testing. These are about to end and the update will soon be available to everyone. Good news, some would think. Well, it’s not! Indeed, if you install this new version of Windows, it may prevent you from playing Valorant. But don’t panic, we’ll explain how to fix the problem.
Why doesn’t Valorant work on Windows 11?
Theoretically, although most players should be able to run Valorant on Windows 11, some have probably encountered error messages. Chances are, that’s precisely why you’re on this article. So what is going on and why is the world so unfair?
In most cases, the thing responsible is TPM 2.0 (for Trusted Platform Module).
It is a technology built into Windows 11 that is used to secure your computer and verify a user’s authentication and credentials. In short, it is basically an encrypted ID card for your computer, similar to a smart card like your credit card. When an action is performed by your computer, TPM 2.0 verifies that you are the originator, rather than an unknown outside source.
Until now, TPM 2.0 technology was integrated into certain motherboards, but was only used in professional environments. With Windows 11, it is directly integrated into the operating system and is therefore widely democratised.
However, there can be conflicts between Vanguard, Valorant’s anti-cheat software, and TPM 2.0, especially if the latter is not activated (which can happen when you fiddle with the registry keys). It is from these conflicts that the various errors arise. Let’s see some possible solutions.
Reinstall VALORANT and Vanguard
If you installed Valorant on Windows 10 before upgrading to Windows 11, it is likely that this installation did not support TPM 2.0.
In order to bring Vanguard back up to date properly, we advise you to uninstall Valorant and its security software and delete all files. Then restart your computer before installing the game again, this time on Windows 11.
Once this relatively simple process has been completed, you should not encounter any problems. If not, please try another solution.
Activate Trusted Platform Module 2.0 on Windows 11
Depending on how you installed Windows 11, TPM 2.0 may simply not be enabled on your motherboard or operating system.
To check that you have TPM 2.0 and activate it, we advise you to follow the steps described on the Microsoft support page. Windows 11 is still in beta and the procedure may change depending on your hardware. The official Microsoft website offers all the up-to-date methods for activating TPM 2.0.

Activate TPM 2.0 from your motherboard
For your own reasons, you may not want to enable TPM 2.0 on Windows 11. In this case, you can try to activate it directly from your motherboard, if it is compatible. To do this, you will have to go through your computer’s BIOS, which can be risky if you don’t know what you are doing.
We advise you to visit your manufacturer’s website to find out if your motherboard is compatible and how to activate TPM 2.0.
Reinstalling Windows 10
If your machine is not compatible with TPM 2.0 or you still can’t connect to the game after reinstalling it, you may have no choice but to switch back to Windows 10.
Fortunately, if you have just installed Windows 11, you have 10 days to decide whether to stay on the operating system or revert to its previous version.
To do this, use the following method:
- Open your computer’s Settings
- Go to the System menu
- Click on «Go Back»
- Microsoft may ask you why you are going backwards. You will be able to reinstall Windows 10 regardless of your answer.
- Microsoft may also offer you updates to Windows 11 before you make your choice. Refuse them.
- Windows 11 will ask you what you want to keep and what you don’t want to keep in the transition to Windows 10. Choose the items that are right for you.
- Let Windows restart your computer and make the transition.
If you’ve had Windows 11 for more than ten days, it can get complicated. You can use the Windows Recovery Tool to attempt a reinstall of Windows 10.
If none of these options are available, chances are you will need to format your system. The first thing to do is to back up all your data to an external hard drive or to a cloud. Don’t forget anything, otherwise it will be lost.
Next, get a bootable USB stick with the Windows 10 installation files. Plug it into your computer and restart it. Follow the steps that appear on your screen when you plug in your USB stick.
Contact support and wait for an update from Valorant
Finally, if none of these solutions are possible, you can always wait for Riot Games to update Valorant to improve compatibility between the game and Windows 11. But you won’t be able to play until then.
If you have tried all of the above solutions and still want to upgrade to Windows 11, you can contact the support of the game. Make a ticket including all the solutions that have already been tried. Do not hesitate to describe at length what you have done and why not include photos. This will greatly help the person who answers you and tries to find a final solution to your problem.

At the moment, the easiest solution is still to stay on Windows 10. So if we suggest that you upgrade now, feel free to postpone it a little to give the Valorant teams time to optimise the game for this new version of the operating system.