

Данная запись отражает исключительно мое личное мнение о внешнем виде новой (для меня) операционной системы, и никоим образом не предназначена для оскорбления пользователей.
Часть первая. Установка.
Тут все просто. Главное — чтобы загрузчик лег туда, куда надо.

Загрузчик ляжет на первый раздел диска 0, если диски перепутаны — нужно изменить их приоритет в BIOS или просто отключить лишние.
После установки появился выбор что грузить — предыдущую ось или Windows 7.
Мусора от загрузчика особо нет — всего пара .bak файлов.
Остается поправить меню выбора ОС. Это можно сделать через консоль
bcdedit /set {ntldr} description "Windows XP x86 SP3"

bcdedit /set {current} description "Windows 7 x64 SP1"
или
батником.
Часть вторая. Настройки.
Ну вот все поставилось и можно созерцать картинку:


Полный список настроек приводить нет смысла, все их и так знают по Windows XP, отмечу основные.
Классическая тема:
ПКМ на рабочем столе, вид — мелкие значки
ПКМ на рабочем столе, персонализация — классическая тема
Там же — Изменение значков рабочего стола — поставить галочки где надо.
Убрать сворачивание трея:
ПКМ на панели задач — свойства
Панедь задач — настроить — всегда отображать все значки и уведомления
И еще кое-чего из настроек:


Возвращение панели быстрого запуска:
ПКМ на панели задач — панели — создать панель инструментов
В строку «папка» вписать:
%userprofile%\AppData\Roaming\Microsoft\Internet Explorer\Quick Launch
Делее с помощью даблклика на надписи «Quick Launch» и передвигая разделители можно поместить панель быстрого запуска в положенное место:

Снять пару галочек:

И похоже стандартными средствами большего не добиться:

Часть третья. Левый софт.
Приведение в порядок меню пуск:
Для этого понадобится
ClassicShell
Настроить по вкусу.
Приведение в порядок проводника:
ClassicShell уже установлен, осталось включить меню в проводнике:


Можно еще вернуть адресную строку к прежнему виду.
Для этого в ClassicExplorer есть опция — »Disable Breadcrumbs»
Убрать добавление » — Ярлык» можно поправив реестр:
[HKEY_CURRENT_USER\Software\Microsoft\Windows\CurrentVersion\Explorer]

"link"=hex:00,00,00,00
Ремонт кнопки BackSpace:
Для этого есть прога
HTGBack, просто кинуть ее в автозагрузку.
Убожество под названием «Windows Search»:
Выкорчевываем нафиг этот новый ублюдочный тормозной и неудобный поисковик:
Панель управления — Программы и компоненты — Включение или отключение компонентов Windows
Снять птицу напротив Windows Search и перезагрузиться.
Для поиска можно использовать прогу
Agent Ransack:
В итоге получается ось с минимальными внешними отличиями от привычных Windows 2000 и Windows NT:

Ссылки по теме:
Обсуждение Windows 7 + FAQ.
Windows7 по сравнению с Windows XP
Classic Shell
Редактирование меню загрузки операционных систем, или куда пропал boot.ini
Make Backspace in Windows 7 or Vista Explorer Go Up like XP Did
Advanced Search In Windows 7 – More Like XP Classic
Выслушаю критику.
Telegram-канал @overclockers_news — теперь в новом формате. Подписывайся, чтобы быть в курсе всех новостей!
В последней версии своей операционной системы корпорация Microsoft много сделала для улучшения внешнего вида Windows 7. Однако всё, даже самое хорошее, постепенно надоедает и пользователи начинают искать возможность поменять привычное рабочее окружение. Банальная смена обоев Рабочего стола в счет не идет — сегодня мы поговорим о более глубоком изменении “окошек”.
Темы и стили
В интернете можно скачать огромное количество тем для Windows 7. Однако, зачастую, скачав и разархивировав тему, пользователь видит папку с набором непонятных файлов, которые не понятно как и куда устанавливать. В этой ситуации на помощь придет утилита Windows Themes Installer.
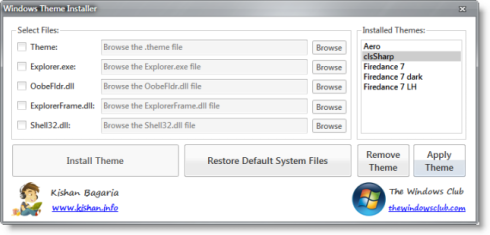
Программа не требует установки, но запускать её необходимо от имени администратора (Правый клик — Запуск от имени администратора). После этого утилита автоматически пропатчит вашу систему, сделав доступной установку различных тем оформления. Затем необходимо указать путь к нужным файлам из скачанной вами темы и нажать на кнопку Install Theme. Тема появится справа в списке установленных тем. Теперь достаточно выбрать в списке нужный вариант оформления и нажать Apply Theme, чтобы изменить внешний вид вашей системы.
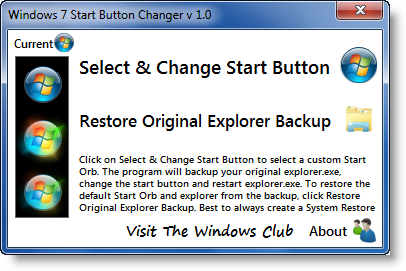
Кнопка Пуск
Для изменения внешнего вида кнопки Пуск воспользуемся программой Windows 7 Start Button Changer. В комплекте с утилитой идет десять вариантов оформления кнопки пуск. После выбора подходящего варианта произойдет перезапуск Проводника и вы увидите обновленную кнопку Пуск.
Иконки программ
Изменить иконки установленных приложений можно и стандартными средствами Windows — выбрав в свойствах файла нужную картинку. Но для всех установленных программ сделать это довольно долго, поэтому лучше воспользоваться приложением 7conifier, которое не только позволяет одним махом изменить множество значков, но и содержит несколько приятных для глаза тем.
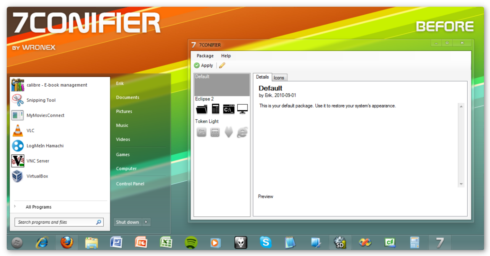
Можно легко переключаться между наборами иконок в интерфейсе программы, а также восстановить набор по умолчанию, если вы последовали совету программы и сделали резервную копию при первом запуске. С помощью 7conifier есть возможность создавать свои наборы значков.
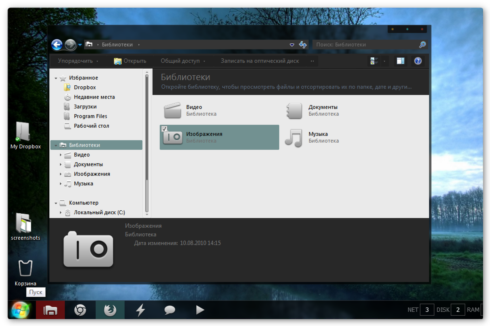
Ну и в результате, после применения всех вышеперечисленных программ, ваша система приобретет совершенно новый вид. Например, такой:
Ask the publishers to restore access to 500,000+ books.
Internet Archive Audio
Live Music Archive
Librivox Free Audio
Featured
- All Audio
- Grateful Dead
- Netlabels
- Old Time Radio
- 78 RPMs and Cylinder Recordings
Top
- Audio Books & Poetry
- Computers, Technology and Science
- Music, Arts & Culture
- News & Public Affairs
- Spirituality & Religion
- Podcasts
- Radio News Archive
Images
Metropolitan Museum
Cleveland Museum of Art
Featured
- All Images
- Flickr Commons
- Occupy Wall Street Flickr
- Cover Art
- USGS Maps
Top
- NASA Images
- Solar System Collection
- Ames Research Center
Software
Internet Arcade
Console Living Room
Featured
- All Software
- Old School Emulation
- MS-DOS Games
- Historical Software
- Classic PC Games
- Software Library
Top
- Kodi Archive and Support File
- Vintage Software
- APK
- MS-DOS
- CD-ROM Software
- CD-ROM Software Library
- Software Sites
- Tucows Software Library
- Shareware CD-ROMs
- Software Capsules Compilation
- CD-ROM Images
- ZX Spectrum
- DOOM Level CD
Texts
Open Library
American Libraries
Featured
- All Texts
- Smithsonian Libraries
- FEDLINK (US)
- Genealogy
- Lincoln Collection
Top
- American Libraries
- Canadian Libraries
- Universal Library
- Project Gutenberg
- Children’s Library
- Biodiversity Heritage Library
- Books by Language
- Additional Collections
Video
TV News
Understanding 9/11
Featured
- All Video
- Prelinger Archives
- Democracy Now!
- Occupy Wall Street
- TV NSA Clip Library
Top
- Animation & Cartoons
- Arts & Music
- Computers & Technology
- Cultural & Academic Films
- Ephemeral Films
- Movies
- News & Public Affairs
- Spirituality & Religion
- Sports Videos
- Television
- Videogame Videos
- Vlogs
- Youth Media
Search the history of over 946 billion
web pages
on the Internet.
Search the Wayback Machine
Search icon
An illustration of a magnifying glass.
Mobile Apps
- Wayback Machine (iOS)
- Wayback Machine (Android)
Browser Extensions
- Chrome
- Firefox
- Safari
- Edge
Archive-It Subscription
- Explore the Collections
- Learn More
- Build Collections
Save Page Now
Capture a web page as it appears now for use as a trusted citation in the future.
Please enter a valid web address
- About
- Blog
- Projects
- Help
- Donate
- Contact
- Jobs
- Volunteer
- People
- About
- Blog
- Projects
- Help
-
Donate
Donate icon
An illustration of a heart shape - Contact
- Jobs
- Volunteer
- People
Item Preview

dfd4lk0-70c7a222-0cff-4c61-a113-1f98767c0a55.png
Flag this item for
-
Graphic Violence
-
Explicit Sexual Content
-
Hate Speech
-
Misinformation/Disinformation
-
Marketing/Phishing/Advertising
-
Misleading/Inaccurate/Missing Metadata
image
Windows Classic Color Scheme for Windows 7
- by
- Florian
- Publication date
-
2022-09-09
- Topics
- windows classic windows 7
- Item Size
- 138.6K
Ported from Windows Vista.
- Addeddate
- 2023-08-04 18:58:42
- Identifier
- windows-classic-color-scheme-for-windows-7
- Scanner
- Internet Archive HTML5 Uploader 1.7.0
plus-circle Add Review
plus-circle Add Review
comment
Reviews
There are no reviews yet. Be the first one to
write a review.
206
Views
2
Favorites
DOWNLOAD OPTIONS
download 1 file
ITEM TILE download
download 1 file
PNG download
download 1 file
TORRENT download
download 1 file
ZIP download
download 8 Files
download 7 Original
SHOW ALL
IN COLLECTIONS
Community Images
Uploaded by
unclecaptain5426
on
SIMILAR ITEMS (based on metadata)
Terms of Service (last updated 12/31/2014)
You are here:
Home » Windows 7 Guides » How To Install Themes In Windows 7 Starter And Home Basic Editions
As you may know, Windows 7 is available in six different editions: Starter, Home Basic, Home Premium, Professional, Enterprise, and Ultimate. Of all these editions, Starter and Home Basic editions lack many features as well as personalization options.

If you’ve spent any significant amount of time with Home Basic or Starter edition of Windows 7, then you must know that these editions don’t support desktop theme packs. That is, one can’t download and install theme packs in Starter and Home Basic editions. In fact, the Personalization window is missing from both Starter and Home Basic editions.

While one can manually visit the official personalization page and download themes designed for Windows 7, you can’t install the downloaded theme. When you try to install the downloaded theme by double-clicking on the theme file, you get “This edition of Windows doesn’t support themes” error.
The best way to get all personalization and other essential feature is to upgrade to Home Premium or Professional edition (see how to upgrade Windows 7 editions and also how downgrade from Ultimate to Home Premium or professional). But if for some reason, don’t want to upgrade to Home Premium and want to install hundreds of available themes on your existing Home Basic or Starter edition, you need to either extract all theme files to get wallpapers and sound files, or use a third-party tool to install themes in Starter or Home Basic edition.

Users who would like to take the help of third-party tool can download a free tool named Personalization Panel. Personalization Panel is a free tool specially designed to help install themes in Starter and Home Basic editions of Windows 7. When you install this utility, it adds Personalization option to the desktop context menu (right-click menu). So, once installed, you get the Personalization window feature in your Starter and Home Basic editions as well.
Besides, Personalization Panel also lets you choose your own color for window borders and taskbar, just like in other editions of Windows 7.

Installing a theme file is simple, you don’t even need to open the Personalization panel. Simply double-click on the downloaded theme file to install and apply it.
Please note that the current version (v2.5) of Personalization Panel tool doesn’t support installing Windows 8 themes in Windows 7. If you’re on Home Premium or higher edition of Windows 7 and want to install themes specially designed for Windows 8, go through our how to install deskthemepack file in Windows 7 guide. How to create your own theme in Windows 8 guide might also interest you.
Users who don’t like to install Personalization Panel can use the portable version of the software to install themes.
Download Personalization Panel
Skip to content
Personalization Panel for Windows 7 Starter ? Windows 7 Home Basic provides a premium personalization features for low-end Windows 7 Editions. It can bypass the restrictions and offers the useful UI like in Ultimate Edition of Windows 7.
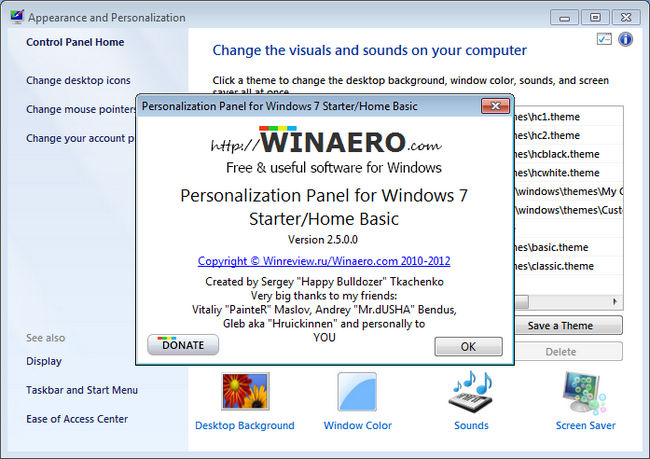
Personalization Panel 2.5 is the latest version. It is strongly recomended to update your current version right now!
It covers most personalization features and also allows you to change wallpaper in Windows 7 Starter and change color of windows in Windows 7 Home Basic.
Changelog since 1.2.x branch
- Fixed application crash when user has canceled UAC promt under Windows 7 Starter
- Fixed metrics reset between themes
- Code optimization
- Fixed installer: double language selection prompt was removed
- Installer does not open any sites without user request anymore
- Added «save a theme» feature. It allows you to save your current appearance as
- .theme file.
- Added simple «check for update» system
- rebranding. Now personalization panel is a part on Winaero.com project, not Winreview.ru
The complete changelog you’ll find in the installation directory
The Personalization Panel in action
I have prepared the demo video of Windows 7 Starter running Personalization Panel.
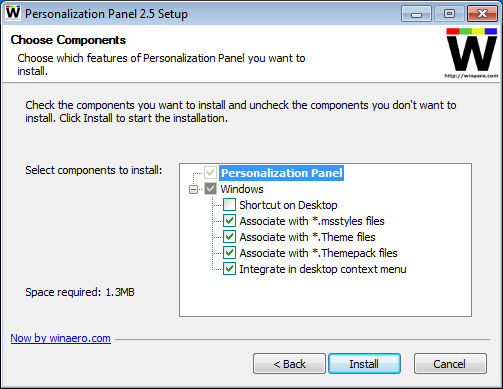
Personalization Panel Features
- Desktop Context Menu integration
- OS Language depended/Auto-translation: All text labels are from Windows libraries and always be in your native language!
- .theme files support in both Starter and Home Basic. Everything will be applied correct except windows metric for classic themes
- Allows you to change Windows 7 Starter Wallpaper
- Allows you to change windows and taskbar colors in Windows 7 Home Basic by two methods with live preview
- Useful access to related Control Panel applets
- .theme files associations handling
- .msstyles files associations handling
- .themepack files associations handling (limited to installation at this moment. You can’t create your own themepacks)
Something you have to know
- What is the reason to use Personalization Panel?The answer is simple — it is a small, even portable application and it does not break your OS and does not modfy any of system files. It just works. Also you can always ask us for help — this is a good reason too.
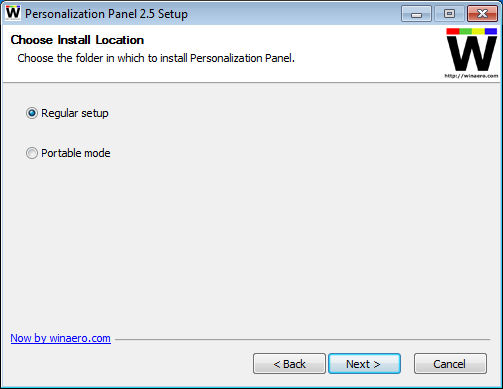
- There are two types of setup available — portable and regular. Regular setup in only one way to get proper theme switching and system integration.

The portable setup does not handle any type of files and applications will be not available from desktop context menu.
Regular setup is recommended way of installation to you.
- Privacy statement. Since version «Personalization Panel 2.5» I have added simple updates check in panel. It does not send any type of your personal data to me. It cannot be used to personally identify you.Everything it does is simple window what shows the new version numbers when it available. The goal is to help you to stay up-to-date and nothing more.
- Why we made rebranding. Because we won’t to use Winreview.ru as development corner. Today its just my personal blog.
- Whats next? I plan to implement desktop slideshow and themepacks creation in the near future. BTW, themepacks already done but I have exluded their code from this release due to bugs. Stay tuned!
Download Personalization Panel
Support us
Winaero greatly relies on your support. You can help the site keep bringing you interesting and useful content and software by using these options:
If you like this article, please share it using the buttons below. It won’t take a lot from you, but it will help us grow. Thanks for your support!