
4 Answers
- Run: gpedit.msc.
- Find:
- Microsoft network client: Send unencrypted password to third-party SMB server: Switch it to “Enabled”.
- Network security: LAN Manager authentication level: Select the option: Send LM & NTLM – use NTLMv2 session security if negotiated.
How do I access my SMB server?
Select Windows SMB server.
Put your Windows machine’s IP address or local hostname into the URL field. Provide the Windows user account login and password. Name the storage and tap Done. After that, the connection with the computer will be established.
How do I access my SMB drive in Windows?
[Network Place (Samba) Share] How to access the files on Network Devices using SMBv1 in Windows 10?
- Open Control Panel in your PC/Notebook.
- Click on Programs.
- Click on Turn Windows features on or off link.
- Expand the SMB 1.0/CIFS File Sharing Support option.
- Check the SMB 1.0/CIFS Client option.
- Click the OK button.
How do I enable Samba file sharing in Windows 7?
Under Control Panel Home, select Turn Windows features on or off to open the Windows Features box. In the Windows Features box, scroll down the list, clear the check box for SMB 1.0/CIFS File Sharing Support and select OK. After Windows applies the change, on the confirmation page, select Restart now.
Is SMB a Windows share?
Windows Server uses the Server Message Block (SMB) file-sharing protocol and the File and Printer Sharing for Microsoft Networks component (also known as the Server service) to perform file sharing.
What is SMB protocol?
Feature description. The Server Message Block (SMB) protocol is a network file sharing protocol that allows applications on a computer to read and write to files and to request services from server programs in a computer network. The SMB protocol can be used on top of its TCP/IP protocol or other network protocols.
How do I find my SMB IP address?
From the desktop, click on the Start button. In the search box, type: CMD and press enter. Once the Command Prompt opens, type: “ipconfig” and press enter. The IP address will then be listed (example: 192.168.
How do I access SMB share from browser?
How to access SMB share from windows over the internet with specific port number
- go to My computer.
- Click add network location.
- Enter x.x.x.x as ip (ofcourse I enter a real public IP)
- Then try to connect.
Does Windows 7 have SMB?
Windows 7 does not have the Windows Features for smb available.
What is the difference between SMB and Samba?
SAMBA was originally SMB Server – but the name had to be changed due to SMB Server being an actual product. SMB was the predecessor to CIFS. SMB (Server Message Block) and CIFS (Common Internet File System) are protocols. Samba implements CIFS network protocol.
How do I find my SMB server IP address?
How does an SMB connection work?
The SMB protocol creates a connection between the server and the client by sending multiple request-response messages back and forth. Imagine your team is working on a large project that involves a lot of back and forth. You might want to be able to share and edit files that are stored in one place.
What port is SMB?
SMB is a network file sharing protocol that requires an open port on a computer or server to communicate with other systems. SMB ports are generally port numbers 139 and 445.
What is a SMB location?
A location is an endpoint for a Server Message Block (SMB) file share, which can be hosted on-premises or by another cloud provider (for example, Azure Files).
What is SMB port number?
SMB has always been a network file sharing protocol. As such, SMB requires network ports on a computer or server to enable communication to other systems. SMB uses either IP port 139 or 445.
What version of SMB does Windows 7 use?
Answer
| Protocol Version | First Client Version | Data ONTAP Version |
|---|---|---|
| SMB 2.0 | Windows Vista | 7.3.1 and later; 8.x |
| SMB 2.1 | Windows 7 | 8.1 clustered Data ONTAP; 8.1.1 7-Mode |
| SMB 3.0 | Windows 8 | clustered Data ONTAP 8.2 and later |
| SMB 3.1 | Windows 10 | ONTAP 9 |
How do you check which SMB version is used?
Open Powershell as an Administrator. Right click on the icon and say “Run as Administrator”. Now, you’re going to run 2 commands within 10 seconds or else Windows closes the ports as unused. Run Get-SmbConnection : your “Dialect” column is the version of your SMB.
What is IP address of SMB device?
SMB uses either IP port 139 or 445.
What is the purpose of SMB server?
What is a SMB connection?
How do I know if my port 445 is open?
Answer: Open the Run command and type cmd to open the command prompt. Type: “netstat –na” and hit enter. Find port 445 under the Local Address and check the State. If it says Listening, your port is open.
How do I open port 445?
Go to Computer Configuration > Policies > Windows Settings > Security Settings > Windows Firewall with Advanced Security > Windows Firewall with Advanced Security – LDAP > Inbound Rules. Right-click and choose New Rule. Choose Port and click Next. Choose TCP and at specific local ports enter 135, 445, then click Next.
Can Windows 7 use SMB2?
Windows Server 2008, Windows Vista, and Windows 7 also support SMB 2.0, a new version of SMB that has been redesigned for today’s networking environments and the needs of the next generation of file servers. SMB 2.0 has the following enhancements: Supports sending multiple SMB commands within the same packet.
How do I enable port 445?
Does port 445 need to be open?
We also recommend blocking port 445 on internal firewalls to segment your network – this will prevent internal spreading of the ransomware. Note that blocking TCP 445 will prevent file and printer sharing – if this is required for business, you may need to leave the port open on some internal firewalls.
Samba is a free and open-source software that allows you to share files and printers between Windows, macOS, and Linux operating systems. If you’re a Windows 7 user, you might be wondering how to use Samba to access shared resources on a network. In this comprehensive guide, we’ll take you through the process of installing, configuring, and using Samba on Windows 7.
What is Samba?
Before we dive into the nitty-gritty of using Samba on Windows 7, let’s take a brief look at what Samba is and how it works. Samba is a free and open-source software that implements the Server Message Block (SMB) protocol, which is used to share files, printers, and other resources between computers on a network.
Samba allows you to access shared resources on a network, including files, folders, printers, and other devices. It’s commonly used in business environments to share files and resources between employees, but it can also be used in home networks to share files and devices between family members or roommates.
Installing Samba on Windows 7
To use Samba on Windows 7, you’ll need to download and install the Samba software on your computer. Here’s how to do it:
Downloading Samba
- Open a web browser and navigate to the official Samba website (www.samba.org).
- Click on the “Download” button and select ” Binary Packages” from the drop-down menu.
- Select the “Windows” option and choose the correct architecture (32-bit or 64-bit) for your Windows 7 system.
- Click on the “Download” button to download the Samba installation package.
Installing Samba
- Once the download is complete, run the installation package and follow the prompts to install Samba on your Windows 7 system.
- Accept the license agreement and choose the installation location.
- Select the components you want to install, including the Samba server and client.
- Choose the startup type (Automatic or Manual) and click “Next” to continue.
- Click “Install” to begin the installation process.
Configuring Samba on Windows 7
After installing Samba, you’ll need to configure it to connect to a shared resource on a network. Here’s how to do it:
Configuring the Samba Server
- Open the Samba configuration file (smb.conf) using a text editor such as Notepad.
- Add the following lines to the end of the file:
“`
[global]
workgroup =
security = user
map to guest = Bad User
[share]
comment = My Shared Folder
path = /path/to/shared/folder
browsable = yes
writable = yes
guest ok = yes
``

Replace
with the name of your workgroup, and/path/to/shared/folder` with the path to the folder you want to share.
- Save the changes to the smb.conf file.
Configuring the Samba Client
- Open the Command Prompt as an administrator.
-
Type the following command to connect to the Samba server:
net use <SHARE_NAME>: \\<SERVER_IP>\<SHARE_NAME>
Replace<SHARE_NAME>with the name of the shared folder, and<SERVER_IP>with the IP address of the Samba server. -
Press Enter to connect to the Samba server.
Accessing Shared Resources with Samba
Now that you’ve configured Samba, you can access shared resources on a network using the following methods:
Mapping a Network Drive
- Open the Command Prompt as an administrator.
-
Type the following command to map a network drive:
net use z: \\<SERVER_IP>\<SHARE_NAME>
Replace<SHARE_NAME>with the name of the shared folder, and<SERVER_IP>with the IP address of the Samba server. -
Press Enter to map the network drive.
Browsing the Network
- Open the Windows Explorer and navigate to the “Network” section.
- Look for the Samba server and the shared folder.
- Double-click on the shared folder to access its contents.
Troubleshooting Common Issues
If you encounter any issues while using Samba on Windows 7, here are some common solutions to try:
Samba Server Not Found
- Check the Samba server’s IP address and make sure it’s correct.
- Ensure that the Samba server is running and configured correctly.
Unable to Connect to the Samba Server
- Check the workgroup name and make sure it matches the one configured on the Samba server.
- Ensure that the Samba client is configured correctly and the correct IP address is specified.
File Permissions Issues
- Check the file permissions on the shared folder and ensure that the correct users or groups have access.
- Use the
chmodcommand to change the file permissions on the Samba server.
Conclusion
Using Samba on Windows 7 is a relatively straightforward process, but it does require some technical knowledge and configuration. By following the steps outlined in this guide, you should be able to install, configure, and use Samba to access shared resources on a network. Remember to troubleshoot common issues and adjust your configuration as needed to ensure seamless file sharing and collaboration.
Key Takeaways:
- Samba is a free and open-source software that implements the SMB protocol for sharing files and resources between computers on a network.
- Installing Samba on Windows 7 requires downloading and installing the Samba software and configuring the Samba server and client.
- Configuring Samba involves editing the smb.conf file and specifying the workgroup name, security settings, and shared folder path.
- Accessing shared resources with Samba can be done by mapping a network drive or browsing the network.
- Troubleshooting common issues involves checking the Samba server’s IP address, workgroup name, and file permissions.
What is Samba and why do I need it on my Windows 7?
Samba is a free and open-source software that allows Windows machines to share files and printers with other devices on a network. It is essentially an implementation of the SMB/CIFS protocol that allows Windows to communicate with Linux and other Unix-based systems. If you have a mixed environment with Windows and Linux machines, Samba is a must-have to seamlessly share resources between them.
By installing Samba on your Windows 7 machine, you will be able to access files and printers shared from Linux machines, and also share your own files and printers with others on the network. This eliminates the need for tedious workarounds, such as using FTP or cloud storage services, and makes it easy to collaborate with colleagues or access resources on other systems.
Is Samba compatible with Windows 7 64-bit?
Yes, Samba is compatible with Windows 7 64-bit. In fact, Samba is available in both 32-bit and 64-bit versions, so you can install the appropriate version depending on your system architecture. During the installation process, you will be prompted to choose the correct version, so make sure to select the 64-bit option if you have a 64-bit system.
It’s worth noting that Samba is a relatively lightweight software, so it won’t consume a significant amount of system resources. This means you can install and run Samba on your Windows 7 64-bit machine without worrying about performance issues or system crashes.
How do I install Samba on Windows 7?
Installing Samba on Windows 7 is a relatively straightforward process. First, download the Samba installer package from the official Samba website or a reputable mirror site. Once downloaded, run the installer and follow the prompts to install Samba on your system. The installation process typically takes only a few minutes, and you will be prompted to reboot your system after completion.
After rebooting, you will need to configure Samba to connect to your network and set up the necessary shares. This involves editing the Samba configuration file, typically located at /etc/samba/smb.conf. You can use a text editor or the Samba GUI configuration tool to edit the file and set up your shares.
How do I configure Samba to connect to my network?
Configuring Samba to connect to your network involves editing the Samba configuration file to specify the necessary settings, such as the workgroup, server name, and share definitions. You can use the Samba GUI configuration tool or a text editor to edit the file. The configuration file is usually located at /etc/samba/smb.conf.
A typical Samba configuration file will include settings for the workgroup, server name, and share definitions. For example, you might set the workgroup to “WORKGROUP” and the server name to “MyWindows7Machine”. You can also specify share definitions, such as sharing a specific folder or printer. Once you have edited the configuration file, save the changes and restart the Samba service to apply the new settings.
How do I access Samba shares from another machine on the network?
To access Samba shares from another machine on the network, you will need to map the share to a drive letter on the client machine. This involves opening the File Explorer or My Computer, and then navigating to the Network section. Look for the Samba server in the list of available network devices, and then double-click on it to access the shares.
Once you have accessed the shares, you can map the share to a drive letter by right-clicking on the share and selecting “Map network drive”. You can then choose a drive letter and specify the share path. This will create a persistent connection to the share, allowing you to access it easily in the future.
Is Samba secure?
Samba is a secure protocol, but like any network service, it can be vulnerable to security risks if not properly configured. By default, Samba uses encryption to protect data in transit, and it also supports user authentication and access control lists (ACLs) to restrict access to shares.
However, it’s still important to take additional security measures to protect your Samba installation. This includes setting strong passwords, limiting access to shares, and keeping your Samba installation up to date with the latest security patches. You should also use a firewall to block incoming traffic from unauthorized sources and limit access to the Samba service.
What are some common issues I might encounter with Samba on Windows 7?
One common issue you might encounter with Samba on Windows 7 is connectivity problems. This can occur if the Samba configuration file is not set up correctly, or if the server name or workgroup is not specified correctly. You might also encounter issues with authentication, such as being unable to log in to the Samba share.
Another common issue is slow performance or slow file transfer speeds. This can occur if you have a large number of files to transfer, or if your network connection is slow. To resolve this, try using the smbfs file system instead of the default cifs file system, or use a third-party file transfer utility that supports Samba. Additionally, make sure to update your Samba installation regularly to ensure you have the latest performance optimizations.
Enterprise Networking Planet content and product recommendations are editorially independent. We may make money when you click on links to our partners. Learn More.
Windows 7 is out, and everyone says they are going to upgrade, finally. What does this mean for your Samba servers? In this article we will talk about our experience using Windows 7 with Samba, both as a domain controller and as a basic file server.
Samba is not important just for those rogue sysadmins who try to avoid buying Windows Server products. Samba is used by storage appliance manufacturers and within a wide variety of other embedded devices. Samba interoperability is therefore important for both IT shops that run Linux servers, and businesses that sell Linux-based devices. Microsoft may not, contrary to popular belief, intentionally break Samba, but updates to the protocol and client default settings (due to complaints about security in the Windows world) often leave Samba unable to operate, which brings us to some good news:
This time, with Windows 7, only half of Samba stops working.
Accessing Samba Shares
Accessing Samba shares from Windows 7 “just works.” That is, assuming you’re running a relatively recent version of Samba. Samba 3.3.2, which ships with Ubuntu Jaunty, works perfectly with Windows Vista and therefore Windows 7 (they are the same, really). In testing, we had no problem connecting to various different Samba servers and Windows XP-based shares.
If you are stuck with an older version of Samba and cannot upgrade, workarounds do exist. Many NAS devices still run Samba 2.x, and do not have an upgrade mechanism. Before modifying all your Windows 7 machines’ registries, it is worth checking with the manufacturer of your storage device to inquire about an upgrade. Failing that, you must “degrade” Windows 7.
Go to: Control Panel -> Administrative Tools -> Local Security Policy
Select: Local Policies -> Security Options
As shown in Figure 1, there are two settings to change.
“Network security: LAN Manager authentication level” -> Send LM & NTLM responses
“Minimum session security for NTLM SSP” -> uncheck: Require 128-bit encryption
Figure 1. Click for a larger image.
After these two settings have been changed, you will be able to connect to older Samba-based file shares.
If problems still exist, one final thing to try is removing the stored credentials for the Samba share. During testing, it’s possible that something strange got “stuck” in there. In the Control Panel -> Credential Manager, find and remove the stored credentials for the Samba server.
The “just works” comment should be true for people with an already-working Samba setup, who need to allow access from new Windows 7 clients. If you are trying this for the first time, we have left out a lot of details. Start the Samba project’s own documentation.
Joining to a Samba Domain Controller
To join a Windows 7 workstation to your Samba domain controller, you must be running Samba 3.3.4 or higher. It also requires registry hacks within the Windows 7 machine due to security upgrades from Microsoft. Microsoft is not intentionally breaking Samba support, they are simply forcing the Windows Server world to upgrade and deploy more secure mechanisms. Samba often gets caught in the crossfire of forced security hardening, but this is to be expected given that Microsoft doesn’t work with or inform the Samba team of upcoming changes.
Failure to join a Samba domain is confusing. The error, as seen in Figure 2, will state, “The specified domain either does not exist or could not be contacted.” If the domain controller really was inaccessible, you would get another error, before Windows asked for credential to join the machine to the domain. That error would explain how a domain controller was not found. This error, however, really has nothing to do with a connection error.
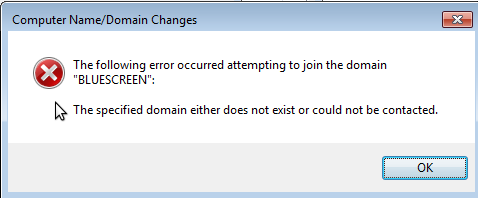
Figure 2. Some Windows errors are needlessly confusing.
To get Windows 7 clients to connect to the domain running Samba 3.3.4 or higher, four registry keys need to be changed. For the ones that don’t exist, create them.
Two dword keys within HKEY_LOCAL_MACHINESYSTEMCurrentControlSetservicesLanmanWorkstationParameters:
«DomainCompatibilityMode» = 1
«DNSNameResolutionRequired» = 0
And two within HKEY_LOCAL_MACHINESYSTEMCurrentControlSetservicesNetlogonParameters:
«RequireSignOnSeal» = 0
«RequireStrongKey» = 0
After setting these, you should be able to join the machine to the existing Samba-run domain. Again, this is assuming you’re working in an already-working environment. Configuring Samba to act as a domain controller is covered in the article, Build a Primary Domain Controller With Samba.
If you are adding a new Windows 7 machine to the domain, don’t forget to create the machine account in Samba, after the Unix account exists. In Samba: ‘useradd -a -m HOSTNAME’. And finally, remember that when joining the Windows 7 machine to the domain, you must use an account that has credentials to add machines.
Windows 7 is largely the same as Vista, so figuring out other problems that crop up doesn’t take long, since people have been using and testing the operating system for a few years now. If you are planning to run a Samba domain controller for Windows 7 workstations, we recommend automating those registry setting changes within your installation environment.
Overall, Windows Vista/7 didn’t present many surprises. The most common use case of Samba, as just a basic file server, works flawlessly assuming you have a fairly recent version of Samba. Most IT environments running a few Samba shares mixed within a Windows network, should have no problem supporting Windows 7 clients.
Обновлено 24 марта 2021
Содержание
- Введение
- Настройка сервера
- Настройка LDAP
- Настройка Samba
- Добавление и удаление пользователей
- Настройка прав доступа
- Настройка прав доступа к файловой системе
- Настройка прав доступа для пользователей Windows-компьютеров
- Структура Samba-групп
- Подключение Unix-клиентов
- Подключение Windows-клиентов
- Подключение клиента с ОС Windows 7
- Подключение клиента с ОС Windows 10
- Подключение клиента с ОС Windows Server 2008
- Подключение клиента с ОС Windows 7
- Просмотр информации
Введение
Samba — это популярный пакет программ с открытыми исходными текстами, который предоставляет файловые и принт-сервисы Microsoft® Windows® клиентам. Настройка Samba-сервера может быть выполнена при помощи утилит Calculate входящих в пакет sys-apps/calculate-server. Для хранения учётных записей пользователей, групп и машин и управления ими утилиты используют OpenLDAP-сервер. Необходимое программное обеспечение входит в состав Calculate Directory Server.
В качестве Linux клиента может выступать любая версия Calculate Linux Desktop (CLD, CLDC, CLDL, CLDM или CLDX). В качестве Windows клиентов могут быть использованы операционные системы семейства Windows. На данный момент Microsoft прекратила официальную поддержку доменов NT4 в операционных системах Windows. Однако с некоторыми изменениями вы все еще можете использовать более поздние выпущенные операционные системы Windows с доменом Samba NT4.
Настройка сервера
Настройка Samba-сервера выполняется в несколько этапов. Так как все данные пользователей и машин хранятся в LDAP, вначале неободимо выполнить настройку OpenLDAP-сервера, а затем — настройку LDAP для хранения учётных записей пользователей Linux. Это необходимо для работы Linux-клиентов. После этого можно настроить Samba-сервер.
Настройка LDAP
Настройте LDAP-сервер согласно руководству.
Настройка Samba
Перед настройкой Samba-сервера настройте LDAP для хранения учётных записей Unix-пользователей. Для этого выполните:
 * ПРЕДУПРЕЖДЕНИЕ: Выполнение этой программы изменит конфигурационные файлы и базу данных сервиса LDAP.
 Если вы готовы продолжить выполнение программы, введите 'yes', если нет - 'no': yes

 * Добавлен ldif файл ...                                                                                        [ ok ]
 * Unix сервис сконфигурирован ...                                                                               [ ok ]
Для настройки Samba-сервера выполните:
 * ПРЕДУПРЕЖДЕНИЕ: Выполнение этой программы изменит конфигурационные файлы Samba сервиса.
 Если вы готовы продолжить выполнение программы, введите 'yes', если нет - 'no': yes

 * Добавлен ldif файл ...                                                                                        [ ok ]
 * Запускается Samba ...                                                                                         [ ok ]
 * Пользователь client добавлен в Unix сервис
 * Пользователь client добавлен в Samba сервис
 * Пользователь admin добавлен в Unix сервис
 * Пользователь admin добавлен в Samba сервис
 * Samba сервис сконфигурирован ...                                                                              [ ok ]
В качестве параметров вы можете указать netbios и workgroup.
- -n name — устанавливает имя NetBIOS, под которым будет работать Samba сервер. По умолчанию оно устанавливается равным первому компоненту DNS-имени хоста.
- -w workgroup — имя домена или рабочей группы NT для компьютеров, которые будут получать доступ к этому серверу.
Задайте пароль администратора (пользователь с логином admin):
Новый пароль:
Повторите новый пароль:
* Пароль пользователя admin Samba сервиса изменен
Заметка
Пользователь admin используется только для ввода клиентского компьютера с ОС Windows в домен. Admin не имеет домашней директории.
Если нужен администратор домена для управления компьютерами на Windows, создайте нового пользователя и включите его в доменную группу Domain Admins.
Пример создания администратора домена:
Новый SMB пароль:
Повторите новый SMB пароль:
* Пользователь d_admin добавлен в Unix сервис
* Пользователь d_admin добавлен в Samba сервис
Добавление и удаление пользователей
Для работы с пользователями используйте аналоги стандартных Unix-команд: cl-useradd, cl-userdel, cl-usermod, cl-passwd, cl-groupadd, cl-groupdel, cl-groupmod. Синтаксис этих команд будет во многом совпадать с одноименными системными утилитами.
Для примера добавьте пользователя test и задайте ему пароль:
* Пользователь test добавлен в Unix сервис
* Пользователь test добавлен в Samba сервис
Новый пароль:
Повторите новый пароль:
* Пароль пользователя Unix сервиса изменен
* Пароль пользователя test Samba сервиса изменен
Настройка прав доступа
Настройка прав доступа к файловой системе
Для настройки прав доступа к файлам на сервере используйте ACL (Access Control List — список контроля доступа). Изменяя права на файлы, вы ограничиваете к ним доступ в равной степени как для Windows-, так и для Linux-клиентов. При отсутствии прав доступа к файлам и директориям они не будут отображаться в Samba-ресурсе.
Права доступа применяются как к файлам, так и к директориям. Вы можете указать права доступа на владельца файла, либо на группу. Если Windows-клиент будет распознавать только Samba-группы, то в Linux будут отображаться имена Unix- и Samba-групп. Поэтому, для разграничения прав доступа, предпочтительней использовать Samba-группы.
Для примера создадим Samba-группу manager:
* Группа 'manager' добавлена в Samba сервис
Для создания Unix-группы job, достаточно выполнить:
* Группа 'job' добавлена в Unix сервис
Настройка прав доступа для пользователей Windows-компьютеров
Для настройки дополнительных прав Windows машин, таких как: возможность устанавливать программы, возможность выхода из домена и т.д., используйте Samba группы.
Пример повышения прав пользователя test до администратора домена:
* Пользователи добавлены в группу Domain Admins
Структура Samba-групп
Samba-группы могут быть следующих типов:
- Доменные группы (номер типа группы 2)
- Локальные группы (номер типа группы 4)
- Встроенные группы (номер типа группы 5)
Группы, созданные по умолчанию:
-
Доменные группы — глобальные группы, которые действуют в домене.
- Domain Admins — администраторы домена (полные права на компьютерах в домене).
- Domain Guests — гости домена (минимальные права).
- Domain Users — пользователи домена.
- Domain Computers — компьютеры домена.
-
Локальные группы — группы, действующие локально на данном компьютере.
Локальные группы отсутствуют -
Встроенные группы — группы встроенные в систему.
- Administrators — администраторы (полные права).
- Account Operators — операторы учетных записей. Создание и управление пользовательской учетной информацией, создание и управление группами, резервное копирование файлов и каталогов.
- Backup Operators — операторы архивов. Резервное копирование, восстановление из резервной копии, остановка системы.
- Print Operators — операторы печати. Управление принтерами, резервное копирование.
- Replicators — репликаторы. Эта группа используется службой репликации File Replication на контроллерах домена.
- System Operators — операторы системы. Изменение системного времени, останов системы, останов с удаленной системы, резервное копирование, восстановление из резервной копии, блокирование сервера, преодоление блокировки сервера, форматирование жесткого диска, управление сетевыми каталогами, управление принтерами.
Пример создания доменной группы test. По умолчанию создается доменная группа, тип группы — 2.
* Группа 'test' добавлена в Samba сервис
Пример создания встроенной группы Power Users — пользователей, имеющих дополнительные права.
* Группа 'Power Users' добавлена в Samba сервис
Где:
- g — идентификатор группы 547 (Group ID)
- rid — уникальный идентификатор 547 (RID)
- t — тип группы 5 (встроенная группа)
Подключение Unix-клиентов
Клиентская машина должна резолвить имя сервера calculate.example.org (hostname -f). Если у вас не настроен DNS, используйте один из двух вариантов:
- На клиенте пропишите IP адрес сервера в /etc/hosts:
<IP адрес> calculate.example.org
- На сервере отредактируйте файл /var/calculate/remote/calculate.env, прописав в него IP адрес сервера:
[client]
sr_samba_host = <IP адрес>
Для подключения Unix-клиентов укажите пароль для служебного пользователя client:
Новый пароль:
Повторите новый пароль:
* Пароль пользователя client Samba сервиса изменен
На клиентской машине выполните:
* Проверка DOMAIN на наличие доменных ресурсов ...                                                              [ ok ]
Пароль для ввода рабочей станции в домен:
* Samba ресурс [remote] подключен
* Применены шаблоны ввода в домен ...
* Компьютер настроен для работы в домене
* Компьютен добавлен в домен DOMAIN
где DOMAIN — сетевое имя или IP-адрес сервера.
Подключение Windows-клиентов
Важно
В ОС семейства Windows активируйте учетную запись Администратора командой:
net user Администратор /active:yes
Подключение клиента с ОС Windows 7
Для подключения клиента с ОС Windows 7 войдите в систему под учётной записью Администратора и с помощью текстового редактора создайте текстовый файл с именем samba_7_2008_fix.reg со следующим содержимым:
samba_7_2008_fix.reg
Windows Registry Editor Version 5.00

[HKEY_LOCAL_MACHINE\System\CurrentControlSet\Services\LanManWorkstation\Parameters]
"DomainCompatibilityMode"=dword:00000001
"DNSNameResolutionRequired"=dword:00000000
Дважды кликните файл, чтобы импортировать его в реестр. После этого перезагрузитесь, чтобы изменения вступили в силу.
Теперь необходимо ввести компьютер в Samba-домен. Для этого перейдите в свойства компьютера, а оттуда в настройку удалённого доступа. Во вкладке «Имя компьютера» нажмите кнопку «Изменить».

Далее укажите, что компьютер является членом домена, и введите его имя:
Введите имя и пароль пользователя, созданного на Samba-сервере и входящего в группу администраторов домена:

После этого компьютер станет членом домена:
Подключение клиента с ОС Windows 10
Для подключения клиента с ОС Windows 10 войдите в систему под учётной записью Администратора и с помощью текстового редактора создайте текстовый файл с именем samba_7_2008_fix.reg со следующим содержимым:
samba_7_2008_fix.reg
Windows Registry Editor Version 5.00

[HKEY_LOCAL_MACHINE\System\CurrentControlSet\Services\LanManWorkstation\Parameters]
"DomainCompatibilityMode"=dword:00000001
"DNSNameResolutionRequired"=dword:00000000
Дважды кликните файл, чтобы импортировать его в реестр. После этого перезагрузитесь, чтобы изменения вступили в силу.
После этого перезапустите сервис samba:
samba             | * samba -> stop: smbd ...                             [ ok ]
samba             | * samba -> stop: nmbd ...                             [ ok ]
samba             | * samba -> start: smbd ...                            [ ok ]
samba             | * samba -> start: nmbd ...                            [ ok ]
Теперь необходимо ввести компьютер в Samba-домен. Для этого перейдите в свойства компьютера, а оттуда в настройку удалённого доступа. Во вкладке «Имя компьютера» нажмите кнопку «Изменить».

Далее укажите, что компьютер является членом домена, и введите его имя:
Введите имя и пароль пользователя, созданного на Samba-сервере и входящего в группу администраторов домена:

После этого компьютер станет членом домена:
Подключение клиента с ОС Windows Server 2008
Для подключения клиента с ОС Windows 2008 войдите в систему под учётной записью Администратора и с помощью текстового редактора создайте текстовый файл с именем samba_7_2008_fix.reg со следующим содержимым:
samba_7_2008_fix.reg
Windows Registry Editor Version 5.00

[HKEY_LOCAL_MACHINE\System\CurrentControlSet\Services\LanManWorkstation\Parameters]
"DomainCompatibilityMode"=dword:00000001
"DNSNameResolutionRequired"=dword:00000000
Дважды кликните файл, чтобы импортировать его в реестр. После этого перезагрузитесь, чтобы изменения вступили в силу.
Теперь необходимо ввести компьютер в Samba)домен. Для этого перейдите в свойства компьютера, а оттуда в настройку удалённого доступа. Во вкладке «Имя компьютера» нажмите кнопку «Изменить».

Далее укажите, что компьютер является членом домена, и введите его имя:
Введите имя и пароль пользователя, созданного на Samba-сервере и входящего в группу администраторов домена:

После этого компьютер станет членом домена:
Просмотр информации
Для просмотра информации о пользователях и группах сервера используйте утилиту cl-info. В качестве параметра может выступать один из сервисов: unix или samba.
Пример команды для вывода списка Unix-пользователей:
Все LDAP пользователи для сервиса Unix
+------+--------+-----------------------------+------------------+---------------------+
| ID   | Логин  | Полное имя                  | Первичная группа | Домашняя директория |
+------+--------+-----------------------------+------------------+---------------------+
| 900  | client | Client unix workstation     | 900              | /dev/null           |
| 901  | admin  | Administrator samba service | 544              | /dev/null           |
| 1000 | user1  | Calculate user              | user1            | /home/user1         |
| 1001 | user2  | Calculate user              | user2            | /home/user2         |
+------+--------+-----------------------------+------------------+---------------------+
(4 строк)
Пример команды для вывода списка Samba-пользователей:
Все LDAP пользователи для сервиса Samba
+--------+-----------------------------+--------------+--------+
| Логин  | Полное имя                  | Заблокирован | Пароль |
+--------+-----------------------------+--------------+--------+
| client | Client unix workstation     | Нет          | Да     |
| admin  | Administrator samba service | Нет          | Да     |
| user1  | Calculate user              | Нет          | Да     |
| user2  | Calculate user              | Нет          | Да     |
+--------+-----------------------------+--------------+--------+
(4 строк)
Пример команды для просмотра информации о пользователе user1 Unix-сервиса:
Информация о пользователе user1 для сервиса Unix
+-----------------------+--------------------------+
| Поле                  | Значение                 |
+-----------------------+--------------------------+
| ID                    | 1000                     |
| Логин                 | user1                    |
| Полное имя            | Calculate user           |
| Заблокирован          | Нет                      |
| Видимый               | Да                       |
| Первичная группа      | user1                    |
| Дополнительные группы | user1                    |
|                       | group                    |
| Домашняя директория   | /home/user1              |
| Оболочка              | /bin/bash                |
| Пароль                | Да                       |
| Изменение пароля      | 25.09.2018               |
| Jabber ID             | user1@server.example.com |
| Почтовый адрес        | usr1@example.com         |
+-----------------------+--------------------------+
(14 строк)
Пример команды для просмотра информации о пользователе user1 Samba-сервиса:
Информация о пользователе user1 для сервиса Samba
+-----------------------+------------------------------------------------------+
| Поле                  | Значение                                             |
+-----------------------+------------------------------------------------------+
| Логин                 | user1                                                |
| Полное имя            | Calculate user                                       |
| Заблокирован          | Нет                                                  |
| Пароль                | Да                                                   |
| Изменение пароля      | 25.09.2018                                           |
| Дополнительные группы | Нет                                                  |
| Домашняя директория   | /var/calculate/server-data/samba/home/user1          |
| Общая директория      | /var/calculate/server-data/samba/share               |
| Linux профиль         | /var/calculate/server-data/samba/profiles/unix/user1 |
| Windows профиль       | /var/calculate/server-data/samba/profiles/win/user1  |
| Windows logon         | /var/calculate/server-data/samba/netlogon/user1      |
+-----------------------+------------------------------------------------------+
(11 строк)
Пример команды для вывода списка Unix-групп:
Все LDAP группы для сервиса Unix
+------------+--------------------+------+
| Группа     | Полное имя         | GID  |
+------------+--------------------+------+
| maildomain | Default Mail Users | 1000 |
| user1      | Calculate group    | 1001 |
| user2      | Calculate group    | 1002 |
| group      | Calculate group    | 1003 |
+------------+--------------------+------+
(4 строк)
Пример команды для вывода списка Samba-групп:
Все LDAP группы для сервиса Samba
+-------------------+-----+-------------------+
| Группа            | GID | Тип группы        |
+-------------------+-----+-------------------+
| System Operators  | 549 | встроенная группа |
| Print Operators   | 550 | встроенная группа |
| Domain Guests     | 514 | доменная группа   |
| Domain Admins     | 512 | доменная группа   |
| Account Operators | 548 | встроенная группа |
| Domain Users      | 513 | доменная группа   |
| Administrators    | 544 | встроенная группа |
| client            | 900 | доменная группа   |
| Backup Operators  | 551 | встроенная группа |
| Replicators       | 552 | встроенная группа |
| Domain Computers  | 515 | доменная группа   |
+-------------------+-----+-------------------+
(11 строк)
Пример команды для просмотра информации о группе group Unix-сервиса:
+-----------------------+-----------------+
| Поле                  | Значение        |
+-----------------------+-----------------+
| Группа                | group           |
| Полное имя            | Calculate group |
| GID                   | 1003            |
| Пользователи в группе | user1           |
|                       | user2           |
+-----------------------+-----------------+
(5 строк)
Пример команды для просмотра информации о группе Domain Users Samba-сервиса:
Информация о группе Domain Users для сервиса Samba
+-----------------------+-----------------+
| Поле                  | Значение        |
+-----------------------+-----------------+
| Группа                | Domain Users    |
| Полное имя            | Domain Users    |
| GID                   | 513             |
| Тип группы            | доменная группа |
| Пользователи в группе | Нет             |
+-----------------------+-----------------+
(5 строк)
Сетевой протокол SMB (Server Message Block) используется для предоставления совместного удаленного доступа к файлам, принтерам и другим устройствам через порт TCP 445. В этой статье мы рассмотрим: какие версии (диалекты) протокола SMB доступны в различных версиях Windows (и как они соотносятся с версиями samba в Linux); как определить версию SMB на вашем компьютере; и как включить/отключить клиент и сервер SMBv1, SMBv2 и SMBv3.
Содержание:
- Версии протокола SMB в Windows
- Как проверить поддерживаемые версии SMB в Windows?
- Вывести используемые версии SMB с помощью Get-SMBConnection
- Об опасности использования SMBv1
- Включение и отключение SMBv1, SMBv2 и SMBv3 в Windows
Версии протокола SMB в Windows
Есть несколько версии протокола SMB (диалектов), которые последовательно появлялись в новых версиях Windows:
Для реализации протокола SMB в Linux/Unix системах используется samba. В скобках мы указали в каких версиях samba поддерживается каждый диалект SMB.
- CIFS — Windows NT 4.0;
- SMB 1.0 — Windows 2000;
- SMB 2.0 — Windows Server 2008 и Windows Vista SP1 (поддерживается в Samba 3.6);
- SMB 2.1 — Windows Server 2008 R2 и Windows 7 (поддерживается в Samba 4.0);
- SMB 3.0 — Windows Server 2012 и Windows 8 (поддерживается в Samba 4.2);
- SMB 3.02 — Windows Server 2012 R2 и Windows 8. 1 (не поддерживается в Samba);
- SMB 3.1.1 – Windows Server 2016 и Windows 10 (не поддерживается в Samba).
Начиная с версии Samba 4.14, по умолчанию используется SMB2.1.
При сетевом взаимодействии по протоколу SMB между клиентом и сервером используется максимальная версия протокола, поддерживаемая одновременно и клиентом, и сервером.
Ниже представлена сводная таблица, по которой можно определить версию протокола SMB, которая выбирается при взаимодействии разных версий Windows:
| Операционная система | Win 10, Server 2016 | Windows 8.1, Server 2012 R2 |
Windows 8, Server 2012 |
Windows 7, Server 2008 R2 |
Windows Vista, Server 2008 |
Windows XP, Server 2003 и ниже |
| Windows 10 ,
Windows Server 2016 |
SMB 3.1.1 | SMB 3.02 | SMB 3.0 | SMB 2.1 | SMB 2.0 | SMB 1.0 |
| Windows 8.1 , Server 2012 R2 |
SMB 3.02 | SMB 3.02 | SMB 3.0 | SMB 2.1 | SMB 2.0 | SMB 1.0 |
| Windows 8 , Server 2012 |
SMB 3.0 | SMB 3.0 | SMB 3.0 | SMB 2.1 | SMB 2.0 | SMB 1.0 |
| Windows 7, Server 2008 R2 |
SMB 2.1 | SMB 2.1 | SMB 2.1 | SMB 2.1 | SMB 2.0 | SMB 1.0 |
| Windows Vista, Server 2008 |
SMB 2.0 | SMB 2.0 | SMB 2.0 | SMB 2.0 | SMB 2.0 | SMB 1.0 |
| Windows XP, 2003 и ниже | SMB 1.0 | SMB 1.0 | SMB 1.0 | SMB 1.0 | SMB 1.0 | SMB 1.0 |
К примеру, при подключении клиентского компьютера с Windows 8.1 к файловому серверу с Windows Server 2016 будет использоваться протокол SMB 3.0.2.
Согласно таблице Windows XP, Windows Server 2003 для доступа к общим файлам и папкам на сервере могут использовать только SMB 1.0, который в новых версиях Windows Server (2012 R2 / 2016) может быть отключен. Таким образом, если в вашей инфраструктуре одновременно используются компьютеры с Windows XP (снятой с поддержки), Windows Server 2003/R2 и сервера с Windows Server 2012 R2/2016/2019, устаревшие клиенты не смогут получить доступ к файлам и папкам на файловом сервере с новой ОС.
Если Windows Server 2016/2012 R2 с отключенным SMB v1.0 используется в качестве контроллера домена, значить клиенты на Windows XP/Server 2003 не смогут получить доступ к каталогам SYSVOL и NETLOGON на контроллерах домена и авторизоваться в AD.
На старых клиентах при попытке подключиться к ресурсу на файловом сервере с отключенным SMB v1 появляется ошибка:
The specified network name is no longer available
Как проверить поддерживаемые версии SMB в Windows?
Рассмотрим, как определить, какие версии протокола SMB поддерживаются на вашем компьютере Windows.
В Windows 10, 8.1 и Windows Server 2019/2016/2012R2 вы можете проверить состояние различных диалектов SMB протокола с помощью PowerShell:
Get-SmbServerConfiguration | select EnableSMB1Protocol,EnableSMB2Protocol

Данная команда вернула, что протокол SMB1 отключен (
EnableSMB1Protocol=False
), а протоколы SMB2 и SMB3 включены (
EnableSMB1Protocol=True
).
Обратите внимание, что протоколы SMBv3 и SMBv2 тесно связаны между собой. Нельзя отключить или включить отдельно SMBv3 или SMBv2. Они всегда включаются/отключаются только совместно, т.к. используют один стек.
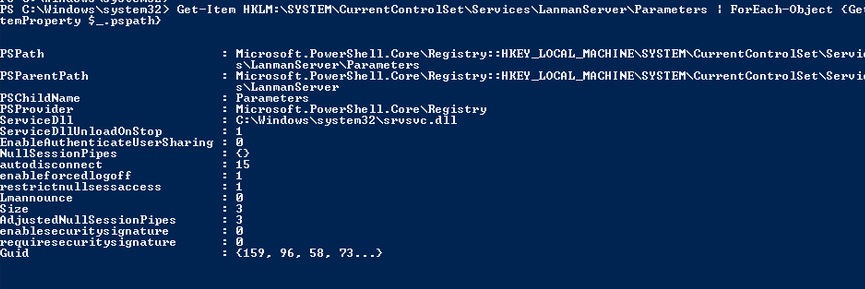
В Windows 7, Vista, Windows Server 2008 R2/2008:
Get-Item HKLM:\SYSTEM\CurrentControlSet\Services\LanmanServer\Parameters | ForEach-Object {Get-ItemProperty $_.pspath}
Если в данной ветке реестра нет параметров с именами SMB1 или SMB2, значить протоколы SMB1 и SMB2 по умолчанию включены.
Также в этих версиях Windows вы можете проверить, какие диалекты SMB разрешено использовать в качестве клиентов с помощью команд:
sc.exe query mrxsmb10
SERVICE_NAME: mrxsmb10
TYPE : 2 FILE_SYSTEM_DRIVER
STATE : 4 RUNNING
(STOPPABLE, NOT_PAUSABLE, IGNORES_SHUTDOWN)
WIN32_EXIT_CODE : 0 (0x0)
SERVICE_EXIT_CODE : 0 (0x0)
CHECKPOINT : 0x0
WAIT_HINT : 0x0
sc.exe query mrxsmb20
SERVICE_NAME: mrxsmb20
TYPE : 2 FILE_SYSTEM_DRIVER
STATE : 4 RUNNING
(STOPPABLE, NOT_PAUSABLE, IGNORES_SHUTDOWN)
WIN32_EXIT_CODE : 0 (0x0)
SERVICE_EXIT_CODE : 0 (0x0)
CHECKPOINT : 0x0
WAIT_HINT : 0x0
В обоих случаях службы запущены (
STATE=4 Running
). Значит Windows может подключаться как к SMBv1, так и к SMBv2 серверам.
Вывести используемые версии SMB с помощью Get-SMBConnection
Как мы говорили раньше, компьютеры при взаимодействии по протоколу SMB используют максимальную версию, поддерживаемую как клиентом, так и сервером. Для определения версии SMB, используемой для доступа к удаленному компьютеру можно использовать командлет PowerShell
Get-SMBConnection
:
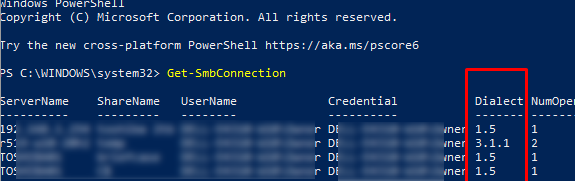
Версия SMB, используемая для подключения к удаленному серверу (ServerName) указана в столбце Dialect.
Можно вывести информацию о версиях SMB, используемых для доступа к конкретному серверу:
Get-SmbConnection -ServerName servername
Если нужно отобразить, используется ли SMB шифрование (появилось в SMB 3.0), выполните:
Get-SmbConnection | ft ServerName,ShareName,Dialect,Encrypted,UserName
В Linux вывести список SMB подключения и используемые диалекты в samba можно командой:
$ sudo smbstatus
Чтобы на стороне сервера вывести список используемых клиентами версий протокола SMB и количество клиентов, используемых ту или иную версию протокола SMB, выполните команду:
Get-SmbSession | Select-Object -ExpandProperty Dialect | Sort-Object -Unique

В нашем примере имеется 825 клиентов, подключенных к серверу с помощью SMB 2.1 (Windows 7/Windows Server 2008 R2) и 12 клиентов SMB 3.02.
С помощью PowerShell можно включить аудит версий SMB, используемых для подключения:
Set-SmbServerConfiguration –AuditSmb1Access $true
События подключения затем можно извлечь из журналов Event Viewer с помощью PowerShell:
Get-WinEvent -LogName Microsoft-Windows-SMBServer/Audit
Об опасности использования SMBv1
Последние несколько лет Microsoft из соображений безопасности планомерно отключает устаревший протокол SMB 1.0. Связано это с большим количеством критических уязвимостей в этом протоколе (вспомните историю с эпидемиями вирусов-шифровальщиков wannacrypt и petya, которые использовали уязвимость именно в протоколе SMBv1). Microsoft и другие IT компании настоятельно рекомендуют отказаться от его использования.
Однако отключение SMBv1 может вызвать проблемы с доступом к общий файлам и папкам на новых версиях Windows 10 (Windows Server 2016/2019) с устаревших версий клиентов (Windows XP, Server 2003), сторонних ОС (Mac OSX 10.8 Mountain Lion, Snow Leopard, Mavericks, старые версии Linux), различных старых NAS устройствах.
Если в вашей сети не осталось legacy устройств с поддержкой только SMBv1, обязательно отключайте эту версию диалекта в Windows.
В том случае, если в вашей сети остались клиенты с Windows XP, Windows Server 2003 или другие устройства, которые поддерживают только SMBv1, их нужно как можно скорее обновить или тщательно изолировать.
Включение и отключение SMBv1, SMBv2 и SMBv3 в Windows
Рассмотрим способы включения, отключения различных версий SMB в Windows. Мы рассматриваем отдельно включение клиента и сервера SMB (это разные компоненты).
Windows 10, 8.1, Windows Server 2019/2016/2012R2:
Отключить клиент и сервер SMBv1:
Disable-WindowsOptionalFeature -Online -FeatureName smb1protocol
Отключить только SMBv1 сервер:
Set-SmbServerConfiguration -EnableSMB1Protocol $false
Включить клиент и сервер SMBv1:
Enable-WindowsOptionalFeature -Online -FeatureName smb1protocol
Включить только SMBv1 сервер:
Set-SmbServerConfiguration -EnableSMB1Protocol $true
Отключить сервер SMBv2 и SMBv3:
Set-SmbServerConfiguration -EnableSMB2Protocol $false
Включить сервер SMBv2 и SMBv3:
Set-SmbServerConfiguration -EnableSMB2Protocol $true

Windows 7, Vista, Windows Server 2008 R2/2008:
Отключить SMBv1 сервер:
Set-ItemProperty -Path "HKLM:\SYSTEM\CurrentControlSet\Services\LanmanServer\Parameters" SMB1 -Type DWORD -Value 0 –Force

Включить SMBv1 сервер:
Set-ItemProperty -Path "HKLM:\SYSTEM\CurrentControlSet\Services\LanmanServer\Parameters" SMB1 -Type DWORD -Value 1 –Force
Отключить SMBv1 клиент:
sc.exe config lanmanworkstation depend= bowser/mrxsmb20/nsi
sc.exe config mrxsmb10 start= disabled
Включить SMBv1 клиент:
sc.exe config lanmanworkstation depend= bowser/mrxsmb10/mrxsmb20/nsi
sc.exe config mrxsmb10 start= auto
Отключить SMBv2 сервер:
Set-ItemProperty -Path "HKLM:\SYSTEM\CurrentControlSet\Services\LanmanServer\Parameters" SMB2 -Type DWORD -Value 0 -Force
Включить SMBv2 сервер
Set-ItemProperty -Path "HKLM:\SYSTEM\CurrentControlSet\Services\LanmanServer\Parameters" SMB2 -Type DWORD -Value 1 –Force
Отключить SMBv2 клиент:
sc.exe config lanmanworkstation depend= bowser/mrxsmb10/nsi
sc.exe config mrxsmb20 start= disabled
Включить SMBv2 клиент:
sc.exe config lanmanworkstation depend= bowser/mrxsmb10/mrxsmb20/nsi
sc.exe config mrxsmb20 start= auto
Для отключения сервера SMBv1 на всех компьютерах независимо от версии Windows можно распространить параметр реестра типа REG_DWORD с именем SMB1 и значением 0 (HKEY_LOCAL_MACHINE\SYSTEM\CurrentControlSet\Services\LanmanServer\Parameters)на через GPO.
Для отключения SMBv2 нужно в этой же ветке установить параметр SMB2=0.
Для отключения SMBv1 клиента нужно распространить такой параметр реестра:
- Key: HKEY_LOCAL_MACHINE\SYSTEM\CurrentControlSet\services\mrxsmb10
- Name: Start
- Type: REG_DWORD
- Value: 4
При отключении SMB 1.0/CIFS File Sharing Support в Windows вы можете столкнуться с ошибкой “0x80070035, не найден сетевой путь”, ошибкой при доступе к общим папкам, и проблемами обнаружения компьютеров в сетевом окружении. В этом случае вместо служба обозревателя компьютеров (Computer Browser) нужно использовать службы обнаружения (линк).