
Рассказываем о том, как исправить ошибку 0x00000109 в Windows 7.
Blue Screen of Death (BsoD) или «Синий экран смерти» – осведомительное сообщение о фатальной ошибке операционной системы Windows (преимущественно версии 7), именуемое также STOP-ошибкой. Она сопровождается немедленной остановкой всех процессов, происходивших в системе. Это делается для предотвращения серьёзных повреждений программных и аппаратных компонентов компьютера, потерявшего управление системой.
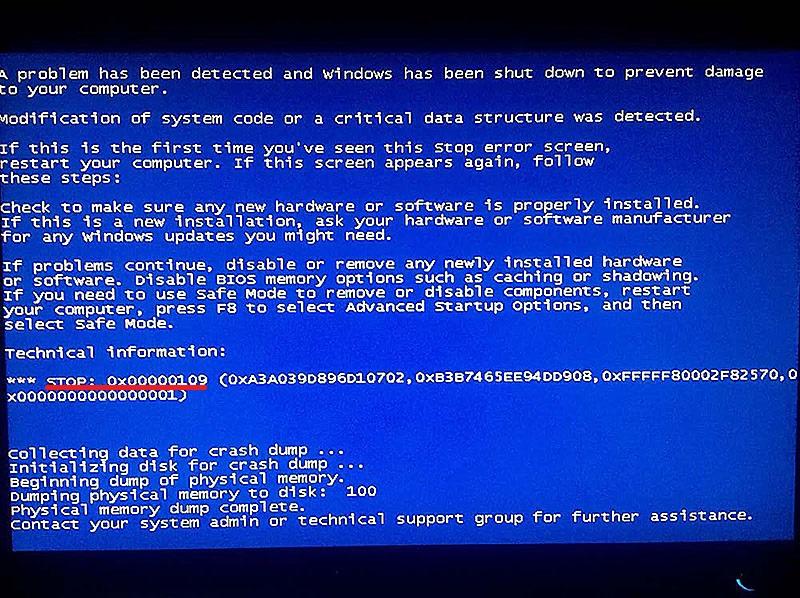
Экран ошибки 0x00000109
Несмотря на устрашающее название, при первом появлении синего экрана тревожиться рано. Возможно, STOP-ошибка была вызвана преходящим сбоем. В таком случае поможет обычная перезагрузка. Другое дело, если синий экран появляется при каждом запуске системы. Для облегчения восстановительных действий после слова STOP выводится код индицированной ошибки с кодами уточняющих её параметров.
Причины возникновения ошибки 0x00000109 и первые корректирующие действия
Анализ англоязычной технической информации Microsoft связывает ошибку с кодом 0x00000109 преимущественно с неполадками следующих компонентов компьютера, которые будут последовательно рассмотрены ниже:
- драйверы,
- память,
- системные файлы.
В свою очередь, неполадки с драйверами или файлами могут быть следствием вирусного заражения, поэтому первым делом следует запустить тщательную антивирусную проверку компьютера, лучше – в его безопасном режиме. Его можно вызвать из окна «Дополнительные варианты загрузки», которое появится, если нажимать клавишу клавиатуры F8 в момент загрузки системы.
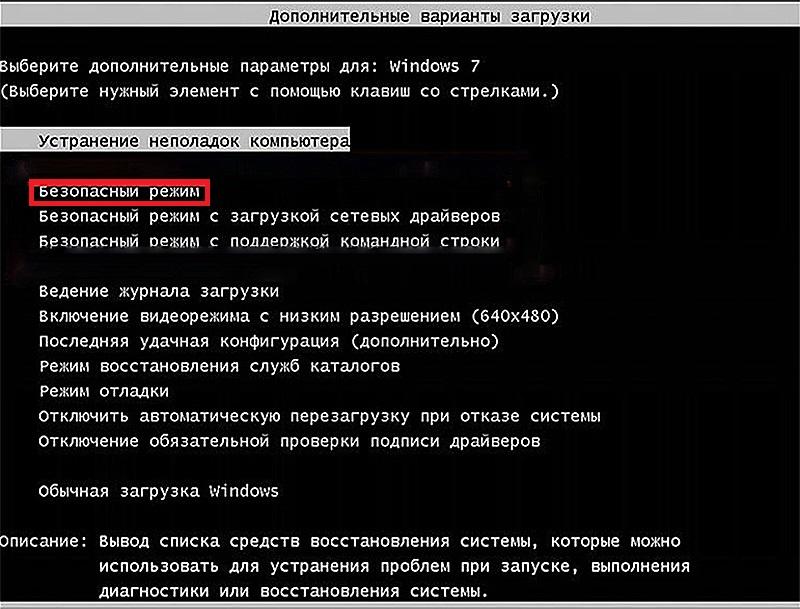
Вызов безопасного режима
Следующее малозатратное по времени действие – откат системы к точке восстановления с датой, когда отмеченная ошибка не проявлялась. Метод подробно рассмотрен в другой статье на нашем сайте.
Устранение неполадок с драйверами
Они могут быть неверно установленными, устаревшими или неоригинальными. Безопасный режим работы компьютера, о котором шла речь выше, отличается минимальным использованием драйверов. Поэтому, если во время антивирусной проверки компьютера синий экран не возникает, этот факт может указывать на связь его с неоптимальными драйверами. Рекомендуется скачать с сайта производителя их последнюю версию и переустановить. Процесс поиска последней версии драйвера аппаратуры по её коду подробно рассмотрен в другой статье.
Проверка памяти
Переход к диагностике с помощью окна параметров восстановления системы
Как видно в предыдущем скриншоте, в окне «Дополнительные варианты загрузки» первая строка из списка называется «Устранение неполадок компьютера». С её помощью производится переход к системным средствам диагностики и восстановления системы, одно из которых было упомянуто выше. В этом же окне можно проверить работоспособность ОЗУ, проблемы которого – вторая после драйверов вероятная причина исследуемой ошибки. Этот вариант перехода к диагностике удобен в случае появления синего экрана при каждой загрузке.
Для начала проверки памяти щёлкаем строку «Устранение неполадок компьютера».
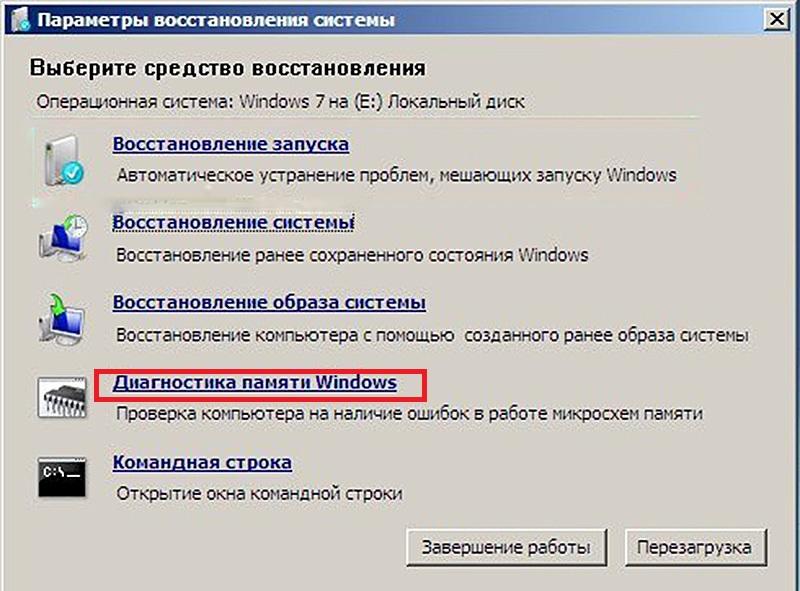
Вызываем пункт «Диагностика памяти»
После перезагрузки компьютера подтверждаем выбранную раскладку клавиатуры и вводим пароль пользователя с правами администратора. Появляется окно «Параметры восстановления системы», один из разделов которого называется «Диагностика памяти». Щёлкаем этот пункт.
Переход к диагностике посредством системной утилиты
Более короткий альтернативный способ перехода к диагностике возможен в том случае, если синий экран досаждает пользователю не постоянно, а периодически.
Щёлкаем кнопку «Пуск», в появившейся строке ввода команды набираем название системной утилиты – mdsched, затем жмём клавишу клавиатуры Enter.
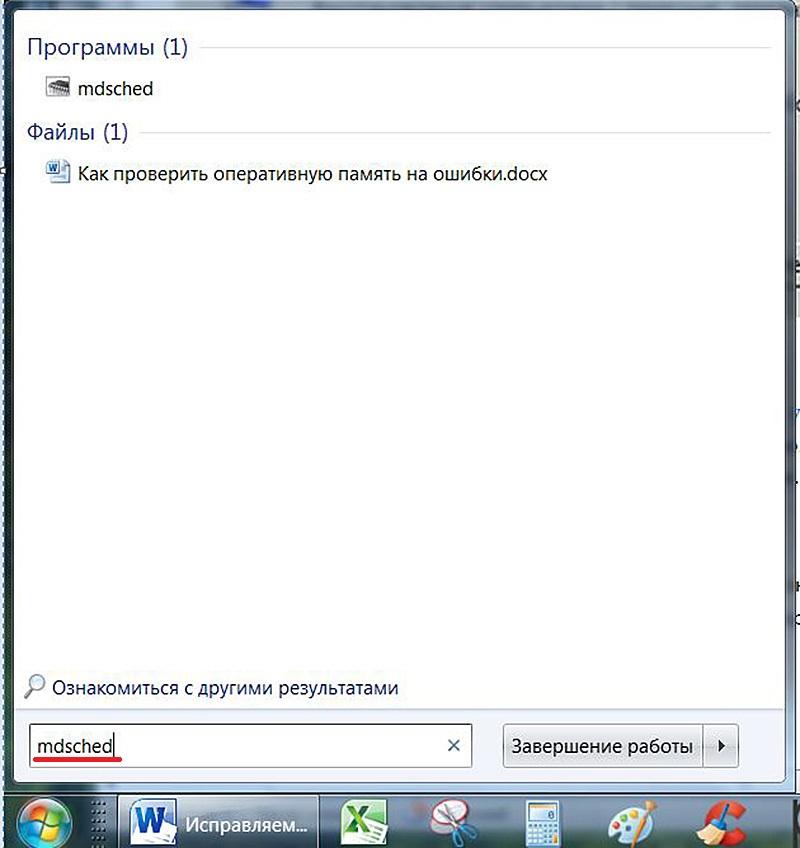
Вызываем системную утилиту mdsched
В появившемся окне «Средство проверки памяти Windows» щёлкаем верхнюю строку.

Переходим к проверке памяти после перезагрузки
Процесс диагностики памяти
В обоих описанных вариантах после перезагрузки компьютера появляется рабочее окно инициированной проверки памяти, на котором подчёркнута красным самая важная информация.
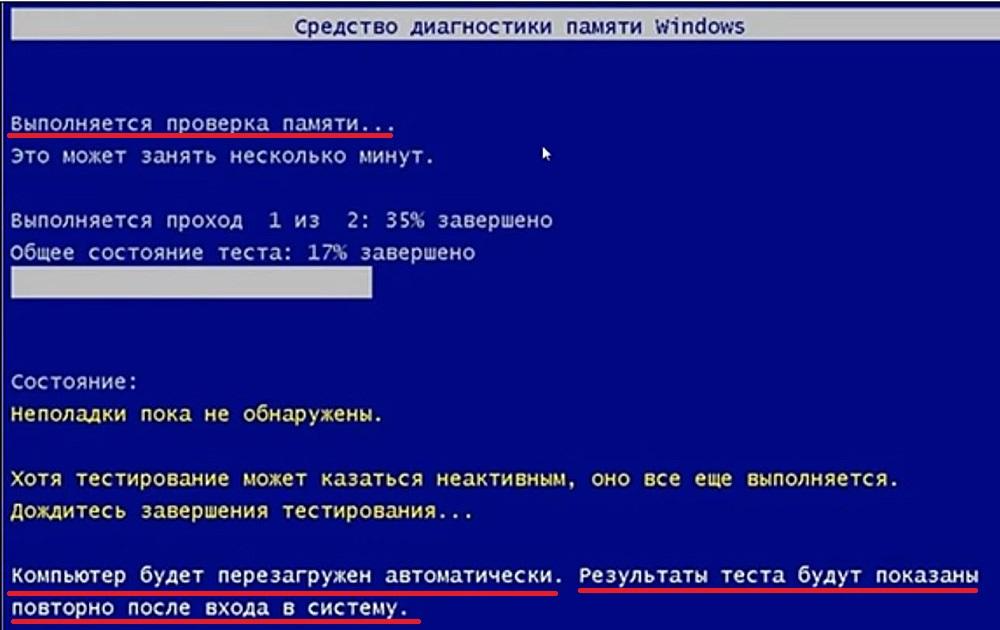
Экран во время проверки памяти
Если неполадок выявлено не будет, то в нижней части экрана Windows, на панели задач, появится значок с изображением микросхемы памяти и уведомлением об отсутствии ошибок. В противном случае «Средство проверки памяти Windows» выдаёт такое окно.
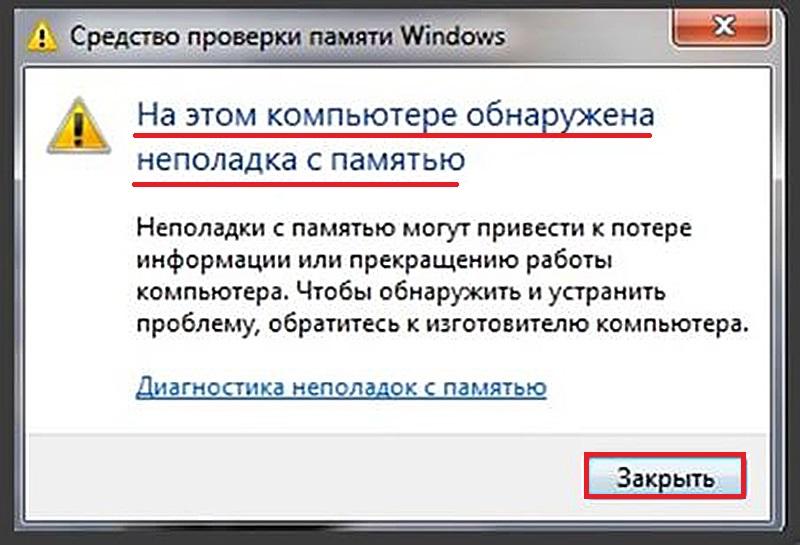
В памяти есть ошибки
Что делать?
Конечно же, рекомендуемый в окне вариант обращения к изготовителю компьютера сугубо теоретический. На практике действия пользователя будут зависеть от количества микросхем (чипов) памяти на разъёмах (слотах) материнской платы. Если чип единственный, то нужно попробовать вставить его в другой разъём, предварительно зачистив его контакты обычным ластиком. Если чипов два или четыре, то следует попробовать по очереди изымать их из разъёмов с целью определения неисправного.
Восстановление системных файлов
Третья по частоте причина появления ошибки 0x00000109 – повреждение важных системных файлов. На их обнаружении и восстановлении специализируются две системные утилиты – System File Checker (SFC) и Deployment Image Servicing and Management (DISM). Обе они работают в режиме командной строки. Первая из утилит работает быстрее, а вторая – обладает большими возможностями. В обоих случаях, прежде всего, переходим в режим командной строки. Для этого щёлкаем «Пуск», затем «Все программы» –> «Стандартные» –> «Командная строка».
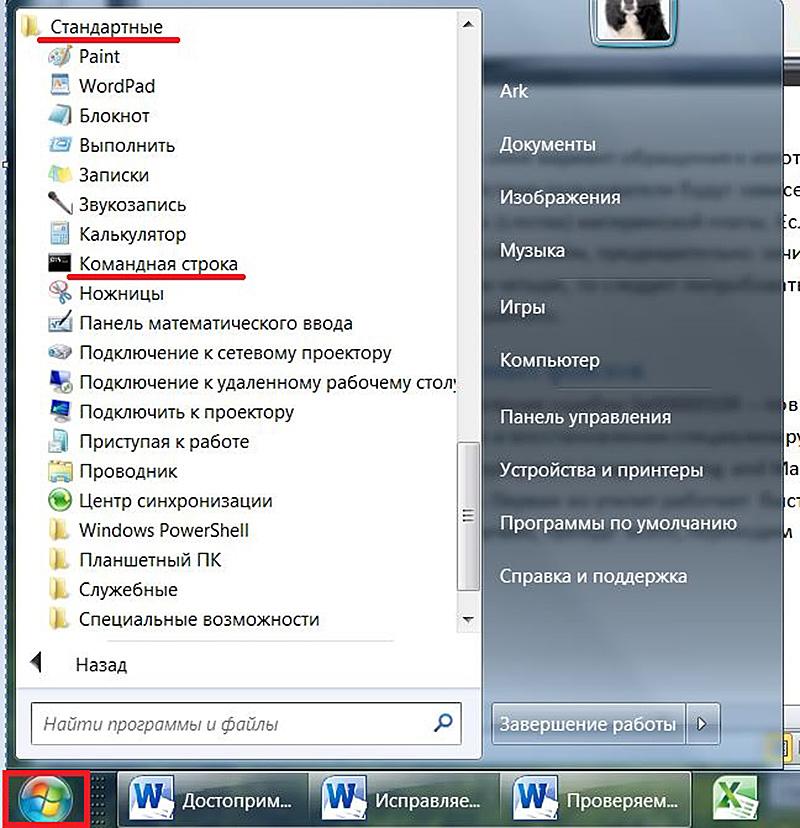
Переходим в режим командной строки
Утилита System File Checker
- Затем на чёрном экране командной строки набираем sfc с параметром scannow и жмём Enter. Как видно на скриншоте, при первой попытке «Защите ресурсов Windows не удаётся запустить службу восстановления».

Первая попытка не удалась
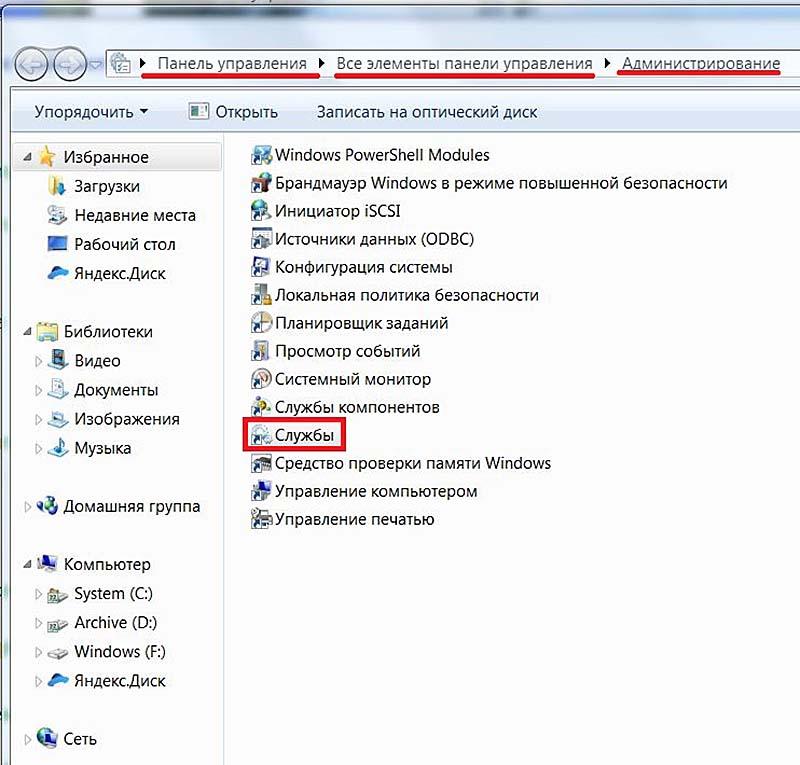
- Для устранения этого препятствия в разделе «Администрирование» Панели управления переходим в «Службы».

Переход к окну «Службы»
- Открываем список служб и, при необходимости, запускаем «установщик Windows» и/или «Установщик модулей Windows».

Включаем нужные службы
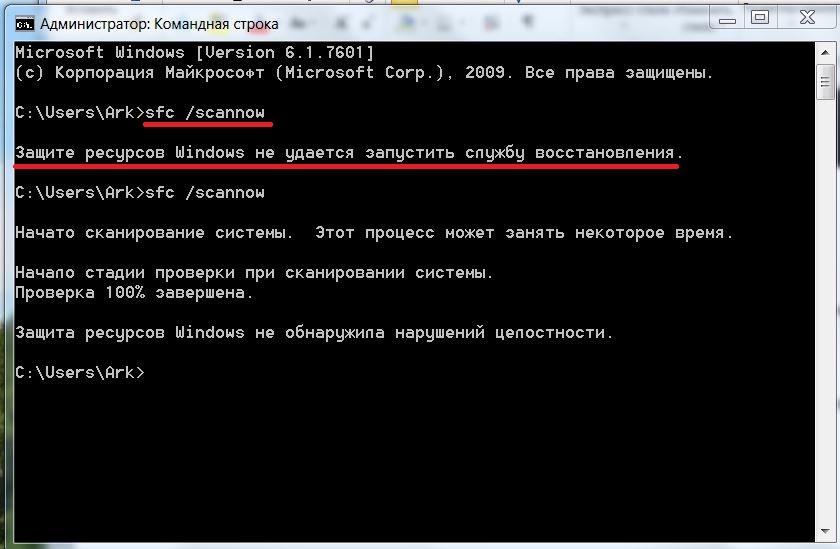
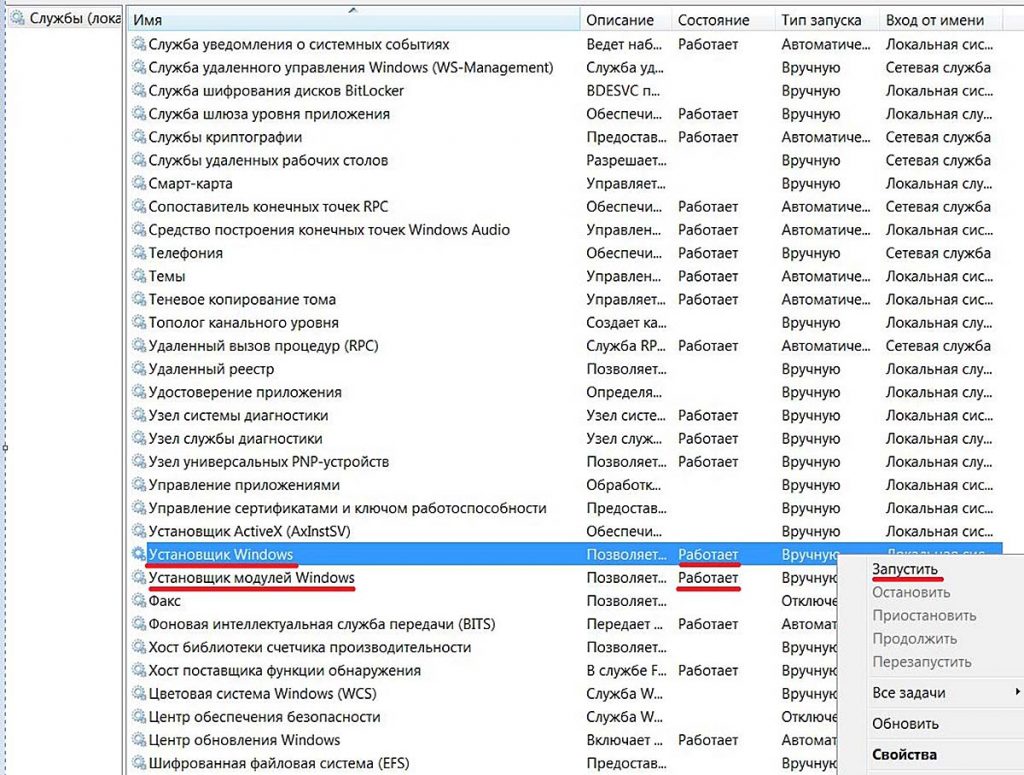
После этого утилита запускается без помех.
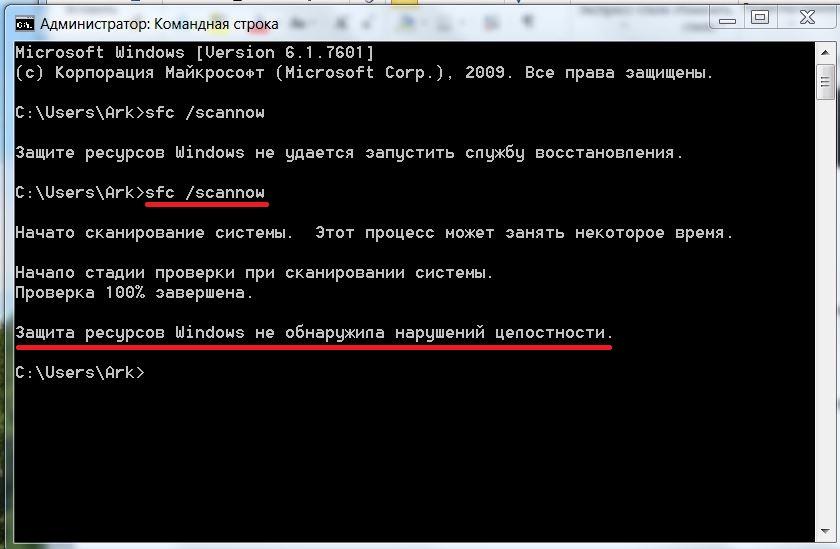
Вторая попытка успешна
Кроме показанного на скриншоте результата проверки, возможны ещё два:
- «Защита ресурсов Windows обнаружила повреждённые файлы и успешно их восстановила»;
- «Защита ресурсов Windows обнаружила повреждённые файлы, но не может восстановить некоторые из них».
В первом и третьем случаях приходится констатировать, что корректирующих возможностей утилиты SFC оказалось недостаточно. Приходится обращаться к более мощному системному средству.
Утилита Deployment Image Servicing and Management
Проверка и восстановление системных файлов с помощью утилиты DISM длится довольно долго. Перед её запуском рекомендуется временно отключить антивирус и возможный режим экономии энергии, который отключает жёсткий диск.
На чёрном экране командной строки набираем dism с тремя параметрами, разделяемыми косой чертой и пробелом – /Online /Cleanup-image /ScanHealth.
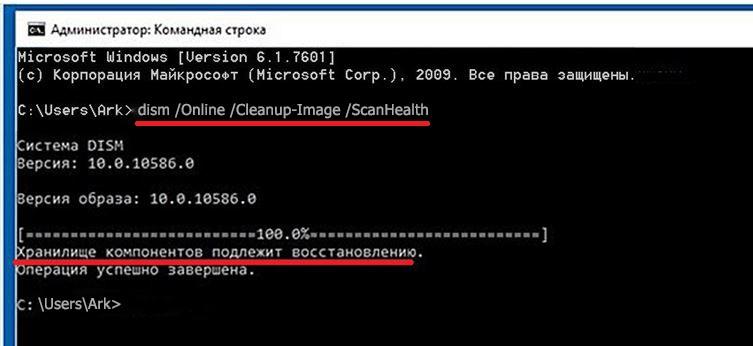
Диагностируем системные файлы утилитой DISM
В процессе длительного сканирования утилита DISM надолго замирает на отметке 20%, даже создавая видимость зависания. При получении завершающего сообщения «Хранилище компонентов подлежит восстановлению» можно переходить к непосредственному восстановлению. Для этого запускаем утилиту с изменённым третьим параметром, а именно – /RestoreHealth.
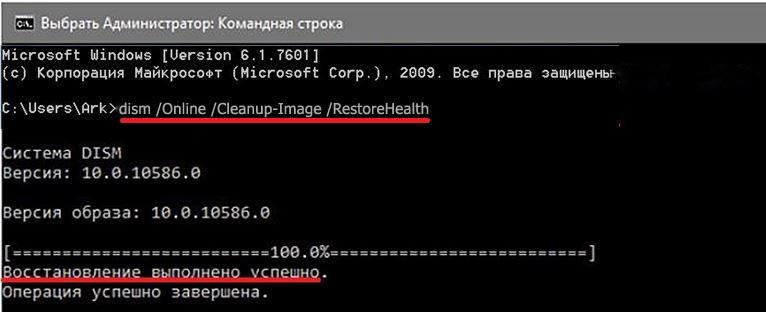
Восстанавливаем системные файлы утилитой DISM
Успешное «восстановление здоровья» сопровождается выдачей соответствующего сообщения. В противном случае утилита сообщает, что «Не удалось найти исходные файлы».
Другие возможные причины
Неисправные сектора жёсткого диска
В некоторых случаях ошибка 0x00000109 может быть следствием неисправности некоторых секторов винчестера. Для их проверки и возможного восстановления выполняем следующую последовательность действий.
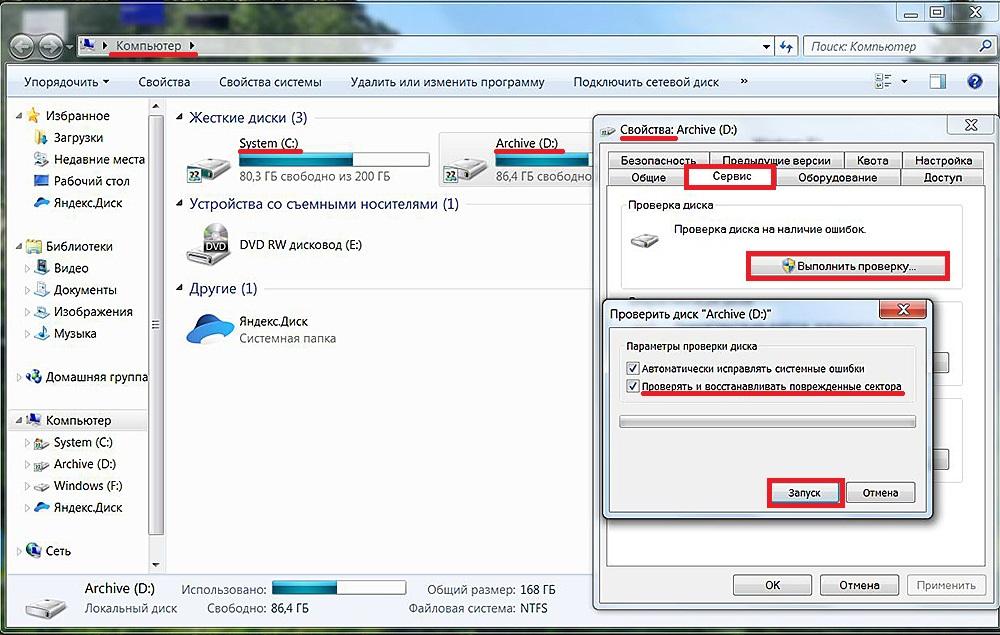
- В контекстном меню соответствующего раздела жёсткого диска щёлкаем пункт «Свойства».

Проверяем разделы диска на наличие сбойных секторов
- В появившемся одноимённом окне переходим на вкладку «Сервис» и щёлкаем пункт «Выполнить проверку».
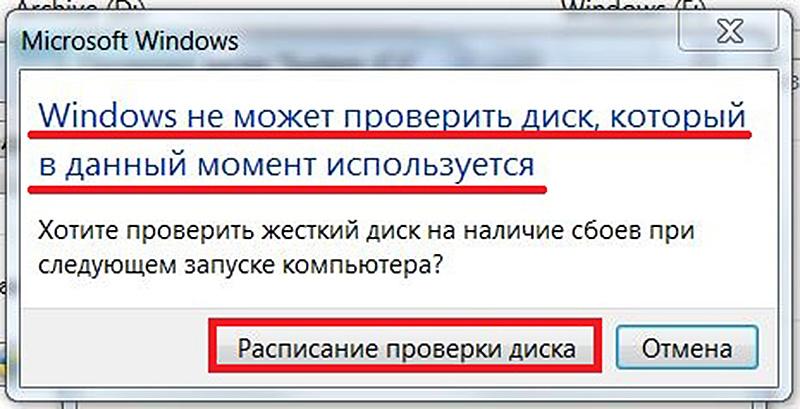
- В окне «Проверить диск…» ставим галочку рядом с пунктом «Проверять и восстанавливать повреждённые сектора» и щёлкаем «Запуск». Показанный на скриншоте раздел диска D, в котором хранится архив, будет проверен без проблем. Что же касается работающего системного раздела C, то при попытке его проверки появится следующее окно.

Проверка системного диска откладывается
- В данном случае для положительного ответа на вопрос щёлкаем пункт «Расписание проверки диска». Он добавится в расписание планируемых действий и будет проверен при следующей перезагрузке ещё до начала загрузки системы.
Повреждённые записи реестра
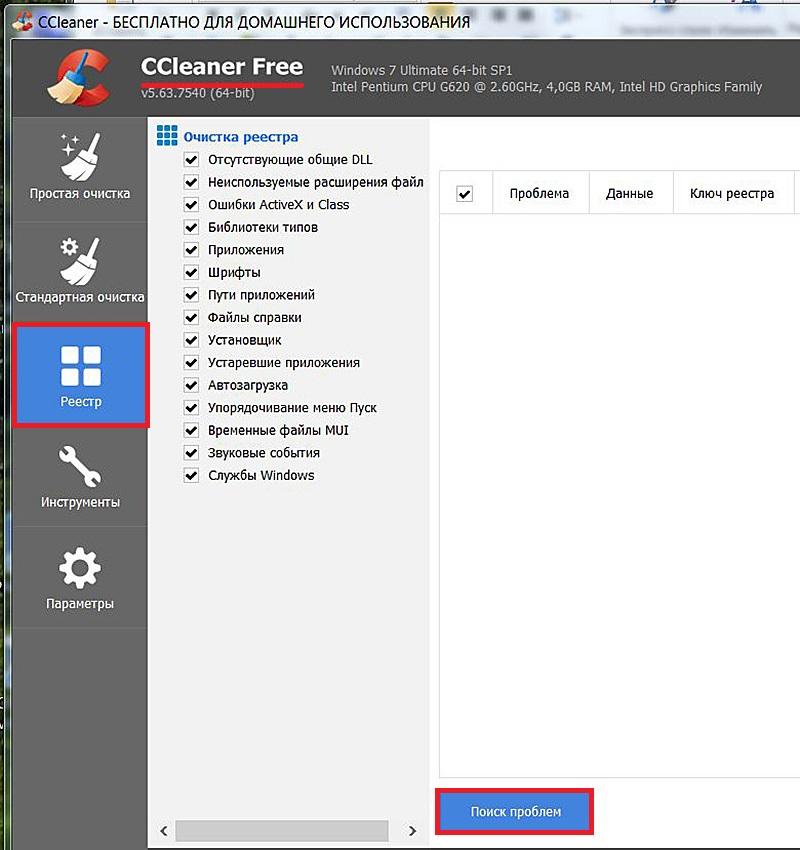
Не исключено, что исследуемая ошибка может быть следствием повреждённых записей реестра. Для проверки корректности записей реестра встроенных программных средств не существует. Однако эту функцию успешно выполняет бесплатная программа CCleaner, которая благодаря своему удобству устанавливается почти на каждый компьютер.
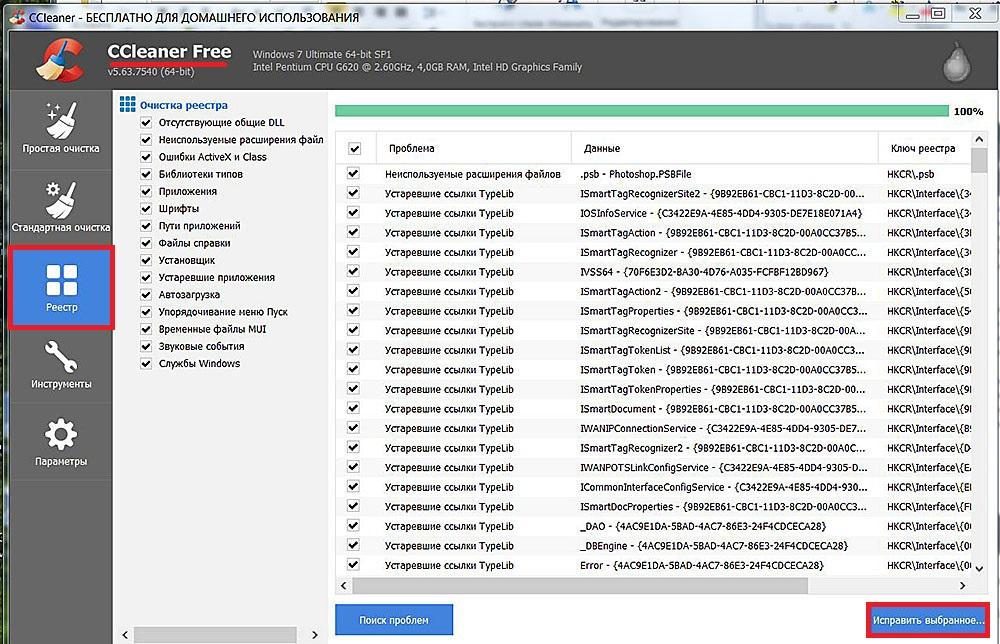
- Открываем программу CCleaner Free, переходим в раздел «Реестр» и щёлкаем пункт «Поиск проблем».

Ищем проблемные записи реестра
- Через десяток-другой секунд в окне появляется список обнаруженных в реестре проблемных записей.

Список обнаруженных проблем
- Щёлкаем пункт «Исправить выбранное».

Исправляем обнаруженные проблемные записи
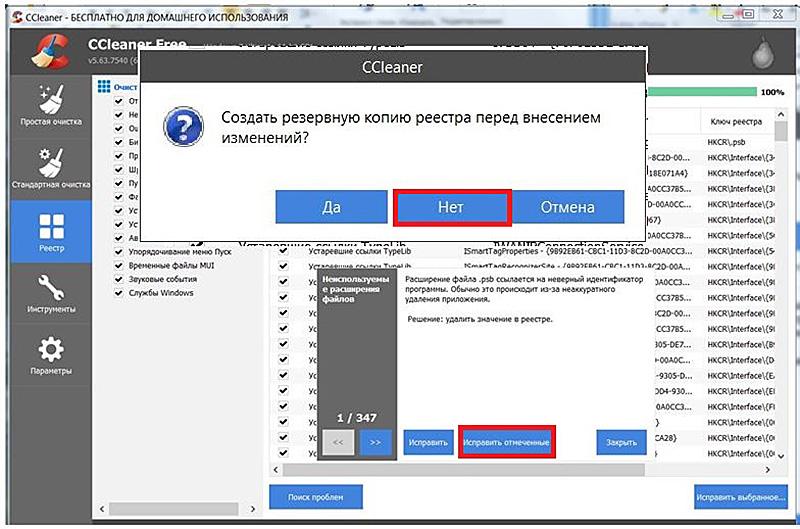
- Программа CCleaner имеет хорошую репутацию, поэтому необходимости в резервной копии реестра «нет». После этого щёлкаем пункт «Исправить отмеченные» для того, чтобы не корректировать каждую из 347 записей по отдельности.
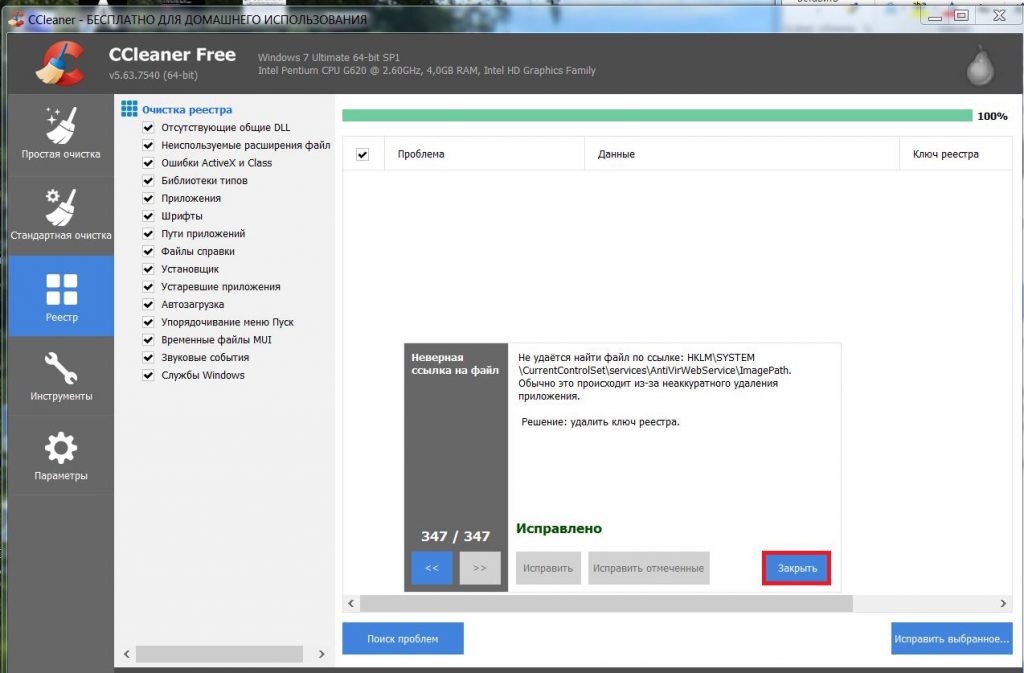
- Через несколько секунд в окне появляется информация о подробностях корректировки последней из 347 проблемных записей (все остальные пролетели мгновенно). Щёлкаем пункт «Закрыть».

Все проблемные записи исправлены
В заключение отметим, что причиной появления ошибки 0x00000109 может быть и нелицензионная сборка Windows 7. Таких сборок, по возможности, следует избегать.
Post Views: 8 476
The Blue Screen of Death is an unusual error that can occur to every Windows user running sooner or later. Unfortunately, this error is accompanied by error code 0x00000109 on a blue screen, which automatically shuts down or stops your device. It’s a frustrating problem, as it’s often tough to troubleshoot and can pop up out of nowhere. This blog will walk you through some essential tips for fixing a BSOD error 0x00000109.
What is the BSOD 0x00000109 error?
Blue screen 0x00000109 is a ‘Critical Structure Corruption’ error that can cause your computer to shut down completely. When this error arises, you will no longer see your desktop screen but a blue screen along with the code: 0x00000109. The occurrence of this error also means the kernel of your PC has detected data corruption or critical kernel code. The kernel is an integral part of the OS responsible for controlling the hardware, precisely the RAM and CPU time. When the kernel is damaged, it affects functions in other areas of your system, like drivers, RAM, hardware, and CPU.
Why does Blue Screen of Death Error 0x00000109 Occur?
When a BSOD 0x00000109 error occurs, Windows OS will shut down many vital functions of your PC, making it impossible for you to use. Hence, it is important to fix the Blue Screen error as soon as possible because this error can result in causing many serious issues like data corruption and data loss. Blue Screen 0x00000109 can occur because of the following reasons:
- Virus infection
Some viruses can modify system kernel data resulting in a blue screen error.
- System memory is malfunctioning
If the memory or RAM of the PC is corrupted, it can lead to BSOD.
- System drivers are outdated
Outdated device drivers or Windows can also cause Blue Screen of Death.
- File system integrity compromised
Disk read/write errors, power outages, or virus attacks can corrupt your PC’s file system, resulting in BSoD error 0x00000109.
To fix the error 0x00000109, try the following methods one-by-one until the BSOD CRITICAL_STRUCTURE_CORRUPTION is fixed successfully.
1. Boot into Safe Mode
In Safe boot mode, Windows boots your computer with a minimum of drivers and features. This will help you analyze whether the error is caused by third-party software or hardware.
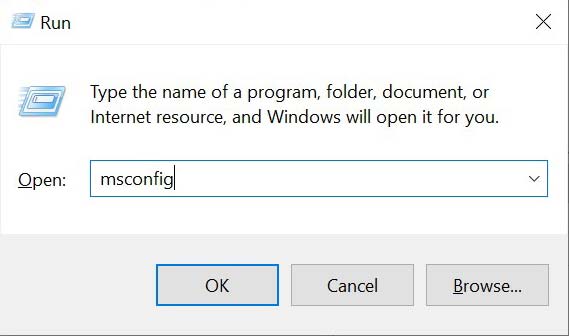
- Press Windows + R key to open Run.
- Type msconfig in the Run box and click OK.
- Click on the Boot tab under the System Configuration Window.
- Check the box next to the Safe boot.
- Then set the Boot option and click OK.

- A pop-up will appear asking if you want to reboot immediately; click Yes.
Note – The option you chose will make your system boot in a safe mode every time from now on. To cancel it, uncheck the box next to Safe Boot options under the Boot tab.
2. Check for Windows Updates
Missing updates can be the reason behind the Blue Screen of Death error; that’s why you always download the latest Update patches for your system.
- Click on the Window icon and select Settings.
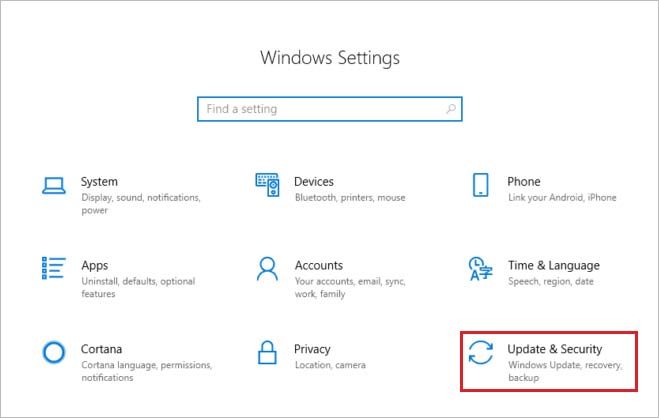
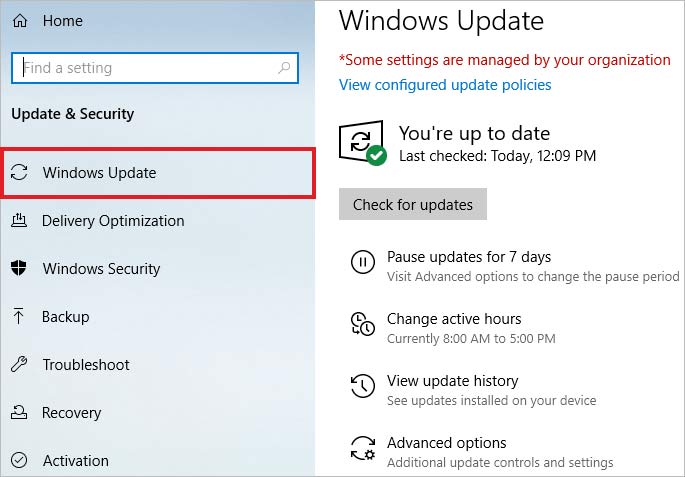
- Now navigate to Windows Update and click on Check for updates.
- Wait some time to see all the available updates, and click the Download button.
- Downloading will start shortly, and installation will begin.
- Once done, restart your system for the changes to apply.
3. Scan your PC for Viruses
Sometimes, viruses or malware may cause a 0x00000109 BSOD error. Use Window Defender to scan and remove viruses from your PC.
- Type Windows Security in the search bar of Windows and click Open.
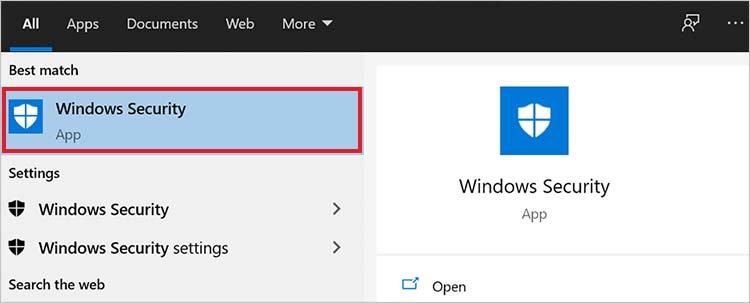
- Click Virus & threat protection and then select Scan options.
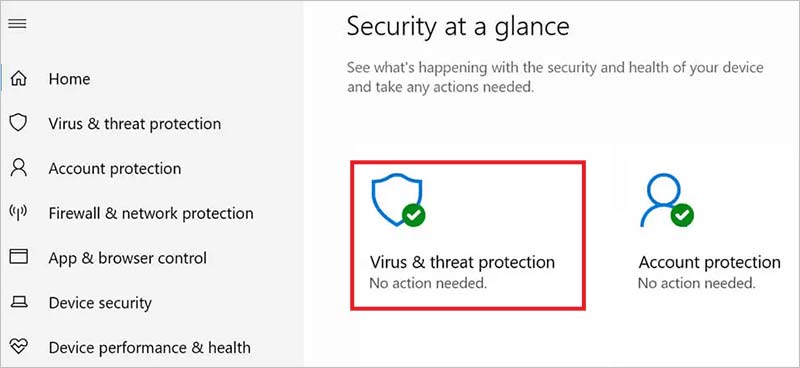
- Now choose the Full Scan option and click Scan Now.
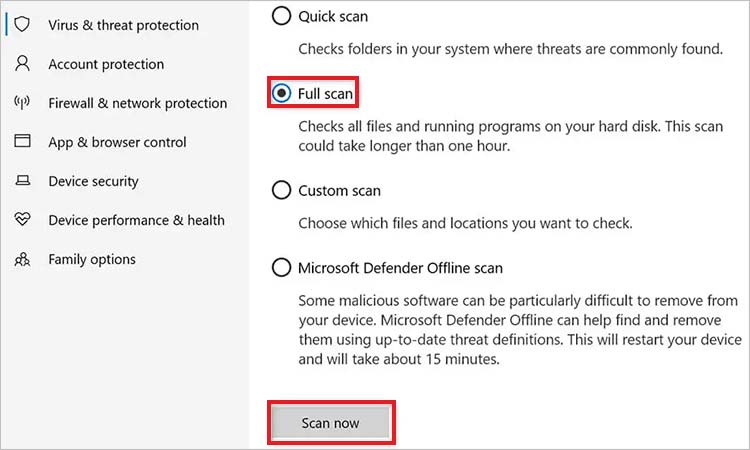
- Wait for the antivirus tool to scan your entire system, and then reboot your system.
4. Update Device Drivers
Outdated drivers can be responsible for causing the BSOD 0x00000109 error in Windows 11. So, fix this error by updating all your device drivers to the latest versions.
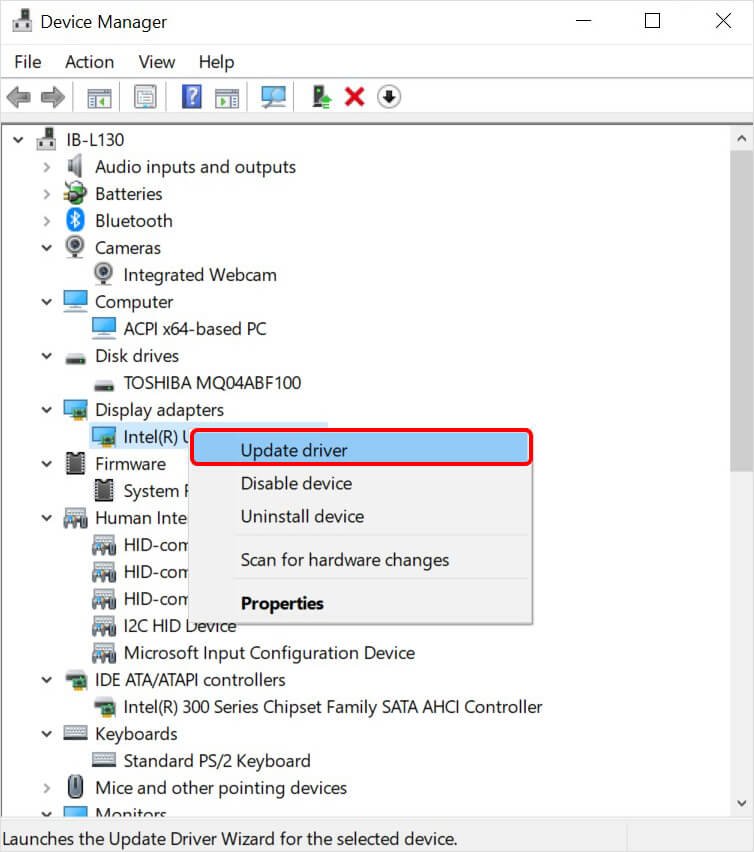
- Type Device Manager in the Windows search and click Open.
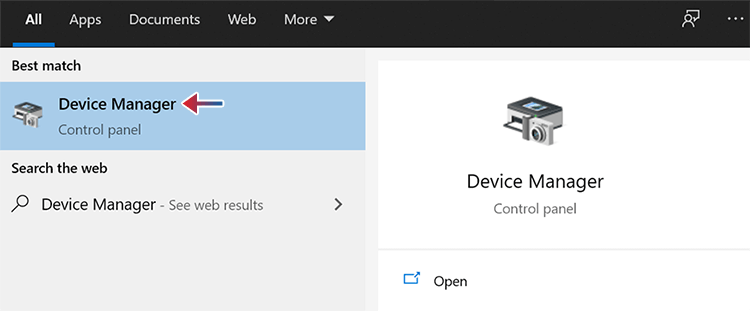
- Look for the device driver in the list that needs to be updated.
- Then right-click on the device and click Update driver.
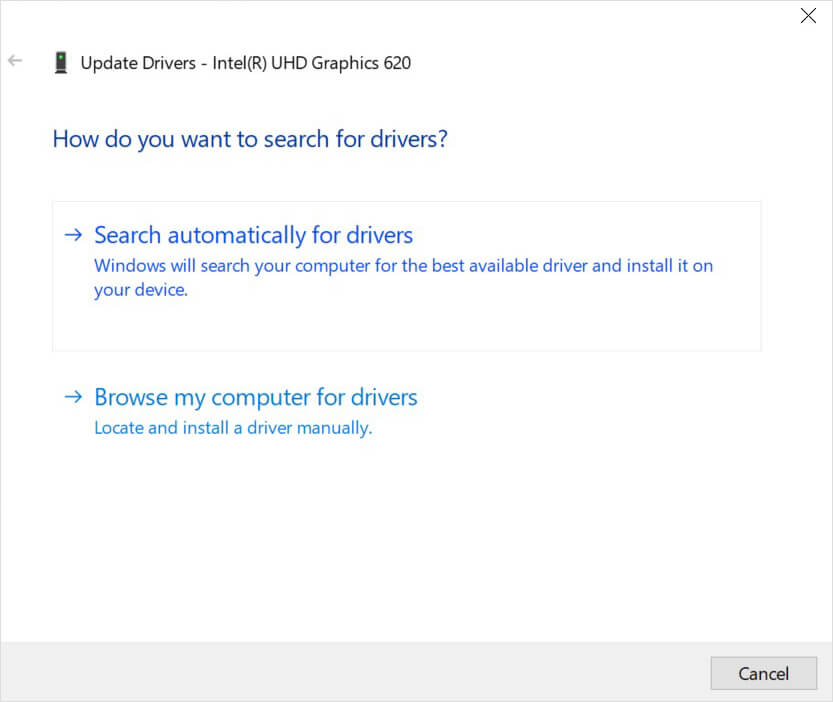
- Now, choose the ‘Search automatically for drivers’ option.
- Download the updates for drivers if available and then install them.
- Once all device drivers are updated, restart your PC.
5. Run Windows Memory Diagnostic
Blue Screen of Death error 0x00000109 can also occur due to low memory or if there is a problem with RAM. Use Windows Memory Diagnostic, the built-in tool, to check if the problem is related to the system memory or not.
- Click the Windows icon and type Windows Memory Diagnostic in the search.
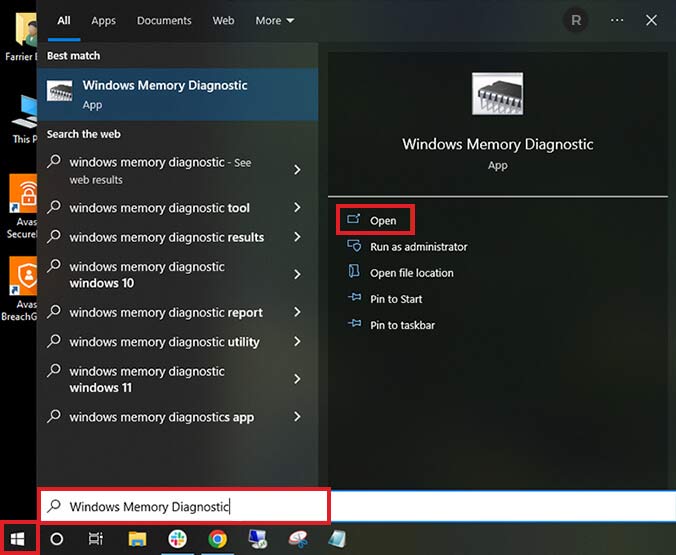
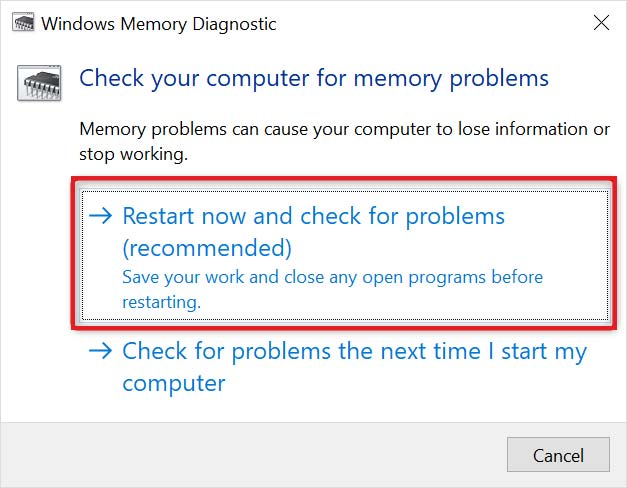
- Click Open to launch it and select the “Restart now and check for problems” option.
- Once the test is complete, reboot your system, and check whether the BSOD error is fixed.
6. Run SFC and DISM Scan
Blue Screen of Death 0x00000109 error can also be caused due to corrupted file systems. So scan and repair your corrupted system files using System File Checker and DISM, Windows built-in utility tools.
- Type Command Prompt in the Windows search.
- Then click the option of Run it as Administrator to launch it.
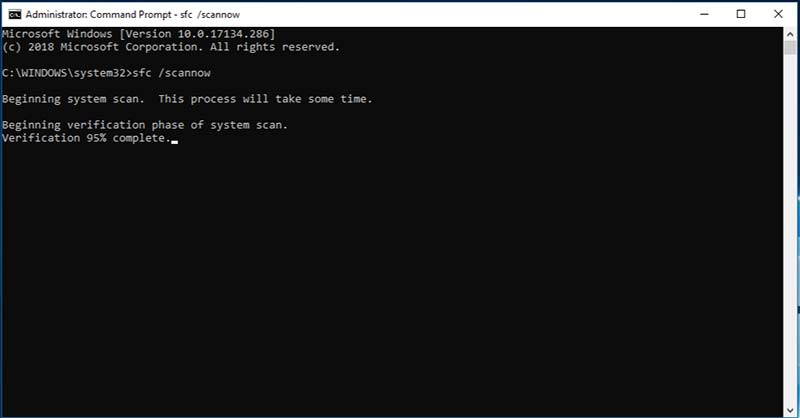
- Type sfc/scannow and hit the Enter key to start the system scan.
- Reboot your PC, after completion of scan and check whether the 0x00000109 BSOD error is solved.
If the SFC scan cannot repair the corrupted system files, try using the DISM tool to scan, check and restore the health of your operating system.
- Open Command Prompt as an Administrator.
- Then type the following commands and press Enter key after each command.
- Dism /Online /Cleanup-Image /CheckHealth
- Dism /Online /Cleanup-Image /ScanHealth
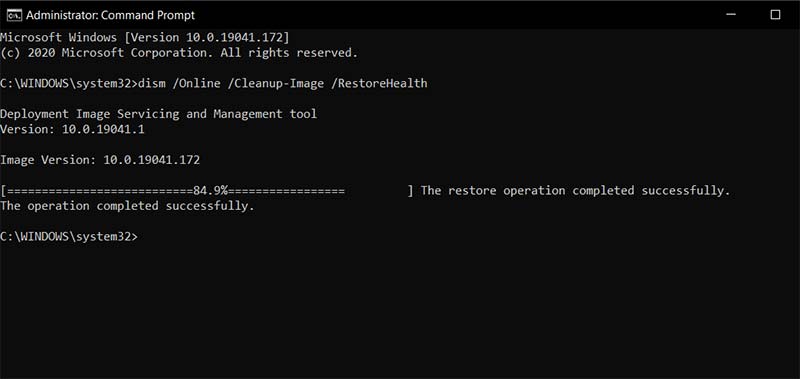
- Dism /Online /Cleanup-Image /RestoreHealth
- Once all is done, reboot your system to check whether the BSOD 0x00000109 error is solved.
7. Use System Restore Point
Once you have booted into safe mode, you can try to perform a system restore to fix the BSOD error 0x00000109. Follow these to return your system to a previous restore point where a blue screen error does not exist.
- Click Windows and type create a restore point in the search bar.
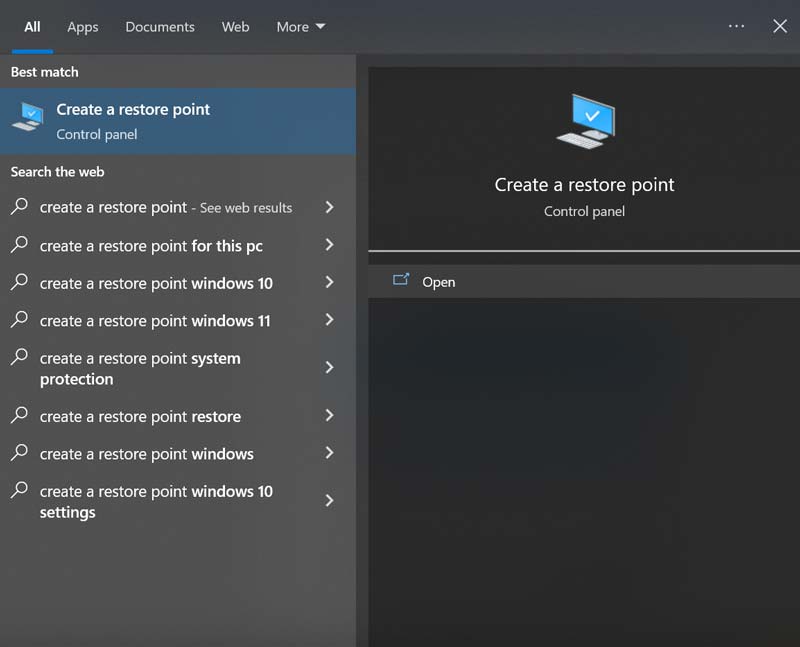
- Click Open to launch the System Restore.
- Select the most recent System Restore Point from the list and click Next.

- In the next pop-up, confirm that you have selected the correct restore point and click Finish.
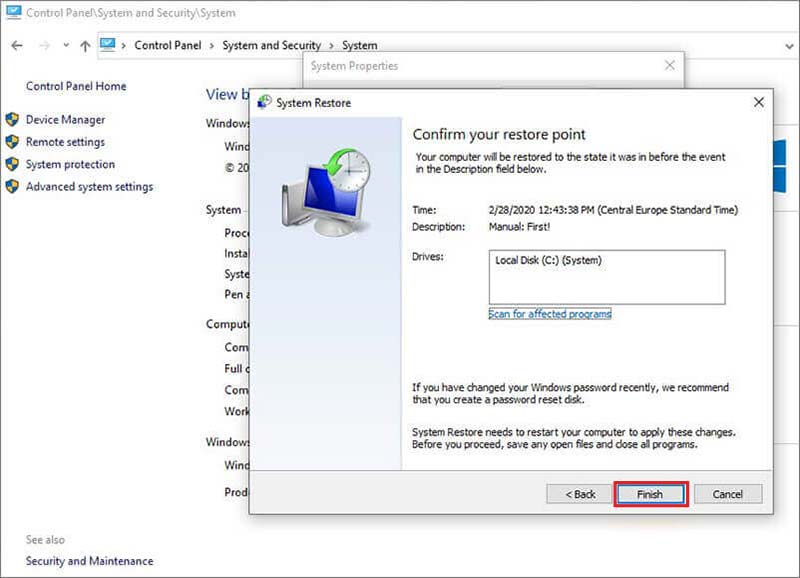
- Your PC will restart so that Windows can apply the changes.
How to Recover Lost Files Using Stellar Data Recovery Software?
Blue Screen of Death 0x00000109 error could also trigger another thorny issue – data loss. To deal with the data loss scenario, you can use efficient data recovery software – Stellar Data Recovery Professional for Windows.
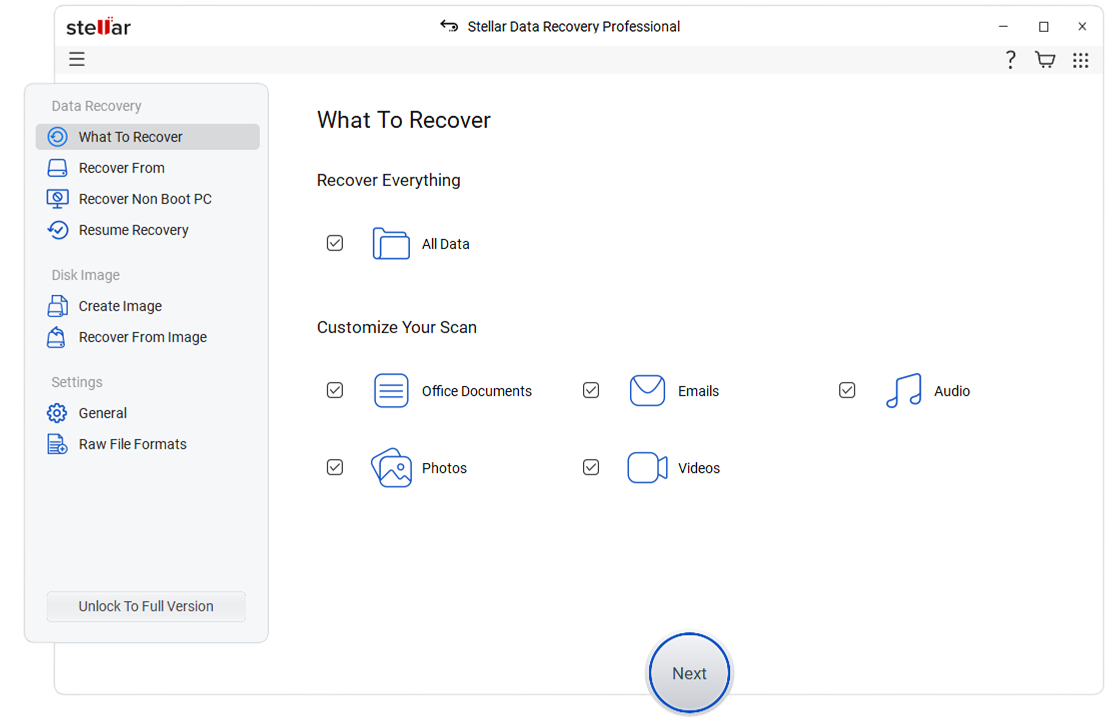
- Download and launch Stellar Data Recovery Professional for Windows on your system.
- On the ‘Select What to Recover’ screen, choose the File type you wish to recover.
- On the ‘Recover From’ screen, select the location from where you wish to recover data.
- Then toggle on the Deep Scan feature at the bottom and click Scan.
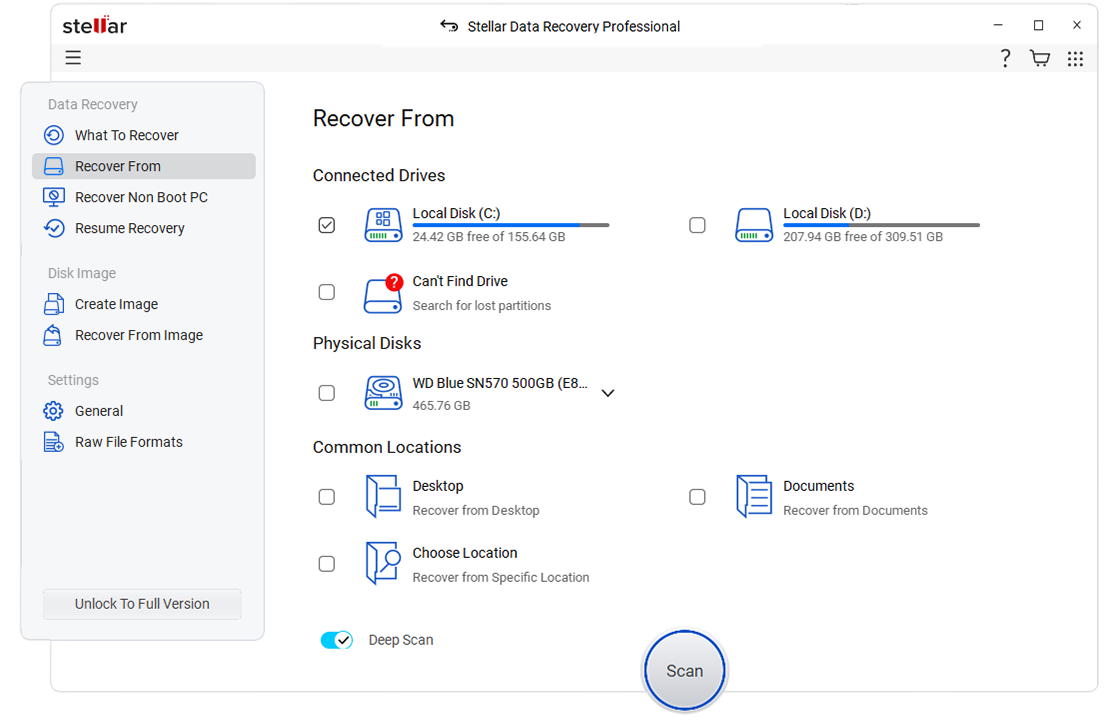
- The scanning will begin, and you will see the result once the Scan is over.
- Select the files you need to recover from the scan result and click Recover to save the recovered data.
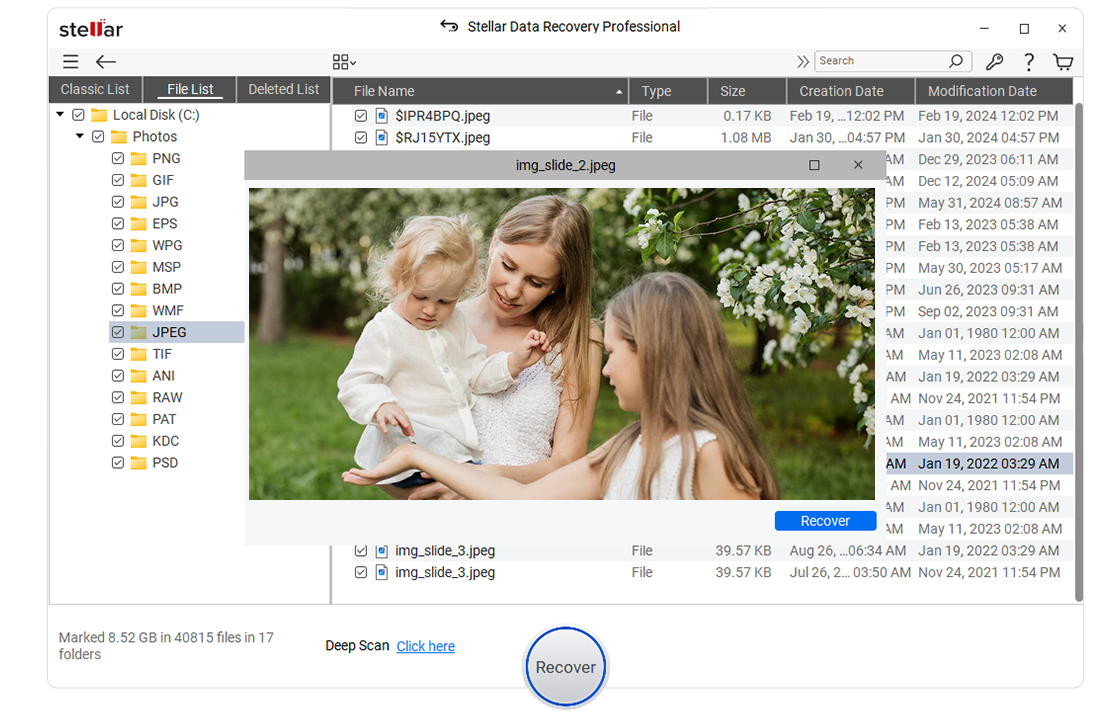
- Browse the location to save the restored data and click Save.
Conclusion
BSOD 0x00000109 error can occur due to driver issues, virus infection, system file corruption, and corrupted RAM. However, to fix this issue, you must ensure that all available Windows updates are installed and device drivers have been updated to the latest version. You can even turn on your computer in Safe Mode and even use Memory Diagnostic tool to fix the blue screen error.
Furthermore, there is a possibility of data loss during a Blue Screen of Death error; in that case, use Stellar Data Recovery Software to retrieve your valuable data.
FAQ
Can formatting fix the blue screen error?
Formatting can fix BSOD 0x00000109 error if it is caused by something installed on your computer, such as drivers, apps, etc. If this error is due to faulty hardware, then formatting cannot fix the issue.
Can the Blue Screen of Death errors be fixed?
Yes, BSOD errors can be fixed. Read this article to know more about BSOD errors.
Can dust cause a blue screen error?
If your system is overheating to dust, defective fans, or overburdened hardware, it may display a BSOD error.
Was this article helpful?
YES1
NO
Table of contents
- What is the BSOD error 0x00000109? What causes it, and how can it be fixed?
- What Is Causing the Error 0x00000109?
- How to Fix the Error 0x00000109 in Windows 10
- Fix 1: Boot into Safe Mode
- Fix 2: Run the Windows Memory Diagnostic Tool
- Fix 3: Update Device Drivers
- Fix 4: Scan Your PC for Viruses
- Fix 5: Perform a System Restore
- Fix 6: Run SFC and DISM Scans
- Fix 7: Run CHKDSK
- Fix 8: Perform a Clean Install
Are you being frustrated by the Blue Screen of Death (BSOD) Error 0x00000109? It is also referred to as Critical Structure Corruption. Your system is forced to shut down, and the startup sequence fails to complete, leaving you unable to use your PC.
What is the BSOD error 0x00000109? What causes it, and how can it be fixed?
Keep reading to find out.
The error message goes like this:
“A problem has been detected and Windows has been shut down to prevent damage to your computer.
Modification of system code or a critical data structure was detected.
If this is the first time you’ve seen this Stop error screen, restart your computer. If this screen appears again, follow these steps:
Check to make sure any new hardware or software is properly installed.
If this is a new installation, ask your hardware or software manufacturer for any Windows updates you might need.
If problems continue, disable or remove any newly installed hardware or software;
Disable BIOS memory options such as caching or shadowing.
If you need to use Safe Mode to remove or disable components, restart your computer, press F8 to select Advanced Startup Options, and then select Safe Mode.
Technical Information:
*** STOP: 0x00000109 (0x00000001, 0x00000001, 0x00000000, 0x00000000)
Collecting data for crash dump …
Initializing disk for crash dump …
Beginning dump for physical memory.
Dumping physical memory to disk: 100
Physical memory dump complete.
Contact your system admin or technical support group for further assistance.”
As you can see, the error message is quite self-explanatory and suggests a couple of fixes you should try.
What Is Causing the Error 0x00000109?
The error is usually triggered when a device driver or third-party software modifies kernel data without authorization, leading to data damage or a critical kernel code.
The kernel is an important part of a computer’s operating system. During the booting process, it is the first program that loads into the protected memory area. In addition to acting as the bridge between the system resources and the PC user, it also serves the function of memory management, resource management, and device management. So you can see how a problem with the kernel leads to a Blue Screen of Death.
However, other factors can also trigger the error, including corrupt hardware memory, the incorrect usage of a kernel debugger tool, and a virus infection.
As the error 0x00000109 occurs, the operating system turns off several critical tasks so that the computer cannot be used. If the error is not resolved promptly, it can cause serious damage.
Since there are various factors that can cause the error, it is necessary to find out the particular cause and get it resolved. They include the following:
- Driver Issues: You may have recently installed a driver that has affected the boot configuration data of your PC. Also, sometimes system drivers are installed incorrectly after a Windows update. In this case, what you have to do is to boot into safe mode and use the System Restore utility to revert your PC to a previous state when the issue did not exist.
- Virus Infection: One of the most common causes of this error is when a virus tries to modify system kernel data. In such a case, a clean boot will be required, after which you should scan the system for viruses.
- System File Corruption: Sudden power outages and improper shutdown or startup procedures, disk read/write errors, and virus attacks can lead to the corruption of system files. It is one of the common causes of the error in discussion. To resolve the issue, there are built-in utilities, such as SFC and DISM, that you can run. Another option is to do a clean install so as to reset every component of the operating system.
- System Memory Malfunction: The blue screen error can result when a RAM memory module is not functioning correctly. The system then forcefully disables all important tasks that are associated with RAM. A module can get faulty as time passes or when there’s power outage. You need to check the system memory and make sure that it still works correctly.
Now that we have seen the various causes, it is time to go ahead and discuss how to remove the 0x00000109 BSOD. So please, keep reading.
How to Fix the Error 0x00000109 in Windows 10
- Boot into Safe Mode
- Run the Windows Memory Diagnostic tool
- Update device drivers
- Scan your PC for viruses
- Perform a system restore
- Run SFC and DISM scans
- Run CHKDSK
- Perform a clean install
Let’s get started:
Fix 1: Boot into Safe Mode
Starting your computer in safe mode is the first thing you have to do to resolve the BSOD error. In safe mode, only the essential system programs and services are allowed to start up at boot. If you succeed in booting into safe mode, it shows that a third-party application or device driver was the cause of the error 0x00000109 by interfering with the operating system’s BCD (Boot Configuration Data).
Follow these easy steps to boot into safe mode:
- If your computer is currently on, press the power button until the system turns off.
- Now press the power button again to turn on the computer.
- Once the initial startup screen comes up, press the F8 button repeatedly until the Advanced Boot Options menu is displayed.
- Use the down arrow key to select Enable Safe Mode and then press Enter (Or you can simply press F4 to immediately run the option so you won’t have to use the down arrow key to scroll).
- Wait for the boot sequence to complete.
If the stop error does not appear after you’ve completed the above steps, you can then apply Fixes 2, 3, 4, and 5. However, if you are unable to boot into safe mode because the stop error persists, then move on to Fixes 6, 7, and 8.
Fix 2: Run the Windows Memory Diagnostic Tool
You need to check if you have a faulty memory stick. The Windows Memory Diagnostic tool is a built-in utility that you can use to find out whether your computer has a memory problem.
- Press the Windows logo key + R to invoke the Run dialogue.
- Type Control Panel and press Enter.
- Click System and Security > Administrative Tools.
- Locate Windows Memory Diagnostic in the list and double-click on it.
Tip: You can launch the tool quickly by typing ‘mdsched.exe’ in the Run dialogue and then pressing Enter.
- Click the option that says, “Restart now and check for problems (recommended).”
- Once the scan completes, your computer will restart automatically.
You now have to check the test results in the Event Viewer to determine whether you have a bad RAM module:
- Press the Windows logo key to open Start.
- Type ‘eventvwr.exe’ in the search bar and click on it from the results to open Event Viewer.
- Open the Windows Logs folder and then right-click on System.
- Click Find from the context menu.
- Now type ‘MemoryDiagnostics-Results’ in the ‘Find what’ bar.
- Click the Find Next button and then close the Find dialog.
- Double-click ‘MemoryDiagnostic-Results’ listed in the Event Viewer window. If the message reads, “The Windows Memory Diagnostic tested the computer’s memory and detected no errors,” then it means that you do not have a faulty memory module. However, if there are some errors, then it means that one of your RAM modules may need to be replaced.
Fix 3: Update Device Drivers
If the stop error is caused by a problematic device driver, then performing an update can help resolve it. You can follow these steps to do it manually:
- Press the Windows logo key + R.
- Type ‘devmgmt.msc’ into the search field and then click OK or press Enter.
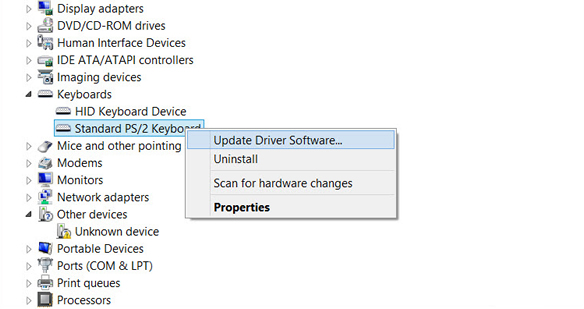
- Look for devices that have a yellow rectangle with an exclamation mark in the middle. That shows that there is an issue with them.
- Right-click on the device you want to update and then click Update Driver Software.
Pro tip: You can fix all faulty, outdated, and missing drivers easily with Auslogics Driver Updater. The tool runs a scan to detect driver issues, after which it downloads and installs the latest manufacturer-recommended versions of the required drivers.
Fix 4: Scan Your PC for Viruses
The 0x00000109 error might have been caused by a virus infection that tried to modify kernel data. You need to run a virus scan and get rid of all infected files.
Pro Tip: We recommend you use Auslogics Anti-Malware. It is made available by a certified Microsoft ® Silver Application Developer.
Fix 5: Perform a System Restore
Once you can boot into Safe Mode, performing a system restore is an easy way to resolve the Stop Error 0x00000109. It will return the system to a previous state in which the issue does not exist.
Here’s how to run the System Restore utility:
- Invoke the Run dialog box by pressing the Windows logo key + R shortcut on your keyboard.
- Type ‘rstrui’ and press Enter or click OK.
- Once you are on the System Restore Wizard, click Next.
- Now, mark the box for ‘Show more restore points.’
- Select an appropriate restore point (one that lies before you started experiencing the error).
- Click Next > Finish.
- Once the process is complete, your computer will restart automatically.
Note: Keep in mind that any apps, drivers, settings, etc. that were not implemented on your PC on the date of your chosen restore point will no longer be present after the system restore is complete.
Fix 6: Run SFC and DISM Scans
If you try to boot into safe mode but still run into the stop error, it is an indication of system file corruption. You will have to open an elevated command prompt via the Advanced Options menu and run the SFC (System File Checker) and DISM (Deployment Image Servicing and Management) utilities.
Follow these easy steps:
- Insert your Windows installation media.
- Restart your computer and press any key when the prompt appears.
Tip: In case you don’t have the installation media, you can still bring up the Advanced Startup Options Menu by turning on your computer and then holding the power button to disrupt the booting sequence. You will have to do this about three consecutive times. Afterwards, move on to Step 4.
- After you’ve booted from the installation media, click ‘Repair your computer’ displayed in the bottom-left corner of the screen.
- Select Troubleshooting > Advanced Options > Command Prompt.
- In the elevated command prompt window, type ‘sfc /scannow’ and press Enter.
- Wait for the process to complete. Do not interrupt the process. Doing so can cause some additional logical errors. Plug your PC to charge so as to make sure that the scan is not interrupted due to low battery.
Tip: System File Checker (SFC) replaces corrupted files with healthy equivalents from a locally stored folder.
- Restart your computer after the scan is complete and follow Steps 1 through 4 to return to the elevated command prompt window.
- To scan for and fix corrupt files using DISM, type in the following commands and press Enter after each one:
- Dism /Online /Cleanup-Image /CheckHealth
- Dism /Online /Cleanup-Image /ScanHealth
- Dism /Online /Cleanup-Image /RestoreHealth
Note: DISM downloads healthy copies of the corrupted files using a Windows update subcomponent. Therefore, connect to a stable network before initiating the process.
- Once the scan is complete, restart your computer and see if the stop error 0x00000109 has been resolved.
Fix 7: Run CHKDSK
The CHKDSK (Check disk) utility will let you know if the stop error is caused by a corrupt HDD. Follow the steps below to run it:
- Insert your Windows installation media (disk, USB stick).
- Restart your computer and press any key when you see the prompt.
- Wait for the Windows Setup screen and then press Shift + F10 to open the command prompt window.
- Type chkdsk C: /f and press Enter.
Note: If Windows is not installed on the C drive, replace C: with the letter of the drive where Windows is installed.
- Wait for the scan to complete.
Fix 8: Perform a Clean Install
If the fixes above have not been sufficient in fixing the error 0x00000109, then the option you have left is to refresh all Windows components and boot-related data by way of a clean install. There are two different ways to achieve this, namely repair install and reinstall Windows.
If there is personal data you don’t want to lose, including applications, games, photos, videos, and even some user preferences, Repair Install should be your port of call. Although the process can be quite tedious, it will save your personal data without you having to perform any prior backup.
The second option you have is to reinstall Windows. This is easier to perform. However, keep in mind that all your data will be wiped in the process.
We hope this guide has helped you to successfully resolve the Critical Structure Corruption error 0x00000109.
If you have any comments, questions, or suggestions, kindly share them in the comments section below. We’ll like to hear from you.
Get the fix to “0x00000109: selected entry could not be loaded” error for Windows Vista, 7, 8, or 8.1 operating systems.
About the “0x00000109” error
The following information on this error has been compiled by NeoSmart Technologies, based on the information gathered and reported by our global network of engineers, developers, and technicians or partner organizations.
Description and Symptoms
The error messages, alerts, warnings, and symptoms below are tied to this error.
Symptom 1: 0x00000109 error screen
This error is usually triggered by an unauthorized kernel data modification by a device driver. While this is the most common cause for the error, other causes can trigger this error too:
- A virus tried to modified kernel data
- Incorrect use of a kernel debugger tool
- Hardware memory may be corrupted

A problem has been detected and Windows has been shut down to prevent damage
to your computer.

Modification of system code or a critical data structure was detected.

If this is the first time you've seen this Stop error screen,
restart your computer. If this screen appears again, follow
these steps:

Check to make sure any new hardware or software is properly installed.
If this is a new installation, ask your hardware or software manufacturer
for any Windows updates you might need.

If problems continue, disable or remove any newly installed hardware
or software. Disable BIOS memory options such as caching or shadowing.
If you need to use Safe Mode to remove or disable components, restart
your computer, press F8 to select Advanced Startup Options, and then
select Safe Mode.

Technical Information:

*** STOP: 0x00000109 (0x00000001, 0x00000001, 0x00000000, 0x00000000)

Collecting data for crash dump ...
Initializing disk for crash dump ...
Beginning dump for physical memory.
Dumping physical memory to disk: 100
Physical memory dump complete.
Contact your system admin or technical support group for further assistance.
Causes of this Error
This error has been known to occur as a result of one or more of the following:
Cause 1: Virus infection
The most common cause of this error is a virus that modifies system kernel data. If that’s the case, then it is advised to make a clean boot and scan the system for viruses.
Cause 2: System memory is malfunctioning
Another common cause is a RAM memory module that works incorrectly. A module may become faulty after a power outage or simply as the time passes, so it is recommended to check the system memory periodically to make sure that it works correctly.
Cause 3: System drivers are outdated
Sometimes after a system reinstall or a Windows Update, the system drivers are installed incorrectly and the system is unable to boot as a result.
Cause 4: File system integrity compromised
The last cause for this error is a corrupt file system. This may happen because of disk read/write errors, power outages or virus attacks.
Fixing “0x00000109” on Windows
Windows Setup CD/DVD Required!
Some of the solutions below require the use of the Microsoft Windows setup CD or DVD. If your PC did not come with a Windows installation disc or if you no longer have your Windows setup media, you can use Easy Recovery Essentials for Windows instead. EasyRE will automatically find and fix many problems, and can also be used to solve this problem with the directions below.
Fix #1: Scan for viruses
If the 0x00000109 error is caused by a virus that might modify kernel data, run a virus scan and delete all infected files found.
If system files are infected and you delete these infected files, your Windows may not run properly afterwards.
Open an antivirus software and perform a scan. If you don’t have an antivirus, use Easy Recovery Essentials’ built-in Antivirus Scanner that runs outside Windows (it’s bootable from a CD/DVD or USB drive) and can deep scan your computer for viruses:
The Professional Edition of Easy Recovery Essentials for Windows features a powerful antivirus and rootkit scanner that can normally resolve this and similar errors caused by viruses, rootkits, trojans, or spyware. EasyRE is currently available for Windows XP, Vista, 7 and 8 and can be downloaded and created on any PC.
- Download Easy Recovery Essentials. Make sure to note your Windows version (XP, Vista, 7 or
 before you download EasyRE. This guide can help you identify what version of Windows you have installed. For the purposes of this guide, you will need to obtain the Professional Edition of EasyRE.
 - Burn the image. Follow these instructions on how to burn the bootable ISO image very carefully, as making a bootable CD can be tricky! Alternatively, these instructions explain how to create a bootable EasyRE recovery USB stick/drive.
- Boot up your PC from the Easy Recovery Essentials CD or USB you created.
- Once EasyRE is running, choose the “Virus Scanner” option and click Continue.

Choose “Virus Scanner” in Easy Recovery Essentials
- After EasyRE scans your computer’s drives, identify and select the drive letter for your Windows installation from the list, and then click on the Scan button to begin.
Choose the drive associated with the Windows installation you’re trying to repair.
- EasyRE will begin scanning the drive for viruses, rootkits, trojans, spyware, and other unwanted malware on your machine. No intervention is required, and EasyRE will repair viruses as it finds them, reporting its progress as it goes along:
Easy Recovery Essentials searches for viruses and cleans infections on the selected Windows installation.
- Once the process is complete, EasyRE will report its findings. Click on the Restart button to reboot your PC and test the changes.
 before you download EasyRE. This guide can help you identify what version of Windows you have installed. For the purposes of this guide, you will need to obtain the Professional Edition of EasyRE.


You can download Easy Recovery Essentials from here.
Fix #2: Run Windows Memory Diagnostic
The Windows Memory Diagnostic tool can check your memory for corrupt data.
To run this tool, follow these steps:
- Start Windows
- Click Start
- Type
windows memory diagnosticin the search box - Click Windows Memory Diagnostic from the search results list
- Follow the tool’s wizard steps to complete the process. After the process is done, you can determine if your memory is corrupt.
Windows Memory Diagnostic screen
If you’re not able to boot into Windows and run Windows Memory Diagnostic, you can also run Easy Recovery Essentials’ Automated Repair process that has a built-in testing process for RAM Memory and HDD drives:
- Download Easy Recovery Essentials. Make sure to note your Windows version (XP, Vista, 7, 8, 10, or Windows 11) before you download EasyRE. This guide can help you identify what version of Windows you have installed.
- Burn the image. Follow these instructions on how to burn the bootable ISO image very carefully, as making a bootable CD can be tricky! Alternatively, these instructions explain how to create a bootable EasyRE recovery USB stick/drive.
- Boot up your PC from the Easy Recovery Essentials CD or USB you created.
- Choose “Automated Repair” option and click Continue.
Choose “Automated Repair” in Easy Recovery Essentials
- After EasyRE scans your computer’s drives, identify and select the drive letter for your Windows installation from the list, and then click on the Automated Repair button to begin.
Choose the drive associated with the Windows installation you’re trying to repair.
- Easy Recovery Essentials will start analyzing the selected drive for problems. EasyRE will test for and attempt to automatically correct errors with the disk, partition, bootsector, filesystem, bootloader, and registry.
No intervention is required, as EasyRE’s repair is fully automated:
Easy Recovery Essentials searches for errors and makes corrections to the selected Windows installation.
- Once the process is complete, EasyRE will report its findings. Click on the Restart button to reboot your PC and test the changes.
- Your PC begins to boot again:
Windows, booting up successfully.


Download Easy Recovery Essentials by clicking this link.
Fix #3: Install updates
It’s important that your Windows version – either Vista, 7 or 8 – has the latest updates installed. A missed update might fix the 0x00000109 error.
- Open Windows Updates by typing
updatein the search box - Click Update and Recovery
- Click “Choose how updates get installed:
- Select “Install updates automatically” at the Important updates section
- Check Give me recommended updates the same way I receive important updates check box under Recommended updates
- Click OK

Windows updates screen
Fix #4: Update device drivers
If the error is caused by a corrupt or problematic device driver, updating your drivers manually might fix the error.
To do so, and update your drivers manually, open Device Manager by following these steps:
- Click Start
- Type
devmgmt.mscin the search box - Click on devmgmt or Device Manager from the search results list

Device Manager in Windows Vista
- Right-click on each third-party device driver you’d like to update. Make sure your device manufacturer has the latest version available for your Windows version.
- Click Update

Device Manager: Update Driver Software
If you’d like to update the drivers automatically, follow these steps instead:
- Click Start
- Type
devices and printersin the search box - Right-click on your computer’s name from the list
- Click Device Installation Settings
- Select Yes, do this automatically
- Click Save Changes

Device installation settings screen
Fix #5: Run chkdsk
Running the chkdsk utility tool can output any issues found with your HDD driver. If the 0x00000109 error is caused by a corrupt HDD, chkdsk should let you know.
Here are the steps to run CHKDSK:
- Boot from your Windows install disc
- Click on Repair your computer after selecting proper language, time and keyboard input.
- Select the Windows installation drive, which is usually
C:\, and click Next - Choose Command Prompt when the System Recovery Options box appears
- Write the following command and press Enter afterwards:
chkdsk C: /f
Replace C: with the letter of the driver where Windows is installed.
Here is an example of what the PC’s console output should look like once the chkdsk.exe is complete:

Chkdsk utility results screen
More Information
Linked Entries
- chkdsk
Support Links
- Easy Recovery Essentials for Windows – our repair and recovery disk.
It’s an easy-to-use and automated diagnostics disk. It’s available for Windows 8, Windows 7 and Windows Vista. It’s also available for Windows XP and Windows Server.
Read more at Windows Recovery Disks.
- The NeoSmart Support Forums, member-to-member technical support and troubleshooting.
- Get a discounted price on replacement setup and installation discs: Windows Vista, Windows 7, Windows 8, Windows 10.
Applicable Systems
This Windows-related knowledgebase article applies to the following operating systems:
- Windows Vista (all editions)
- Windows 7 (all editions)
- Windows 8 (all editions)
- Windows 8.1 (all editions)
- Windows 10 (all editions)
Propose an edit