
I recently ran into a really annoying problem on my Windows 7 64-bit PC: every time I restarted it and booted into Windows, the Windows Explorer Libraries window would pop up. It never occurred before and I could not pinpoint any particular software or update that I had installed that would cause it to start happening.
Anyway, after playing around and doing some research, I was able to fix the problem. In this article, I’ll show you a couple of methods to hopefully resolve the problem.

Method 1 – Check Startup Folder
If the Explorer Libraries folder is popping up on every boot up, then the first place you want to check is the startup folder. Go to Start, All Programs and click on Startup. If there is a shortcut to the Libraries folder, go ahead and delete it.

Method 2 – Userinit Registry Key
The second way is to check the registry for a specific key and change it to a different value. First, open the registry editor by clicking on Start and typing regedit. Then navigate to the following key:
HKEY_LOCAL_MACHINE\SOFTWARE\Microsoft\Windows NT\CurrentVersion\Winlogon\
Find the Userinit key and replace the value with the following:
C:\Windows\system32\userinit.exe,
Now go ahead and restart your computer and see what happens. Hopefully, you should not have the Windows Explorer window opened to the Libraries folder pop up.
Method 3 – Shell Registry Key
In the same place that you have Userinit above, there is another key called Shell. Make sure that is set to only explorer.exe and nothing else.

Method 4 – Restore Previous Folders
Windows Explorer has this option called Restore previous folders, which will do exactly that when you logon. You can disable it by opening Explorer, clicking on Organize and then Folder and Search Options.
Make sure that Restore previous folder windows at logon is not checked.
Method 5 – Delete Registry Key
For some users, if you have Internet Explorer v5 installed (for some crazy reason), then you have to delete a key in the registry. Navigate to:
HKEY_CURRENT_USER\Software\Microsoft\Windows\CurrentVersion\Explorer
Go ahead and delete the DesktopProcess value from the registry key.
Method 6 – Third-Party Software
Some Acer computers have an annoying piece of software called SmartStart that will take anything you open after loading Windows and have it start automatically the next time you login. You can either uninstall the program or open it and set or remove the programs you want to have at startup. In addition to this program, other people have reported issues with software like Choice Guard, etc. Try uninstalling any new programs you may have installed recently and see if that fixes the issue.
If you’re still having this problem, post a comment here with the details and we’ll try to help. Enjoy!
Related Posts
- How to Use Event Viewer to Troubleshoot Windows Problems
- What Is ehprivjob.exe and Do You Need It?
- How to Boot into Safe Mode in All Versions of Windows
- How To Get Ready For Windows 7 End Of Life
- How To Change The Windows 7 Login Screen Background Image
Симптомами проблемы являются:
1. Отсутствие на рабочем столе ярлыков и меню «Пуск».
Возможные причины проблемы:
1. Повреждение файла explorer.exe вирусом.
2. Изменение ключей реестра вирусом.
Последовательность устранения:
Способ 1.
1. Запускаем редактор реестра: Ctrl-alt-del -> в диспетчере задач -> Новая задача -> regedit
2. Проверяем ветки:
HKEY_LOCAL_MACHINE\software\microsoft\windows nt\current version\winlogon -> shell [string] explorer.exe
Значение ключа shell должно быть explorer.exe при необходимости исправить!
HKEY_LOCAL_MACHINE\software\microsoft\windows nt\current version\image file execution options\explorer.exe
HKEY_LOCAL_MACHINE\software\microsoft\windows nt\current version\image file execution options\iexplorer.exe
необходимо удалить explorer.exe и (или) iexplorer.exe
HKEY_CURRENT_USER\Software\Microsoft\Windows\CurrentVersion\Explorer\StuckRects2
необходимо удалить StuckRects2
HKEY_CURRENT_USER\Software\Microsoft\Windows\CurrentVersion\Explorer\Streams
необходимо удалить Streams
HKEY_CURRENT_USER\Software\Microsoft\Windows\CurrentVersion\Explorer\StreamsMRU
необходимо удалить StreamsMRU
HKEY_LOCAL_MACHINE\SOFTWARE\Microsoft\Windows NT\CurrentVersion\Winlogon -> Userinit [string] C:\Windows\system32\userinit.exe, (записи после запятой удаляем)
[наличие изменений в реестре указывает на заражение компьютера вирусом]
3. Необходимо проверить наличие системного файла EXPLORER.EXE [который должен находится в системной папке: C:\Windows]
Если он рабочий в диспетчере задач должен быть процесс explorer.exe
(Ctrl-alt-del -> в диспетчере задач -> Новая задача -> EXPLORER.EXE)
В случае повреждения файла система выдает сообщение об ошибке, если файл удален — сообщение отсутствует)
4. Заменяем поврежденный или отсутствующий файл из дистрибутива Windows, использовавшегося при установи системы.
Файл находится в папке: I386 -> EXPLORER.EX_ (который переименовываем в EXPLORER.EXE)
Обратите особое внимание! Замену (установку) файла EXPLORER.EXE необходимо выполнять в безопасном режиме (для чегоперед загрузкой операционной системы жмем клавишу F8 для выбора соответствующего режима).
5. После перезагрузки как правило все работает!
Способ 2.
1. Восстановление работоспособности файла EXPLORER.EXE при помощи утилиты AVZ
Запускаем компьютер в безопасном режиме входим в меню утилиты: Файл -> Восстановление системы, выбираем следующие пункты меню: 5; 8; 16 и нажимаем кнопку «Выполнить отмеченные операции«.
2. Перезагружаем компьютер.
Способ 3.
1. Запускаем восстановление системных файлов: Ctrl-alt-del -> в диспетчере задач -> Новая задача -> sfc /scannow
(используя дистрибутив Windows, с которого устанавливалась система)
2. Перезагружаем компьютер.
If you are a long-time reader of this blog, you might be knowing that we love Windows customization. We have shared so many customization stuff in past for Windows and other software.
We also post articles about UI modifications such as customizing dialog boxes, text strings, menus, images, etc using Resource Hacker program.
Customizing Windows UI (user interface) involves editing system files such as EXE, DLL, CPL, etc. You first edit the required file using Resource Hacker and then you replace existing default system file with your modified file. To replace the default system file, you need to take its ownership before replacing it. Sometimes you also need 3rd party software Replacer to replace the files easily and safely.
But replacing system files is very dangerous task. If you made a mistake while modifying the system file and you replaced default system file with it, chances are your system will no longer boot and you’ll have no other option left except reinstalling Windows.
Many times we need to edit “Explorer.exe” file which is present in “Windows” directory of the system drive where Windows is installed in your system. We might edit it to customize Start button text in Windows XP or to customize Start ORB look in Windows 7.
Today in this tutorial, we are going to tell an easy and absolutely safe way to apply and use your customized Explorer.exe file in Windows without replacing default Explorer.exe file present in Windows directory.
This method requires you to set a custom shell or user interface for Windows. You just need to edit a key in Windows Registry which tells Windows to use your mentioned shell program instead of default Explorer.exe file when you log into Windows.
You might have seen many companies and cyber cafe having different shell when you log into your user account. They also use the same technique which we are going to share in this tutorial.
So using this tutorial, you can not only use your customized Explorer.exe file without replacing default file but also you can set any other program such as Internet Explorer, Mozilla Firefox, Notepad, Microsoft Word or any 3rd party shell program as default shell or user interface in Windows.
One more use of this tutorial can be found in Windows 8. As we know Microsoft has added new Start Screen in Windows 8 which replaced good old Start Menu in Windows 8. Many Windows 8 users are trying to find ways to skip this new Start Screen and directly boot into Windows Desktop. There are ways such as scheduling launch of Show Desktop shortcut on startup using Task Scheduler but all those methods are waste of time because they need some extra time to launch the shortcuts. You can better click on Desktop tile in much less time.
So you can use this method to set different shell in Windows 8 to skip Start Screen and directly boot into that program.
Phew!!! We have shared lots of details and benefits of this tutorial in above paragraphs. Now we should share the tutorial without wasting time:
PS: This tutorial will work for all Windows versions including Windows XP, Vista, Windows 7 and Windows 8.
STEP 1. If you want to modify Explorer.exe file, first modify it and save it at some different place such as E:\MyExplorer.exe.
If you want to set a different program as Windows shell instead of default Explorer.exe, check 2nd step.
STEP 2. Now open Registry Editor. Type regedit in RUN or Start Menu search box and press Enter.
STEP 3. Now you’ll need to tell Windows which EXE file should it use as default Windows shell or user interface. There are 2 ways to do it:
- You can set your customized shell for currently logged in user only (Step 4)
- Or set the customized shell for whole system including all user accounts (Step 5)
STEP 4.a. If you want to set the customized shell to currently logged in user only which is also recommended, go to following key:
HKEY_CURRENT_USER\Software\Microsoft\Windows\CurrentVersion\Policies
4.b. Under “Policies” key look for another key named “System“. If its not present, create it manually.
4.c. Now select “System” key and in right-side pane, create a new String value Shell and set its value to the full path of your desired program. For example, if you modified Explorer.exe file and saved it somewhere else such as E:\MyExplorer.exe, then set value to E:\MyExplorer.exe. If you want to set a 3rd party program as default shell, set the value to the full path of that program’s EXE file.

4.d. That’s it. Once you finish the steps, restart your system and you’ll see your desired program once you log into Windows.
STEP 5.a. If you want to set customized shell for whole system including all user accounts, go to following key:
HKEY_LOCAL_MACHINE\SOFTWARE\Microsoft\Windows NT\CurrentVersion\Winlogon
5.b. In right-side pane, look for String value Shell. Its value would be set to explorer.exe. Double-click on it and change its value to your customized Explorer.exe path or to desired 3rd party shell program’s full path as mentioned in step 4.c.

5.c. Restart your system and get ready to boot into your desired shell program.
NOTE: If you face problems after changing the shell or you want to restore default user interface, don’t worry. Press Ctrl+Shft+Esc keys together to launch Task Manager. Click on File -> New Task option and type regedit and press Enter. It’ll open Registry Editor. Now you can safely remove Shell string value created in step 4.b to restore default Explorer.exe file as Windows shell. Or if you modified value of Shell string using step 5.b, restore its value to explorer.exe and restart your system.
PS: To better understand this tutorial, check out following video in which we applied Internet Explorer as default shell in Windows 8 and then restored default Explorer.exe as shell in the end:
Feel free to follow this tutorial and share your feedback about it in your comment…
You are here: Home » Windows 7 » How to Apply and Safely Use Custom User Interface (Shell or Explorer) in Windows?
Для удобства пользования используется следующая система, позволяющая наглядно представить все возможности реестра.
Используемые сокращения
HKLM = HKEY_LOCAL_MACHINE
HKCU = HKEY_CURRENT_USER
HKCR = HKEY_CLASSES_ROOT
- Оболочка Windows
- Системные и специальные папки
- Контекстное меню Проводника
- Новый ярлык
- Панель инструментов
- Меню Проводника
- Установка классического вида в Проводнике
- Связанные документы
- Проводник как два отдельных процесса
- Изменение цвета файла при подведении мыши
- Перезагрузка Windows
- Диски
Оболочка Windows
Надоел Проводник в качестве оболочки Windows? Можно поставить любую программу, которая будет служить в качестве такой оболочки, например, progman.exe, входящий в стандартную поставку Windows. Для этого поменяйте значение параметра Shell на progman.exe в разделе
HKCU\Software\Microsoft\Windows\CurrentVersion\Policies\System
Когда захочется вернуть все назад, поменяйте указанное значение на explorer.exe
Системные и специальные папки
В Windows можно поменять место расположения системных и специальных папок (Принтеры, Рабочий стол, Избранное, SendTo и т.п.). Но просто так перенести их в другое место не удастся — при следующей загрузке они опять восстановятся на старом месте. Это связано с тем, что пути к этим папкам прописаны в реестре. Чтобы настроить расположение этих папок на вашем жестком диске, зайдите в раздел
HKCU\Software\ Microsoft\Windows\CurrentVersion\Explorer\Shell Folders
или
HKCU\Software\ Microsoft\Windows\CurrentVersion\Explorer\User Shell Folders
и поменяйте путь для нужных вам папок. Затем их можно будет спокойно перенести по прописанному вами адресу После перезагрузки изменения вступят в силу
Контекстное меню Проводника
- Блокировка контекстного меню
Чтобы сделать недоступным контекстное меню Проводника при щелчке правой кнопкой мыши, найдите ветвь:
HKCU\Software\Microsoft\Windows\CurrentVersion\Policies\Explorer
— и создайте параметр типа DWORD NoViewContextMenu со значением 1
- Удаление команды Создать
Если вы хотите удалить команду Создать из контекстного меню Проводника, то удалите строковый параметр {D969A300-E7FF-11d0-A93B-00A0C90F2719} в разделе
HKCR\Directory\Background\shellex\ContextMenuHandlers\New
- Новые пункты «Копировать в папку» и «Переместить в папку»
Зачастую, возможностей стандартного контекстного меню файлов не хватает для различных задач пользователей. В Windows 2000/XP можно добавить еще пару пунктов, которые заложены в самой операционной системе, но по умолчанию не включены. В реестре Windows существует два раздела
{C2FBB630-2971-11d1-A18C-00C04FD75D13}
и {C2FBB631-2971-11d1-A18C-00C04FD75D13}которые отвечают за копирование и перемещение файлов в Windows. Эти две возможности, Копировать в папку и Переместить в папку, можно включить в контекстное меню файлов. Эти два пункта вызывают стандартное окно для копирования или перемещения файла, пользоваться которыми порой гораздо удобнее, чем открывать отдельное окно с нужным каталогом, а потом перетаскивать в него файлы.
Чтобы включить новые пункты в контекстное меню надо создать разделы и параметры в реестре:
для копирования: установить значение по умолчанию равным {C2FBB630-2971-11d1-A18C-00C04FD75D13} в разделеHKCR\*\shellex\ContextMenuHandlers\Copyto
для перемещения: установить значение по умолчанию равным {C2FBB631-2971-11d1-A18C-00C04FD75D13} в разделе
HKCR\*\shellex\ContextMenuHandlers\Moveto
В этом случае пункты меню появятся у всех файлов и папок. Чтобы добавить их только в файлы с конкретным расширением, надо добавлять записи в раздел shellex этих файлов. Так, для текстовых файлов это будет выглядеть таким образом:
для копирования
[HKCR\txtfile\shellex\ContextMenuHandlers\Copyto]
@=»{C2FBB630-2971-11d1-A18C-00C04FD75D13}»для перемещения
[HKCR\txtfile\shellex\ContextMenuHandlers\Moveto]
@=»{C2FBB631-2971-11d1-A18C-00C04FD75D13}»Изначально раздела shellex там нет. Надо создать его и все подразделы самостоятельно
Новый ярлык
В Проводнике или Мой компьютер через меню Файл-Создать-Ярлык вы можете получить доступ к дискам компьютера, даже если вы отключили контекстное меню Проводника. Чтобы не допустить появления мастера создания нового ярлыка, удалите или переименуйте раздел:
HKCR\.lnk\ShellNew
Возможность создания нового ярлыка сохранится, но доступ к дискам будет перекрыт
Панель инструментов
- Настройка панели инструментов
Если щелкнуть правой кнопкой мыши на панели инструментов, то появлятся всплывающее меню, содержащее пункт Настройка, который позволяет настраивать панель инструментов. Чтобы скрыть этот пункт, создайте параметр типа DWORD NoToolbarCustomize со значением 1 в разделе
HKCU\Software\Microsoft\Windows\CurrentVersion\Policies\Explorer
Подобный пункт будет удален также и в Internet Explorer
- Замена фона в панели инструментов в Проводнике
Существует возможность установки своего фона для панели инструментов в Проводнике. Для этого в разделе реестра
HKCU\SOFTWARE\Microsoft\Internet Explorer\Toolbar
создайте строковый параметр BackBitmapShell, значением которого будет полное имя BMP-файла с нужной картинкой — она и замостится мозаикой на панелях окон
- Удаление кнопки Поиск из Проводника
Проводник Windows содержит кнопку Поиск на панели инструментов. Для удаления данной кнопки используйте параметр DWORD NoShellSearchButton со значением равным 1 в разделе
HKCU\SOFTWARE\Microsoft\Windows\CurrentVersion\Policies\Explorer
Также будет удалена эта кнопка из окна Мои документы, и других мест, использующих оболочку Windows
Меню Проводника
- Удаление пункта меню Файл из Проводника
Для удаления пункта меню Файл из Проводника используйте параметр типа DWORD NoFileMenu со значением 1 в разделе
HKCU\SOFTFARE\Microsoft\Windows\CurrentVersion\Policies\Explorer
Также будет удален этот пункт из окна Мои документы, Internet Explorer и других мест, использующих оболочку Windows
- Настройка вида папки
Для запрещения команды Настройка вида папки в меню Вид используйте параметр типа DWORD NoCustomizeWebView со значением 1 в разделе
HKCU\Software\Microsoft\Windows\ CurrentVersion\Policies\Explorer
Установка классического вида в Проводнике
Проводник Windows содержит пункты меню, как Переход и Избранное, которые отражают новые Web-возможности Windows. Если нет необходимости использовать новые возможности, то можно использовать классический стиль окон оболочки и проводника, добавив параметр ClassicShell со значением DWORD равным 0x00000001 в раздел
HKCU\SOFTWARE\Microsoft\Windows\CurrentVersion\Policies\Explorer
Связанные документы
В последних версиях Windows появилось понятие сопоставленных файлов. Например, если вы собираетесь переместить или удалить html-документ, то будут также перемещены или удалены и сопоставленные с этим документом файлы, которые содержаться в папке ИмяДокумента.files. Если вы хотите отключить подобное поведение, то создайте параметр DWORD NoFileFolderConnection со значением 1 в разделе
HKCU\Software\Microsoft\Windows\CurrentVersion\Explorer
Проводник как два отдельных процесса
Как известно, Проводник выступает и в качестве оболочки Windows, и в качестве файл-менеджера. И хотя это повышает удобство, на использовании памяти это сказывается отнюдь не лучшим образом. При нормальных условиях Проводник отнимает целых 8 Мбайт памяти Windows. Из-за проблем с выделением памяти Windows использует двойную квоту памяти для Проводника, считая ее используемой разными программами. Чтобы избавиться от этой проблемы, «интегрированной» в систему, надо запустить Проводник как два отдельных процесса вместо одного. Для этого нужно изменить значение параметра DWORD SeparateProcess в разделе
HKEY_CURRENT_USER\Software\Microsoft\Windows\CurrentVersion\Explorer\Advanced
(«0» — один процесс, «1» — два процесса)
Изменение цвета файла при подведении мыши
Если в Проводнике используется веб-вид (в Windows XP этот стиль стоит по умолчанию), то при подведении курсора мыши к значку и имени файла или папки изменяется цвет текста. По умолчанию этот цвет совпадает со цветом выделенного файла. Можно задать другой цвет, отличающийся от цвета выделенного файла. Создайте строковый параметр HotTrackingColor в разделе
HKCU\Control Panel\Colors
Данный параметр должен содержать цвет в формате RGB, который является комбинацией трех цветов: красного, зеленого и голубого (например, 255 0 0). Ниже приводится список некоторых цветов:
| красный | 255 0 0 |
| желтый | 255 255 0 |
| зеленый | 0 255 0 |
| голубой | 0 255 255 |
| синий | 0 0 255 |
| сиреневый | 255 0 255 |
После перезагрузки вы увидите, как изменяется цвет имени файла при наведении на него мыши
Перезагрузка Windows
- Перезагрузка после краха
Чтобы принудительно заставить Windows перегрузиться после краха в системе, измените значение параметра DWORD AutoReboot в разделе
HKLM\SYSTEM\CurrentControlSet\Control\CrashControl
с 0 на 1
- Перезагрузка оболочки
По умолчанию при ошибках оболочки (Explorer) в Windows перезагружается вся операционная система. Однако, существует возможность перезагружать только саму оболочку, тем самым не теряя данных, обрабатываемых другими приложениями. Для этого в разделе
HKCU\Software\Microsoft\Windows NT\CurrentVersion\WinlogonM
надо изменить параметр DWORD AutoRestartShell
0 — перезагружается операционная система
1 — перезагружается только оболочка
Диски
- Изменение значков для разделов диска
Можно изменить вид значков и описание диска в окне Мой компьютер и Проводник. Для этого откройте раздел
HKLM\Software\Microsoft\Windows\CurrentVersion\Explоrer
и создайте новый подраздел DriveIcons. Далее в созданном подразделе необходимо создать подразделы с буквами дисков, чьи значки и описания вы собираетесь менять. Следующий шаг — создание в подразделах диска двух новых подразделов DefaultIcon и DefaultLabel.
В этих подразделах нужно изменить значения по умолчанию. В первом случае нужно указать путь к значку, а во втором — описание диска. Например, вот как будет выглядеть параметры в реестре для диска С
[HKEY_LOCAL_MACHINE\SOFTWARE\Microsoft\Windows\CurrentVersion\Explorer\DriveIcons\C\ DefaultIcon]
@=»explorer.exe,8″[HKEY_LOCAL_MACHINE\SOFTWARE\Microsoft\Windows\CurrentVersion\Explorer\DriveIcons\C\ DefaultLabel]
@=»Мой системный диск» - Скрытие значков дисков в окне Мой компьютер и Проводник
Если вы хотите скрыть значки дисков в окне Мой компьютер и Проводник, то откройте раздел
HKCU\Software\Microsoft\Windows\CurrentVersion\Policies\Explоrer
и создайте параметр NoDrives типа DWORD с требуемым значением. Также будут скрыты эти значки и в стандартных окнах Открытия и Сохранения файлов. Тем не менее, пользователь по-прежнему имеет доступ к этим дискам (через команду Выполнить или печатая вручную адрес в адресной строке Проводника)
Данный параметр является набором битовых флагов. Каждый бит соответствует одному из 26 возможных имен дисков. Каждому диску присваиваются значения (hex): A -1; B — 2; C — 4 и т.д. Чтобы скрыть нужные вам диски, нужно сложить эти биты. Сложность состоит в переводе двоичного значения в шестнадцатеричное. Здесь приводится небольшой список возможных значений
0x03FFFFFF Скрывает все значки 0x3 Скрывает только диски A и B 0x4 Скрывает только диск C 0x8 Скрывает только диск D 0x7 Скрывает только диски A, B и C 0xF Скрывает только диски A, B, C и D 0x0 Видны все диски Можно использовать и десятичную систему. Смотри совет ниже.
- Запрет на доступ к содержимому выбранных дисков
Можно не скрывать сами значки дисков, но запретить пользователю доступ к файлам заданных дисков через Проводник, Мой компьютер, Выполнить или команду Dir. Откройте реестр и создайте параметр NoViewOnDrive типа DWORD в разделе
HKCU\Software\Microsoft\Windows\CurrentVersion\Policies\Explorer
содержащий битовую маску для дисков. Например, диск A имеет бит 1, диск С — 4, диск D — 8. Таким образом, чтобы скрыть диски A и D, нужно сложить их значения 1 (A) + 8 (D) и установить значение 9.
Список всех дисков:
A: 1, B: 2, C: 4, D: 8, E: 16, F: 32, G: 64, H: 128, I: 256, J: 512, K: 1024, L: 2048, M: 4096, N: 8192, O: 16384, P: 32768, Q: 65536, R: 131072, S: 262144, T: 524288, U: 1048576, V: 2097152, W: 4194304, X: 8388608, Y: 16777216, Z: 33554432, Все диски: 67108863
- Вкладка Оборудование
Чтобы удалить вкладку Оборудование при просмотре свойств локального диска, создайте параметр типа DWORD NoHardwareTab в разделе
HKCU\Software\Microsoft\Windows\CurrentVersion\Policies\Explorer
How do I access the registry on Windows PC? How do I open the registry? The Windows Registry is a hierarchical database that stores the low-level settings of the Microsoft Windows operating system and its applications. Apart from the program, kernel, device drivers, services, Security Accounts Manager, and user interfaces can all use the Windows Registry.

The registry is a useful function on Windows, and you can perform most of the PC troubleshooting tasks by tweaking the registry settings. In this gearupwindows article, we will guide you with some useful options to access the Windows Registry. These are the following:-
- Via Run Box
- Using Command Prompt
- Through Taskbar Search
- By PowerShell
- Via File Explorer
- By Creating a Desktop Shortcut
How to Open Registry Editor using the Run dialog box?
Perhaps using the Run box to open the Registry Editor is the easiest way. Perform the following steps to access the Registry Editor:-
Step 1. Press the Windows logo + R keys simultaneously from the keyboard to open the Run command box.
Step 2. In the Run box, type regedit and click the OK button to open the Registry Editor.
How to Start Registry Editor using Command Prompt?
If you prefer to use Command Prompt to perform an administrative task, this method will help you. Here is what to do.
Step 1. Open the Command Prompt.
To open the Command Prompt with elevated rights, click the Start button on Windows 11/10 to open the Start menu (or Start screen in Windows 8/7) and type Command Prompt. From the available results, click on the “Command Prompt” entry to launch it.
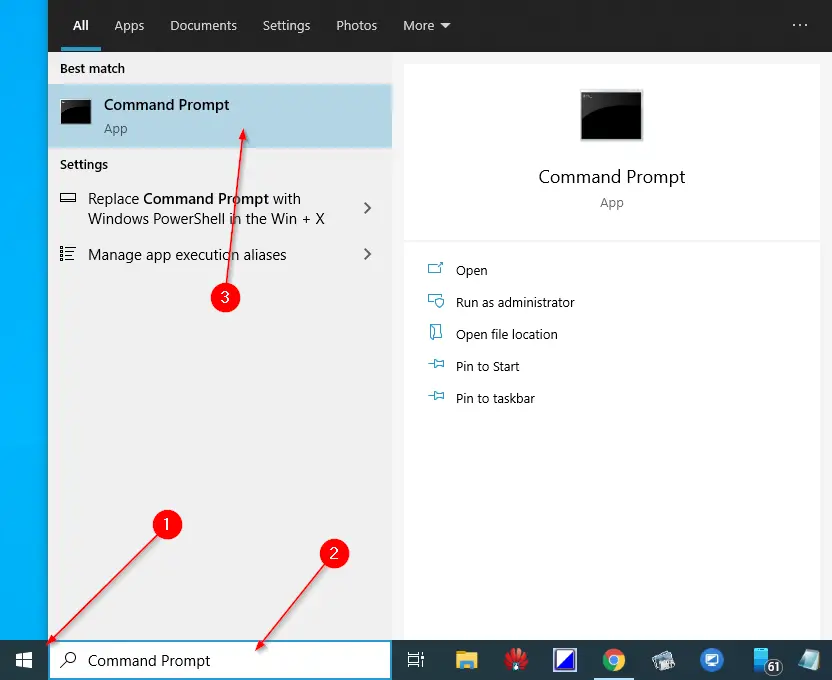
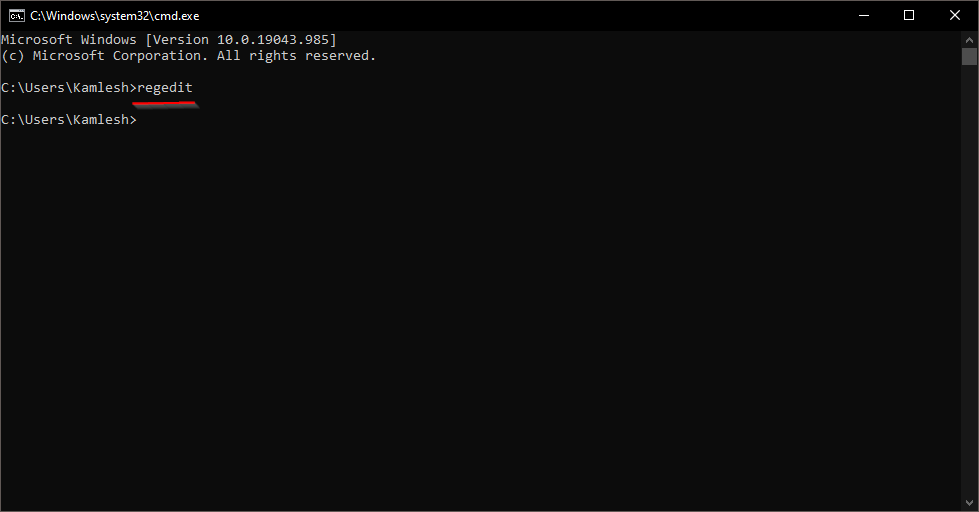
Step 2. In the Command Prompt window, type the following and hit Enter from the keyboard:-
regedit
How to Open Registry Editor through Taskbar Search?
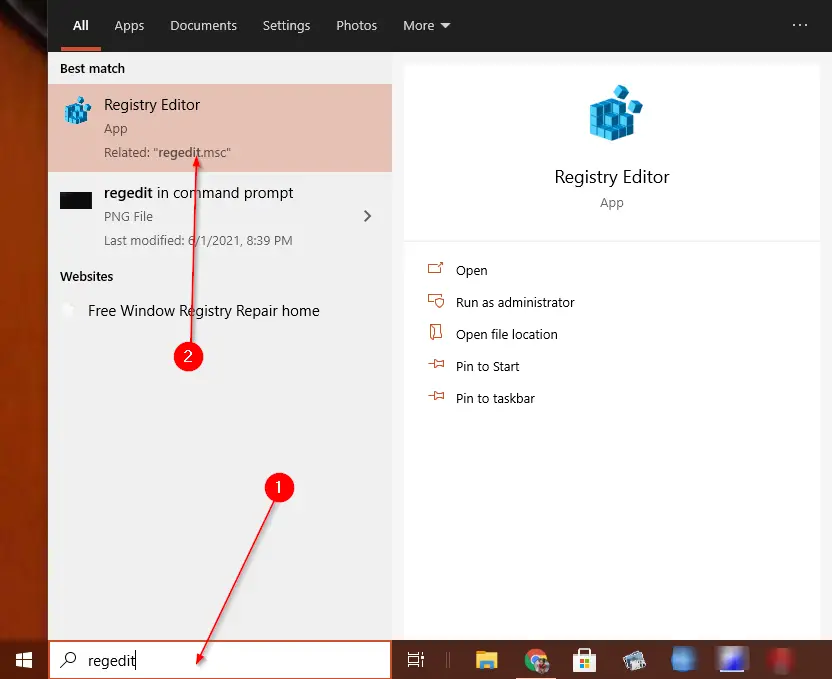
To open Registry Editor through Taskbar Search, do these steps:-
Step 1. On the Taskbar Search, type regedit.
Step 2. In the available results, click on the Registry Editor to open it.
How to Access Registry Editor using PowerShell?
Follow these steps to launch Registry Editor using PowerShell:-
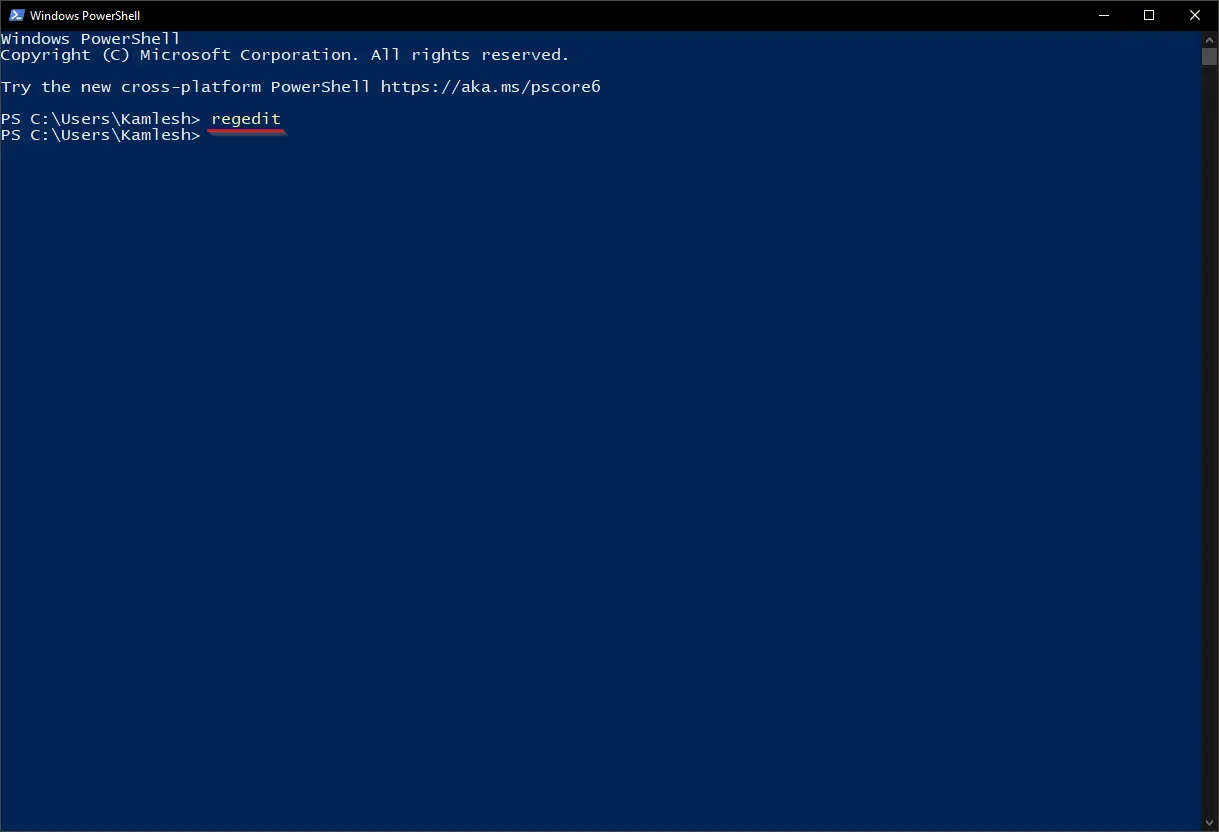
Step 1. Open PowerShell.
Step 2. In the Windows PowerShell window, type the following and hit Enter from the keyboard to open the Registry Editor:-
regedit
How to Open Registry Editor using File Explorer?
To access Registry Editor using File Explorer, follow these steps:-
Step 1. Access File Explorer.
Step 2. Now, navigate to the following path:-
C:\Windows\System32
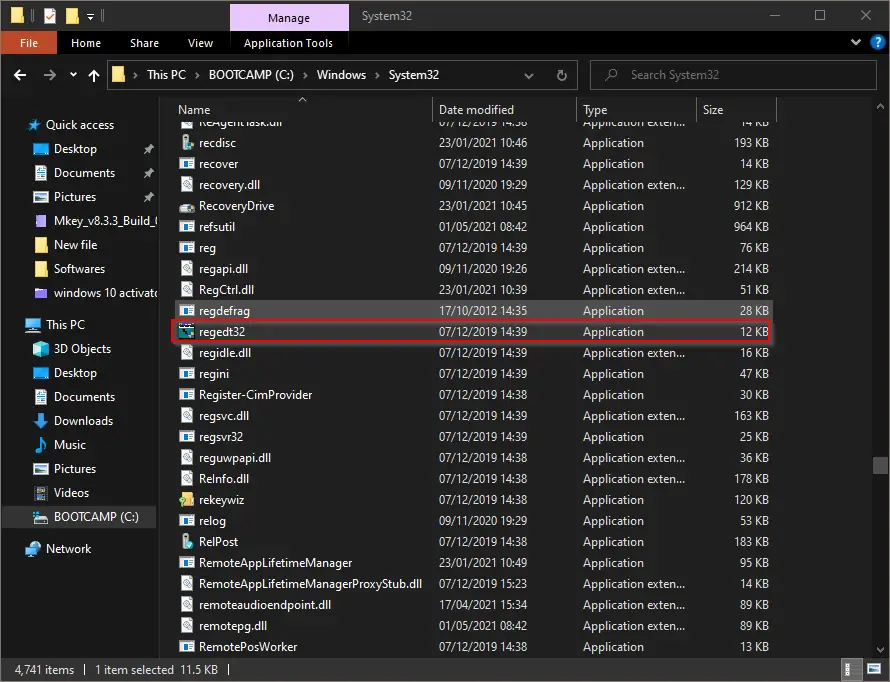
Step 3. Double-click on the regedt32 application to open the Registry Editor.
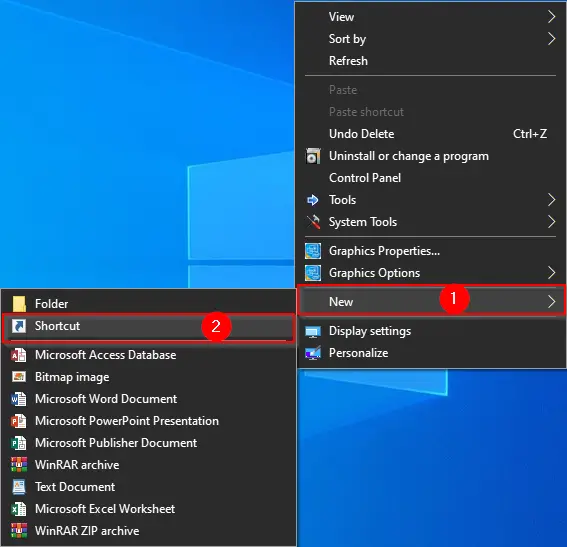
How to Open Registry Editor from the Desktop Shortcut?
For those who need to access Registry Editor frequently, this shortcut method may be appropriate for them:-
Step 1. Right-click on free space on the Desktop. Select New and then the Shortcut option.
Step 2. In the Create Shortcut wizard that opens, on the location textbox, type %windir%\regedit.exe.
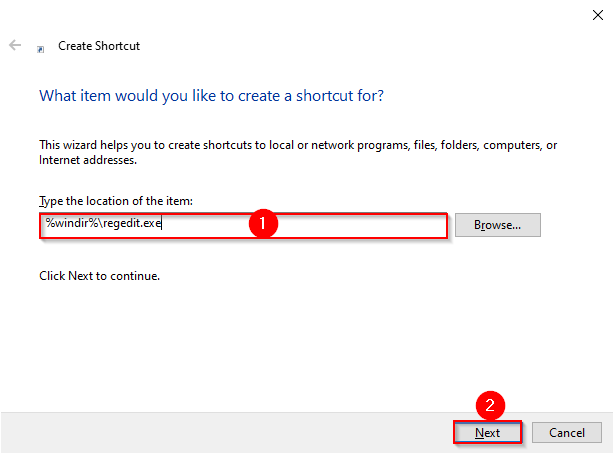
Step 3. Click the Next button.
Step 4. In the following screen, type the name as “Registry Editor.”
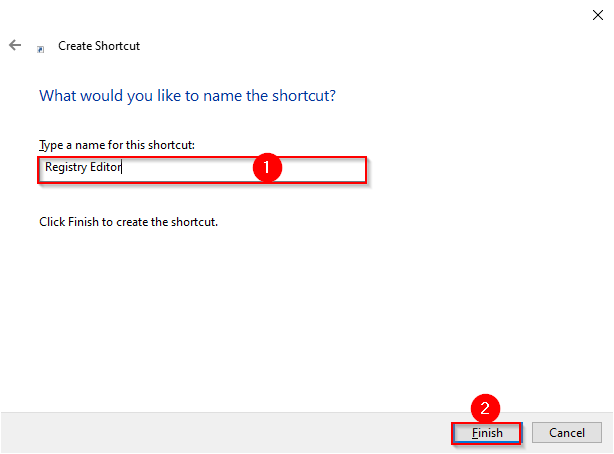
Step 5. Click the Finish button.
From now you can access the Registry Editor by double-clicking on its shortcut icon.
Conclusion
In conclusion, accessing the Windows Registry is an essential part of troubleshooting and customizing the operating system. With various methods available, including using the Run box, Command Prompt, Taskbar Search, PowerShell, File Explorer, and creating a desktop shortcut, users have many options to access the Registry Editor. Whether you need to modify settings for programs, kernels, device drivers, services, Security Accounts Manager, or user interfaces, the Registry Editor provides an easy and efficient way to do so. By following the steps outlined in this article, users can access the Windows Registry quickly and easily.